You are using an out of date browser. It may not display this or other websites correctly.
You should upgrade or use an alternative browser.
You should upgrade or use an alternative browser.
My Cam Research for the Experts Eye
- Thread starter TXChevy
- Start date
Yes I agree with you.I would expect yours to be some higher since your engine has more surface area for
increased friction. I'm somewhat smaller at 400 cuin.
Well I decided to go with the Rollmaster Gen VI CS2095/IWIS double roller chain. I called up Straub and added it to the order, had a pretty good chat with their purchasing mgr. Like everything, they are seeing extended timeframe getting their cores and parts. But the good news is that my cam may be done within a week or so, so maybe New Years will bring me a gift.'ve been looking at Gen VI timing sets and have 3 that are of interest:
- Summit G6617R-B Billet Steel Double Roller, 9 keyways, thrust bearing, about $80.
- Cloyes 9-3649X3 Single Roller, 3 keyways, iron/steel gears, no thrust bearing, about $155.
- Rollmaster CS2095 Double Roller Billet, 9 keyways, Torrington bearing, nitrided gears, IWIS chain about $164.
I read generally good info about the Rollmaster/IWIS chain combo vs the same brand with chain made in India.
Cloyes is good quality, nothing too fancy, fair price?
Not sure who's making the Summit brand, as it varies, but I see more good than bad comments about it.
I still need to contact Fel Pro too.
It will probably be some time lag on more progress, I plan to get rings fitted and wash and paint the block, but that's probably it through the holidays.
I've been putting attention to a few things so the engine approach has been leisurely over these holidays. That's ok, it's given me time to finish up the fuel lines and work on stuff around here.
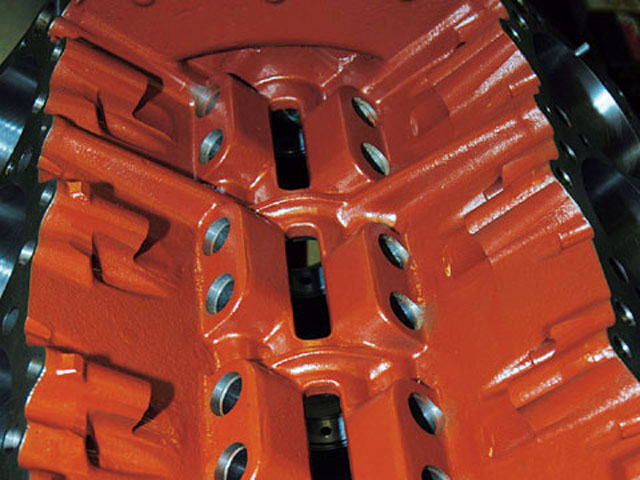
I did want to ask your opinion on cleaning/prepping the block deck. The pic below is as returned from the machine shop, it's much cleaner now. I did remove casting flash in the valley drainbacks and edges before I took it in.

The deck is flat, and all surfaces when I removed the heads showed very even remainder (compression) of the Permatorque gasket that was used. I'll get the heads checked when I take them in. Anyway, as you can see the surface is generally clean, some staining, but I would like to get it prepped a bit better. I'm not worried about the slight pitting where the cooling passage sat but I'd like to go over the deck safely.
I've looked at info about:
- red scorchbrite and the warnings about getting it onto bearing surfaces. Cam bearings are installed.
- blocking lightly with 600 grit wet sandpaper using WD-40 as a lubricant
- going over the surface using 3M white or green roloc disc
- doing nothing other than wipe with acetone
What do you suggest?
Merry Christmas and a safe holiday season to you
I did want to ask your opinion on cleaning/prepping the block deck. The pic below is as returned from the machine shop, it's much cleaner now. I did remove casting flash in the valley drainbacks and edges before I took it in.
The deck is flat, and all surfaces when I removed the heads showed very even remainder (compression) of the Permatorque gasket that was used. I'll get the heads checked when I take them in. Anyway, as you can see the surface is generally clean, some staining, but I would like to get it prepped a bit better. I'm not worried about the slight pitting where the cooling passage sat but I'd like to go over the deck safely.
I've looked at info about:
- red scorchbrite and the warnings about getting it onto bearing surfaces. Cam bearings are installed.
- blocking lightly with 600 grit wet sandpaper using WD-40 as a lubricant
- going over the surface using 3M white or green roloc disc
- doing nothing other than wipe with acetone
What do you suggest?
Merry Christmas and a safe holiday season to you
Last edited:
scotch-brite pads,
always leaves abrasive residual trash,
generally best to avoid, as chances of mistakes are reasonably high if your not very careful
I generally PAINT all cast/non-machined surfaces
power sanding or wire brushes
can cause significant damage to machined surfaces in seconds, generally avoid use.
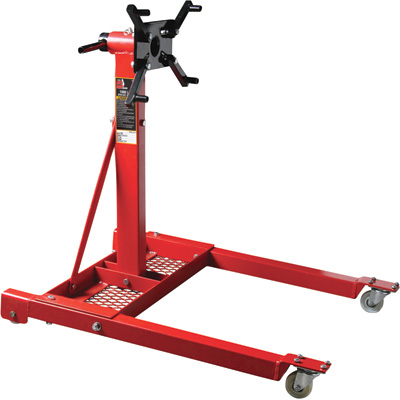
a good engine stand is a very big help
if you want a clean deck, you might start with a clean rag soaking wet with acetone,
followed with a bit of 600 grit sand paper on a 12" long section of 2x6 board,
to maintain a flat surface,
but remember to wash the whole block with warm soapy water & DAWN dish wash liquid, mix
public supermarkets sells
FORMULA 23 grease solvent,
DAWN dish wash liquid,
and white vinegar,
a cup of each in a 1/2 full of hot water, 5 gallon bucket
and an ounce of dawn ,
makes a decent block wash formula to remove grit grease and machine shop dirt
then high pressure spray, with a nozzle that reaches into all passages,
to remove residual soap/sanding grit,
(don't forget to blow dry all oil passages, lifter bores etc.)
immediately blow dry with high pressure air,\ and follow with a decent heat gun

and, once its dry and too hot to touch the block, spray WD40 on all machined surfaces

the new wd40 rust preventative spray works far better than the older version
READ THREADS
always leaves abrasive residual trash,
generally best to avoid, as chances of mistakes are reasonably high if your not very careful
I generally PAINT all cast/non-machined surfaces
power sanding or wire brushes
can cause significant damage to machined surfaces in seconds, generally avoid use.
a good engine stand is a very big help
if you want a clean deck, you might start with a clean rag soaking wet with acetone,
followed with a bit of 600 grit sand paper on a 12" long section of 2x6 board,
to maintain a flat surface,
but remember to wash the whole block with warm soapy water & DAWN dish wash liquid, mix
public supermarkets sells
FORMULA 23 grease solvent,
DAWN dish wash liquid,
and white vinegar,
a cup of each in a 1/2 full of hot water, 5 gallon bucket
and an ounce of dawn ,
makes a decent block wash formula to remove grit grease and machine shop dirt
then high pressure spray, with a nozzle that reaches into all passages,
to remove residual soap/sanding grit,
(don't forget to blow dry all oil passages, lifter bores etc.)
immediately blow dry with high pressure air,\ and follow with a decent heat gun
and, once its dry and too hot to touch the block, spray WD40 on all machined surfaces
the new wd40 rust preventative spray works far better than the older version
READ THREADS
block prep.
you really should read these links for a lot more USEFUL info, on block pre prep one of the least discussed & acknowledged, and yet more common reasons engines fail , is related to micro metallic crud left in the engine while its being assembled, especially engine's built on newly machined...
garage.grumpysperformance.com
oil system mods that help
heres a short list REMEMBER the object or goal in building and maintaining the lubrication system is too maintain a 100% dependable pressurized cooling flow of lubricant to the bearings, rockers ,valves etc. your most important tool, is your ability to think about how things are supposed to...
garage.grumpysperformance.com
magnets
heres an old post "Any source for the magnets Grumpy? what do you use? " http://www.kjmagnetics.com/proddetail.a ... SH&cat=167 magnets are ceramic and glass hard, don,t try to drill or grind them, as they can shatter or http://www.magnet4sale.com/samarium-cobalt-discs/ proper magnets trap...
garage.grumpysperformance.com
valve train shrapnel screens
its fairly common practice for race engines to install a course mesh screen over the oil return holes in the block to limit the travel of fragmented valve train components, should something rather nasty occur and bits and pieces of fragmented valve train find their way into the lifter gallery...
garage.grumpysperformance.com
Last edited:
Thank you!
I'll go the 600 wet sand route on the deck. I've got a rectangular piece of marble that I've used as a sanding block and in this case it will only be the weight of the block, just a very mild light surface clean.
The heat gun application is something I hadn't thought of but I'll do that too. I'll follow on the cleaning info you provided and will probably repeat the cleaning process at least a couple of times.
Just an update to verify I'm not disappearing lol.
I've been going over the decks with 600 grit/wd40. Not looking to give it a freshly milled look, just a very mild blocking cleanup to follow the tank cleaning it got from the shop.
The new cam bearings are installed, but I found that a piece of pipe foam insulation fits into them just fine. Just to keep major gunk out while I'm doing the decks.
I smoothed out the interior valley area, not to the extent that Rick did, but I think enough to facilitate oil drainback. I decided not to paint the interior surfaces.
So in a few more days the block should be final cleaned (I'll use acetone and heat as last pass), then primed and painted. I'll ensure all internal passages are clean as well.
I picked up the HF saw sharpener and will make a plate to fix the ring parallel to the disc. I think I can figure out how to slot the fixture and have a dial indicator to verify depth of cut. I know a lot of folks just grab a file and eyeball it, but I'd rather go this route. Plus I've got plenty of old rings to practice on.
Seems that everything around here broke at the same time so I've had a list of things getting my attention too.
First, thanks for checking back in and keeping us informed of your progress ! It's appreciated !I'll ensure all internal passages are clean as well.
I used some rifle cleaning brushes and chucked the extensions in a drill. Run them in-and-out many times thru the main oil galleries during the cleaning process. You probably already have something in mind, but this is what worked for me.
Yes I've got a complete set of brushes. Shop has already installed galley plugs etc but I can still spray cleaner and gently blow out passages with air.
Tidbit of info.... I'll still follow up on the felpro rear main seals but the engine had a national 460571 seal that actually worked very well for many years. Still in decent shape.
Tidbit of info.... I'll still follow up on the felpro rear main seals but the engine had a national 460571 seal that actually worked very well for many years. Still in decent shape.
I finished up with the 600 grit sanding on the block decks with wd40. I also deburred the coolant passages and went over the chamfer at the top of the cylinders.
The block got a cleaning and exterior wire brushing but I will also go back and get rid of some exterior casting flash, so more cleanings will be needed before it's ready to paint. I want to be 100% sure there's no internal debris anywhere.
I also made a simple change to the HF saw blade sharpener. I want to ensure that the ring stays flat and square when grinding. I had some scrap lexan that I used to make a platform for the ring. I added 3 locating posts, just small bolts going thru a piece of brake line tube. The holes are slotted so I can get the ring located correctly and thus squared up to the grinding wheel.
Rick, I paid note to your engine build (ring grinder) comments on where the plane of grinding should be, which in my case is the right face of the grinding wheel. Very helpful, thanks.
The horizontal bar under the lexan plate is set perpendicular to the wheel, so as long as I keep the blade flat on the lexan the grind will be square. Nothing fancy but it worked well on a couple of old rings. For the cost of a hand grinder I have a decent power grinder with diamond wheel. I'm happy with this setup, the grinding process feels steady and very controllable.
The motor/grinding wheel can tilt towards and away from you and can also tilt left to right, so getting the grinding wheel in the correct plumb position is pretty straightforward.
I thought about how to add a dial indicator to verify amount of cut but I think that with care when grinding I may not need it. I'm aware that the second land ring can grind away faster than the top land ring so I'll be sure to test on some of my old rings and to go slow on the new rings.
And I can easily put the tool back for regular use on saw blades
Last edited:
I greatly appreciate you including my thread in your comments, thanks! Were you referring to the Visio drawing I did ?Rick, I paid note to your engine build (ring grinder) comments on where the plane of grinding should be, which in my case is the right face of the grinding wheel. Very helpful, thanks.

By providing 3 points you have a more precise alignment than using the two pins and the grinding surface.
You are doing some "most excellent work" yourself !!! I'm very impressed !!!
.
But my pictures suck lol. Yours were fantastic.
Yes, that was the drawing/info I used to help me set up the platform, thanks again.
And still waiting on my Nov. 12 cam order, it's the delay on cam cores that's holding it up.
Here's a closer view - I think for this inexpensive setup it's going to be as good as I can get. Especially considering that many are successful with the manual grinder. I do like that with a gentle touch the diamond wheel is very easy on the ring end, produces a very smooth result.
Last edited:
Version 2.0
I did some more tests on old rings and didn't like the slight flex I could get with the lexan, plus the rings were a bit stiff to turn.
This version works great. I added a fourth ring post and slots for all the posts. This lets me position the ring accurately against the grinding face. The platform is 1/4 thick HDPE and is very stiff with a "slippery" surface. Result is the ring can slide easily while still being held securely.
The line is indicative of the wheel face which is parallel to the end of the ring. It's not aligned with anything else like the ring centerline because the ring is not circular when it's in the machine. It becomes circular when it goes into the cylinder.
With this gizmo improvement the results are repeatable, and when the ring is compressed into the cylinder the gap is even.
Last edited:
With the slots it should be able to accommodate a variety of sizes. If the size changes dramatically, like for a lawnmower, I think some additional slots can be added.So does this work with any diameter ring or just yours
I'm sure more refinements can be added
I recycled the version 1 lexan plastic from the ring grinder into a ring locator tool. Very easy, I did a rough circular cut larger than the bore size, then attached it with an arbor into my drill press and filed/sanded it into size. Works really well.


After another cleaning, engine is ready to paint. After I had washed it again, I used brake cleaner in the passages with regulated compressed air. Machined areas/bores got wd40 then it was time for masking.
General color scheme will be gloss black for block and heads, gloss gray for oil pan, brackets, mounts, gray headers and aluminum intake and timing cover.
The car is painted red but the overall color scheme of frame/suspension/interior/underhood is black and gray so the engine colors work with that.
Last edited:
General color scheme...


The front spring links are preload plates - I made my own cal-tracs years ago and I'm cleaning them up to re-use. Even with the old engine they were a great addition. All front/rear suspension bushings, ball joints etc are new.
This old girl is getting a complete fresh start.
The front spring links are preload plates - I made my own cal-tracs years ago and I'm cleaning them up to re-use. Even with the old engine they were a great addition. All front/rear suspension bushings, ball joints etc are new.
This old girl is getting a complete fresh start.
Last edited: