digital dash swap questions

ok i was wondering if a digital dash from a mid 90's S-10 Blazer would work in a C4
i know the mounts are prolly gonna be different do you think the plug in the back would be the same???
just figured since im gonna swap a BBC in it might aswell change a lil of the interior too
just like being different lol
let me know pros and cons
 
sounds like your trying to add far more problems than solutions
Id suggest just replacing the gauges and gauge insert
not necessarily like this but youve got options

read the sub linked info
You can get the film at:
http://www.polarization.com/polarshop/
And a nice tutorial at:
http://www.batee.com/corvette/dcrg/film/index.htm

http://www.batee.com/corvette/dcrg/anal ... /index.htm

http://garage.grumpysperformance.co...er-repair-or-replacement-link.1006/#post-8030

viewtopic.php?f=62&t=1469&p=3303&hilit=+gauges#p3303

viewtopic.php?f=62&t=1006&p=8030&hilit=digital+dash%E2%80%A6#p8030

http://garage.grumpysperformance.co...er-repair-or-replacement-link.1006/#post-8030
<break /> [B said:
Highway Man [/B]
]
Digital Dash Repair
I own a 1992 C4 and recently the speedometer readout went wacky with all kinds on undecipherable flashing and my oil gauge was acting up also to the point that something was going to have to be done. Good news! Bryon Thompson in Rolla, MO. can fix these things! Bryon has been fixing the earlier C4 dashes but now he is able to repair the later C4 dashes as well. Long story short Bryon reworked the module and fixed it as good as new. I watched him repair it and I can tell you that Bryon knows what he's doing. If you are having similiar problems I highly recommend you get in contact with Bryon. His e-mail address is batee2@gmail.com and his phone number is 573-647-5301 Thanks Bryon!

gaugecluster.jpg

C4 Corvette 1984 1989 LED Digital Dash Gauge Instrument Cluster Direct Fit White2.jpg


for the few guys that have taken the challenge and opened up the dash, Id say,congrats, you show some initiative!
I know lots of guys who are afraid to work on the digital dash because they assume its far too complicated and they also assume they could never get it reassembled correctly, and while its not a real simple project its hardly the type of repairs that most people would have a great deal of difficulty with once they see it done a few times, its just that most guys are intimidated enough they won,t even try it!
I know I was sure a bit hesitant the first time I disassembled a corvettes dash assembly, but its not nearly as complicated as it looks and if your careful you'll find you can do the repairs.

BTW it helps to have several different quality screw drivers and a set of 1/4" drive sockets , and 1/4 " drive ratchet, sure helps
http://www.sears.com/shc/s/p_10153_1260 ... oriesmv=rr

headlamps.jpg

having a hands free head lamps a good idea

A small magnetic bowl to pitch the screws in so they don,t get lost helps
http://www.harborfreight.com/4-inch-mag ... 90566.html
15275.jpg


a power screw driver won,t hurt either

most gauges come with rather clear instructions, or diagrams and color charts, its mounting the gauges neatly running the wiring and connections to the sensors that's usually the problem,having an excellent ground bar and fusing the gauges is usually required to get everything working correctly, LABELING each wire with a clearly readable tag and keeping a detailed chart for later reference is also a good idea. some gauges are sensitive to heat, moisture and vibration so keep that in mind and run wires where they are not subjected to exhaust heat chaffing or moisture if you can, if its difficult shield the wiring with insulation or protection and always try to leave some slack for component movement and later repairs

viewtopic.php?f=80&t=1219

viewtopic.php?f=32&t=577

viewtopic.php?f=80&t=728

http://www.grandprix.net/upgrades/oilgauge.html

viewtopic.php?f=62&t=1006&p=8030&hilit=digital+dash%E2%80%A6#p8030

http://www.propartsllc.com/

http://www.deftracing.com/prosport_gaug ... e_52mm.htm

http://www.jegs.com/webapp/wcs/stores/s ... es+for+car

http://neptune.spacebears.com/cars/stories/trgauge.html

http://neptune.spacebears.com/cars/stor ... gauge.html

http://neptune.spacebears.com/cars/stories/fuelreg.html

http://www.miata.net/garage/GaugeInstall/

http://www.superchevy.com/technical/int ... index.html

viewtopic.php?f=36&t=2142&p=5772#p5772

http://www.toyotacorollamodifications.c ... gauges.htm

http://homepage.ntlworld.com/john.combes2/Vdo.htm

http://www.autometer.com/tech_faq.aspx

http://autorepair.about.com/library/ill ... 8a-lib.htm
 
Last edited by a moderator:
i know it would far easier to install regular gauges but i like the digital dash from the blazer and i think it would look way better then the original cluster.
im gonna have to start some research on this. i think im gonna have to fab up a new cluster trim plate and maybe get rid of the information switches over the radio. but all that will be AFTER the big block swap. first things first lol
 
if you take your time and think it thru you can do most mods to a car and get them both looking and functioning correctly, the custom kit car guys are forced to do this frequently, and Ive seen both custom welded aluminum and plywood covered with fiberglass used to produce good results

anyone owning a corvette should own
a FACTORY SHOP MANUAL
for the year corvette they own,

step one,

CAREFULLY check all fuses and grounds

http://garage.grumpysperformance.co...ing-down-an-electrical-drain.8493/#post-29779
Fusebox2.jpg


Grounds0001.jpg


step two
pull trouble codes

READ THRU THE SUB LINKS THEY CONTAIN THE MAJORITY OF THE USEFUL INFO


http://www.batee.com/corvette/dcrg/index.htm

http://www.batee.com/

http://garage.grumpysperformance.co...er-repair-or-replacement-link.1006/#post-8030

http://www.dakotadigital.com/index....t_id=190/category_id=427/mode=prod/prd190.htm

viewtopic.php?f=44&t=1469&p=3303&hilit=gauges#p3303

viewtopic.php?f=62&t=1006&p=8030&hilit=digital+dash%E2%80%A6#p8030

http://www.ecklerscorvette.com/corvette ... -1989.html

https://www.speedhut.com/gauges/

http://garage.grumpysperformance.com/index.php?threads/engine-test-run-stand.930/#post-40783

http://floridaspeedometer.com/VehicleProductList.aspx

http://garage.grumpysperformance.co...er-repair-or-replacement-link.1006/#post-8030

http://garage.grumpysperformance.com/index.php?threads/digital-dash-swap-questions.3399/#post-8969

http://garage.grumpysperformance.com/index.php?threads/digital-cluster-repair.1007/#post-1822


59449.jpg


OPTIONS
item_50148.jpg

prd_zm_190.gif


http://www.dakotadigital.com/index.cfm? ... prd190.htm

http://www.ehow.com/how_4499857_make-fi ... -dash.html

http://www.ehow.com/how_2250694_build-c ... -dash.html

http://www.ehow.com/how_6576352_make-ho ... -dash.html

Instructions
Things You'll Need:

* Fiberglass
* Resin
* Sanding blocks
* Dash dimensions

1.
1

Measure the interior of your car from side to side and then make measurements of the depth and height of the dash. You will want to remove the dash currently in the car first, and use it as a rough model, to ensure a proper fit.
2.
2

Cut Styrofoam to the length and width of the dash for the top. Then cut another sheet for the face. You can cut out the section of the dash that will hold the accessories you want to install later.
3.
3

Shape your Styrofoam to mimic the shape of your dash. You can layer thin sheets of Styrofoam and grind them with a light sander, then cut out the sections for the dashboard, DVD player and other accessories. Be sure to curve the top and face exactly how you want them, and double check your measurements for the accessories. Remember, the fiberglass will add about an 1/8 inch on either side of the interior boxes.
4.
4

Dry fit the final product to your car carefully. Then make any necessary adjustments.
5.
5

Layer mod release compound on the form, then lay the fiberglass sheets on top of the release compound.
6.
6

Smooth out all your sheeting and make sure it is perfect. Some people like to pin the fabric to the form to keep it steady; this helps when you apply your resin. If you have already cut your boxes for accessories, wrap the fiberglass into these boxes.
7.
7

Mix your resin and apply it to the strips with a resin brush. Mix up plenty of resin and be generous in your application. Then wait until the fiberglass hardens.
8.
8

Remove the mold by starting at one edge and popping the mold right off the Styrofoam. You now have a complete shell of your dash.
9.
9

Create similar molds for the interior boxes that will hold the accessories. You can cut extra boxes into the mold, and build forms for the boxes separately and then attach them to the dash. Just apply the fiberglass strips over the dash face and use the resin to glue and harden then to the frame.
10.
10

Sand the frame using increasing grits of sand paper, starting with something as heavy as 80 grit, and working up to as fine a grit as you like.
11.
11

Spray paint your dash with an interior paint, or rubberized coating. Or customize further with shag carpet, velvet or suede.
12.
12

Complete the assembly of interior parts, glove box doors and latches.

Cable-Assembly-321-Web.jpg

Read more: How to Make a Fiberglass Dash | eHow.com http://www.ehow.com/how_4499857_make-fi ... z0xLX6bjhM

http://meehanelectronics.com/cable-assembly-box-build/

http://www.racepages.com/brand/painless.html

viewtopic.php?f=62&t=1469&p=3303&hilit=+gauges#p3303

http://www.customwiring.com/hotrods.html

http://www.exoticwoodtrim.com/productdetail.asp?pid=82

http://www.ehow.com/how_6576352_make-ho ... -dash.html

http://www.themotorbookstore.com/9780760332887.html

motobooks_2117_12211708
 
Last edited by a moderator:
heres a list of the 13 MINIMAL gauges Id "like" too see mounted in a dash display
keeping a constant eye on whats happening in the engine compartment helps prevent and diagnose problems
http://garage.grumpysperformance.co...lay-switch-locations-and-info.728/#post-43477


http://www.jegs.com/p/Equus/Equus-8000-Series-Gauges/1532060/10002/-1


http://garage.grumpysperformance.com/index.php?threads/engine-test-run-stand.930/#post-40783

http://garage.grumpysperformance.co...instrument-cluster-has-stopped-working.16375/

speedometer
http://www.summitracing.com/parts/atm-5156/media/images
gagespeedo.jpg


fuel level
http://www.summitracing.com/parts/vdo-301106/overview/
gagefuel.jpg

fuel pressure
http://www.summitracing.com/parts/atm-3363
gagefuelpressure.jpg

tach/engine rpm
http://www.summitracing.com/parts/vdo-333160/overview/
gagetach.jpg

oil pressure
http://www.summitracing.com/parts/vdo-350104/overview/
gageoilpressure.jpg

engine plenum vacuum
http://www.summitracing.com/parts/vdo-150042/overview/
gagevacuum.jpg

oil temperature
http://www.summitracing.com/parts/vdo-310106/overview/
gageoiltemp.jpg

coolant temperature (plus fan on indicator light)
http://www.summitracing.com/parts/vdo-310105/overview/
gagecoolant.jpg

trans fluid temperature (plus aux cooler fan on indicator light)
http://www.summitracing.com/parts/vdo-310107/overview/
gagetrans.jpg

battery voltage
http://www.summitracing.com/parts/vdo-3 ... dia/images
gagevolt.jpg


fuel/air ratio meter
atm-3378_w_ml.jpg

http://www.summitracing.com/parts/atm-3378
EXHAUST GAS TEMPS, one for each exhaust collector bank
really these are optional but nice to have

exgatemp.png

http://www.enjukuracing.com/products/SG ... nheit.html

OF COURSE THERES ALWAYS SOME GUY PUSHING THINGS PAST A REASONABLE USEFUL LIMIT

vettegage.jpg
 
Last edited by a moderator:

It would be very interesting if one could see the ignition timing in real time
while driving. I'm sure it's possible with all the computer controlled systems, but
could it be added to the normal distributor ???

 
http://www.speedhut.com/gauges/4-1-2-inch/37:5

https://www.speedhut.com/gauges/

http://www.speedhut.com/kit/GR4.5-6KITGPS-03T/6-gauge-custom-set---GPS-Speedometer-Gauge-200mph,-Tachometer-Gauge-8K-RPM-Shift-light-(TSHB)
200gau.png


ANYTIME YOU GO OUT AND PRICE AFTERMARKET WIRE HARNESS< FUSE BLOCKS ETC< YOULL QUICKLY REALIZE WHY YOU BUY THE CONNECTORS TOOLS WIRE AND LEARN TO WIRE THE CAR YOURSELF!
anytime you price out a car custom wire harness youll be in shock at the absolute absurd prices quoted.
personally Id hit the local salvage yards Id bet you could negotiate the price of a complete wire harness from a fairly new truck for under $200
when I got quotes on wiring my shop .. read this link
http://garage.grumpysperformance.com/index.php?threads/how-to-wire-a-shop.5/

http://www.rowand.net/Shop/Tech/AutomotiveElectricalConnectors.htm
now Ive wired more than a few cars
http://garage.grumpysperformance.com/index.php?threads/sources-for-auto-elecrtrical-connectors.3105/

http://www.repairconnector.com/

http://www.delcity.net/store/Wire-C...es/r_IS1028?&gclid=CJzJz8nJzckCFQaJaQodyVQJHA

http://www.wiringproducts.com/general-motors-connectors-sockets

http://garage.grumpysperformance.co...roblem-getting-the-engine-started.63/#post-76
index.php

if you work around older cars for awhile your sure to notice a great many problems can be traced back to faulty, corroded or broken electrical connections, sockets and connectors or fuses ans wiring that need to be repaired or replaced, especially in moist areas, and in many cases youll be far ahead to just buy a new connector and carefully solder it in and use shrink tubing over the splice
wirecar.jpg

having a wire roll caddy , thats easy to access or fabricating one for working around the cars helpful
I can easily see where some simple fabrication skills, some careful measuring and a bit of rough design work on a pad with a ruler and pencil and a quick trip to harbor freight and home depot, to buy a few components , a power drill, a few bits screws and some 1/2" conduit ,a couple 2 foot long sections of 2" angle aluminum,could rather easily result in a rather well designed electrical wire spool holder rack of several types depending on your shops needs

http://www.globalindustrial.com/g/stora ... pool-racks
60752.jpg

http://www.globalindustrial.com/p/stora ... ddy-RT4-8S
BRN_RT4-8S.jpg

automotive electrical connectors and related info


http://repairconnector.com/


16dbd753-4d4c-40ea-9451-0dbc27426fe0_300.jpg

http://www.homedepot.com/s/wire+stripper?NCNI-5
http://www.homedepot.com/p/Ideal-Stripm ... 819657-_-N
70222843_large.jpg

http://www.alliedelec.com/search/produc ... U=70222843
70222844_large.jpg


http://www.helminc.com/helm
http://www.factoryrepairmanuals.com...ice-manual-2-volume-set-original-shop-repair/
your working at a huge dis-advantage if you don,t have a factory shop manual for your specific year car, and basic tools like a multi-meter, and vacuum /pressure gauge
96manual.jpg

http://www.harborfreight.com/fuel-injection-pump-tester-92699.html
feulpres.jpg

http://www.harborfreight.com/5-in-1-dig ... 98674.html
image_6238.jpg


viewtopic.php?f=50&t=3110&p=12074&hilit=multi+meter#p12074


Last edited by a moderator:
I found this posted else ware by " the BAD over on DC"

Dim Display Fix

My display has been dim for a few months now and when I do a search here for the fix I find that I keep getting a link to another site.
That's fine and it is a very good read, however, I feel we can benefit from having one here as well so here is mine.
(Junkman, I specifically searched for a thread by you but found none. If you have one out there, we can remove this one)

Tools required:
Wrench
10mm socket
7mm socket
3/16 socket
Torx 15 screwdriver
Small flat head screwdriver
Solder iron
Solder (may or may not be needed, mine didn't)

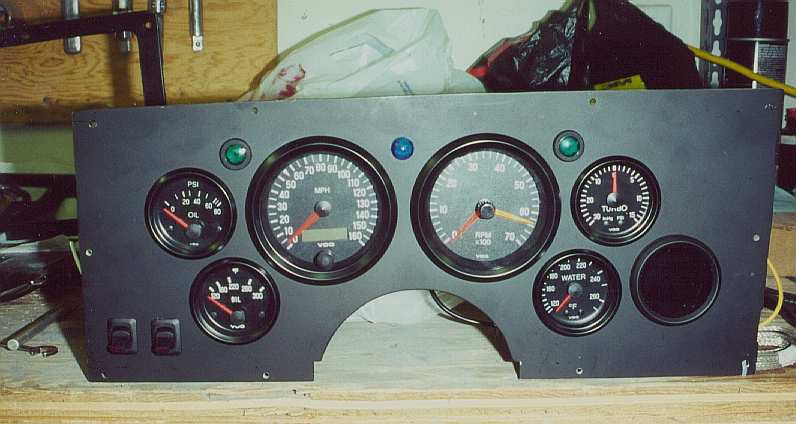
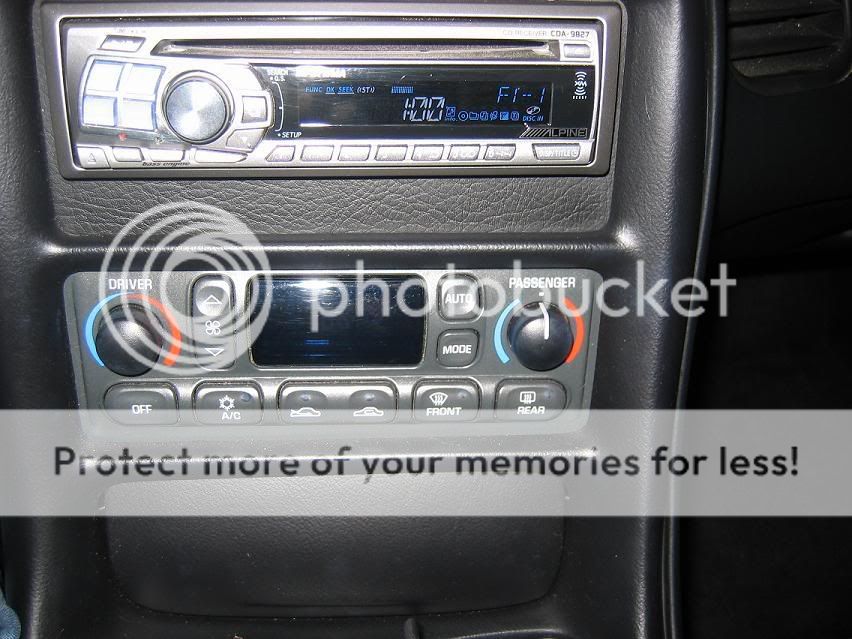
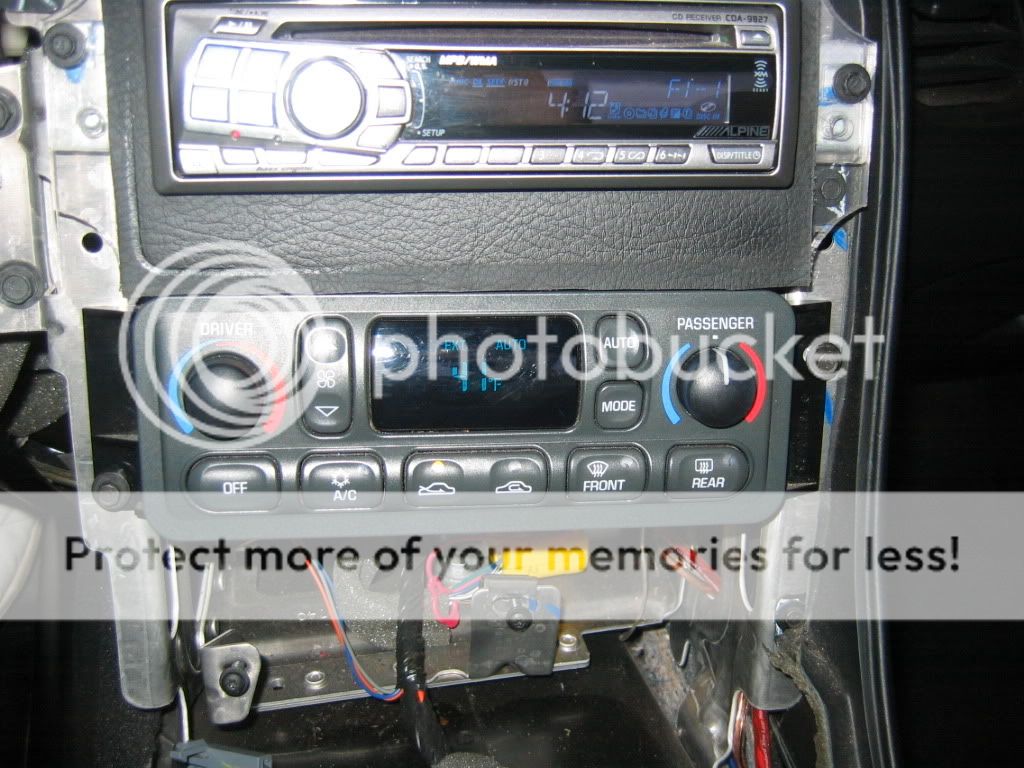
A few months back I noticed that the display on my Climate Control was getting dim.
It started on the right side of the display and over time the entire display was dim.
A light tap on the screen would usually bring it back bright but eventually it just stayed dim.
So today I decided to fix it.

wol_error.gif
This image has been resized. Click this bar to view the full image.
11-7-09003-1.jpg

Report this image


wol_error.gif
This image has been resized. Click this bar to view the full image.
11-7-09002-1.jpg

Report this image


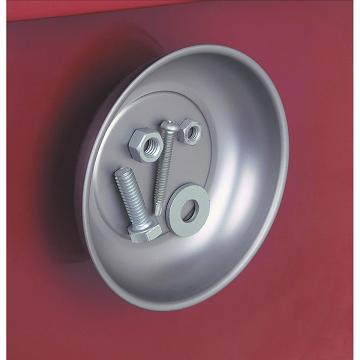
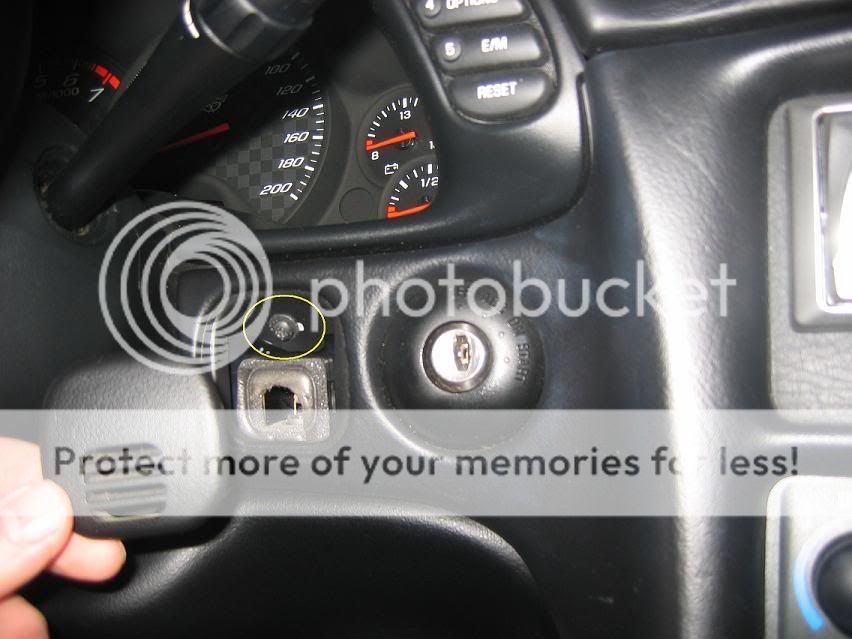
1) Remove the sensor cover by the ignition and remove the T15 screw.

wol_error.gif
This image has been resized. Click this bar to view the full image.
step1.jpg

Report this image


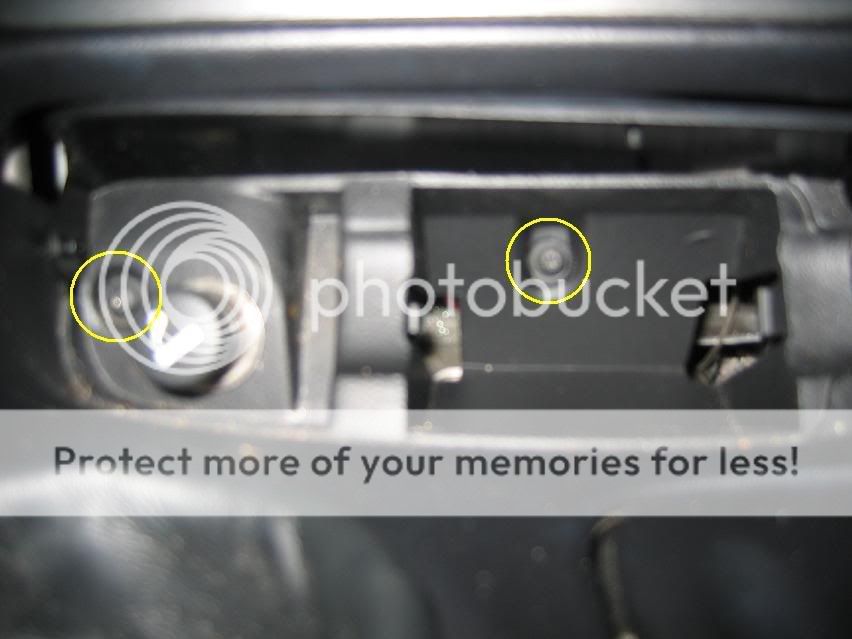
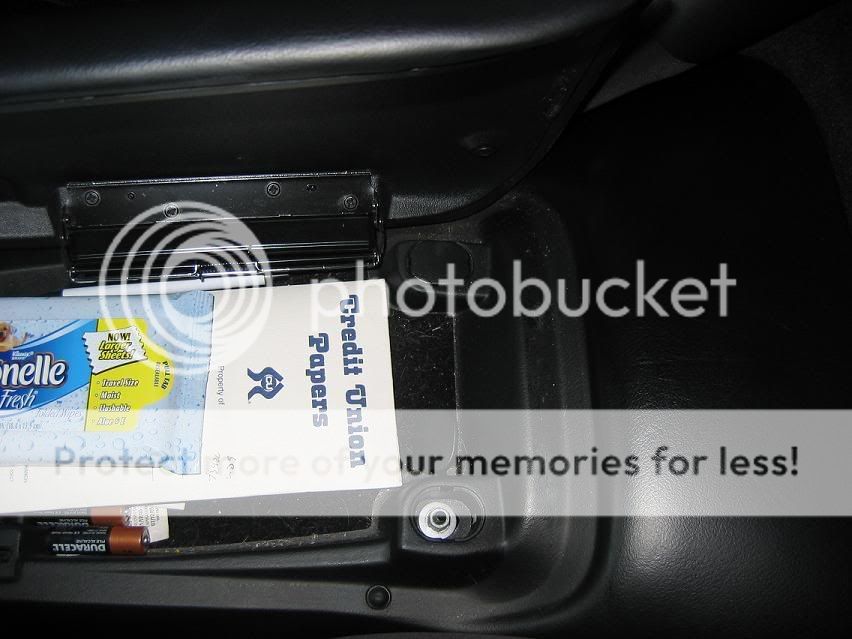
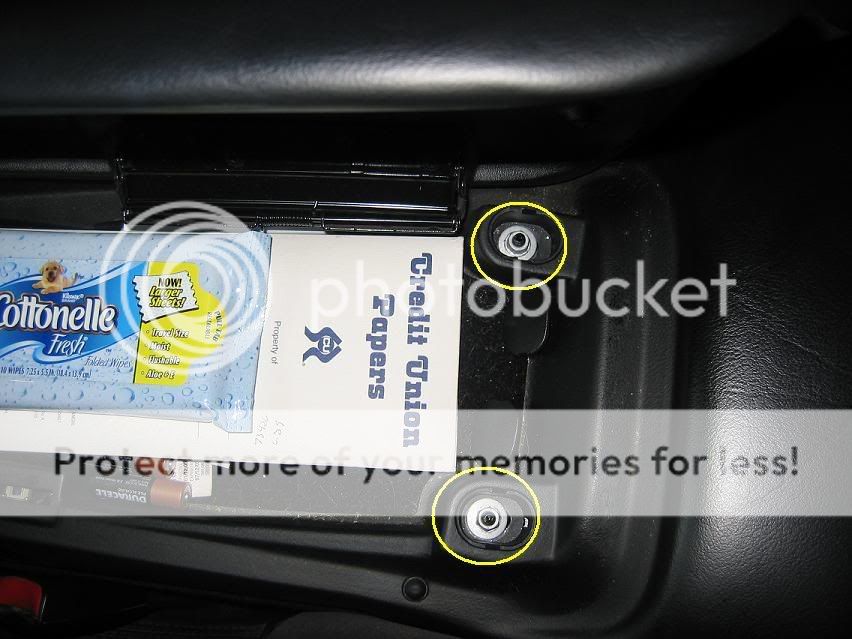
2) Remove the 2 T15 screws in the ashtray/lighter area.
One is hidden behind the ashtray.

wol_error.gif
This image has been resized. Click this bar to view the full image.
step2.jpg

Report this image


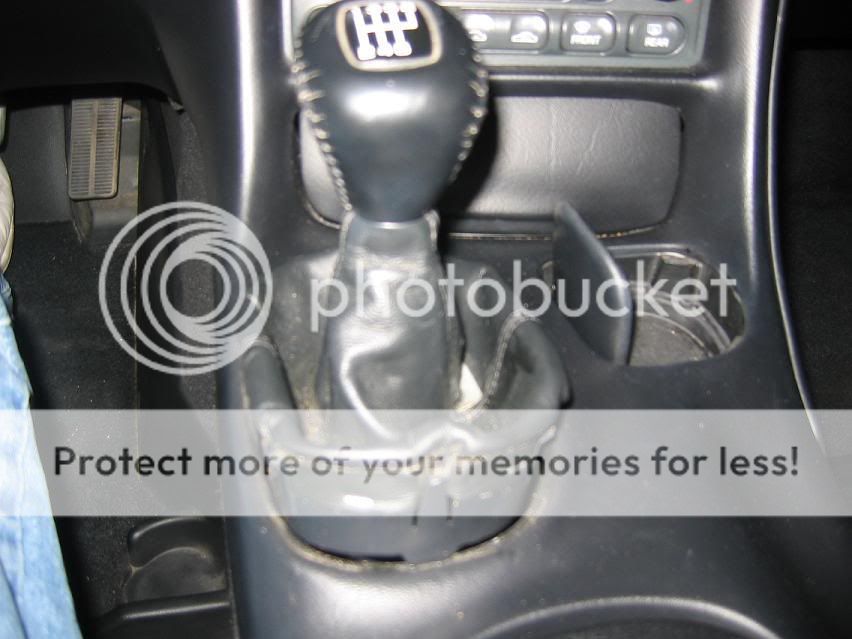
3) Undo the base of the shift boot.
You don't have to completely remove it from the shifter, just need to be able to manipulate it to remove the console.
(I'm not sure if it is the same for the auto)

wol_error.gif
This image has been resized. Click this bar to view the full image.
step3.jpg

Report this image


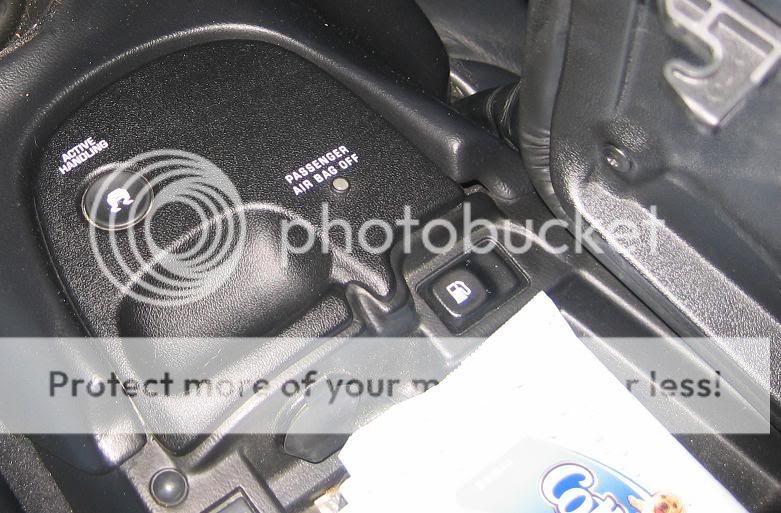
4) Lift the console lid so you can remove the Active Handling/Pass Airbag panel.
I've had mine off several times before so it is easy now.
You may need a small flat head screwdriver to pry it up.
It just pops off.
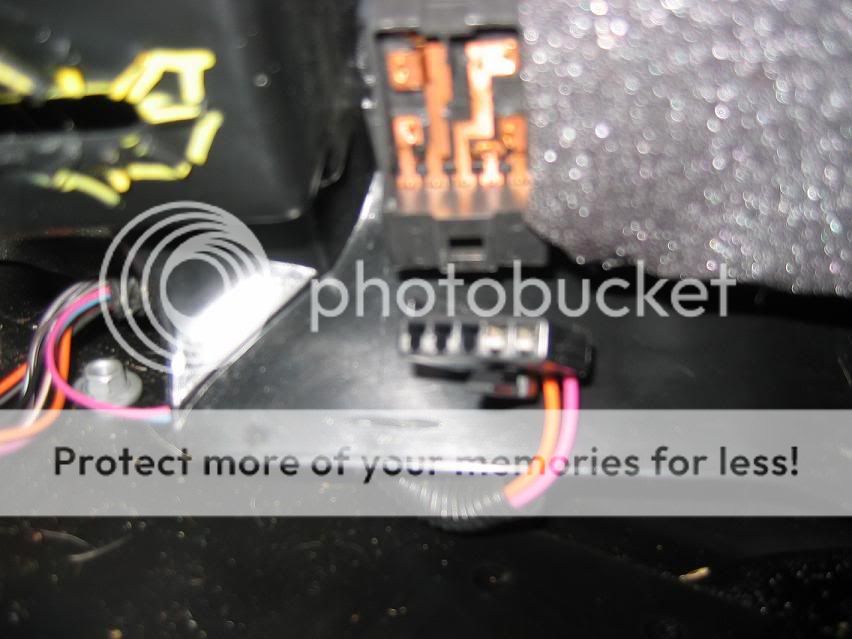
Once it is off, unplug the Active Handling, Airbag light, and Acc power plugs.
Then remove the 2 10mm nuts.

wol_error.gif
This image has been resized. Click this bar to view the full image.
step4.jpg

Report this image


wol_error.gif
This image has been resized. Click this bar to view the full image.
step45.jpg

Report this image


5) I don't know If possible to remove the Radio/Climate Control cover without removing the center console or not.
I remove it because it's easy and gives me lot of room to remove the Radio cover.
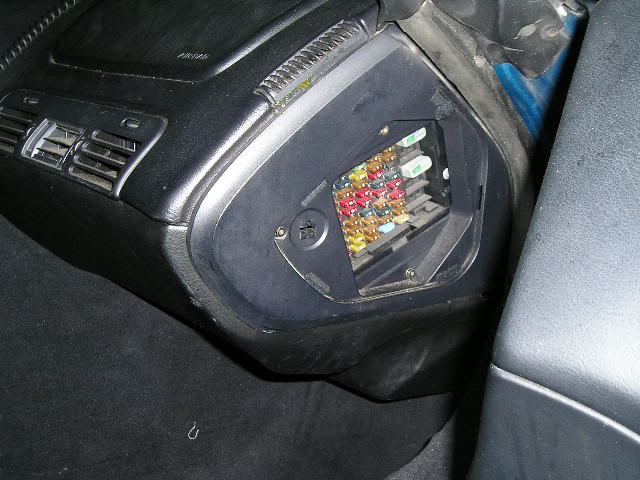
Remove the 2 plastic covers from the rear of the console compartment and the the 2 10mm nuts.

wol_error.gif
This image has been resized. Click this bar to view the full image.
step5.jpg

Report this image


wol_error.gif
This image has been resized. Click this bar to view the full image.
step55.jpg

Report this image


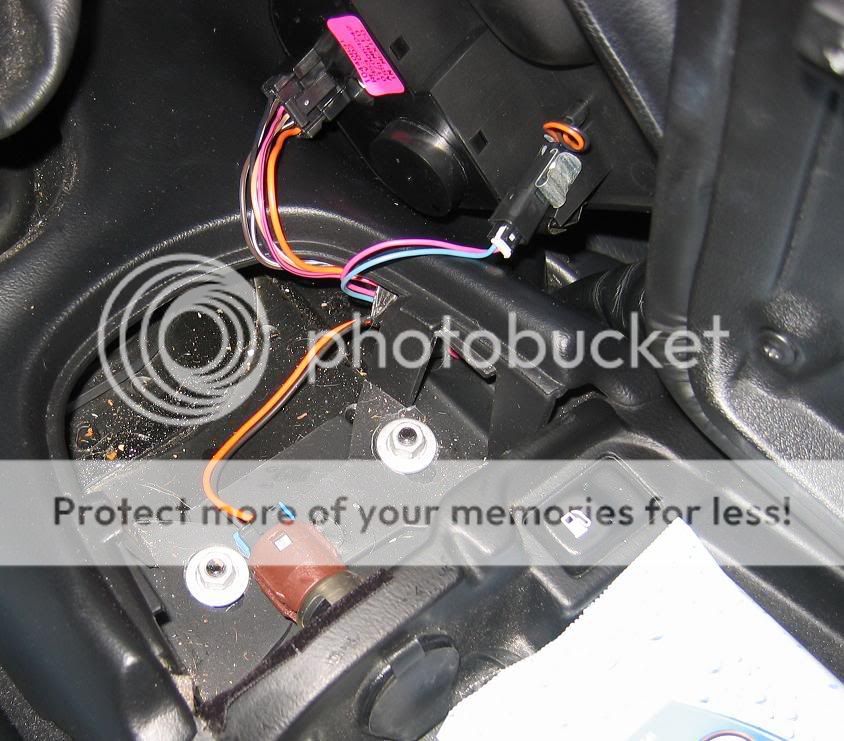
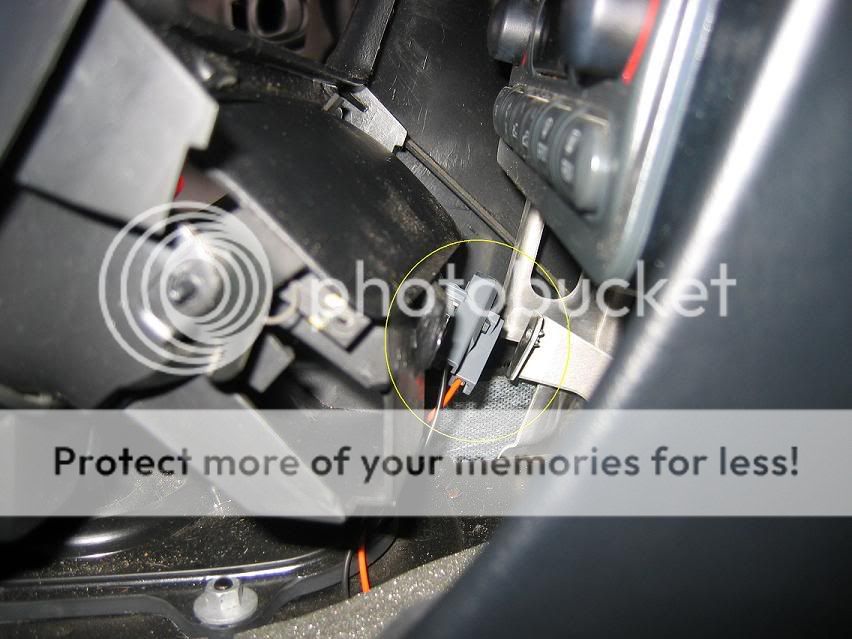
6) Lift the rear, slide back and unplug the Fuel Door plug.
Now set it out of the way.

wol_error.gif
This image has been resized. Click this bar to view the full image.
step7.jpg

Report this image


7) Now you can pull the Radio/Climate Control cover back by lifting at the rear by the emergency brake and pulling away from the dash.
You need to unplug the lighter at this point.
I put the shifter in 4th and move the front of the boot up to the top of the shifter and remove the entire cover.

wol_error.gif
This image has been resized. Click this bar to view the full image.
step6.jpg

Report this image


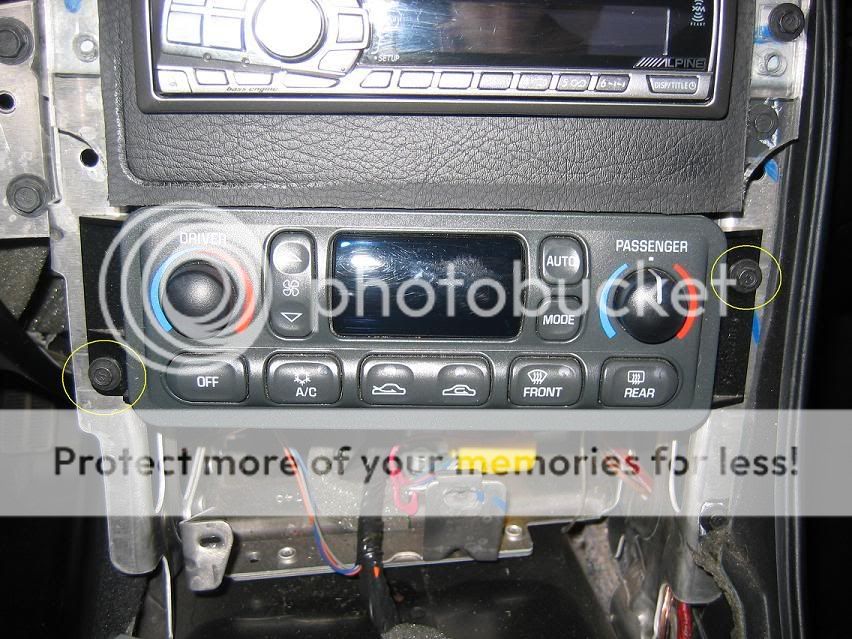
8) Remove 2 7mm screws that hold the Climate Control in place.

wol_error.gif
This image has been resized. Click this bar to view the full image.
step8.jpg

Report this image


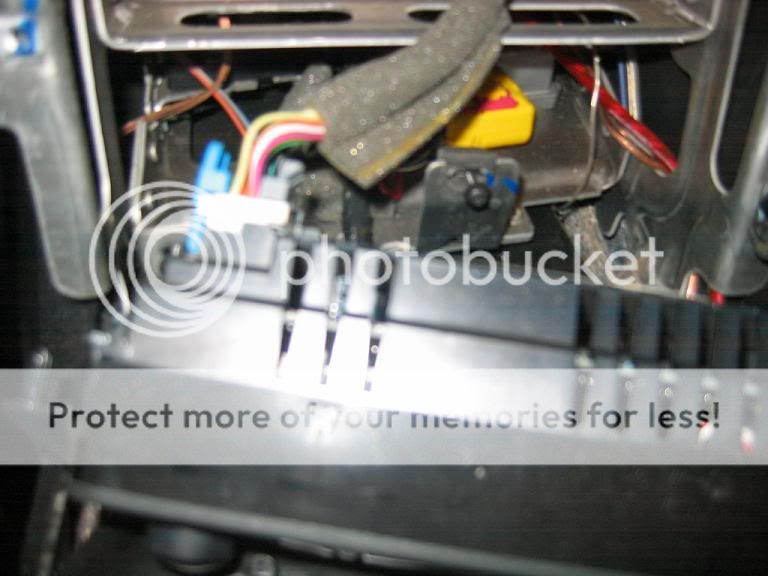
9) Unplug the connector from the back of the Climate Control.
There is just the one connection.

wol_error.gif
This image has been resized. Click this bar to view the full image.
step9.jpg

Report this image


10) Now that you have the Climate Control removed, you can move out of the car and into a well lit work area.
Remove 4 3/16 in. screws located on the corners.
Sorry I forgot to take a pic.

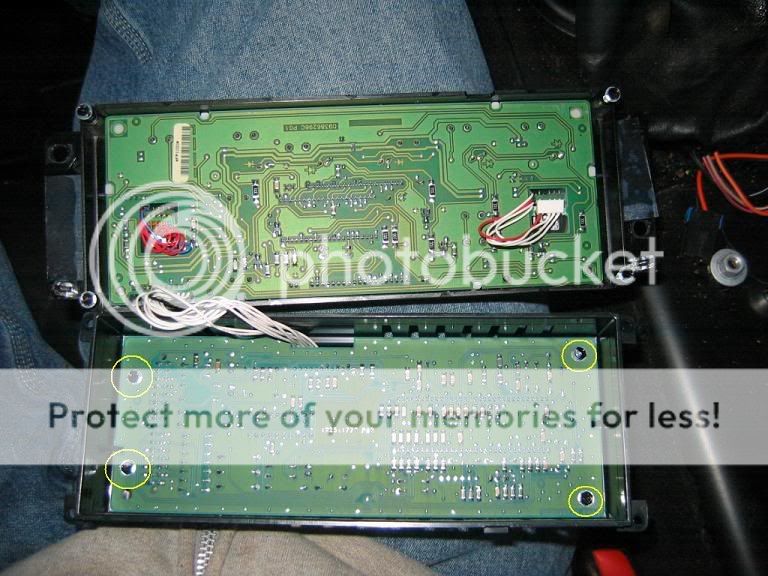
11) Remove 4 3/16 in. screws at the corners of the circuit board.

wol_error.gif
This image has been resized. Click this bar to view the full image.
step10.jpg

Report this image


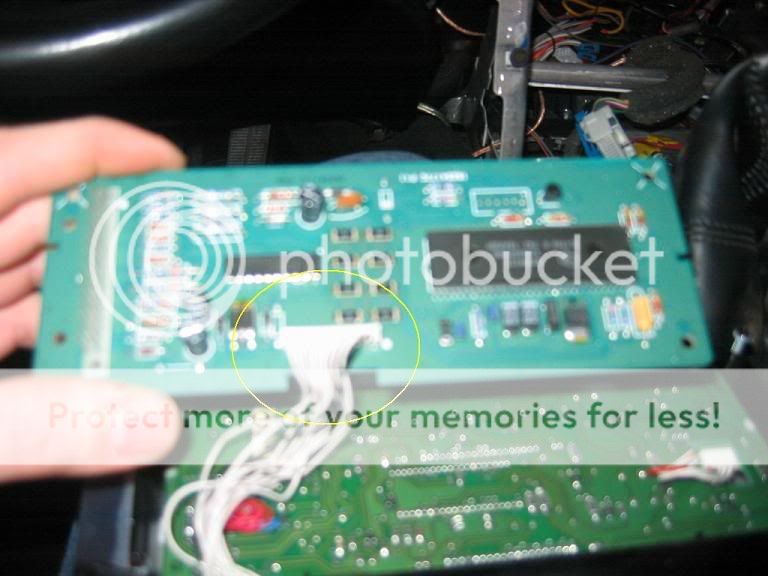
12) Slide the board out and unplug the connection.

wol_error.gif
This image has been resized. Click this bar to view the full image.
step11.jpg

Report this image


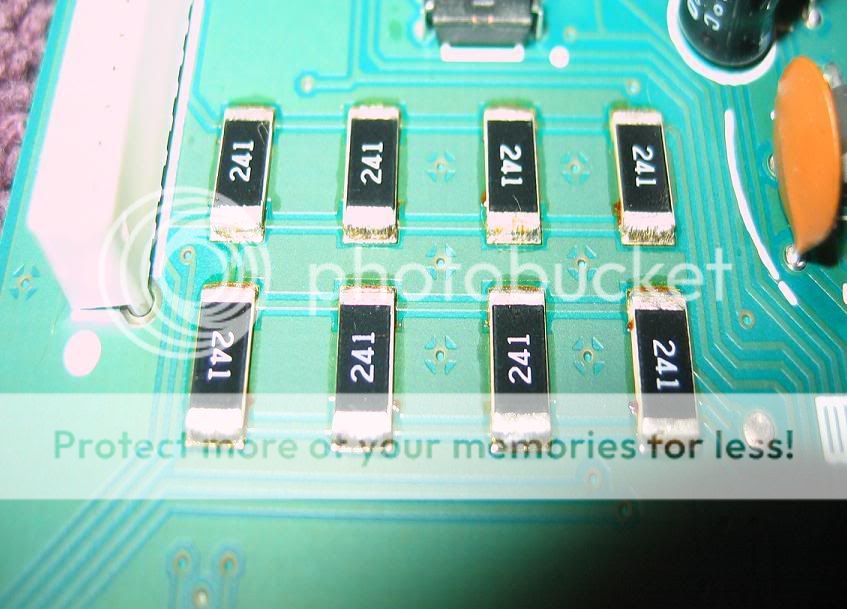
13) There are better pics of the bad solder joints but these are mine.
I've read about people having the resistors move on them so I held them down with tweezers and just ran the tip of the solder iron along the edges to melt the existing solder.

wol_error.gif
This image has been resized. Click this bar to view the full image.
11-7-09028.jpg

Report this image


wol_error.gif
This image has been resized. Click this bar to view the full image.
11-7-09032.jpg

Report this image


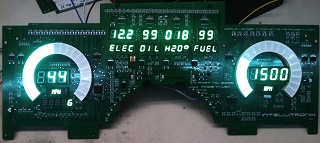
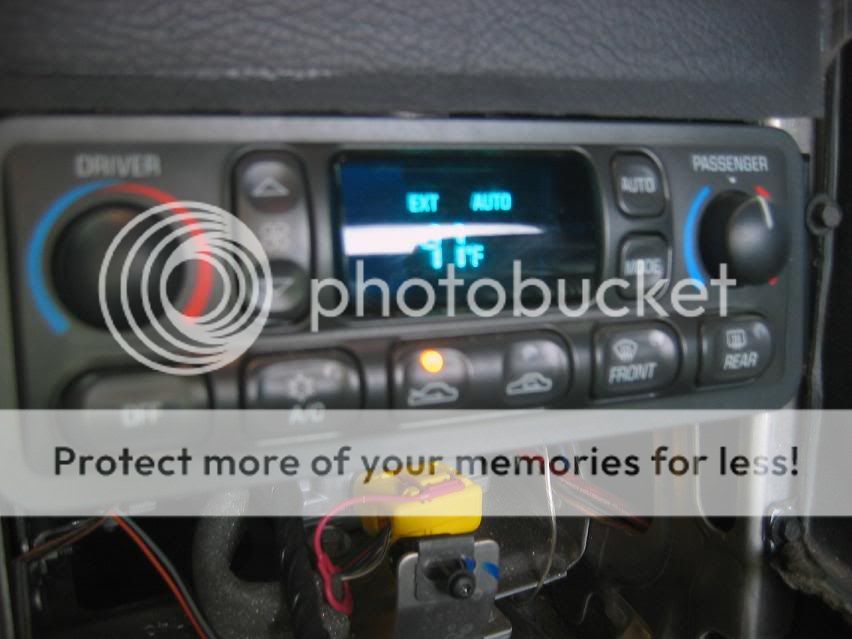
14) After the soldering, I put the Climate Control unit back together and placed it back in the car to test it.
Looks like it worked!!

wol_error.gif
This image has been resized. Click this bar to view the full image.
11-7-09035.jpg

Report this image


wol_error.gif
This image has been resized. Click this bar to view the full image.
11-7-09038.jpg

Report this image


As always, reverse the steps to reinstall everything.
Hope this helps.
 
Back
Top