if any of you gentlemen are auto air conditioning repair techs,...
or are just well skilled and experienced with working with air conditioning systems in cars,
heres a chance to help out the web site, and get some personal recognition.
Id sure appreciate your efforts if you would post a few basic trouble-shooting,
how to test and isolate, and basic air conditioning related repair threads
list of tools, how to test with a multi meter,
use of gauges etc.
https://images-na.ssl-images-amazon.com/images/I/91f4+jNGMeS.pdf

https://www.harborfreight.com/ac-r134a-manifold-gauge-set-62707.html
https://fjcinc.com/a-tutorial-guide-to-manifold-gauges/
A Tutorial Guide to Manifold Gauges

https://www.aa1car.com/library/ac98.htm
Before servicing a vehicle, confirm system refrigerant type. Cross contamination of refrigerants can cause damage to A/C system, service tools and equipment.
GENERAL MANIFOLD INFORMATION:
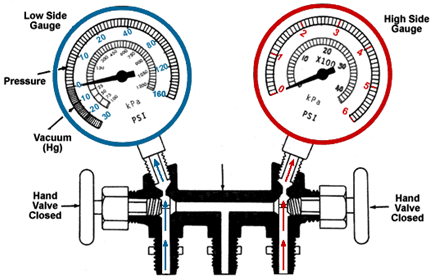
The right (red) side of the manifold is the high side and the red gauge is the high pressure gauge. The left (blue) side of the manifold is the low side and the blue gauge is the vacuum/pressure gauge. Separate passages from the low and high side fittings to their respective gauges allow one to check pressure and vacuum readings. The manifold body connects all three fittings to each other by internal passages.
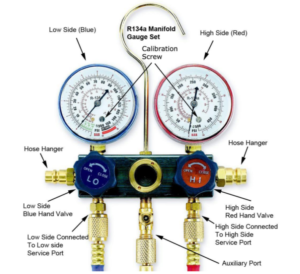
Note: If gauges do not read 0 psi, remove gauge face and adjust calibration screw to 0 psi.
Caution: Never open the high side valve on manifold gauge set when the A/C System is operating.
SYSTEM OPERATION:
Service couplers must be connected to a refrigerant hose and the refrigerant hose must be connected to a manifold gauge set with both low and high side valves in the closed position before connecting the couplers to an A/C System.
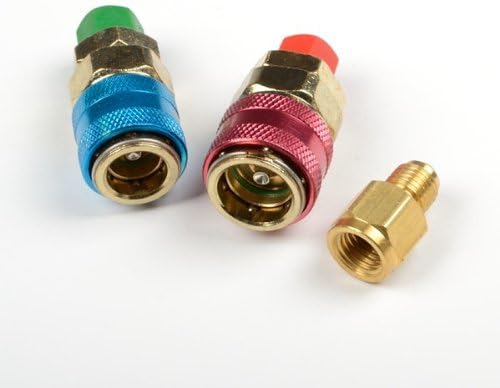
https://www.amazon.com/Manifold-Gauges-Gauge-Hose-Industrial/dp/B00BJS9QMU

types of refrigerants etc.
ideally with diagrams and a few pictures
like most things theres a great deal that needs to be pointed out and discussed
or are just well skilled and experienced with working with air conditioning systems in cars,
heres a chance to help out the web site, and get some personal recognition.
Id sure appreciate your efforts if you would post a few basic trouble-shooting,
how to test and isolate, and basic air conditioning related repair threads
list of tools, how to test with a multi meter,
use of gauges etc.
https://images-na.ssl-images-amazon.com/images/I/91f4+jNGMeS.pdf
https://www.harborfreight.com/ac-r134a-manifold-gauge-set-62707.html
https://fjcinc.com/a-tutorial-guide-to-manifold-gauges/
A Tutorial Guide to Manifold Gauges
https://www.aa1car.com/library/ac98.htm
Before servicing a vehicle, confirm system refrigerant type. Cross contamination of refrigerants can cause damage to A/C system, service tools and equipment.
GENERAL MANIFOLD INFORMATION:
The right (red) side of the manifold is the high side and the red gauge is the high pressure gauge. The left (blue) side of the manifold is the low side and the blue gauge is the vacuum/pressure gauge. Separate passages from the low and high side fittings to their respective gauges allow one to check pressure and vacuum readings. The manifold body connects all three fittings to each other by internal passages.
Note: If gauges do not read 0 psi, remove gauge face and adjust calibration screw to 0 psi.
Caution: Never open the high side valve on manifold gauge set when the A/C System is operating.
SYSTEM OPERATION:
Service couplers must be connected to a refrigerant hose and the refrigerant hose must be connected to a manifold gauge set with both low and high side valves in the closed position before connecting the couplers to an A/C System.
- Close all valves on the manual service couplers and manifold gauge set. Connect the high side coupler to the high side port and connect the low side coupler to the low side port.
- Start the vehicle. Turn on the A/C system, and let it run until gauge readings stabilize.
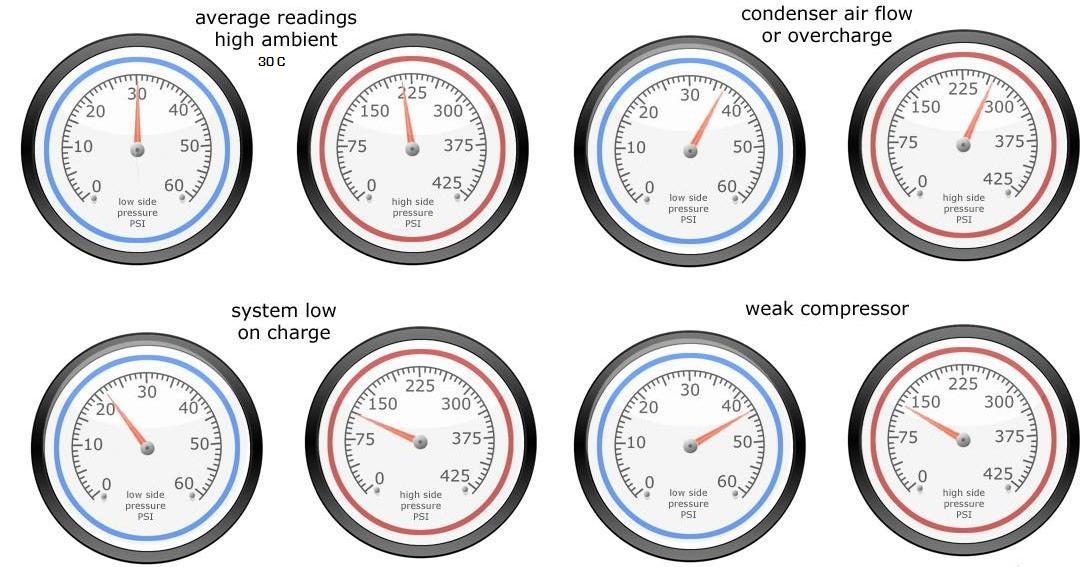
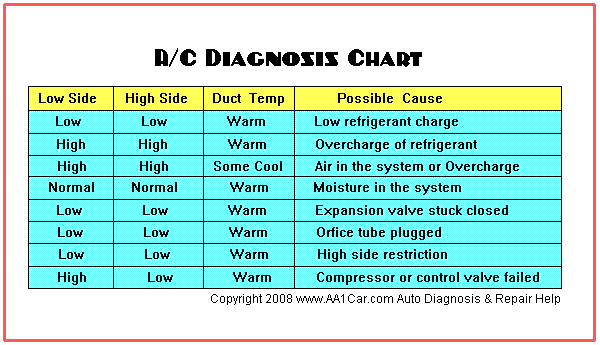
- If the pressure shown on the gauges differ from the manufacturer’s specs, determine the problem and make necessary repairs.
- Recover all refrigerant from the system. DO NOT VENT REFRIGERANT TO THE ATMOSPHERE, USE APPROPRIATE RECOVERY EQUIPMENT.
- Connect the BLUE hose to the low side service port. Connect the RED hose to the high side service port. Connect the YELLOW hose to a vacuum pump.
- Open the HIGH and LOW manifold valves using the Red and Blue hand valves and start the pump.
- After evacuating the system according to the manufacturer’s specs, close both valves and turn off the vacuum pump. Disconnect the YELLOW charging hose from the vacuum pump and connect it to the appropriate refrigerant container.
- After all connections have been made, the refrigerant can be added through the low side per manufacturer’s specifications.
- Vehicle engine the A/C system must both be off.
- Make certain that the dispensing valve on the refrigerant source is in the closed position.
- Make certain that both the high pressure and the low pressure valves are in their closed position.
- Connect both high and low couplers to the A/C system’s service ports. After connecting the couplers, open them by turning the knob on the top of it clockwise until it stops.
- Open valve on the refrigerant source.
- Open the low side valve on the manifold gauge set.
- Charge system until gauges read over 50 pounds of pressure.
- Close low side valve on the manifold gauge set.
- Turn off High Side and Low Side valves on the manifold gauge set.
- Go to step # 4 in Charging an A/C System that is low on Refrigerant (below)
- Make certain that the dispensing valve on the refrigerant source is closed.
- Make certain that both the high pressure and the low pressure valves are closed.
- Connect both couplers to the system’s service ports. Afterwards, open them by turning the knob on the top of the coupler until it stops.
- Start the vehicle. Ensure adequate air flow through the front of the vehicle to avoid overheating.
- Turn on the A/C and set controls for MAX COOL and high fan.
- Open the dispensing valve on the refrigerant source. (Keep the refrigerant source upright at all times so that refrigerant can only enter the hoses as a gas.) To begin adding refrigerant (with system running) open the BLUE low side valve. Allow the gas to flow into the system until the desired amount has been added or until the source container is empty. Getting the required refrigerant amount into the system may take several minutes.
- When you have charged the system to manufacturer’s specs, close the manifold’s blue valve. Let the compressor run and check the gauge readings to be sure the system is operating properly. If not, repair the system as required by manufacturer’s service manual.
- To disconnect the manifold when the system is filled and operating properly, close the BLUE (low side) and RED (high side) hand valves on the manifold.
- To disconnect the manual coupler, turn the knob on it until finger tight. Slide the coupler sleeve up, releasing the coupler from the vehicle’s service port.
- Replace protective caps on vehicle’s service fittings.
https://www.amazon.com/Manifold-Gauges-Gauge-Hose-Industrial/dp/B00BJS9QMU
types of refrigerants etc.
ideally with diagrams and a few pictures
like most things theres a great deal that needs to be pointed out and discussed
Last edited: