- Home
- Forums
- Technical Articles/muscle cars
- Engine & transmission Swaps, related info
- Drive Train and Tires: Selection and Modification
You are using an out of date browser. It may not display this or other websites correctly.
You should upgrade or use an alternative browser.
You should upgrade or use an alternative browser.
200-4r Rebuild Questions
- Thread starter jelco
- Start date
Yes, mine says CRF. I was just agreeing that CZF is the better one. Sorry for the confusion.Doesn't the tag say "CRF" ?
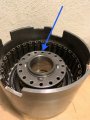
Images of 646 drilled hole
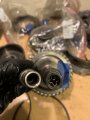
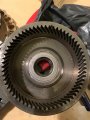
comparing 604s, I don’t know why they’re different.
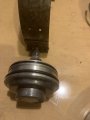
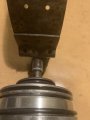
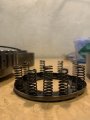
611 bent due to my “plier press”. Is that a big deal or do I need to try to straighten it?
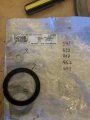
My original 503 missing 501.
comparing 604s, I don’t know why they’re different.
611 bent due to my “plier press”. Is that a big deal or do I need to try to straighten it?
My original 503 missing 501.
Attachments
-
 EA491EC0-DD09-41E0-958E-A8AABE81733A.jpeg102.5 KB · Views: 4
 -
 BF8CDEDC-D543-40BB-A1C6-77975FC95E79.jpeg109.5 KB · Views: 4
 -
 E867C921-B03A-4148-9184-2C9AFC67965B.jpeg208.7 KB · Views: 4
 -
 0DE2B90A-3E9A-48CE-8A2F-2EF9C3C5681A.jpeg135.9 KB · Views: 2
 -
 957AFBEE-FD1D-45F7-8F96-E44F0E480420.jpeg86.2 KB · Views: 2
Looks good.Images of 646 drilled hole
That maybe how they balanced the direct drum. As long as the tangs of the Input Drum 640 fitscomparing 604s, I don’t know why they’re different.
properly into the Direct Clutch Drum 604, you should be good.
Well it couldn't hurt to try and straighten it, so long as you don't make it worse. I've bent those611 bent due to my “plier press”. Is that a big deal or do I need to try to straighten it?
spring packs also, so it happens.
That will have to be replaced if you are using a lockup torque converter.My original 503 missing 501.
See page 39 of CK's book.
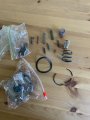
Waiting on solid Teflon rings and a bushing until I can put things back together. I wasn’t able to figure out where these two washers in the kit are supposed to go. I forgot to take a picture of all the others before putting them in their place but I noted their ATSG #s
Attachments
I'm not sure about the smaller silver washer, but the black plastic item looks like a Thrust Washer 643.I wasn’t able to figure out where these two washers in the kit are supposed to go.
There was just one like this. I'll do that.
A while back I saw in one of your posts that the 3-2 control valve spring (316) is to be eliminated and plugged with ¼” plug, but there is no page # for reference. I can't find where it is in the book. Do you have any idea?
A while back I saw in one of your posts that the 3-2 control valve spring (316) is to be eliminated and plugged with ¼” plug, but there is no page # for reference. I can't find where it is in the book. Do you have any idea?
Last edited:
Thanks. And the image of 316 is on the previous page of this thread.
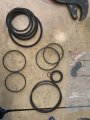
Looks like you sent me 516 wave spring by mistake instead of 651. And looks like a broken oil seal ring for the center support but I already have new ones.
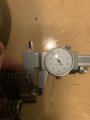
The 611 springs you sent are 0.29” longer than the ones I have. I guess they’re not all the same. No big deal since I have the 2nd trans now.
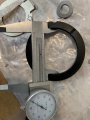
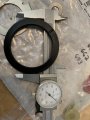
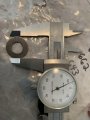
Image of the washer I asked about. ID 2.36”, OD 3.11”, thickness 0.153”.
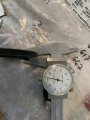
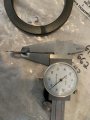
And the smaller washer ID 0.444”, OD 1”, thickness 0.037”
Looks like you sent me 516 wave spring by mistake instead of 651. And looks like a broken oil seal ring for the center support but I already have new ones.
The 611 springs you sent are 0.29” longer than the ones I have. I guess they’re not all the same. No big deal since I have the 2nd trans now.
Image of the washer I asked about. ID 2.36”, OD 3.11”, thickness 0.153”.
And the smaller washer ID 0.444”, OD 1”, thickness 0.037”
Attachments
-
 18A51B76-3F28-4136-948E-CCE6CBBF729C.jpeg138.5 KB · Views: 2
 -
 0FCE5A7D-98C4-477F-A782-D26EA15D45EA.jpeg83.6 KB · Views: 2
 -
 A897C933-99EB-42BE-8C9E-6C1F7890E29F.jpeg124.7 KB · Views: 3
 -
 DACE338D-93CA-4B0B-8906-33F064F30CB8.jpeg126.9 KB · Views: 2
 -
 81B686A4-3F8E-4788-A224-1DB5BAFA4606.jpeg112.9 KB · Views: 2
 -
 A69EBCDA-6E26-48E2-A76A-79F97D7D40B4.jpeg100.9 KB · Views: 2
 -
 B6190D08-B3FE-4206-8094-15C597DE6C4E.jpeg113.5 KB · Views: 2
 -
 1702FB5D-3E6E-49BE-8DEB-443C934B2854.jpeg120.1 KB · Views: 1
 -
 1C076582-99A5-42D0-B517-8CAEBA955852.jpeg92.6 KB · Views: 1
Did you read the very last page of the CK Re-Calibration Kit manual, it's important ?Thanks. And the image of 316 is on the previous page of this thread.
BTW, when the manual had instructions for 3 different levels of performance, I following the
lowest performance option because of the light weight car I had. This is what CK suggested
when I asked him.
I'm sorry that was not the right wave spring! That ring was not broke when I shipped it, but youLooks like you sent me 516 wave spring by mistake instead of 651. And looks like a broken oil seal ring for the center support but I already have new ones.
were after the springs weren't you?
I compared them to a complete spring pack that I had and visually they were the same size.The 611 springs you sent are 0.29” longer than the ones I have. I guess they’re not all the same. No big deal since I have the 2nd trans now.
Although the ATSG diagram does not show the details of the shape (grooves and the notch in the OD),Image of the washer I asked about. ID 2.36”, OD 3.11”, thickness 0.153”.
the dimension match with a thrust washer I have labeled as 659.
I still have no idea where this washer goes to.And the smaller washer ID 0.444”, OD 1”, thickness 0.037”
The post office website is not correct about their flat rate shipping. It had me believing the cost would be
$4.95, when in reality it cost $8.30. I say this because this mistake was made in your favor.
So can we call it even?
https://about.usps.com/postal-bulletin/2009/pb22265/html/info1_004.htm

.
Thanks no problem. I did read the last page and sped read the whole thing. I think you’re right about 659. I think some older transmissions had a plastic washer.
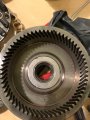
Is there a general rule for bearings? the dvd and manual aren’t clear on all of them. “Black facing out” sometimes depends on the wear. Some new ones have a black side. Image of 529 and 528.
Is there a general rule for bearings? the dvd and manual aren’t clear on all of them. “Black facing out” sometimes depends on the wear. Some new ones have a black side. Image of 529 and 528.
Attachments
Ok. Yes, I’m starting to reassemble but I haven’t taken the valve body apart yet.
I have a few seals and o-rings that I don’t know what to do with. I’ve gone through all the atsg diagrams and listed them so these in the top left appear to be extra. There’s a couple accumulator piston and servo seals here I haven’t installed yet.
I have a few seals and o-rings that I don’t know what to do with. I’ve gone through all the atsg diagrams and listed them so these in the top left appear to be extra. There’s a couple accumulator piston and servo seals here I haven’t installed yet.
Attachments
You probably said earlier, but where did you get your seals from ? Did you buy from more than
one place ?
ones you have and the extras are in the top left corner of your photo ?
one place ?
So how do you know what seals are extra ? Have you tried to match all your used seals to the newI have a few seals and o-rings that I don’t know what to do with. I’ve gone through all the atsg diagrams and listed them so these in the top left appear to be extra.
ones you have and the extras are in the top left corner of your photo ?
Transtar 54008B deluxe kit from Carid.com. I think the ones in the top left corner are extra.
It was difficult to assemble the lo/reverse clutch housing but got it in eventually. I rested the output shaft on a brick, old steel clutches, file, the put the shaft in a roll of electrical tape, and a couple washers in the roll of tape, under the shaft. All this helped to center and put the shaft at the right height.
The rear section end play was 0.009” and center end play with the #12 (0.123”) 629 washer was about 0.020”. I have a #13 (0.128”) washer but I thought the 12 would be ok and I didn’t feel like removing the direct drum, forward clutch housing and center support.
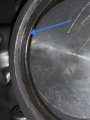
Scratch/crack on the case where the servo sits. Looks too small to cause a leak, let’s hope.
How do you measure the servo pin? How would I know if I need a servo pin extender? Is the servo cover/piston supposed to fit tight after securing it with the snap ring? I thought there was supposed to be a little play/spring movement.
Also, did you drill 8 1/8” holes in the backing plate, 507, as well? CK book pg. 49
I measured the front end play with a dial indicator and it’s at 0.040”. I have the (atsg 9) yellow washer, 0.188”. The dvd says to be between 0.004-0.030” without mentioning measuring between the overdrive carrier 524 and the snap ring (which measured 0.032” for me. CK’s tolerance is between 3-6 thousandths when subtracting the two.
Am I ok or do I need the 0.198” washer? It’s out of stock everywhere.
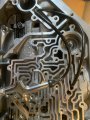
Image of band air check. I couldn’t get the air check on the 601 band to work so I disassembled and reassembled. I tried installing the servo first, one side of the band where the servo pin presses then the anchor pin. Still didn’t work. Any suggestions?
It was difficult to assemble the lo/reverse clutch housing but got it in eventually. I rested the output shaft on a brick, old steel clutches, file, the put the shaft in a roll of electrical tape, and a couple washers in the roll of tape, under the shaft. All this helped to center and put the shaft at the right height.
The rear section end play was 0.009” and center end play with the #12 (0.123”) 629 washer was about 0.020”. I have a #13 (0.128”) washer but I thought the 12 would be ok and I didn’t feel like removing the direct drum, forward clutch housing and center support.
Scratch/crack on the case where the servo sits. Looks too small to cause a leak, let’s hope.
How do you measure the servo pin? How would I know if I need a servo pin extender? Is the servo cover/piston supposed to fit tight after securing it with the snap ring? I thought there was supposed to be a little play/spring movement.
Also, did you drill 8 1/8” holes in the backing plate, 507, as well? CK book pg. 49
I measured the front end play with a dial indicator and it’s at 0.040”. I have the (atsg 9) yellow washer, 0.188”. The dvd says to be between 0.004-0.030” without mentioning measuring between the overdrive carrier 524 and the snap ring (which measured 0.032” for me. CK’s tolerance is between 3-6 thousandths when subtracting the two.
Am I ok or do I need the 0.198” washer? It’s out of stock everywhere.
Image of band air check. I couldn’t get the air check on the 601 band to work so I disassembled and reassembled. I tried installing the servo first, one side of the band where the servo pin presses then the anchor pin. Still didn’t work. Any suggestions?
Attachments
See CK's Book, page 136. The pin should move approximately .060".How do you measure the servo pin? How would I know if I need a servo pin extender? Is the servo cover/piston supposed to fit tight after securing it with the snap ring? I thought there was supposed to be a little play/spring movement.
I didn't really check this very accurately. I couldn't see the band move, but I could feel it. In my PDF
file of my build thread on Adobe Reader page 177 is where I check this by feel. I did not install an
extension, it was not called for in the Billet Servo I bought from CK. The CK servo probably compensated
in the servo piston dimensions.
No, I did not make this modification.Also, did you drill 8 1/8” holes in the backing plate, 507, as well? CK book pg. 49
If I understand correctly, then you have .008" for your front section end play? (.040 - .032 = .008"). I wouldI measured the front end play with a dial indicator and it’s at 0.040”. I have the (atsg 9) yellow washer, 0.188”. The dvd says to be between 0.004-0.030” without mentioning measuring between the overdrive carrier 524 and the snap ring (which measured 0.032” for me. CK’s tolerance is between 3-6 thousandths when subtracting the two.
Am I ok or do I need the 0.198” washer? It’s out of stock everywhere.
not have a problem with an additional .002" of clearance.
When you say it didn't work, what do you mean? Like I was saying earlier in this post, I could not see the bandImage of band air check. I couldn’t get the air check on the 601 band to work so I disassembled and reassembled. I tried installing the servo first, one side of the band where the servo pin presses then the anchor pin. Still didn’t work. Any suggestions?
move, but I could feel it. You will have to make your best guess or devise a way to measure how far the pin is moving.

.
Thanks for the reply.
I don’t know if my math is right because the dvd doesn’t mention the clearance beneath snap ring.
If I were to get a bigger #9 washer and had 0.030” of input shaft play would I have negative 0.002”? Can you have negative clearance?
Isn’t the servo pin supposed to go in the location of the first photo? In the dvd it looks like he simply throws the band in and the pin sits at the location in the second photo.
I’ve tried both methods and didn’t feel the band move. The first method required me to install the servo first then the band.