ok basics first,
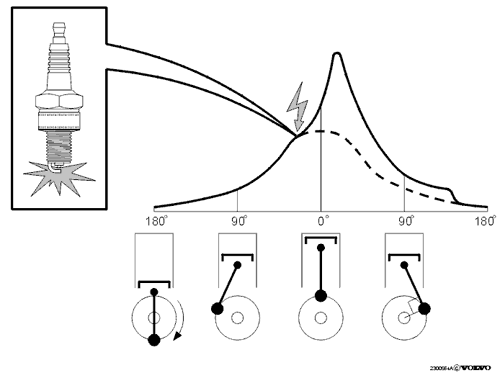
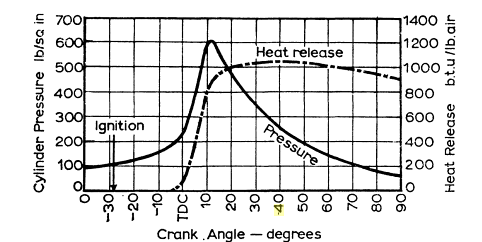
in an ideal engine running the ideal fuel ,the ignition would ignite the compressed mix of fuel air trapped and compressed over the piston at just after top dead center, and the burning mix would near instantly produce about the max pressure the engine strength would safely contain and keep that mass of burning fuel air producing a high and constant pressure over the piston until the piston was about 120 degrees past tdc,\
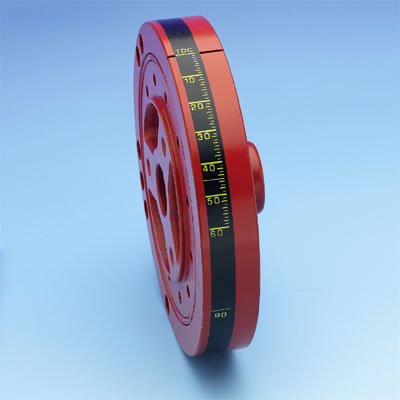
obviously you need to have a consistent base line advance curve to work with,
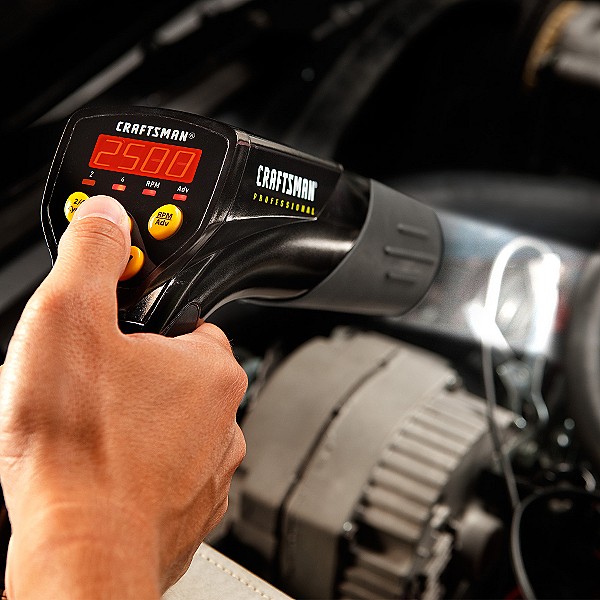
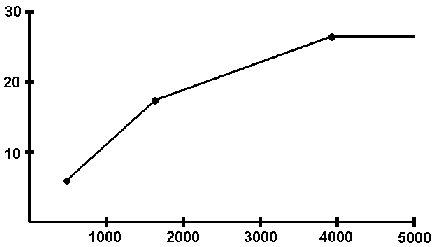
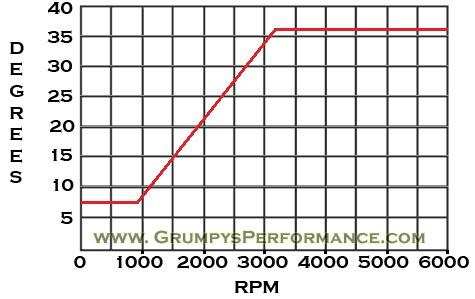
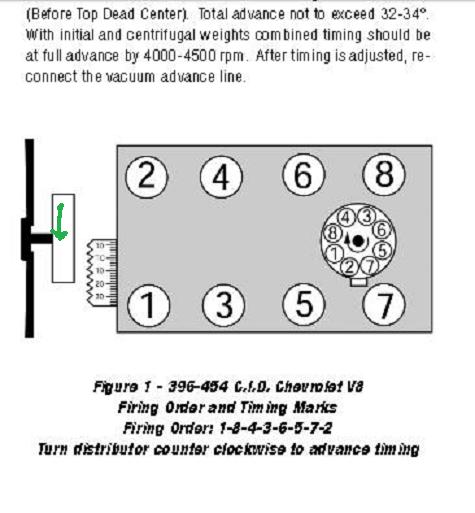
on most Chevy v8 engines that run cams designed for street/strip use Ive generally found a advance that goes from about 8 degrees at idle speed (800-900rpm in most cases) and smoothly advances the ignition to about 36 degrees or about 28 degrees advance from where it started at to reach 36 degrees at about 3200rpm , is generally a good place to start, or about 82 rpm increase per degree of ignition advance , up to about 3200rpm, where increase turbulence and squish tends to speed the burn process, you can then play with the engine and determine what changes MIGHT be require
watch video
http://www.youtube.com/watch?v=UYGU7mTw ... r_embedded
watch this

BUT in the real world the fuel takes time to ignite, time to burn and build useful pressure and its all effectively burnt as far as increased pressure is concerned well before the pistons more than 45 degrees past tdc, so you need to locate the pressure curve so the piston on its power stroke can use that pressure effectively,
this requires the fuel/air mixture to be ignited well before the piston reaches tdc, so ignition timing is advanced, the advance , is required, to allow the flame front to cross the cylinder and get the full charge of fuel/air mix burning and producing pressure,the down side is that the pressure builds rapidly as the piston is approaching tdc so it produces pressure that tends to resist the ideal rotation direction of the engine, during the first few degrees of that burn time that are before top dead center in the pistons rotation, taking away from its efficiency, and it burns out before the pistons reached its max mechanical advantage near 90 degrees past tdc.
with in limits imposed by detonation due to fuel octane ratings and a few other factors the higher the compression ratio the more power can be produced, but keep in mind that as the engine speed increases the time available to fill and evacuate the cylinder decreases dramatically
setting the ignition advance is a compromise designed to maximize the usable pressure over the piston on the power stroke and minimize the pressure building before tdc in the cranks rotation that resists the intended rotational direction.
as the ignition advance curve, & total timing or rate of advance in relation to the rpms increases so does the cylinder temperatures, and pressures and the tendency to get into detonation , so matching the ignition advance to the compression ratio, and fuel octane to maximize the pressure over the piston, is a compromise or balance that needs to be struck, you'll need to keep out of the detonation range in temp. and pressure, but ideally maximize the pressure after tdc to increase the torque, produced with the useful pressure curve in the cylinder
it takes time for the flame front to cross the cylinder , at lower rpms,up to 50 thousands of a second, but theres only 7-8 power strokes a second, as rpms increase the compressed gas turbulence in the combustion chamber increases burn efficiency , but the time available is also becoming much shorter, but by about 3200rpm the constant increase in ignition advance lead timing is no longer required, as the burn speeds have continued to increase.


yes reading thru the linked info takes time but youll be amazed at the info they contain, if you take the effort
standard vacuum connections
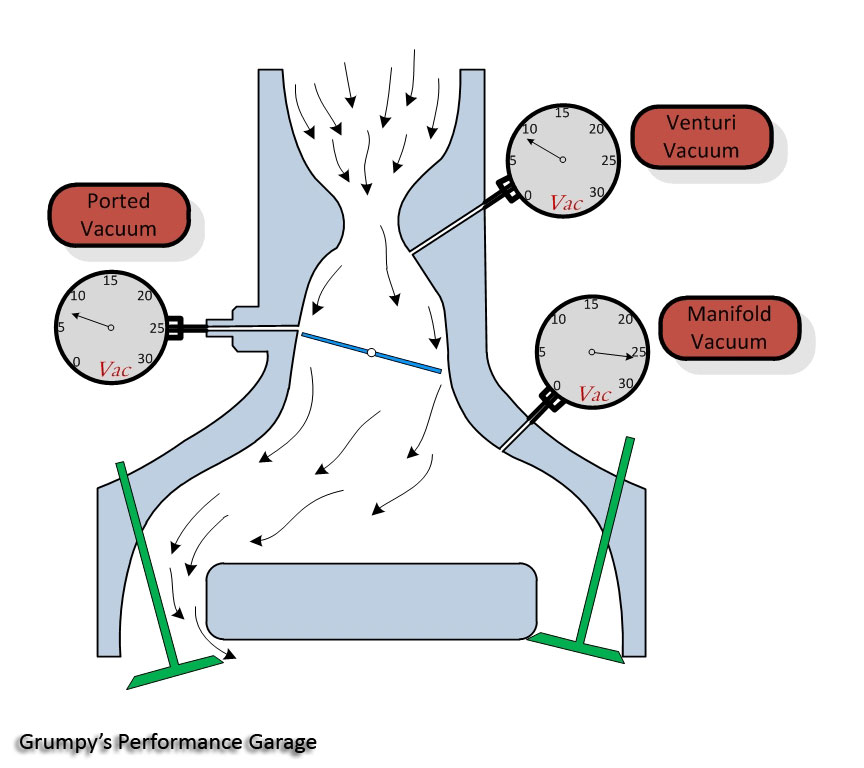
manifold to power brake booster
manifold to distrib vacuum advance
pvc to carb or air cleaner assembly
viewtopic.php?f=70&t=1411&p=3281&hilit=+detonation#p3281
http://www.circletrack.com/ultimateraci ... index.html
http://www.circletrack.com/enginetech/c ... index.html
http://temp.corvetteforum.net/c3/joevet ... urve.shtml
viewtopic.php?f=52&t=727&p=3212&hilit=+detonation#p3212
viewtopic.php?f=70&t=875
http://www.chevyhiperformance.com/howto ... index.html
viewtopic.php?f=38&t=1099&p=2152&hilit=volumetric#p2152
http://www3.fs.cvut.cz/web/fileadmin/do ... vac-Bl.pdf
http://www.kb-silvolite.com/article.php ... ad&A_id=36
http://www.tpub.com/content/altfuels02/ ... 340011.htm
http://www.tpub.com/engine1/en1-105.htm
http://www.chevyhiperformance.com/techa ... index.html
http://auto.howstuffworks.com/ignition-system.htm
http://www.chevyhiperformance.com/howto ... index.html
http://en.wikipedia.org/wiki/Ignition_timing
viewtopic.php?f=70&t=1411
http://www.centuryperformance.com/ignit ... g-219.html
http://www.hotrod.com/techarticles/sett ... index.html
viewtopic.php?f=70&t=875
http://www.msdignition.com/uploadedFile ... op_ten.pdf
http://circletrack.automotive.com/10831 ... index.html
in an ideal engine running the ideal fuel ,the ignition would ignite the compressed mix of fuel air trapped and compressed over the piston at just after top dead center, and the burning mix would near instantly produce about the max pressure the engine strength would safely contain and keep that mass of burning fuel air producing a high and constant pressure over the piston until the piston was about 120 degrees past tdc,\
obviously you need to have a consistent base line advance curve to work with,
on most Chevy v8 engines that run cams designed for street/strip use Ive generally found a advance that goes from about 8 degrees at idle speed (800-900rpm in most cases) and smoothly advances the ignition to about 36 degrees or about 28 degrees advance from where it started at to reach 36 degrees at about 3200rpm , is generally a good place to start, or about 82 rpm increase per degree of ignition advance , up to about 3200rpm, where increase turbulence and squish tends to speed the burn process, you can then play with the engine and determine what changes MIGHT be require
watch video
http://www.youtube.com/watch?v=UYGU7mTw ... r_embedded
watch this
BUT in the real world the fuel takes time to ignite, time to burn and build useful pressure and its all effectively burnt as far as increased pressure is concerned well before the pistons more than 45 degrees past tdc, so you need to locate the pressure curve so the piston on its power stroke can use that pressure effectively,
this requires the fuel/air mixture to be ignited well before the piston reaches tdc, so ignition timing is advanced, the advance , is required, to allow the flame front to cross the cylinder and get the full charge of fuel/air mix burning and producing pressure,the down side is that the pressure builds rapidly as the piston is approaching tdc so it produces pressure that tends to resist the ideal rotation direction of the engine, during the first few degrees of that burn time that are before top dead center in the pistons rotation, taking away from its efficiency, and it burns out before the pistons reached its max mechanical advantage near 90 degrees past tdc.
with in limits imposed by detonation due to fuel octane ratings and a few other factors the higher the compression ratio the more power can be produced, but keep in mind that as the engine speed increases the time available to fill and evacuate the cylinder decreases dramatically
setting the ignition advance is a compromise designed to maximize the usable pressure over the piston on the power stroke and minimize the pressure building before tdc in the cranks rotation that resists the intended rotational direction.
as the ignition advance curve, & total timing or rate of advance in relation to the rpms increases so does the cylinder temperatures, and pressures and the tendency to get into detonation , so matching the ignition advance to the compression ratio, and fuel octane to maximize the pressure over the piston, is a compromise or balance that needs to be struck, you'll need to keep out of the detonation range in temp. and pressure, but ideally maximize the pressure after tdc to increase the torque, produced with the useful pressure curve in the cylinder
it takes time for the flame front to cross the cylinder , at lower rpms,up to 50 thousands of a second, but theres only 7-8 power strokes a second, as rpms increase the compressed gas turbulence in the combustion chamber increases burn efficiency , but the time available is also becoming much shorter, but by about 3200rpm the constant increase in ignition advance lead timing is no longer required, as the burn speeds have continued to increase.
yes reading thru the linked info takes time but youll be amazed at the info they contain, if you take the effort
standard vacuum connections
manifold to power brake booster
manifold to distrib vacuum advance
pvc to carb or air cleaner assembly
viewtopic.php?f=70&t=1411&p=3281&hilit=+detonation#p3281
http://www.circletrack.com/ultimateraci ... index.html
http://www.circletrack.com/enginetech/c ... index.html
http://temp.corvetteforum.net/c3/joevet ... urve.shtml
viewtopic.php?f=52&t=727&p=3212&hilit=+detonation#p3212
viewtopic.php?f=70&t=875
http://www.chevyhiperformance.com/howto ... index.html
viewtopic.php?f=38&t=1099&p=2152&hilit=volumetric#p2152
http://www3.fs.cvut.cz/web/fileadmin/do ... vac-Bl.pdf
http://www.kb-silvolite.com/article.php ... ad&A_id=36
http://www.tpub.com/content/altfuels02/ ... 340011.htm
http://www.tpub.com/engine1/en1-105.htm
http://www.chevyhiperformance.com/techa ... index.html
http://auto.howstuffworks.com/ignition-system.htm
http://www.chevyhiperformance.com/howto ... index.html
http://en.wikipedia.org/wiki/Ignition_timing
viewtopic.php?f=70&t=1411
http://www.centuryperformance.com/ignit ... g-219.html
http://www.hotrod.com/techarticles/sett ... index.html
viewtopic.php?f=70&t=875
http://www.msdignition.com/uploadedFile ... op_ten.pdf
http://circletrack.automotive.com/10831 ... index.html
Last edited by a moderator: