Bending fuel line

g10van8772

Active Member
Okay, to start, I'm being stubborn. I'm still putting together a 305 to put in my van, nothing definite on what I'm gonna do with the 250 I'm gonna take out to make room for the 8, but that's different.

Right now I've got the carb mounted, and the fuel pump, but need to connect the two. Enter fuel line, and debate regarding it. I want to keep with most stock applications and use a steel line. This is where the problem comes in and where I can't figure out what I'm doing wrong....... (and please...... no comments that my first thing wrong is not putting in rubber hoses) Got 3/8" tube, and have bender, but the first time I started bending it the tube slid and instead of a nice radiused turn, I got a sharp turn and a kink......... luckily this stuff is $3 for a 30" section, so not cryin' yet.

Need help from you guys who've learned the "tricks" because I'm not wanting to have to give up just yet, but also can't blow money on a long line of kinked fuel line attempts.
 
tubing benders come in a vast number of different designs, they all work too some degree but the cheaper ones are usually a P.I.T.A. to use in my experience.
naturally your reluctant to spend $100, $200 even $700 plus or more on a tool that's probably seldom used,so a compromise must be reached, and while the correct tools make the process easy having some experience and skills helps a great deal, one simple route if you only need gentle curves is to find a tension style spring, tubing bender, that barely slides over the tubing, and a can of WD40 as a lubricant, place the spring over the area to be bent, lube it and press it in a gently repeat bouncing motion over a section or 3" pipe so it follows that contour, once bent you simply slip off the spring.
firmly holding both ends of the fuel line and
bouncing the outer springs surface against a 3" pipe curve, gently , increasing the extent of the curve, in that fuel line, slowly works it into shape far more effectively than a single full bend
here is a source of that style bending springs
http://www.mannix-inst.com/Products/Ste ... nders.aspx

RELATED INFO

viewtopic.php?f=46&t=7218&p=24259#p24259

http://www.aircraftspruce.com/catalog/m ... tubing.php

http://www.anfittingsdirect.com/stpg.ph ... ings_sizes

Instructions
Bending a Pipe:
Note: General recommends using one bender over the tube and an additional bender inside the tube. Remember that the inner spring will need to be smaller in diameter than the outer spring.
1. Slide tubing bender spring over the tube.
2. If available, slide 2nd tubing bender spring inside the tube.
3. Holding the spring and tube firmly in both hands, bend the tube to the desired angle, applying equal pressure with both hands.
4. To release the spring, you may need to over-bend the tube slightly before bending it back to the desired angle. This will help to unbind the spring.
5. For the outer spring, twist bender to expand the spring and then pull.
6. For the inner spring, twist bender to contract the spring and then pull.


sum-900675.jpg

http://store.summitracing.com/partdetai ... toview=sku
otc-6515_w.jpg

http://store.summitracing.com/partdetai ... toview=sku

you don,t need to spend a huge sum but the very cheap ones are usually not a bargain

http://www.aeroquip.com/media/performan ... S006-E.PDF

http://www.hotrod.com/projectbuild/fbom ... aring.html

http://www.gre6.com/ansize

http://www.homedepot.com/webapp/wcs/sto ... =100647967

http://www.vansantent.com/hand_bender.htm

http://www.teamscss.com/Supercharger%20 ... ge%202.htm

http://www.precisionenginetech.com/tech ... us-part-1/


http://www.classictube.com/faqs.asp

http://www.harborfreight.com/cpi/ctaf/d ... mber=98612
read thru the links

http://www.classictrucks.com/tech/0501c ... index.html

http://www.hotrod.com/projectbuild/fbom ... index.html

http://www.classictrucks.com/tech/0708c ... _line.html

http://www.moparmusclemagazine.com/tech ... index.html
FLARING INFO LINK BELOW

viewtopic.php?f=55&t=1030&p=1973#p1973
 
Well, I finally got it done. couldn't get hold of one of the 180 degree ones locally, so ran with a 90 degree and something like prayer

Anyways, here's finished product

Fuel-Line.jpg


not especially pretty, but I finally got it. if I get everything running, once I find work, can spring for the 180 bender, cutter and flaring tool, and make up one that is prettier.
 
Well, I keep hoping I'm Jack-of-all-Trades, but can never be sure. I've enjoy photography, and have picked up a decent film SLR a while ago, then a year or so ago picked up a similar model digital, can interchange lenses. only thing I've been a bit lazy about was downsizing the images.
 
big and clear beats small and blurry any day!

BTW SUMMIT RACING sells a tubeing bender

Indycars said:
Here is an excellent tutorial on the use of the Imperial Tubing Bender 370-FH.

http://www.dualrudder.com/rv7/tube-bending

http://www.aircraft-tool.com/shop/detai ... T_ID=370FH


http://www.summitracing.com/parts/SUM-900156/

sum-900156_w.jpg


http://horsepowerperformance.com/c-7774 ... l-die.html

http://www.anplumbing.com/Hose+Ends/Swivel-Seal-16.html

the usual problems not the 3/8" or an 6 line size its that many common adapters and fuel line fittings REDUCE the flow and have inside diam. that are significantly under 3/8" ID

example, heres a 3/8" barb/3/8 NPT fuel line fitting
49505.jpg

inside diam. significantly less than 3/8" ID
heres a decent barb fitting that fits the 3/8 NPT threads but fits a 1/2 inside diam. fuel line
E9211-1.jpg


an #8 is a better bet at 550 plus hp, and the fittings are designed not to restrict flow
555-110072.jpg

BTW ALUMINUM, mild steel,and STAINLESS STEEL and even copper tubeing has been used for fuel lines, STAINLESS is by far the strongest and least likely to leak of all the hard fuel line materials IF ITS CORRECTLY FLARED, mild steel is a cheaper option, and when the correct fittings are used, with either they are a good choice, but its also harder to work with,than the synthetic fuel lines in some cases and more expensive, at times and HIGH PRESSURE HYDRAULIC LINES with a braided STAINLESS cover are reasonably popular ,because they are easily manufactured to custom lengths by your local hydraulic supply company, the down side of hard lines are that they transmit heat to the fuel easily, the plus is they are hard to cut and smaller in outside diam., for a given inside diam.

http://www.classictube.com/faqs.asp

sizing-fittingthread.gif


sizing-anthread.gif
 
I'll pitch in with some recent experience.
I know exactly what you're refering to with the cheaper bending tool shown in the top pics.
I've tried several bending tools that haven't broke the bank, and I've used the one shown above with best results.
The tubing tends to be pulled into the bender as you start the bending arm motion, resulting in kinked tubing, not clean bends.
I mount the straight arm of the bender in vise jaws. Insert the tubing, and setup to my bend marks. I then take a small 'C' clamp and clamp the tubing to the small tab that protrudes from the straight arm. This keeps the tubing from moving. I spray a little WD-40 on the tube and proceed with the bend. Works for me! :idea:
 
one question...why not go with a braided steel line and some nice AN fittings? overall it'll probably cost you the same if not less and most likely result in less fuel sheer.
 
Well, the main reason is in MY mind durability. the braided lines are rubber fuel line as a core. I've had too many rubber lines overheat, over pressure, split internally, and otherwise fail where the nice steel fuel line is never given a single problem. actually the ONLY points where the braided line seems superior to steel (especially since I'm NOT going for mad power, extreme maneuvering, or other insanities) is that it doesn't need the bending, and when you disconnect the fuel line its unlikely you'll maim the braided as beautifully as you can the steel. I can handle the headaches of bending, and I've learned care to not twist the line.
 
72novaproject POSTED THIS INFO

THE PROBLEM:
If your power levels and plumbing scheme require a larger fuel hard line than the typical 3/8” automotive steel line the next step up is to 1/2” lines. Much to my dismay, this also requires an entirely different approach to plumbing your car as the standard components for 3/8” lines are not available for 1/2” lines. You will also find that all of the fittings, supplies and tooling you once used are now worthless. As I researched what was needed to do this conversion, one of the things I discovered was that the 1/2” aluminum tubing is only available in coils. After working through the details of all the fittings and tooling required I could not find a reasonable way to straighten the tubing. Short of purchasing a very expensive machine, I read about a number of home grown approaches to this problem and tried a few of them much to my dissatisfaction.

I theorized a way to do this that is very simple and as it turns out it worked very well. I thought I might share this with you if for no other reason than to just throw another method into the mix. Results may vary so take it for what it’s worth. It appears it will work very well for me. I burned through an entire 25’ roll to come to this conclusion and it was worth it.

I only have finished pictures to share but this is not rocket science.

THEORY OF OPERATION:
I took what I have learned about the properties of metals and applied it to this problem. You see, all metal is to some extent of elastic. This means it will bend to a certain extent and return to its original shape with no deformity. Bend it past that point and it will take a set. I theorized that the tubing had taken a set as it was coiled at the factory and it merely needed to have those forces reversed to return it to a straight condition. The metal has a memory (it used to be straight) and you just have to help it remember. The following is the approach I took to solve this problem.

UNCOIL THE TUBING:
The coil is only bent in one direction or rather on one geometric plane. When you roll the tubing out onto a flat surface it is very easy to steer it slightly left and right. Imagine the path a caster on the front of a shopping cart makes. It wiggles slightly left and right as it generally travels straight. When you do this uncoiling the tubing, you bent it slightly on a very inconsistent second geometric plane with an entirely different and varying radius. These additional bends then also need to be straightened. This only complicates your efforts to straighten the tubing because it is now bent in ways it never was when you bought it. This can be avoided by clamping a 2” X 4” board down and rolling the tubing along the edge like a fence. This way you only affect the original plane of the coil which is the only place it is actually bent. After you uncoil it, make no attempt to further straighten the tubing at this time. After rolling it out on a flat surface, allow it to spring back to the shape it naturally wants to take.

MAKING YOUR FORM:
How much you roll out initially is up to you. I did around 5’. You will notice you now have a fairly consistent arc or radius. You will use this as a template for the radius of your form.

I used a 2” x 4” piece of lumber but a 2” X 6” might work better. Lay the piece of unrolled tubing on the lumber and make a pencil mark along its length. You should have an arc on the lumber identical to the piece of tubing you unrolled.

I screwed the lumber down to my saw horses so I could cut it. The arc is so gradual you can cut it with a typical carpenter’s circular saw. I used this as a pattern to form a fence so I can unroll the tubing directly on the form and guide the tubing straight as I unroll it all at the same time. This eliminates the entire step of unrolling it onto a flat surface. You will go directly from the coil to the form.

Simply unroll the tubing over the form keeping the form arc and the tubing arc on the same but opposite vertical plane. When it springs back from the form it will for the most part be very straight. Astonishingly straight was my observation after trying other methods. If not to your liking, use the form to make minor adjustments. The gradual radius of the form will not allow you to make any bends in the tubing that can’t be re-straightened with the same form.
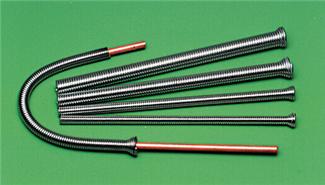
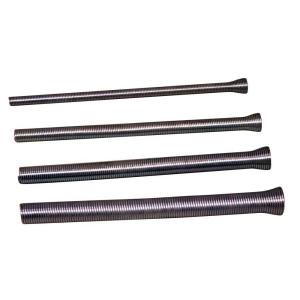
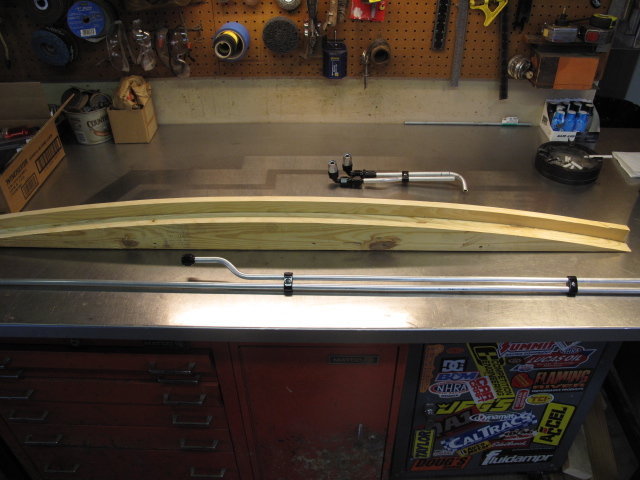
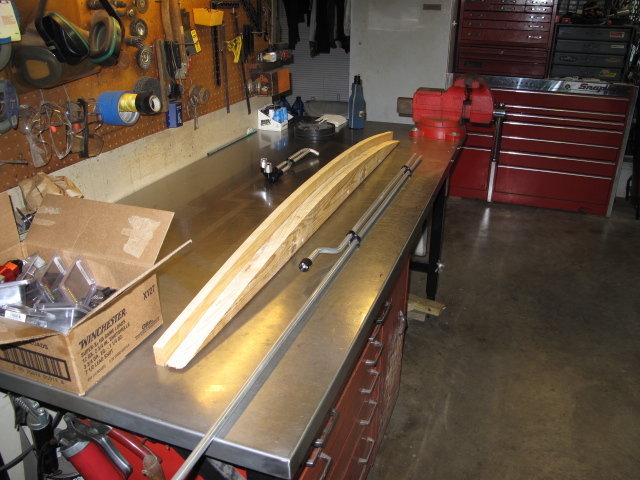

THE RESULTS:
The long piece you see in the photo is the original piece used to draw the radius and was then straightened on the form. The shorter piece was unrolled directly on the form. I should say that both of these pieces were done before I came up with the fence idea. I would expect that my next sections will be even straighter. I expect that any imperfections remaining in the pieces shown are due to the caster effect rather than variations in the original plane. Even at that, these pieces are plenty straight to be used on the car.

Good luck and I hope this helps,

Steve

398822732.jpg


398822734.jpg

398822736.jpg
 
Back
Top