Everyone knows the first answers when rust in a cylinder's compression area is mentioned but here I go..again... Cool is the Rule but when is bad really bad? one sometimes wonders.
Intro:
Garage.Grumpy Performance has been a most rewarding experience while hoping to gain information to help me re-build my wife's 2005 chevy OEM 3400 engine with 113K after head gasket failure. While OEM is obviously not your focus I have been burned out following some front-running forums.
G-search results seem to bring up many of the same tired links from pre 2010 and older. Sometimes the landed site will lose a piece of a useful and older bookmarked thread "photo(s) not found" that you previously found invaluable and wanted to refer back to. Sometimes links just go away. Using a time period modified search timeframe doesn't always help. I found Garage.GrumpysPerformance in a google search but it is not like 'G.GP' popped up everywhere I went. Yet I am here and that is what matters.
The Problem and Situation:
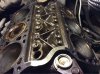
Back to the engine, problems are in the step-by-step plodding along after discovering pitting in cylinder six. Block is still in the van, the top half is out and in dry keeping. I have made a fully adjustable engine cradle and the engine-subframe will come out the bottom of the van and onto the homemade cradle. Job site is my carport.
The Block, still installed, has been covered with 6 mil plastic under towels and tended to with WD40 to keep it from rusting to include hand turning the crank and spraying the cylinder walls. Wish I had thought to flood the block with oil in addition to what's in the oil pan. I did several times pump oil through the oil pressure switch port to end up into the crankcase oil pan. Water jackets are inundated with dexcool's muck and rust.
The cylinder walls still have traces of the cross hatching and no ridge. I now have a recent purchase bore gauge but have not yet cylinder measured. This vehicle has been in my carport for nearly four years. Lots was going on and I simply could not get to the project.
Two years ago I had a local redneck who drag races look at the block because only in cylinder six, 1 1/4" down on the thrust side, is a thumbnail clipping size rust spot. Trace coolant sat in that cylinder for maybe a year, before I found it during heads removal. Only this spot has pitting to it where the other rust is rust staining, if that's the word for it. The drag racing guy said we should, upon bare block, free-hand light hone and re-ring the pistons and get me on my way. A second opinion from an engine supplier/former builder at the time told me they would do the same by what I described. Lastly, a popular race engine builder who I do not know and lives about 45 miles away refused to answer an email at the time. Maybe it was worded it wrong.
If you remember 1970s Harry Chapin's 'Taxi' where the interlude just leaves the song, this is how I exited my engine project, then was pulled into the imaginary Land of Learning. What to do with the cylinder rust pitting beyond my 2 year automotive vo-tech certificate plus 4 months machine shop? I have been taken to depths unknown to common man. In the fantasy land I have actually been beat up, robbed and left for dead by a roving gang of the jealous and those long on presumptions to include friends and family. I have been seduced by engine advice that was ludicrous. Reading Forum interchanges and interviews were more like watching episodes of 'Days of our Lives' whereby at the end of the melee you don't know what and who to believe; let alone who is the good guy and who is the bad guy. Don't even mention the brain-dead bimbo who starred the segment and wasted precious few minutes you and others spared for the cause at hand.
Tools - I have a fair start on basic precision measuring tools as well as several calibrated name-brand torque wrenches. I understand TTY bolts, gasketing, sealants and how to measure most of the engine. I have an engine hoist, jacks, jack stands, compressor, solvent and so on. Have the big thick factory shop manual but it only goes so far.
The Cylinder Heads were taken to a machine shop about 2 years ago to be worked, whatever that meant then. I did the disassembly keeping track of original parts orientation by cylinder number. Heads were shaved I don't know how much because of failing to measure beforehand but was told a number under .010" that I can't remember. The seats were one-angle 45 degree stone ground and about 3/32" for both intake and exhaust. Heads were cleaned. I bought new lifters and valves through the machine shop. I was charged a reasonable price that can be looked up but don't remember. The customer service was excellent.
To this day all the cylinder head parts sit "as is" indoors as I knew upon leaving the machine shop that things were not right considering the ground seats and.. the guides... the intake guides I checked hover around .002" but the exhaust are around .005" and yet both I's and E's passed machine shop muster. I tinkered with installed height which looked okay but with future seat re-working likely needed I gave that up. Need to purchase a thimble height gauge to get away from the vernier. Of course, new valve springs.
The Camshaft lobes look good, did not measure height. The original lifters are good I presume, their bores are smooth and without blemish . The vehicle ran fine - less almost unnoticeable misfire - before teardown with no check engine light but was running midway on the temp gauge. The infamous valve or piston noise this engine is known for would occur on engine cold start up.
The Upper and Lower intakes and Throttle Body were cleaned of gunk, dirt and carbon inside and out. All removed items in the teardown have been kept protected. Non-ethanol fuel in the tank had been drained twice over time but I added 5 gallons of new fuel to sit in the tank between drains.
Other Thoughts:
Theory & Knowledge - I have been studying aspects of rebuilds off and on since discovering my #6 cylinder pitting and have learned that I possess a highly efficient little engine made out of thin-wall casting that promises nothing but misery if I tend to its psychopathy any more than necessary. To this end I landed upon your website about two weeks ago and solicit your help. if anything goes wrong which it shouldn't then it is MY fault and mine alone. Perhaps that is why the pros like to avoid the part-time, often clueless and stubborn but passionate enthusiast who has a point of view on standards and or procedure, mechanically speaking, that is wholly incorrect.
Machining - The local, and only, automotive machine shop near me is a few highly likable guys that I don't have the guts to ask higher standards of.. Older equipment which, is okay, but maybe a "close-enough is good enough" workplace. I have worked in places like that.. produced some of my best memories but precision measurement tolerances are another thing these days. Then it is to the yellow pages, you know the position well.
Affordability - I don't have the money to do it right and the OEM is a piece of non-investment garbage anyway that I am trying to nurse back to some sort of normal aspiration one day. A short block doesn't exist and I can't afford a crate motor. I don't want to machine, pay parts, and balance the crank on the aforementioned as it is not worth it, has unknowns, and may not be truly needed. But, if it means anything even minimally, there is enough time into this engine to now be committed to finishing it.
Work Plan - 1.) get the block out of the vehicle 2.) finish the heads IF the block is deemed good enough 3.) continue to measure parts and clearances 4.) continue knowledge base 5.) purchase parts; assemble; re-measure; re-assemble 6.) install. It is getting cold here, that will slow things down. This may all take weeks or several months.
Blueprint Wobble - I know it is asking to deviate by asking for an inaccurate spec build which also skirts horsepower, proper combustion, applied knowledge, proper technique and longevity. Yet this may quite represent the type of problem that a well-intended guy with his plight faces these days. It comes down to hit or miss
high maintenance modern-day engines that gang bang us unaware and send our vehicles to the used car lot, the junk yard, or to underneath the tree in the front- or backyard. Also, I have seen guys use roloc discs on intake manifold jobs while repairing customer vehicles. We know how that free-flowing fiber works out so sometimes trusting others less experienced can have its own problems after something is inadvertently ill-repaired.
Pictures as needed can be provided, need to first download optimizer app. I tried to lay it all out there, would like to get this rig to run. What to do in the apparent absence of other choices. Thank you.
Intro:
Garage.Grumpy Performance has been a most rewarding experience while hoping to gain information to help me re-build my wife's 2005 chevy OEM 3400 engine with 113K after head gasket failure. While OEM is obviously not your focus I have been burned out following some front-running forums.
G-search results seem to bring up many of the same tired links from pre 2010 and older. Sometimes the landed site will lose a piece of a useful and older bookmarked thread "photo(s) not found" that you previously found invaluable and wanted to refer back to. Sometimes links just go away. Using a time period modified search timeframe doesn't always help. I found Garage.GrumpysPerformance in a google search but it is not like 'G.GP' popped up everywhere I went. Yet I am here and that is what matters.
The Problem and Situation:
Back to the engine, problems are in the step-by-step plodding along after discovering pitting in cylinder six. Block is still in the van, the top half is out and in dry keeping. I have made a fully adjustable engine cradle and the engine-subframe will come out the bottom of the van and onto the homemade cradle. Job site is my carport.
The Block, still installed, has been covered with 6 mil plastic under towels and tended to with WD40 to keep it from rusting to include hand turning the crank and spraying the cylinder walls. Wish I had thought to flood the block with oil in addition to what's in the oil pan. I did several times pump oil through the oil pressure switch port to end up into the crankcase oil pan. Water jackets are inundated with dexcool's muck and rust.
The cylinder walls still have traces of the cross hatching and no ridge. I now have a recent purchase bore gauge but have not yet cylinder measured. This vehicle has been in my carport for nearly four years. Lots was going on and I simply could not get to the project.
Two years ago I had a local redneck who drag races look at the block because only in cylinder six, 1 1/4" down on the thrust side, is a thumbnail clipping size rust spot. Trace coolant sat in that cylinder for maybe a year, before I found it during heads removal. Only this spot has pitting to it where the other rust is rust staining, if that's the word for it. The drag racing guy said we should, upon bare block, free-hand light hone and re-ring the pistons and get me on my way. A second opinion from an engine supplier/former builder at the time told me they would do the same by what I described. Lastly, a popular race engine builder who I do not know and lives about 45 miles away refused to answer an email at the time. Maybe it was worded it wrong.
If you remember 1970s Harry Chapin's 'Taxi' where the interlude just leaves the song, this is how I exited my engine project, then was pulled into the imaginary Land of Learning. What to do with the cylinder rust pitting beyond my 2 year automotive vo-tech certificate plus 4 months machine shop? I have been taken to depths unknown to common man. In the fantasy land I have actually been beat up, robbed and left for dead by a roving gang of the jealous and those long on presumptions to include friends and family. I have been seduced by engine advice that was ludicrous. Reading Forum interchanges and interviews were more like watching episodes of 'Days of our Lives' whereby at the end of the melee you don't know what and who to believe; let alone who is the good guy and who is the bad guy. Don't even mention the brain-dead bimbo who starred the segment and wasted precious few minutes you and others spared for the cause at hand.
Tools - I have a fair start on basic precision measuring tools as well as several calibrated name-brand torque wrenches. I understand TTY bolts, gasketing, sealants and how to measure most of the engine. I have an engine hoist, jacks, jack stands, compressor, solvent and so on. Have the big thick factory shop manual but it only goes so far.
The Cylinder Heads were taken to a machine shop about 2 years ago to be worked, whatever that meant then. I did the disassembly keeping track of original parts orientation by cylinder number. Heads were shaved I don't know how much because of failing to measure beforehand but was told a number under .010" that I can't remember. The seats were one-angle 45 degree stone ground and about 3/32" for both intake and exhaust. Heads were cleaned. I bought new lifters and valves through the machine shop. I was charged a reasonable price that can be looked up but don't remember. The customer service was excellent.
To this day all the cylinder head parts sit "as is" indoors as I knew upon leaving the machine shop that things were not right considering the ground seats and.. the guides... the intake guides I checked hover around .002" but the exhaust are around .005" and yet both I's and E's passed machine shop muster. I tinkered with installed height which looked okay but with future seat re-working likely needed I gave that up. Need to purchase a thimble height gauge to get away from the vernier. Of course, new valve springs.
The Camshaft lobes look good, did not measure height. The original lifters are good I presume, their bores are smooth and without blemish . The vehicle ran fine - less almost unnoticeable misfire - before teardown with no check engine light but was running midway on the temp gauge. The infamous valve or piston noise this engine is known for would occur on engine cold start up.
The Upper and Lower intakes and Throttle Body were cleaned of gunk, dirt and carbon inside and out. All removed items in the teardown have been kept protected. Non-ethanol fuel in the tank had been drained twice over time but I added 5 gallons of new fuel to sit in the tank between drains.
Other Thoughts:
Theory & Knowledge - I have been studying aspects of rebuilds off and on since discovering my #6 cylinder pitting and have learned that I possess a highly efficient little engine made out of thin-wall casting that promises nothing but misery if I tend to its psychopathy any more than necessary. To this end I landed upon your website about two weeks ago and solicit your help. if anything goes wrong which it shouldn't then it is MY fault and mine alone. Perhaps that is why the pros like to avoid the part-time, often clueless and stubborn but passionate enthusiast who has a point of view on standards and or procedure, mechanically speaking, that is wholly incorrect.
Machining - The local, and only, automotive machine shop near me is a few highly likable guys that I don't have the guts to ask higher standards of.. Older equipment which, is okay, but maybe a "close-enough is good enough" workplace. I have worked in places like that.. produced some of my best memories but precision measurement tolerances are another thing these days. Then it is to the yellow pages, you know the position well.
Affordability - I don't have the money to do it right and the OEM is a piece of non-investment garbage anyway that I am trying to nurse back to some sort of normal aspiration one day. A short block doesn't exist and I can't afford a crate motor. I don't want to machine, pay parts, and balance the crank on the aforementioned as it is not worth it, has unknowns, and may not be truly needed. But, if it means anything even minimally, there is enough time into this engine to now be committed to finishing it.
Work Plan - 1.) get the block out of the vehicle 2.) finish the heads IF the block is deemed good enough 3.) continue to measure parts and clearances 4.) continue knowledge base 5.) purchase parts; assemble; re-measure; re-assemble 6.) install. It is getting cold here, that will slow things down. This may all take weeks or several months.
Blueprint Wobble - I know it is asking to deviate by asking for an inaccurate spec build which also skirts horsepower, proper combustion, applied knowledge, proper technique and longevity. Yet this may quite represent the type of problem that a well-intended guy with his plight faces these days. It comes down to hit or miss
high maintenance modern-day engines that gang bang us unaware and send our vehicles to the used car lot, the junk yard, or to underneath the tree in the front- or backyard. Also, I have seen guys use roloc discs on intake manifold jobs while repairing customer vehicles. We know how that free-flowing fiber works out so sometimes trusting others less experienced can have its own problems after something is inadvertently ill-repaired.
Pictures as needed can be provided, need to first download optimizer app. I tried to lay it all out there, would like to get this rig to run. What to do in the apparent absence of other choices. Thank you.