Idle Air Control Cleaning
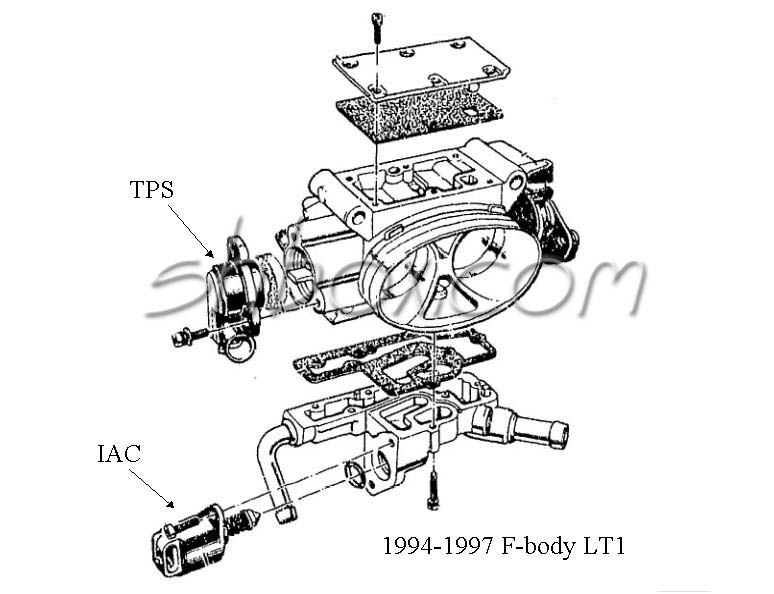
You can remove the IAC and service it., and it won,t be a bad idea to remove and clean the throttle body from the intake plenum, by removing the 4 retaining bolts and the throttle body throttle connections, from the drivers side (carefully inspect the connector clips on the linkage so you know how they reconnect later) and use some spray throttle body cleaner to remove crud from its inner and outer surfaces while your at it, just be sure the electrical sensors like the TPS and IAC are removed from the throttle body casting FIRST, to prevent damage.. naturally you'll need a new intake gasket in most cases because theres a strong tendency for the gasket to be damaged during removal.
btw you can spray both sides of the throttle body gasket with a silicone spray if you want future throttle body removal to be a bit easier.
Remove the electrical connector from the IAC. Unscrew the IAC unit from the throttle body.
You can gently rock the pindle back and forth and allow the spring to extend it until it comes apart in your hands. Clean everything with lint-free cloths and a mild solvent. Harsh solvents can affect the insulation of the stepper motor coils. It's generally the dirt and buildup on this worm shaft that causes sluggish IAC operation.
When the worm gear on the pindle shaft is clean and dry, apply one drop of clean light oil to the shaft and work the pindle back into the rack gears of the motor by the same rocking motion. It takes a while to get the pindle back into the worm gears, but you'll get it. It is important to get the pindle fully retracted into the housing so that the pindle is not forced against the gears when reinstalling the IAC unit in the throttle body.
While the IAC is out, clean the air passages in the throttle body. The orifice in the TB where the IAC resides is the seat that the IAC valve closes against, and it can accumulate a lot of carbon, dirt, and debris. The easy way to do this is with carburetor cleaner and a small stiff brush.
When everything is clean and dry, replace the gasket if it is damaged, apply a little anti-seize to the threads, and torque the IAC to the proper specs. (13 ft/lb for '85-'89 , 30 in/lb for 1990-on.) Proceed with setting the TPS and minimum air position.
youll find a hour or so reading thru the links and sub links will provide a great wealth of related info and incite into related factors, or the function or testing of sensors, that you may not currently be thinking about, or things that you might not think that are related to your issue that PROBABLY ARE
http://www.corvetteactioncenter.com/kb/ ... dy+Diagram
http://www.corvetteactioncenter.com/kb/ ... Idle+Speed
viewtopic.php?f=32&t=6550&p=20807&hilit=high+idle#p20807
IAC and TPS Adjustment
Tom Keliher Mar 31 2006 - 4:07pm
Idle Air Control
Tools needed:
1. Torx bit # T-20
2. Paper Clip
3. Small Punch
Take the paper clip and open it up and form it into a big "U" shape. Insert the clip ends into the ALDL in the 'A' and 'B' pins.
Turn on the ignition, but don't start the engine. Wait 30 seconds. Now, go remove the connector from the IAC.
Start engine. You are now going to adjust "minimum air". There is a Torx screw on the side of the throttle body. This is what needs to be turned to adjust minimum air, or more commonly known as "idle speed". It comes from the factory with a protective metal cap over it. If the cap is still there, use a small punch to knock it out. Set the idle speed to 450 rpm, rotating the Torx screw clockwise to raise rpm, and counter-clockwise to lower rpm. Once the idle rpm is set, turn off the engine.
Re-connect the connector onto the IAC. Start engine. Idle speed is now once again governed by the ECM, but your idle should be smooth and steady, approximately 600 rpm in Drive (for unmodified cars).
If you set an SES light by having the IAC disconnected, then after shutting down the engine disconnect the negative battery terminal. Wait 5 minutes. This will clear the ECM of all trouble codes. Re-connect the battery and drive the car for 20 minutes to allow the ECM to relearn your driving style.
Throttle Position Switch (TPS)
Tools needed:
1. Digital Volt-Ohm-Meter (VOM)
2. Jumper Wires (make your own)
3. Auto Xray Scanner (if available) will eliminate the need for VOM and jumper wires.
Turn on ignition, but don't start the engine.
With a scanner: plug in the scanner and read the TPS voltage. It should be 0.54Volts +/- 0.075Volts
With VOM and jumper wires: disconnect the connector from the TPS. Using your jumper wires, make a connection allowing some room for the VOM terminals to contact the jumper leads and read the TPS voltage.
If out of spec, loosen the two screws holding the TPS to the throttle body, and slightly rotate the TPS up or down, reading the voltage until it comes into specification. Tighten screws. Using the throttle lever, rotate the throttle to WOT (wide open throttle). The TPS voltage should be over 4.0 volts. Close the throttle again, and then slowly open it to WOT, observing the voltage reading. It should increase progressively and in a linear fashion. If it sticks or jumps or falls off at all while doing this check, that could mean a bad TPS switch and could be a cause of stumbling and driveability problems.
After setting the correct voltage, turn off ignition switch. Remove jumpers/scanner and reconnect the TPS connector as required.