Clunk, clunk, clunk, clunk, start problem....

JimmyDuncan

Well-Known Member
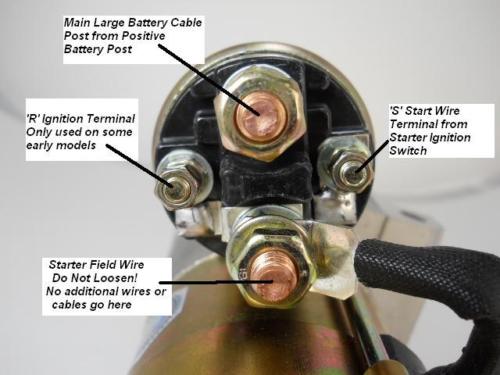
I have a problem with starting that has gotten worse lately... o_O

It usually takes between 3-10 clunk not crank attempts before the starter will crank and then Frank the tank will start.... For a while I was also struggling with hard start when cold, but a guy who came over to buy the old Holden HQ Statesman off me the other day, showed me how "pumping the bejesus out of it!" fixed that... :) Apparently I need to do a carb rebuild.. (or replace it, as is the plan :) )

Anyway... it now starts fairly easily when it cranks, but, what is the likely cause of clunk, clunk, clunk, start?

I have done some research and learnt about voltage drop tests... I did a few tests earlier, but my helper left and I figured out I was not really following a good step by step plan....:rolleyes:

What is the recommended step by step testing plan?

Am I on track that it is a possible wiring or ground issue...? and that a voltage drop test will lead me to the issue.
 
sure sounds like either the starters well worn, maybe the bendix gears not engauging correctly, and possibly on its way out due to miss alignment or wear issues,or the ring gear on the flex plates either worm down or possibly missing a few gear teeth, in any case, putting the car up on a lift or sturdy jack stands , so none of the tires spinning will cause safety issues and doing a close inspection , from under the car, while someone else starts the car might be rather informative in diagnosing the issue.
dealing in proven facts as to whats going on or in this case not going on ,as it was designed too do, beats guessing,as to whats wrong, so the inspection is nearly mandatory
ID also remove ,clean carefully and reconnect both ends of the battery feed and chassis ground cable connections

510SH.jpg

http://garage.grumpysperformance.com/index.php?threads/mini-starters-and-started-related-info.458/

BTW I can,t think of many tools I use as often as the 6 12 ton jack stands, in my shop, and my mechanics creeper and yes I own a car lift, and I use it when its too my advantage, but its generally easier too work laying down on your back, if your working under the car, on something like a starter or clutch,especially if you have an assistant to hand you tools, that actually knows the difference in what the tools look like ,between the tools you ask for!

http://garage.grumpysperformance.com/index.php?threads/under-car-safety.26/

http://garage.grumpysperformance.com/index.php?threads/mechanics-creepers.3178/#post-38649
test the battery and alternator connections and voltage while your trouble shooting
http://garage.grumpysperformance.com/index.php?threads/battery-or-alternator.10003/#post-38749

vettejack1.jpg


hbc.jpg
 
Last edited:
sure sounds like either the starters well worn, maybe the bendix gears not engauging correctly, and possibly on its way out due to miss alignment or wear issues,or the ring gear on the flex plates either worm down or possibly missing a few gear teeth, in any case, putting the car up on a lift or sturdy jack stands , so none of the tires spinning will cause safety issues and doing a close inspection , from under the car, while someone else starts the car might be rather informative in diagnosing the issue.
dealing in proven facts as to whats going on or in this case not going on ,as it was designed too do, beats guessing,as to whats wrong, so the inspection is nearly mandatory
ID also remove ,clean carefully and reconnect both ends of the battery feed and chassis ground cable connections

http://garage.grumpysperformance.com/index.php?threads/mini-starters-and-started-related-info.458/

BTW I can,t think of many tools I use as often as the 6 12 ton jack stands, in my shop, and my mechanics creeper and yes I own a car lift, and I use it when its too my advantage, but its generally easier too work laying down on your back, if your working under the car, on something like a starter or clutch,especially if you have an assistant to hand you tools, that actually knows the difference in what the tools look like ,between the tools you ask for!

http://garage.grumpysperformance.com/index.php?threads/under-car-safety.26/

http://garage.grumpysperformance.com/index.php?threads/mechanics-creepers.3178/#post-38649
test the battery and alternator connections and voltage while your trouble shooting
http://garage.grumpysperformance.com/index.php?threads/battery-or-alternator.10003/#post-38749

vettejack1.jpg


hbc.jpg
Ok, thanks. I'll do some more inspecting... I'll try to get a look at what is actually going on down there, when it clunks..

I have had the starter off, thinking I'd try fitting the one that came with the 350 I'm rebuilding.. It was a different bolt pattern.. (offset vs inline? the tired 307 has a short and a long bolt, the 350 has two long bolts..) so I put it back on hoping it would magically work better.... It didn't.... The clunk is the solenoid engaging I think.. I'll do some more voltage drop testing to ensure its not something there, as that requires no dismantling...

From memory, I had a voltage drop of 0.06..? I"ll re-check.. on the positive side from positive battery stud to positive stud on starter... I found a step by step instruction for test the starter circuit (see below) that I'll try following tonight...

Today we are going to discuss how and why to perform a voltage drop test. Hopefully you've taken the time to read our Automotive Circuit Testing article and are familiar with the basics when it comes to testing automotive electronics. We're about to take it a step further and explain the benefits of checking voltage drop across component connections, connectors and terminals.

Believe it or not, it's possible to check a power supply circuit for voltage and show a good reading of 12 volts, but still have a faulty circuit. You could check that same line for resistance and show an acceptable reading of .2 ohms, and again still have a faulty circuit. Talk about throwing a wrench into the works! How can that be you may be asking yourself. Well, there are a few circuit problems that can contribute to this testing concern. A chaffed line that only has a couple of strands of wire will pass a continuity test, but certainly won't be capable of carrying any real current. Poor connections, loose crimps and corrosion issues may also test out fine on a typical voltage or resistance check, but when a load is turned on and current is needed across these circuits they likely won't perform as expected. Any increase in circuit resistance, even a very small one, is going to create problems. This is where a voltage drop test is used to pinpoint the source of the concern.
Voltage drop tests are most effective with high amperage circuits, and are often used when diagnosing the starting and charging systems in automobiles. As such we will cover testing both systems in today's article. A voltage drop test is done on a "live" circuit, meaning that you must create a load in the circuit while taking your readings. Voltage will always follow the path of least resistance. A circuits wiring and connections should have next to no resistance and as such, all voltage should be used through the load. The "load" is the component using the power, such as a light, starter or blower motor. If a circuit has excessive resistance, it prevents the wire from carrying sufficient current under high load conditions.

When you place your meter "across", or in parallel with the circuit you are testing, you are providing another path for the voltage to travel. If there is excessive resistance then your meter becomes "the path of least resistance" and you will register a voltage reading. If the circuit is functioning properly all voltage will pass directly to the load and your meter will register an acceptable reading. "Acceptable" for most circuits is less than .4 volts, although .1 volts or less is preferred. Some starter circuits can allow up to .6 volts during a voltage drop test. Anything higher than these values indicates a need for repair. Repair usually includes cleaning corrosion from connections, repairing faulty terminal crimps or tightening fasteners and connectors. It is also possible that the wire gauge is inadequate for the size of the load. In this instance a "heavier" or thicker wire is needed.

So that covers the basic theory behind a voltage drop test. Now let's apply this knowledge to a couple of practical applications so we can get a better idea of where to place our test leads and how to approach a complete system. Let's start with a basic starting system. To test this system you'll need to check for excessive resistance throughout the circuit by measuring voltage drop at the battery, cable connections and starter. These readings will need to be taken while the engine is being cranked. Cranking time of around 5 seconds should be adequate for solid test results. Always remember to disable the engine so it will not start while doing these tests. If your vehicle has an inertia or fuel shut-off switch you can trip this. You could also disconnect the coil or ignition circuits or remove the fuel pump or computer relays. So let's get started.

Place your DVOM (Digital Volt Ohm Meter) on the 20 volt scale. First check battery voltage by placing your meter's positive lead on the battery's positive post ( the actual post, not the clamp) and the negative lead on the negative post. We need a minimum of 12 volts to continue testing. Next, leave your meter connected and take a reading while the engine is cranking. Record this voltage reading. Now connect your postive lead to the battery terminal stud on the starter and the negative lead to the starter housing. Again, crank the engine and record the voltage reading. If the voltage reading at the starter is not within 1 volt of battery voltage then we have excessive voltage drop in the starter circuit. We will isolate the cause by testing out the individual parts of the circuit. To check for voltage drop we can turn our meter to the 2 volt scale, or leave it set on auto if your meter is so equipped. We can check total voltage drop in the starter circuit by connecting our positive meter lead to the positive battery post and the negative lead to the battery terminal stud on the starter and read the voltage while cranking the engine. Anything over .6 volts is an excessive voltage drop and can be isolated using the following steps.

First, check battery post to cable connection: positive meter lead on battery positive post, negaitve lead on battery's positive cable clamp. Crank the engine and note the reading. A good connection should have zero voltage drop. Second, check the positive cable: positive meter lead on positive battery clamp, negative lead on starter terminal connector. A good cable will show a voltage drop of .2 volts or less while cranking. Third, check the starter connection: positive meter lead on positive battery terminal on the solenoid, negative meter lead on actual starter stud. A good connection will have a voltage drop of near zero volts. Now to check the negative side of the circuit. Total drop on the ground side should be .3 volts or less and can be checked by placing positive meter lead on starter housing and negative meter lead on battery ground post. Take your reading while cranking the engine, and be sure your connection at the starter is solid and clean. If total voltage drop on this side of the circuit is excessive, complete testing at all connections in the same fashion as the positive side of the circuit. Check the following: between battery post and clamp (zero voltage drop), cable end at battery to cable end at engine. (.2 volts or less), cable end at engine to engine itself (near zero voltage drop), and finally between starter housing and engine block (.1 volts or less). And that wraps up the starter circuit checks last move onto the charging circuit tests. So let's get started!

First check the entire positive side of the charging circuit for excessive voltage drop. Hook your meter's positive lead to the alternator output stud and your negative lead to battery positive post. Run engine at 2,000 RPM with all lights, blower motor, radio etc. on and check voltage reading on meter. Leave the rear defroster off during this check as it may create a unusually high read. An acceptable reading is .5 volts or less. If you have an out of spec. voltage drop, check connections at alternator and battery as well as for an use of undersized cable. Check the negative side for the charging circuit the same as the positive with your meter's negative lead on the alternator case, or ground strap if equipped, and the positive lead on the battery negative post. Voltage drop on this side of the circuit should be .2 volts or less. If it's not you know what to check and how to check it!

And that wraps up our voltage drop article. I hope you have found some useful information. This is the kind of info that can save you on those hard ones. Ones that you test by the book and everything passes, yet you know there's something wrong! Good luck and enjoy the day!


After that, I might try switching out the solenoid from the other starter to the one that's playing up....?
 
Update: So I charged the battery over night and the starter didn't clunk once in about 5-6 turns of the key.... I was just testing for voltage drop, so I didn't persist to see if the clunk would return..

This leads me to believe that it's either the battery being a bit tired or just flat, is the problem and/or resistance in the starting circuit...

I tested for voltage while cranking at the battery and at the starter and got a difference of about 1 volt... When cranking, at the battery it was 9.9 (which seems low and may be indicating that the battery is on its way out?) and when cranking at the starter I got 8.9...

I'm not really surprised that charging the battery helped, as it has been getting a thrashing with the hard cold start lately... with only shorter drives in between... So, my next plan is to pull and clean up all connections.. See how that goes.. If that doesn't help I might go get a battery health check at a local shop.. maybe look at a new positive battery lead (it showed about .6 drop last night I think).

Any thoughts from those with electrical expertise?
 
http://garage.grumpysperformance.com/index.php?threads/battery-or-alternator.10003/#post-38749

http://garage.grumpysperformance.co...uys-don-t-look-at-the-clues.11176/#post-50124

http://custombatterycables.com/product_info.htm
having heavy gauge COPPER battery and ground connection cables with the correct ends, and a 140 amp-to-200 amp alternator goes a long way towards
reducing potential battery and starter related issues


that sure sounds like the batterys on its way out or the alternators not charging, get out the multi-meter and check the voltage after it starts and runs vs before it starts , read the links
 
Last edited:
I cleaned up some of the connections, which didn't make any difference...

The battery is getting tested today, so that will hopefully rule that out.

A friend of mine suggested a relay in the starter circuit. The connection between the ignition and the starter is a fairly long run of wire that passes through the neutral safety switch along the way and the old wire may not be up to the task anymore...? Sounds like options are a relay to give full power to the starter or maybe replace the wire with new thicker gauge? Sounds like the relay install is a fairly common modification?

I saw a few threads related to using a Ford style solenoid as the relay?

http://chevellestuff.net/tech/ford_solenoid.htm

http://www.summitracing.com/parts/sum-g1750/overview/

Anyone know about this?

Any thoughts on the pros and cons of a relay to the starter?
 
Last edited:
I'm feeling proud :D and annoyed o_O......

Proud..... because I managed to identify the cause and fix the problem with the starter! It hasn't made the clunk no start, once in the last few drives (and each time I try a few test starts just to test it further).

Annoyed..... because I didn't use any of the bits that I bought to fix the problem....... I've got some nice new lengths of wire, a new length of battery cable and a remote starter solenoid.... none were required.. :(

I had decided based on my research that the issue was old wiring leading to insufficient voltage getting to the starter...The go to solution it seems is to wire in a relay or a Ford remote starter solenoid.

After buying the bits required, but before going ahead with the fix, I found two links that described the solution to the exact problem I was experiencing on a boating forum.....:rolleyes:

http://www.moyermarine.com/forums/showthread.php?t=1913

kelly said:
Common solenoid/starter problem solution
Many threads here detail problems involving either the solenoid or the starter- or both. I recently worked through one of my own (with my father-in-law, the best one could hope for) and wanted to share the troubleshooting and solution with everyone.

Symptoms: very often in starting the engine (almost every time), pushing on the starter button would result in a loud click but no running of the starter motor. After one, two or three (or more) pushes on the starter button, and with a loud click every time, the starter motor would eventually turn and the engine would start. These symptoms did not depend on engine temperature and could manifest themselves at any time of the day. I never had a "no start" situation but when ever I would get the click and no starter motor, my heart would skip three beats.

After checking the carbon brushes in the starter motor and cleaning all accessible connections (the starter motor ran like a champ on the bench and the solenoid never hesitated in sliding its piston back and pushing the starter gear forward) the condition remained the same once re-installed on the engine.

Engine check: we rigged a 12V lamp between the two large terminals on the back of the solenoid and tried starting the engine. Bingo! When we heard the loud click and didn't get the starter motor running, the lamp was not shining: no 12V current was arriving at the starter despite all indications that the solenoid was functioning correctly.

Solution: we took apart the back of the solenoid (see photos) to find that the heads of the large copper bolts were worn and that the large washer that is pushed-up against the two bolts in order to close the circuit was corroded. We rotated the bolts in their housings to expose fresh metal and cleaned-up the washer. Everything looked good but after further testing, the problem remained!!

Final solution: it turns out that the washer was only making occasional contact with the bolt heads despite our efforts. A second intervention involved placing fiber washers under the heads of the two large bolts (one washer each) to move them closer to the connecting washer. In this way, the contact is assured despite tiring springs and worn bolt heads.

In the first photo you can clearly see one of the larger copper bolts. The washer was placed where you can see the thin copper washer sitting over the square portion of the bolt. The same was done for the second large bolt, visible in the solenoid casing in the second photo.

You can also clearly see the large, corroded washer mounted between two springs on the central axis. This is what is pushed up towards the copper bolts when you press the starter button (or turn the key) in order to allow the full 12V coming from the batteries to reach the starter motor.

The piece I am holding between my fingers doesn't seem to be used in most of our A4 configurations while the hard-wired bolt directly opposite is the "S" post on the back of the solenoid.

Hopefully this explanation will be of some use to others with similar disquieting symptoms.

Kelly
attachment.php


http://www.moyermarine.com/forums/showthread.php?t=4156
"jacques debauche" said:
After replacing my starter solenoid, I did a post mortem on the old one. The solenoid had occasionally been failing to connect the primary starter circuit which suggested worn or corroded contacts. In the "before" picture you can see a ring of corrosion on the circular metal washer which is pushed up against the copper terminals to make the main starter connection. Why Delco chose to save pennies by using a plated steel washer in this application is a mystery. There are small areas of deposits on the two copper contacts as well. These deposits are just enough to occasionally prevent electrical contact.

Rejuvenation is easy. To open the contact chamber you will have to remove the two 5/16" head screws and the 9/16" hex nut on the starter connection, but not the nut to which the battery was connected. You can then lift core with its the washer and little spring from the solenoid coil. Don't bother trying to clean up the washer - just remove the D-clip and flip the washer over. Remove the deposits from the copper contacts with a file or Dremel. It should now look like the "after" picture. Reassemble, and reinstall on the starter or set aside as a spare.

attachment.php
attachment.php


The issue was some corrosion and wear on the contacts inside the solenoid... I removed the starter, removed the solenoid from the starter, opened it up, cleaned the contacts, flipped the contact washer so the non-worn side was now making contact, greased anything needing it in the solenoid and starter and put it all back together.... bench tested the starter to make sure I had in fact fixed rather then wrecked the starter, then reinstalled it in Frank the Tank....

No more clunk, clunk, start issues! happy days. :D[/quote]
 
Last edited by a moderator:
thank you for the nice write up, that may prove helpful to some members
 
Don't be annoyed, you are building inventory that can be used later to fix a problem. And
you won't even have to make a trip to the local auto supply !!!
 
Back
Top