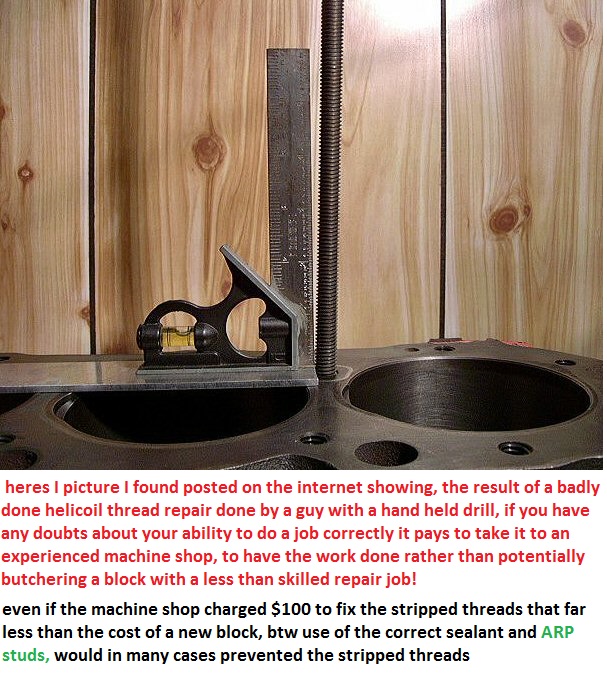
step one, most crank bolt threads strip when guys try to use the damper bolt to pull the damper onto the crank snout, thats NOT the correct way to do it, theres a TOOL designed to do it correctly,and you should own one and use it.
READ THIS THREAD
viewtopic.php?f=53&t=83&p=106&hilit=beat+damper+hammer#p106
http://www.jegs.com/i/JEGS-Performance- ... 1/10002/-1
when you use the cranks damper,locking bolt theres frequently not enough threads engauged and the threads tend to strip under the stress.
head bolts that show any thread damage should be replaced,
and be aware that NEW ARP studs put far less sress on threads,and are potentially stronger, than using bolts to secure heads to the block
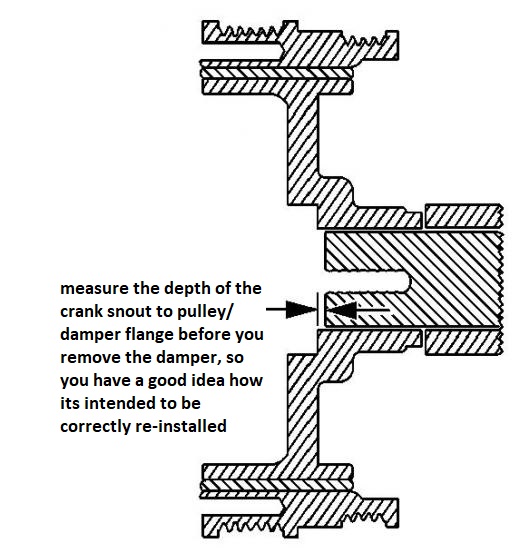
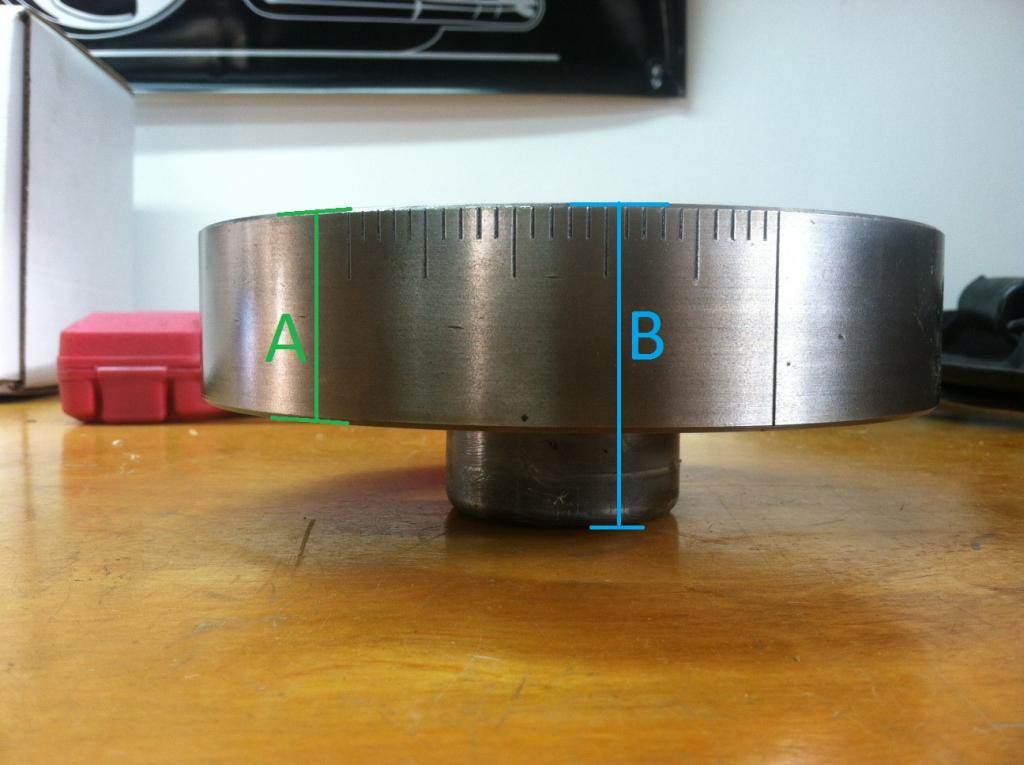
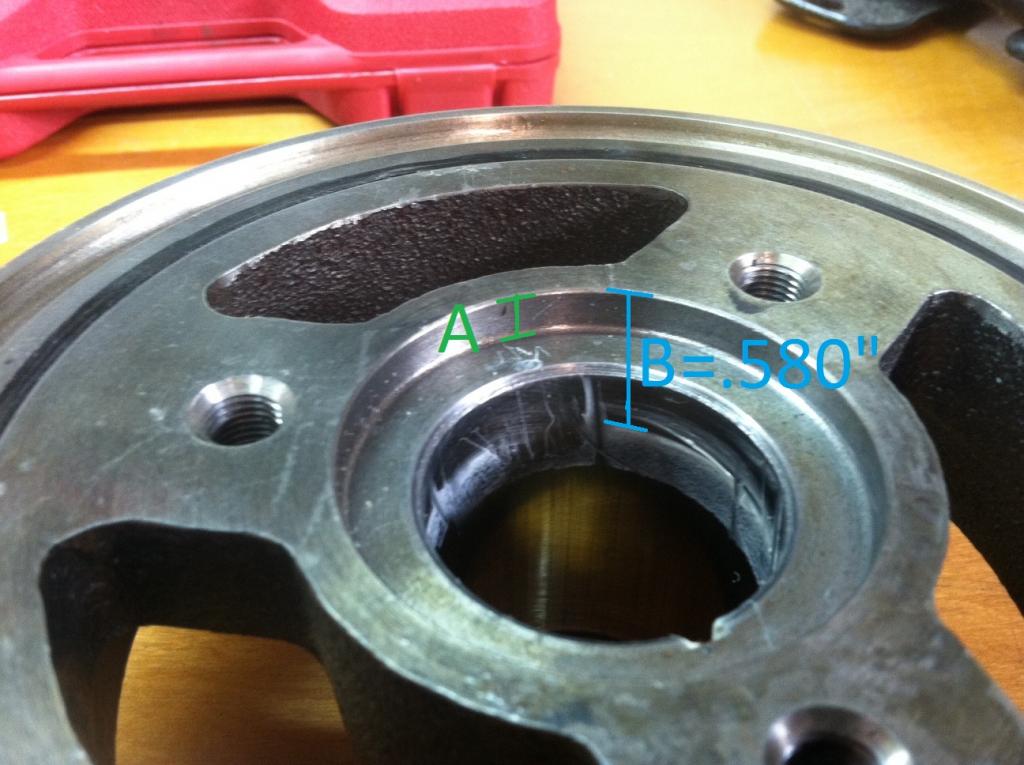
obviously you will need to be measuring the distance from the front surface on the damper that the damper retaining washer bears against ,and
the true total depth of the threaded hole in the crank snout
http://www.harborfreight.com/cpi/ctaf/d ... mber=98851
thats why every engine assembler has tools like this, for getting quick checks , done on clearances etc.
if the bolts significantly shorter than that length then its obvious that the threads on the bolt were not fully engaged with the cranks inner snout threads
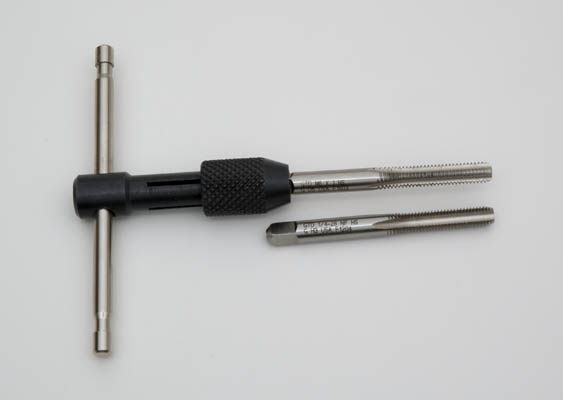
doing the repair by redrilling and re-tapping the crank snout with a larger thread size is fairly easy, but getting access to the crank with the engine still in the car /truck can be rather dificult and time consuming.
If you can remove the radiator and supprt and possiably the grill and get room its no big deal but its very common to have a huge problem getting enough clearance to work.
Having access to the correct tools helps
example
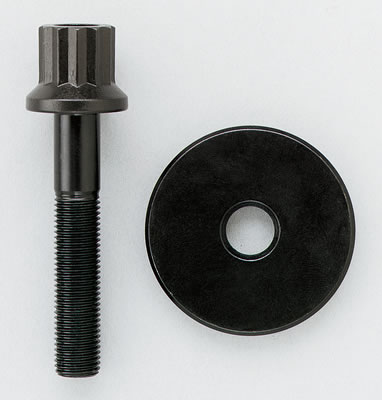
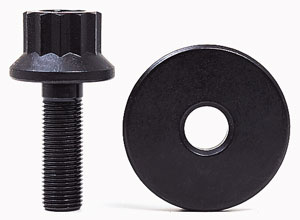
if your current crank bolt is an ARP bolt, heres the dimensions,
keep in mind a bolt threaded in steel should have 1.5 times its diam. MINIMUM in the threads before the bolt starts to draw or tighten or clamp and TWICE its diam. in the threads is better as a minimum to prevent stripped threads, and remember the bolt should never be allowed to bottom out in the crank snout threads and tighten against the bottom of the drilled hole either
Summit Racing Part Number ARP-134-2501
Thread Size 7/16-20 RH in.
Underhead Length (in) 2.470 in.
Head Style 12-point
Washer Included Yes
Fastener Yield Strength (psi) 200,000 psi
Fastener Material Chromemoly
Fastener Finish Black oxide
Quantity Sold individually.
Notes Features 5/8 in. socket size.
One tough bolt.
As the crankshaft flexes, the damper absorbs incredible amounts of energy. These damper bolt kits from ARP will ensure that your balancer is locked into position. They feature a 1/4 in. thick wide-area washer and an extra tall 12-point head that accepts a deep socket to eliminate the fear of stripping the head.
http://www.summitracing.com/parts/ARP-134-2501/
now you can probably re-tap the current threads and use a longer bolt and get by for now, but drilling it with the correct larger drill diam. and re-threading for the big block Chevy bolt is the more common route taken once you strip crank threads
viewtopic.php?f=53&t=1480&p=6221&hilit=stripped+crank#p6221
viewtopic.php?f=53&t=1798&p=5680&hilit=stripped+crank#p5680
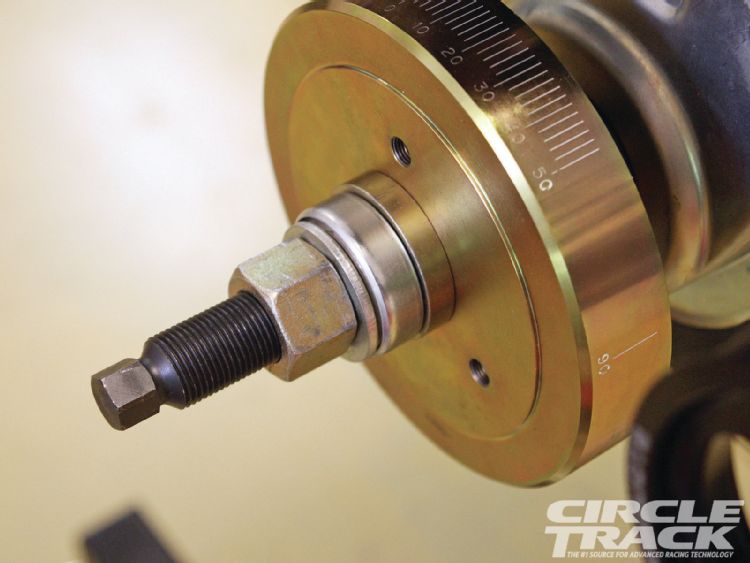
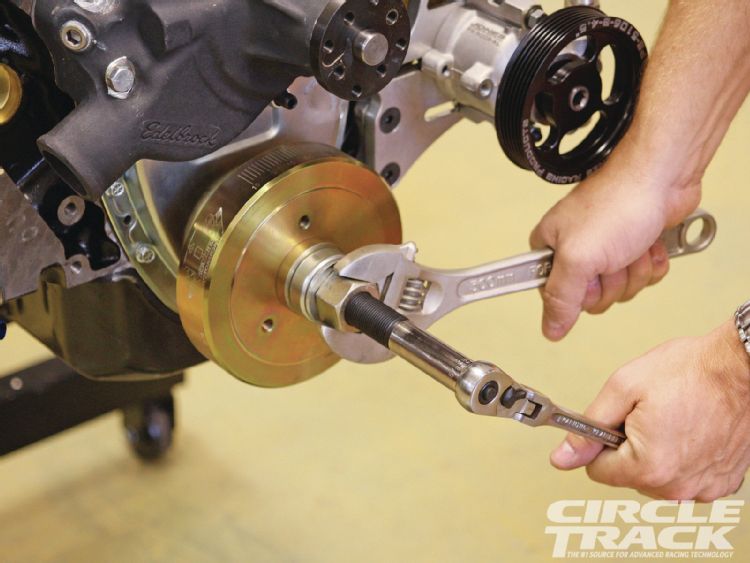
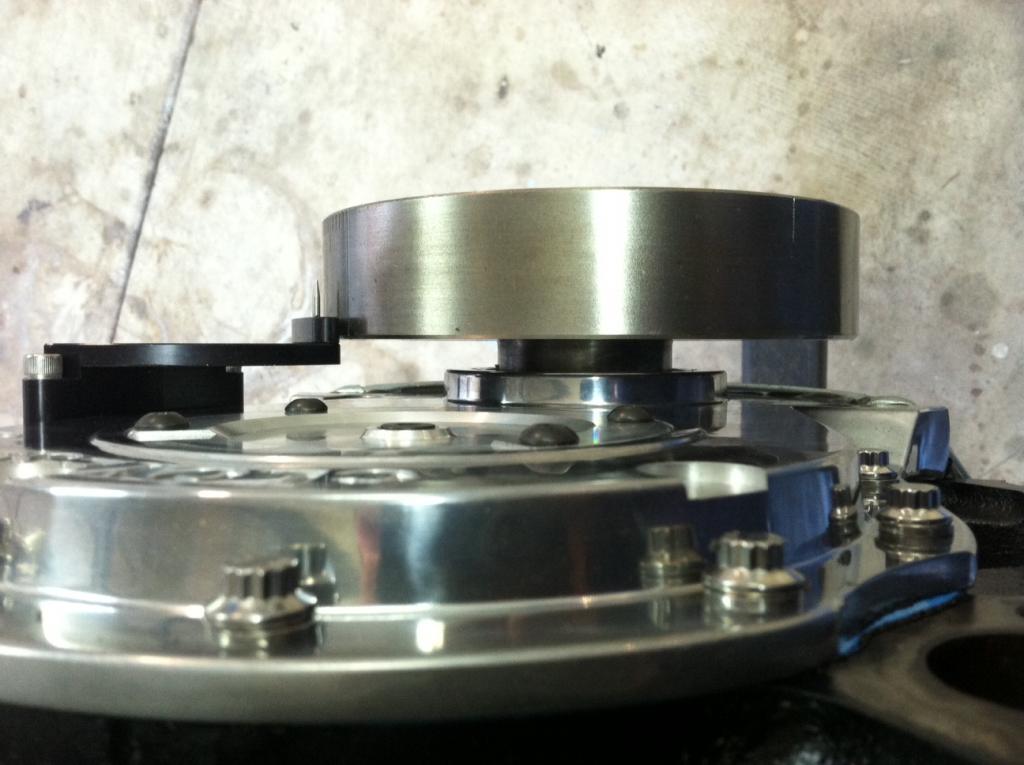
there is supposed to be about a .0001 -.0002 INTERFERENCE fit! so the damper has far less tendency to spin on the crank snout or work the woodriff key loose, you can generally polish the crank snout, and internal damper hole with a flap wheel and 400 grit sand paper enough to get a smoother surface, then, place the damper in boiling water to heat and expand it and oil its mating surface, use the correct damper installation tool, pick the damper up with oven mitts so you don,t get burned, use the tool to install it
http://www.summitracing.com/parts/otc-6505
I,ve generally found that if you've stripped the SBC crank snout threads the best answer is to drill and re-thread to the standard and larger BBC crank snout bolt threads size
btw if youve ever tried to draw on a damper with a crank bolt from a local hard ware store this is frequently the result, that or stripped crank threads,
ID strongly suggest use of the correct Damper tool, and use of ARP crank bolts once its properly installed
next time BUY AND USE AN ARP BRAND BOLT
I,ve generally found that if you've stripped the SBC crank snout threads the best answer is to drill and re-thread to the standard and larger BBC crank snout bolt threads size
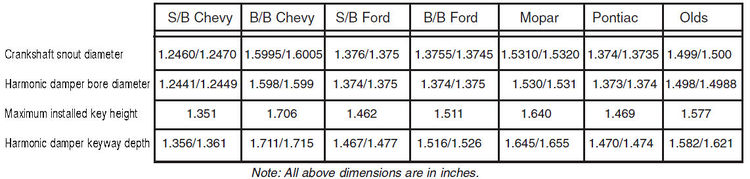
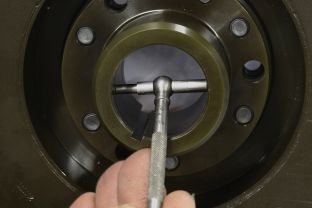
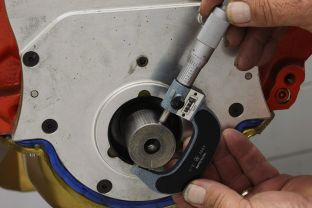
accurately measure the internal damper and the external crank snout diameter
Measure the crank-snout diameter with a micrometer (above left). Ours measured 1.600 inch, which is right on spec. Then use a dial-bore gauge to determine the inside diameter of the Fluidampr damper (below). Ours came in 1.599-inch, resulting in a .001-inch interference fit. This is the right amount of clearance to provide a good snug fit on the crankshaft, but still be able to install and remove without difficulty. Another method of measuring the damper hub ID of your is with a snap gauge (above right). After setting the gauge, the micrometer is used to to determine the final measurement. In this case, the same measurement as the dial bore gage was reached.
http://www.enginebuildermag.com/Article ... stons.aspx
http://www.arp-bolts.com/
http://www.summitracing.com/parts/ARP-134-2501/
http://www.summitracing.com/parts/ARP-234-2503/
viewtopic.php?f=53&t=1798&hilit=damper
viewtopic.php?f=53&t=1480&hilit=+damper
viewtopic.php?f=53&t=1798
if your current crank bolt is an ARP bolt, heres the dimensions,
keep in mind a bolt threaded in steel should have 1.5 times its diam. MINIMUM in the threads before the bolt starts to draw or tighten or clamp and TWICE its diam. in the threads is better as a minimum to prevent stripped threads, and remember the bolt should never be allowed to bottom out in the crank snout threads and tighten against the bottom of the drilled hole either
Summit Racing Part Number ARP-134-2501
Thread Size 7/16-20 RH in.
Underhead Length (in) 2.470 in.
Head Style 12-point
Washer Included Yes
Fastener Yield Strength (psi) 200,000 psi
Fastener Material Chromemoly
Fastener Finish Black oxide
Quantity Sold individually.
Notes Features 5/8 in. socket size.
One tough bolt.
As the crankshaft flexes, the damper absorbs incredible amounts of energy. These damper bolt kits from ARP will ensure that your balancer is locked into position. They feature a 1/4 in. thick wide-area washer and an extra tall 12-point head that accepts a deep socket to eliminate the fear of stripping the head.
http://www.summitracing.com/parts/ARP-134-2501/
now you can probably re-tap the current threads and use a longer bolt and get by for now, but drilling it with the correct larger drill diam. and re-threading for the big block Chevy bolt is the more common route taken once you strip crank threads
viewtopic.php?f=53&t=1480&p=6221&hilit=stripped+crank#p6221
viewtopic.php?f=53&t=1798&p=5680&hilit=stripped+crank#p5680
there is supposed to be about a .0001 -.0002 INTERFERENCE fit! so the damper has far less tendency to spin on the crank snout or work the woodriff key loose, you can generally polish the crank snout, and internal damper hole with a flap wheel and 400 grit sand paper enough to get a smoother surface, then, place the damper in boiling water to heat and expand it and oil its mating surface, use the correct damper installation tool, pick the damper up with oven mitts so you don,t get burned, use the tool to install it
http://www.summitracing.com/parts/otc-6505
I,ve generally found that if you've stripped the SBC crank snout threads the best answer is to drill and re-thread to the standard and larger BBC crank snout bolt threads size
https://www.nookandtranny.com/Info_LT1.html
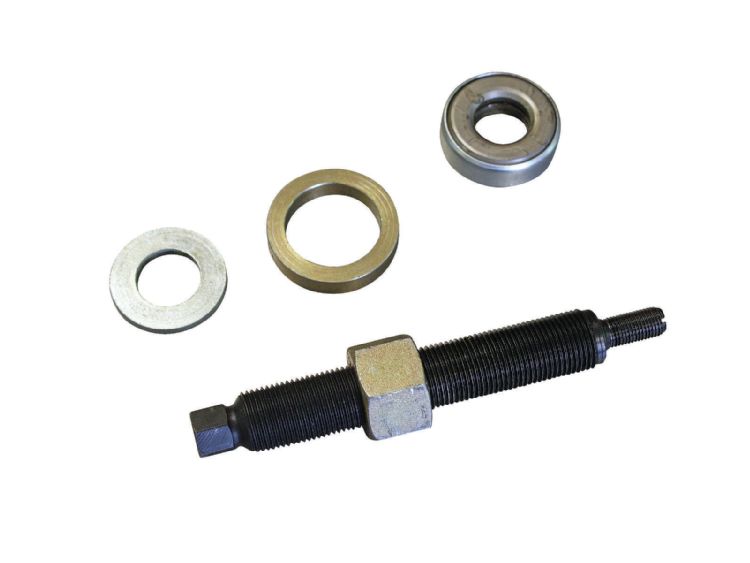
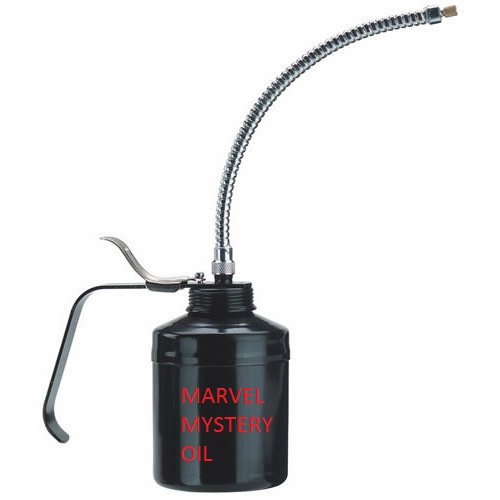
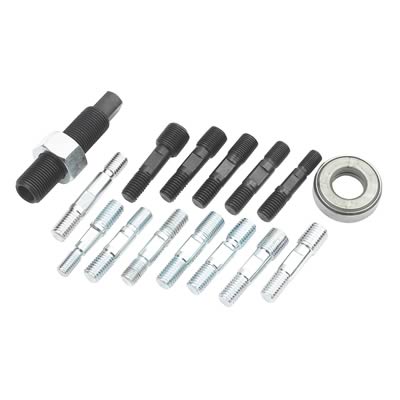
these tools work well, fit most engines and if you do break off a thread adapter you can order a replacement without needing to pay for the whole new tool, and keep in mind the threads strip or adapters break if the dampers OVER TIGHTENED,ALL TOOLS WILL BREAK IF OVER STRESSED, this CAN generally be avoided with simply taking a few accurate measurements and use of some marvel mystery oil on the damper, crank and the installing tool threads
Yes I busted one thread adapter years back , but it was a P.I.T.A. waiting on a replacement and I learned not to over tighten the tool, and watch carefully on the measurements and have not had that happen for 30 plus years keeping the tool and damper and crank snout well lubed makes it slide on easier
measuring and checking the interference fits correct helps
read thru these threads, for info on seating a damper and re-threading a stripped crank
https://www.nookandtranny.com/Info_LT1.html
these tools work well, fit most engines and if you do break off a thread adapter you can order a replacement without needing to pay for the whole new tool, and keep in mind the threads strip or adapters break if the dampers OVER TIGHTENED,ALL TOOLS WILL BREAK IF OVER STRESSED, this CAN generally be avoided with simply taking a few accurate measurements and use of some marvel mystery oil on the damper, crank and the installing tool threads
Yes I busted one thread adapter years back , but it was a P.I.T.A. waiting on a replacement and I learned not to over tighten the tool, and watch carefully on the measurements and have not had that happen for 30 plus years keeping the tool and damper and crank snout well lubed makes it slide on easier
measuring and checking the interference fits correct helps
read thru these threads, for info on seating a damper and re-threading a stripped crank