RARELY DO I FEEL LIKE CRYING, but I got a question asked...
"is it ok to use a large hammer and block of wood to beat the damper back onto the crank when doing a cam swap"
that question gets me that frustrated,
HELL NO! THATS THE WRONG ROUTE AND IT MAY DAMAGE THE CRANK!
IN FACT ITS 100% SURE TO SET UP EXTRA STRESS IN THE FRONT CRANK JOURNAL
yes its been done 1000s of times,yes it may not cause a problem if your nor running under high rpms and stress loads,
but it is a great way to eventually damage the crank or thrust bearing,
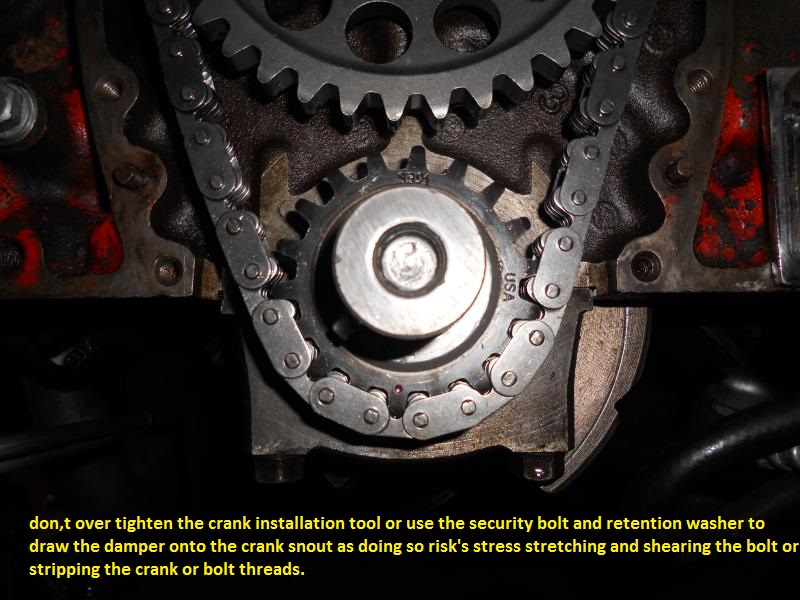
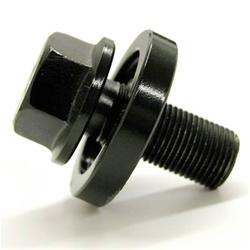
and should be avoided if the crank snouts threaded for a retaining bolt
IF you have a crank thats not threaded for an installation tool,
AND YOUR INSTALLING A STOCK STYLE ELASTOMER DAMPER
heating a damper in boiling water for 15 minutes, to allow it to expand with heat .
boiling water will uniformly and efficiently heat the damper without potentially over heating the damper to the point its internal components or materials may be damaged like a heat gun, torch or oven might......and at the same time, packing the crank snout in DRY ICE to contract its size with cold will generally allow the two components to slide together if your quick and use insulated oven mitts

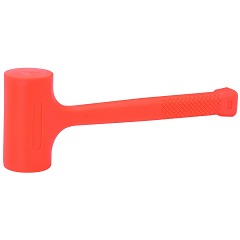
to hold the damper and a dead blow hammer to fully seat it, but you must do this very quickly before the two temps normalize
DRY ICE -109 degrees Fahrenheit
boiling water = about 212F
difference- about 320F usually the TEMPORARY dimensional difference in the two component temps allows .002-.003 more clearance between the inner balancer hub bore and contracted crank snout outer diameter.
http://garage.grumpysperformance.com/index.php?threads/stripped-crank-threads.1798/#post-5680
http://www.summitracing.com/parts/wmr-w89711/overview/
http://www.jegs.com/i/JEGS/555/W897...207804007271&gclid=CI_gnuuKgs0CFQ6maQodXK4BPA
I,ve generally found that if you've stripped the SBC crank snout threads the best answer is to drill and re-thread to the standard and larger BBC crank snout bolt threads size

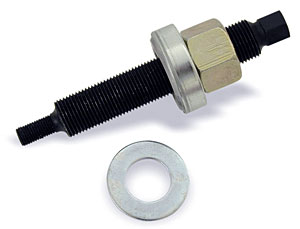
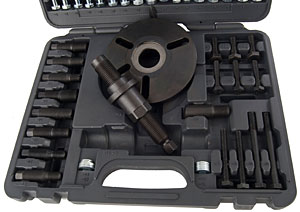
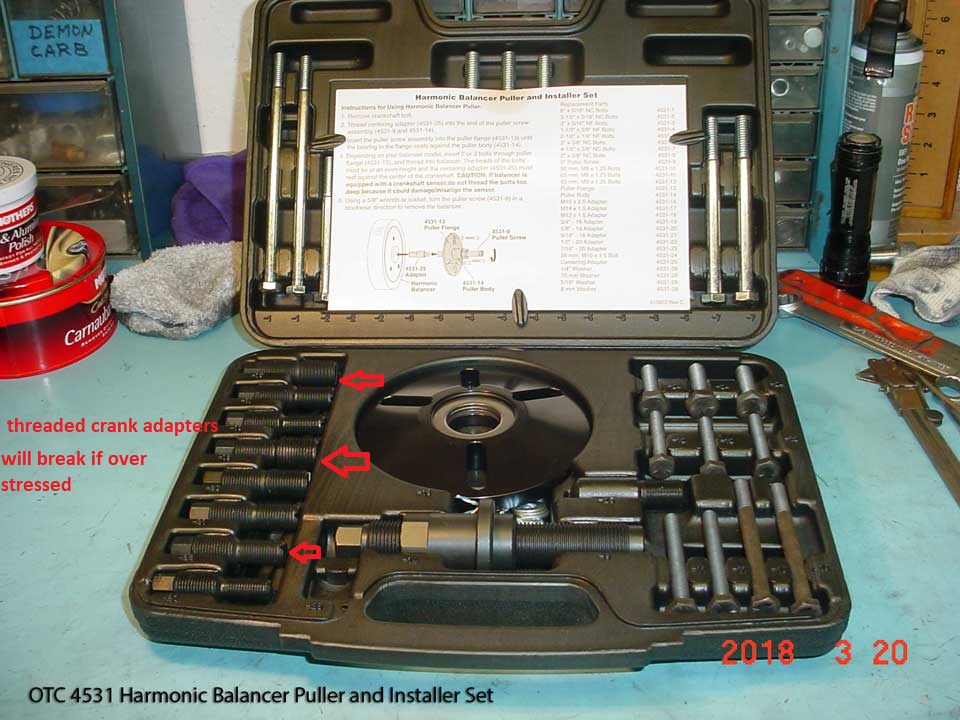
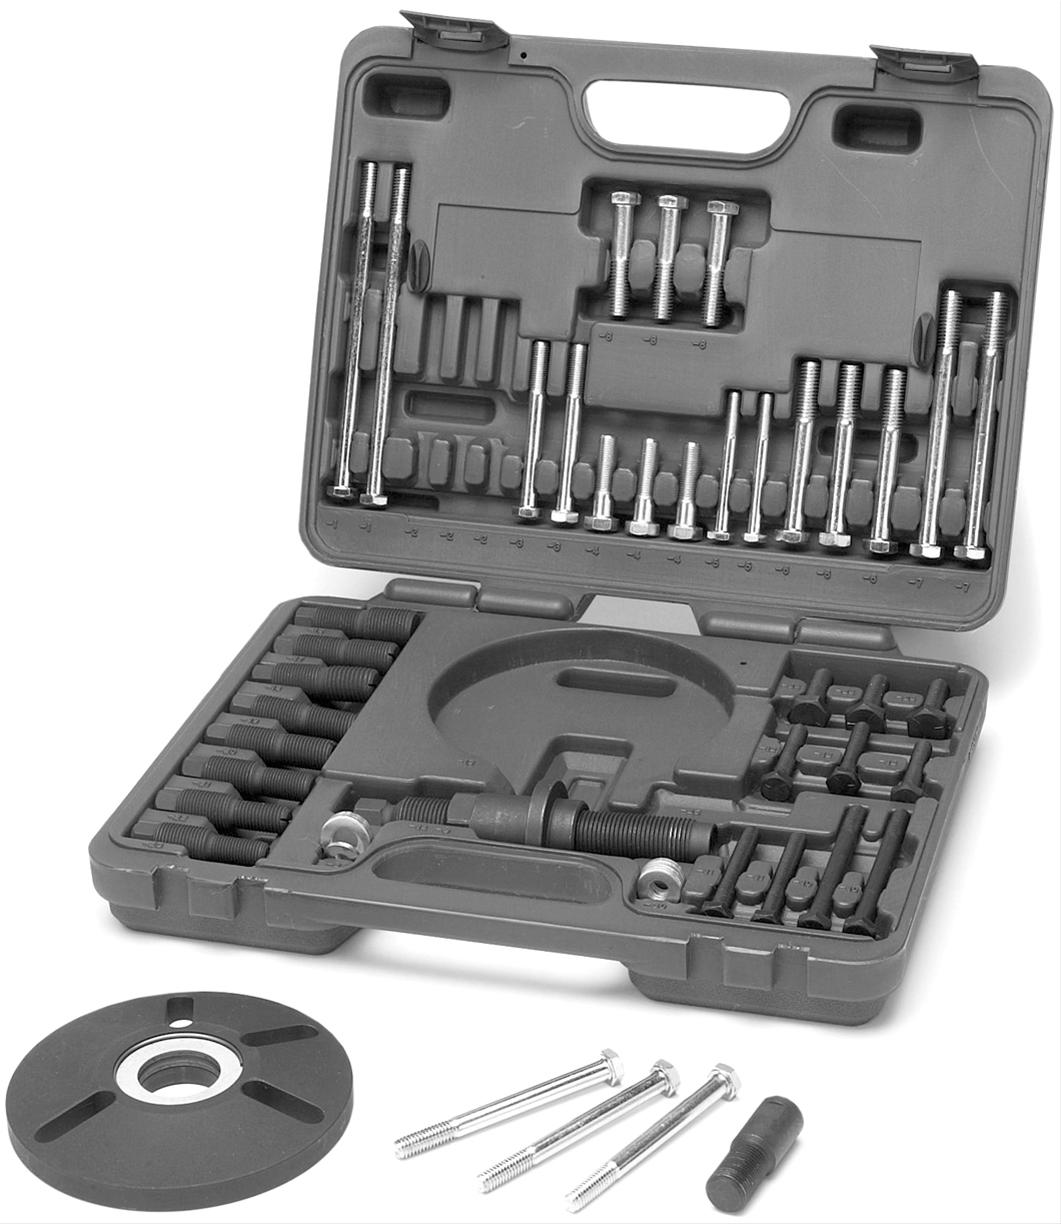
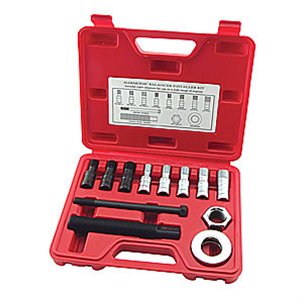
THE TOOL ABOVE WILL REMOVE AND INSTALL DAMPERS WHEN THE CORRECT COMBO OF PARTS ARE ASSEMBLED
http://www.summitracing.com/parts/otc-6505
http://www.fluidampr.com/products/domestic/
http://www.atiracing.com/products/dampers/charts/damchevy.htm
https://innovatorswest.com/faq.html


these tools work well, fit most engines and if you do break off a thread adapter you can order a replacement without needing to pay for the whole new tool, and keep in mind the threads strip or adapters break if the dampers OVER TIGHTENED,ALL TOOLS WILL BREAK IF OVER STRESSED, this CAN generally be avoided with simply taking a few accurate measurements and use of some marvel mystery oil on the damper, crank and the installing tool threads
Yes I busted one thread adapter years back , but it was a P.I.T.A. waiting on a replacement and I learned not to over tighten the tool, and watch carefully on the measurements and have not had that happen for 30 plus years keeping the tool and damper and crank snout well lubed makes it slide on easier
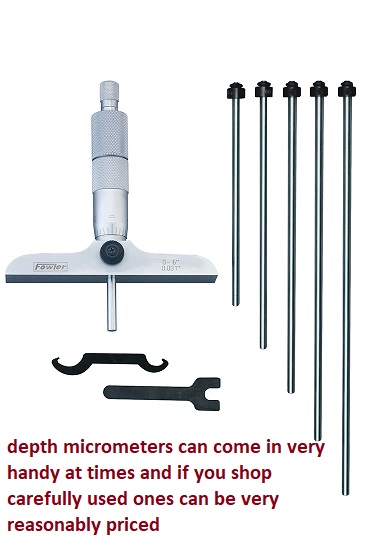
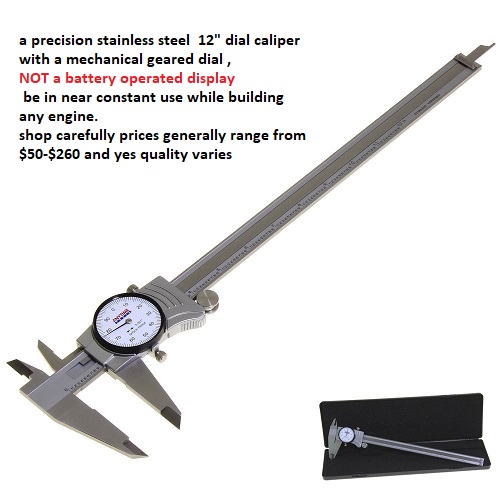
measuring and checking the interference fits correct helps
boiling water = about 212F will expand the hub bore
packing the crank snout in DRY ICE at -109F FOR 15 MINUTE's will contract the outer
dimension
DAMPER PULLER OR REMOVAL TOOL BELOW
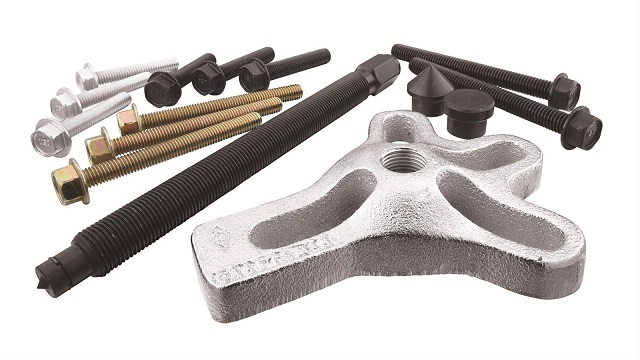
DAMPER INSTALLER TOOL BELOW
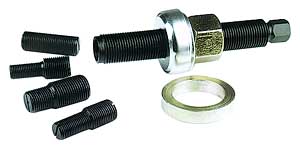

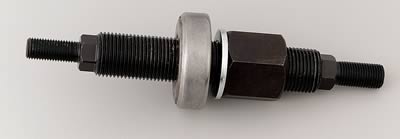
heres the basic installation tool

http://www.summitracing.com/parts/pro-66514
http://www.summitracing.com/parts/mor-61740
http://www.summitracing.com/parts/pro-66515
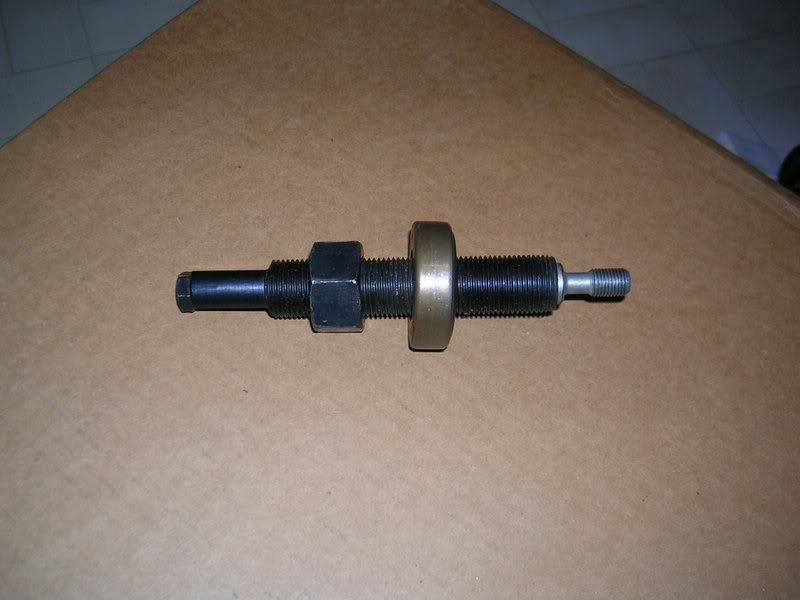
look at the picture carefully, the tool is available from several sources
http://www.jegs.com/p/Proform/Proform-H ... 5/10002/-1
http://toolsandmore.us/oem27144-harmoni ... aller.aspx
heres how to use it...
the small 7/16 thread ,on the tool threads into the crank, the damper slips over the tool, the large washer style bearing slips over the tool followed by the solid washer followed by the large nut that threads on the tool, the back of the tool is normally a 9/16 or 5/8 hex this is held with a box end wrench to keep the engine from turning, the large nut is usually a 1 1/8" nut and it is tightened with an open end 1 1/8" wrench or a adjustable wrench against the two washers drawing the damper onto the crank snout! lube the threads on the tool, the inside of the damper and crank snout with oil before starting. the damper will normally slide on about 1/4 of the way bye hand then the tool is needed to draw the damper on the last 3/4 of the distance, don,t over tighten the tool the 7/16" thread will snap off in the crank after the damper bottoms out on the lower timing gear if you do!,
NEVER USE A HAMMER AND BLOCK OF WOOD TO DRIVE THE DAMPER ON, YES THOUSANDS OF GUYS THINK THEY DID IT WITHOUT ANY PROBLEMS BUT...
IT WILL DAMAGE THE THRUST BEARING CLEARANCES,
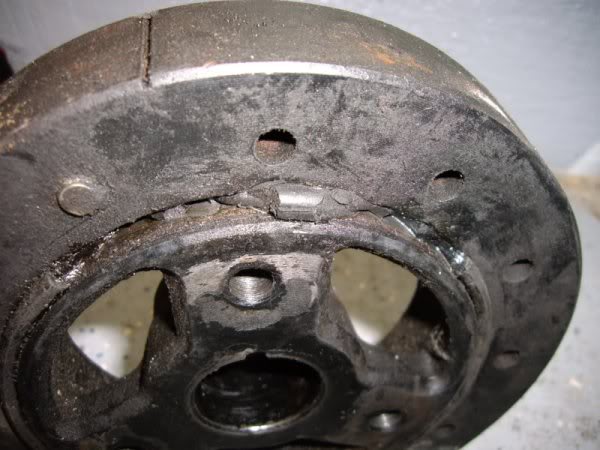
IT CAN BREAK THE ELASTOMER TORSION RING ON STOCK DAMPERS
IT CAN CAUSE THE INERTIAL RING ON FLUIDAMPER TO BECOME JAMMED INTERNALLY
IT CAN CAUSE THE DAMPER TO FAIL.
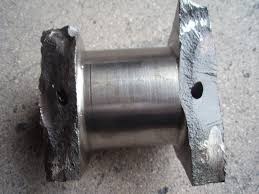
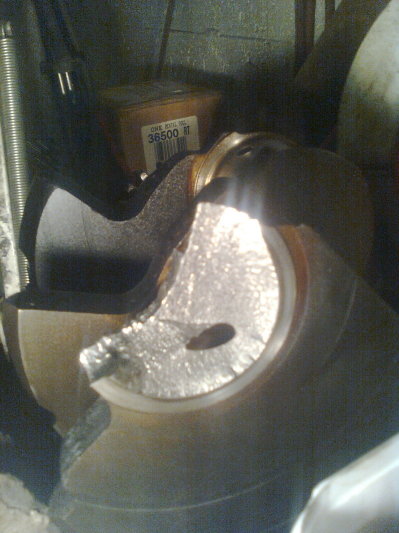
IF THE DAMPER FAILS THE CRANK WILL EVENTUALLY BE DAMMAGED
IT GREATLY STRESSES THE CRANK SHAFT
IT CAN DAMAGE THE CRANKS TRANSMISSION PILOT BEARING
IT CAN DAMAGE THE TRANSMISSION
ALMOST EVERY TYPE OF DAMAGE IS NOT SOMETHING THAT SHOWS UP RIGHT AWAY, BUT IT WILL DAMAGE THE PARTS LISTED AND THERE'S THOUSANDS OF GUYS THAT ARE WONDERING WHY THOSE PARTS FAILED 6-24 Months LATER WITH NO CLUE AS TO THE CAUSE!
ASK YOURSELF THIS QUESTION, IF CRANKSHAFTS THAT ARE A FEW THOUSANDS OUT OF LINE I.E. NOT PERFECTLY STRAIT ARE BENT/STRAITEN WITH A LEAD HAMMER BY CRANK MANUFACTURES (and yes that's how its done) AND CRANKS THAT ARE DROPPED ON A CONCRETE Floor SOMETIMES BEND SLIGHTLY ,(happens all the time) WHAT MAKES YOU THINK THAT BEATING ON THEM WITH A HAMMER AND A BLOCK OF WOOD WONT DAMAGE THEM? AND WHILE WERE AT IT WHAT WOULD YOU DO TO SOME GUY YOU CAUGHT BEATING ON YOUR ENGINE BLOCK WITH A HAMMER? WELL WHAT DO YOU THINK THE CRANKS DOING TO YOUR MAIN CAPS WHEN YOU BEAT ON THE CRANK? PROPERLY USED THAT INSTALLATION TOOL CAN EXERT OVER 15 TONS OF PRESSURE TO SLIDE THE DAMPER ON, IF IT WONT SLIDE ON, THERE'S A PROBLEM! FIND IT AND FIX IT .....DON,T BEAT ON THE DAMPER/CRANK ...........if your cranks not threaded GET IT THREADED next time the cranks out, in the mean time pack the crank snout in dry ice and the damper in boiling water.....once both at at the correct temp. spray the inside surface of the damper with LIQUID WRENCH and using pot holders, to prevent burns slide it quickly onto the crank snout before the temp difference equalizes, and yes it may take a few whacks with a plastic hammer but generally it slides on easily UNTIL the temp difference equalizes
the problem here is that the damage that occurs during hammering the damper onto the crank is not always immediately apparent and it may or may not be critical,depending on many factors, and thrust bearing damage only tends to show up over time.
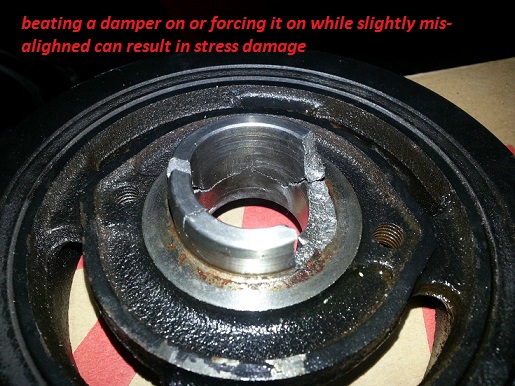
but just because the damage or stress that was transmitted to the crank, does not result in immediate parts failure doesn,t mean there's no damage being done.while were discussing bent crank snouts , IM always amazed at the yahoos that thing that driving a damper onto a crank with a 5 lb hammer and a block of wood is not going to result in eventual damage to thrust bearings and main caps and crank alignment, theres not the least doubt that a couple off center impacts can change the crank journal alignment, or off set the bearing clearances in some cases,
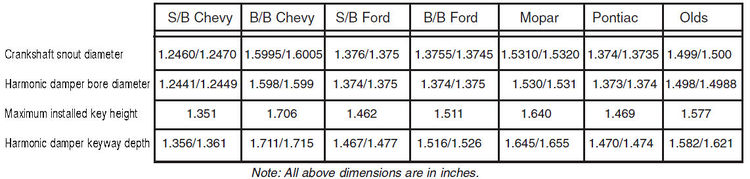
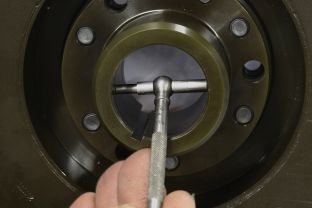
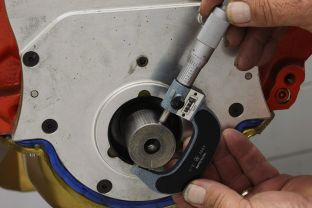
if your having a good deal of a problem, getting a damper to slide onto the crank snout with the correct tool and an oiled crank, you might have the wrong damper so check carefully ,, the next step one is to CAREFULLY measure both the crank snout diam. and damper hub inner diam.in some cases packing the crank in a bag of dry ice and heating the damper in boiling water changes the interference, enough that the crank slides into the damper far easier, and you won,t be the first guy that needs to have a machine shop hone out a damper to allow it to fit
the crank snout should be only about .0005-.001 larger than the hole in the damper
"is it ok to use a large hammer and block of wood to beat the damper back onto the crank when doing a cam swap"
that question gets me that frustrated,
HELL NO! THATS THE WRONG ROUTE AND IT MAY DAMAGE THE CRANK!
IN FACT ITS 100% SURE TO SET UP EXTRA STRESS IN THE FRONT CRANK JOURNAL
yes its been done 1000s of times,yes it may not cause a problem if your nor running under high rpms and stress loads,
but it is a great way to eventually damage the crank or thrust bearing,
and should be avoided if the crank snouts threaded for a retaining bolt
IF you have a crank thats not threaded for an installation tool,
AND YOUR INSTALLING A STOCK STYLE ELASTOMER DAMPER
heating a damper in boiling water for 15 minutes, to allow it to expand with heat .
boiling water will uniformly and efficiently heat the damper without potentially over heating the damper to the point its internal components or materials may be damaged like a heat gun, torch or oven might......and at the same time, packing the crank snout in DRY ICE to contract its size with cold will generally allow the two components to slide together if your quick and use insulated oven mitts
to hold the damper and a dead blow hammer to fully seat it, but you must do this very quickly before the two temps normalize
DRY ICE -109 degrees Fahrenheit
boiling water = about 212F
difference- about 320F usually the TEMPORARY dimensional difference in the two component temps allows .002-.003 more clearance between the inner balancer hub bore and contracted crank snout outer diameter.
http://garage.grumpysperformance.com/index.php?threads/stripped-crank-threads.1798/#post-5680
http://www.summitracing.com/parts/wmr-w89711/overview/
http://www.jegs.com/i/JEGS/555/W897...207804007271&gclid=CI_gnuuKgs0CFQ6maQodXK4BPA
I,ve generally found that if you've stripped the SBC crank snout threads the best answer is to drill and re-thread to the standard and larger BBC crank snout bolt threads size
THE TOOL ABOVE WILL REMOVE AND INSTALL DAMPERS WHEN THE CORRECT COMBO OF PARTS ARE ASSEMBLED
http://www.summitracing.com/parts/otc-6505
http://www.fluidampr.com/products/domestic/
http://www.atiracing.com/products/dampers/charts/damchevy.htm
https://innovatorswest.com/faq.html
these tools work well, fit most engines and if you do break off a thread adapter you can order a replacement without needing to pay for the whole new tool, and keep in mind the threads strip or adapters break if the dampers OVER TIGHTENED,ALL TOOLS WILL BREAK IF OVER STRESSED, this CAN generally be avoided with simply taking a few accurate measurements and use of some marvel mystery oil on the damper, crank and the installing tool threads
Yes I busted one thread adapter years back , but it was a P.I.T.A. waiting on a replacement and I learned not to over tighten the tool, and watch carefully on the measurements and have not had that happen for 30 plus years keeping the tool and damper and crank snout well lubed makes it slide on easier
measuring and checking the interference fits correct helps
boiling water = about 212F will expand the hub bore
packing the crank snout in DRY ICE at -109F FOR 15 MINUTE's will contract the outer
dimension
DAMPER PULLER OR REMOVAL TOOL BELOW
DAMPER INSTALLER TOOL BELOW
heres the basic installation tool
http://www.summitracing.com/parts/pro-66514
http://www.summitracing.com/parts/mor-61740
http://www.summitracing.com/parts/pro-66515
look at the picture carefully, the tool is available from several sources
http://www.jegs.com/p/Proform/Proform-H ... 5/10002/-1
http://toolsandmore.us/oem27144-harmoni ... aller.aspx
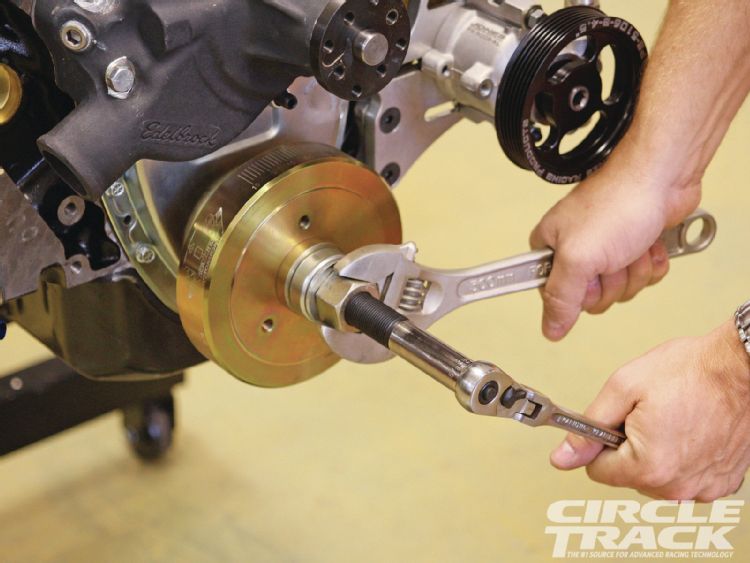
heres how to use it...
the small 7/16 thread ,on the tool threads into the crank, the damper slips over the tool, the large washer style bearing slips over the tool followed by the solid washer followed by the large nut that threads on the tool, the back of the tool is normally a 9/16 or 5/8 hex this is held with a box end wrench to keep the engine from turning, the large nut is usually a 1 1/8" nut and it is tightened with an open end 1 1/8" wrench or a adjustable wrench against the two washers drawing the damper onto the crank snout! lube the threads on the tool, the inside of the damper and crank snout with oil before starting. the damper will normally slide on about 1/4 of the way bye hand then the tool is needed to draw the damper on the last 3/4 of the distance, don,t over tighten the tool the 7/16" thread will snap off in the crank after the damper bottoms out on the lower timing gear if you do!,
NEVER USE A HAMMER AND BLOCK OF WOOD TO DRIVE THE DAMPER ON, YES THOUSANDS OF GUYS THINK THEY DID IT WITHOUT ANY PROBLEMS BUT...
IT WILL DAMAGE THE THRUST BEARING CLEARANCES,
IT CAN BREAK THE ELASTOMER TORSION RING ON STOCK DAMPERS
IT CAN CAUSE THE INERTIAL RING ON FLUIDAMPER TO BECOME JAMMED INTERNALLY
IT CAN CAUSE THE DAMPER TO FAIL.
IF THE DAMPER FAILS THE CRANK WILL EVENTUALLY BE DAMMAGED
IT GREATLY STRESSES THE CRANK SHAFT
IT CAN DAMAGE THE CRANKS TRANSMISSION PILOT BEARING
IT CAN DAMAGE THE TRANSMISSION
ALMOST EVERY TYPE OF DAMAGE IS NOT SOMETHING THAT SHOWS UP RIGHT AWAY, BUT IT WILL DAMAGE THE PARTS LISTED AND THERE'S THOUSANDS OF GUYS THAT ARE WONDERING WHY THOSE PARTS FAILED 6-24 Months LATER WITH NO CLUE AS TO THE CAUSE!
ASK YOURSELF THIS QUESTION, IF CRANKSHAFTS THAT ARE A FEW THOUSANDS OUT OF LINE I.E. NOT PERFECTLY STRAIT ARE BENT/STRAITEN WITH A LEAD HAMMER BY CRANK MANUFACTURES (and yes that's how its done) AND CRANKS THAT ARE DROPPED ON A CONCRETE Floor SOMETIMES BEND SLIGHTLY ,(happens all the time) WHAT MAKES YOU THINK THAT BEATING ON THEM WITH A HAMMER AND A BLOCK OF WOOD WONT DAMAGE THEM? AND WHILE WERE AT IT WHAT WOULD YOU DO TO SOME GUY YOU CAUGHT BEATING ON YOUR ENGINE BLOCK WITH A HAMMER? WELL WHAT DO YOU THINK THE CRANKS DOING TO YOUR MAIN CAPS WHEN YOU BEAT ON THE CRANK? PROPERLY USED THAT INSTALLATION TOOL CAN EXERT OVER 15 TONS OF PRESSURE TO SLIDE THE DAMPER ON, IF IT WONT SLIDE ON, THERE'S A PROBLEM! FIND IT AND FIX IT .....DON,T BEAT ON THE DAMPER/CRANK ...........if your cranks not threaded GET IT THREADED next time the cranks out, in the mean time pack the crank snout in dry ice and the damper in boiling water.....once both at at the correct temp. spray the inside surface of the damper with LIQUID WRENCH and using pot holders, to prevent burns slide it quickly onto the crank snout before the temp difference equalizes, and yes it may take a few whacks with a plastic hammer but generally it slides on easily UNTIL the temp difference equalizes
the problem here is that the damage that occurs during hammering the damper onto the crank is not always immediately apparent and it may or may not be critical,depending on many factors, and thrust bearing damage only tends to show up over time.
but just because the damage or stress that was transmitted to the crank, does not result in immediate parts failure doesn,t mean there's no damage being done.while were discussing bent crank snouts , IM always amazed at the yahoos that thing that driving a damper onto a crank with a 5 lb hammer and a block of wood is not going to result in eventual damage to thrust bearings and main caps and crank alignment, theres not the least doubt that a couple off center impacts can change the crank journal alignment, or off set the bearing clearances in some cases,
if your having a good deal of a problem, getting a damper to slide onto the crank snout with the correct tool and an oiled crank, you might have the wrong damper so check carefully ,, the next step one is to CAREFULLY measure both the crank snout diam. and damper hub inner diam.in some cases packing the crank in a bag of dry ice and heating the damper in boiling water changes the interference, enough that the crank slides into the damper far easier, and you won,t be the first guy that needs to have a machine shop hone out a damper to allow it to fit
the crank snout should be only about .0005-.001 larger than the hole in the damper
Last edited by a moderator: