DANA 36 vs DANA 44
The C-4 Dana 36 was the only axle available in 1984 Corvettes. In 1985, Chevrolet brought out the Dana 44 which was similar to the 80-82 Corvette axle, but not interchangeable. The Dana 44 axle is considerably stronger, but not indestructible. The Dana 36 and the Dana 44 (44's in some autos and all manuals) axles were used through 1996.
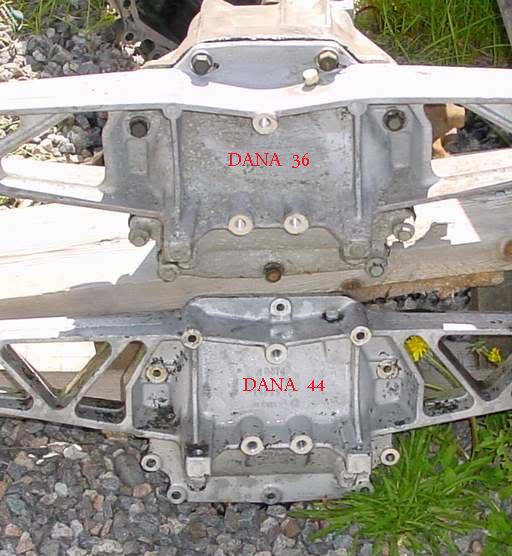
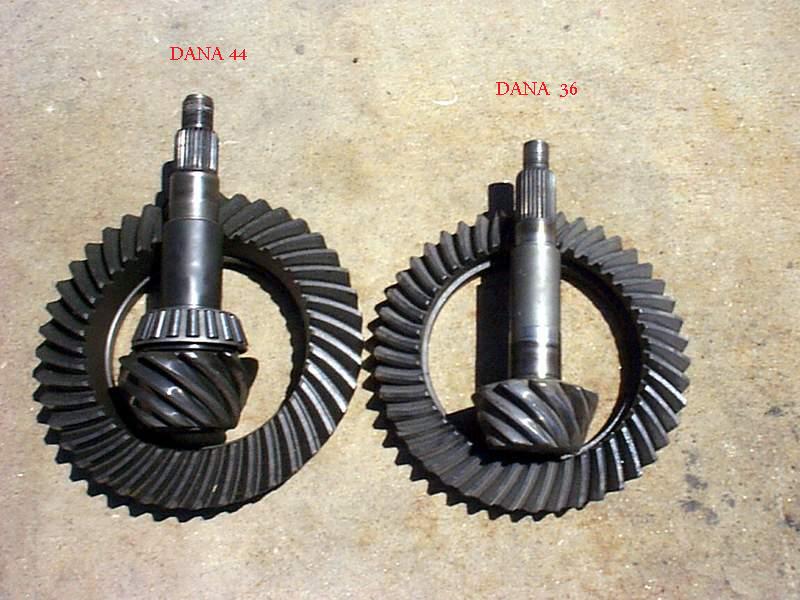
The Dana 44 is much larger than the D36. The 44 has a larger, "beefier" carrier/components to handle larger (lower) ring and pinions, and increased torque. NOTICE THE LOCATION OF THE TOP CENTER BOLT HOLE ON THE DANA 36 THATS NOT ON THE DANA 44 REAR, thats a QUICK WAY TO TELL THEM APART
603967 GM 44 REAR 1980 CORVETTE
605172 GM 36 REAR 1984 CORVETTE
605180 GM 36 REAR 1984 CORVETTE
605220 GM 44 REAR 1985-87 CORVETTE
605239 GM 36 REAR 1984-86 CORVETTE
605260 GM 36 REAR 1985-87 CORVETTE
605321 GM 36 REAR 1988-90 CORVETTE
605322 GM 44 REAR 1989 1/2-90 CORVETTE
605365 GM 44 REAR 1988-89 CORVETTE
605417 GM 44 REAR 1990-90 1/2 CORVETTE
605490 GM 36 REAR 1990 1/2-96 1/2 CORVETTE
605491 GM 44 REAR 1990-96 1/2 CORVETTE
605492 GM 44 REAR 1990 1/2 CORVETTE
http://garage.grumpysperformance.com/index.php?threads/dana-36-vs-dana-44.163/#post-7245
Look at the size difference, especially at the case above the yokes:

And visit
ikerds.com
Who were kind enough to supply the pics
if your going to swap from a dana 36 to a dana 44 in a c4 corvette, youll need a new drive shaft and bat-wing assembly and new half shafts
Carrier and gears, bat-wing, c-beam, drive-shaft, new Spicer Bros non zirked U-joints all around. I have read that some people have adapted the c-beam and drive-shaft from the D36 to work with the 44, but usually when you get them you can find all the stuff together. from a wrecking yard.
In 1985, Chevrolet brought out the Dana 44 which was similar to the 80-82 Corvette axle, but not interchangeable. The Dana 44 axle is considerably stronger, but not indestructible. The Dana 36 and the Dana 44 axles were used through 1996.
The c-beam and drive shaft are abou 1-1/2" inches shorter on the D44 due to a longer differential.
heres some info off a link from CORVETTEFORUM
Dana 36 to Dana 44 Conversion
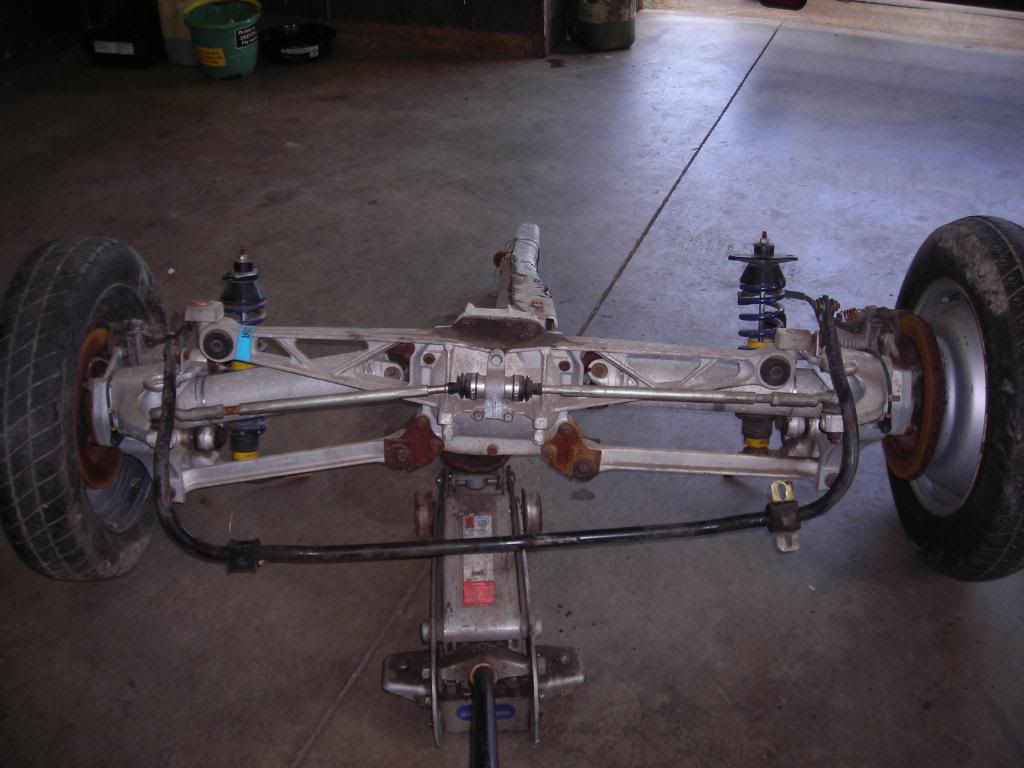
I recently installed a Dana 44 with 3.07 as a result of upgrading the motor to a 406. I know many people here do not trust the reliability of teh d36\'s and often upgrade. As a result, many questions on what is needed and how hard it is to covert over are asked. I hope to supply some instructions on how to do the job and give some comfort to those about to take on the challenge. I am not gonna go through the details of each bolt and what size each are, for if you can\'t figure that out, I wouldn\'t advice you going any further than reading this.") OK. Lets get started. I am gonna assume you are replacing just the differential, cover (batwing), driveshaft and C-beam. If you have to replace the entire unit, this tech tip may not offer direct assistance, but some of the pictures might help. The Dana 44 is much larger than the dainty36, as a result you will need a driveshaft from a manual car that is about 1\" shorter and also a different C -Beam, both of these are usually supplied with the differentials, but you should check to make sure before you find out too late. The first thing you will need to do is secure the car up off the ground. Use all the safety needed to make sure you don\'t get hurt. Once the car is off the ground and you will need a bit of clearance, as the spring will bend downward quite a bit once released. Here is a shot of the Dainty36 When I did mine I undid as little as possible, to make life easier, I will try to explain this is the same fashion I did mine. The first thing your gonna want to do is remove the 3 bolts that hold the torsion bars in place, you can see this in the upper right hand corner of the picture. And the clean hole were they came out of on the rear. DO NOT TURN the torsion bars themselves. I did my swap and never had to mess with re-aligning the car. If you turn them you will mess up the alignment etc. Here is another shot of it straight from the rear. Next you are gonna want to just pull it back out of the way for now. Now move over to the end of the black spring, seen in the picture here. There is a bolt on either side, you will need to support the spring SECURELY with something, a jack or something that is not gonna let go and rip your arm/hand off when you take the bolt out. There is A LOT of potential energy there and it comes down WAY past the end of the threaded rod, so when you pull the nut off you will then need to let the end down slowly with whatever you used to keep it in place. Make sure you are high enough off the ground, for the spring will make a virtual upside down U when fully let down. Now that the spring ends are completed relieved, you can move to the middle section and remove the two bolts that sandwich the spacers and spring itself into place. Seen here in this picture. Now the spring is completely out of the way. I noted the orientation of it with a small scribe mark, as you will need to resure all the pieces. OK these next few pictures are pretty busy so i will try to walk you through what you see. On the first picture it shows the next two bolts you need to remove. DO NOT TURN THE BIG BOLT that looks like the washer if off center. That is another alignment bolt. Remove the other two seen just to the upper left of the big one. ( the bolts that hold the spring are suppose to be gone at this point) With those bolts removed you should be able to rotate those dog bones down towards the ground and over to the wheel. Again this is why you need alot of clearance under the car. These will become very valuable tools to help you get the half shafts out. with both of the dog bones rotated down out you should look like this, except the 1/2 shafts are still connected. Now I am gonna have to fire my camera man for he was slacking through this part of the project, and did not get a shot of the U-Joint straps that you need to remove at this point. There are two little straps that hold the U-joints in place, these need to be taken off each of the two 1/2 shafts at the differential\'s side. Leave the wheel side alone. Again look at the last picture for reference. Two things to be conscious of here. 1. The u joint caps can and will fall off, when you start moving the 1/2 shafts around. I wrapped them with electrical tape to keep them in place. 2. The 1/2 shafts are kinda trapped in the differential\'s cups that the straps are bolted to, so here is where the dog bones come into play. You can use them as a lever to move the wheel and 1/2 shaft out away from the differential, since the wheel is not being help in place anymore. This will give you just enough room to get the 1/2 shaft to the position you see above. Again, you need to push outward using the dog bones to create enough room to get the 1/2 shafts down out. It should now look like this You almost have it licked now! All there is left to do is obviously get a support you can then lower on the differential itself and take the remaining two bolts out that hold it in. These are located at the ends of the bat wing/cover. This is an earlier picture, but you can see one of the bolts up near the yellow that needs to be removed now. Now your ready to lower the dainty 36 down out! Just jocky or maneuver things around until it clears everything. Take a break and drink a beer for lubrication! If your new D44 is apart as mine was, make sure that both mating surfaces are free of dirt and dings that may lead to leaks. Thanks Dad for taking that responsibility on while I drink my beer. Next you are gonna want to have already purchased some gasket sealer called \"The Right Stuff\". Apply it to each mating surface and put the two together. Once you have it torqued to the specifications in your manual, install the unit in the exact reverse order that you took it out! This is what the finished product looks like! Congratulations!
OK. Lets get started. I am gonna assume you are replacing just the differential, cover (batwing), driveshaft and C-beam. If you have to replace the entire unit, this tech tip may not offer direct assistance, but some of the pictures might help. The Dana 44 is much larger than the dainty36, as a result you will need a driveshaft from a manual car that is about 1\" shorter and also a different C -Beam, both of these are usually supplied with the differentials, but you should check to make sure before you find out too late. The first thing you will need to do is secure the car up off the ground. Use all the safety needed to make sure you don\'t get hurt. Once the car is off the ground and you will need a bit of clearance, as the spring will bend downward quite a bit once released. Here is a shot of the Dainty36 When I did mine I undid as little as possible, to make life easier, I will try to explain this is the same fashion I did mine. The first thing your gonna want to do is remove the 3 bolts that hold the torsion bars in place, you can see this in the upper right hand corner of the picture. And the clean hole were they came out of on the rear. DO NOT TURN the torsion bars themselves. I did my swap and never had to mess with re-aligning the car. If you turn them you will mess up the alignment etc. Here is another shot of it straight from the rear. Next you are gonna want to just pull it back out of the way for now. Now move over to the end of the black spring, seen in the picture here. There is a bolt on either side, you will need to support the spring SECURELY with something, a jack or something that is not gonna let go and rip your arm/hand off when you take the bolt out. There is A LOT of potential energy there and it comes down WAY past the end of the threaded rod, so when you pull the nut off you will then need to let the end down slowly with whatever you used to keep it in place. Make sure you are high enough off the ground, for the spring will make a virtual upside down U when fully let down. Now that the spring ends are completed relieved, you can move to the middle section and remove the two bolts that sandwich the spacers and spring itself into place. Seen here in this picture. Now the spring is completely out of the way. I noted the orientation of it with a small scribe mark, as you will need to resure all the pieces. OK these next few pictures are pretty busy so i will try to walk you through what you see. On the first picture it shows the next two bolts you need to remove. DO NOT TURN THE BIG BOLT that looks like the washer if off center. That is another alignment bolt. Remove the other two seen just to the upper left of the big one. ( the bolts that hold the spring are suppose to be gone at this point) With those bolts removed you should be able to rotate those dog bones down towards the ground and over to the wheel. Again this is why you need alot of clearance under the car. These will become very valuable tools to help you get the half shafts out. with both of the dog bones rotated down out you should look like this, except the 1/2 shafts are still connected. Now I am gonna have to fire my camera man for he was slacking through this part of the project, and did not get a shot of the U-Joint straps that you need to remove at this point. There are two little straps that hold the U-joints in place, these need to be taken off each of the two 1/2 shafts at the differential\'s side. Leave the wheel side alone. Again look at the last picture for reference. Two things to be conscious of here. 1. The u joint caps can and will fall off, when you start moving the 1/2 shafts around. I wrapped them with electrical tape to keep them in place. 2. The 1/2 shafts are kinda trapped in the differential\'s cups that the straps are bolted to, so here is where the dog bones come into play. You can use them as a lever to move the wheel and 1/2 shaft out away from the differential, since the wheel is not being help in place anymore. This will give you just enough room to get the 1/2 shaft to the position you see above. Again, you need to push outward using the dog bones to create enough room to get the 1/2 shafts down out. It should now look like this You almost have it licked now! All there is left to do is obviously get a support you can then lower on the differential itself and take the remaining two bolts out that hold it in. These are located at the ends of the bat wing/cover. This is an earlier picture, but you can see one of the bolts up near the yellow that needs to be removed now. Now your ready to lower the dainty 36 down out! Just jocky or maneuver things around until it clears everything. Take a break and drink a beer for lubrication! If your new D44 is apart as mine was, make sure that both mating surfaces are free of dirt and dings that may lead to leaks. Thanks Dad for taking that responsibility on while I drink my beer. Next you are gonna want to have already purchased some gasket sealer called \"The Right Stuff\". Apply it to each mating surface and put the two together. Once you have it torqued to the specifications in your manual, install the unit in the exact reverse order that you took it out! This is what the finished product looks like! Congratulations!
The C-4 Dana 36 was the only axle available in 1984 Corvettes. In 1985, Chevrolet brought out the Dana 44 which was similar to the 80-82 Corvette axle, but not interchangeable. The Dana 44 axle is considerably stronger, but not indestructible. The Dana 36 and the Dana 44 (44's in some autos and all manuals) axles were used through 1996.
The Dana 44 is much larger than the D36. The 44 has a larger, "beefier" carrier/components to handle larger (lower) ring and pinions, and increased torque. NOTICE THE LOCATION OF THE TOP CENTER BOLT HOLE ON THE DANA 36 THATS NOT ON THE DANA 44 REAR, thats a QUICK WAY TO TELL THEM APART
603967 GM 44 REAR 1980 CORVETTE
605172 GM 36 REAR 1984 CORVETTE
605180 GM 36 REAR 1984 CORVETTE
605220 GM 44 REAR 1985-87 CORVETTE
605239 GM 36 REAR 1984-86 CORVETTE
605260 GM 36 REAR 1985-87 CORVETTE
605321 GM 36 REAR 1988-90 CORVETTE
605322 GM 44 REAR 1989 1/2-90 CORVETTE
605365 GM 44 REAR 1988-89 CORVETTE
605417 GM 44 REAR 1990-90 1/2 CORVETTE
605490 GM 36 REAR 1990 1/2-96 1/2 CORVETTE
605491 GM 44 REAR 1990-96 1/2 CORVETTE
605492 GM 44 REAR 1990 1/2 CORVETTE
http://garage.grumpysperformance.com/index.php?threads/dana-36-vs-dana-44.163/#post-7245
Look at the size difference, especially at the case above the yokes:
And visit
ikerds.com
Who were kind enough to supply the pics
if your going to swap from a dana 36 to a dana 44 in a c4 corvette, youll need a new drive shaft and bat-wing assembly and new half shafts
Carrier and gears, bat-wing, c-beam, drive-shaft, new Spicer Bros non zirked U-joints all around. I have read that some people have adapted the c-beam and drive-shaft from the D36 to work with the 44, but usually when you get them you can find all the stuff together. from a wrecking yard.
In 1985, Chevrolet brought out the Dana 44 which was similar to the 80-82 Corvette axle, but not interchangeable. The Dana 44 axle is considerably stronger, but not indestructible. The Dana 36 and the Dana 44 axles were used through 1996.
The c-beam and drive shaft are abou 1-1/2" inches shorter on the D44 due to a longer differential.
heres some info off a link from CORVETTEFORUM
Dana 36 to Dana 44 Conversion
I recently installed a Dana 44 with 3.07 as a result of upgrading the motor to a 406. I know many people here do not trust the reliability of teh d36\'s and often upgrade. As a result, many questions on what is needed and how hard it is to covert over are asked. I hope to supply some instructions on how to do the job and give some comfort to those about to take on the challenge. I am not gonna go through the details of each bolt and what size each are, for if you can\'t figure that out, I wouldn\'t advice you going any further than reading this.
OK. Lets get started. I am gonna assume you are replacing just the differential, cover (batwing), driveshaft and C-beam. If you have to replace the entire unit, this tech tip may not offer direct assistance, but some of the pictures might help. The Dana 44 is much larger than the dainty36, as a result you will need a driveshaft from a manual car that is about 1\" shorter and also a different C -Beam, both of these are usually supplied with the differentials, but you should check to make sure before you find out too late. The first thing you will need to do is secure the car up off the ground. Use all the safety needed to make sure you don\'t get hurt. Once the car is off the ground and you will need a bit of clearance, as the spring will bend downward quite a bit once released. Here is a shot of the Dainty36 When I did mine I undid as little as possible, to make life easier, I will try to explain this is the same fashion I did mine. The first thing your gonna want to do is remove the 3 bolts that hold the torsion bars in place, you can see this in the upper right hand corner of the picture. And the clean hole were they came out of on the rear. DO NOT TURN the torsion bars themselves. I did my swap and never had to mess with re-aligning the car. If you turn them you will mess up the alignment etc. Here is another shot of it straight from the rear. Next you are gonna want to just pull it back out of the way for now. Now move over to the end of the black spring, seen in the picture here. There is a bolt on either side, you will need to support the spring SECURELY with something, a jack or something that is not gonna let go and rip your arm/hand off when you take the bolt out. There is A LOT of potential energy there and it comes down WAY past the end of the threaded rod, so when you pull the nut off you will then need to let the end down slowly with whatever you used to keep it in place. Make sure you are high enough off the ground, for the spring will make a virtual upside down U when fully let down. Now that the spring ends are completed relieved, you can move to the middle section and remove the two bolts that sandwich the spacers and spring itself into place. Seen here in this picture. Now the spring is completely out of the way. I noted the orientation of it with a small scribe mark, as you will need to resure all the pieces. OK these next few pictures are pretty busy so i will try to walk you through what you see. On the first picture it shows the next two bolts you need to remove. DO NOT TURN THE BIG BOLT that looks like the washer if off center. That is another alignment bolt. Remove the other two seen just to the upper left of the big one. ( the bolts that hold the spring are suppose to be gone at this point) With those bolts removed you should be able to rotate those dog bones down towards the ground and over to the wheel. Again this is why you need alot of clearance under the car. These will become very valuable tools to help you get the half shafts out. with both of the dog bones rotated down out you should look like this, except the 1/2 shafts are still connected. Now I am gonna have to fire my camera man for he was slacking through this part of the project, and did not get a shot of the U-Joint straps that you need to remove at this point. There are two little straps that hold the U-joints in place, these need to be taken off each of the two 1/2 shafts at the differential\'s side. Leave the wheel side alone. Again look at the last picture for reference. Two things to be conscious of here. 1. The u joint caps can and will fall off, when you start moving the 1/2 shafts around. I wrapped them with electrical tape to keep them in place. 2. The 1/2 shafts are kinda trapped in the differential\'s cups that the straps are bolted to, so here is where the dog bones come into play. You can use them as a lever to move the wheel and 1/2 shaft out away from the differential, since the wheel is not being help in place anymore. This will give you just enough room to get the 1/2 shaft to the position you see above. Again, you need to push outward using the dog bones to create enough room to get the 1/2 shafts down out. It should now look like this You almost have it licked now! All there is left to do is obviously get a support you can then lower on the differential itself and take the remaining two bolts out that hold it in. These are located at the ends of the bat wing/cover. This is an earlier picture, but you can see one of the bolts up near the yellow that needs to be removed now. Now your ready to lower the dainty 36 down out! Just jocky or maneuver things around until it clears everything. Take a break and drink a beer for lubrication! If your new D44 is apart as mine was, make sure that both mating surfaces are free of dirt and dings that may lead to leaks. Thanks Dad for taking that responsibility on while I drink my beer. Next you are gonna want to have already purchased some gasket sealer called \"The Right Stuff\". Apply it to each mating surface and put the two together. Once you have it torqued to the specifications in your manual, install the unit in the exact reverse order that you took it out! This is what the finished product looks like! Congratulations!
Last edited by a moderator: