You are using an out of date browser. It may not display this or other websites correctly.
You should upgrade or use an alternative browser.
You should upgrade or use an alternative browser.
how to size a 4-2-1 header for my SBC
- Thread starter Carlos
- Start date
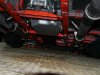
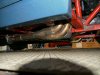
could you please post pictures of the finished headers from under the car and from both sides so we can get a better feel for the whole install, once its up and running?
building headers is a very time intensive project and knowing how to welt especially TIG weld is a great asset.
IVE been saving for a set of these
viewtopic.php?f=56&t=352&p=433&hilit=legos#p433
building headers is a very time intensive project and knowing how to welt especially TIG weld is a great asset.
IVE been saving for a set of these
viewtopic.php?f=56&t=352&p=433&hilit=legos#p433
Carlos
Active Member
getting the stuff done
Hi Grumpy, yes I'll post some more pics from the other side and underneath as soon as it is running.
Tried to save for "the Legos" as well, it must be fun to design with them, but I felt I was running out of time before having the budget...so I went down the painful route")
regards
C.
Hi Grumpy, yes I'll post some more pics from the other side and underneath as soon as it is running.
Tried to save for "the Legos" as well, it must be fun to design with them, but I felt I was running out of time before having the budget...so I went down the painful route
regards
C.
Attachments
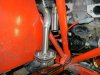
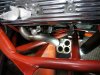
its always mildly amazing and a bit frustrating, how complex the simple routing of a few header primary pipes can become once you need to snake them around suspension and roll cage components in a tight engine compartment, especially if your trying to maintain a semi similar length on each tube, but you look like you've done a good job, and your sure to have gained experience that will prove very useful in the future.
every time I build custom headers I get a bit better at it, gain a bit more skill with a welder, a good deal more skill at cutting tubing and measuring angles, accurately, and usually swear Ill, never do it again, but theres a great deal of satisfaction in doing the job correctly and you'll be surprised at the difference well designed headers can make in your torque curve.
the result seems to be that you constantly feel that the last set you built could be improved upon and in almost every case thats not only correct but you see how, you could have done so, yourself after you've finished each set, so, you look at each set as less than ideal, but the truth is that after a few sets you gain enough basic skill that the gains you make at first are very noticeable, but as you progress , and gain skill in both the planing and fabrication, stages you produce better and better headers, and making major improvements becomes a bit harder to do.
keep in mind most factory headers are designed with ease of fabrication, and low cost and easy installation as the primary goals.
no header will function well unless matched to a low restriction exhaust behind it! and theres a very significant difference in the power potential between your average commercial header thats randomly matched to a cam, and having selected both the header and cam to work together as a complementary matching pair in a selected rpm range, where the combination fully exploits cylinder scavenging efficiency,gains in excess of 40 hp are common.
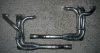
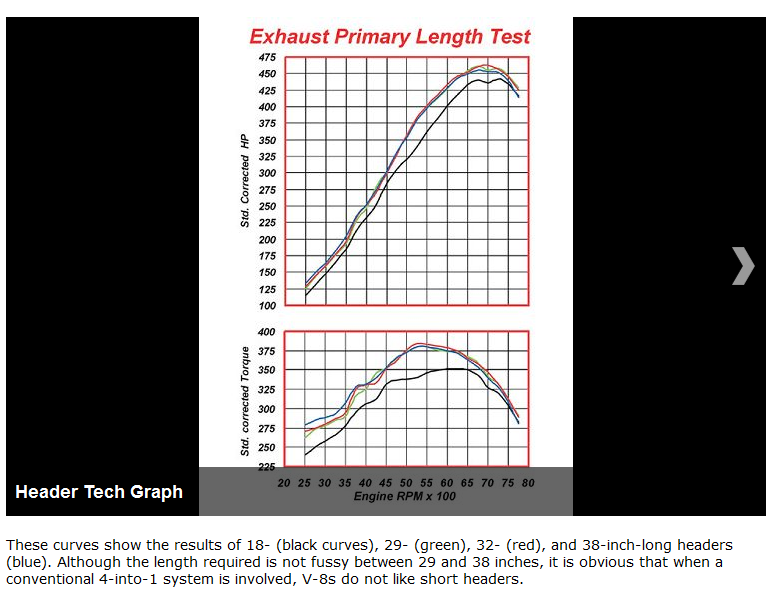
header primary length, diameter and collector design are all something that can be fairly accurately calculated, if you know the engines displacement, compression and cylinder head flow and cam timing.
viewtopic.php?f=56&t=352
viewtopic.php?f=56&t=1166
http://www.slowgt.com/Calc2.htm#Header
http://www.bgsoflex.com/auto.html
these threads might help
http://metalgeek.com/static/cope.pcgi
http://www.pontiacracing.net/js_header_length1.htm
every time I build custom headers I get a bit better at it, gain a bit more skill with a welder, a good deal more skill at cutting tubing and measuring angles, accurately, and usually swear Ill, never do it again, but theres a great deal of satisfaction in doing the job correctly and you'll be surprised at the difference well designed headers can make in your torque curve.
the result seems to be that you constantly feel that the last set you built could be improved upon and in almost every case thats not only correct but you see how, you could have done so, yourself after you've finished each set, so, you look at each set as less than ideal, but the truth is that after a few sets you gain enough basic skill that the gains you make at first are very noticeable, but as you progress , and gain skill in both the planing and fabrication, stages you produce better and better headers, and making major improvements becomes a bit harder to do.
keep in mind most factory headers are designed with ease of fabrication, and low cost and easy installation as the primary goals.
no header will function well unless matched to a low restriction exhaust behind it! and theres a very significant difference in the power potential between your average commercial header thats randomly matched to a cam, and having selected both the header and cam to work together as a complementary matching pair in a selected rpm range, where the combination fully exploits cylinder scavenging efficiency,gains in excess of 40 hp are common.
header primary length, diameter and collector design are all something that can be fairly accurately calculated, if you know the engines displacement, compression and cylinder head flow and cam timing.
viewtopic.php?f=56&t=352
viewtopic.php?f=56&t=1166
http://www.slowgt.com/Calc2.htm#Header
http://www.bgsoflex.com/auto.html
these threads might help
http://metalgeek.com/static/cope.pcgi
http://www.pontiacracing.net/js_header_length1.htm
Last edited by a moderator:
viewtopic.php?f=60&t=3158&p=8431&hilit=roll+cage#p8431
btw anytime you get the least feeling you can,t weld.....................look thru this thread above its sure to make you feel better about your skill level, I know it brought a big grin to my face seeing how badly it really can be done!
btw anytime you get the least feeling you can,t weld.....................look thru this thread above its sure to make you feel better about your skill level, I know it brought a big grin to my face seeing how badly it really can be done!
Carlos
Active Member
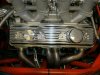
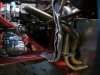
Both headers are done, looking forward to get them installed tomorrow
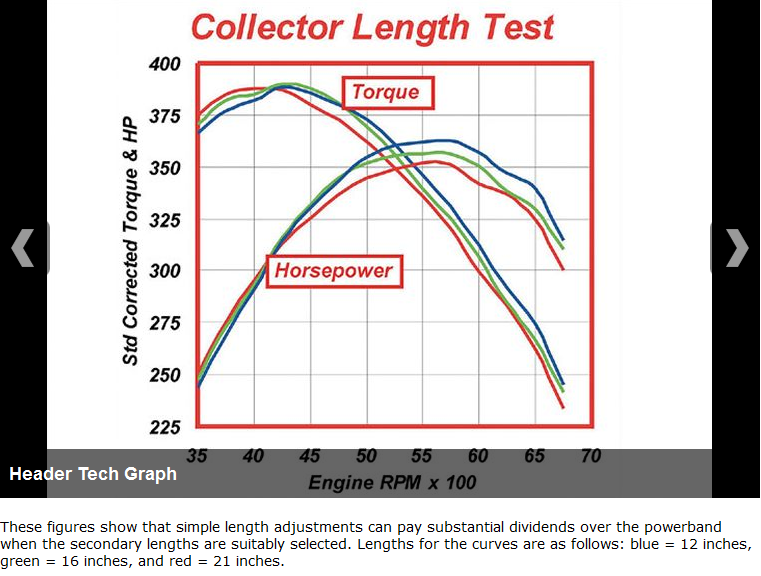
as you might reconize in respect of length I connected the long primaries to the short bends of the collectors 4-2-1, and vc vs the short primaries to long bend of the collectors. Also firing order has ben taken into account.
Hope this all back the effort at the dyno.
C.
as you might reconize in respect of length I connected the long primaries to the short bends of the collectors 4-2-1, and vc vs the short primaries to long bend of the collectors. Also firing order has ben taken into account.
Hope this all back the effort at the dyno.
C.
Attachments
its always Impressive, to see the amount of work required and the details of that work that was required to build custom components, especially engine and related components ,especially when you considered, that you need to work around the frame,suspension and engine to get headers to fit and still try to maintain semi-equal length tubes.
many guys would have tried to do that custom fabrication work and given up after a couple hours ,after realizing its not nearly as easy to do as it at first might appear to be, I think you did a really nice job for a first try!,Id point out that Ive seen many sets that looked far less well done, produced from supposed pro-muffler shops, whose main goal was making a profit , which is as I,m sure you know now an unlikely prospect once you start counting the time and materials required,to fabricate headers that fit a custom installation with suspension and frame components blocking the easy routes
if you get a chance, after those headers are installed, let us know your impression of both how the car sounds and how it runs and accelerates
yes as usual theres some very helpful linked info most guys will ignore to their LOSS
http://garage.grumpysperformance.com/index.php?threads/x-or-h-pipe.1503/
http://www.hotrod.com/how-to/engine/header-basics/
http://www.nmradigital.com/2014/10/21/headers-kick-huge-bolt-horsepower-heres-need-know/
http://www.headersbyed.com/hc_imphdrd.htm
http://www.headersbyed.com/getmoreinfo.htm
Last edited by a moderator:
Carlos
Active Member
header job is done
Cobra is waiting for the final tune next spring...
C.
Cobra is waiting for the final tune next spring...
C.
Attachments

can you list your current engine component, list of parts?
Carlos
Active Member
grumpyvette said:can you list your current engine component, list of parts?
I listed tech spec at the beginning of this post, just added the ECU/EFI part, mechanical stuff remaines unchanged.
If you have some spare time... I would be interested about HP & torque of my combo, calculated by your desktop dyno ;o)
As I will do the final tune in spring, your calculations could be a teaser...
C.
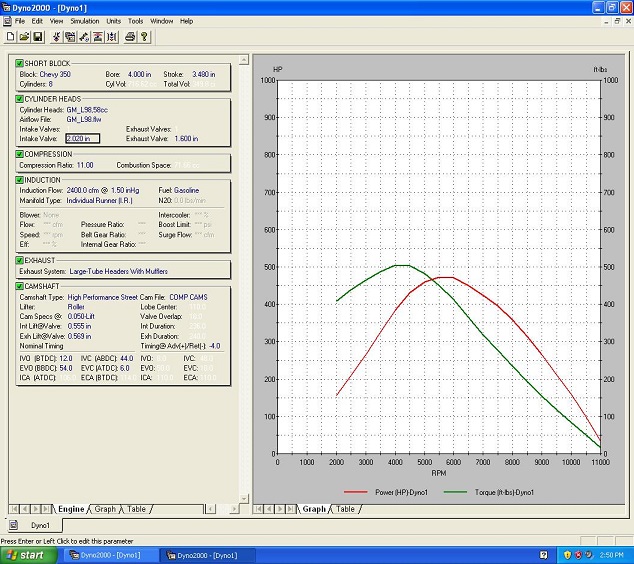
here my software dyno prediction based on what youve posted, it will be interesting how close the software dyno, wild guess comes to reality
(470 FLYWHEEL hp at 5500rpm/500 FLYWHEEL ft lbs at 4000rpm)
thats about 386hp/415 ft lbs at the rear wheels
assuming your weight adds about 200 lbs to the car......getting into the low 11 second range or high 10s in the 120mph or a bit more certainly seems do-able
http://www.race-cars.net/calculators/et_calculator.html
Carlos
Active Member
You seem to have a webcam...pretty closegrumpyvette said:assuming your weight adds about 200 lbs to the car......
The calculation looks promising - Thanks a lot.
On the other hand...I guess my transmission will give up w/o an upgrade.
It is a custom made 200R4 with custom made stall converter, was built it to withstand 400hp.
I was going with the small trans due to space restrictions those days.
Guess I need to speak with Greg @ phoenixtrans.com, he offers world class service, even to me over here at "world's end".
C.
WELL?
ANY FURTHER COBRA build progress?
PICTURES?
recent mods?
ANY FURTHER COBRA build progress?
PICTURES?
recent mods?
Carlos
Active Member
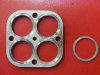
new gaskets by Harley Davidson )
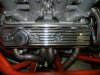
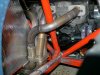
Latest update.
After having run my headers, it turned out I came to close to the footbox/floor. Very good during winter :mrgreen:
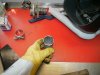
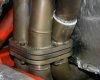
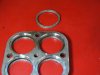
So I got had to make two 4 hole flanges as a spacer between the top and bottom part of the headers, to lower them a bit.
Flanges and gasket custom made (laser cut)
Unfortunately the gaskets didn't work out very well at the end...although flanges are perfectly plain.
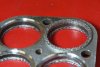
Due to the fact that the bolts are not putting enough pressure to the edges of the flanges, the gaskets are worn out after a few hundred miles.
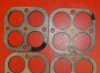
Blown off at the edges, as the pictures show.
Discussing this with my buddy who is a genius in workin on all years of Harleys, he came up with a new idea...
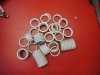
Why not using the gaskets they use for the HD motorcycles?
Fortunately the dimensions were perfect.
The flanges had to be modified to offer a proper seat for the gaskets, which needed a bit of milling work.
I will take the Cobra for the first trip in two weeks from now, hope this works better now.
Carlos
)Latest update.
After having run my headers, it turned out I came to close to the footbox/floor. Very good during winter :mrgreen:
So I got had to make two 4 hole flanges as a spacer between the top and bottom part of the headers, to lower them a bit.
Flanges and gasket custom made (laser cut)
Unfortunately the gaskets didn't work out very well at the end...although flanges are perfectly plain.
Due to the fact that the bolts are not putting enough pressure to the edges of the flanges, the gaskets are worn out after a few hundred miles.
Blown off at the edges, as the pictures show.
Discussing this with my buddy who is a genius in workin on all years of Harleys, he came up with a new idea...
Why not using the gaskets they use for the HD motorcycles?
Fortunately the dimensions were perfect.
The flanges had to be modified to offer a proper seat for the gaskets, which needed a bit of milling work.
I will take the Cobra for the first trip in two weeks from now, hope this works better now.
Carlos
Attachments
WOW! thanks for posting those clear pictures AND for relaying the idea for the gasket inserts!
hows the car running now and can you post more pictures of that cobra??
hows the car running now and can you post more pictures of that cobra??
Carlos
Active Member
...well, I am still lacking the final tune up. Since 4 years now as I just recognized when reading my own post.
Unfortunately the last year (again) was a year with too much business, so I put a few miles on the Cobra only.
I hope I can see the dyno soon. You can be shure I will post the figures / curves as soon as I have them.
First priority is to get on the road this weekend and hear the sound :mrgreen:
Carlos
lots more pictures of your cobra, your cobras engine, and posting several detailed updates on the tune up , and the changes and results of those changes, will be very much appreciated
lots more pictures of your cobra, your cobras engine, and posting several detailed updates on the tune up , and the changes and results of those changes, will be very much appreciated
just hoping you've made some further progress on the COBRA REPLICA and can post a few more detailed pictures??
8
87vette81big
Guest
Some day I will have the chance and spare $ to build big tube headers.