lineing up hood
just thought id give you some ideas as to how to remove and reinstall that hood while keeping the alignment just right
(1) before you loosen the first bolt clean the hinge and the area around it with fantastic/409/or something like that, that will remove all grease/oil
(2)lightly spray the hinge base area where it meets the hood surface with white paint( just a very light dusting coat)
(3) let it dry
( 4)now remove the bolts that go into the hood itself and leave the ones going into the car alone
(5)place the hood WHERE IT WONT GET KNOCKED OVER OR STEPPED ON
(6)when you finish working on the car(you are using fender protector mats aren't, you) the exact spot where the hinge mounts to the hood will be VERY clearly marked(outlined in white dusted paint)
(7) match hood to outline and tighten bolts
(8)spray area with the normal under hood color to hide any white paint dust
(9) let dry; and your done!
HOOD ADJUSTMENTS
Hood adjustments should be made in the
following order:
1. Loosen and tighten hood hinge nuts to align hood
laterally.
2. Loosen and tighten hood hinge frame bolts for
fore and aft adjustment.
3. Loosen and tighten either the lock and bolt
assemblies or latch assembly for lateral alignment
at rear of hood.
1984-1996 Hood Adjustment Procedure
608-154,
1985-1996 Stock Replacement Hood
Conditions of a misadjusted hood:
1. When the hood release handle is pulled, one or both sides do not pop up.
Reasons for the hood not popping up:
A. Weak gas struts or gas hood prop.
B.
Release cable out of adjustment. There should be about 1/8” gap between the
release arm on the receiving latch assembly and the receiving latch plate. To adjust
the cable loosen the plastic 9/16” nut on the cable at the latch and turn the sleeve.
C. Hood striker not aligned to receiving latch.
2. When closing the hood only one side or both sides will not latch shut.
Hood closing test:
Hold the hood as close to the center as possible. While holding the hood about 18”
above the closed position; release it and allow it to drop. This is the recommended
procedure for closing the Corvette hood and this hood closing test is performed on
every Corvette at the assembly plant.
3.
Wide gap between the door and the hood. The hood should be flush with the door edge.
Hood installation sequence in the Corvette assembly plant:
A. The doors are installed and fit to the body.
B. The hood is then installed and fit to the doors.
C. When the car enters the trim line the front bumper is then fit to the hood.
Hood adjustment procedure:
1. The hood’s too high or too low in the rear.
A. Loosen the striker spring 1 1/2” nut.
B.
Using a flat screwdriver turn the striker clockwise to lower the hood and counter
-
clockwise to raise the hood.
C.
Re-tighten the striker nut and close the hood to check the height. Note: Whenever
you adjust the striker you may have to lengthen or shorten the rubber bumper stop.
2. The hood will not latch on one or both sides.
A.
Open the hood and lower the hood until the hood is resting in the down
position, but not latched.
B.
Go to the side that won’t latch and push down on the hood. You should feel the
hood go into the receiving latch opening. If you feel it rubbing on one side, the
striker plate assembly needs adjusting.
Adjusting the striker plate:
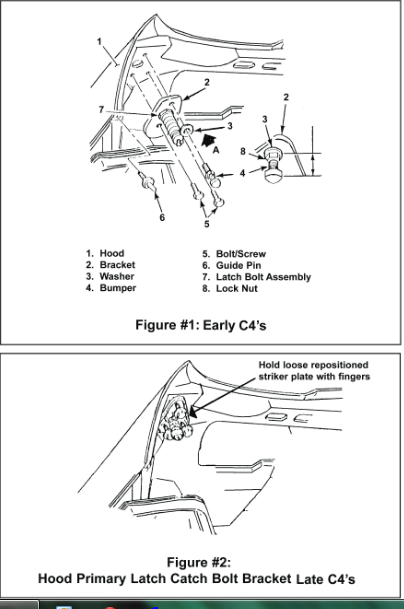
A.
On early C4’s with the rubber bumper stop on the car’s body, you will have to
loosen, don’t remove, the three 13mm headed bolts holding the bracket. The striker
spring is attached to the plate. It is not necessary to loosen it. (Figure 1)
B. When the plate bolts are loosened, the plate will move in both directions.
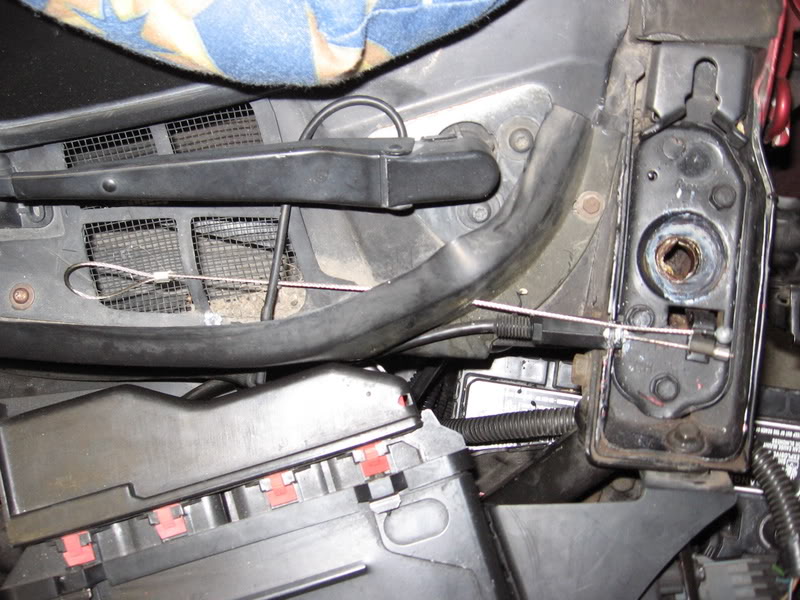
C.
Lower the hood and push the hood striker down into the receiving latch; but, don’t
latch it. With the hood pushed down, place your hand under the edge of the hood
and hold the striker plate. (Figure 2) Raise the hood and re-tighten the 13 mm
bolts. The paint marks will show how much the striker was out of position.
Mid America Motorworks, #1 Mid America Place, P.O. Box 1368, Effingham, IL 62401
800.500.1500 • Worldwide: 217.540.4200 • FAX: 217.540.4800 • www.mamotorworks.com • mail@mamotorworks.com
Copyright 2009 Mid America Motorworks
D.
Do the hood-drop test. The hood should latch properly. You may have to do this to
both sides of the hood.
On later C4 Corvettes the bumper stop is on the hood striker plate. To adjust the stop and
striker plate loosen the 15 mm nut holding the bumper stud to the striker plate. (Figure 2)
Tip #1 - If the front bumper gap is too close, too low, too high, or too wide, it is a bumper
adjustment issue, not a hood adjustment problem.
Tip #2 - If the hood on an 1988 or later does not pop up, or is heavy when opening, check for
weak gas-filled hood prop.
Tip #3 - The gas charged assist struts used on 1984 through early 1988 Corvettes can be in
-
stalled and the hood will open a lot easier. If the 1988 through early 1988 car’s hood is heavy
while opening, these gas assist struts need replaced.
once you get the hood open you might want to install emergency hood release cables, it lets you avoid a lot of aggravation in the future
http://www.corvettemagazine.com/1999/de ... hoodp1.asp
IF YOUR HOOD GETS STUCK THIS THREAD LINK MIGHT BE USEFUL
viewtopic.php?f=35&t=503
BTW I know how I go about it, but I,m always willing to learn new tricks or listen to tips you might have learned about so do any of you gentlemen have any good info on how to get the two hood pins lined up with the two hood latches on the car?
just thought id give you some ideas as to how to remove and reinstall that hood while keeping the alignment just right
(1) before you loosen the first bolt clean the hinge and the area around it with fantastic/409/or something like that, that will remove all grease/oil
(2)lightly spray the hinge base area where it meets the hood surface with white paint( just a very light dusting coat)
(3) let it dry
( 4)now remove the bolts that go into the hood itself and leave the ones going into the car alone
(5)place the hood WHERE IT WONT GET KNOCKED OVER OR STEPPED ON
(6)when you finish working on the car(you are using fender protector mats aren't, you) the exact spot where the hinge mounts to the hood will be VERY clearly marked(outlined in white dusted paint)
(7) match hood to outline and tighten bolts
(8)spray area with the normal under hood color to hide any white paint dust
(9) let dry; and your done!
HOOD ADJUSTMENTS
Hood adjustments should be made in the
following order:
1. Loosen and tighten hood hinge nuts to align hood
laterally.
2. Loosen and tighten hood hinge frame bolts for
fore and aft adjustment.
3. Loosen and tighten either the lock and bolt
assemblies or latch assembly for lateral alignment
at rear of hood.
1984-1996 Hood Adjustment Procedure
608-154,
1985-1996 Stock Replacement Hood
Conditions of a misadjusted hood:
1. When the hood release handle is pulled, one or both sides do not pop up.
Reasons for the hood not popping up:
A. Weak gas struts or gas hood prop.
B.
Release cable out of adjustment. There should be about 1/8” gap between the
release arm on the receiving latch assembly and the receiving latch plate. To adjust
the cable loosen the plastic 9/16” nut on the cable at the latch and turn the sleeve.
C. Hood striker not aligned to receiving latch.
2. When closing the hood only one side or both sides will not latch shut.
Hood closing test:
Hold the hood as close to the center as possible. While holding the hood about 18”
above the closed position; release it and allow it to drop. This is the recommended
procedure for closing the Corvette hood and this hood closing test is performed on
every Corvette at the assembly plant.
3.
Wide gap between the door and the hood. The hood should be flush with the door edge.
Hood installation sequence in the Corvette assembly plant:
A. The doors are installed and fit to the body.
B. The hood is then installed and fit to the doors.
C. When the car enters the trim line the front bumper is then fit to the hood.
Hood adjustment procedure:
1. The hood’s too high or too low in the rear.
A. Loosen the striker spring 1 1/2” nut.
B.
Using a flat screwdriver turn the striker clockwise to lower the hood and counter
-
clockwise to raise the hood.
C.
Re-tighten the striker nut and close the hood to check the height. Note: Whenever
you adjust the striker you may have to lengthen or shorten the rubber bumper stop.
2. The hood will not latch on one or both sides.
A.
Open the hood and lower the hood until the hood is resting in the down
position, but not latched.
B.
Go to the side that won’t latch and push down on the hood. You should feel the
hood go into the receiving latch opening. If you feel it rubbing on one side, the
striker plate assembly needs adjusting.
Adjusting the striker plate:
A.
On early C4’s with the rubber bumper stop on the car’s body, you will have to
loosen, don’t remove, the three 13mm headed bolts holding the bracket. The striker
spring is attached to the plate. It is not necessary to loosen it. (Figure 1)
B. When the plate bolts are loosened, the plate will move in both directions.
C.
Lower the hood and push the hood striker down into the receiving latch; but, don’t
latch it. With the hood pushed down, place your hand under the edge of the hood
and hold the striker plate. (Figure 2) Raise the hood and re-tighten the 13 mm
bolts. The paint marks will show how much the striker was out of position.
Mid America Motorworks, #1 Mid America Place, P.O. Box 1368, Effingham, IL 62401
800.500.1500 • Worldwide: 217.540.4200 • FAX: 217.540.4800 • www.mamotorworks.com • mail@mamotorworks.com
Copyright 2009 Mid America Motorworks
D.
Do the hood-drop test. The hood should latch properly. You may have to do this to
both sides of the hood.
On later C4 Corvettes the bumper stop is on the hood striker plate. To adjust the stop and
striker plate loosen the 15 mm nut holding the bumper stud to the striker plate. (Figure 2)
Tip #1 - If the front bumper gap is too close, too low, too high, or too wide, it is a bumper
adjustment issue, not a hood adjustment problem.
Tip #2 - If the hood on an 1988 or later does not pop up, or is heavy when opening, check for
weak gas-filled hood prop.
Tip #3 - The gas charged assist struts used on 1984 through early 1988 Corvettes can be in
-
stalled and the hood will open a lot easier. If the 1988 through early 1988 car’s hood is heavy
while opening, these gas assist struts need replaced.
once you get the hood open you might want to install emergency hood release cables, it lets you avoid a lot of aggravation in the future
http://www.corvettemagazine.com/1999/de ... hoodp1.asp
IF YOUR HOOD GETS STUCK THIS THREAD LINK MIGHT BE USEFUL
viewtopic.php?f=35&t=503
BTW I know how I go about it, but I,m always willing to learn new tricks or listen to tips you might have learned about so do any of you gentlemen have any good info on how to get the two hood pins lined up with the two hood latches on the car?
Last edited by a moderator: