Starter Troubleshooting, READ ALL THE LINKED INFO
start with the basics , clean your battery cable ends and make sure the connectors are clean, not corroborated and firmly clamped or bolted to the battery,verify youve got fuel pressure ,at the fuel rails and the fuel filter, and the fuel rails show no indication of water in the fuel, test for water by bleed fuel from the valve on the fuel rail and replacing any fuel filter more than 6 months old.
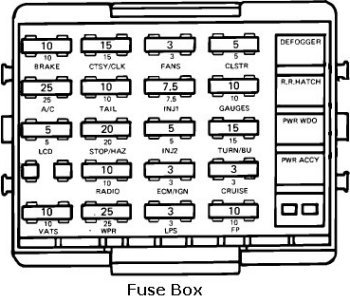
CHECK ALL YOUR FUSES WITH A MULTI METER
http://www.harborfreight.com/catalogsea ... al+cleaner

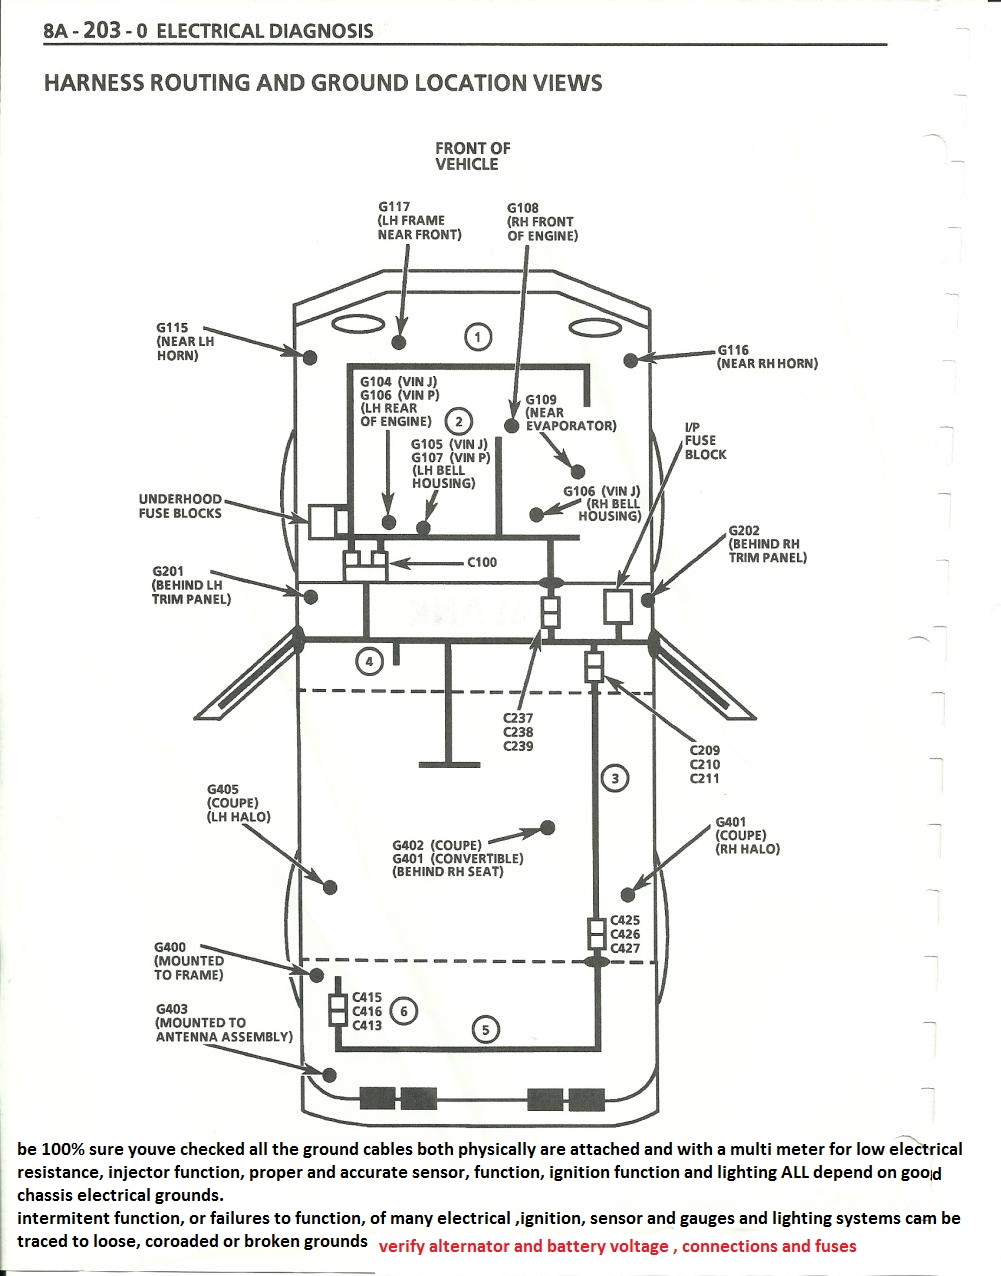
btw the most common electrically related problem I see on a consistent basis is corroded or badly rusted or defective battery connections and grounds so before you go crazy its a good idea to replace those as a first step in any electrical problem diagnoses
BTW FAULTY GROUNDS, IN MANY CARS AND ESPECIALLY NEWER CORVETTES CAUSE MANY ELECTRICAL ISSUES SO IF YOU HAVE INTERMITTENT ELECTRICAL ISSUES CHECK THEM CAREFULLY
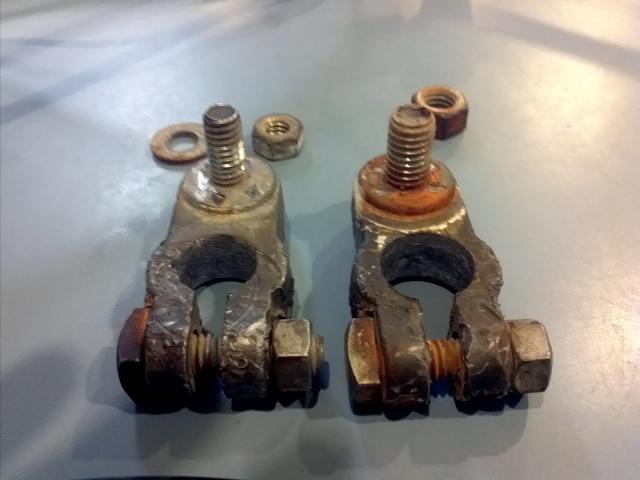
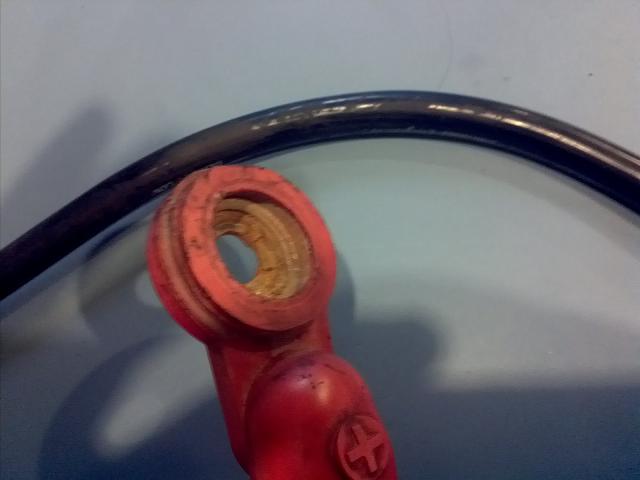
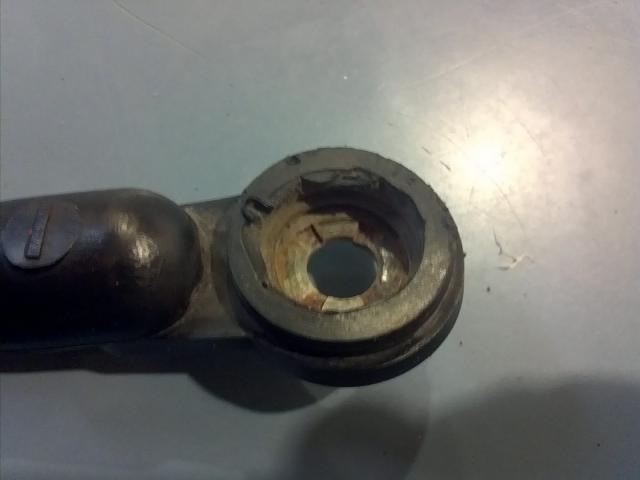
the newer side bolt battery connectors are well known for being loose or making only minimal contact so if required replace the battery cables or connector bolts, the more expensive BRASS CONNECTOR BOLTS ARE WORTH THE MONEY

and then get out a multi meter and verify your battery ,and alternator produce MORE than 12 volts UNDER CRANKING LOADS
http://www.ehow.com/video_2328097_diagn ... ystem.html
This seems to be a much-requested procedure, so I've added it to my list of technical articles.
The situation here is that your car won't start. You turn the key to start, and you get nothing. This procedure is only for those times when the starter doesn't even try to crank the engine. You turn the key and you get nothing or maybe a click and some dimming of the idiot lights.
Here's the troubleshooting procedure for you.
Your first goal is to determine the state of charge of your battery. Turn your headlights on and see how bright they are. If they are of normal brightness then you are probably OK. If you have a voltmeter, put it across the terminals of the battery. A fully charged battery will read around 12.5 volts, a dead battery will be less than say 11.8 volts. If your battery is dead, charge it and then proceed to the next step.
Next you want to find out if your ignition switch is sending power to the solenoid. A preliminary check for this is if your idiot lights dim when you turn the key to start, that's a good indicator that the ignition switch is functioning properly. To check for sure, get under the car and disconnect from the solenoid the wire that comes from the ignition switch. It connects to a push-on spade connector on the solenoid. Fuel-injected cars have two spade connectors on the solenoid. In that case, the ignition switch wire will be the heavier of the two wires. Disconnect the wire, then use your voltmeter to check for 12v at that wire. Put the positive lead to the wire and ground the negative lead, then have your helper turn the key to start. When your helper does this, you should read 12v at the wire. If not, suspect a defective ignition switch or a break in the wiring (or disconnected) wire between the battery and ignition switch or ignition switch and starter. Repair and try again. If you do have power at that wire, move on to the next step.
Next you want to see if the problem lies in the starter motor itself. Looking at the back of the solenoid, you will see two big post electrical connectors. What you want to do here (TRANSMISSION IN NEUTRAL -- PARKING BRAKE ON!!!!!!!!!!!!!) is grab a big screwdriver or a pair of insulated pliers. Touch only the plastic or rubber handle. You want to take this tool and short across the two big post terminals. Be prepared for some sparks, but hold the tool up there until you make a good connection. What you are doing here is connecting the battery directly to the starter motor, WITHOUT engaging the solenoid. So what should happen is that the starter motor will spin but will not crank the engine. It should sound like a regular electric motor, no gravelly or strange noises. If it does not spin or sounds really bad, have it rebuilt. If it works like it's supposed to, the motor is good so move on to the next step.
OK, you're now starting to run out of possible problems! The next test is to see if the solenoid is working. Here's how this goes. First, TRANSMISSION IN NEUTRAL -- PARKING BRAKE ON!!!!!!!. Look at the back of the solenoid. There are the two big post terminals you just played with. Look at the one on the right. You will see that there is simply a short heavy braided wire attached to it that runs down into the starter motor. What you want to do here is spike the positive lead of your voltmeter into this braided wire and ground the negative lead. Then have your helper turn the key to start. When your helper does this, you should hear a clunk and measure 12v with your voltmeter (additionally, the engine should be cranking as this happens). If you do not measure 12v, your solenoid is not activating and is not sending power to the starter motor. I had a case on my van where the solenoid would clunk but I was only measuring 1.5 volts at that braided wire, and the starter motor was not turning. I had the solenoid rebuilt at a shop and that solved the problem.
What you can also do to further test the solenoid is to remove the wire from the ignition switch from the solenoid. TRANSMISSION IN NEUTRAL -- PARKING BRAKE ON!!!!!!!. Take your screwdriver or insulated pliers and short the big post with all the wires to it to the terminal on the solenoid where the ignition switch wire plugged in. This will bypass the ignition switch and send full battery current directly to the solenoid. This should make the solenoid kick in and the engine should crank. If it cranks this way but not when you do the test in the paragraph above, then your solenoid works but it's either sticky or you have a big voltage drop when going through the ignition switch, possibly a dead ignition switch. The preceding parts of this test should have identified a bad ignition switch already, so if you've gotten this far and it works when you short the solenoid directly to battery power, you likely just have an old stick solenoid that needs a lot more current to activate than it's getting from the ignition switch. See below for your options.
If you do not measure 12v at the braided wire as above, then there are two possible situations. First is that you have the famous VW hot-start sticky solenoid problem. What you should do (and I recommend this as a first remedy to anyone who is experiencing the above problem) is to wire a relay into the circuit. The circuit is already marginal due to the lack of a relay from the factory and the long wiring path. Age and temperature of the wires serves to further degrade the situation. You can wire a relay into the system and starting reliability will be greatly improved. See my relay installation article for instructions.
If, after wiring in the relay, your situation does not improve, then you have to face the music -- your solenoid is toast. Remove the starter and have the solenoid rebuilt -- if your starter motor tests fine and you are short on cash, you may wish to just have the solenoid rebuilt, as I did. I took it to a local automotive electrical rebuilder and that solved my problem. Or you can go whole hog and exchange your starter/solenoid assembly for a rebuilt model bought at a parts store. This, however, can be quite expensive.
And that should do it, that's a fairly good troubleshooting procedure that ought to tell you where you stand and what you need to fix.
Sean Bartnik
April 6, 1998


good related info
viewtopic.php?f=36&t=63&p=3403&hilit=vats+resistor#p3403
http://www.prestolite.com/pgs_training/training_4.php
http://www.classictruckshop.com/clubs/e ... nition.htm
http://www.2carpros.com/first_things/ca ... _crank.htm
http://autorepair.about.com/od/troubles ... -start.htm
http://www.aa1car.com/library/voltage_drop_testing.htm
viewtopic.php?f=32&t=1401&p=3104#p3104
viewtopic.php?f=36&t=3222&p=8575&hilit=alternator#p8575
viewtopic.php?f=36&t=63&p=3403&hilit=vats+resistor#p3403
viewtopic.php?f=50&t=609&p=810#p810
start with the basics , clean your battery cable ends and make sure the connectors are clean, not corroborated and firmly clamped or bolted to the battery,verify youve got fuel pressure ,at the fuel rails and the fuel filter, and the fuel rails show no indication of water in the fuel, test for water by bleed fuel from the valve on the fuel rail and replacing any fuel filter more than 6 months old.
CHECK ALL YOUR FUSES WITH A MULTI METER
http://www.harborfreight.com/catalogsea ... al+cleaner
btw the most common electrically related problem I see on a consistent basis is corroded or badly rusted or defective battery connections and grounds so before you go crazy its a good idea to replace those as a first step in any electrical problem diagnoses
BTW FAULTY GROUNDS, IN MANY CARS AND ESPECIALLY NEWER CORVETTES CAUSE MANY ELECTRICAL ISSUES SO IF YOU HAVE INTERMITTENT ELECTRICAL ISSUES CHECK THEM CAREFULLY
the newer side bolt battery connectors are well known for being loose or making only minimal contact so if required replace the battery cables or connector bolts, the more expensive BRASS CONNECTOR BOLTS ARE WORTH THE MONEY
and then get out a multi meter and verify your battery ,and alternator produce MORE than 12 volts UNDER CRANKING LOADS
http://www.ehow.com/video_2328097_diagn ... ystem.html
This seems to be a much-requested procedure, so I've added it to my list of technical articles.
The situation here is that your car won't start. You turn the key to start, and you get nothing. This procedure is only for those times when the starter doesn't even try to crank the engine. You turn the key and you get nothing or maybe a click and some dimming of the idiot lights.
Here's the troubleshooting procedure for you.
Your first goal is to determine the state of charge of your battery. Turn your headlights on and see how bright they are. If they are of normal brightness then you are probably OK. If you have a voltmeter, put it across the terminals of the battery. A fully charged battery will read around 12.5 volts, a dead battery will be less than say 11.8 volts. If your battery is dead, charge it and then proceed to the next step.
Next you want to find out if your ignition switch is sending power to the solenoid. A preliminary check for this is if your idiot lights dim when you turn the key to start, that's a good indicator that the ignition switch is functioning properly. To check for sure, get under the car and disconnect from the solenoid the wire that comes from the ignition switch. It connects to a push-on spade connector on the solenoid. Fuel-injected cars have two spade connectors on the solenoid. In that case, the ignition switch wire will be the heavier of the two wires. Disconnect the wire, then use your voltmeter to check for 12v at that wire. Put the positive lead to the wire and ground the negative lead, then have your helper turn the key to start. When your helper does this, you should read 12v at the wire. If not, suspect a defective ignition switch or a break in the wiring (or disconnected) wire between the battery and ignition switch or ignition switch and starter. Repair and try again. If you do have power at that wire, move on to the next step.
Next you want to see if the problem lies in the starter motor itself. Looking at the back of the solenoid, you will see two big post electrical connectors. What you want to do here (TRANSMISSION IN NEUTRAL -- PARKING BRAKE ON!!!!!!!!!!!!!) is grab a big screwdriver or a pair of insulated pliers. Touch only the plastic or rubber handle. You want to take this tool and short across the two big post terminals. Be prepared for some sparks, but hold the tool up there until you make a good connection. What you are doing here is connecting the battery directly to the starter motor, WITHOUT engaging the solenoid. So what should happen is that the starter motor will spin but will not crank the engine. It should sound like a regular electric motor, no gravelly or strange noises. If it does not spin or sounds really bad, have it rebuilt. If it works like it's supposed to, the motor is good so move on to the next step.
OK, you're now starting to run out of possible problems! The next test is to see if the solenoid is working. Here's how this goes. First, TRANSMISSION IN NEUTRAL -- PARKING BRAKE ON!!!!!!!. Look at the back of the solenoid. There are the two big post terminals you just played with. Look at the one on the right. You will see that there is simply a short heavy braided wire attached to it that runs down into the starter motor. What you want to do here is spike the positive lead of your voltmeter into this braided wire and ground the negative lead. Then have your helper turn the key to start. When your helper does this, you should hear a clunk and measure 12v with your voltmeter (additionally, the engine should be cranking as this happens). If you do not measure 12v, your solenoid is not activating and is not sending power to the starter motor. I had a case on my van where the solenoid would clunk but I was only measuring 1.5 volts at that braided wire, and the starter motor was not turning. I had the solenoid rebuilt at a shop and that solved the problem.
What you can also do to further test the solenoid is to remove the wire from the ignition switch from the solenoid. TRANSMISSION IN NEUTRAL -- PARKING BRAKE ON!!!!!!!. Take your screwdriver or insulated pliers and short the big post with all the wires to it to the terminal on the solenoid where the ignition switch wire plugged in. This will bypass the ignition switch and send full battery current directly to the solenoid. This should make the solenoid kick in and the engine should crank. If it cranks this way but not when you do the test in the paragraph above, then your solenoid works but it's either sticky or you have a big voltage drop when going through the ignition switch, possibly a dead ignition switch. The preceding parts of this test should have identified a bad ignition switch already, so if you've gotten this far and it works when you short the solenoid directly to battery power, you likely just have an old stick solenoid that needs a lot more current to activate than it's getting from the ignition switch. See below for your options.
If you do not measure 12v at the braided wire as above, then there are two possible situations. First is that you have the famous VW hot-start sticky solenoid problem. What you should do (and I recommend this as a first remedy to anyone who is experiencing the above problem) is to wire a relay into the circuit. The circuit is already marginal due to the lack of a relay from the factory and the long wiring path. Age and temperature of the wires serves to further degrade the situation. You can wire a relay into the system and starting reliability will be greatly improved. See my relay installation article for instructions.
If, after wiring in the relay, your situation does not improve, then you have to face the music -- your solenoid is toast. Remove the starter and have the solenoid rebuilt -- if your starter motor tests fine and you are short on cash, you may wish to just have the solenoid rebuilt, as I did. I took it to a local automotive electrical rebuilder and that solved my problem. Or you can go whole hog and exchange your starter/solenoid assembly for a rebuilt model bought at a parts store. This, however, can be quite expensive.
And that should do it, that's a fairly good troubleshooting procedure that ought to tell you where you stand and what you need to fix.
Sean Bartnik
April 6, 1998
good related info
viewtopic.php?f=36&t=63&p=3403&hilit=vats+resistor#p3403
http://www.prestolite.com/pgs_training/training_4.php
http://www.classictruckshop.com/clubs/e ... nition.htm
http://www.2carpros.com/first_things/ca ... _crank.htm
http://autorepair.about.com/od/troubles ... -start.htm
http://www.aa1car.com/library/voltage_drop_testing.htm
viewtopic.php?f=32&t=1401&p=3104#p3104
viewtopic.php?f=36&t=3222&p=8575&hilit=alternator#p8575
viewtopic.php?f=36&t=63&p=3403&hilit=vats+resistor#p3403
viewtopic.php?f=50&t=609&p=810#p810
Last edited by a moderator:


