From the February, 2009 issue of Circle Track
By Jeff Huneycutt
Piston Ring Prep
It can be a hassle filing...
read full caption
Piston Ring Prep
It can be a hassle filing three sets of rings per cylinder, but when done correctly the results can mean more power and less fall-off before the next rebuild.
Most of us consider piston rings little more than a necessary evil. That's probably because grinding rings is a time-consuming chore. And who hasn't accidentally ground a gap too large and wasted both time and money ordering up a replacement?
But when done right, piston rings can create a power advantage by maximizing dynamic engine compression while still maintaining good oil control. This involves both proper selection for the intended use and proper preparation when gapping your rings. To get more information on making your piston rings work for you, we spoke with engine builder Keith Dorton, owner of Automotive Specialists.
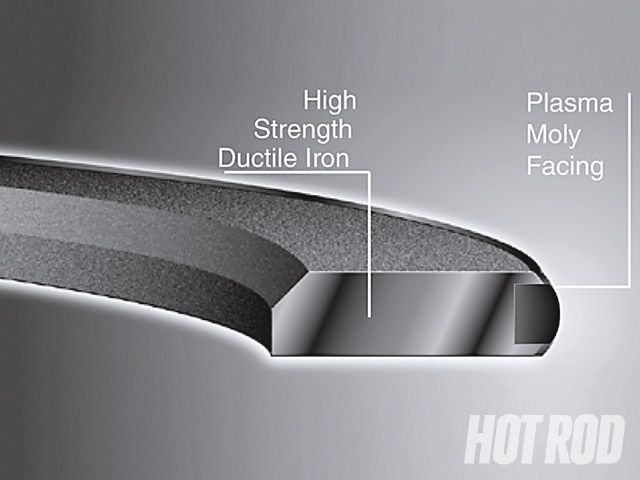
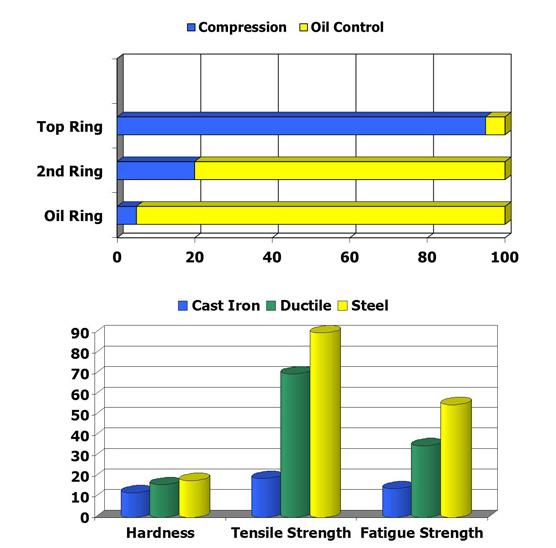
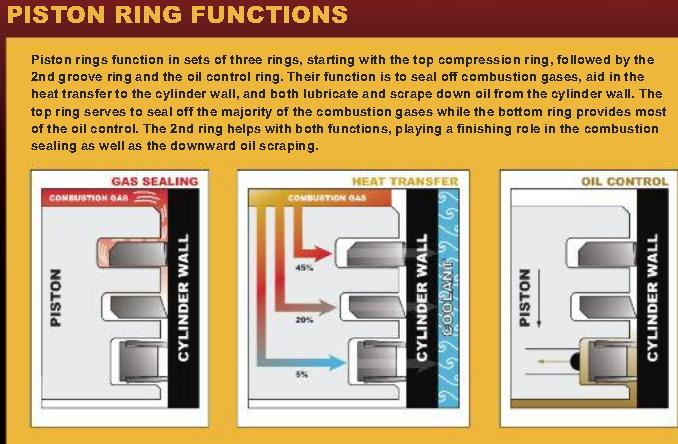
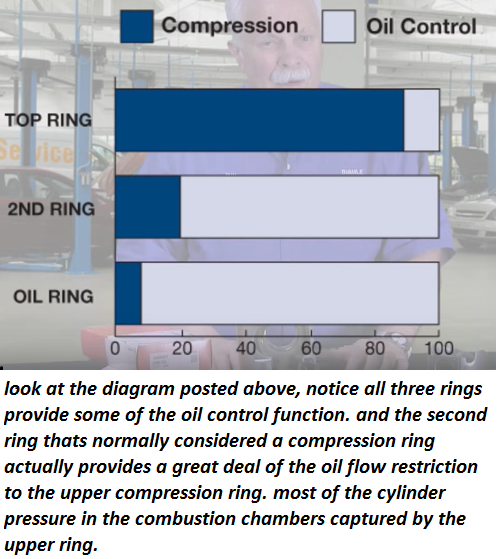
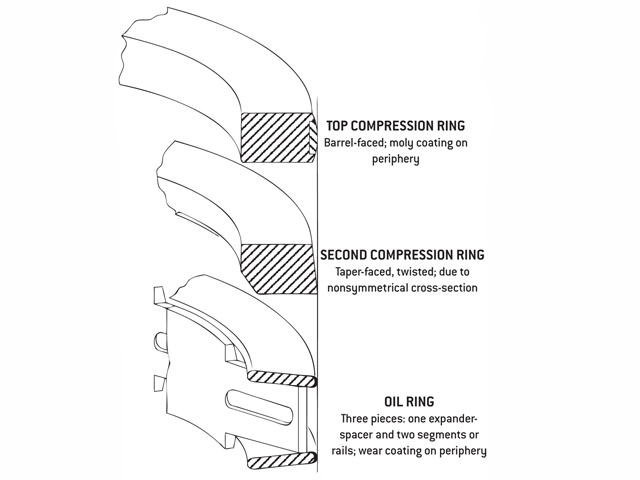
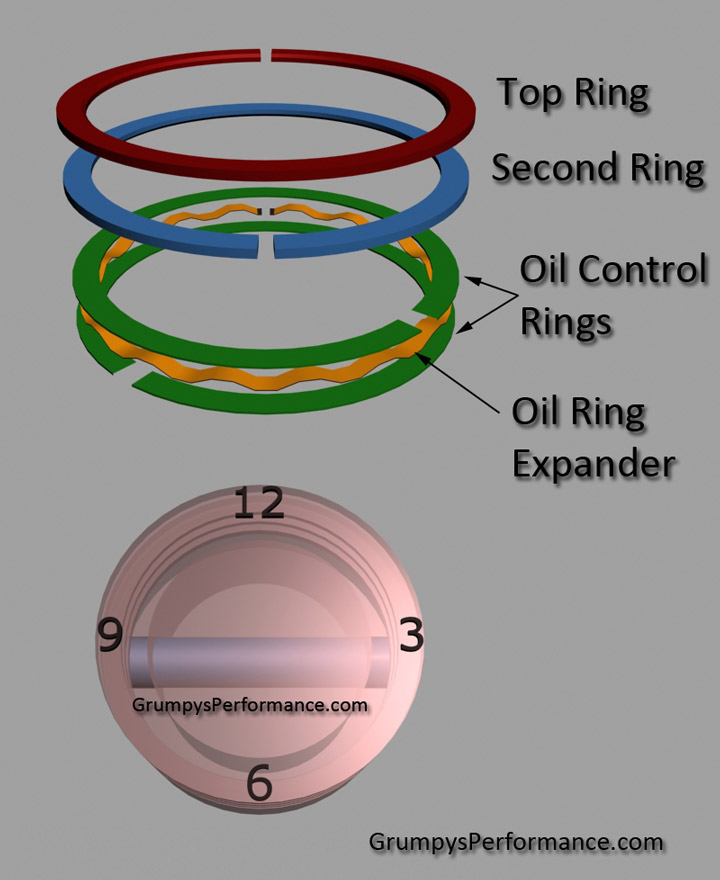
The purpose of piston rings is to seal the gap between the sides of the piston and the cylinder wall. On almost all stock car pistons there are three rings. The top ring is in direct contact with the combustion flame and sees the most heat. Because of that, it usually has a moly coating to make it better able to withstand the harsh environment. For racing, the primary purpose of the top ring is to effectively seal the combustion chamber to maintain compression.
Piston Ring Prep
Here is a ring that hasn't...
read full caption
Piston Ring Prep
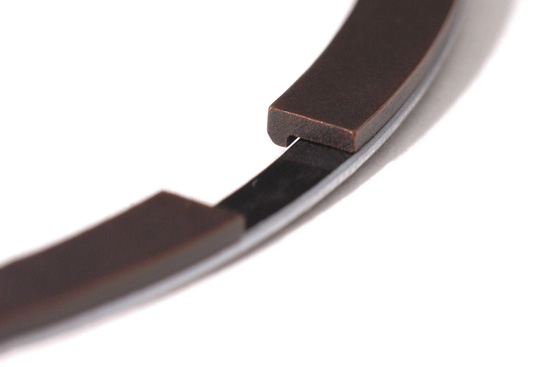
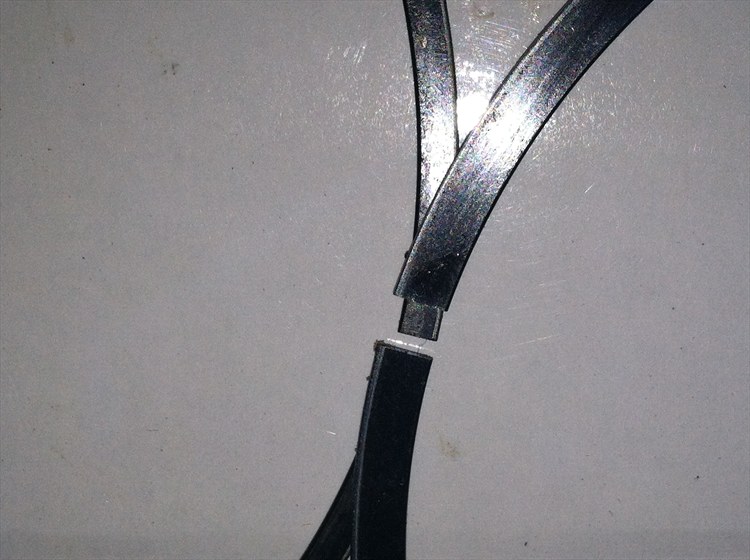
Here is a ring that hasn't been ground properly. As you can see, the ends are no longer square to each other. It may not seem like much, but this can lead to a power-robbing loss of combustion pressure.
In OEM applications where a set of rings must be expected to last over 100,000 miles, the second ring is also expected to help maintain compression. But for racing, this isn't an issue. Instead, the second ring mostly helps with oil control. You do not want the second ring to provide too much of a seal because in a high-rpm application like racing, combustion pressure that passes the top ring and gets caught by the second ring can lead to ring flutter in the top ring. This should be avoided at nearly all costs.
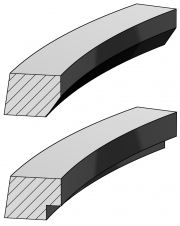
The second ring is typically constructed from softer ductile iron because it doesn't see the heat that the top ring is subjected to, and also because the softer material helps the ring seal to the cylinder wall. The face of the ring also typically has a taper to it so that only the bottom portion of the ring actually touches the cylinder wall. This helps it function better as an oil scraper. The taper wears over time, and once it wears so much that the entire face of the ring is in contact with the cylinder wall, the ring's usefulness is long gone.
most applications would have a ring gap of about .004-.005 per inch of bore diam.
but tests have shown even a .050 end gap has only a marginal effect on engine power or blow by, simply because at even 1000rpm theres slightly more than 8 power strokes per second, and the pressure is ner max mostly in the 10 degrees before and 30 degrees after TDC, theres very little time to force much thru a .005 or less piston to bore clearance and two .050 end gaps even if that was the case
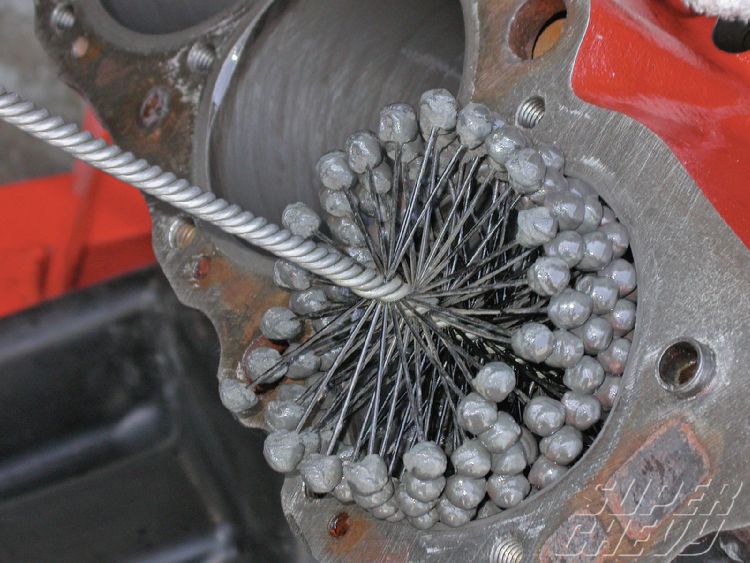
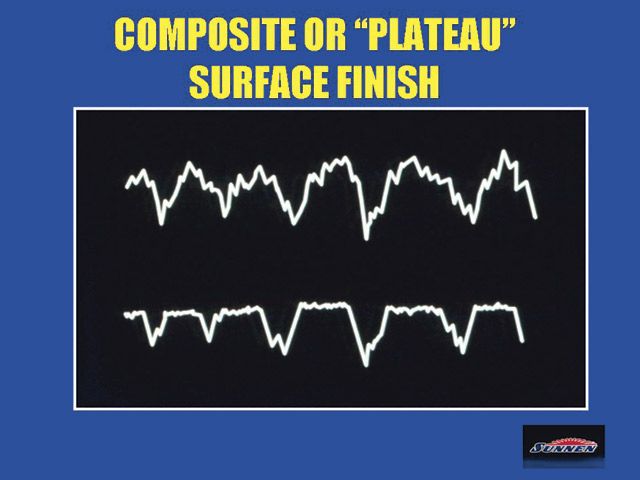
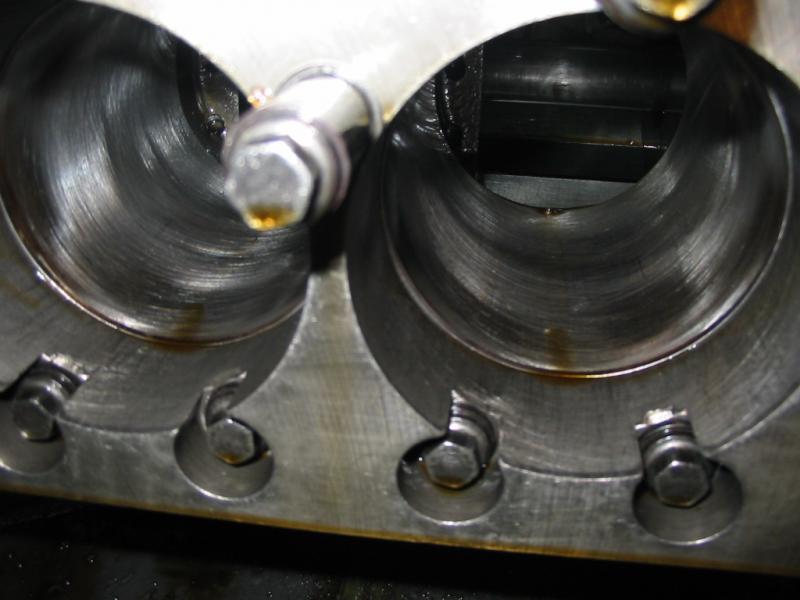
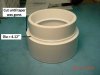
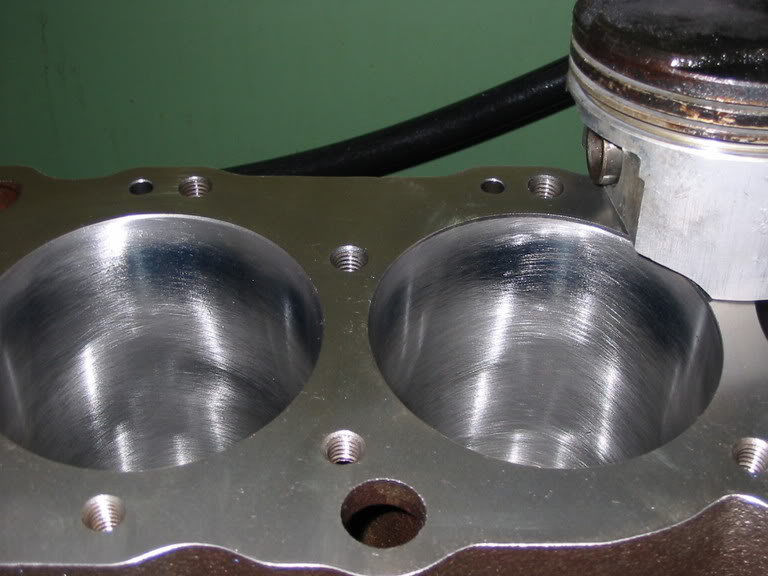
BORING and HONING a blocks bore are best done at a local machine shop where clearances and surface finish are more accurately controlled, BUT, IF your going to be honing the bores for MOLY rings I,d suggest a 240-280 grit hone a 45 degree cross hatch angle and a constant flow of flushing liquid washing over the stones and bore surface to keep the stones from clogging with micro grit trash, that gets removed from the high points in the bore surface.
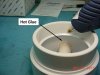
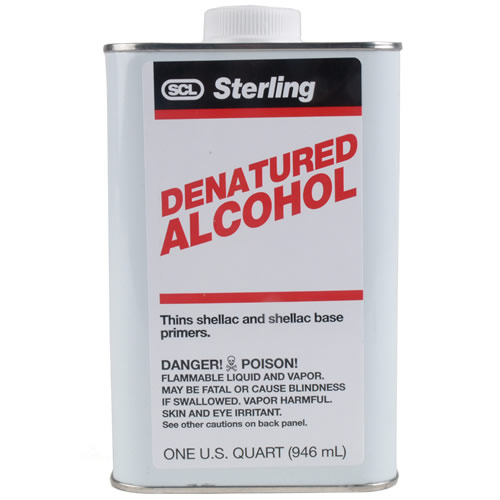
Ive used both a flush of 90% diesel fuel mixed with 10% marvel mystery oil, as a flush and Ive used hot water with a couple teaspoons of dawn dish washing soap, both work, but I think the hot water and dawn solution produced the most uniform result, on the bore surface but that requires a good deal of cleaning and washing the block just like the diesel fuel mix as you darn sure want to remove all traces of grit and prevent rust forming from moisture so after hone work I power wash the block with a pressure washer,, flush the surface with alcohol paint thinner as it tends to get under and lift out micro crud and speed surface dry time ,then I spray it over with WD40 and heat it with a heat gun to remove moisture traces then re-spray it with WD, 40 [/b]
http://www.harborfreight.com/1600-watt- ... 69342.html
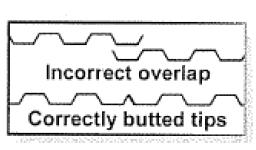
BTW GAPLESS PISTON RINGS HAVE TWO PIECES THAT EACH MUST BE GAPPED< THE IDEA IS THAT THE TWO GAPS IN THE SET ARE ON OPPOSITE SIDES OF THE PISTON GROOVE
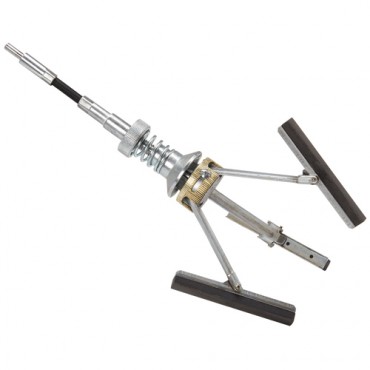
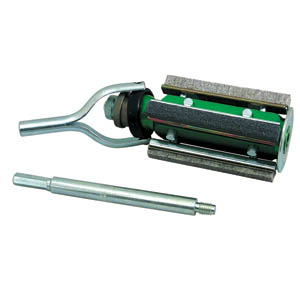
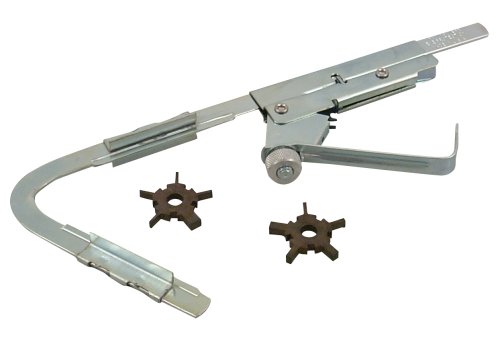
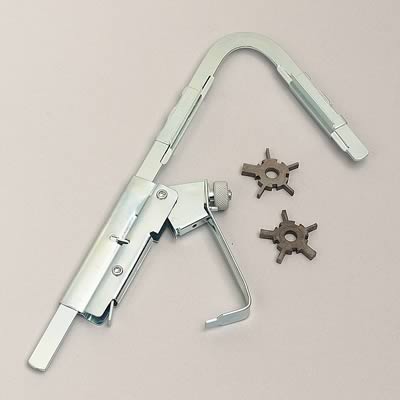
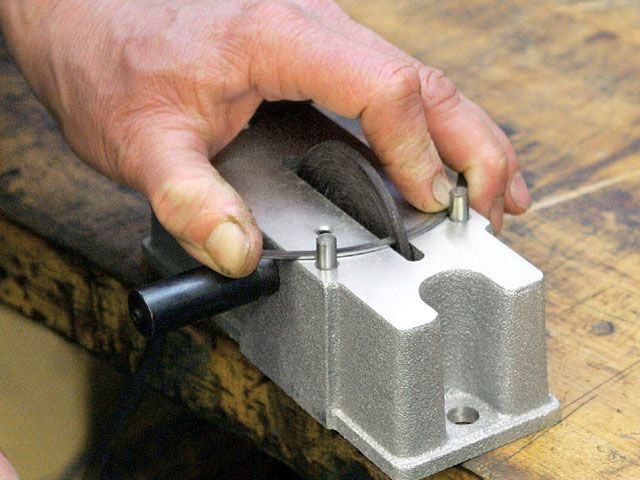
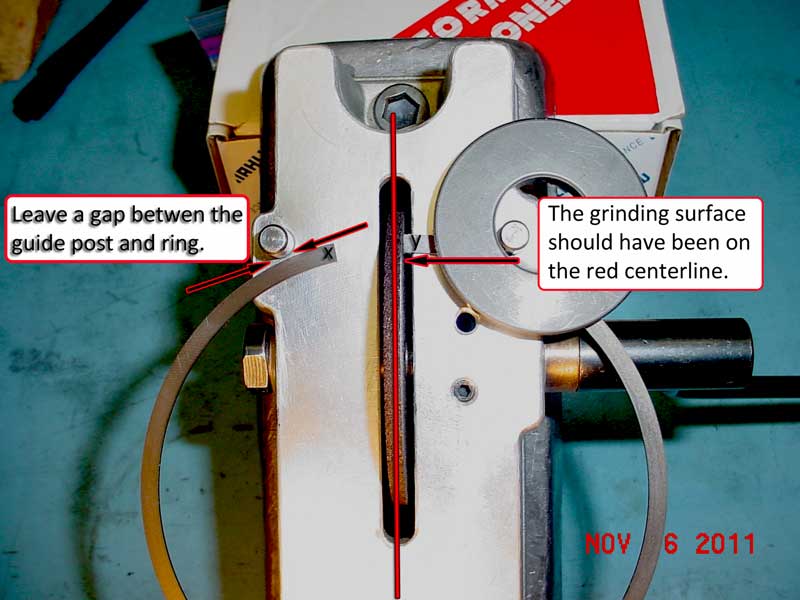
Although Dorton uses a powered ring grinder that greatly speeds up the process, a manual crank-style grinder, such as this one from Powerhouse Products, works just as well (if you are willing to be patient) and costs a lot less.
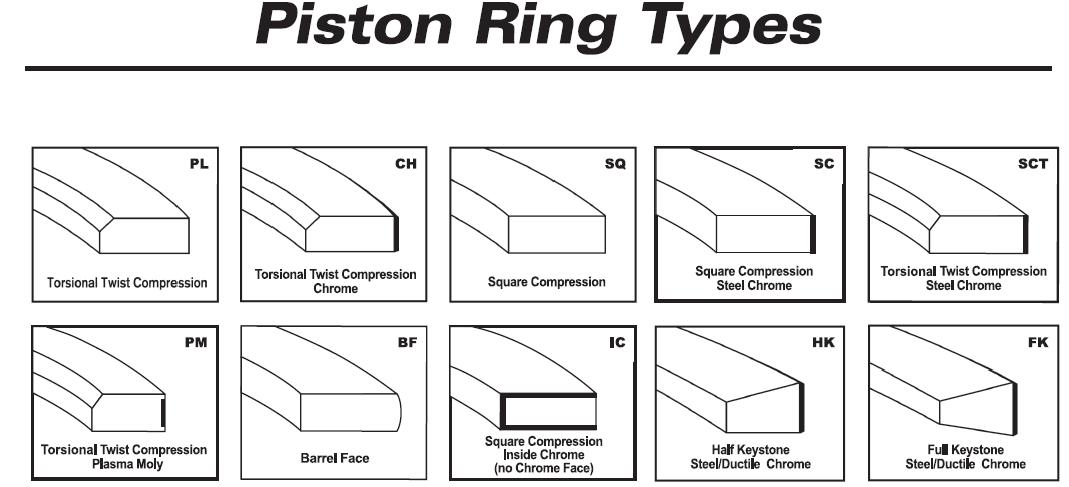
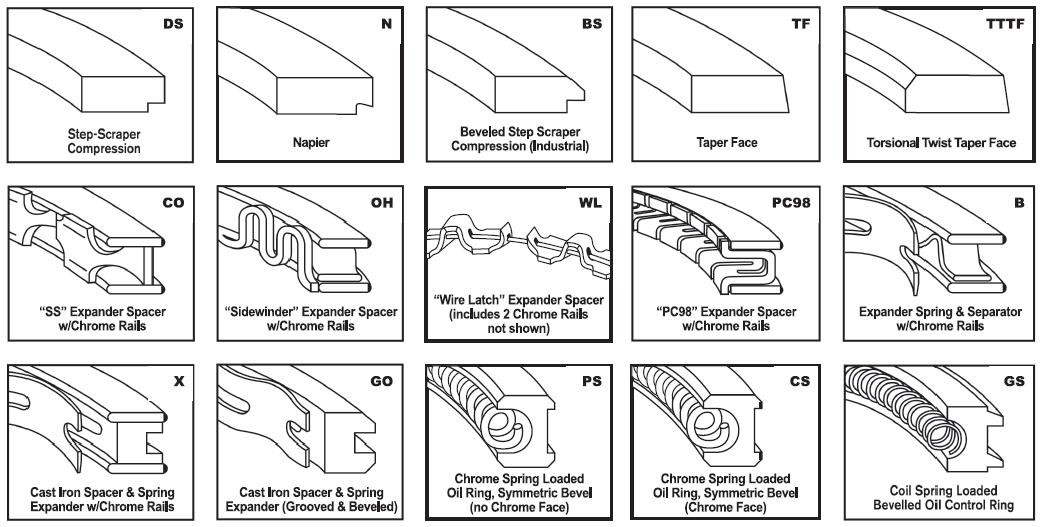
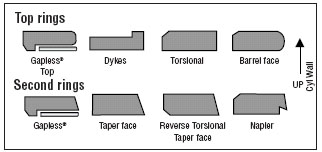
Some high-end ring packs will also feature a second ring with a Napier-style design. A Napier ring has a "ridge" that steps up so that the inside of the ring is thicker than the outside. Dorton says that the effect is to provide more material inside the ring land for increased rigidity, while the face of the ring that contacts the cylinder wall is thinner to reduce sliding friction between the ring and the cylinder bore. Dorton says the Napier design works but, as you might expect, the extra engineering does come with extra costs attached. Usually, Dorton only uses Napier-style rings in dry sump applications where the vacuum created in the crankcase helps keep oil out of the combustion chambers.
Finally, the oil ring is actually an assembly of two scraper rings and a center expander ring. As it's named, the oil ring's only job is to pull oil off the cylinder walls and dump it into the oil pan.
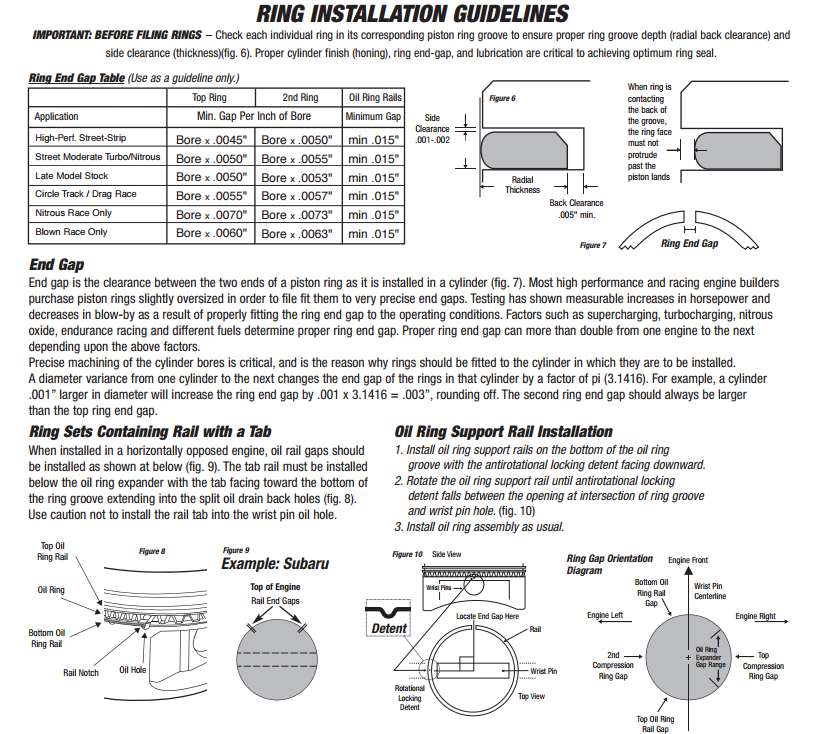
Most ring packs for street applications come pre-gapped. But that simply isn't precise enough for racing where gaps should be accurate to within 0.001 inch or less. The purpose of the gap is to allow enough room so that the ring can expand once the engine is hot so that the ends almost touch. The trick is to get the gap as small as possible when the engine is hot without the ends butting. It's better to go too large rather than too small because if the ends do butt, it will lead to scuffing the cylinder walls, micro-welding of the ring to the piston's ring lands, and possibly even breaking the ring.
After filing your ring and...
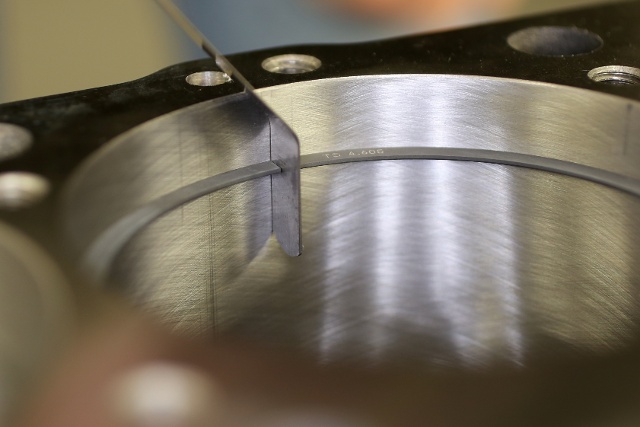
After filing your ring and before trial fitting inside the cylinder bore, take a moment to knock the burr off of the outside edge of the ring. If this isn't done it can throw off your gap measurement.
Dorton uses a powered ring filer, but a more traditional crank-style ring filer is a more economical option for those of us who aren't building engines for a living. No matter what you use, you must be careful to only make small cuts on the rings because you can't put material back on. Also, be prepared to put in a little practice with a couple of old rings before you can reliably make smooth, perpendicular cuts on the rings.
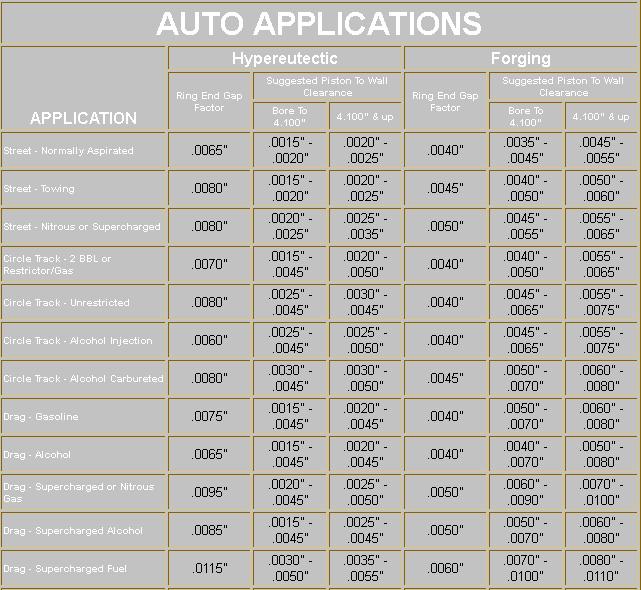
The size of the ring gap necessary varies by the amount of heat generated and which ring you are talking about. But the variables are mostly limited to whether you are running naturally aspirated or using a turbocharger. Fortunately, for stock car racing, there isn't as much variance whether we are talking about Street Stocks or an ARCA engine, so the following recommendations hold true no matter what division you race.
Because the top ring sees the most heat, it requires the largest gap. Dorton says that for anything with a bore between 4.00 and 4.100 inches, a 0.022-inch gap should work fine. In fact, Dorton says he has experimented with gaps everywhere between 0.016 and 0.030 inch on the dyno on several different styles of engines and seen no real difference in terms of power.
Piston Ring Prep
Insert the ring into the cylinder...
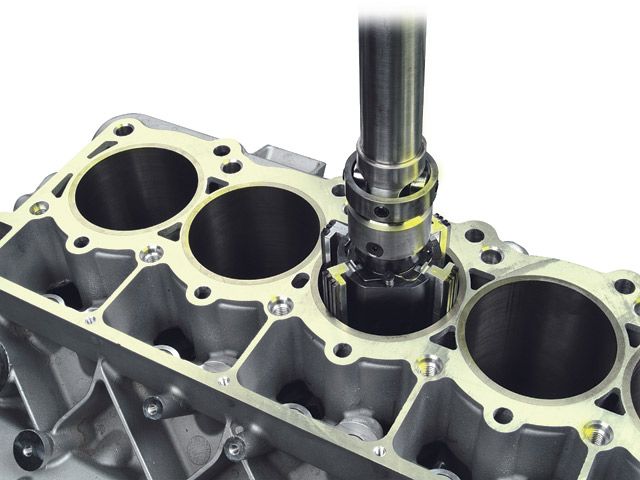
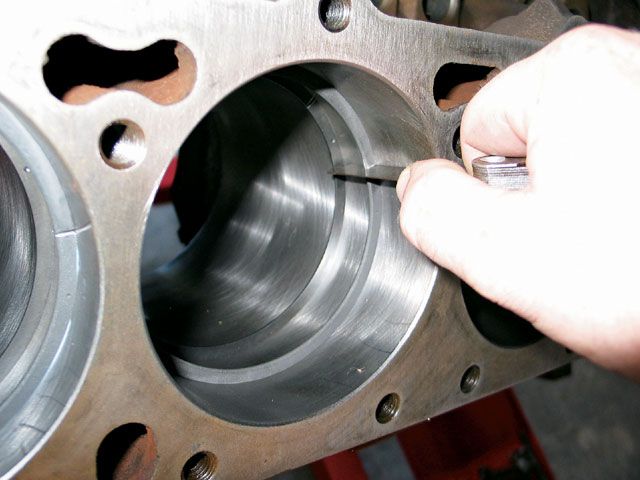
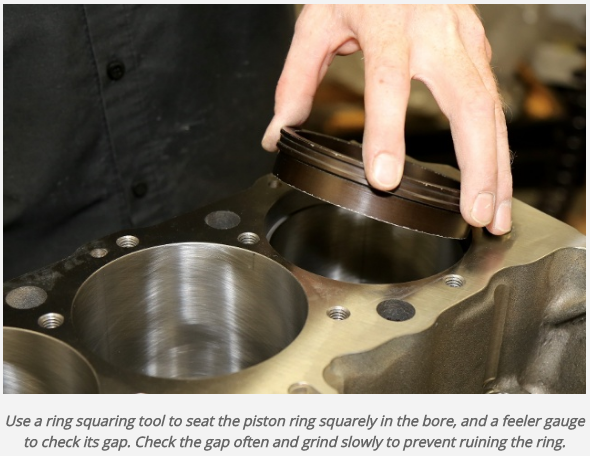
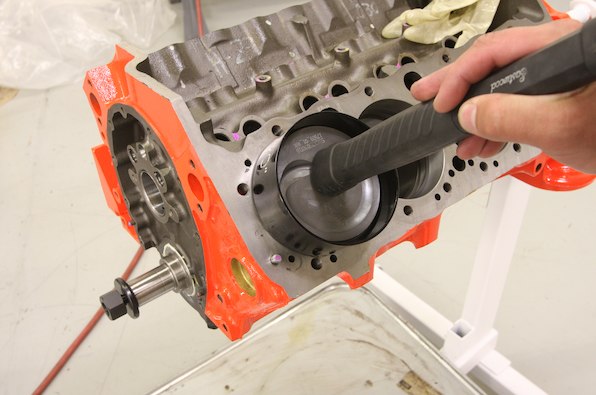
Insert the ring into the cylinder and then use a ring-squaring tool to make sure it is perpendicular to the centerline of the cylinder bore. If you don't have a squaring tool, you can use a piston that has the top ring installed. Simply install the ring in the top of the bore and then use the piston to push it into the bore until the ring installed on the piston contacts the deck of the block all the way around.
On the same piston, the second ring should be gapped between 0.016 and 0.020 inch. Less gap is necessary because the second ring is protected from hot combustion gasses by the top ring, but you still don't want it too tight to eliminate the possibility of ring flutter on the top ring.
Finally, Dorton recommends going in the opposite direction for the oil ring. In order to get maximum oil control, the gaps in the oil rails need to be as tight as absolutely possible. Dorton says that as long as you can fit the rings inside the cylinder bore without them butting then you will be fine, but a practical gap should be between 0.006 and 0.008 inch.
Rings are critical for proper engine operation, but they also cost you some power. The movement of the rings against the cylinder walls creates drag, and any portion of that drag you can eliminate while still maintaining proper combustion in the chambers, the better off you will be. To get a better idea of how much power we are talking about, Dorton mentions a test he did several years ago with a race engine. After dyno'ing the engine to determine a baseline, he says he pulled the heads, dropped the oil pan, and removed all the pistons and rods. He pulled the second ring off of all the pistons, rebuilt the motor right there on the dyno stand, and fired the engine back up. With the 0.060-inch second ring removed from all eight pistons the engine gained 5 hp over its 400hp baseline!
Piston Ring Prep
After the ring is correctly...
After the ring is correctly gapped, use a honing stone to knock the burr off of the edges of the ring. Make sure only to knock the burr off and not round the edges of the ring as you can see here. This will kill the ring's ability to seal off the combustion chamber.
This is why most piston manufacturers now offer race-quality pistons with ring lands designed for thinner rings. The reduced surface area contacting the cylinder walls creates less drag. Where most performance ring packages used to be 1/16, 1/16, and 3/16, new metric-based rings sized at 1.2, 1.2 and 3 millimeters are gaining popularity.
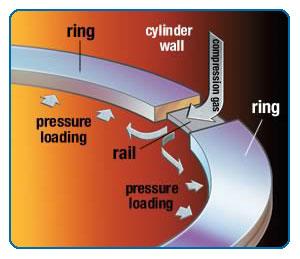
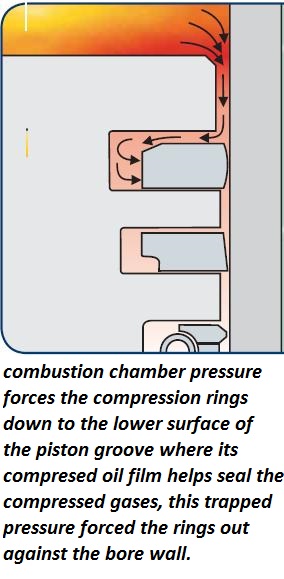
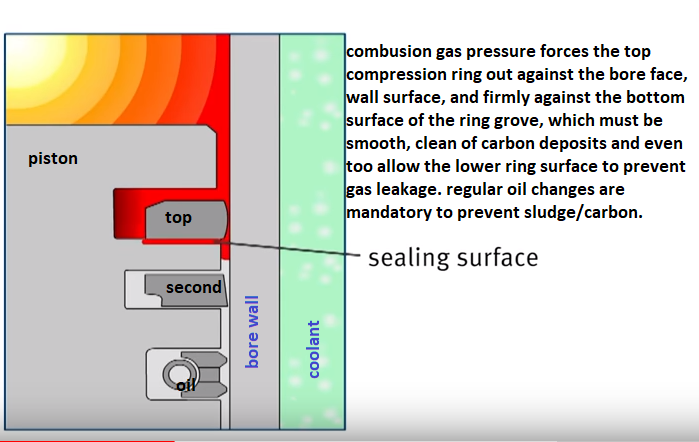
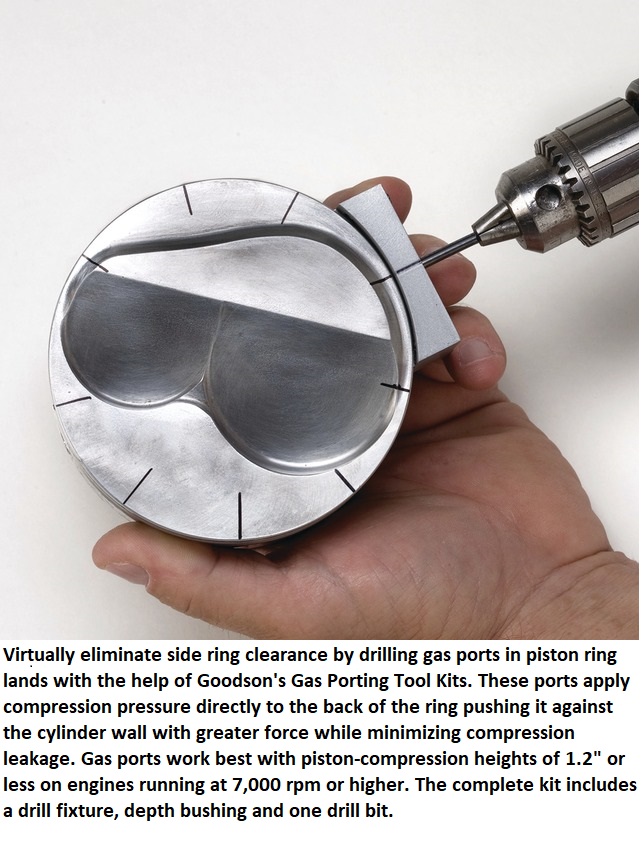
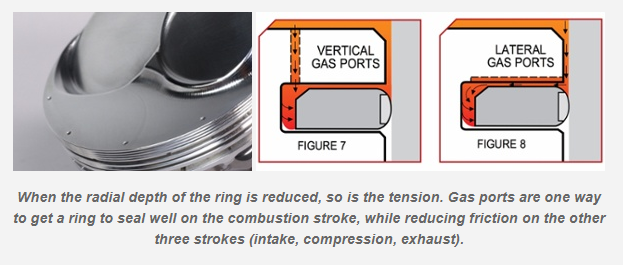
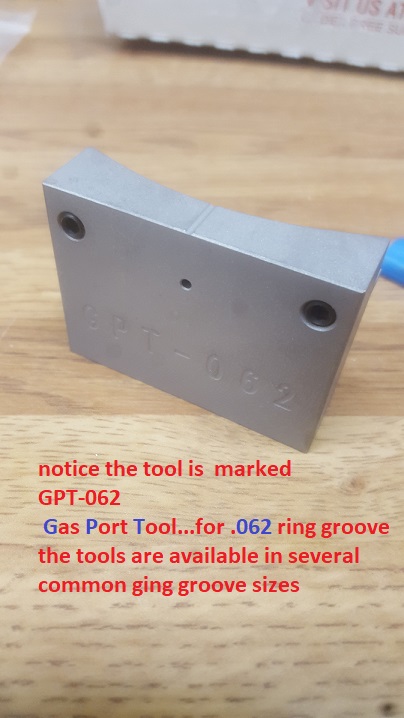
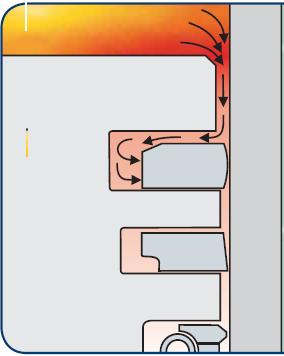
One drawback is that low-tension rings simply do not do as good a job of scraping oil off of the cylinder walls. Fortunately, the solution is to use pistons with gas ports. Gas ports are simply slots drilled into the top of the upper ring land that allows combustion pressure to get behind the ring. This pressure from combustion pushes the ring down against the bottom of the piston's ring land and out against the cylinder wall, improving cylinder sealing. Then, on the exhaust stroke when the pressure is reduced, the friction between the ring and the cylinder wall is greatly reduced.
Piston Ring Prep - Ringing In The Power
This is a good comparison...
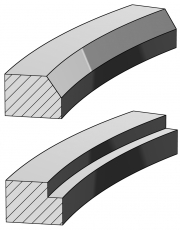
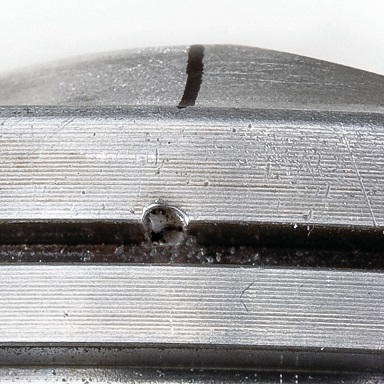
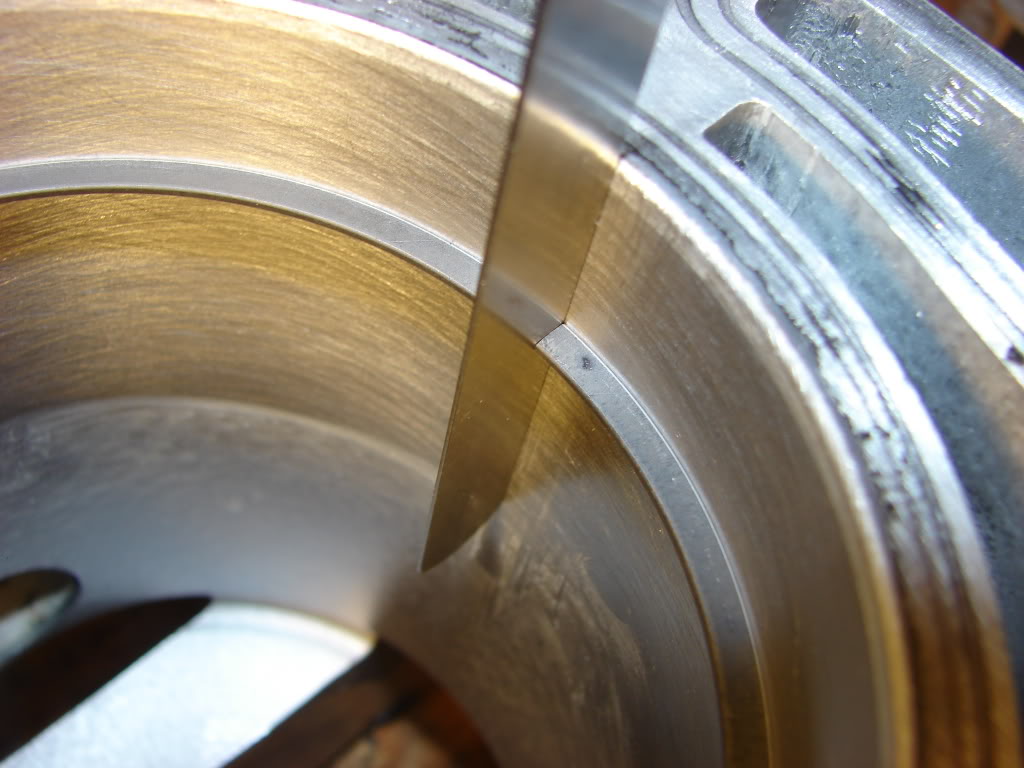
This is a good comparison of two second rings with the tapered-face design that have seen different amounts of use. The upper ring has not seen excessive use, and only a small part of its face is shiny (from direct contact with the cylinder bore wall). The outside face of the lower ring is completely shiny, meaning that it is worn out.
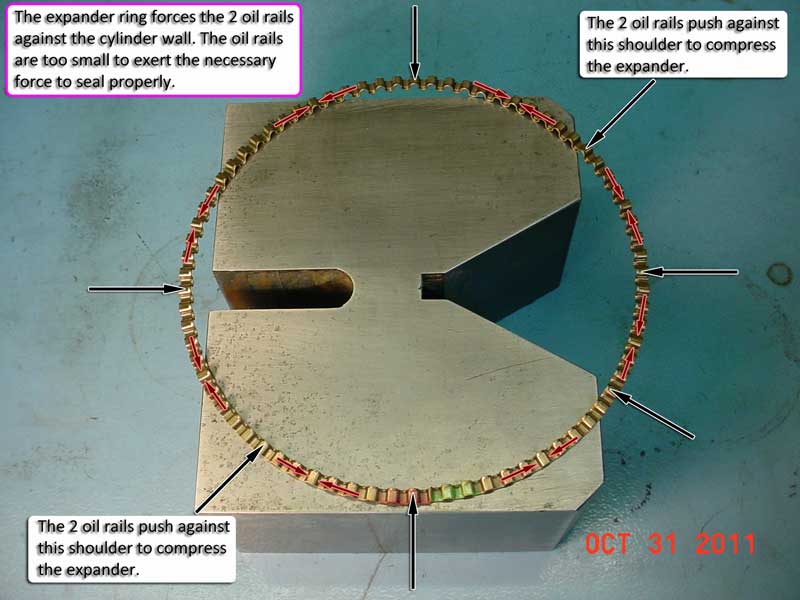
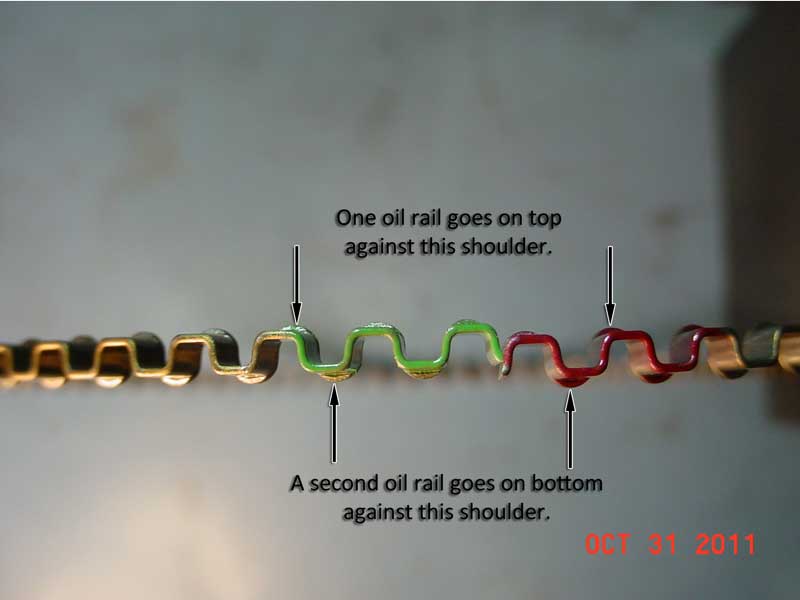
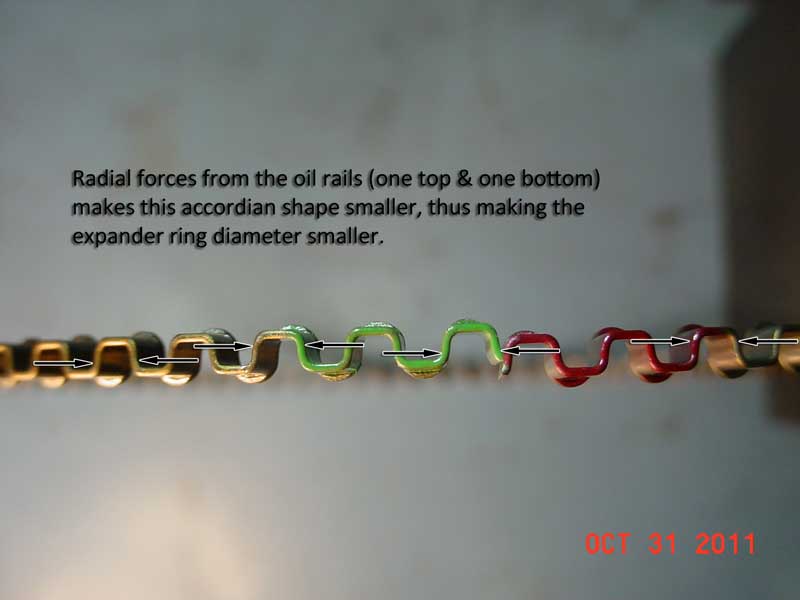
The oil ring is a completely different animal than the top two rings. Unlike the others, the tension of the oil ring is controlled by the radial thickness of both of the oil rails as well as the size of the gap in the expander ring. By manipulating the different parts of the oil ring to reduce the tension, Dorton has found a couple of horsepower on the dyno without harming oil control.
The radial thickness of the rings can vary by as much as 0.015 inch. This variance comes in different production runs, so you shouldn't see that much change in one pack of rings. But because the ID of the oil ring sits inside the expander, a ring with a greater radial thickness will have more tension than a ring with less radial thickness. This is true even if both rings have the same end gap.
Begin by separating out your rings according to thickness. Keep the thinnest and save the rings with the greater radial thickness for a later rebuild. You may need to go through a few packs to get a good set. If you cannot afford to purchase several sets of rings, see if your local engine builder would be willing to swap a few with you.
You can also check for variances in the gap in your expander rings. A properly sized expander ring will fit in the cylinder bore so that the ends butt without buckling the ring. You cannot gap an expander ring, but if you have one that has a gap when placed inside the bore, you can match it with scraper rings that have a greater radial thickness.
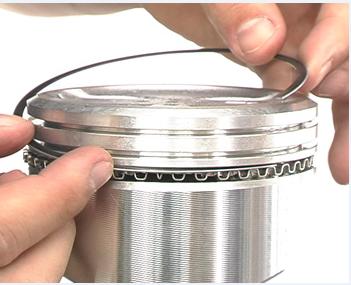
You can actually feel the difference in a well-matched set of low-tension oil rings. Install both oil rings with the expander on a piston and install it upside-down in a dry cylinder bore. Slide the piston up and down inside the bore and get a feel for the resistance. Now try the same thing with a set of oil rings with a greater radial thickness matched to the same expander ring and notice the difference.
(years ago the thinking was that because the second rings did not endure the same high temperatures as the top ring the second lower ring could have less gap as it would expand less from heat, modern thinking resulting from testing shows the second ring should have a slightly wider end gap to prevent the stop ring from loosing its seal pressure and developing RING FLUTTER at higher rpms, the problem is that "higher rpms" differ with every combo built)
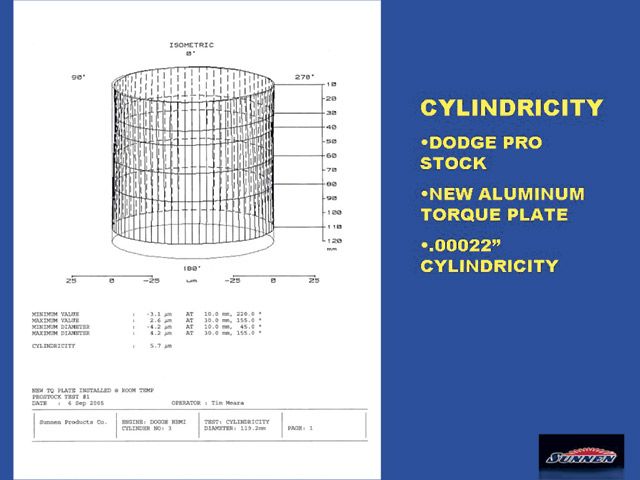
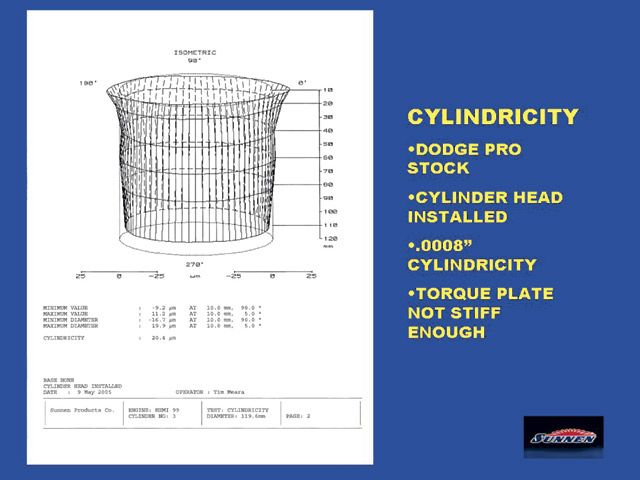
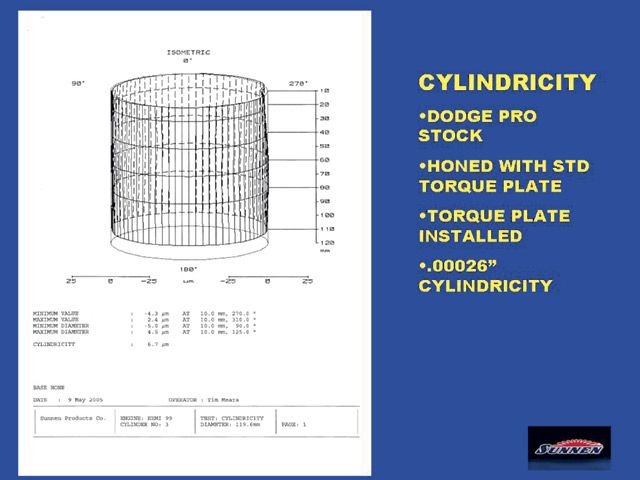
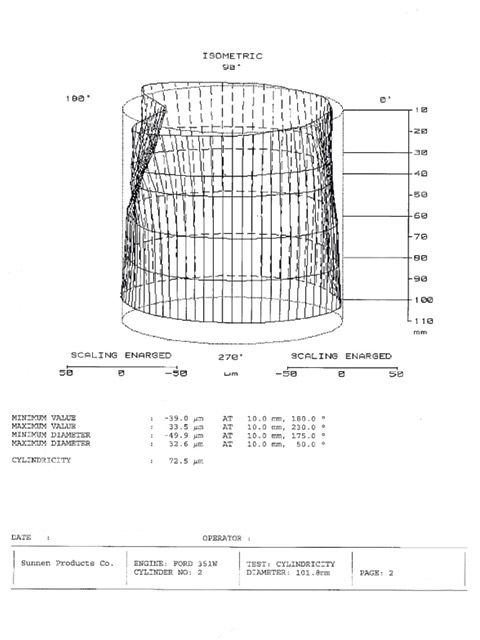
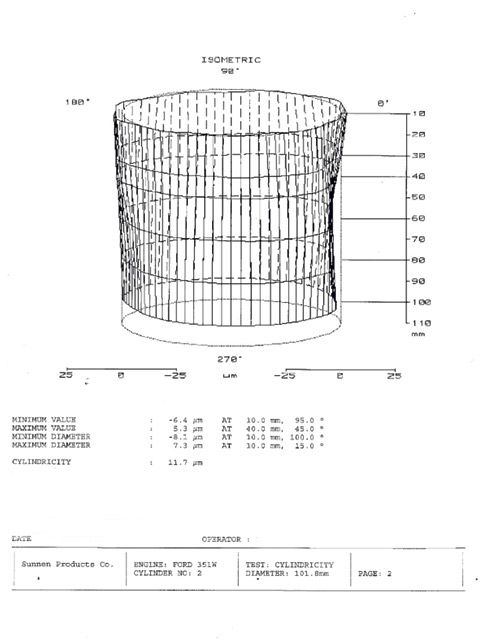
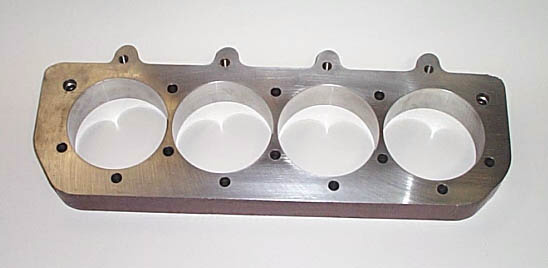
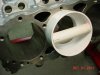
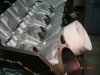
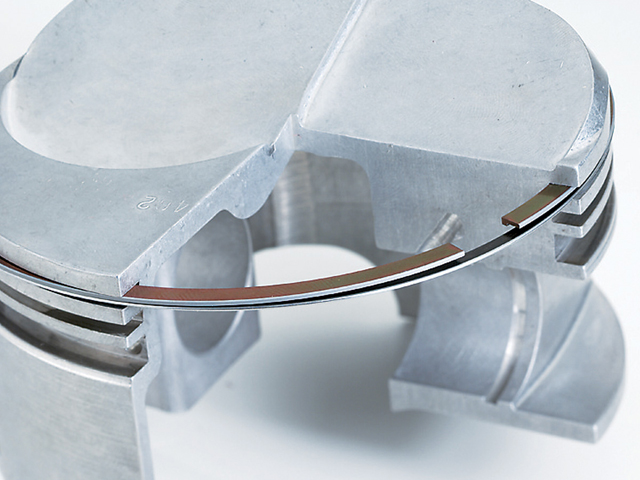
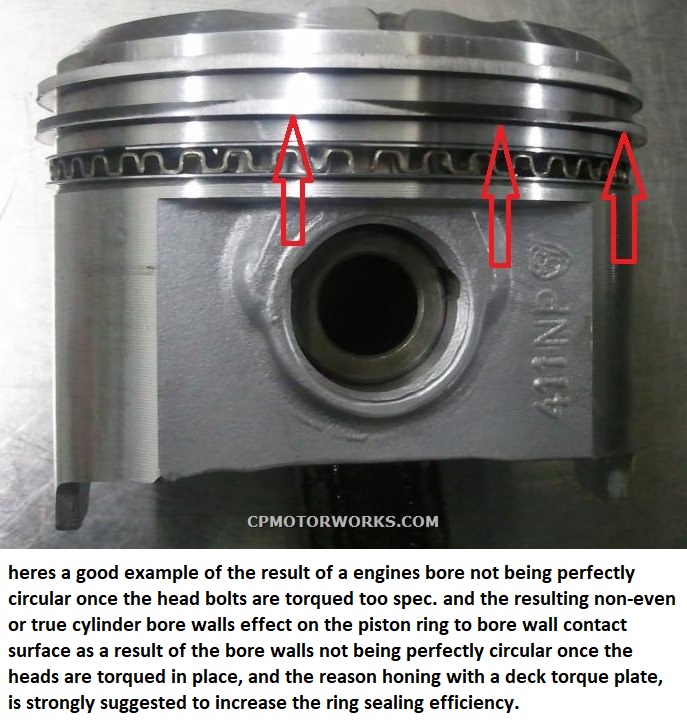
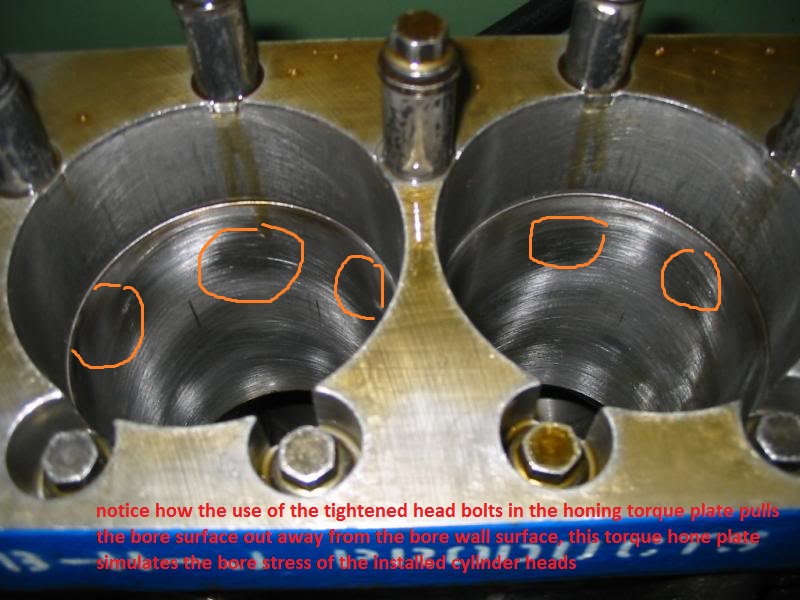
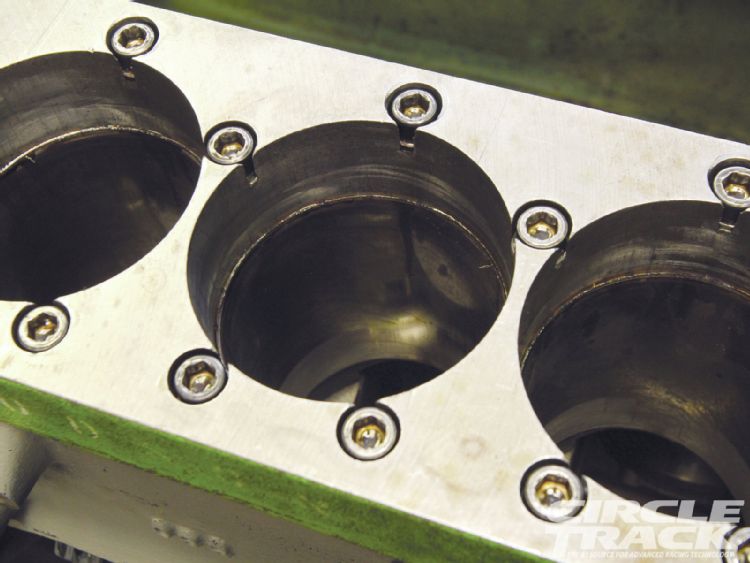
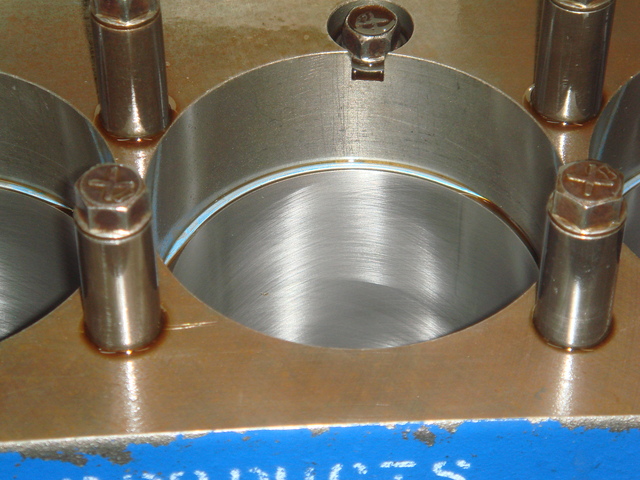
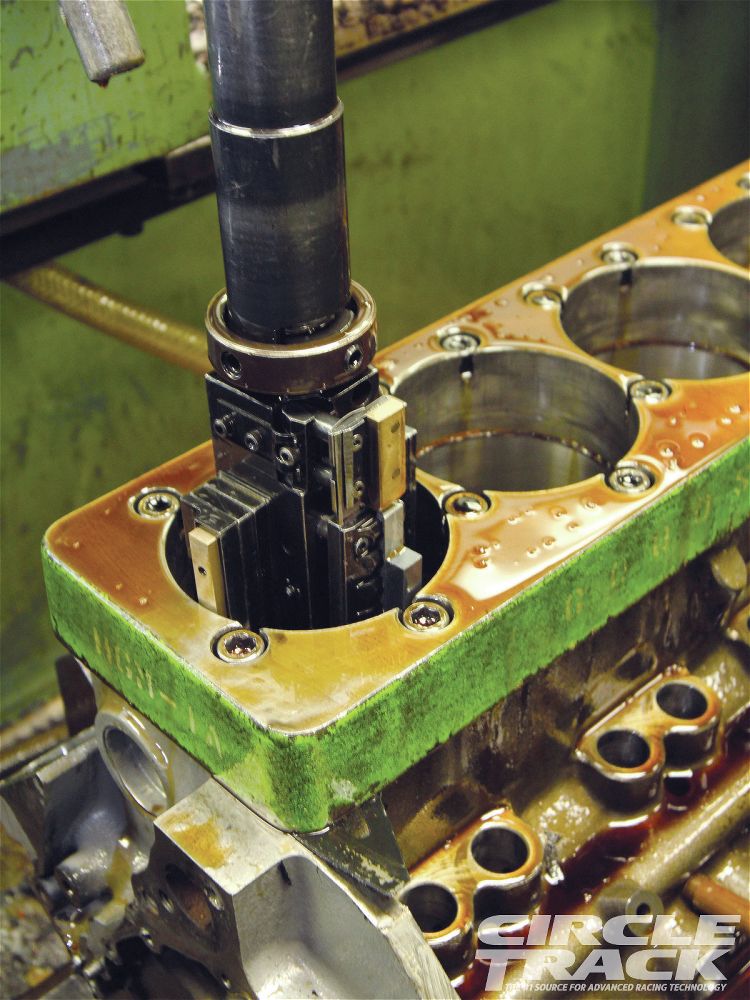
bores must be honed with a deck torque plate to simulate the stress of a installed cylinder head stress , the torqued bolts exert on the bore walls, the torque plate induces and duplicates that stress so that the bore walls will be pulled into the same relationship when you hone the walls concentric, rings won,t seal correctly in a non concentric bore
use of torque plates to match the dimensional stress a properly torqued cylinder head has on bore dimensions is critical to max ring seal, during cylinder honing

gaps must be correct for the application
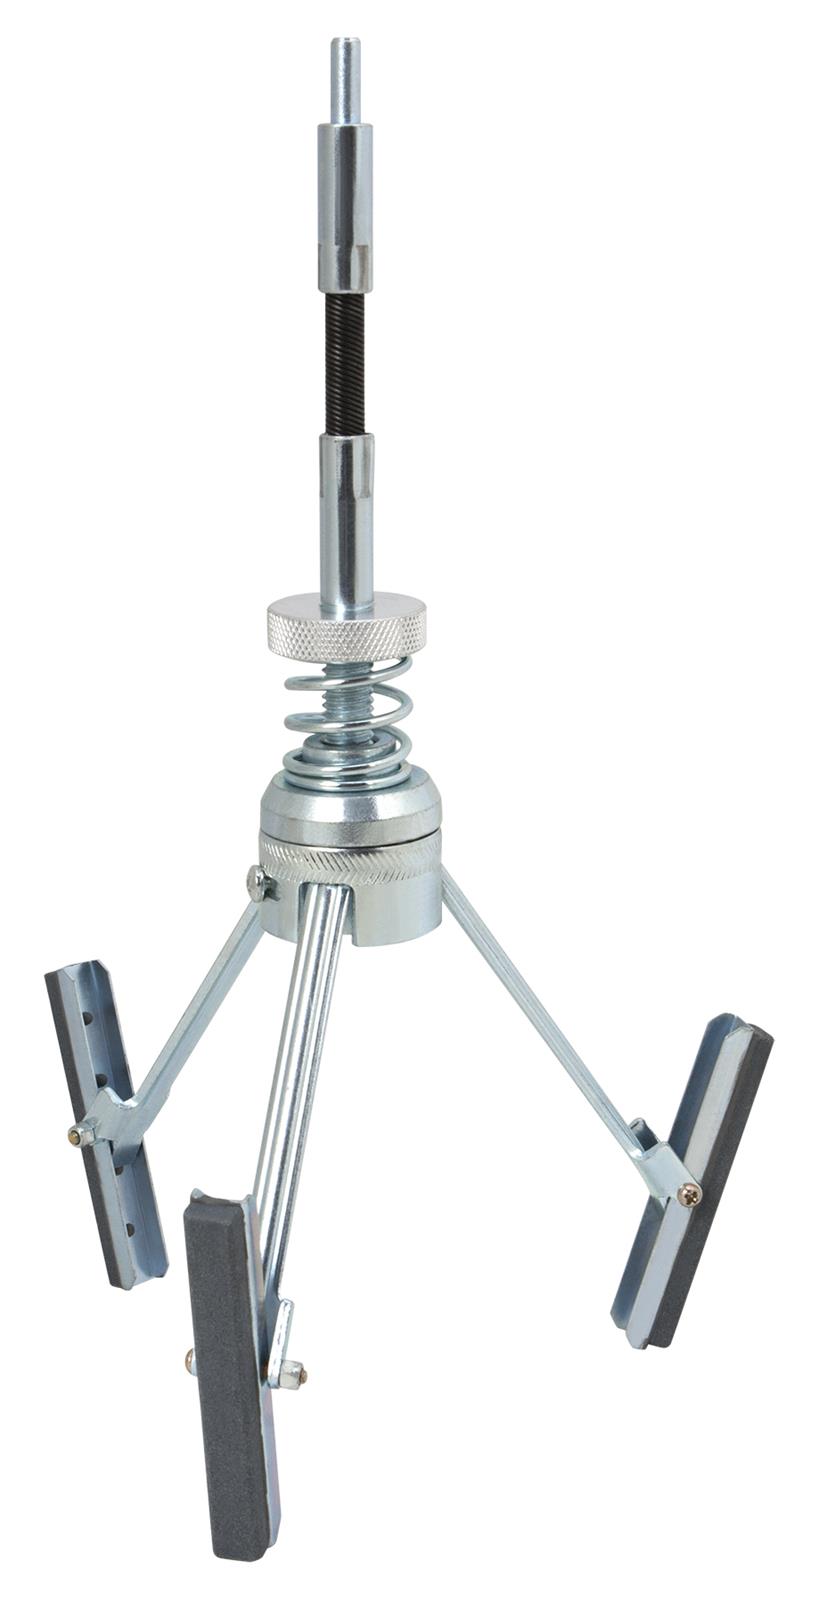
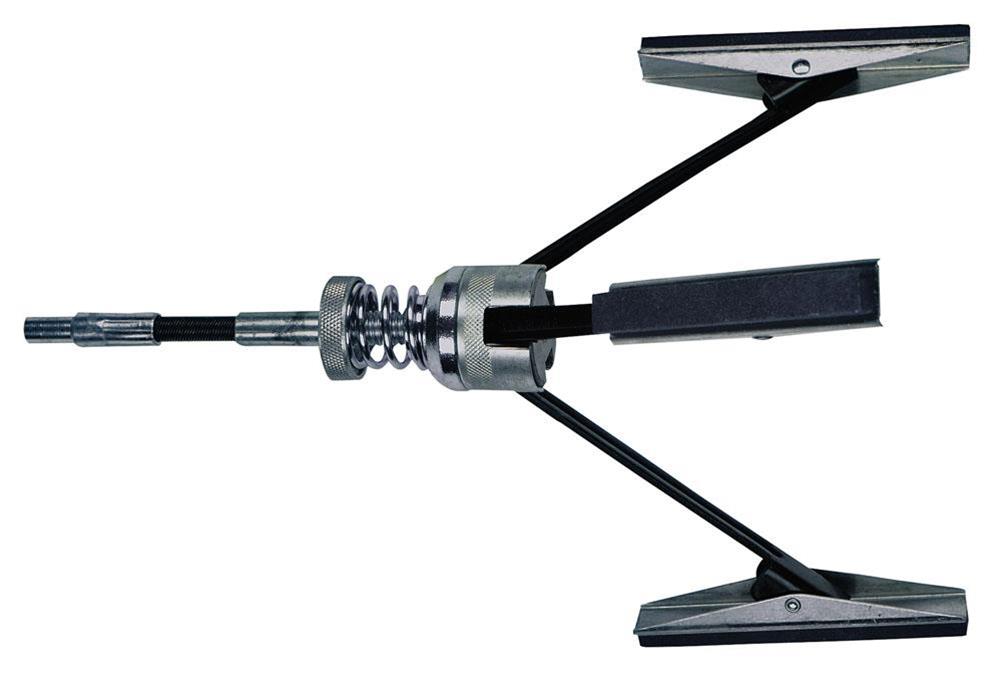
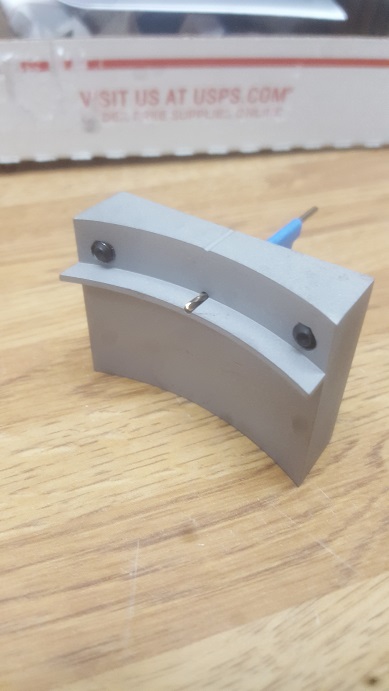
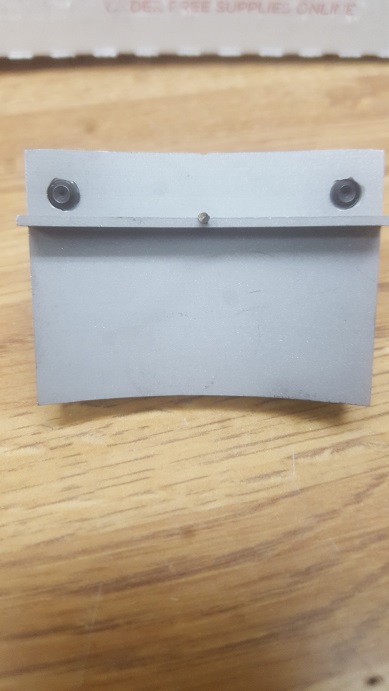
RINGS MUST BE MEASURED WHILE SQUARE IN THE BORE< A RING SQUARE TOOL HELPS, I USUALLY PLACE THEM ABOUT 1" DOWN THE BORE THEN MEASURE END GAP, see later in the thread for how to make a good but dirt cheap ring square tool
buy and use the correct piston groove cleaning tool, if your one of the guys that think scrapping out crud in a piston ring groove with a broken ring will give good results, I can assure you close detailed inspection will show minor scratches and ring groove damage that reduces the ring seal efficiency
no one has mastered all the skills and going back over even rather common assembly skills and looking for tips on how to improve existing procedures seldom hurts.
as time progresses, theres always on-going documented testing, and in many cases the old established way of doing things has proven to be less than ideal as newer and more detailed testing proves.
I well remember the advice in the later 1960s to keep end gaps on upper piston rings in the .004-.005 per inch of bore diameter, and secondary compression rings , to a tighter .04 max per inch of bore diam, as they experience less heat related expansion, the gaps could be tighter, well testing over the last 40-50 years has proven that approach to be less than idea, a looser .005-.006 second compression ring end gap is now been rather conclusively proven to work a bit better as it tends to lower and trapped combustion pressure, that could reduce the top rings bore seal.

http://www.sjdiscounttools.com/lis24000.html
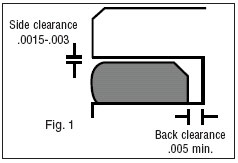
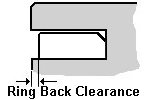
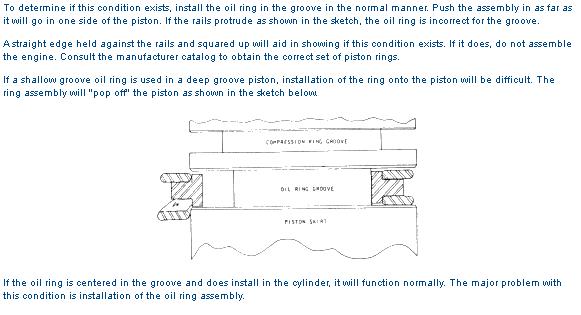
measure carefully as the piston groove depth and back clearance must match the rings you use or youll have major problems
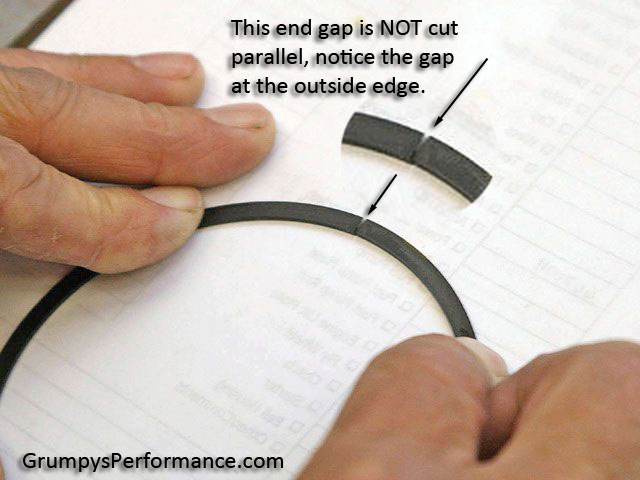
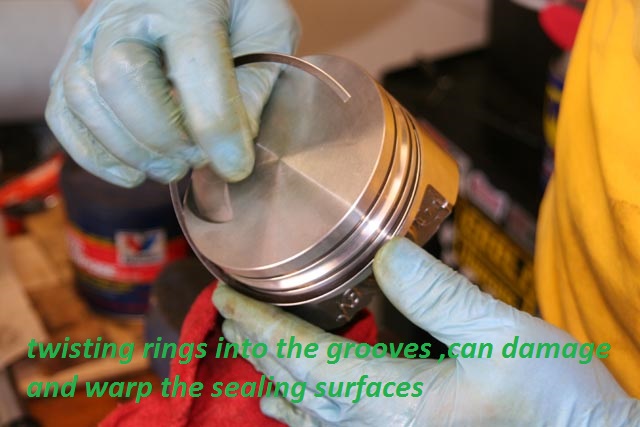
ring ends must be, correctly gaped, cut parallel and de-burred before installation
]
ring ends must be, correctly gaped, cut parallel and de-burred before installation

http://www.superstreetonline.com/how-to/engine/impp-1110-piston-anatomy-tech-knowledge/
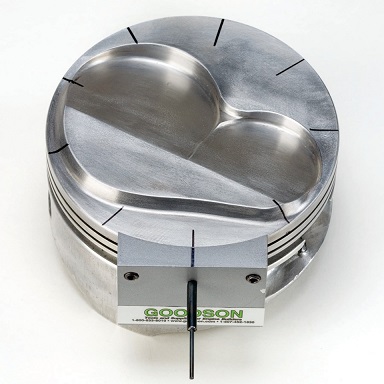
https://goodson.com/products/gas-porting-tools
these tools come in various ring sizes ,(but the various piston diameters are not as critical as ring width, it should be obvious that you MUST USE the tool that places the drilled gas port at the correct place in the upper ring groove roof and you damn sure better not drill deeper than the rear edge of the ring groove or youll destroy the piston
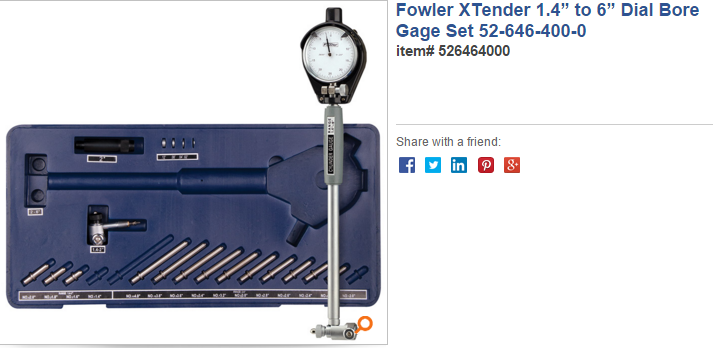
while these professional ring filing tools ,(LINKED BELOW) would be great to have on hand,
during your engine assembly
, the price makes owning one as a hobbyist unlikely
early in this thread theres pictures and links to the manual piston ring filers
and if your very careful you can use a cut-off wheel on a dremel tool
yes as always theres cheap,functional, and theres expensive precision ring filers
http://www.grumpysperformance.com/oct18/ringtech.jpg
http://www.grumpysperformance.com/july18/dot2r.jpg
http://www.grumpysperformance.com/july18/dot3r.jpg
[IMG]http://www.grumpysperformance.com/july18/twodots.gif
[IMG]http://www.racetep.com/carpics/RingInstallation2.jpg
http://www.superstreetonline.com/how-to/engine/impp-1110-piston-anatomy-tech-knowledge/
https://goodson.com/products/gas-porting-tools
these tools come in various ring sizes ,(but the various piston diameters are not as critical as ring width, it should be obvious that you MUST USE the tool that places the drilled gas port at the correct place in the upper ring groove roof and you damn sure better not drill deeper than the rear edge of the ring groove or youll destroy the piston
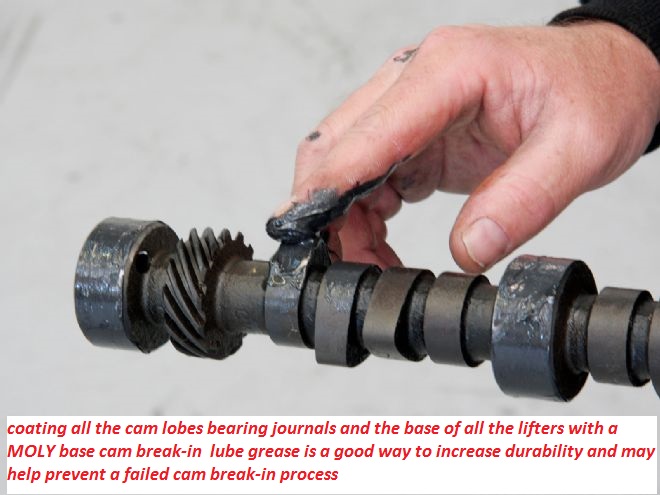
if the valve train clearances and rings are installed correctly ,cylinder pressure helps ring seal and break-in so don,t be afraid to keep the engine constantly changing rpm and load as this seats both the rings to cylinder walls and throws extra oil mist on the cam lobes, lifters and cylinder walls and maintain enough oil pressure to keep the rockers properly lubricated
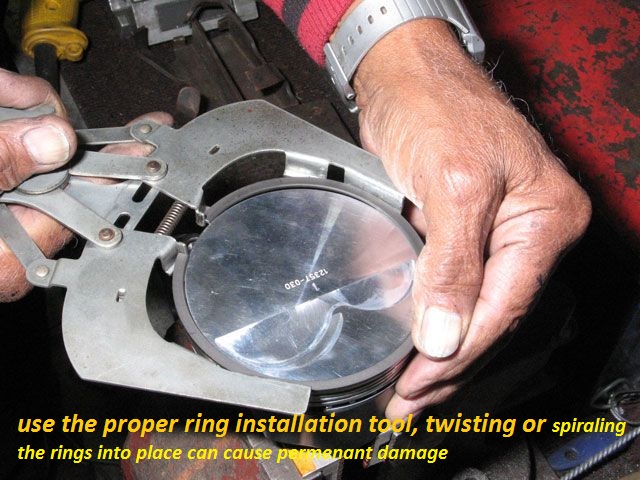
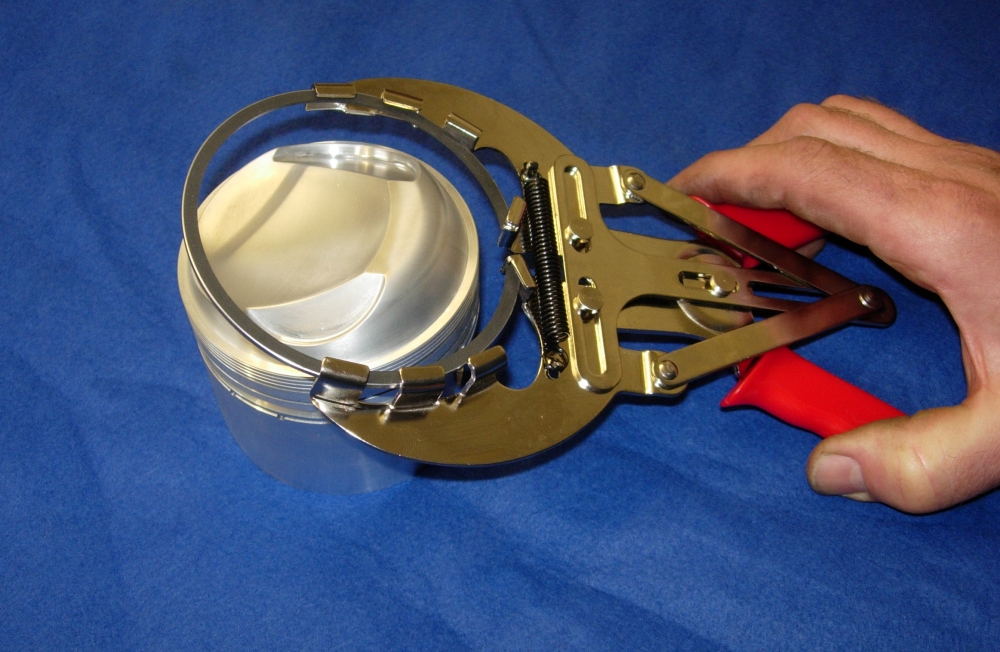
use of the proper tool helps keep the gap and ring ends square and parallel

http://courses.washington.edu/engr100/S ... 0Rings.htm
http://www.kb-silvolite.com/news.php?ac ... ad&N_id=27
http://www.wiseco.com/PDFs/Manuals/RingEndGap.pdf
http://www.circletrack.com/howto/1818/index.html
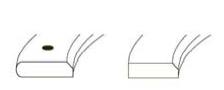
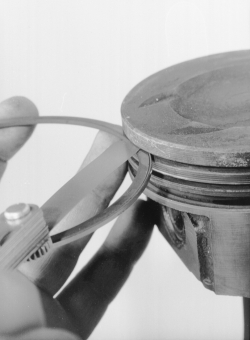
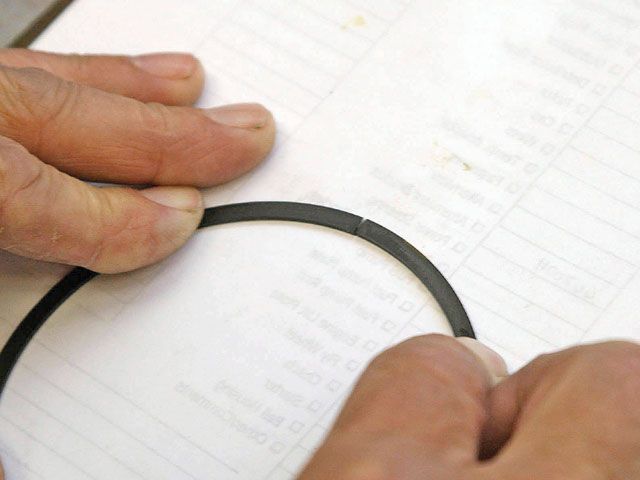
remove the burrs from the ends of the ring after gapping them,but don,t round off the ring ends like the left side, in his fingers here
http://garage.grumpysperformance.co...ng-piston-pin-height-compression-height.5064/
http://garage.grumpysperformance.co...n-wrist-pins-one-really-over-looked-part.978/
http://garage.grumpysperformance.co...piston-to-bore-clearance-on-your-block.14251/
if you find the rotating assembly is more difficult to rotate than you expected, you may want to verify some clearance issues that get over looked at times,
theres also some, other potential issues,
theres a slight potential for the piston wrist pins too not rotate effortlessly in the piston pin bores ,
that may add to the difficulty in rotating the assembly in the block.
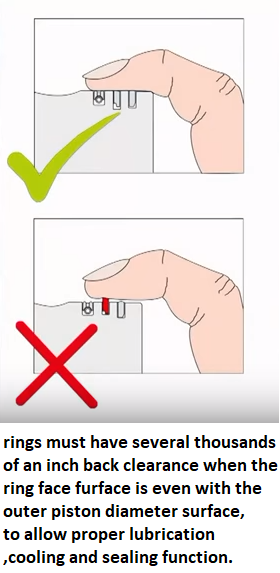
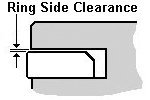
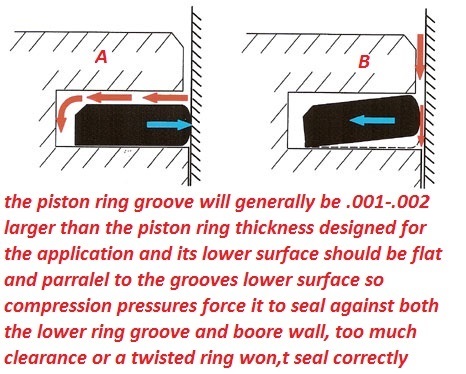
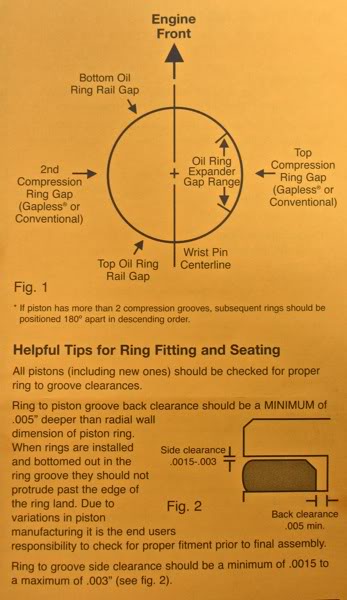
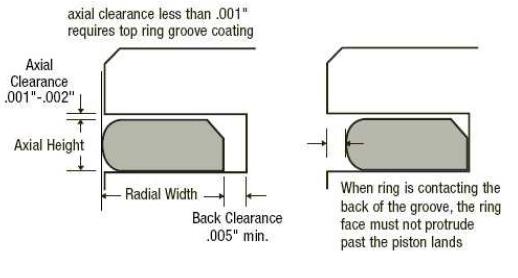
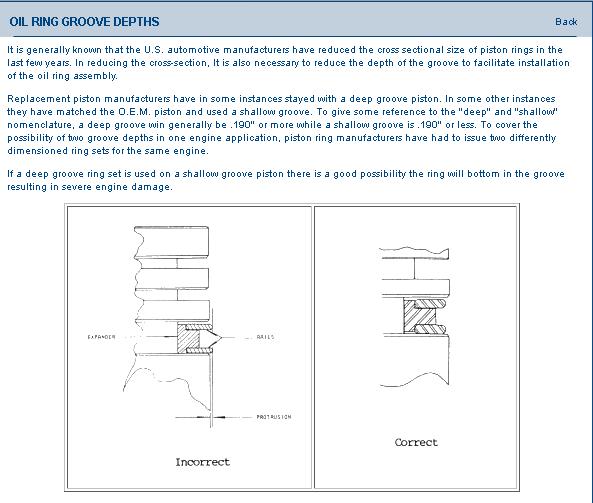
the piston rings must have vertical and back clearance in the piston ring grooves
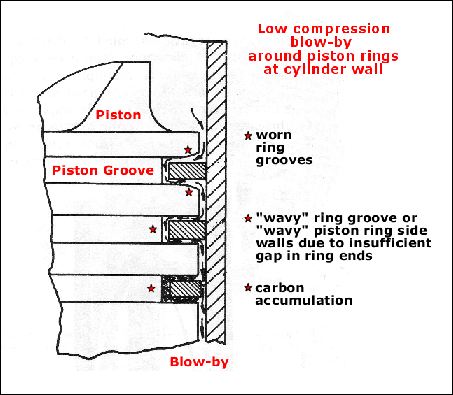

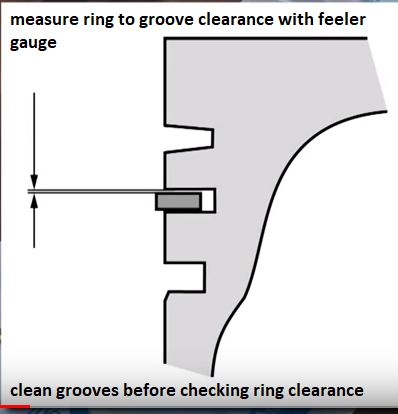
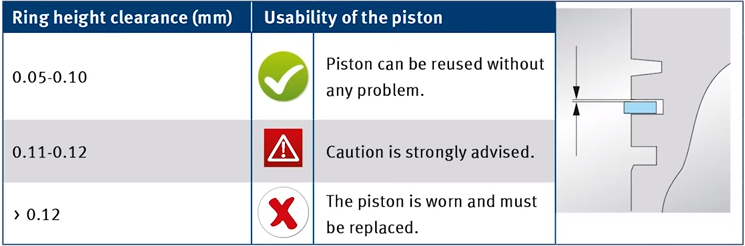
Piston Ring Groove Clearance
Pistons are grooved to fit rings that seal the cylinder’s compression and allow for lubrication of the cylinder walls. Piston rings come in a set. There are two compression rings. The top ring is affected by the most cylinder compression pressures. The second compression ring reinforces the top ring. The third ring down is the oil ring. It controls lubrication between the piston and cylinder bore.
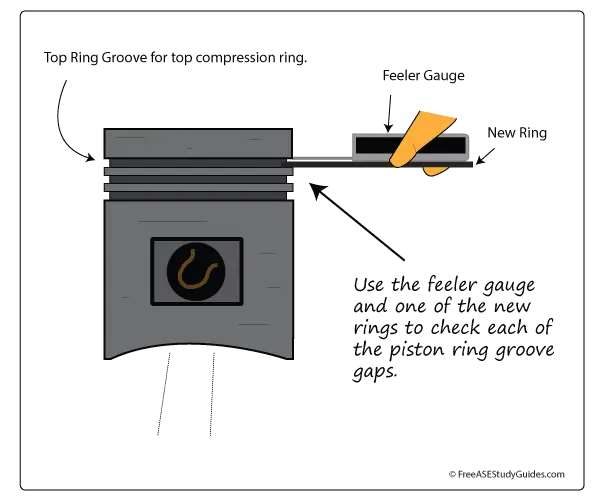
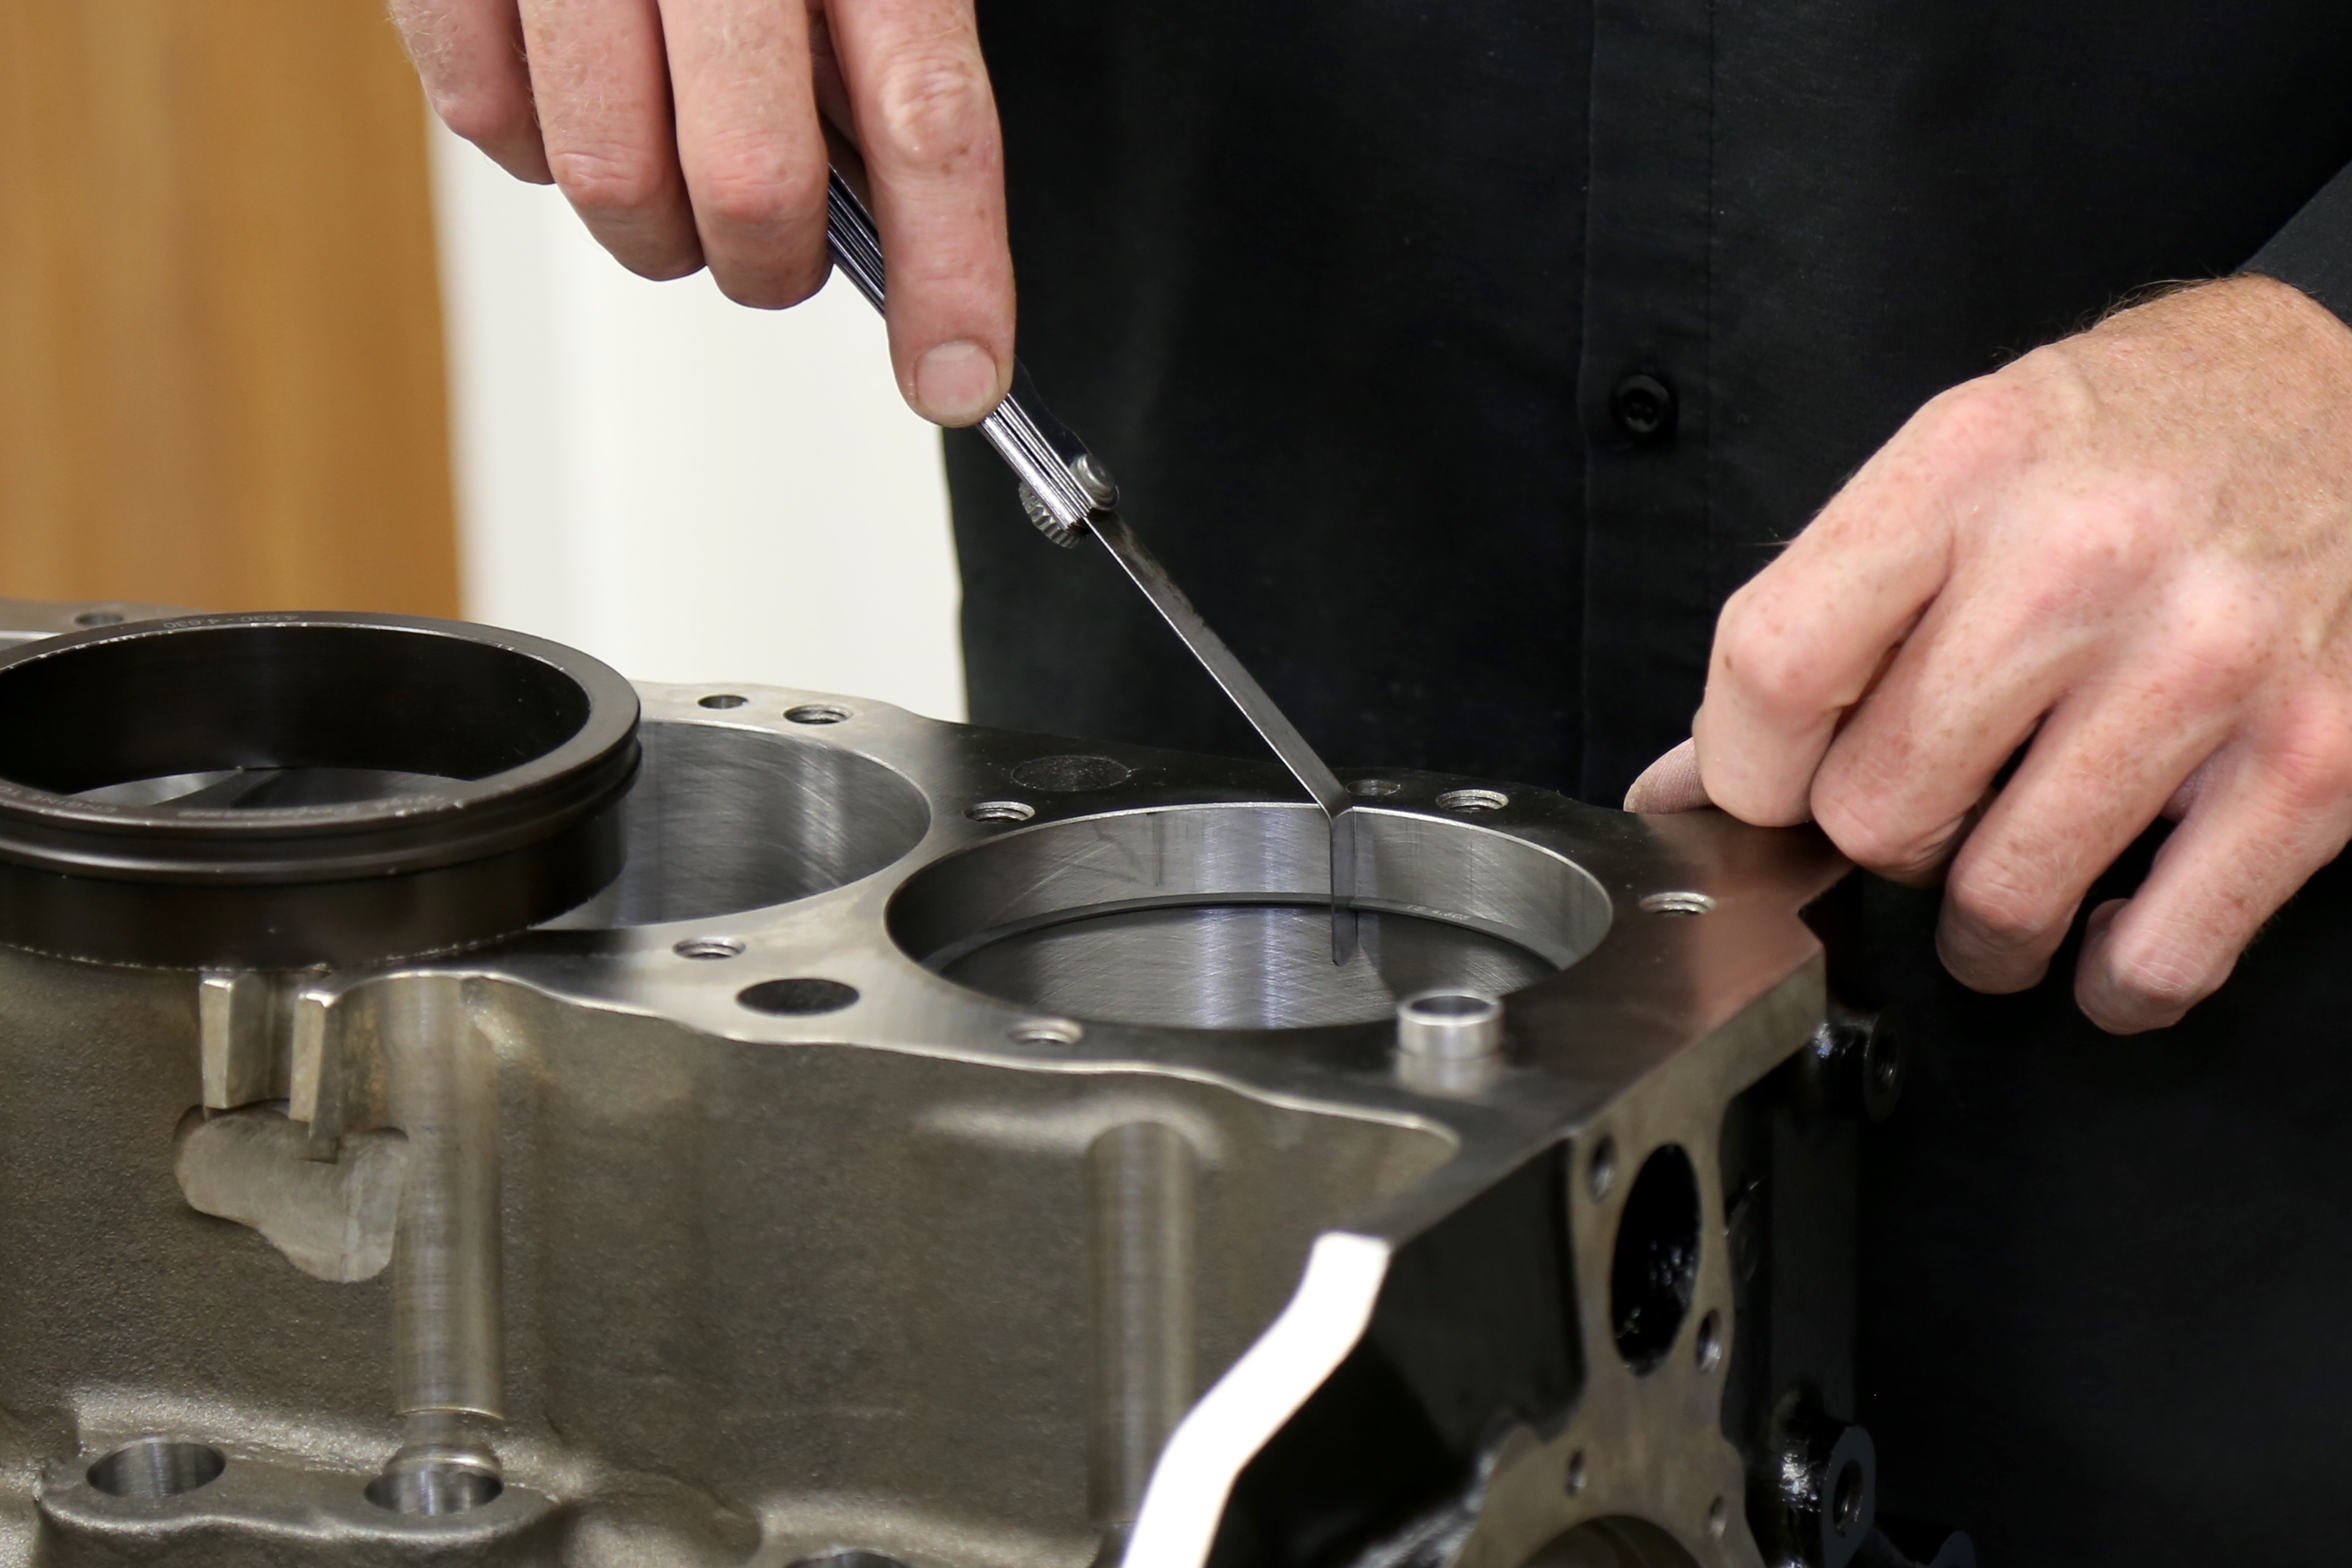
Place the new ring into the top piston groove, and then place a feeler gauge into the gap between the new ring and the upper land. Move around the pistons groove and obtain a few measurements. Compare this reading to specifications. If this reading is too much and the gap is too large, the piston must be replaced. The top ring takes the most compression. This causes the ring to slap against and wear the lands in the piston groove.
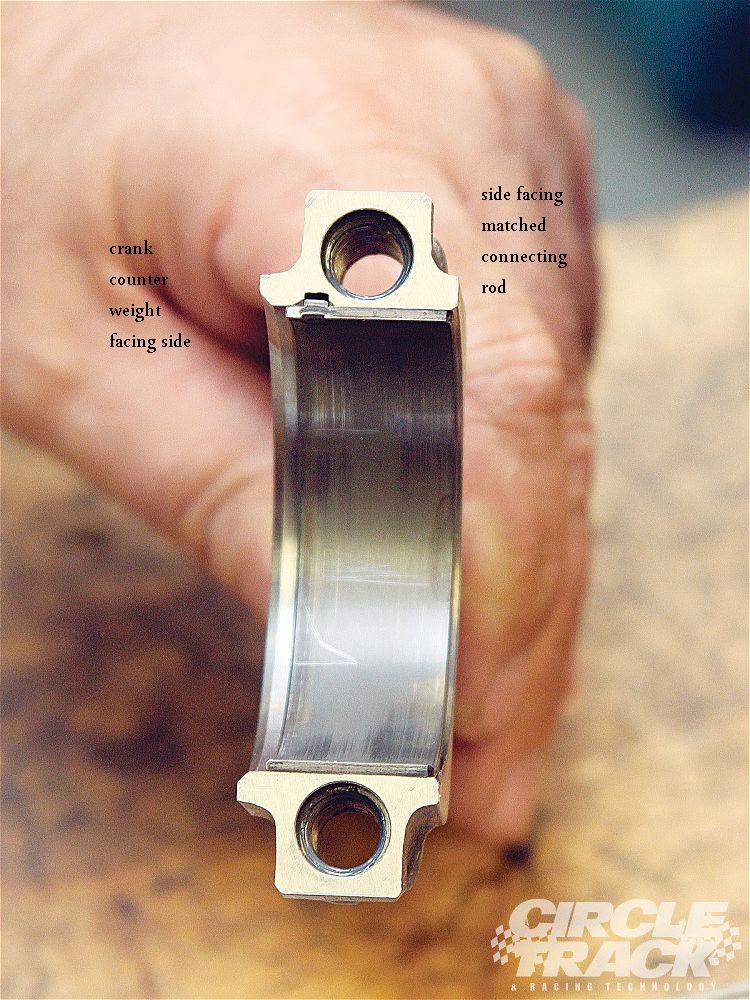
and of course the pistons must have the correct piston too bore clearance. and connecting rod can only be installed facing one direction

http://courses.washington.edu/engr100/S ... 0Rings.htm
viewtopic.php?f=51&t=588&p=764&hilit=hone+plates+block#p764
http://www.totalseal.com/TechPage.aspx#trRingInstall
http://www.circletrack.com/techarticles ... index.html
http://www.cp-carrillo.com/LinkClick.as ... D&tabid=83
http://circletrack.automotive.com/11015 ... index.html
http://www.fme-cat.com/Docs/1204.pdf
http://www.beckracing.com/page05.htm
viewtopic.php?f=53&t=5454
http://kb-silvolite.com/article.php?action=read&A_id=10
http://kb-silvolite.com/article.php?action=read&A_id=56
http://kb-silvolite.com/article.php?action=read&A_id=32
http://kb-silvolite.com/article.php?action=read&A_id=5
http://www.circletrack.com/enginetech/c ... index.html
you generally only need to grind the tips of the expander ring (RARELY NEEDED OR DONE) or bend them only a tiny bit (PREFERRED METHOD)
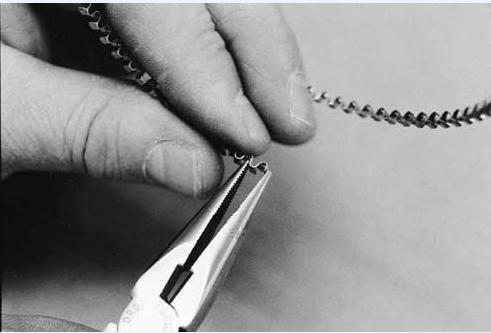
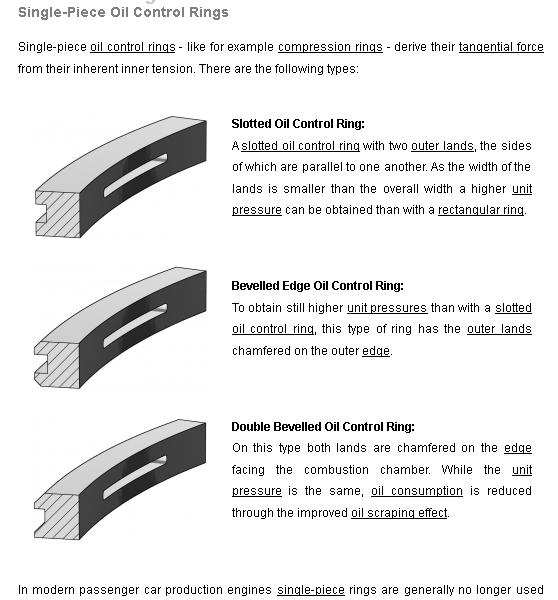
if at all, in most cases they come out of the packager ready to install (THERE ARE EXCEPTIONS) the expander ring should sit level in the bore , and sitting parallel with the deck with minimal tension, their job is mostly maintaining consistent space between the wiper rings, which generally use a .018 gap and allowing oil to drain back thru the groove drain slots in the piston, its the oil scraper rings not the expander that provide much of the MINIMAL tension required to keep the oil ring in contact with the bore surface
as always a call to the manufacturer is a good idea, if you have questions because different ring designs require different clearances
http://www.hastingsmfg.com/ContentData. ... ntentid=65
http://www.hastingsmfg.com/ServiceTips/ ... depths.htm
http://www.chevyhiperformance.com/tech/ ... index.html
http://www.enginebuildermag.com/Article ... rings.aspx
http://www.enginebuildermag.com/Article ... mance.aspx
http://www.hotrod.com/techarticles/engi ... ewall.html
http://www.kb-silvolite.com/assets/auto ... ctions.pdf
http://www.superchevy.com/technical/eng ... ewall.html
NOTICE the two totally different OIL ring scraper ring widths in this picture above,OIL RINGS come in dozens of designs so, you can not use all oil rings on all pistons and you can,t swap expanders and wipe rings thru different designs, and you must verify piston groove measurements , measure carefully as the piston groove depth and back clearance must match the rings you use or youll have major problems

heres a few threads related to maximizing ring seal,and related info
http://www.circletrack.com/howto/4639_m ... to_10.html
http://www.wiseco.com/PDFs/Manuals/RingEndGap.pdf
viewtopic.php?f=53&t=3897&p=11709&hilit=hone#p11709
viewtopic.php?f=53&t=509&p=11324&hilit=hone#p11324
viewtopic.php?f=51&t=125&p=10972&hilit=hone#p10972
viewtopic.php?f=53&t=2795&p=8966&hilit=hone#p8966
viewtopic.php?f=53&t=2837&p=7342&hilit=hone#p7342
viewtopic.php?f=51&t=588&p=7313&hilit=hone#p7313
viewtopic.php?f=53&t=852&p=1311&hilit=ring+compressor#p1311
viewtopic.php?f=50&t=55&p=68&hilit=ring+compressor#p68
viewtopic.php?f=53&t=110&p=3631&hilit=hone#p3631
viewtopic.php?f=53&t=247
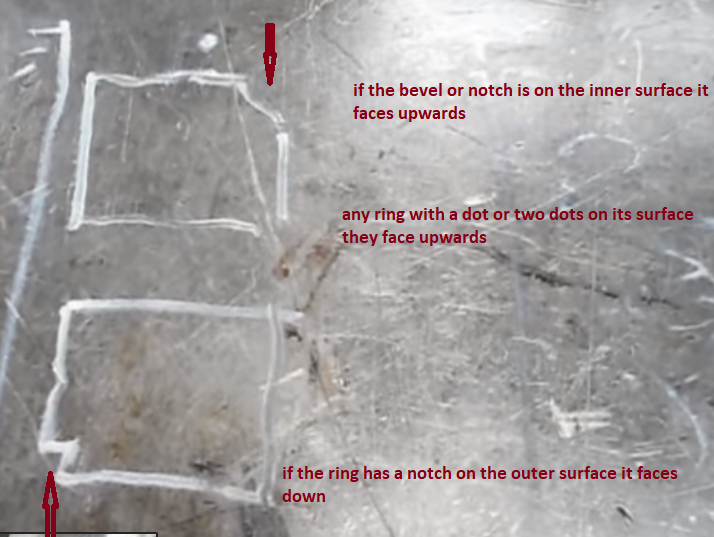
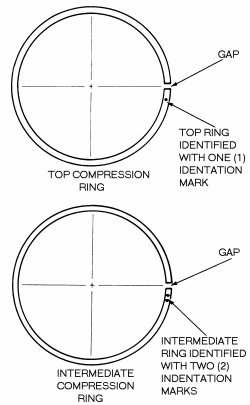
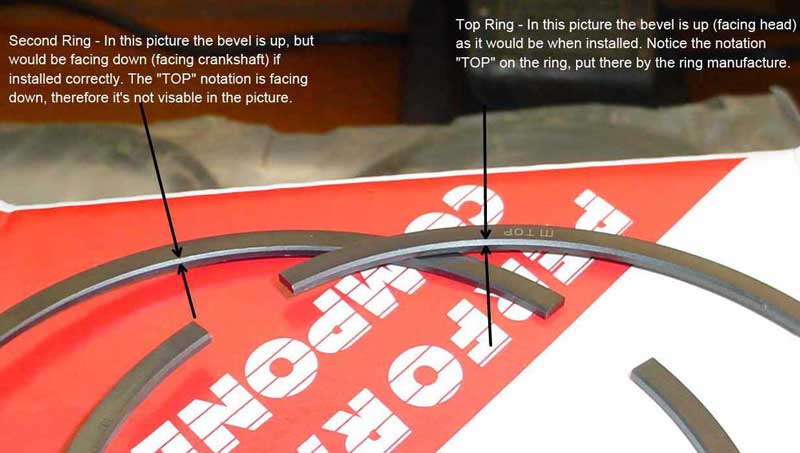
for anyone reading thru this thread, be aware that the piston rings have a side that faces up , its usually marked with a DOT but some rings have a beveled inner edge that faces up instead, get the rings installed upside down in the piston grooves and your guaranteed to have sealing and oil burning issues, most rings come packaged in separate packages , for top, second and oil rings, inspect them carefully as you don,t want second rings installed in top ring grooves or to have rings installed upside down or with the wrong end gaps

related threads
viewtopic.php?f=53&t=247
viewtopic.php?f=53&t=852
viewtopic.php?f=53&t=3897
viewtopic.php?f=53&t=5454
viewtopic.php?f=53&t=4630
viewtopic.php?f=53&t=509
viewtopic.php?f=53&t=3449
viewtopic.php?f=53&t=726
viewtopic.php?f=53&t=2795
viewtopic.php?f=53&t=2837
viewtopic.php?f=51&t=3774
viewtopic.php?f=51&t=588
By Jeff Huneycutt
Piston Ring Prep
It can be a hassle filing...
read full caption
Piston Ring Prep
It can be a hassle filing three sets of rings per cylinder, but when done correctly the results can mean more power and less fall-off before the next rebuild.
Most of us consider piston rings little more than a necessary evil. That's probably because grinding rings is a time-consuming chore. And who hasn't accidentally ground a gap too large and wasted both time and money ordering up a replacement?
But when done right, piston rings can create a power advantage by maximizing dynamic engine compression while still maintaining good oil control. This involves both proper selection for the intended use and proper preparation when gapping your rings. To get more information on making your piston rings work for you, we spoke with engine builder Keith Dorton, owner of Automotive Specialists.
The purpose of piston rings is to seal the gap between the sides of the piston and the cylinder wall. On almost all stock car pistons there are three rings. The top ring is in direct contact with the combustion flame and sees the most heat. Because of that, it usually has a moly coating to make it better able to withstand the harsh environment. For racing, the primary purpose of the top ring is to effectively seal the combustion chamber to maintain compression.
Piston Ring Prep
Here is a ring that hasn't...
read full caption
Piston Ring Prep
Here is a ring that hasn't been ground properly. As you can see, the ends are no longer square to each other. It may not seem like much, but this can lead to a power-robbing loss of combustion pressure.
In OEM applications where a set of rings must be expected to last over 100,000 miles, the second ring is also expected to help maintain compression. But for racing, this isn't an issue. Instead, the second ring mostly helps with oil control. You do not want the second ring to provide too much of a seal because in a high-rpm application like racing, combustion pressure that passes the top ring and gets caught by the second ring can lead to ring flutter in the top ring. This should be avoided at nearly all costs.
The second ring is typically constructed from softer ductile iron because it doesn't see the heat that the top ring is subjected to, and also because the softer material helps the ring seal to the cylinder wall. The face of the ring also typically has a taper to it so that only the bottom portion of the ring actually touches the cylinder wall. This helps it function better as an oil scraper. The taper wears over time, and once it wears so much that the entire face of the ring is in contact with the cylinder wall, the ring's usefulness is long gone.
most applications would have a ring gap of about .004-.005 per inch of bore diam.
but tests have shown even a .050 end gap has only a marginal effect on engine power or blow by, simply because at even 1000rpm theres slightly more than 8 power strokes per second, and the pressure is ner max mostly in the 10 degrees before and 30 degrees after TDC, theres very little time to force much thru a .005 or less piston to bore clearance and two .050 end gaps even if that was the case
BORING and HONING a blocks bore are best done at a local machine shop where clearances and surface finish are more accurately controlled, BUT, IF your going to be honing the bores for MOLY rings I,d suggest a 240-280 grit hone a 45 degree cross hatch angle and a constant flow of flushing liquid washing over the stones and bore surface to keep the stones from clogging with micro grit trash, that gets removed from the high points in the bore surface.
Ive used both a flush of 90% diesel fuel mixed with 10% marvel mystery oil, as a flush and Ive used hot water with a couple teaspoons of dawn dish washing soap, both work, but I think the hot water and dawn solution produced the most uniform result, on the bore surface but that requires a good deal of cleaning and washing the block just like the diesel fuel mix as you darn sure want to remove all traces of grit and prevent rust forming from moisture so after hone work I power wash the block with a pressure washer,, flush the surface with alcohol paint thinner as it tends to get under and lift out micro crud and speed surface dry time ,then I spray it over with WD40 and heat it with a heat gun to remove moisture traces then re-spray it with WD, 40 [/b]
http://www.harborfreight.com/1600-watt- ... 69342.html
BTW GAPLESS PISTON RINGS HAVE TWO PIECES THAT EACH MUST BE GAPPED< THE IDEA IS THAT THE TWO GAPS IN THE SET ARE ON OPPOSITE SIDES OF THE PISTON GROOVE
Although Dorton uses a powered ring grinder that greatly speeds up the process, a manual crank-style grinder, such as this one from Powerhouse Products, works just as well (if you are willing to be patient) and costs a lot less.
Some high-end ring packs will also feature a second ring with a Napier-style design. A Napier ring has a "ridge" that steps up so that the inside of the ring is thicker than the outside. Dorton says that the effect is to provide more material inside the ring land for increased rigidity, while the face of the ring that contacts the cylinder wall is thinner to reduce sliding friction between the ring and the cylinder bore. Dorton says the Napier design works but, as you might expect, the extra engineering does come with extra costs attached. Usually, Dorton only uses Napier-style rings in dry sump applications where the vacuum created in the crankcase helps keep oil out of the combustion chambers.
Finally, the oil ring is actually an assembly of two scraper rings and a center expander ring. As it's named, the oil ring's only job is to pull oil off the cylinder walls and dump it into the oil pan.
Most ring packs for street applications come pre-gapped. But that simply isn't precise enough for racing where gaps should be accurate to within 0.001 inch or less. The purpose of the gap is to allow enough room so that the ring can expand once the engine is hot so that the ends almost touch. The trick is to get the gap as small as possible when the engine is hot without the ends butting. It's better to go too large rather than too small because if the ends do butt, it will lead to scuffing the cylinder walls, micro-welding of the ring to the piston's ring lands, and possibly even breaking the ring.
After filing your ring and...
After filing your ring and before trial fitting inside the cylinder bore, take a moment to knock the burr off of the outside edge of the ring. If this isn't done it can throw off your gap measurement.
Dorton uses a powered ring filer, but a more traditional crank-style ring filer is a more economical option for those of us who aren't building engines for a living. No matter what you use, you must be careful to only make small cuts on the rings because you can't put material back on. Also, be prepared to put in a little practice with a couple of old rings before you can reliably make smooth, perpendicular cuts on the rings.
The size of the ring gap necessary varies by the amount of heat generated and which ring you are talking about. But the variables are mostly limited to whether you are running naturally aspirated or using a turbocharger. Fortunately, for stock car racing, there isn't as much variance whether we are talking about Street Stocks or an ARCA engine, so the following recommendations hold true no matter what division you race.
Because the top ring sees the most heat, it requires the largest gap. Dorton says that for anything with a bore between 4.00 and 4.100 inches, a 0.022-inch gap should work fine. In fact, Dorton says he has experimented with gaps everywhere between 0.016 and 0.030 inch on the dyno on several different styles of engines and seen no real difference in terms of power.
Piston Ring Prep
Insert the ring into the cylinder...
Insert the ring into the cylinder and then use a ring-squaring tool to make sure it is perpendicular to the centerline of the cylinder bore. If you don't have a squaring tool, you can use a piston that has the top ring installed. Simply install the ring in the top of the bore and then use the piston to push it into the bore until the ring installed on the piston contacts the deck of the block all the way around.
On the same piston, the second ring should be gapped between 0.016 and 0.020 inch. Less gap is necessary because the second ring is protected from hot combustion gasses by the top ring, but you still don't want it too tight to eliminate the possibility of ring flutter on the top ring.
Finally, Dorton recommends going in the opposite direction for the oil ring. In order to get maximum oil control, the gaps in the oil rails need to be as tight as absolutely possible. Dorton says that as long as you can fit the rings inside the cylinder bore without them butting then you will be fine, but a practical gap should be between 0.006 and 0.008 inch.
Rings are critical for proper engine operation, but they also cost you some power. The movement of the rings against the cylinder walls creates drag, and any portion of that drag you can eliminate while still maintaining proper combustion in the chambers, the better off you will be. To get a better idea of how much power we are talking about, Dorton mentions a test he did several years ago with a race engine. After dyno'ing the engine to determine a baseline, he says he pulled the heads, dropped the oil pan, and removed all the pistons and rods. He pulled the second ring off of all the pistons, rebuilt the motor right there on the dyno stand, and fired the engine back up. With the 0.060-inch second ring removed from all eight pistons the engine gained 5 hp over its 400hp baseline!
Piston Ring Prep
After the ring is correctly...
After the ring is correctly gapped, use a honing stone to knock the burr off of the edges of the ring. Make sure only to knock the burr off and not round the edges of the ring as you can see here. This will kill the ring's ability to seal off the combustion chamber.
This is why most piston manufacturers now offer race-quality pistons with ring lands designed for thinner rings. The reduced surface area contacting the cylinder walls creates less drag. Where most performance ring packages used to be 1/16, 1/16, and 3/16, new metric-based rings sized at 1.2, 1.2 and 3 millimeters are gaining popularity.
One drawback is that low-tension rings simply do not do as good a job of scraping oil off of the cylinder walls. Fortunately, the solution is to use pistons with gas ports. Gas ports are simply slots drilled into the top of the upper ring land that allows combustion pressure to get behind the ring. This pressure from combustion pushes the ring down against the bottom of the piston's ring land and out against the cylinder wall, improving cylinder sealing. Then, on the exhaust stroke when the pressure is reduced, the friction between the ring and the cylinder wall is greatly reduced.
Piston Ring Prep - Ringing In The Power
This is a good comparison...
This is a good comparison of two second rings with the tapered-face design that have seen different amounts of use. The upper ring has not seen excessive use, and only a small part of its face is shiny (from direct contact with the cylinder bore wall). The outside face of the lower ring is completely shiny, meaning that it is worn out.
The oil ring is a completely different animal than the top two rings. Unlike the others, the tension of the oil ring is controlled by the radial thickness of both of the oil rails as well as the size of the gap in the expander ring. By manipulating the different parts of the oil ring to reduce the tension, Dorton has found a couple of horsepower on the dyno without harming oil control.
The radial thickness of the rings can vary by as much as 0.015 inch. This variance comes in different production runs, so you shouldn't see that much change in one pack of rings. But because the ID of the oil ring sits inside the expander, a ring with a greater radial thickness will have more tension than a ring with less radial thickness. This is true even if both rings have the same end gap.
Begin by separating out your rings according to thickness. Keep the thinnest and save the rings with the greater radial thickness for a later rebuild. You may need to go through a few packs to get a good set. If you cannot afford to purchase several sets of rings, see if your local engine builder would be willing to swap a few with you.
You can also check for variances in the gap in your expander rings. A properly sized expander ring will fit in the cylinder bore so that the ends butt without buckling the ring. You cannot gap an expander ring, but if you have one that has a gap when placed inside the bore, you can match it with scraper rings that have a greater radial thickness.
You can actually feel the difference in a well-matched set of low-tension oil rings. Install both oil rings with the expander on a piston and install it upside-down in a dry cylinder bore. Slide the piston up and down inside the bore and get a feel for the resistance. Now try the same thing with a set of oil rings with a greater radial thickness matched to the same expander ring and notice the difference.
(years ago the thinking was that because the second rings did not endure the same high temperatures as the top ring the second lower ring could have less gap as it would expand less from heat, modern thinking resulting from testing shows the second ring should have a slightly wider end gap to prevent the stop ring from loosing its seal pressure and developing RING FLUTTER at higher rpms, the problem is that "higher rpms" differ with every combo built)
bores must be honed with a deck torque plate to simulate the stress of a installed cylinder head stress , the torqued bolts exert on the bore walls, the torque plate induces and duplicates that stress so that the bore walls will be pulled into the same relationship when you hone the walls concentric, rings won,t seal correctly in a non concentric bore
use of torque plates to match the dimensional stress a properly torqued cylinder head has on bore dimensions is critical to max ring seal, during cylinder honing
gaps must be correct for the application
RINGS MUST BE MEASURED WHILE SQUARE IN THE BORE< A RING SQUARE TOOL HELPS, I USUALLY PLACE THEM ABOUT 1" DOWN THE BORE THEN MEASURE END GAP, see later in the thread for how to make a good but dirt cheap ring square tool
buy and use the correct piston groove cleaning tool, if your one of the guys that think scrapping out crud in a piston ring groove with a broken ring will give good results, I can assure you close detailed inspection will show minor scratches and ring groove damage that reduces the ring seal efficiency
no one has mastered all the skills and going back over even rather common assembly skills and looking for tips on how to improve existing procedures seldom hurts.
as time progresses, theres always on-going documented testing, and in many cases the old established way of doing things has proven to be less than ideal as newer and more detailed testing proves.
I well remember the advice in the later 1960s to keep end gaps on upper piston rings in the .004-.005 per inch of bore diameter, and secondary compression rings , to a tighter .04 max per inch of bore diam, as they experience less heat related expansion, the gaps could be tighter, well testing over the last 40-50 years has proven that approach to be less than idea, a looser .005-.006 second compression ring end gap is now been rather conclusively proven to work a bit better as it tends to lower and trapped combustion pressure, that could reduce the top rings bore seal.
http://www.sjdiscounttools.com/lis24000.html
measure carefully as the piston groove depth and back clearance must match the rings you use or youll have major problems
ring ends must be, correctly gaped, cut parallel and de-burred before installation
]
ring ends must be, correctly gaped, cut parallel and de-burred before installation
http://www.superstreetonline.com/how-to/engine/impp-1110-piston-anatomy-tech-knowledge/
https://goodson.com/products/gas-porting-tools
these tools come in various ring sizes ,(but the various piston diameters are not as critical as ring width, it should be obvious that you MUST USE the tool that places the drilled gas port at the correct place in the upper ring groove roof and you damn sure better not drill deeper than the rear edge of the ring groove or youll destroy the piston
while these professional ring filing tools ,(LINKED BELOW) would be great to have on hand,
during your engine assembly
, the price makes owning one as a hobbyist unlikely
early in this thread theres pictures and links to the manual piston ring filers
and if your very careful you can use a cut-off wheel on a dremel tool
yes as always theres cheap,functional, and theres expensive precision ring filers
http://www.grumpysperformance.com/oct18/ringtech.jpg
http://www.grumpysperformance.com/july18/dot2r.jpg
http://www.grumpysperformance.com/july18/dot3r.jpg
[IMG]http://www.grumpysperformance.com/july18/twodots.gif
[IMG]http://www.racetep.com/carpics/RingInstallation2.jpg
http://www.superstreetonline.com/how-to/engine/impp-1110-piston-anatomy-tech-knowledge/
https://goodson.com/products/gas-porting-tools
these tools come in various ring sizes ,(but the various piston diameters are not as critical as ring width, it should be obvious that you MUST USE the tool that places the drilled gas port at the correct place in the upper ring groove roof and you damn sure better not drill deeper than the rear edge of the ring groove or youll destroy the piston
if the valve train clearances and rings are installed correctly ,cylinder pressure helps ring seal and break-in so don,t be afraid to keep the engine constantly changing rpm and load as this seats both the rings to cylinder walls and throws extra oil mist on the cam lobes, lifters and cylinder walls and maintain enough oil pressure to keep the rockers properly lubricated
use of the proper tool helps keep the gap and ring ends square and parallel
http://courses.washington.edu/engr100/S ... 0Rings.htm
http://www.kb-silvolite.com/news.php?ac ... ad&N_id=27
http://www.wiseco.com/PDFs/Manuals/RingEndGap.pdf
http://www.circletrack.com/howto/1818/index.html
remove the burrs from the ends of the ring after gapping them,but don,t round off the ring ends like the left side, in his fingers here
http://garage.grumpysperformance.co...ng-piston-pin-height-compression-height.5064/
http://garage.grumpysperformance.co...n-wrist-pins-one-really-over-looked-part.978/
http://garage.grumpysperformance.co...piston-to-bore-clearance-on-your-block.14251/
if you find the rotating assembly is more difficult to rotate than you expected, you may want to verify some clearance issues that get over looked at times,
theres also some, other potential issues,
theres a slight potential for the piston wrist pins too not rotate effortlessly in the piston pin bores ,
that may add to the difficulty in rotating the assembly in the block.
the piston rings must have vertical and back clearance in the piston ring grooves
Piston Ring Groove Clearance
Pistons are grooved to fit rings that seal the cylinder’s compression and allow for lubrication of the cylinder walls. Piston rings come in a set. There are two compression rings. The top ring is affected by the most cylinder compression pressures. The second compression ring reinforces the top ring. The third ring down is the oil ring. It controls lubrication between the piston and cylinder bore.
Place the new ring into the top piston groove, and then place a feeler gauge into the gap between the new ring and the upper land. Move around the pistons groove and obtain a few measurements. Compare this reading to specifications. If this reading is too much and the gap is too large, the piston must be replaced. The top ring takes the most compression. This causes the ring to slap against and wear the lands in the piston groove.
and of course the pistons must have the correct piston too bore clearance. and connecting rod can only be installed facing one direction
http://courses.washington.edu/engr100/S ... 0Rings.htm
viewtopic.php?f=51&t=588&p=764&hilit=hone+plates+block#p764
http://www.totalseal.com/TechPage.aspx#trRingInstall
http://www.circletrack.com/techarticles ... index.html
http://www.cp-carrillo.com/LinkClick.as ... D&tabid=83
http://circletrack.automotive.com/11015 ... index.html
http://www.fme-cat.com/Docs/1204.pdf
http://www.beckracing.com/page05.htm
viewtopic.php?f=53&t=5454
http://kb-silvolite.com/article.php?action=read&A_id=10
http://kb-silvolite.com/article.php?action=read&A_id=56
http://kb-silvolite.com/article.php?action=read&A_id=32
http://kb-silvolite.com/article.php?action=read&A_id=5
http://www.circletrack.com/enginetech/c ... index.html
you generally only need to grind the tips of the expander ring (RARELY NEEDED OR DONE) or bend them only a tiny bit (PREFERRED METHOD)
if at all, in most cases they come out of the packager ready to install (THERE ARE EXCEPTIONS) the expander ring should sit level in the bore , and sitting parallel with the deck with minimal tension, their job is mostly maintaining consistent space between the wiper rings, which generally use a .018 gap and allowing oil to drain back thru the groove drain slots in the piston, its the oil scraper rings not the expander that provide much of the MINIMAL tension required to keep the oil ring in contact with the bore surface
as always a call to the manufacturer is a good idea, if you have questions because different ring designs require different clearances
http://www.hastingsmfg.com/ContentData. ... ntentid=65
http://www.hastingsmfg.com/ServiceTips/ ... depths.htm
http://www.chevyhiperformance.com/tech/ ... index.html
http://www.enginebuildermag.com/Article ... rings.aspx
http://www.enginebuildermag.com/Article ... mance.aspx
http://www.hotrod.com/techarticles/engi ... ewall.html
http://www.kb-silvolite.com/assets/auto ... ctions.pdf
http://www.superchevy.com/technical/eng ... ewall.html
NOTICE the two totally different OIL ring scraper ring widths in this picture above,OIL RINGS come in dozens of designs so, you can not use all oil rings on all pistons and you can,t swap expanders and wipe rings thru different designs, and you must verify piston groove measurements , measure carefully as the piston groove depth and back clearance must match the rings you use or youll have major problems
heres a few threads related to maximizing ring seal,and related info
http://www.circletrack.com/howto/4639_m ... to_10.html
http://www.wiseco.com/PDFs/Manuals/RingEndGap.pdf
viewtopic.php?f=53&t=3897&p=11709&hilit=hone#p11709
viewtopic.php?f=53&t=509&p=11324&hilit=hone#p11324
viewtopic.php?f=51&t=125&p=10972&hilit=hone#p10972
viewtopic.php?f=53&t=2795&p=8966&hilit=hone#p8966
viewtopic.php?f=53&t=2837&p=7342&hilit=hone#p7342
viewtopic.php?f=51&t=588&p=7313&hilit=hone#p7313
viewtopic.php?f=53&t=852&p=1311&hilit=ring+compressor#p1311
viewtopic.php?f=50&t=55&p=68&hilit=ring+compressor#p68
viewtopic.php?f=53&t=110&p=3631&hilit=hone#p3631
viewtopic.php?f=53&t=247
for anyone reading thru this thread, be aware that the piston rings have a side that faces up , its usually marked with a DOT but some rings have a beveled inner edge that faces up instead, get the rings installed upside down in the piston grooves and your guaranteed to have sealing and oil burning issues, most rings come packaged in separate packages , for top, second and oil rings, inspect them carefully as you don,t want second rings installed in top ring grooves or to have rings installed upside down or with the wrong end gaps
related threads
viewtopic.php?f=53&t=247
viewtopic.php?f=53&t=852
viewtopic.php?f=53&t=3897
viewtopic.php?f=53&t=5454
viewtopic.php?f=53&t=4630
viewtopic.php?f=53&t=509
viewtopic.php?f=53&t=3449
viewtopic.php?f=53&t=726
viewtopic.php?f=53&t=2795
viewtopic.php?f=53&t=2837
viewtopic.php?f=51&t=3774
viewtopic.php?f=51&t=588
Last edited by a moderator: