Loves302Chevy
"One test is worth a thousand expert opinions."
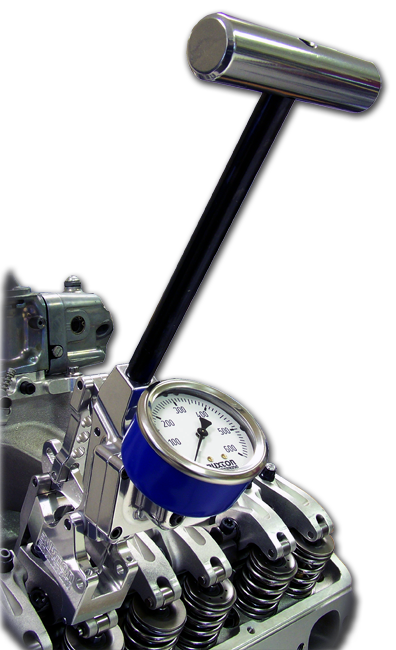
I thought about building a valve spring tester to use a torque wrench to measure spring pressures. But then I thought that there might be something like this already out there. I found this on ebay:
 $25 + $15 shipping and I was the only bidder - I OWN IT. This thing is really clean for being made in the 40s. I noticed that the threaded scale leaned a little to the left, which meant that the spring would not be compressed as evenly as it could. So before I even read the directions, I had it apart. Where the nut seats at the base of the threaded scale, it was not machined parallel to the base.
 I could have corrected this on the Bridgeport milling machine, but I made a correction washer instead by sanding 1 side of a thick washer the appropriate amount. I put it back together and it took some time to make sure that zero was exactly in line with the center of rotation where the torque wrench connects. When I was satisfied, then I finally read the directions on the nameplate.
 They mention something about a tone sounding, and I'm thinking to myself that torque wrenches did not beep in the 40s. So WTF. On the underside of the tester is a ramp and an arm attached to the shaft where the torque wrench connects. I thought it might be some kind of locking device.
 I set the dial for 1.00" and put a 1" scale in the spring platform (the knurled nut). I pushed down on the top arm and heard a ring, similar to a bell. What?!?
I rotated the nut to a little over 1", still with the 1" scale on the platform, and pressed down. No tone. I rotated the nut to a little under 1" and pressed down. I heard the tone. As it turns out, it rings at exactly 1" - 1 knurl over and no ring. So I thought it might be perfectly calibrated.
Those old mechanical engineers were pretty damn smart!
I just had a valve spring tested at the machine shop last week. I plugged my Harbor Freight Digital Torque Adapter in between the spring tester and my breaker bar.

 I bought the digital torque adapter for those times that you might need to use extensions and/or universals and angles to torque obstructed fasteners. That and for calibrating my click type torque wrenches. The ad says, "Convert any ratchet into a torque wrench." Also, "PEAK mode displays highest torque value after load is released. Accurate within +/- 2% Torque range: 29.5 to 147.6 ft. lbs. (40 to 200 NM)"
Since you have to double your torque wrench reading to get the valve spring pressure with this tester, I should be able to measure springs up to 295 pounds. But I read a review that says the published range is for the setting of torque alarms, you can go higher or lower. And it will read starting at zero. So this should be perfect for measuring my springs for flat tappet camshafts.
The spring I had tested at the machine shop measured 120# at 1.830" and 360# at 1.318" (.512" valve lift). So I set the tester for 1.830" and slowly and evenly pulled on the breaker bar. The reading came up about 8# too low. I did this a few more times to verify. It was very repeatable. Then I set the tester for 1.318" and tried again. When I got to about 150#, I realized that unless Hulk Hogan was stopping by to pull on this thing, I needed to add an extension to the breaker bar. The beauty of this setup is that with the torque adapter being plugged in directly to the spring tester, it measures the torque right there, so it doesn't matter how long of a bar you use to torque with. I found a nice 3-4 foot section of pipe and slid it on the breaker bar about 6 inches. So now I had about a 4 foot bar to torque with. I pulled and stopped when I heard the tone. The reading came up about 27# too low. I repeated this a few more times to verify. Next I raised the knurled nut the amount necessary to achieve 180# on the tester. You have to double your reading (180 x 2 = 360) since the spring and center of rotation are 6" apart. It ended up being about 1 turn. So I readjusted the threaded scale up that 1 turn. It took a while to get it dialed in, but when I was done, I was repeatably reading 180.1# on the digital torque adapter. I then set the tester back to 1.320" and read 60.1#. I'll call that good.
Those old timers must have one hell of a time checking springs using this tester and a beam type torque wrench. And it must have taken 2 people to do it, 1 to pull on the torque wrench and 1 to quickly read the scale on the torque wrench when the tone sounds, especially with stiff springs.
All I have to do with this setup is evenly pull on the breaker bar or pipe, and stop when I hear the tone. The digital display records the peak torque. The only hard part is that the scale is graduated in fractional inches, so you still need a calculator to help set the knurled nut for your intended checking height.

 But I am able to do math, so I can deal with that.
So now I have this old valve spring tester that is now much easier to use and way more accurate than the original designers could have ever imagined. It's no Rimac, but it will definitely get the job done.
$25 + $15 shipping and I was the only bidder - I OWN IT. This thing is really clean for being made in the 40s. I noticed that the threaded scale leaned a little to the left, which meant that the spring would not be compressed as evenly as it could. So before I even read the directions, I had it apart. Where the nut seats at the base of the threaded scale, it was not machined parallel to the base. I could have corrected this on the Bridgeport milling machine, but I made a correction washer instead by sanding 1 side of a thick washer the appropriate amount. I put it back together and it took some time to make sure that zero was exactly in line with the center of rotation where the torque wrench connects. When I was satisfied, then I finally read the directions on the nameplate. They mention something about a tone sounding, and I'm thinking to myself that torque wrenches did not beep in the 40s. So WTF. On the underside of the tester is a ramp and an arm attached to the shaft where the torque wrench connects. I thought it might be some kind of locking device. I set the dial for 1.00" and put a 1" scale in the spring platform (the knurled nut). I pushed down on the top arm and heard a ring, similar to a bell. What?!?I rotated the nut to a little over 1", still with the 1" scale on the platform, and pressed down. No tone. I rotated the nut to a little under 1" and pressed down. I heard the tone. As it turns out, it rings at exactly 1" - 1 knurl over and no ring. So I thought it might be perfectly calibrated.
Those old mechanical engineers were pretty damn smart!
I just had a valve spring tested at the machine shop last week. I plugged my Harbor Freight Digital Torque Adapter in between the spring tester and my breaker bar.
I bought the digital torque adapter for those times that you might need to use extensions and/or universals and angles to torque obstructed fasteners. That and for calibrating my click type torque wrenches. The ad says, "Convert any ratchet into a torque wrench." Also, "PEAK mode displays highest torque value after load is released. Accurate within +/- 2% Torque range: 29.5 to 147.6 ft. lbs. (40 to 200 NM)"Since you have to double your torque wrench reading to get the valve spring pressure with this tester, I should be able to measure springs up to 295 pounds. But I read a review that says the published range is for the setting of torque alarms, you can go higher or lower. And it will read starting at zero. So this should be perfect for measuring my springs for flat tappet camshafts.
The spring I had tested at the machine shop measured 120# at 1.830" and 360# at 1.318" (.512" valve lift). So I set the tester for 1.830" and slowly and evenly pulled on the breaker bar. The reading came up about 8# too low. I did this a few more times to verify. It was very repeatable. Then I set the tester for 1.318" and tried again. When I got to about 150#, I realized that unless Hulk Hogan was stopping by to pull on this thing, I needed to add an extension to the breaker bar. The beauty of this setup is that with the torque adapter being plugged in directly to the spring tester, it measures the torque right there, so it doesn't matter how long of a bar you use to torque with. I found a nice 3-4 foot section of pipe and slid it on the breaker bar about 6 inches. So now I had about a 4 foot bar to torque with. I pulled and stopped when I heard the tone. The reading came up about 27# too low. I repeated this a few more times to verify. Next I raised the knurled nut the amount necessary to achieve 180# on the tester. You have to double your reading (180 x 2 = 360) since the spring and center of rotation are 6" apart. It ended up being about 1 turn. So I readjusted the threaded scale up that 1 turn. It took a while to get it dialed in, but when I was done, I was repeatably reading 180.1# on the digital torque adapter. I then set the tester back to 1.320" and read 60.1#. I'll call that good.
Those old timers must have one hell of a time checking springs using this tester and a beam type torque wrench. And it must have taken 2 people to do it, 1 to pull on the torque wrench and 1 to quickly read the scale on the torque wrench when the tone sounds, especially with stiff springs.
All I have to do with this setup is evenly pull on the breaker bar or pipe, and stop when I hear the tone. The digital display records the peak torque. The only hard part is that the scale is graduated in fractional inches, so you still need a calculator to help set the knurled nut for your intended checking height.
But I am able to do math, so I can deal with that.So now I have this old valve spring tester that is now much easier to use and way more accurate than the original designers could have ever imagined. It's no Rimac, but it will definitely get the job done.