BREAK-IN PROCEDURES
FOR REMANUFACTURED ENGINES
SUGGESTED PRECAUTIONS FOR REMANUFACTURED ENGINES
This engine has been carefully remanufactured to precision standards, and will
perform properly if certain steps are taken by the mechanic making the installation.
Following is a list of causes for a remanufactured engine to fail early in service, and
suggested procedures to prevent failure. When a properly remanufactured engine
fails to give satisfactory service, it is usually due to: burning piston heads caused by
detonation, pre-ignition or “luggingâ€; piston scuffing or seizing usually caused by
overheating or excess fuel; bearing and crankshaft wear caused by underlubrication,
dirt or coolant seepage; excessive piston and cylinder wear caused by
dirt, ineffective air filtering, coolant seepage or excessively rich, air-fuel ratio.
The customer and the remanufacturer have a mutual interest in this engine.
We both want it to perform and give long and satisfactory life.
We recommend these precautions:
1. Be sure to prime the oil pump, oil lines and fill the oil filters with oil using an
auxiliary pump, operating the internal oil pump with a hand drill, or an external
pressure tank connected to the oil pressure gauge or sending unit fitting before
starting the engine. It is desirable to fill the crankcase in this manner. If using an air
pressure tank be sure it does not run out of oil and blow air through the lines.
2. Proper air-fuel ratio is vital in today’s engines. Be sure the carburetor or fuel
injection system has been remanufactured to manufacturer’s specifications. Manifold
and cylinder head surfaces should be checked and in good condition (resurface if
necessary). Be sure the cylinder heads and manifolds are torqued and retorqued in
proper sequence if required. Air seepage can cause lean air-fuel ratio which causes
detonation. Check fuel pump for proper pressure.
3. Ignition or diesel fuel injection system should be properly serviced or calibrated,
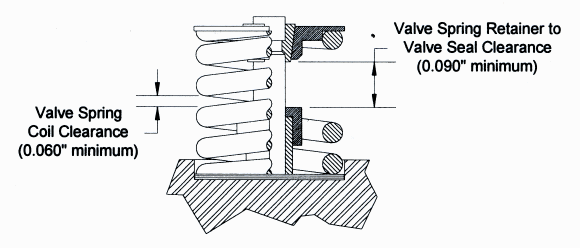
and engine timing corrected. Proper valve lash or clearance is very important.
4. Be sure to use spark plugs of the correct heat range and gap as specified by the
engine manufacturer. Check electronic sensors and sending units for proper
operation. Vacuum lines must be properly routed and connected to the appropriate
fittings to ensure operation of emission control devices and related engine controls.
5. Check the exhaust thermostat control (commonly called the heat riser) to be
certain it is free and operating properly. Check the exhaust gas recirculation valve
(EGR valve) for proper operation. Clean the intake manifold to remove deposits from
the various passages.
6. Rebuild or replace the radiator and hose lines to ensure they are free from
deposits so that the cooling system can function properly. Restrictions can cause
overheating. Thermostats should be checked or replaced with one of the correct
temperature. Use the proper pressure cap as specified by the engine manufacturer,
and make sure it is properly seated.
7. Important - replace filter elements. Thoroughly check engine accessories which
are to be reused. Clean them internally and externally before installing.
8. The coolant used should be compatible with aluminum engine components and
blended to a mixture of no more than 60% antifreeze and 40% water. We
recommend that a good sealer with rust inhibitors be added to the cooling system.
This will tend to prevent rust and scale deposits and guard against coolant seepage.
9. Before releasing the engine for regular service, check the air-fuel ratio. Caution
the driver against “lugging.â€
RECOMMENDED “BREAK-IN†PROCEDURES FOR REMANUFACTURED ENGINES
Protect the investment you have in your engine. Take the time to read and follow
these recommendations.
CAUTION
1. Before starting the engine for the first time, be sure it has been properly prelubricated.
2. Never add cold water to the cooling system while the engine is running. The
engine should be allowed to run at normal operating temperature.
3. Start engine and run at fast idle, approximately 1500 RPM, and check the oil
pressure. Run the engine for 30 minutes even though coolant may rise to operating
temperature in a few minutes. Adjust tappets, if required, carburetor and ignition
timing. If the coolant should “boil over,†stop engine and allow to cool. Then start
again and proceed as above.
4. When required retorque cylinder heads and manifolds to engine manufacturer’s
specifications in proper sequence. Readjust tappets if necessary.
5. Start engine again and make a test run on the road at 30 MPH in “drive†range or
select the proper gears for standard transmission. Periodically accelerate to 50 MPH
and decelerate rapidly. Repeat this procedure at least 10 times. For a large truck or
industrial engine, accelerate in intermediate gears as above.
NOTE: Applying loads to the engine for short periods of time causes increased ring
pressure against the cylinder walls and helps to seat the rings. This is especially
important because you are “breaking-in†the engine with heavy duty oils. The rapid
deceleration increases vacuum and gives extra lubrication to the piston and ring
assemblies.
ENGINE OR VEHICLE SERVICE RECOMMENDATIONS
Passenger Cars
Drive normally but not at continuous high speeds or under heavy loads for the first
500 miles. Change oil and filters after 500 miles.
Trucks
Operate the vehicle with light loads up to 500 miles and avoid “lugging.†Occasional
acceleration and deceleration in proper gear during this period is advisable. Change
oil and filters after 500 miles of service.
Industrial Engines
Follow the above instructions and operate under partial loads for several hours.
Change oil and filters after approximately 20 hours of operation.
As required by the engine or gasket manufacturer, after 1000 miles of service,
retorque cylinder heads and manifolds to proper specifications. Readjust tappets
when required. We suggest this be done again after 5000 miles. We know that this
means extra work, but it assures long and satisfactory engine performance.
DESIGNATION, IDENTIFICATION AND DESCRIPTIONS OF OIL CATEGORIES
API Engine Service Description
Letter Designations: SA, SB, SC, CA, CB
Oils with this designation are considered obsolete and should not be used unless
specifically authorized by the engine manufacturer.
Letter Designation: SD
1968 Gasoline Engine Warranty Maintenance Service ...typical of gasoline engines in
1968 - 1970 models of passenger cars and some trucks operating under engine
manufacturer’s warranties in effect during those model years. Oils designed for this
service provide more protection against high - and low-temperature engine deposits,
wear, rust, and corrosion in gasoline engines than oils which are satisfactory for API
Engine Service Categories SC and may be used when category SC is recommended.
Letter Designation: SE
1972 Gasoline Engine Warranty Maintenance Service ...typical of gasoline engines in
passenger cars and some trucks beginning with 1972 and certain 1971 models
operating under engine manufacturer’s warranties. Oils designed for this service
provide more protection against oil oxidation, high temperature engine deposits, rust
and corrosion in gasoline engines than oils which are satisfactory for API Engine
Service Categories SD or SC and may be used when either of these categories is
recommended.
Letter Designation: SF
1980 Gasoline Engine Warranty Maintenance Service ...typical of gasoline engines in
passenger cars and some trucks beginning with 1980 - 1988 model years operating
under engine manufacturer’s recommended maintenance procedures. Oils developed
for this service provide increased oxidation stability and improved anti-wear
performance relative to oils that meet the minimum requirements for API Service
Category SE. These oils provide protection against engine deposits, rust and
corrosion. Oils meeting API Service Category SF may be used where categories SE,
SD or SC are recommended.
Letter Designation: SG
1989 Gasoline Engine Service - Service typical of gasoline engines in present
passenger cars, vans and light trucks operating under manufacturer’s recommended
maintenance procedures. Category SG quality oils include the performance
properties of API Service Category CC. (Certain manufacturers of gasoline engines
require oils also meeting API Service Category CD). Oils developed for this service
provide improved control of engine deposits, oil oxidation and engine wear relative to
oils developed for previous categories. These oils also provide protection against rust
and corrosion. Oils meeting API Service Category SG may be used where categories
SF, SE, SF/CC or SE/CC are recommended.
Letter Designation: SH
This oil classification came to the industry in 1992 to replace the SG oil and provide
better protection against rust, oxidation, sludge, varnish as well as providing
extended component life expectancy. It is currently still available, however it is
obsolete for PCMO licensing. It can be used only with API CF, CF-2, DF-4 and CG-4
when displayed in the API service symbol and the C category appears first.
Letter Designation: SJ
This oil classification came to the industry in 1996 to replace the SH oil with
continued refinements to the SH oil. It is currently available and acceptable for use in
engines manufactured previous to the year 2,000.
Letter Designation: ILSAC GF-3
(ILSAC, International Lubrication Standardization & Approval Committee)
This oil meets the current automotive manufacturer requirements for their newest
lines of engines and will be used in 2,000 automotive engines. There were earlier
versions used before the year 2000. The ISLAC grades are described as SAE 0W-20,
0W-30, 5W-20, 5W-30, 10W-30. These oils have improved overall oil performance
while increasing fuel economy while providing emission systems protection.
Letter Designation: CC
Moderate Duty Diesel and Gasoline Engine Service - Service typical of certain
naturally aspirated, turbocharged, or supercharged diesel engines operated in
moderate to server-duty service and certain heavy-duty gasoline engine. Oils
designed for this service provide protection from high-temperature deposits and
bearing corrosion in these diesels and also from rust corrosion, and low-temperature
deposits in gasoline engines. These oils were introduced in 1961.
Letter Designation: CD
Severe Duty Diesel Engine Service - Service typical of certain naturally aspirated
turbocharged or supercharged diesel engines where highly effective control of wear
and deposits is vital or when using fuels of wide quality range including high sulfur
fuels. Oils designed for this service were introduced in 1955 and provide protection
from bearing corrosion and from high-temperature deposits in these diesel engines.
Letter Designation: CD-II
Severe Duty Two-Stroke Cyclic Diesel Engine Service - Service typical of two-stroke
cycle diesel engines requiring highly-effective control over wear and deposits. Oils
designed for this service also meet all performance requirements of API Service
Category CD.
Letter Designation: CE
Severe Duty Diesel Engine Service - Service typical of certain naturally aspirated,
turbocharged or supercharged heavy duty diesel engines manufactured since 1983
and operated under both low speed - high load and high speed - high load
conditions. Oils designed for this service must meet the requirements of API Engine
Service Category CC and CD.
LUBRICANT RECOMMENDATIONS FOR
“BREAKING-IN†REMANUFACTURED ENGINES
Follow the recommendations of the engine manufacturer for the proper viscosity and
type of oil to be used during and after the “break-in†period.
It is important to use heavy-duty detergent oils which contain an EP (extreme
pressure) additive right from the start. Special “break-in†oils should not be used
unless specified by the manufacturer. Older engines without oil filters may require
special considerations, such as the use of non-detergent oils unless otherwise
specified by the manufacturer.
Consult the owner’s or service manual for the latest manufacturer’s recommendation
on oil selection.
See the accompanying chart for additional information on the type of engine oils
currently in production and available for use with today’s engines.
SAE Motor Oil Viscosity Classifications
Since 1911, the petroleum industry has used the SAE Crankcase Oil Viscosity
Classification System to describe and classify motor oils according to their ability to
flow at various temperatures. The grades in common used today are: 5W, 10W,
15W, 20, 30, 40 and 50. The “W†indicates the oil is suitable for use during low
ambient temperatures such as during the winter months. For instance, oils
designated at 5W-30 provide adequate lubrications at -13°F (-25°C). Multigrade oils
are able to maintain their viscosity over a wide range of temperatures. An oil
designated as 10W-40 performs as well as a 10W designated oil at low
temperatures, and as well as a single grade 40 designated oil at high temperatures.
Synthetic Motor Oils
The introduction of synthetic motor oils dates back to World War II and they are
often described as the “oil of the future.†Synthetic oils are man made, manufactured
in a laboratory rather than pumped out of the ground and refined. They offer a
variety of advantages over natural oils from better fuel economy, stability over a
wide range of temperatures and operating conditions and longevity.
However, the use of synthetic engine oils is not recommended for the “break-inâ€
period. Its outstanding ability to reduce wear by virtually eliminating friction between
moving components is not desirable for a “break-in†oil. Certain predictable amounts
of friction are required for proper “break-in†of piston and piston rings. AERA does
not recommend the use of synthetic engine oils for the first 5,000 miles of service.
Thereafter it is up to the vehicle owner to weight the cost of more expensive
synthetic motor oils, manufacturer’s oil classification recommendations and drain
intervals.
Abbreviations and Symbols
API - American Petroleum Institute
SAE - The Society of Automotive Engineers
--
AERA – Engine Builders Association
The purpose of the Association is to develop and encourage high standards of
workmanship and ethics among its members; to improve business conditions
through the exchange of information and ideas; and to promote the common
business interests of persons and organizations engaged in the remanufacturing of
internal combustion engines or basic internal components of such engines in
automotive machine shops.