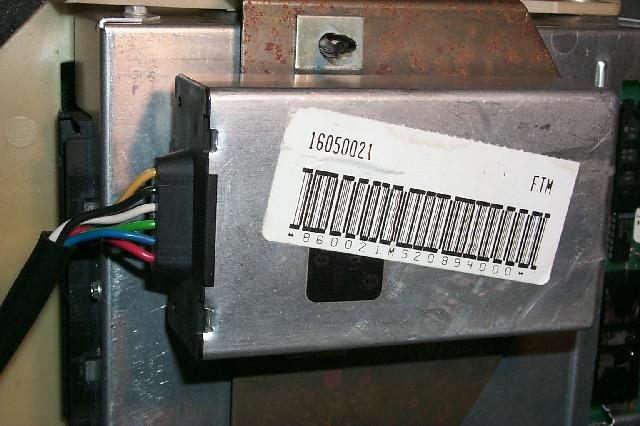
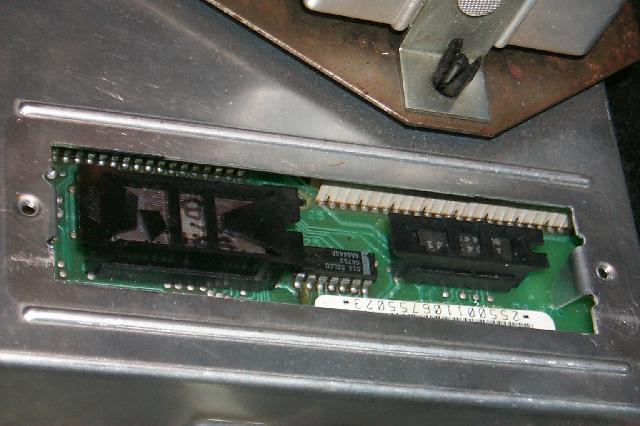
back when I first bought my 1985 corvette all my friends that owned the 1984-91 corvettes (at that time in 1992 there was nothing newer) all spoke of adding a performance chip to the cars as if it was some magical cure for lack of power, and while at that time there was several magazine articles promoting their use and even a few dyno tests showing 18-26 hp gains after installs , I was rather UN-impressed, reading these articles promoting their use simply because by that time, I had enough experience, building engines and racing cars, to fully understand that magazines get paid big bucks to promote the sale of products and advertizing cash flow seemed to sway their objectivity, plus by that time I had learned that magazine article's in performance magazines were frequently designed MOSTLY to promote product sales. regardless of what the legitimate dyno testing might show.
well in any case , almost every one of these guys had by this time ordered and installed CHIPS and most of them said they had noticed an improvement, so I was rather curious.
I asked questions and not a single guy had done a before and after dyno test because the chips cost far less than dyno test time.
I asked how difficult the chips were to install , and one of my friends decided to show me , how easy it was by pulling the chip out of his 1985 corvette and installing it temporarily in my car so I could see the difference for my self.
he started by showing me where the chip was located, up under the dash on the pass side foot well.


but when he opened the aluminum box containing the CHIP I found I already had one installed from the previous owner, and he showed me how they just clip in place, this was later to prove very useful, several months later, when I was tracking down an issue with my car not holding a steady idle speed which eventually proved to be cure by removing the "PERFORMANCE CHIP" and after it was REMOVED my car ran much better.
this was not a rare failure from what I've seen, and of those guys I still know of and talk to a great many guys have since removed the chips as they seem to be prone to intermittent electrical glitches.
now I'm surely not saying that none of the upgrade chips do what they are designed to do, because obviously I have not tested all brands or can i be sure they were all installed correctly, but the early chips had an appallingly high failure rate, and many of them seemed to cause intermittent electrical glitches, in my friends corvettes, mostly related to idle speed control issues or over heated engines, or fuel/air ratio distribution, and removing the chips has frequently resulted in cars running better in my experience.
Id also point out that many of the chips simply push on, and contacts corrode with age and especially in moist environments
https://www.eecis.udel.edu/~davis/z28/ecm_swap/
youll find many guys claiming that aftermarket CPU chip upgrades help a great deal
Ive found some help marginally but many actually hurt performance
http://www.iroc-z.com/articles/articlepages/1990-3Chips Article by Cliff Gromer, Super Stock, 1991.htm
THERES A GREAT DEAL OF RELATED INFO< IN THESE THREADS AND SUB LINKS
http://www.ecklerscorvette.com/hypertec ... chips.html
http://www.ws6.com/mycar.htm
viewtopic.php?f=32&t=2825&p=7295&hilit=1985+1986+baud#p7295
viewtopic.php?f=80&t=728&p=43477&hilit=camaro+sensors#p43477
viewtopic.php?f=55&t=10141&p=39832&hilit=1985+1986+baud#p39832
viewtopic.php?f=87&t=1817&p=26483&hilit=rigged#p26483
http://garage.grumpysperformance.co...chevy-cams-and-a-few-similar-aftermarket.133/
well in any case , almost every one of these guys had by this time ordered and installed CHIPS and most of them said they had noticed an improvement, so I was rather curious.
I asked questions and not a single guy had done a before and after dyno test because the chips cost far less than dyno test time.
I asked how difficult the chips were to install , and one of my friends decided to show me , how easy it was by pulling the chip out of his 1985 corvette and installing it temporarily in my car so I could see the difference for my self.
he started by showing me where the chip was located, up under the dash on the pass side foot well.


but when he opened the aluminum box containing the CHIP I found I already had one installed from the previous owner, and he showed me how they just clip in place, this was later to prove very useful, several months later, when I was tracking down an issue with my car not holding a steady idle speed which eventually proved to be cure by removing the "PERFORMANCE CHIP" and after it was REMOVED my car ran much better.
this was not a rare failure from what I've seen, and of those guys I still know of and talk to a great many guys have since removed the chips as they seem to be prone to intermittent electrical glitches.
now I'm surely not saying that none of the upgrade chips do what they are designed to do, because obviously I have not tested all brands or can i be sure they were all installed correctly, but the early chips had an appallingly high failure rate, and many of them seemed to cause intermittent electrical glitches, in my friends corvettes, mostly related to idle speed control issues or over heated engines, or fuel/air ratio distribution, and removing the chips has frequently resulted in cars running better in my experience.
Id also point out that many of the chips simply push on, and contacts corrode with age and especially in moist environments
https://www.eecis.udel.edu/~davis/z28/ecm_swap/
youll find many guys claiming that aftermarket CPU chip upgrades help a great deal
Ive found some help marginally but many actually hurt performance
http://www.iroc-z.com/articles/articlepages/1990-3Chips Article by Cliff Gromer, Super Stock, 1991.htm
THERES A GREAT DEAL OF RELATED INFO< IN THESE THREADS AND SUB LINKS
http://www.ecklerscorvette.com/hypertec ... chips.html
http://www.ws6.com/mycar.htm
bytor said:Since I have had my ‘new to me’ 1987 corvette for almost a year now and being the nerd that I am I wanted to know what made the 1227165 ECU tick. I thought I would start a post to generate some discussion. Obviously the 80’s ODB1 ECU’s are rather antiquated compared to today technology but it’s interesting to see how these things work. It’s helped me gain a deeper understanding of the TPI engine control rather than looking at the ECU as a black box. I have researched both the ECU hardware and software. Below is a summary of the ECU hardware and plan to follow up later with a software discussion. Disclaimer – I am in no way an expert involving this following info. It’s based on my research and I have made some assumptions and educated guesses. Feedback and additional insight welcome….
Starting off with the hardware, I put together a functionality block diagram below depicting the chips and their functionality inside the ECU providing a little more insight into what the inputs and outputs actually connect to inside the ECU. Also below is a description of the chips and generally what their functionality is I think. There is very little info out there on most of these chips.
Description of the Chips:
16034988 (U8) - ECU main central 8 bit processor chip (CPU). The processor runs at a modest 2Mhz with 512K of SRAM on the chip. The upper 256K is retained by the car battery. This is where the ‘learned’ variables are stored (BLM) and what’s reset when the battery is disconnected. The architecture of this processor chip is almost the exact same as a Motorola 68HC11 with some minor differences. Motorola produced this custom chip for GM based on GM specifications. The programing instruction set is also the same as the 68HC11 and assembly language is used to write the code. This processor was used in most all of the P4 ECU’s thought the 80’s.
http://en.wikipedia.org/wiki/Freescale_68HC11
http://www.retro.co.za/rsre/efi/DIY_EFI/1999/efi4-117.txt
http://www.freescale.com/files/microcontrollers/doc/ref_manual/M68HC11ERG.pdf
https://www.clear.rice.edu/elec201/Book/6811_asm.html
16045148 (U9) - Time Processing Unit (TPU) chip. Very little info exist about this chip but it appears to be responsible for on/off output control for relays and pulsed outputs like the check engine light. More importantly this chip is also responsible for interfacing variable frequency and other pulse train inputs to the CPU and providing the pulse width modulation and other reference clock signals for driving the injectors and ignition timing. Apparently, lots of smarts in this chip.
16034984 (U12) - Fuel modeling device (FMD) chip. This chip seems to be the smarts that take the CPU ignition and fuel commands then interfaces them to the distributor and injectors. It also provides on/off inputs from things like the park neutral switch and AC on/off inputs. This is where some of the limp home smarts live as well. Very little details exist about the inter working of this chip.
16054995 (U11) - Limp home control chip or redundant fuel module(RFM). Again, very little info on this chip but it seems to work with the MEMCAL and 16034984 (FMD) to control If the CPU or multiple sensors fail, this chip in conjunction with the U11 the link home controller and the MEMCAL would manage all engine functions.
16034988 (U10) - Analog to digital converter chip. Used to sample varying DC input signals from the MAF and coolant temperature sensors for example. This chip is comparable to the Texas Instruments ADC0811.
http://www.ti.com/lit/ds/symlink/adc0811.pdf
16042368 (U3&6) - Quad driver chip. A high-voltage, high-current quadruple low-side switch especially
designed for driving from low-level logic to peripheral loads such as relays, solenoids, motors, lamps, and other high-voltage high-current loads. This chip is primarily used to drive the various relays like the cooling fan and MAF burn off relays. This chip is comparable to the Texas Instruments TPIC2404.
http://www.ti.com/lit/ds/symlink/tpic2404.pdf
16034987 (U4) - Oxygen sensor amplifier chip. Basic sensor amplifier specifically used for the O2 sensor. This chip is comparable to the Texas Instruments LM9044.
http://www.ti.com/lit/ds/symlink/lm9044.pdf
16064606 (U2) - CPU serial to ALDL interface chip. Used to interface the CPU serial data to the ALDL interface connector. http://home.earthlink.net/~cliff_harris/1227165/Links/bi_sxr.pdf
16034993 (U7) - Idle air control stepper motor driver chip. Used to interface the ECU to the IAC stepper motor controlling idle. Looks like a run of the mill stepper motor driver chip.
16034992 (U1) - Power sequencer/reset/voltage regulator chip. Not much info available on this chip other than the pin outs. http://home.earthlink.net/~cliff_harris/1227165/Links/16034992.gif
16045580 (U13) - Single driver/switch chip used to control the fuel pump relay. Looks like a run of the mill stepper relay driver chip.
More to come.
viewtopic.php?f=32&t=2825&p=7295&hilit=1985+1986+baud#p7295
viewtopic.php?f=80&t=728&p=43477&hilit=camaro+sensors#p43477
viewtopic.php?f=55&t=10141&p=39832&hilit=1985+1986+baud#p39832
viewtopic.php?f=87&t=1817&p=26483&hilit=rigged#p26483
http://garage.grumpysperformance.co...chevy-cams-and-a-few-similar-aftermarket.133/
Last edited by a moderator:
