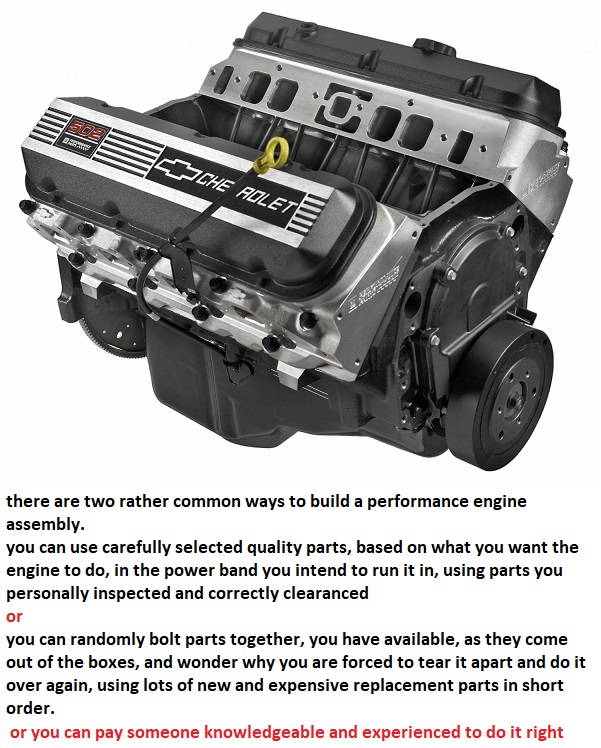
ok first some facts
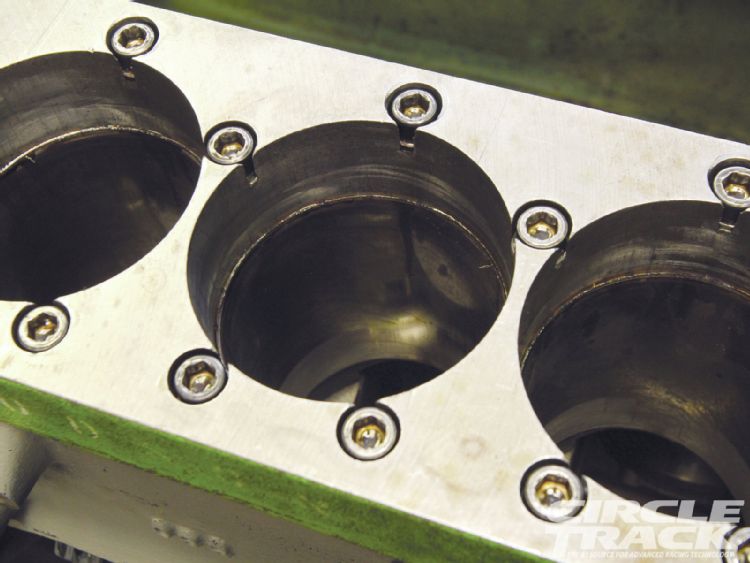
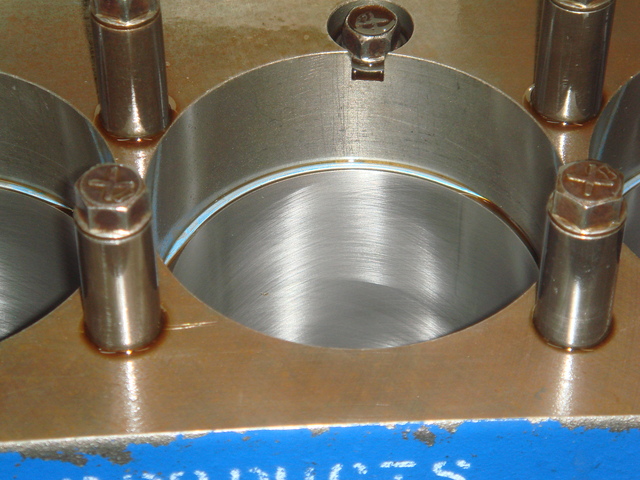
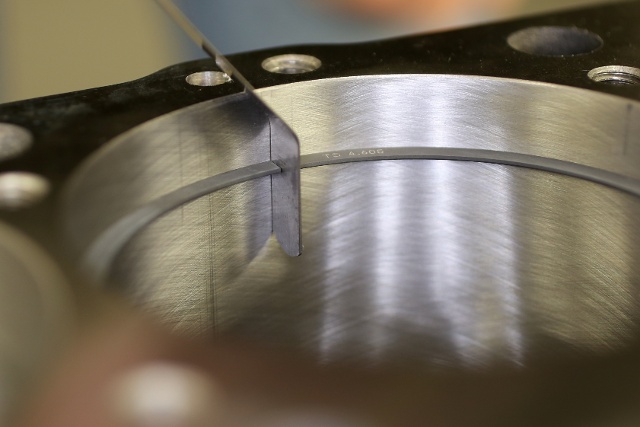
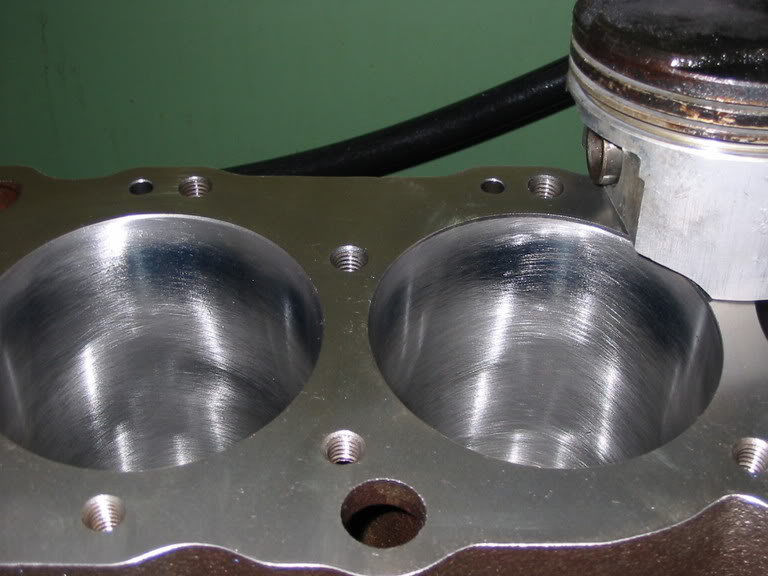
(1)cylinders will not be honed to true round as they will be in use with out the use of a deck plate to simulate and duplicate the bolt clamp stress on the cylinder walls, bores in blocks without a head or deck plate with the bolts or studs torqued to spec are not nearly the same shape before having the torqued studs bolts stress applied, theres almost no chance of getting a good ring seal without having the bores honed with a deck plate
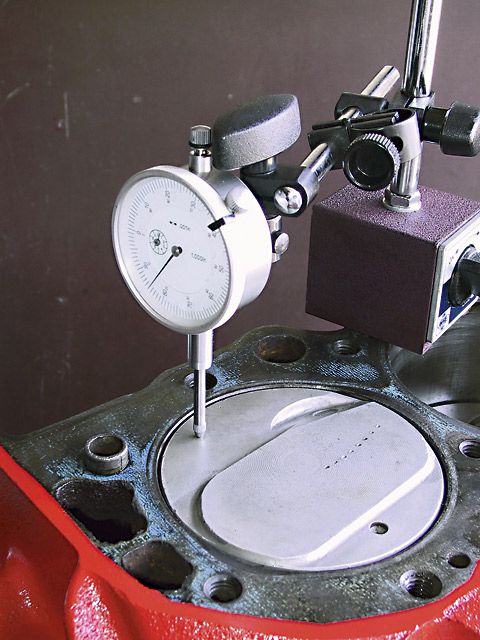
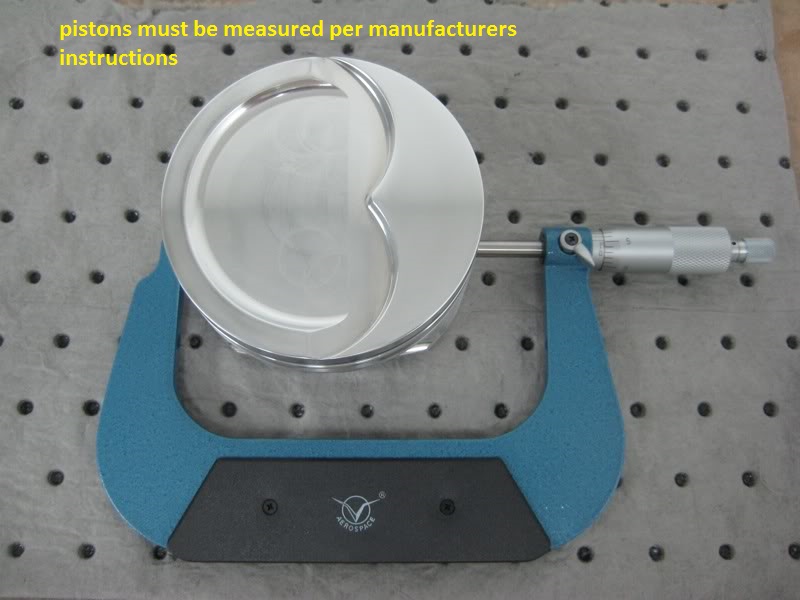
always read, understand and follow the piston manufacturers guide for piston to bore clearance and how you measure that correctly
YOU NEED TO KNOW what is the piston to bore side clearance, where on the piston in relation to the pin,it will need to be accurately measured,in relation too the piston pin bore axis and piston top,surface, and how you measure it according to the manufacturer, and how did you measure both the piston and the bore and whats your ring gap supposed too be set at?
think carefully about both the initial cost and the structural strength of the engine block you select, the OEM blocks used in production car engines will RARELY accept a .030 plus over bore with out having one or more cylinders having marginally thin bore walls, this results in inadequate bore to ring sealing if its in the wrong area and promotes stress cracks. A .060 over bore in a SBC is rather commonly pushing that bore wall thickness up to or over a reasonable limit so you need to sonic and magnetically check the block for cracks and wall thickness.
you could easily dump $500-$1500 into machine work on a block that won't last more than a few months under high stress if its not carefully checked PRIOR to the machine work being done.
 be sure you, measure EACH bore and EACH piston,
(CORRECTLY with the proper tools in the way the tool and piston manufacturers suggested)
and number them on an engine build sheet indicating the bore and piston diam.
from large to smallest on each and install them on each cylinder to get the most consistent piston to bore clearance's
yes the difference may only be a few ten thousands if the bores are machined correctly, but you'll get the best results , most consistent lubrication, best durability and less heat build up that might result in detonation issues that way. its the little things that add up to making a good durable engine assembly,
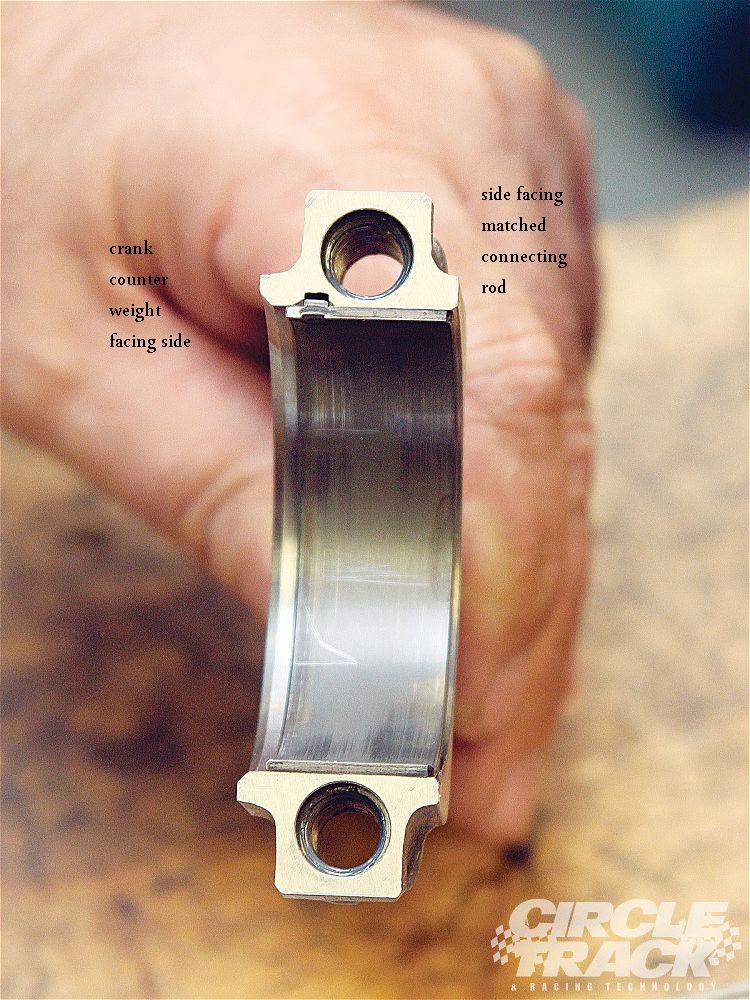
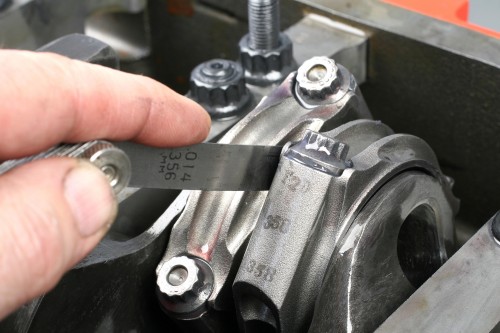
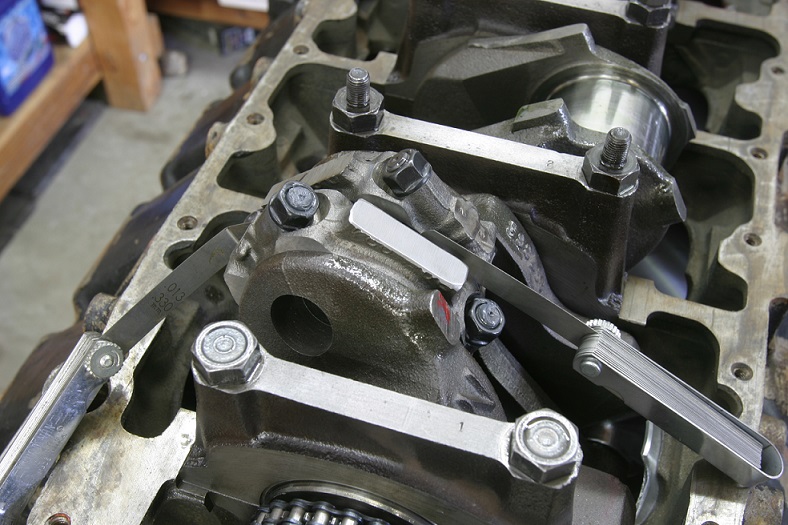
BTW check rod orientation, so the beveled sides don't fact the adjacent rods, and check the bearing clearances with plasti guage
 btw
btw
its standard practice to cc the combustion chambers, in the cylinder heads and the piston domes,(obviously check quenck and piston pin height, and clearances , mpisyton to head clearance, valve to piston cleances also,
(usually the piston domes volume is generally measured with the piston deck or quench surface rotated down the bore , exactly 1 inch) use your caliper or dial indicator and piston bridge)and the rings sealed temporarily with a bith of grease or paraffin to make sure you'll be dealing with as close as possible to the exact same compression ratio, in each cylinder, mark each piston with a indulable black magic marker A,B,C,D,E,F,G,H
and the bores 1-2-3-4-5-6-7-8 so you don't get measurements on the build sheet confused between bore diam and piston diam, and you can also not confuse dme volume on each piston
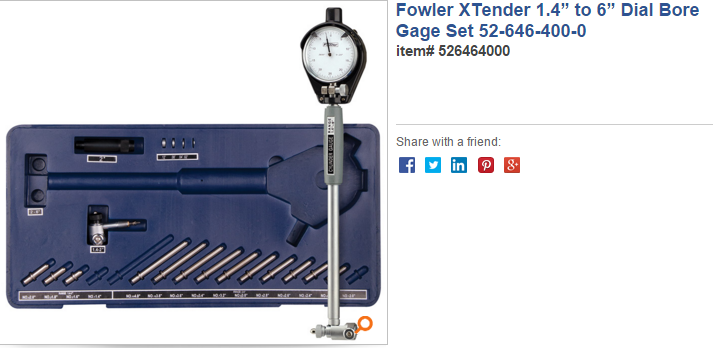
http://www.sjdiscounttools.com/lis24000.html
measure carefully as the piston groove depth and back clearance must match the rings you use or youll have major problems
common sbc pin height info
Specs
I've seen a great many machine shops who either just don,t give a rats A$$ or they are CLUELESS INCOMPETENTS
you can't assume anything you paid for was done correctly,
until
YOU VERIFY IT PERSONALLY (AND YES THAT REQUIRES PRECISION MEASURING AND EFFORT)
in either case this forces a decent engine builder to verify all the work was properly done
New
http://honingplates.com/index.php?main_page=product_info&products_id=28
http://honingplates.com/index.php?main_page=product_info&products_id=29
http://garage.grumpysperformance.co...-the-rabbit-hole-with-alice.10933/#post-66925
a day or so spent in careful research & reading can save you hundreds of dollars and months of wasted work
http://garage.grumpysperformance.com/index.php?threads/precision-measuring-tools.1390/
http://garage.grumpysperformance.com/index.php?threads/piston-to-bore-clearance.4630/
http://garage.grumpysperformance.co...tion-of-crank-durring-short-blk-assembly.852/
http://garage.grumpysperformance.co...g-and-installing-connecting-rods-pistons.247/
http://garage.grumpysperformance.com/index.php?threads/rotating-assembly-bearings.9527/
http://garage.grumpysperformance.co...oven-facts-if-your-in-doubt.13051/#post-69824
http://garage.grumpysperformance.com/index.php?threads/assembly-lube-summary.6352/
http://garage.grumpysperformance.com/index.php?threads/maximizing-piston-to-bore-ring-seal.3897/
http://garage.grumpysperformance.co...ng-and-basic-piston-ring-info-youll-need.509/[/quote]
read the links don,t skip them, youll likely save a great deal of cash and time knowing whats involved
http://garage.grumpysperformance.com/index.php?threads/block-prep.125/
http://garage.grumpysperformance.co...k-after-a-cam-lobe-rod-or-bearings-fail.2919/
http://garage.grumpysperformance.co...piston-to-bore-clearance-on-your-block.14251/
http://garage.grumpysperformance.com/index.php?threads/engine-block-cylinder-wall-thickness.976/
http://garage.grumpysperformance.com/index.php?threads/why-build-a-383-vs-a-350.715/
http://garage.grumpysperformance.com/index.php?threads/blocks-from-summitt-or-comp-products.10174/
http://garage.grumpysperformance.co...s-why-doesn-t-anyone-ever-ask-or-check.11532/
http://garage.grumpysperformance.com/index.php?threads/precision-measuring-tools.1390/

related threads with very useful info
garage.grumpysperformance.com
garage.grumpysperformance.com
garage.grumpysperformance.com
garage.grumpysperformance.com
garage.grumpysperformance.com
garage.grumpysperformance.com
garage.grumpysperformance.com
garage.grumpysperformance.com
garage.grumpysperformance.com
garage.grumpysperformance.com
garage.grumpysperformance.com
garage.grumpysperformance.com
garage.grumpysperformance.com
if you want a fast dependable car you will need to either do the research required to know exactly how and why things should work, or pay someone else to do the work that has taken that time and effort.
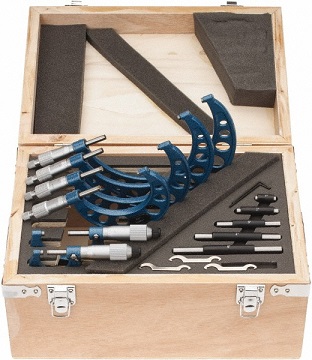
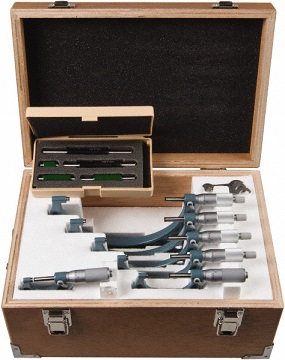
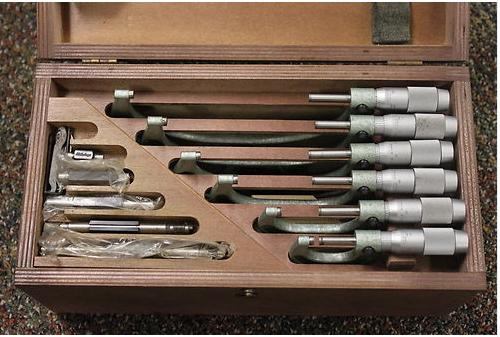
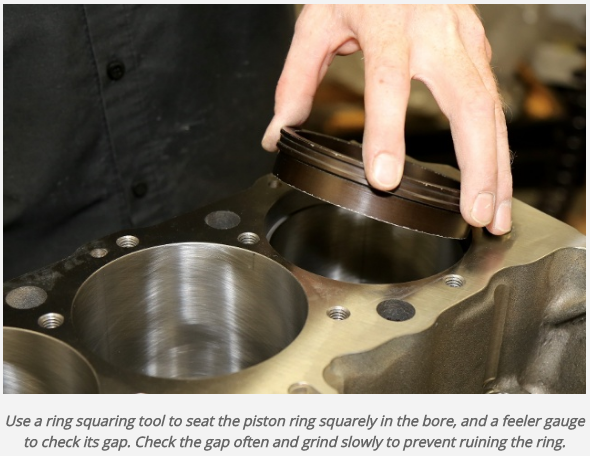
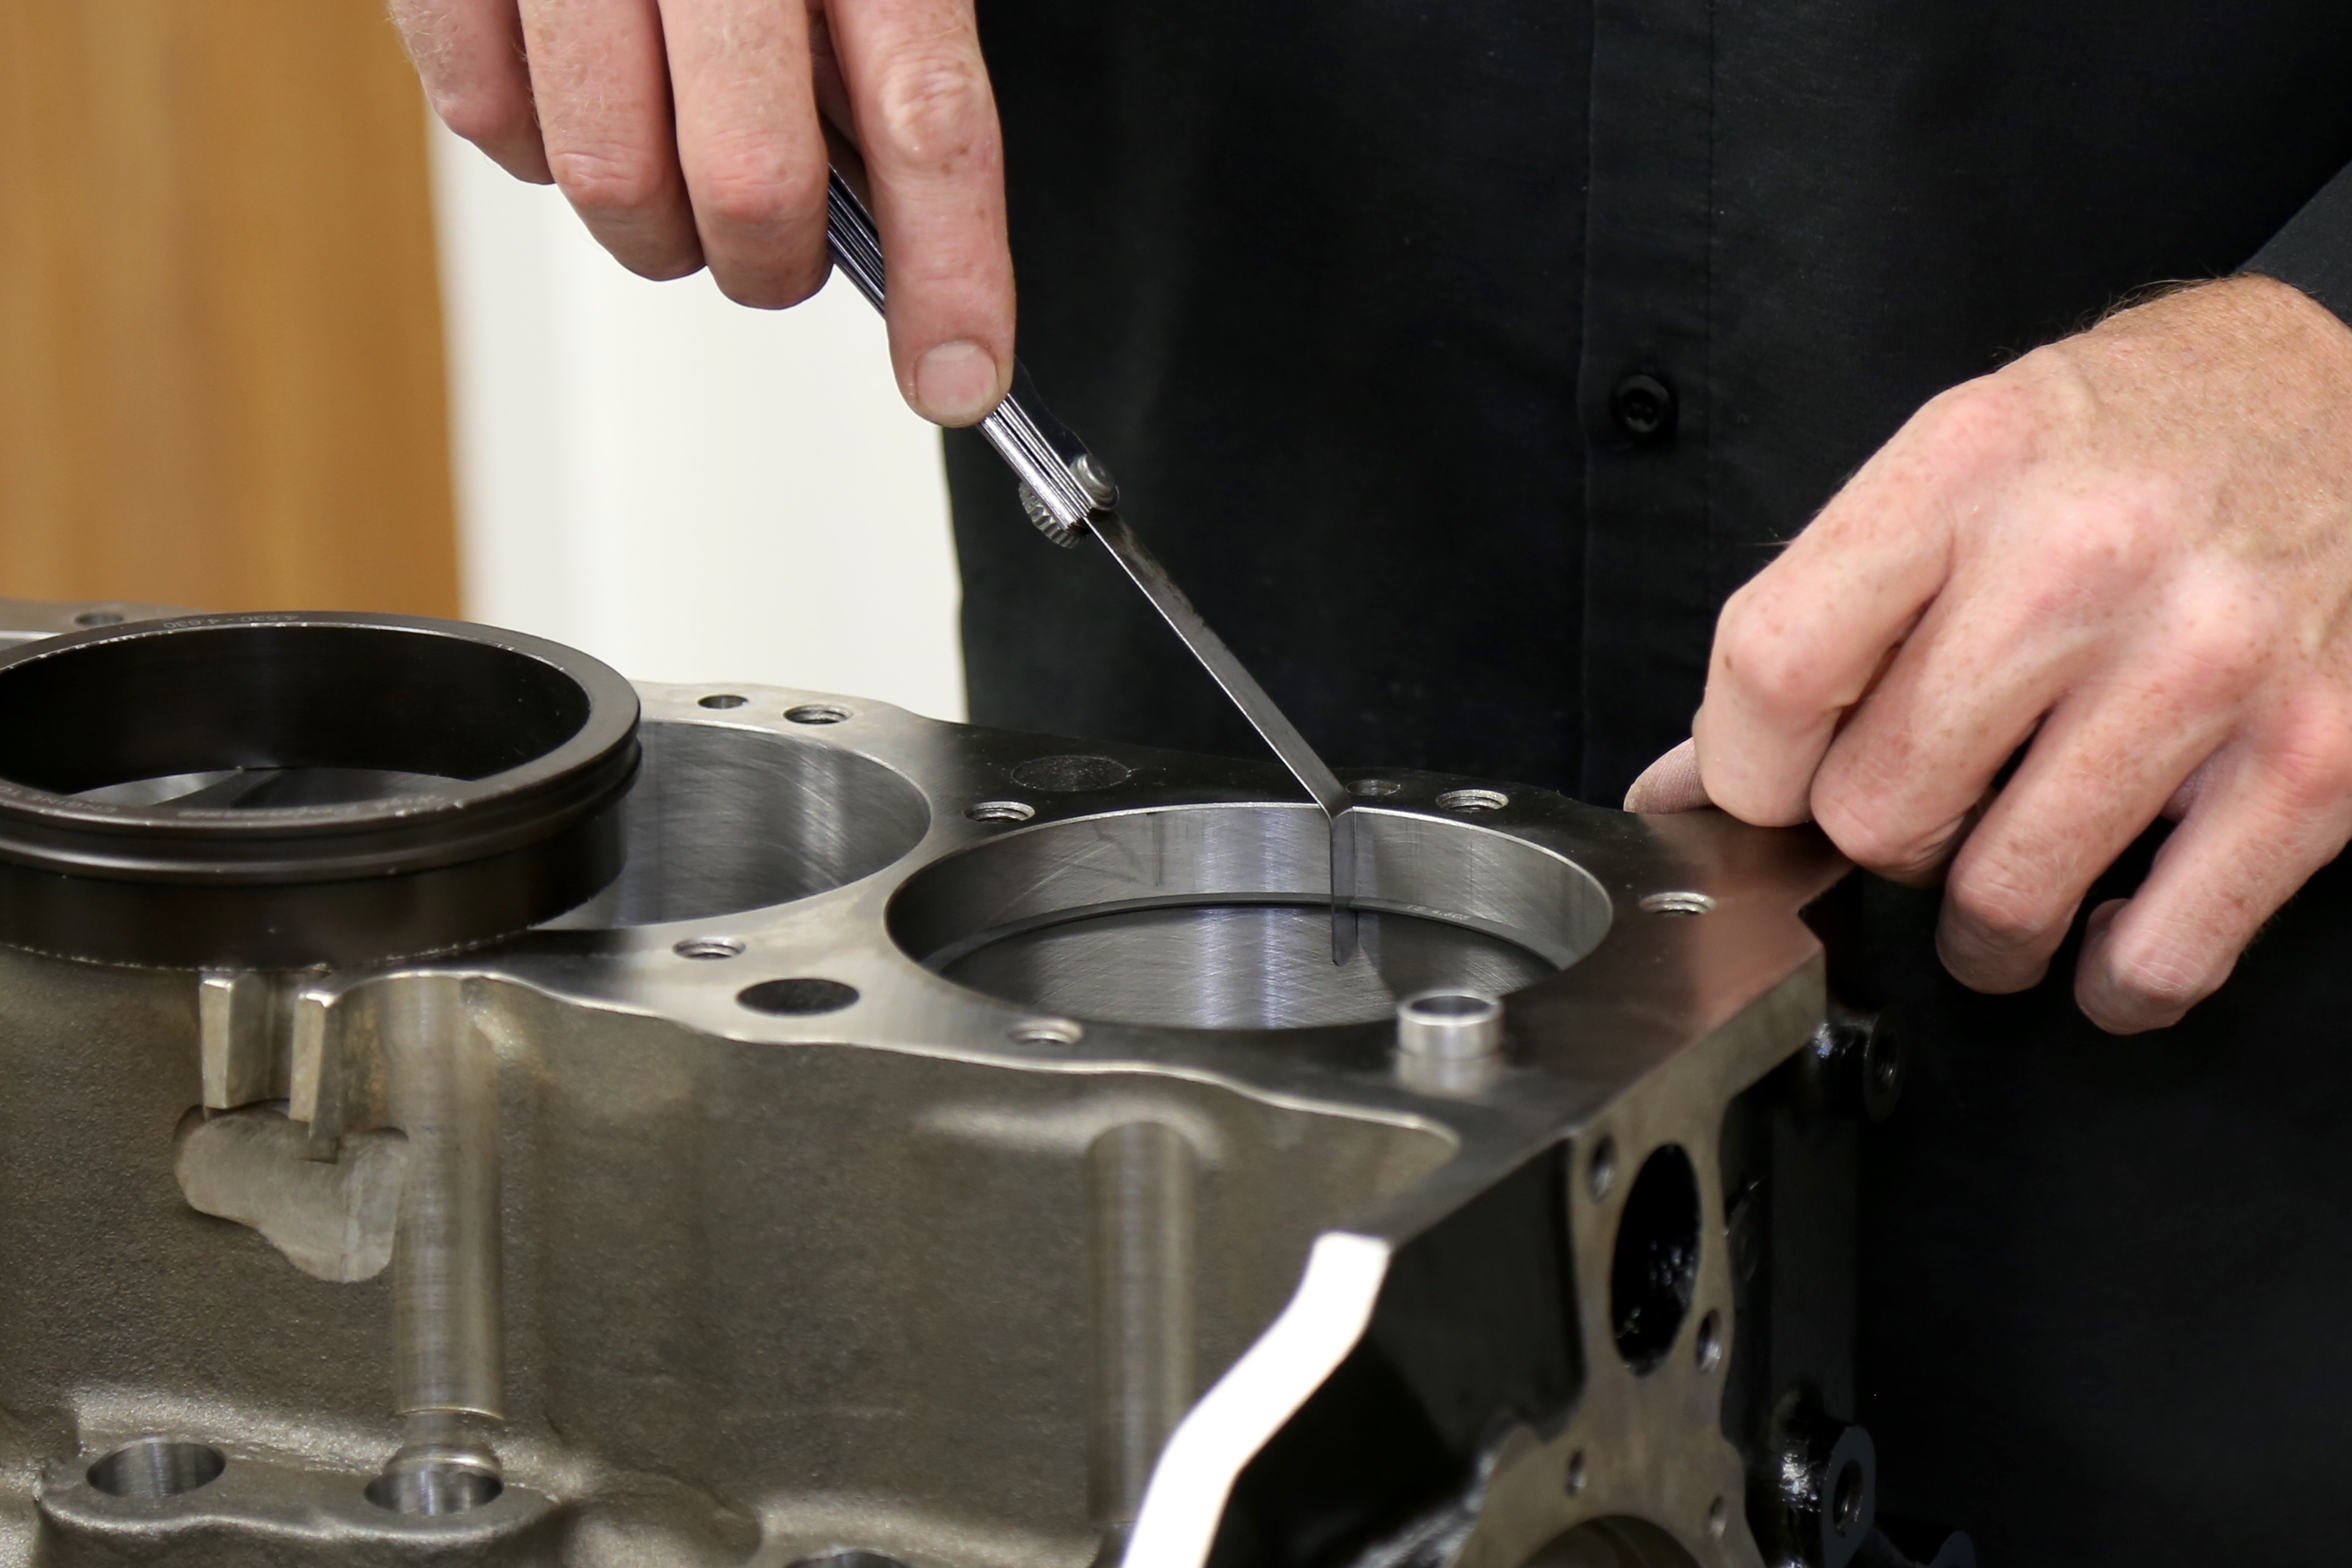
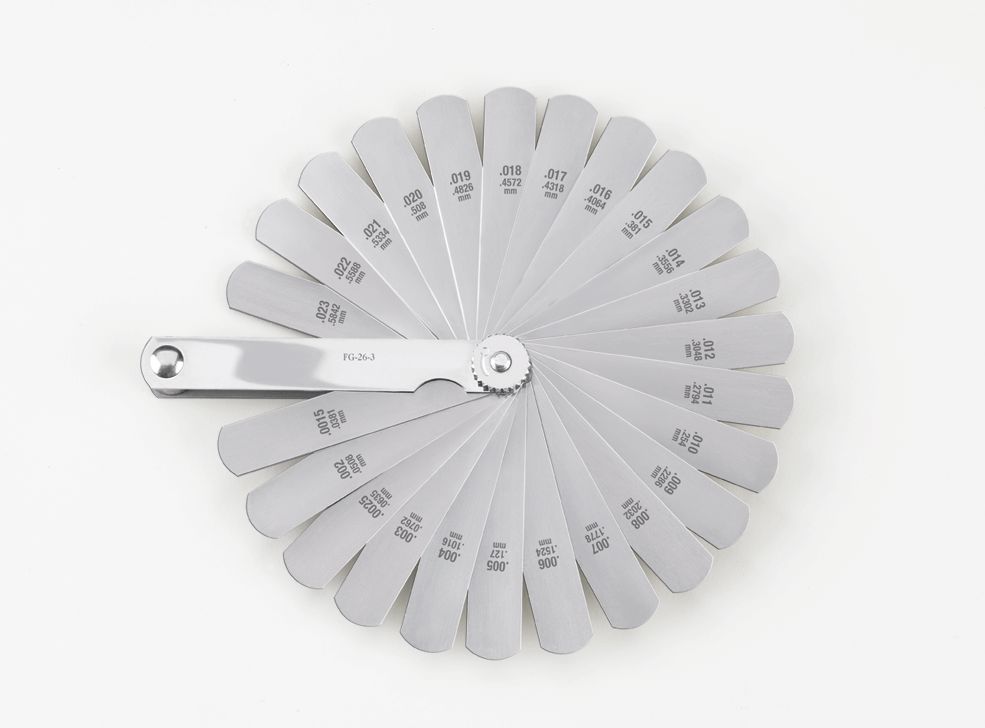
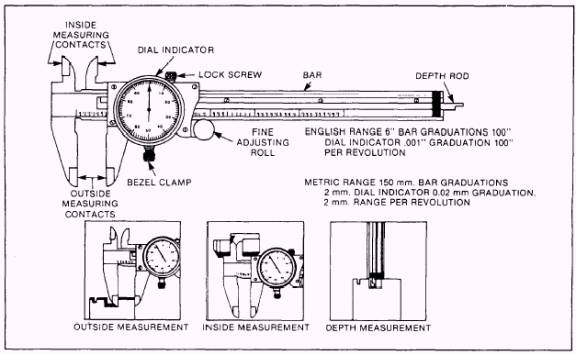
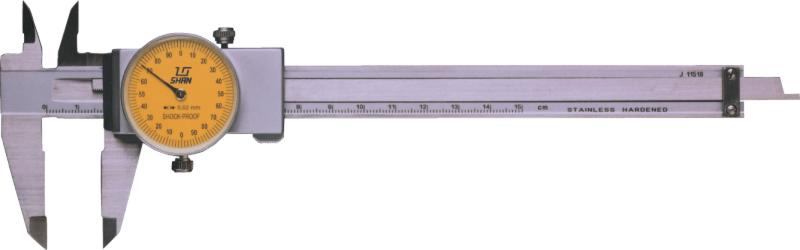
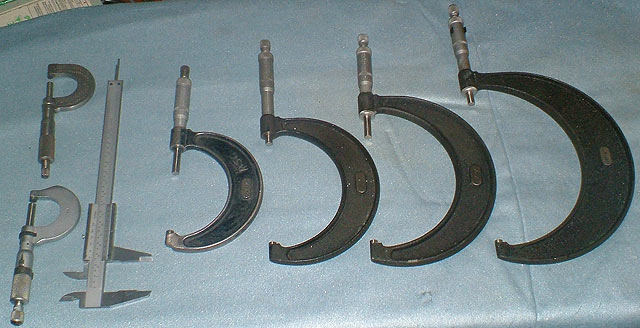
your going to need decent feeler gauges

if the ring gaps, or piston to bore clearances are not carefully checked, or not correct your engine could easily get screwed up
Due to machining tolerances on both pistons and bore sizes theres always some minor differences between components,
when your assembling any engine, youll file fit the ring gaps to individual cylinders,and youll,
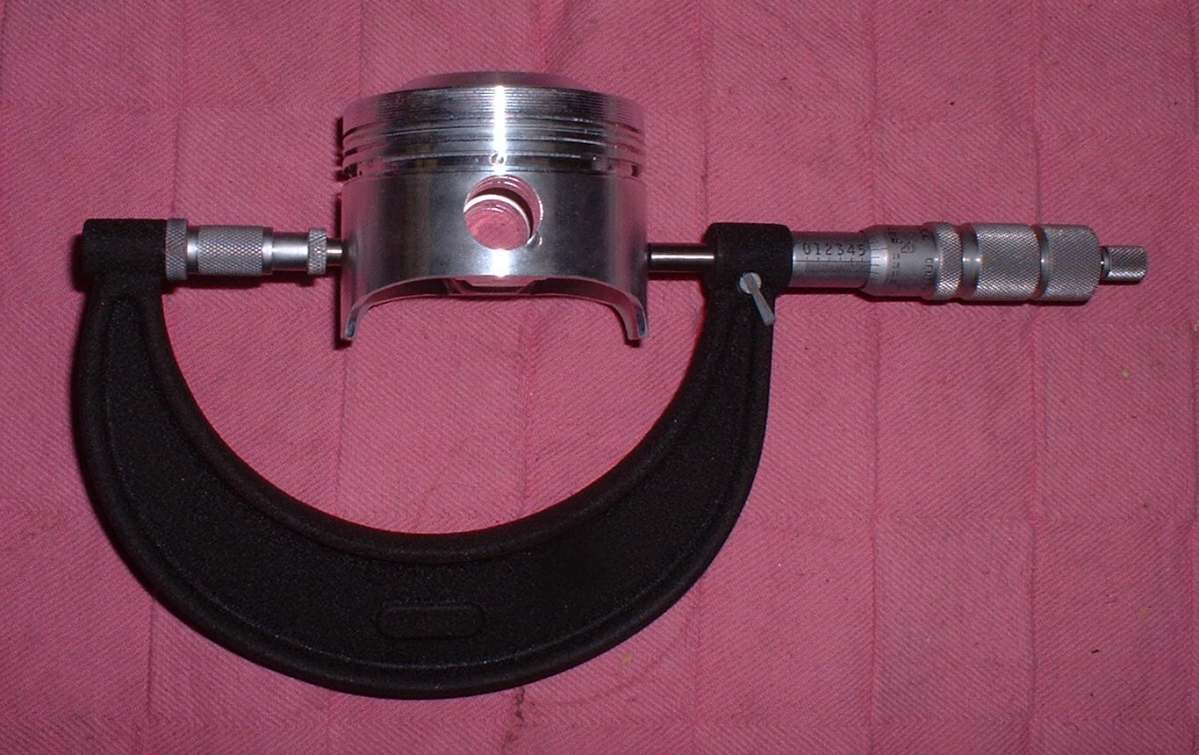
generally you'll want to carefully measure each individual piston diameter and each individual bore diameter very carefully,
and match the larger pistons to the larger bore sizes to keep the average side clearance as consistent as possible
most applications would have a ring gap of about .004-.005 per inch of bore diam.
(2) if the cylinder walls are sonic checked at less than about .150 Id suggest looking for a different engine block or partly filling the coolant passages to increase cylinder wall strength
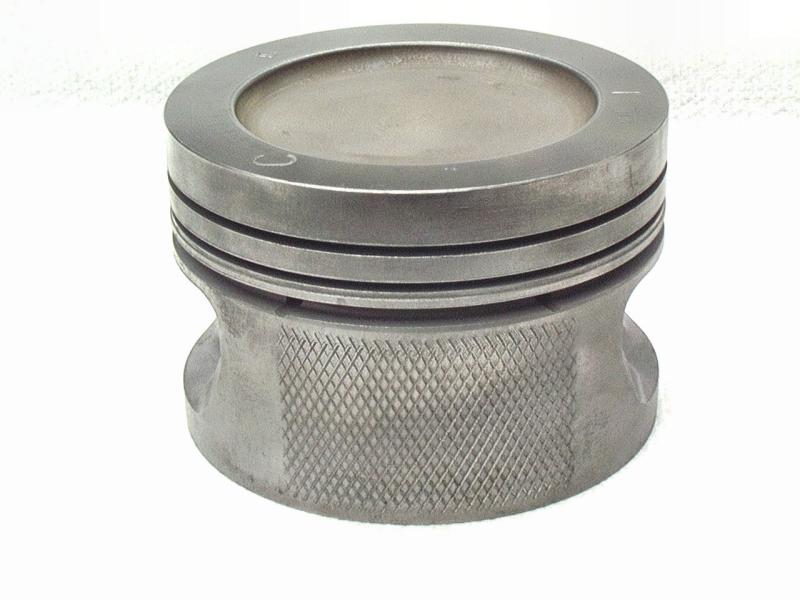
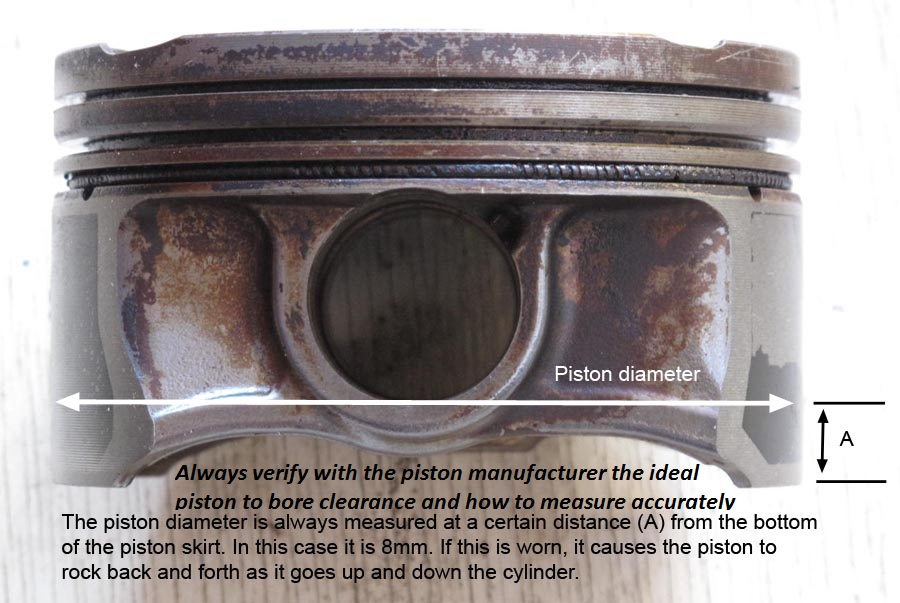
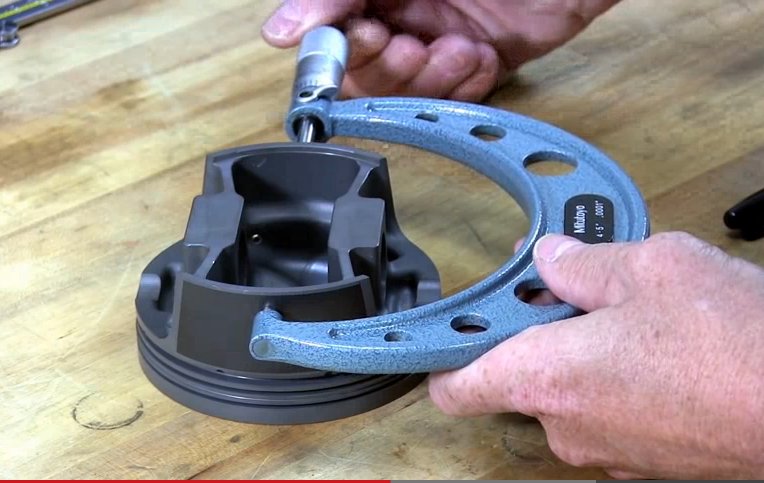
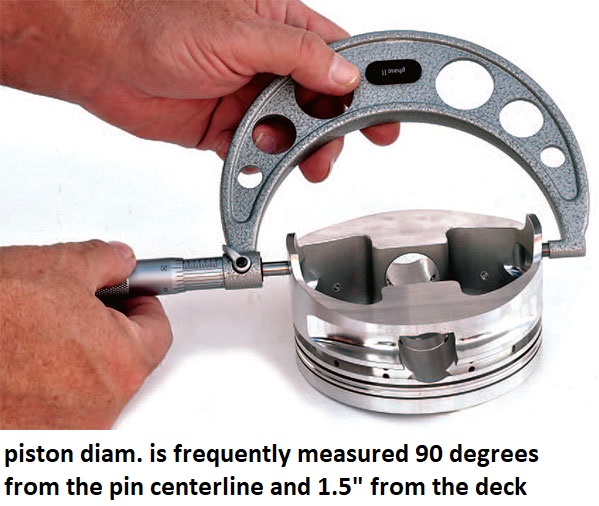
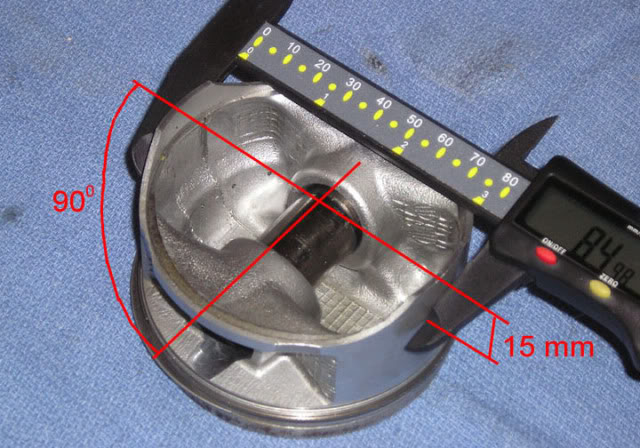
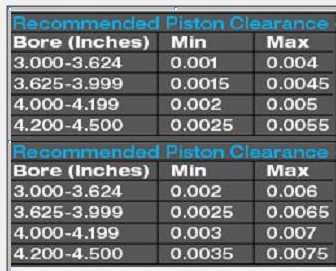
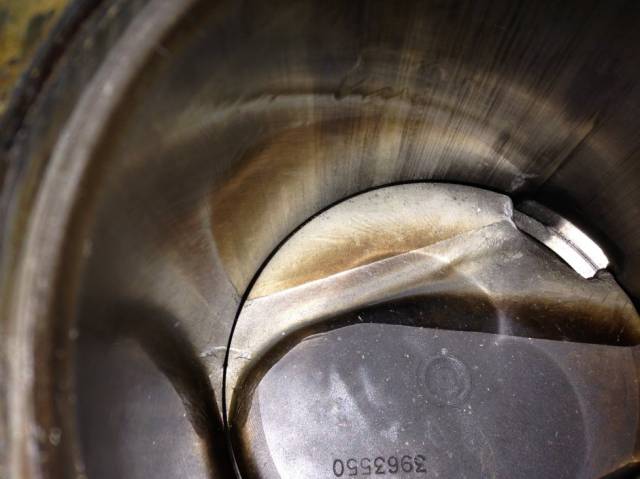
(3) pistons are NOT exactly ROUND so verify with the manufacturer as to the correct place to measure them and the correct bore size they are to be used in, pistons are not round or evenly dimensioned, in circumference as with the heat of running in an engine,different sections expand at different rates this varies a great deal between applications, piston design and piston materials.
typical side clearances range in the .002-.005 ranges but you need to verify and measure both the bore and piston per the piston manufacturers instructions Every piston manufacturer measures their pistons at different spots depending on the design but about the best place to measure those it perpendicular to the wrist pin even with the top of the balance pad - typically .500"-.750" down from the top of the piston quench, but as stated CHECK WITH THE MANUFACTURER., all forged,or cast, or hypereutectic pistons will not require the same clearances nor are they measured in the same place[/color]
On to clearance,,
.005 is fine with some forged pistons & not so fine with others depending on application & piston design.
All listed clearances are minimum.
There are some that run much tighter, down to .0015 & some that need more
Most pistons are measured at the pin center line or just below it & some come with a dimension from the pin or deck down for clearance measurement, some from the bottom up.
The older Speed Pro & TRW ones were measured at the pin center line
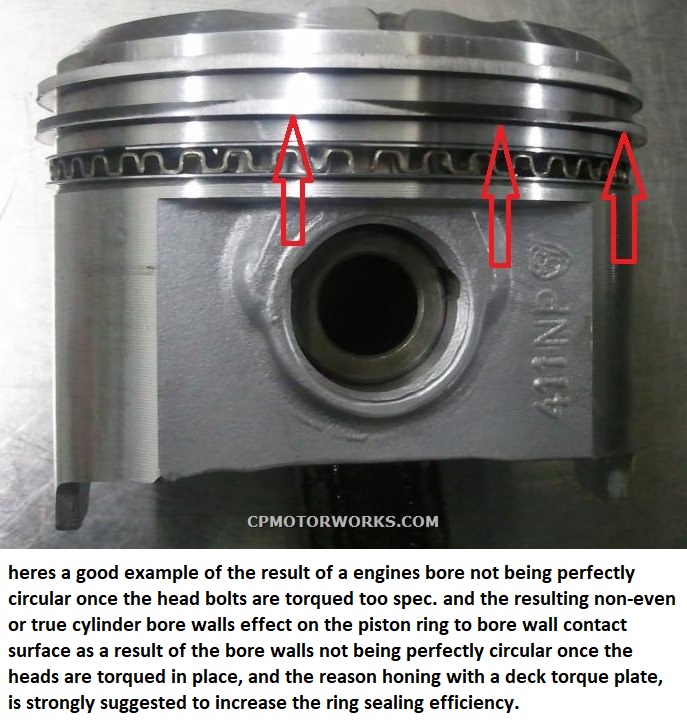
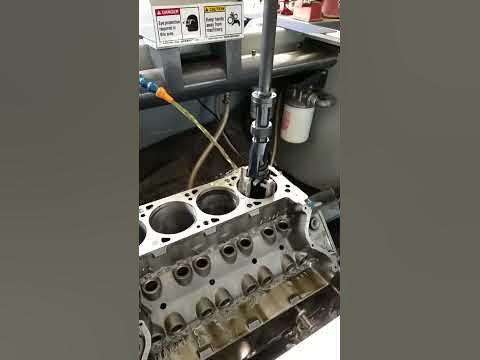
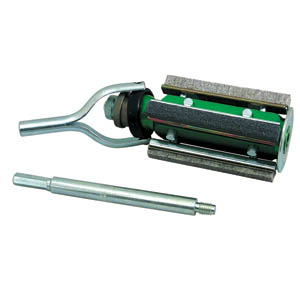
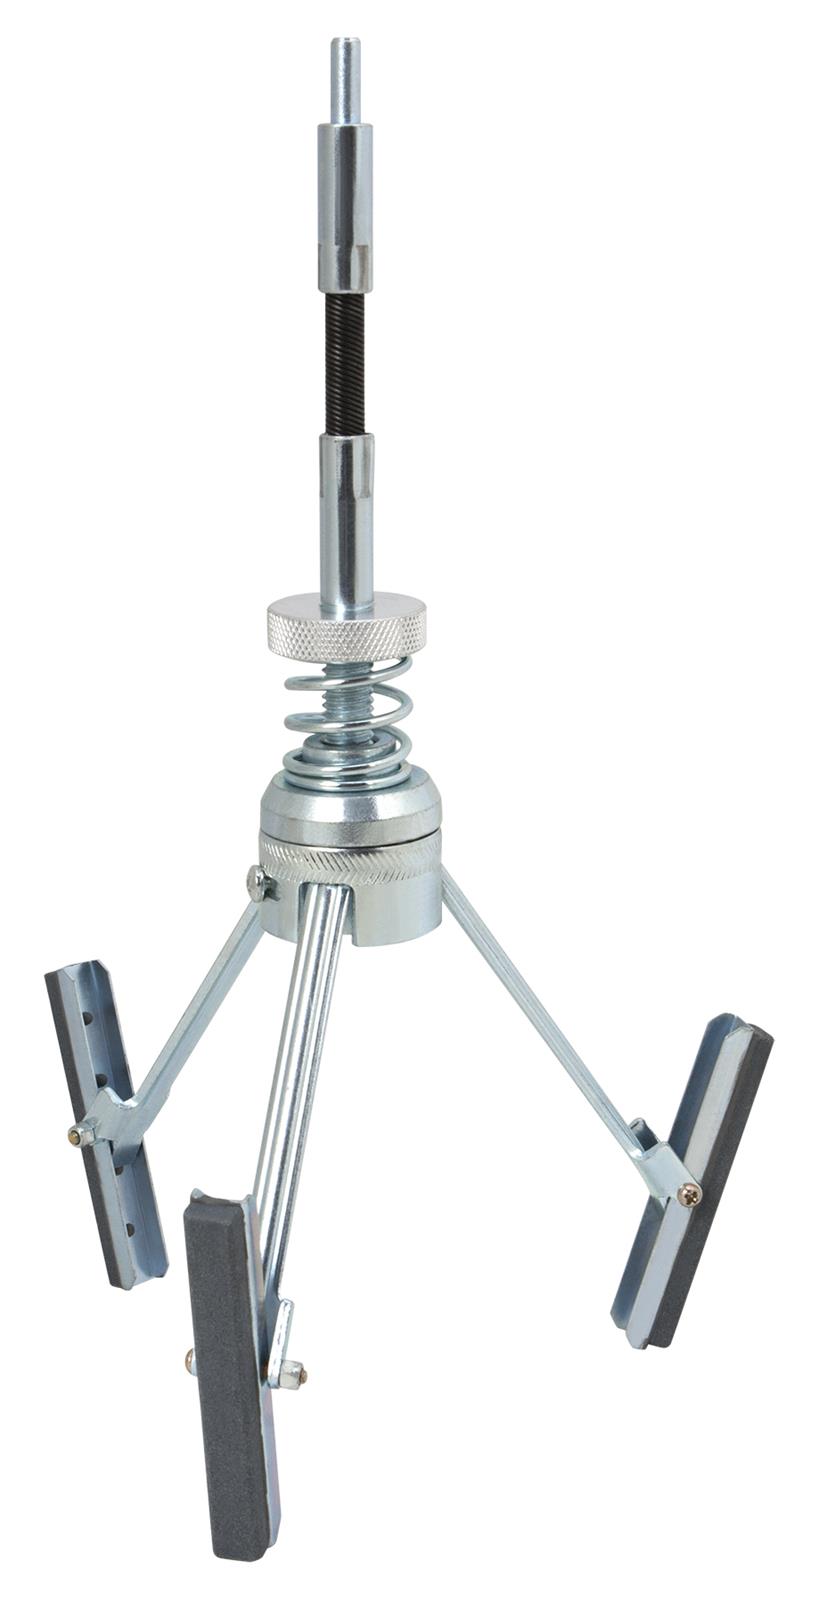
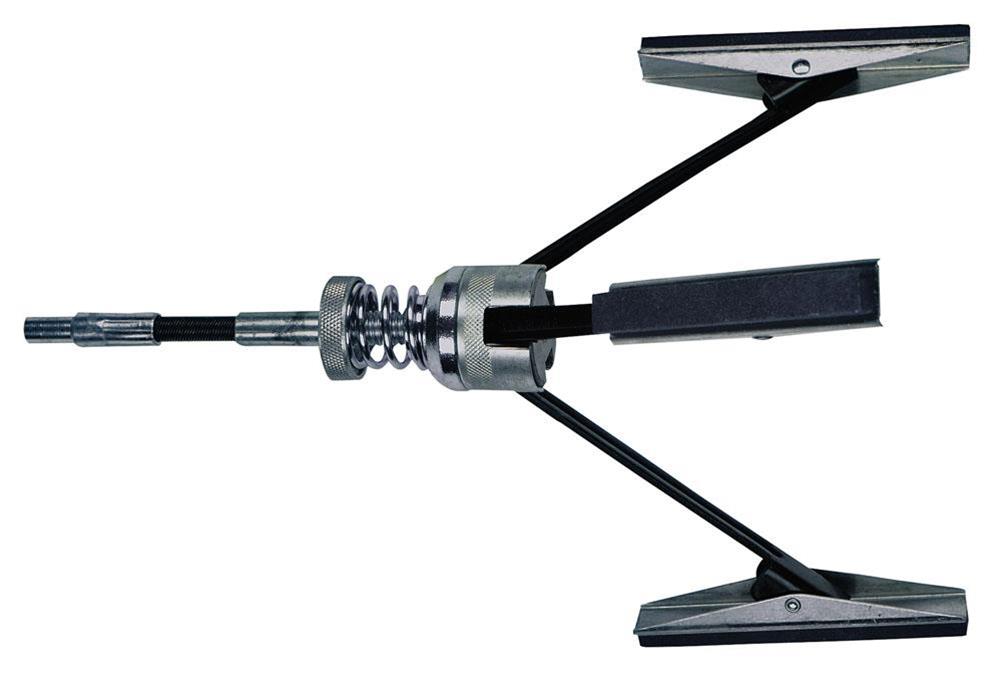
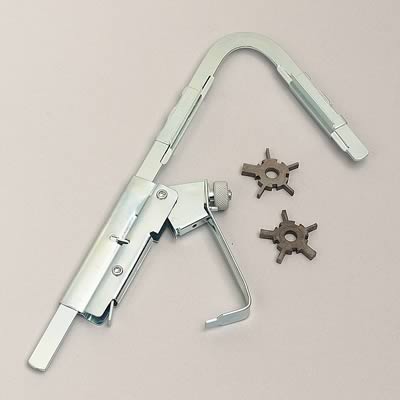
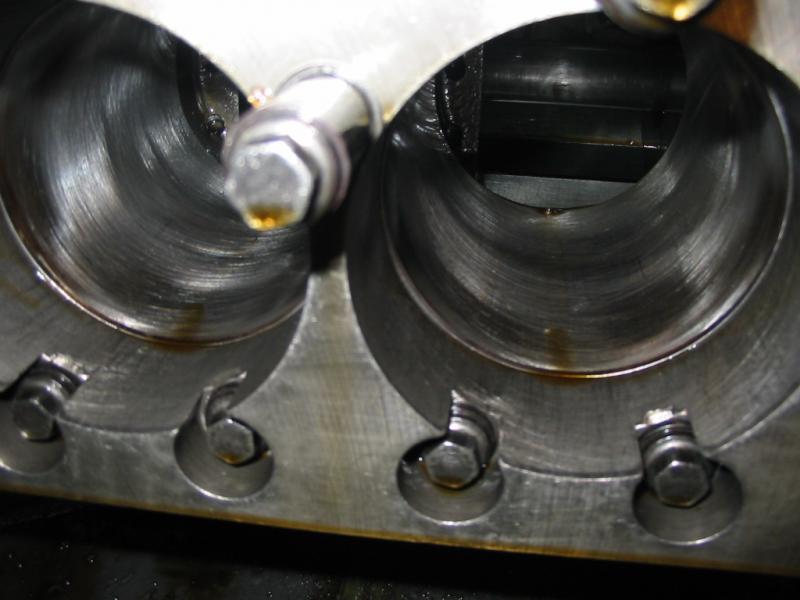
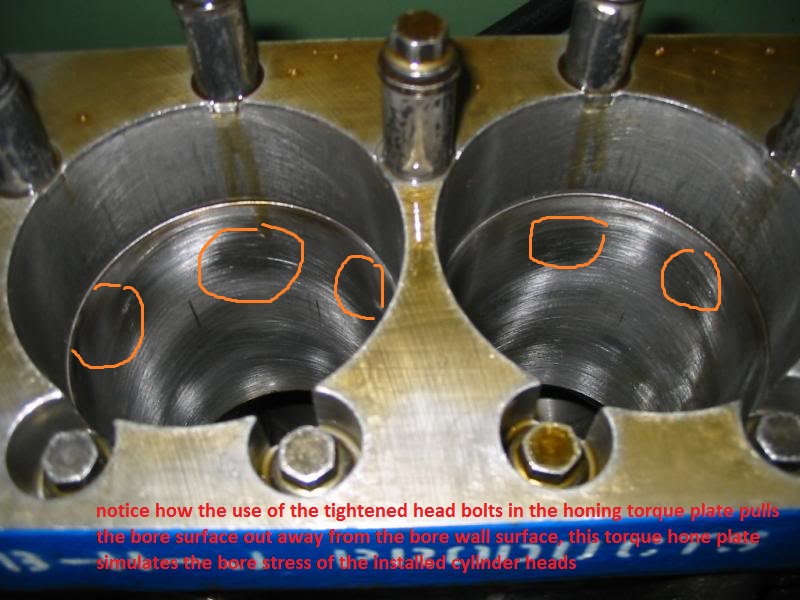
here is where you, or your machine shop can screw things up on ring to bore seal, you need to have the cylinders bored and honed to the correct size specified by the manufacturer of the pistons,after MEASURING THE PISTONS to verify their size per the piston manufacturers instructions, then gap the rings per the ring manufacturers instructions, when you hone the bores,get and use block deck hone plates, during the hone process , keep in kind you want to use the same (STUDS OR BOLTS) the machine shop used and the same torque settings they used when the cylinders were honed with deck plates or the distortion of the bore and ring seal won,t be identical (exactly round)or ideal, keep in mind the piston side clearance must match what the piston manufacturer states.
Read more: http://forums.hotrod.com/70/6661552/pit ... z1ZRP7N7a0
HONE WITH HONE PLATES to duplicate the stress the head bolts place on the cylinder walls to get a true round bore wall surface
http://www.mscdirect.com/browse/Measuri ... eler+gauge
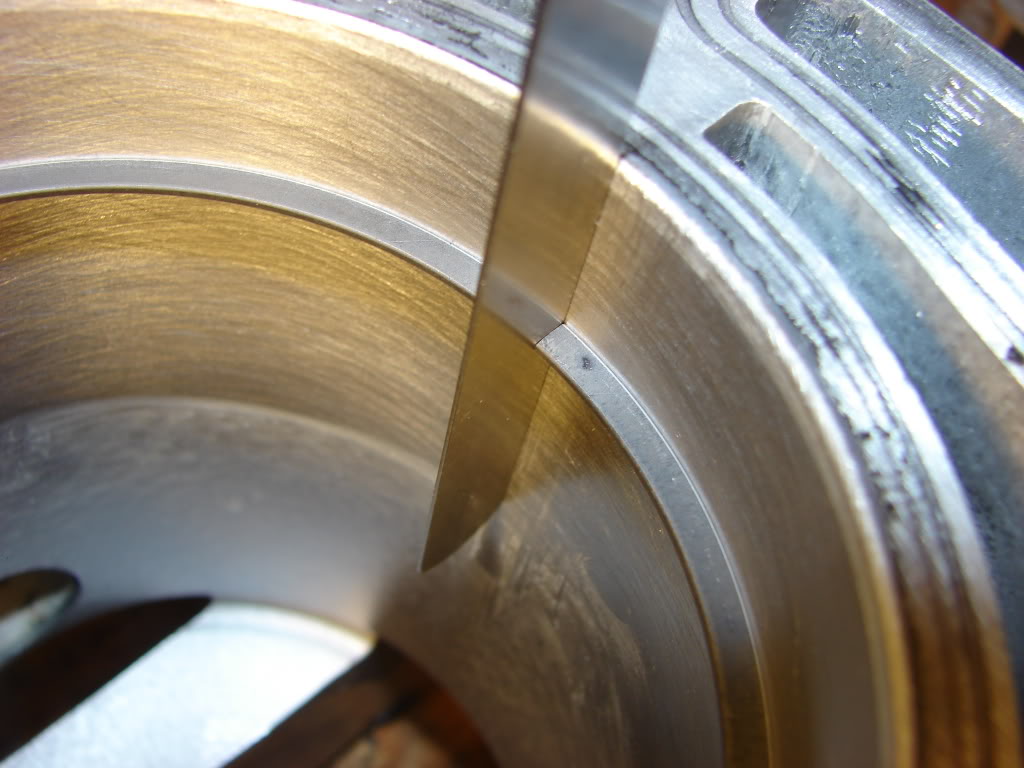
(4) rings need both back clearance and the correct end gaps plus some vertical clearance to function correctly and lubricate and cool efficiently
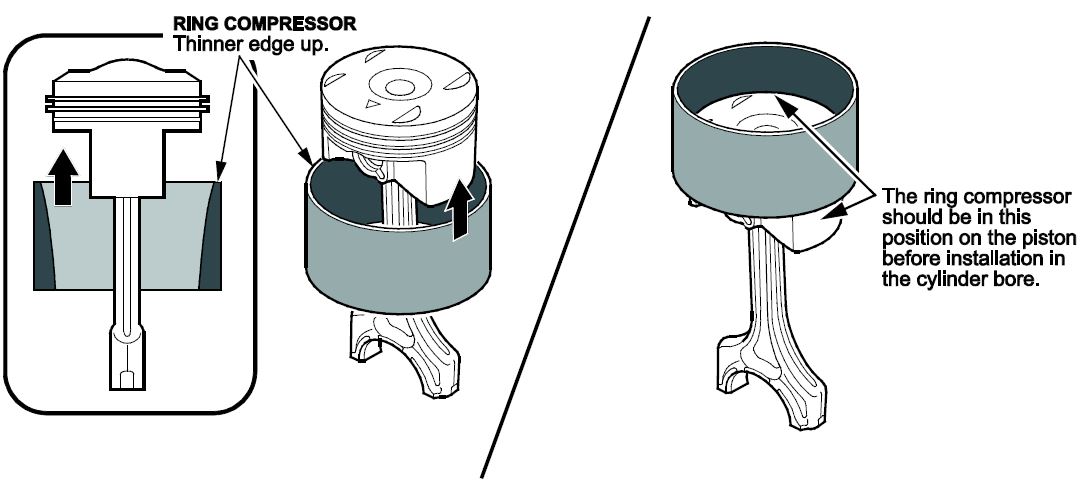
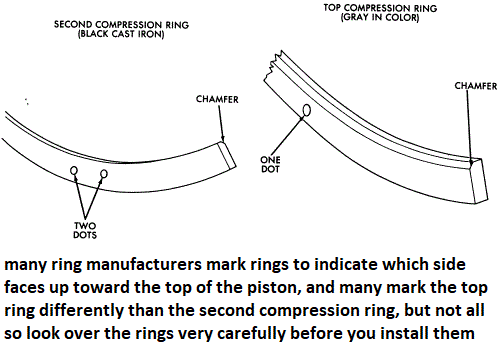
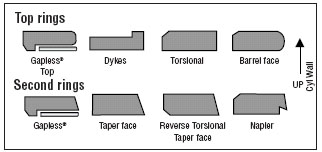
(5) ring must be installed with the correct side facing upward and in the intended groove
(6) the cylinder wall finish is mostly dictated by the rings to be used, so verify that with the ring manufacturer, and each alloy and piston design may require a slightly different bore clearance.
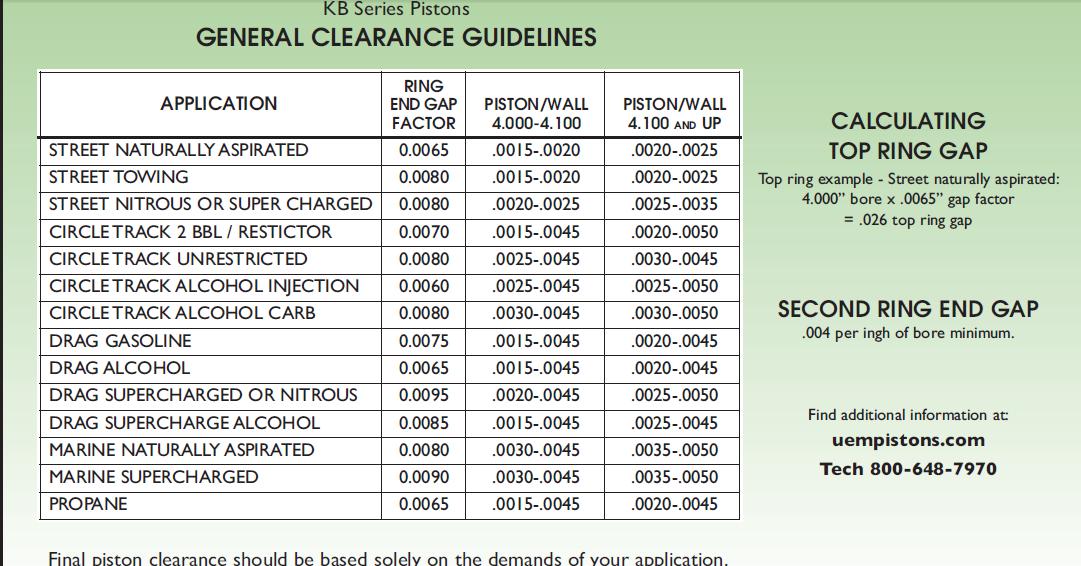
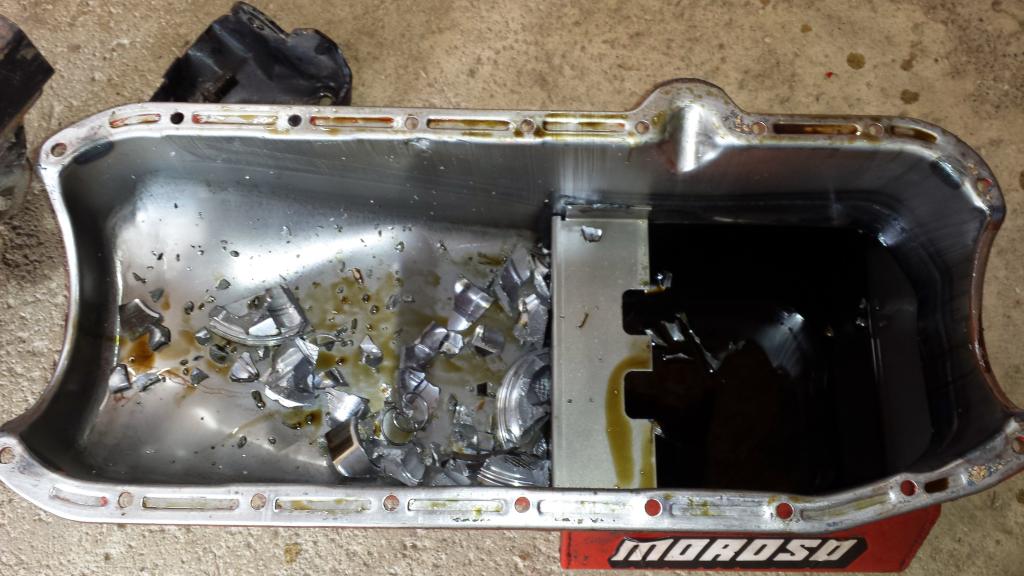
GET THE RING END GAP TOO TIGHT ,OR PISTON SIDE CLEARANCE TOO TIGHT,OR NOT PAY ATTENTION TO THE LUBE SYSTEM DETAILS,AND WHEN THE RINGS EXPAND WITH ENGINE HEAT THE ENDS TOUCH THE RINGS LOCK IN THE BORE AND THE PISTON LANDS SHEAR OFF, it RESULTS IN EXPENSIVE FAILURES GET THE GAP A BIT TOO LARGE AND YOU MIGHT BURN A BIT MORE OIL OR LOOSE SOME COMPRESSION, YOU'LL SEE A CHART LATER IN THE THREAD, BUT GENERALLY YOU'LL WANT .0045-.0065 PER INCH OF BORE DIAM. FOR A RING END GAP
http://garage.grumpysperformance.co...ng-piston-pin-height-compression-height.5064/
http://garage.grumpysperformance.co...n-wrist-pins-one-really-over-looked-part.978/
http://garage.grumpysperformance.com/index.php?threads/maximizing-piston-to-bore-ring-seal.3897/
if you find the rotating assembly is more difficult to rotate than you expected, you may want to verify some clearance issues that get over looked at times,
theres also some, other potential issues,
theres a slight potential for the piston wrist pins too not rotate effortlessly in the piston pin bores ,
that may add to the difficulty in rotating the assembly in the block.
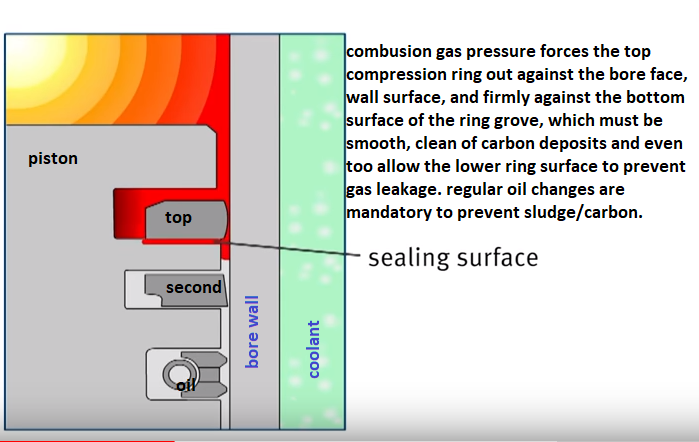
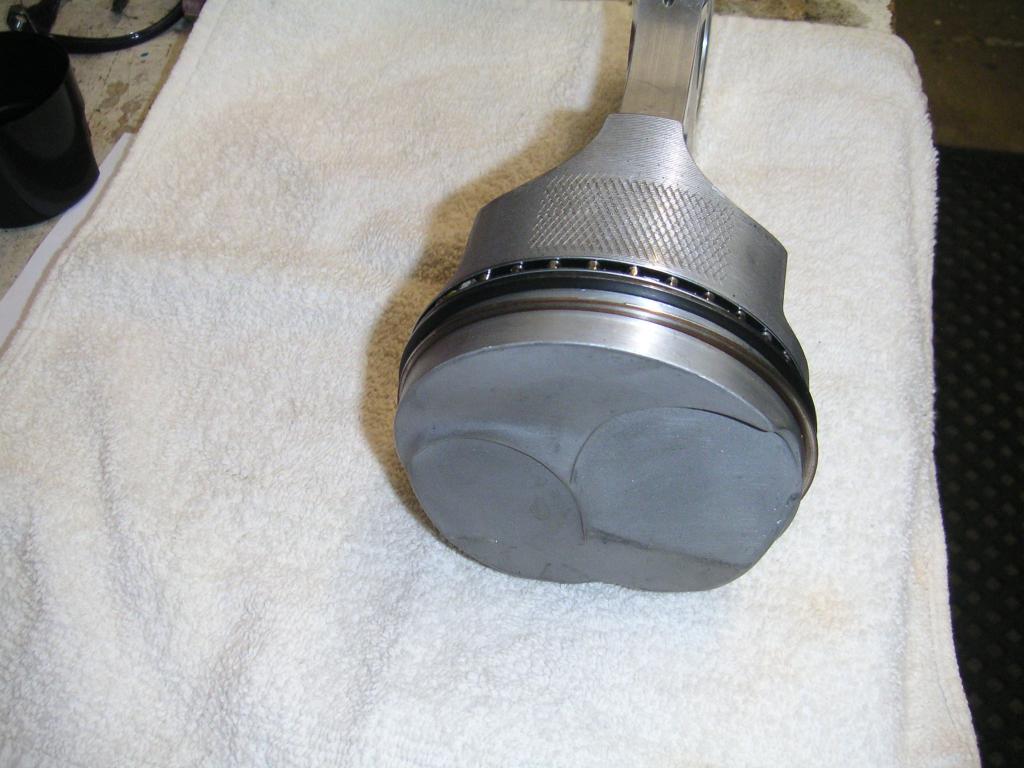
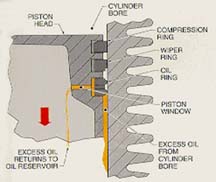
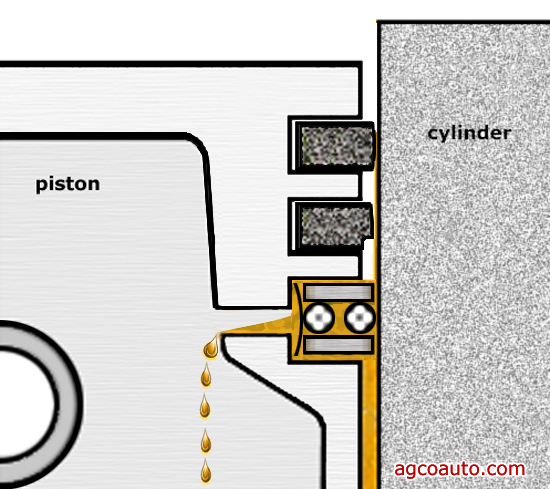
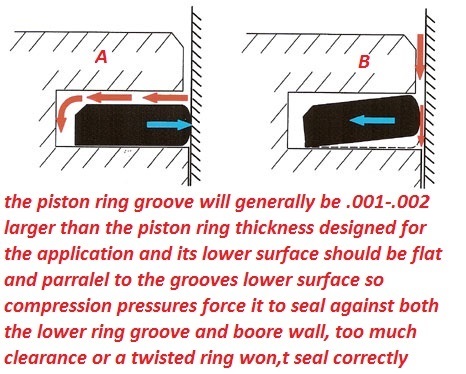
the piston rings must have vertical and back clearance in the piston ring grooves
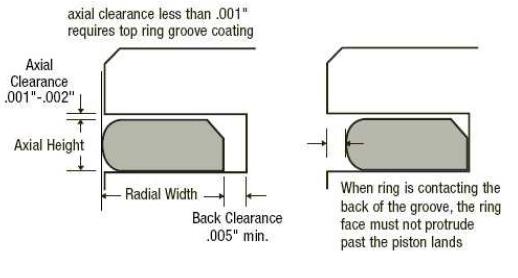

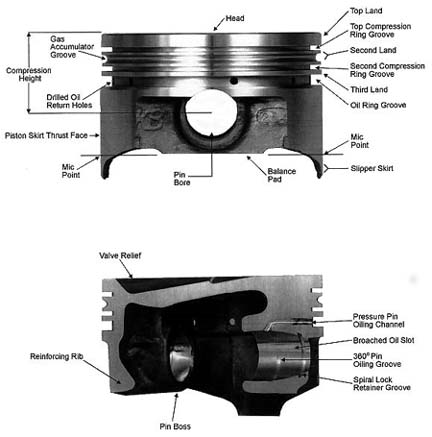
Piston Ring Groove Clearance
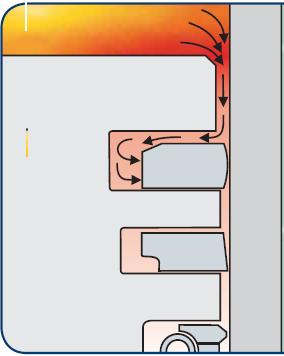
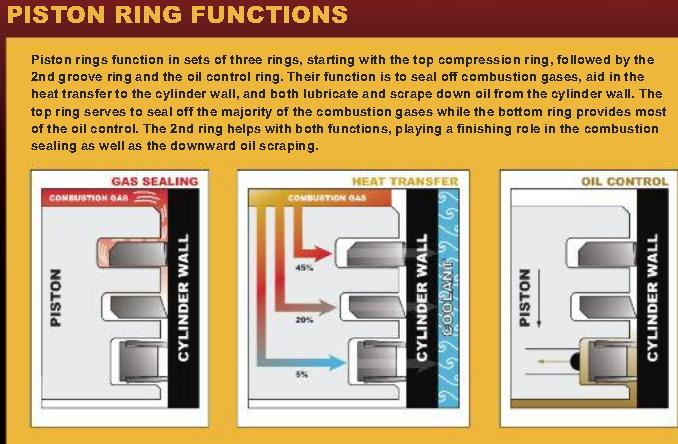
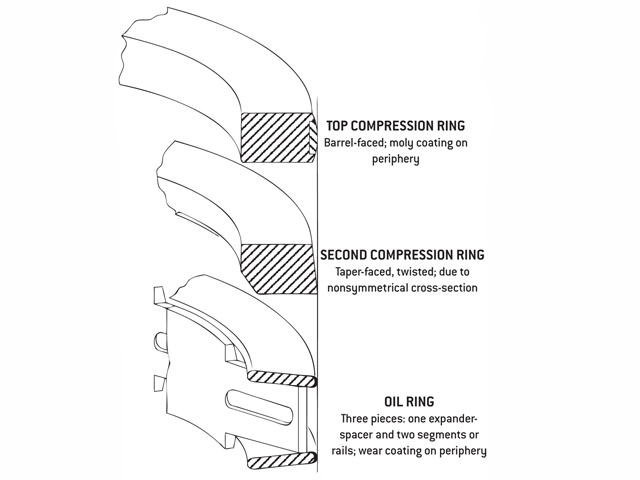
Pistons are grooved to fit rings that seal the cylinder’s compression and allow for lubrication of the cylinder walls. Piston rings come in a set. There are two compression rings. The top ring is affected by the most cylinder compression pressures. The second compression ring reinforces the top ring. The third ring down is the oil ring. It controls lubrication between the piston and cylinder bore.
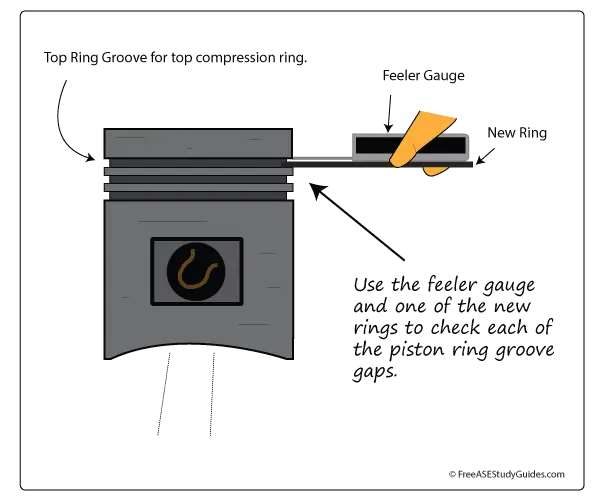
Place the new ring into the top piston groove, and then place a feeler gauge into the gap between the new ring and the upper land. Move around the pistons groove and obtain a few measurements. Compare this reading to specifications. If this reading is too much and the gap is too large, the piston must be replaced. The top ring takes the most compression. This causes the ring to slap against and wear the lands in the piston groove.
be sure you, measure EACH bore and EACH piston,
(CORRECTLY with the proper tools in the way the tool and piston manufacturers suggested)
and number them on an engine build sheet indicating the bore and piston diam.
from large to smallest on each and install them on each cylinder to get the most consistent piston to bore clearance's
yes the difference may only be a few ten thousands if the bores are machined correctly, but you'll get the best results , most consistent lubrication, best durability and less heat build up that might result in detonation issues that way. its the little things that add up to making a good durable engine assembly,
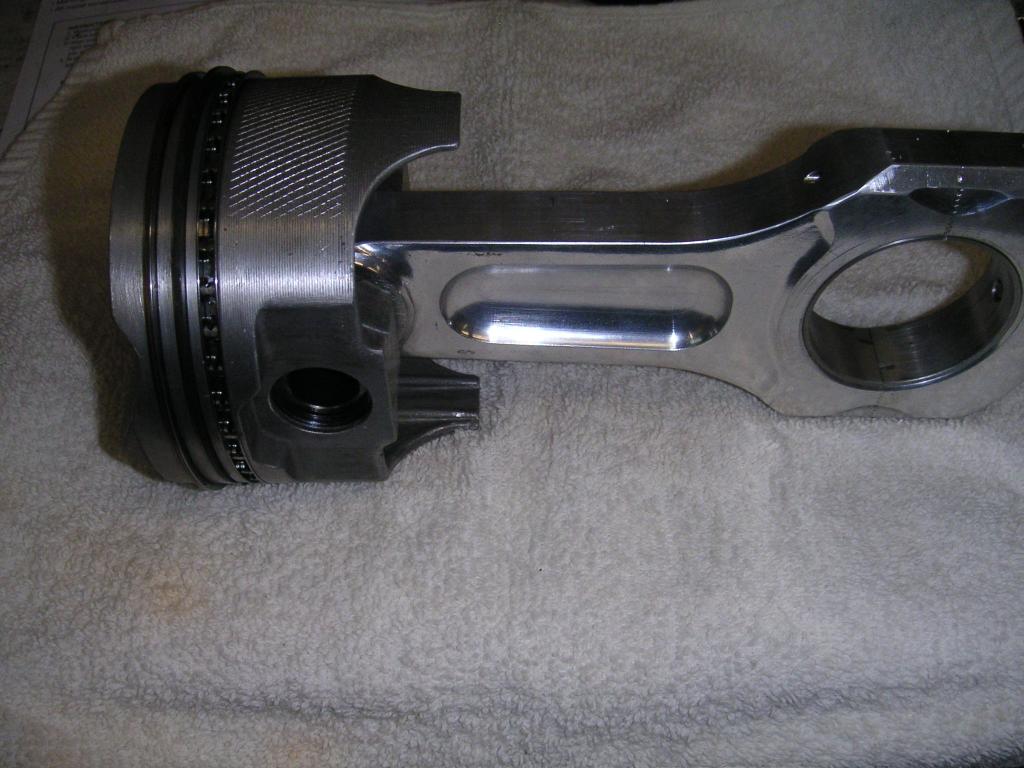
BTW check rod orientation, so the beveled sides don't fact the adjacent rods, and check the bearing clearances with plasti guage
and of course the pistons must have the correct piston too bore clearance. and connecting rod can only be installed facing one direction

RELATED THREADS & INFO YOU SHOULD READ or look AT
viewtopic.php?f=53&t=110&p=1672&hilit=2618#p1672
http://www.youtube.com/watch?v=QtJAuDZX ... re=related
http://www.youtube.com/watch?v=HQfh6AZx ... re=related
http://racingarticles.com/article_racing-10.html
http://garage.grumpysperformance.co...in-height-compression-height.5064/#post-66240
(1)cylinders will not be honed to true round as they will be in use with out the use of a deck plate to simulate and duplicate the bolt clamp stress on the cylinder walls, bores in blocks without a head or deck plate with the bolts or studs torqued to spec are not nearly the same shape before having the torqued studs bolts stress applied, theres almost no chance of getting a good ring seal without having the bores honed with a deck plate
always read, understand and follow the piston manufacturers guide for piston to bore clearance and how you measure that correctly
YOU NEED TO KNOW what is the piston to bore side clearance, where on the piston in relation to the pin,it will need to be accurately measured,in relation too the piston pin bore axis and piston top,surface, and how you measure it according to the manufacturer, and how did you measure both the piston and the bore and whats your ring gap supposed too be set at?
think carefully about both the initial cost and the structural strength of the engine block you select, the OEM blocks used in production car engines will RARELY accept a .030 plus over bore with out having one or more cylinders having marginally thin bore walls, this results in inadequate bore to ring sealing if its in the wrong area and promotes stress cracks. A .060 over bore in a SBC is rather commonly pushing that bore wall thickness up to or over a reasonable limit so you need to sonic and magnetically check the block for cracks and wall thickness.
you could easily dump $500-$1500 into machine work on a block that won't last more than a few months under high stress if its not carefully checked PRIOR to the machine work being done.
diagnosing a busted 632 BBC
there's a whole lot of info on the 632 CID BBC they go over, if you don't watch and listen carefully you'll miss important details the engine, disassembly can tell you a great deal, and look carefully at the components, listen carefully, and they point out a great many parts, strong points and...
garage.grumpysperformance.com
(CORRECTLY with the proper tools in the way the tool and piston manufacturers suggested)
and number them on an engine build sheet indicating the bore and piston diam.
from large to smallest on each and install them on each cylinder to get the most consistent piston to bore clearance's
yes the difference may only be a few ten thousands if the bores are machined correctly, but you'll get the best results , most consistent lubrication, best durability and less heat build up that might result in detonation issues that way. its the little things that add up to making a good durable engine assembly,
BTW check rod orientation, so the beveled sides don't fact the adjacent rods, and check the bearing clearances with plasti guage
its standard practice to cc the combustion chambers, in the cylinder heads and the piston domes,(obviously check quenck and piston pin height, and clearances , mpisyton to head clearance, valve to piston cleances also,
(usually the piston domes volume is generally measured with the piston deck or quench surface rotated down the bore , exactly 1 inch) use your caliper or dial indicator and piston bridge)and the rings sealed temporarily with a bith of grease or paraffin to make sure you'll be dealing with as close as possible to the exact same compression ratio, in each cylinder, mark each piston with a indulable black magic marker A,B,C,D,E,F,G,H
and the bores 1-2-3-4-5-6-7-8 so you don't get measurements on the build sheet confused between bore diam and piston diam, and you can also not confuse dme volume on each piston
getting the correct piston to bore clearance, on your block
always think every step you take in any performance engine build through, logically and don't just jump off the dock head first, financially, without asking detailed questions , and documenting as much as you can in writing, and having a well thought through plan, parts list and time frame...
garage.grumpysperformance.com
http://www.sjdiscounttools.com/lis24000.html
measure carefully as the piston groove depth and back clearance must match the rings you use or youll have major problems
common sbc pin height info
Specs
- Comp Height 5.565" Rod - 1.561
- Comp Height 5.7" Rod - 1.433
- Comp Height 6.0" Rod - 1.13
- Pin Diameter - 0.9272
I've seen a great many machine shops who either just don,t give a rats A$$ or they are CLUELESS INCOMPETENTS
you can't assume anything you paid for was done correctly,
until
YOU VERIFY IT PERSONALLY (AND YES THAT REQUIRES PRECISION MEASURING AND EFFORT)
in either case this forces a decent engine builder to verify all the work was properly done
New
http://honingplates.com/index.php?main_page=product_info&products_id=28
http://honingplates.com/index.php?main_page=product_info&products_id=29
http://garage.grumpysperformance.co...-the-rabbit-hole-with-alice.10933/#post-66925
a day or so spent in careful research & reading can save you hundreds of dollars and months of wasted work
http://garage.grumpysperformance.com/index.php?threads/precision-measuring-tools.1390/
http://garage.grumpysperformance.com/index.php?threads/piston-to-bore-clearance.4630/
http://garage.grumpysperformance.co...tion-of-crank-durring-short-blk-assembly.852/
http://garage.grumpysperformance.co...g-and-installing-connecting-rods-pistons.247/
http://garage.grumpysperformance.com/index.php?threads/rotating-assembly-bearings.9527/
http://garage.grumpysperformance.co...oven-facts-if-your-in-doubt.13051/#post-69824
http://garage.grumpysperformance.com/index.php?threads/assembly-lube-summary.6352/
http://garage.grumpysperformance.com/index.php?threads/maximizing-piston-to-bore-ring-seal.3897/
http://garage.grumpysperformance.co...ng-and-basic-piston-ring-info-youll-need.509/[/quote]
read the links don,t skip them, youll likely save a great deal of cash and time knowing whats involved
http://garage.grumpysperformance.com/index.php?threads/block-prep.125/
http://garage.grumpysperformance.co...k-after-a-cam-lobe-rod-or-bearings-fail.2919/
http://garage.grumpysperformance.co...piston-to-bore-clearance-on-your-block.14251/
http://garage.grumpysperformance.com/index.php?threads/engine-block-cylinder-wall-thickness.976/
http://garage.grumpysperformance.com/index.php?threads/why-build-a-383-vs-a-350.715/
http://garage.grumpysperformance.com/index.php?threads/blocks-from-summitt-or-comp-products.10174/
http://garage.grumpysperformance.co...s-why-doesn-t-anyone-ever-ask-or-check.11532/
http://garage.grumpysperformance.com/index.php?threads/precision-measuring-tools.1390/
related threads with very useful info
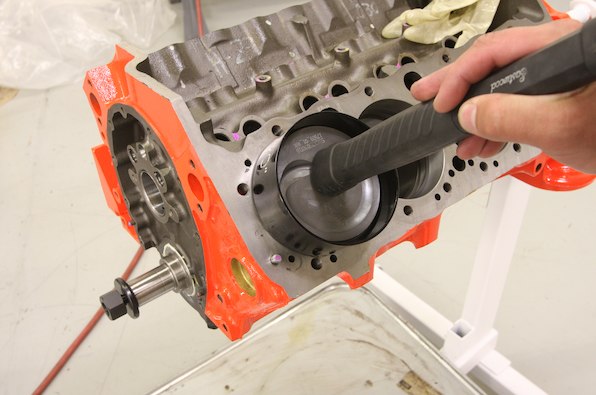
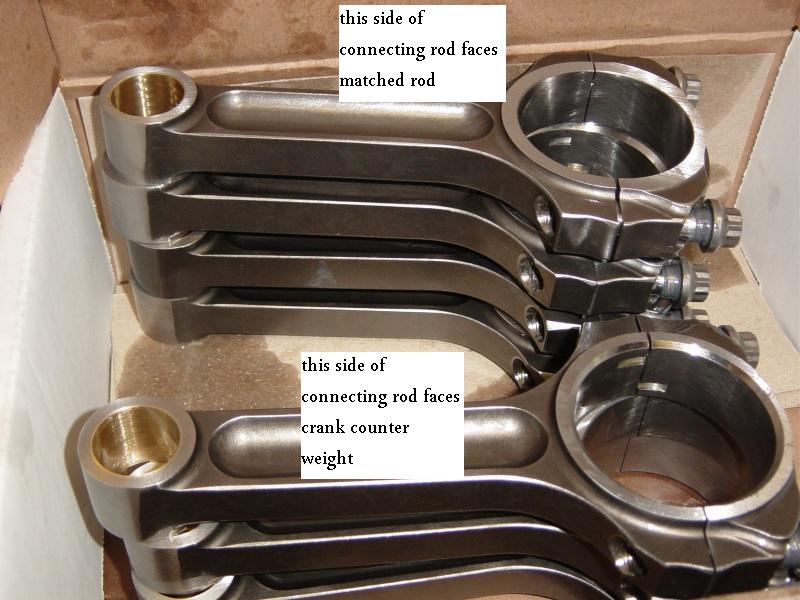
assembling and installing connecting rods/pistons
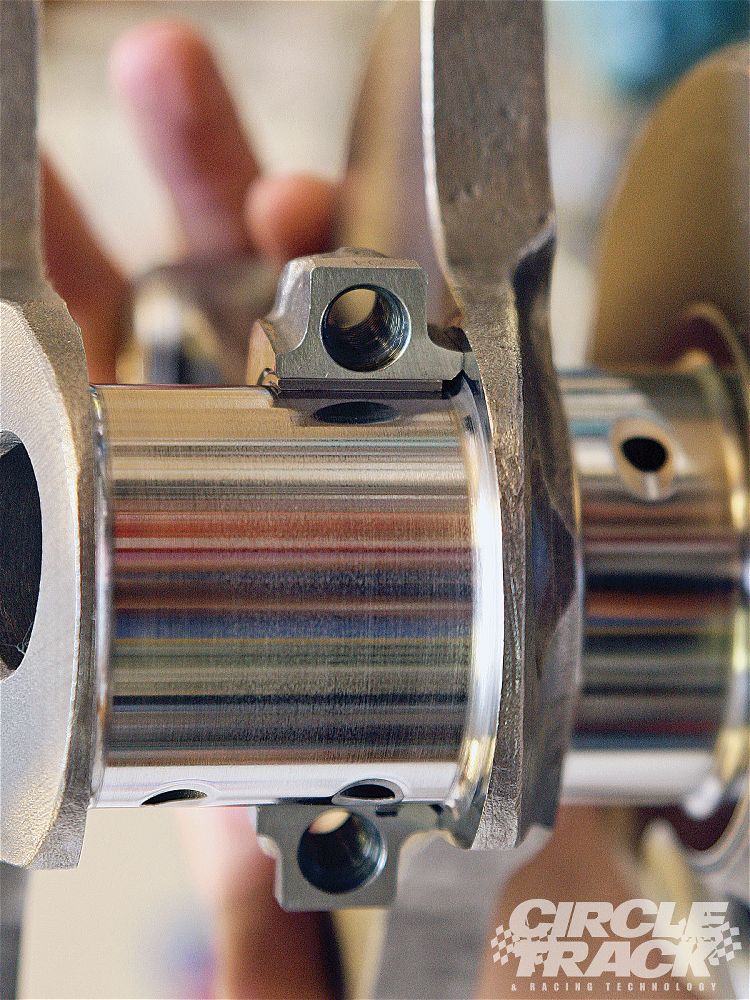
look closely at the connecting rods one edge of the main bearing are is beveled noticeably more than the other that beveled side faces away from the rod its paired with because it matches the slight radiased bevel of the crank journal many builder class pistons are designed to go in, in either...garage.grumpysperformance.com
assembling and installing connecting rods/pistons
look closely at the connecting rods one edge of the main bearing are is beveled noticeably more than the other that beveled side faces away from the rod its paired with because it matches the slight radiased bevel of the crank journal many builder class pistons are designed to go in, in either...garage.grumpysperformance.com
Another rings end gap question
Hi, I'm rebuilding my 4.3L Vortec from 2003 Chevy Astro Cargo Van. When I bought it a year ago it had ~26.000 miles. The engine was knocking and I couldn't get rid of that annoying sound - tried to clean up lifters through the push roads and by "seafoaming". It didn't work out, so I just...garage.grumpysperformance.com
resistance to rotation, of crank durring short blk assembly
Ok youve just installed your crankshaft in the engine block, with new main bearings and everything's well coated with assembly lube,and oil, and youve torqued down the main caps to spec. in at least three stages, and then gone back and rechecked the studs or bolts per the manufacturers...garage.grumpysperformance.com
Made a mistake filing rings, still good?
First I want to thank Grumpy for his help on many forums and him maintaining this one. It's an absolute WEALTH of info. So.... I am assembling an essentially stock 350. For use in a daily driver 95 Tahoe with TBI. I'm using a .030 over eagle rotating kit and a hydraulic roller cam out of an...garage.grumpysperformance.com
getting the correct piston to bore clearance, on your block
always think every step you take in any performance engine build through, logically and don't just jump off the dock head first, financially, without asking detailed questions , and documenting as much as you can in writing, and having a well thought through plan, parts list and time frame...garage.grumpysperformance.com
maximizing piston to bore ring seal
From the February, 2009 issue of Circle Track By Jeff Huneycutt Piston Ring Prep It can be a hassle filing... read full caption Piston Ring Prep It can be a hassle filing three sets of rings per cylinder, but when done correctly the results can mean more power and less fall-off before the...garage.grumpysperformance.com
installing rings in piston grooves
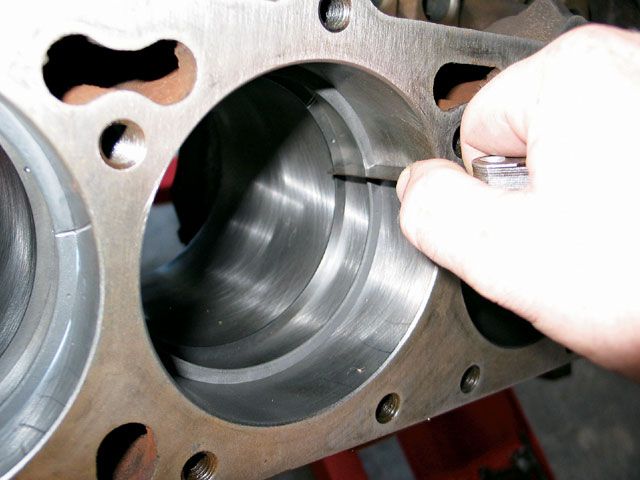
obviously if you've been around engine rebuilds, long enough, your aware that you'll eventually see guys installing rings in piston grooves by spiral twisting them into place, like the picture below depicts, AND YES YOU MIGHT NOT EVEN REALIZE THAT THE RING HAS BEEN SLIGHTLY DISTORTED...garage.grumpysperformance.com
cleaning piston ring grooves, and related info
now if there's any job that's frequently ignored or avoided during an engine rebuild , its more than likely ,cleaning pistons and cleaning the grooves its high on the list! RELATED INFO (take advantage of millions of hours of previous engine builds, by skilled and experienced people, and the...garage.grumpysperformance.com
crankshaft and connecting rod compatability
POSTED BY, navygunner08; "Does it matter what length rod you use with a particular crank? So if a crank is listed for use with 5.7" rods, can you use a 6" rod without modifications? And vise versa? " one factor to keep in mind is that rods typically have a side that rides against its matched...garage.grumpysperformance.com
piston ring gaps
the general rule is that for normal use a pistons top ring should have a minimum of .004 thousandths end gap for each inch of bore diam. ie a 4" bore requires a minimum of a .016 end gap, to prevent the ring ends from bearing on each other after heat expansion,expanding them, so as to prevent...garage.grumpysperformance.com
how piston ring groove depth & clearance effects ring seal
the job of the rings is to provide a high pressure gas tight seal preventing pressure in the combustion chamber during the compression, exhaust and power strokes above the piston from leaking past the rings and piston, the combination of slight inertial loads friction and pressure above the...garage.grumpysperformance.com
piston rings & related info
step ONE if the bores not concentric, and bore walls parallel and the bore surface consistent in its surface Finish or if you had the bore honed without the use of torque plates simulating a cylinder heads bolted in place, the rings WILL NOT SEAL as effectively , as they would if you had...garage.grumpysperformance.com
if you want a fast dependable car you will need to either do the research required to know exactly how and why things should work, or pay someone else to do the work that has taken that time and effort.
your going to need decent feeler gauges
if the ring gaps, or piston to bore clearances are not carefully checked, or not correct your engine could easily get screwed up
Due to machining tolerances on both pistons and bore sizes theres always some minor differences between components,
when your assembling any engine, youll file fit the ring gaps to individual cylinders,and youll,
generally you'll want to carefully measure each individual piston diameter and each individual bore diameter very carefully,
and match the larger pistons to the larger bore sizes to keep the average side clearance as consistent as possible
most applications would have a ring gap of about .004-.005 per inch of bore diam.
(2) if the cylinder walls are sonic checked at less than about .150 Id suggest looking for a different engine block or partly filling the coolant passages to increase cylinder wall strength
(3) pistons are NOT exactly ROUND so verify with the manufacturer as to the correct place to measure them and the correct bore size they are to be used in, pistons are not round or evenly dimensioned, in circumference as with the heat of running in an engine,different sections expand at different rates this varies a great deal between applications, piston design and piston materials.
typical side clearances range in the .002-.005 ranges but you need to verify and measure both the bore and piston per the piston manufacturers instructions Every piston manufacturer measures their pistons at different spots depending on the design but about the best place to measure those it perpendicular to the wrist pin even with the top of the balance pad - typically .500"-.750" down from the top of the piston quench, but as stated CHECK WITH THE MANUFACTURER., all forged,or cast, or hypereutectic pistons will not require the same clearances nor are they measured in the same place[/color]
On to clearance,,
.005 is fine with some forged pistons & not so fine with others depending on application & piston design.
All listed clearances are minimum.
There are some that run much tighter, down to .0015 & some that need more
Most pistons are measured at the pin center line or just below it & some come with a dimension from the pin or deck down for clearance measurement, some from the bottom up.
The older Speed Pro & TRW ones were measured at the pin center line
here is where you, or your machine shop can screw things up on ring to bore seal, you need to have the cylinders bored and honed to the correct size specified by the manufacturer of the pistons,after MEASURING THE PISTONS to verify their size per the piston manufacturers instructions, then gap the rings per the ring manufacturers instructions, when you hone the bores,get and use block deck hone plates, during the hone process , keep in kind you want to use the same (STUDS OR BOLTS) the machine shop used and the same torque settings they used when the cylinders were honed with deck plates or the distortion of the bore and ring seal won,t be identical (exactly round)or ideal, keep in mind the piston side clearance must match what the piston manufacturer states.
Read more: http://forums.hotrod.com/70/6661552/pit ... z1ZRP7N7a0
HONE WITH HONE PLATES to duplicate the stress the head bolts place on the cylinder walls to get a true round bore wall surface
http://www.mscdirect.com/browse/Measuri ... eler+gauge
(4) rings need both back clearance and the correct end gaps plus some vertical clearance to function correctly and lubricate and cool efficiently
(5) ring must be installed with the correct side facing upward and in the intended groove
(6) the cylinder wall finish is mostly dictated by the rings to be used, so verify that with the ring manufacturer, and each alloy and piston design may require a slightly different bore clearance.
GET THE RING END GAP TOO TIGHT ,OR PISTON SIDE CLEARANCE TOO TIGHT,OR NOT PAY ATTENTION TO THE LUBE SYSTEM DETAILS,AND WHEN THE RINGS EXPAND WITH ENGINE HEAT THE ENDS TOUCH THE RINGS LOCK IN THE BORE AND THE PISTON LANDS SHEAR OFF, it RESULTS IN EXPENSIVE FAILURES GET THE GAP A BIT TOO LARGE AND YOU MIGHT BURN A BIT MORE OIL OR LOOSE SOME COMPRESSION, YOU'LL SEE A CHART LATER IN THE THREAD, BUT GENERALLY YOU'LL WANT .0045-.0065 PER INCH OF BORE DIAM. FOR A RING END GAP
http://garage.grumpysperformance.co...ng-piston-pin-height-compression-height.5064/
http://garage.grumpysperformance.co...n-wrist-pins-one-really-over-looked-part.978/
http://garage.grumpysperformance.com/index.php?threads/maximizing-piston-to-bore-ring-seal.3897/
if you find the rotating assembly is more difficult to rotate than you expected, you may want to verify some clearance issues that get over looked at times,
theres also some, other potential issues,
theres a slight potential for the piston wrist pins too not rotate effortlessly in the piston pin bores ,
that may add to the difficulty in rotating the assembly in the block.
the piston rings must have vertical and back clearance in the piston ring grooves
Piston Ring Groove Clearance
Pistons are grooved to fit rings that seal the cylinder’s compression and allow for lubrication of the cylinder walls. Piston rings come in a set. There are two compression rings. The top ring is affected by the most cylinder compression pressures. The second compression ring reinforces the top ring. The third ring down is the oil ring. It controls lubrication between the piston and cylinder bore.
Place the new ring into the top piston groove, and then place a feeler gauge into the gap between the new ring and the upper land. Move around the pistons groove and obtain a few measurements. Compare this reading to specifications. If this reading is too much and the gap is too large, the piston must be replaced. The top ring takes the most compression. This causes the ring to slap against and wear the lands in the piston groove.
be sure you, measure EACH bore and EACH piston,
(CORRECTLY with the proper tools in the way the tool and piston manufacturers suggested)
and number them on an engine build sheet indicating the bore and piston diam.
from large to smallest on each and install them on each cylinder to get the most consistent piston to bore clearance's
yes the difference may only be a few ten thousands if the bores are machined correctly, but you'll get the best results , most consistent lubrication, best durability and less heat build up that might result in detonation issues that way. its the little things that add up to making a good durable engine assembly,
BTW check rod orientation, so the beveled sides don't fact the adjacent rods, and check the bearing clearances with plasti guage
don,t guess on clearances and journal surface
So I decided to buy a couple of worthless old 283s to learn how to build engines. If I acquire the appropriate skills, I'm going to build a torquey 383 out of the anemic '77 350 in my C30. It tows cars, but it doesn't exactly set the road on fire, if you know what I mean. Anyway, I bought two...
garage.grumpysperformance.com
ring gapping and basic piston ring info YOULL NEED
YES YOU NEED TO READ THRU THE LINKS THAT'S WHAT THEY ARE THERE FOR...AND THERE'S A GREAT DEAL OF USEFUL INFO IN THOSE LINKS, don,t get over whelmed, make a list and test adjust correct or replace each problem, and check it off the list then move to the next issue, its a finite list and theres...
garage.grumpysperformance.com
assembling and installing connecting rods/pistons
look closely at the connecting rods one edge of the main bearing are is beveled noticeably more than the other that beveled side faces away from the rod its paired with because it matches the slight radiased bevel of the crank journal many builder class pistons are designed to go in, in either...
garage.grumpysperformance.com
and of course the pistons must have the correct piston too bore clearance. and connecting rod can only be installed facing one direction
RELATED THREADS & INFO YOU SHOULD READ or look AT
viewtopic.php?f=53&t=110&p=1672&hilit=2618#p1672
http://www.youtube.com/watch?v=QtJAuDZX ... re=related
http://www.youtube.com/watch?v=HQfh6AZx ... re=related
http://racingarticles.com/article_racing-10.html
http://garage.grumpysperformance.co...in-height-compression-height.5064/#post-66240
Last edited by a moderator: