You are using an out of date browser. It may not display this or other websites correctly.
You should upgrade or use an alternative browser.
You should upgrade or use an alternative browser.
Planning a new 383 build that is now going to be a 400
- Thread starter busterrm
- Start date
busterrm
solid fixture here in the forum
Did some more on the nova today, after overdosing on coffee this morning and engine install being jinxed by rain. With the help of Rick I did calculations on the wiring and I am in the ballpark with the length and wire sizes for my starter. So I went to the parts store to get battery leads in longer forms. I ran the ground along the sub-frame to the brake hose bracket where I bolted it along with the pigtail to transmission mounting flange on the block. You will see that in the pictures, the red is the positive side of the battery that will bolt to the pigtail I ran with the starter wiring. After I pulled the battery and positive lead d/t rain in forecast for tonight. Take into consideration that the battery box will be there when it in the car permanent.


busterrm
solid fixture here in the forum
I did more on my engine today! I changed the starter wires to shorten them, I ran them to back right off the starter behind the valve cover right up close in vicinity of dizzy. The weather gave me a break right talking to Rick, so the rest of the day I spent installing the engine, which was no cake walk as I though it would be, "Murphy's Law" showed 4-5 times, but it's in. I had to off and on the the fuel pump and alternator to get to room slide in the front mount bolts, but its in and solid. Here are some pics !


Last edited:
Ive found those engine levelers work really well, but I think youll find adding a swivel hook like this one makes the combo even better, in fact I can,t imaging using a crane hoist and leveler without one ever since I found out how much of a difference it made in the ease of installation.. while it may seem like a minor improvement I.m sure you'll notice the difference, and it not very expensive
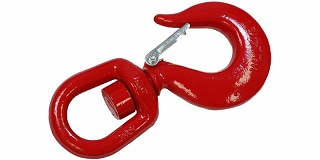
https://www.mfrexpress.com/alloy-swivel ... p-701.html

8
87vette81big
Guest
Get that New Race Turbo 400 Trans & Torque converter in Bob .
70 % there then.
70 % there then.
busterrm
solid fixture here in the forum
I did a little more, went to get connectors at Lowes that we spoke about Rick, some more clamps for the battery leads and fuel line, the parts store for fuel pump fittings, fuel line, hose clamps, and battery hold down. I got the fuel pump sorted out, battery leads sorted, got the battery hold down sorted, I started sorting out the passenger side wiring harness, it gets thinned out to only the alternator leads, starter leads, ignition leads, and the blower motor power leads and the rest goes bye bye. I don't have any pictures its a mess right now, so I will post some when I get all those system straightened out and arranged neatly.
8
87vette81big
Guest
Everyone has their own routine of assembling.
I like to install the engine & then the trans,.
Install headers.
Rest tends to go easier.
I like to install the engine & then the trans,.
Install headers.
Rest tends to go easier.
busterrm
solid fixture here in the forum
I have the blower motor wired to a relay with Rick's help, and have most of the wiring in the engine bay done. I have some more to do with looms to cover the wiring. I have not wired the CDI unit yet, but I have the power supply ready for it, and have decided I will have to mount the unit on the passenger side inner fender well, away from the header and out of open area where it would get exposed to road debris and moisture. I also have got the fan shroud finally finished and mounted secure. It was a PITA to get the bottom bolts in but I did get them before I quit today, after I got most of the sealing of the shroud done also. I had some issues with gaps where air would escape so I used black RTV silicon to seal it. I have some on the fins of the radiator, it was do it or have it lose air around all the gaps. I have a little left to do to get it fully sealed tomorrow. I will start the CDI wiring when that is done tomorrow. I will get some pictures of all the progress and post them probably Sunday night.
Loves302Chevy
"One test is worth a thousand expert opinions."
I got most of the sealing of the shroud done also. I had some issues with gaps where air would escape so I used black RTV silicon to seal it. I have some on the fins of the radiator, it was do it or have it lose air around all the gaps.
That is what they make weatherstripping for.
busterrm
solid fixture here in the forum
I used weatherstripping, still had gaps to fill, not much, it looks worse than it really is, most of the silicon is on the rubber part. I finished looming the wires and the shroud and started on the CDI ignition and got most of it done. The enginebay looks pretty good from my standpoint. I rerouted several things to get them away from heat, also got the radiator hoses on the engine and radiator, I had to pull the alternator off again to get the bottom hose on. The battery ground is run over the passenger fender well along with the new fuel line, the battery ground is run to the mount for the brake lines then up to the block, the fuel line is adjacent to that and runs down behind the fender well to the steel line on the frame. All the system grounds are run to the inner fender where the battery grounds to the body. The CDI box is on that fender well, the coil will be mounted to the heater blower box, I have to get a bracket for it and need to get a male electrode for the coil wire. The coil and the wire are both female, so I will get that when I get the bracket. I have not loomed the wiring on the CDI system yet, will do that when I get the bracket and new electrode. Here are some pictures to show the progress.


OH, those are temp valve covers, my Proform 2 pc covers are in the shop, afraid I would damage them.
OH, those are temp valve covers, my Proform 2 pc covers are in the shop, afraid I would damage them.
Last edited:
Loves302Chevy
"One test is worth a thousand expert opinions."
Looking good. And much simpler without the A/C.
I should have figured you fabricated your own fan shroud. Looks good. I can't really tell from the picture, but
if it were me, I would use a longer fan spacer to put the blade deeper into the shroud for even better air flow.
Whose brackets did you use for the power steering pump? Part number?
That is how I would like my pump to mount.
It will save you from fighting electrical gremlins later.
I should have figured you fabricated your own fan shroud. Looks good. I can't really tell from the picture, but
if it were me, I would use a longer fan spacer to put the blade deeper into the shroud for even better air flow.
Whose brackets did you use for the power steering pump? Part number?
That is how I would like my pump to mount.
Even if there is already a factory one, do yourself a favor and add a HEAVY woven ground strap from the chassis to the body.All the system grounds are run to the inner fender where the battery grounds to the body.
It will save you from fighting electrical gremlins later.
busterrm
solid fixture here in the forum
I bought the brackets and pulleys as a set, I forget the name, top brand though. Brackets,,, alternator,power steering pump, water pump, crankshaft pulleys and all mounting hardware were about 650 wampum. The battery is grounded to frame then to the block the woven ground strap runs to the body from the block, you can't see in any of pictures, its behind the passenger bank, bolts to body in the transmission tunnel.
busterrm
solid fixture here in the forum
I want to say the brackets and pulleys are Marsh, I watched them on Ebay for a few months, at first the whole system was 800. I waited them out, they had like 75 sets, they weren't selling, when it dropped to 650 I grabbed my set. Marsh sells the set for 700, so I saved 50.
Loves302Chevy
"One test is worth a thousand expert opinions."
March. Too expensive for me. The Chinese knockoff it is.