question comes up, can you replace the oil pump while
the engine remains in the c-4 corvette,the answer is yes!
If you intend to remove the oil pan to check, or replace the oil pump or bearings with the engine still in the car,
be aware that the cranks front journal counterweights position may not allow you to slide the oil pan back out,
from under the engine and out,
over the front cross member and allow clearance required.
that oil pan may only slide out over the cross member,
only if the front crank counterweight is in the 12 o'clock location
and yes removing the motor mount bolts and jacking the engine up a few inches certainly tends to help
, but if you do, remove the distributor before you start,
more than a few guys ignored that bit of advice and the result gets darn expensive
and yes check the oil pump pick-up to oil pan floor clearance, if its not 3/8"-1/2" it will cause flow issues
Ive replaced BOTH oil pumps alone and oil pumps and oil pans several times, on c4 corvettes, both L98 and LT1s while the engine was still in the car and on the motor mounts, its fairly easy to pull the pan and replace the oil pump on a C-4,place the car on a level concrete surface and on 4 jack stands one on all four corners at about a 18"-26" height so you can work under the car safely,
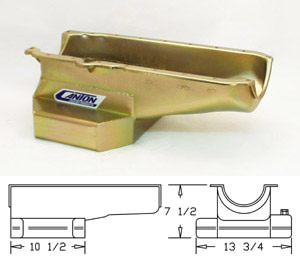
swapping to a higher capacity baffled oil pan, thats no more than 7.5" deep for road clearance adds reliability
read these threads
viewtopic.php?f=27&t=26
viewtopic.php?f=27&t=672
viewtopic.php?f=60&t=1948&p=5176&hilit=brazing#p5176
viewtopic.php?f=44&t=700&p=1095&hilit=sealant#p1095
viewtopic.php?f=54&t=206&p=1154&hilit=+synthetic+gasket#p1154
viewtopic.php?f=51&t=1718&p=4257&hilit=synthetic+gasket#p4257
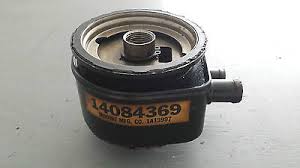
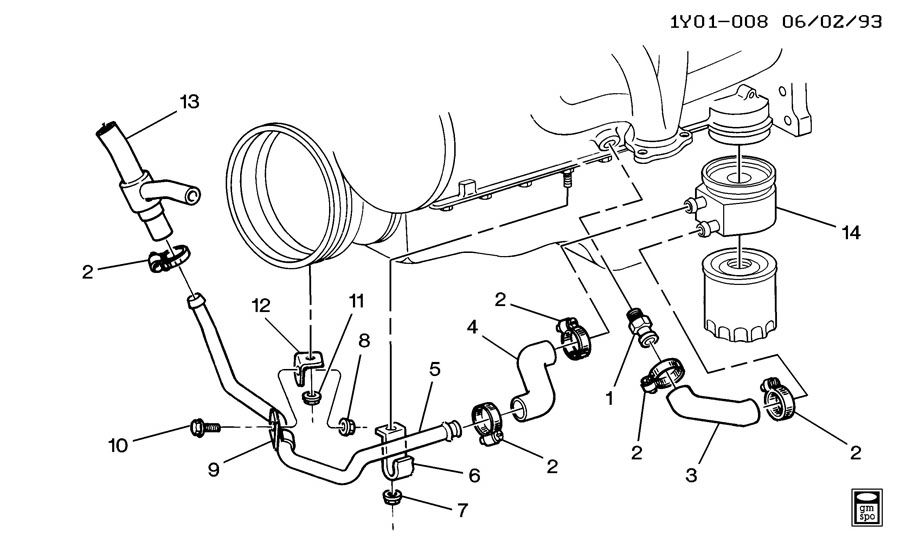
I find it rather amazing that many guys (even a few corvette owners) don,t realize that the oil cooler between the block and oil filter does remove a noticeable amount of heat from the engine oil,or that in some cases that they even have an oil cooler factory installed
the diagonal braces to the k frame usually need to be temporarily removed and the coolant lines under the oil pan disconnected, the starter usually needs to come off, but generally the only trick you won,t obviously see is the crank needs to be rotated slowly once the oil pans free to allow the counter weights on the crank to clear the front lip on the pan because you can only lower it slightly away from the block in the front due to the cross member. in some cases it helps to loosen the motor mounts and jack the engine up an inch or so be remember the distributor cap needs to be removed to do this or it will frequently become damaged as clearances are very tight.
THIS TOOL HELPS
http://www.summitracing.com/parts/WMR-W80510/?rtype=10
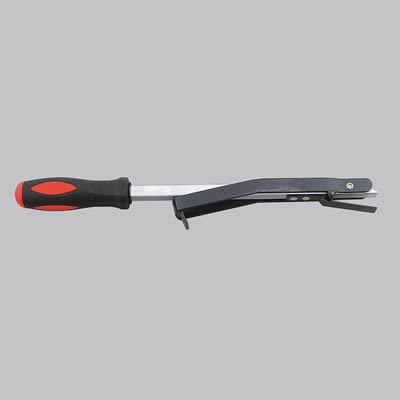
make damn sure the oil pump pickup is 1/2"-3/8" off the oil pan floor once its installed , measure carefully with clay and the oil pan in a temporary test fit and only once its correct have it BRAZED or welded or bolted in place on the pump, AND YES BEFORE YOU ASK ITS SOMETIMES NECESSARY TO REMOVE THE MOTOR MOUNT BOLTS AND JACK THE ENGINE UP SLIGHTLY TO GET THE NECESSARY CRANK TO OIL PAN CLEARANCE ON THE CROSS MEMBER,but that's usually not required with a stock short-block
now what does quite frequently happen is that the guys installing a high volume oil pump just swap out the standard pump, reinstall the stock or similar pick-up and bolt on the pan with the pick-up in the stock position on the oil pump. the stock pick-up is mounted about 3/8" off the pan bottom,the high volume pump is normally equipped with impeller gears about .3 inches longer than stock, the high volume pump body is that much lower in the pan, resulting in the pick-up being only about 1/8" from the pan bottom. the result is that on a normal Chevy oil pump pick-up this leave a space of about 1/8" x 2.5" for oil to flow into the pump. at low rpms this works but as the rpms climb the pick-up that can,t get any oil to pump cavitation as it spins and fails to pump oil, result oil pressure drops until rpms are lowered no matter how much oil is over the pick-up. simply checking to make sure that about 1/2" of space is under the pick-up when the pan is installed cures that problem (a simple trick is to weld a 1/2" thick nut to the oil pump Pick-up base and test fitting the pan BEFORE WELDING THE PICK-UP TO THE PUMP BODY)
this thread should help
viewtopic.php?f=54&t=525&p=4599&hilit=+clay#p4599
BTW if your doing a cam swap , not an oil pan gasket replacement the synthetic oil pan gaskets tend to be far more durable
If you simply need to remove the timing cover,you can frequently loosen the oil pan ENOUGH , to allow the timing cover to be removed and replaced if you have the ONE PIECE SYNTHETIC OIL PAN GASKETS, if not the chances are much higher that the old cork, and rubber end piece style oil pan gaskets or front timing cover style gaskets might leak.
one trick that comes in really hand is to use the newer one piece oil pan gaskets, and use the weather strip adhesive sparingly only on the lower block rail and lower timing cover and rear main cap, and the upper gasket surface, you spread a thin line on each then let it skim dry before pressing the gasket into place where the gasket contacts the engine to temporarily hold it locked into place while, you use a jack to carefully lift and position the oil pan, then verify the gaskets bolt holes line up, if they are a bit off, a small Phillips screw driver can be used to tweak the hole alignment, once its correct start all the bolts and thread them into the block about several thread turns, the jack under the oil pan should have a 8" x 8" section of wood to spread the load as you jack the oil pan up to the gasket to make inserting and starting the bolts far easier.
its critical that the 4 corner bolts that are slightly larger be tightened gradually and you need to verify front and rear seal location stays consistent, but work all the oil pan bolts into the block tightening the pan to the gasket in stages. then remove the jack supporting the oil pan as this makes starting and threading the bolts far easier.
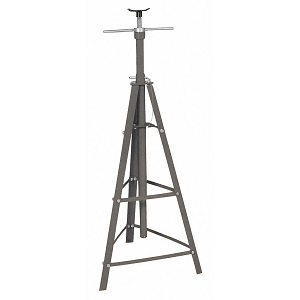
http://www.northerntool.com/shop/tools/ ... _200317499
if your using a lift this type of jack-stand,(above) used with wood to spread the load, to hold the oil pan against the gasket is a huge help
if your working with jack stands and a mechanics creeper theres the option of bottle jacks or floor jacks
POSTED BY Dan85Vette's
93 C4 Oil Leak. Oil Pan Gasket Replacement
I hope my lessons learned will may help someone else.
I had a massive oil leak at the front of the engine that steady got worse over the past 6 months. When it developed in a big puddle in the garage it was time to take action. From reading some of Grump's threads, I followed his advise and luckily my problem was one of the first on his list, oil pan gasket. If you don't have Service Manuals, my next purchase, the Chilton's Manual for 1993-1997 was a great help. If I would have followed my Haynes Manual, I would have dropped the engine when it said to remove the cross-member braces. That would have been a mess. Here's a quick list that I haven't see on other threads.
1) I used the incremental jack up method that I got from these threads and safely got the front end up about 2 1/2 feet without tearing anything up.
2) Remove starter. Can be maneuvered around the tyranny cooling lines without removing them. It's pretty tough getting back in though.
3) Remove oil filter assembly. I wanted to replace that gasket too but I couldn't get the old one out.
4) Remove bolts to the fly wheel cover but you can't remove it without removing the left catalytic converter. I loosen CC but I couldn't get it out. Oil pan can be remove with the flywheel cover loose though.
5) I used the one piece Fel-Pro gasket. This seamed a lot thicker the the original gasket I took out. The holding clips are no good because the oil pan can out be maneuvered between the front of the engine block and the cross-members when using them. I put the new gasket in place on engine block with the oil pan nuts and screws finger tight and used a small bead of Grey silicone RTV at the front and back main-seal areas just keep the gasket in place, but I didn't put any on the engine block mating surfaces. After a 24 hour cure, I removed the oil pan nuts and screws and easily put the oil pan back in place.
6) I put everything back together in reverse order, thigh-ting to torque specs as I went.
I did try to remove the dip stick tube, which would have help in getting the pan back on, but I couldn't get it out and figured I would have ended up bending or breaking it trying to. After reading the threads about replacing those, I didn't want to go there. I've been driving a couple of miles each day for a week and haven't had any problems since. The oil leak is gone. These threads are great and I grabbed a lot of info from different ones. Thanks to all.
If you do build a second performance engine rather than modify your single existing original cars engine,theres some advantages, that us older geezers have come to appreciate at times.
as a general rule, its best to take your time and build a separate performance engine that you can swap into the car over a weekend, this has several advantages
(1) you will not be tying up the car, in an un-driveable condition waiting for weeks on parts to arrive or waiting on machine work to be done,
and you can always swap the original engine back into the car,
to have the car as dependable transportation while the performance engines being built or worked on.
(2) you can sell either engine separately from the car itself and still have a drive-able car.
(3)having your performance engine out on an engine stand certainly makes it far easier to work on.
(4) having a second engine available allows you to drive the car while you make repairs on the original engine
(5) if you screw something up, your not effectively stuck with a non-driveable car for long.
(6) with some experience you,ll find an engine swap between two similar engines can be done in a day , or at most a weekend by yourself, with a skilled and experienced local buddy, a long afternoon!
the engine remains in the c-4 corvette,the answer is yes!
If you intend to remove the oil pan to check, or replace the oil pump or bearings with the engine still in the car,
be aware that the cranks front journal counterweights position may not allow you to slide the oil pan back out,
from under the engine and out,
over the front cross member and allow clearance required.
that oil pan may only slide out over the cross member,
only if the front crank counterweight is in the 12 o'clock location
and yes removing the motor mount bolts and jacking the engine up a few inches certainly tends to help
, but if you do, remove the distributor before you start,
more than a few guys ignored that bit of advice and the result gets darn expensive
and yes check the oil pump pick-up to oil pan floor clearance, if its not 3/8"-1/2" it will cause flow issues
Ive replaced BOTH oil pumps alone and oil pumps and oil pans several times, on c4 corvettes, both L98 and LT1s while the engine was still in the car and on the motor mounts, its fairly easy to pull the pan and replace the oil pump on a C-4,place the car on a level concrete surface and on 4 jack stands one on all four corners at about a 18"-26" height so you can work under the car safely,
swapping to a higher capacity baffled oil pan, thats no more than 7.5" deep for road clearance adds reliability
read these threads
viewtopic.php?f=27&t=26
viewtopic.php?f=27&t=672
viewtopic.php?f=60&t=1948&p=5176&hilit=brazing#p5176
viewtopic.php?f=44&t=700&p=1095&hilit=sealant#p1095
viewtopic.php?f=54&t=206&p=1154&hilit=+synthetic+gasket#p1154
viewtopic.php?f=51&t=1718&p=4257&hilit=synthetic+gasket#p4257
I find it rather amazing that many guys (even a few corvette owners) don,t realize that the oil cooler between the block and oil filter does remove a noticeable amount of heat from the engine oil,or that in some cases that they even have an oil cooler factory installed
the diagonal braces to the k frame usually need to be temporarily removed and the coolant lines under the oil pan disconnected, the starter usually needs to come off, but generally the only trick you won,t obviously see is the crank needs to be rotated slowly once the oil pans free to allow the counter weights on the crank to clear the front lip on the pan because you can only lower it slightly away from the block in the front due to the cross member. in some cases it helps to loosen the motor mounts and jack the engine up an inch or so be remember the distributor cap needs to be removed to do this or it will frequently become damaged as clearances are very tight.
THIS TOOL HELPS
http://www.summitracing.com/parts/WMR-W80510/?rtype=10
make damn sure the oil pump pickup is 1/2"-3/8" off the oil pan floor once its installed , measure carefully with clay and the oil pan in a temporary test fit and only once its correct have it BRAZED or welded or bolted in place on the pump, AND YES BEFORE YOU ASK ITS SOMETIMES NECESSARY TO REMOVE THE MOTOR MOUNT BOLTS AND JACK THE ENGINE UP SLIGHTLY TO GET THE NECESSARY CRANK TO OIL PAN CLEARANCE ON THE CROSS MEMBER,but that's usually not required with a stock short-block
now what does quite frequently happen is that the guys installing a high volume oil pump just swap out the standard pump, reinstall the stock or similar pick-up and bolt on the pan with the pick-up in the stock position on the oil pump. the stock pick-up is mounted about 3/8" off the pan bottom,the high volume pump is normally equipped with impeller gears about .3 inches longer than stock, the high volume pump body is that much lower in the pan, resulting in the pick-up being only about 1/8" from the pan bottom. the result is that on a normal Chevy oil pump pick-up this leave a space of about 1/8" x 2.5" for oil to flow into the pump. at low rpms this works but as the rpms climb the pick-up that can,t get any oil to pump cavitation as it spins and fails to pump oil, result oil pressure drops until rpms are lowered no matter how much oil is over the pick-up. simply checking to make sure that about 1/2" of space is under the pick-up when the pan is installed cures that problem (a simple trick is to weld a 1/2" thick nut to the oil pump Pick-up base and test fitting the pan BEFORE WELDING THE PICK-UP TO THE PUMP BODY)
this thread should help
viewtopic.php?f=54&t=525&p=4599&hilit=+clay#p4599
BTW if your doing a cam swap , not an oil pan gasket replacement the synthetic oil pan gaskets tend to be far more durable
If you simply need to remove the timing cover,you can frequently loosen the oil pan ENOUGH , to allow the timing cover to be removed and replaced if you have the ONE PIECE SYNTHETIC OIL PAN GASKETS, if not the chances are much higher that the old cork, and rubber end piece style oil pan gaskets or front timing cover style gaskets might leak.
one trick that comes in really hand is to use the newer one piece oil pan gaskets, and use the weather strip adhesive sparingly only on the lower block rail and lower timing cover and rear main cap, and the upper gasket surface, you spread a thin line on each then let it skim dry before pressing the gasket into place where the gasket contacts the engine to temporarily hold it locked into place while, you use a jack to carefully lift and position the oil pan, then verify the gaskets bolt holes line up, if they are a bit off, a small Phillips screw driver can be used to tweak the hole alignment, once its correct start all the bolts and thread them into the block about several thread turns, the jack under the oil pan should have a 8" x 8" section of wood to spread the load as you jack the oil pan up to the gasket to make inserting and starting the bolts far easier.
its critical that the 4 corner bolts that are slightly larger be tightened gradually and you need to verify front and rear seal location stays consistent, but work all the oil pan bolts into the block tightening the pan to the gasket in stages. then remove the jack supporting the oil pan as this makes starting and threading the bolts far easier.
http://www.northerntool.com/shop/tools/ ... _200317499
if your using a lift this type of jack-stand,(above) used with wood to spread the load, to hold the oil pan against the gasket is a huge help
if your working with jack stands and a mechanics creeper theres the option of bottle jacks or floor jacks
POSTED BY Dan85Vette's
93 C4 Oil Leak. Oil Pan Gasket Replacement
I hope my lessons learned will may help someone else.
I had a massive oil leak at the front of the engine that steady got worse over the past 6 months. When it developed in a big puddle in the garage it was time to take action. From reading some of Grump's threads, I followed his advise and luckily my problem was one of the first on his list, oil pan gasket. If you don't have Service Manuals, my next purchase, the Chilton's Manual for 1993-1997 was a great help. If I would have followed my Haynes Manual, I would have dropped the engine when it said to remove the cross-member braces. That would have been a mess. Here's a quick list that I haven't see on other threads.
1) I used the incremental jack up method that I got from these threads and safely got the front end up about 2 1/2 feet without tearing anything up.
2) Remove starter. Can be maneuvered around the tyranny cooling lines without removing them. It's pretty tough getting back in though.
3) Remove oil filter assembly. I wanted to replace that gasket too but I couldn't get the old one out.
4) Remove bolts to the fly wheel cover but you can't remove it without removing the left catalytic converter. I loosen CC but I couldn't get it out. Oil pan can be remove with the flywheel cover loose though.
5) I used the one piece Fel-Pro gasket. This seamed a lot thicker the the original gasket I took out. The holding clips are no good because the oil pan can out be maneuvered between the front of the engine block and the cross-members when using them. I put the new gasket in place on engine block with the oil pan nuts and screws finger tight and used a small bead of Grey silicone RTV at the front and back main-seal areas just keep the gasket in place, but I didn't put any on the engine block mating surfaces. After a 24 hour cure, I removed the oil pan nuts and screws and easily put the oil pan back in place.
6) I put everything back together in reverse order, thigh-ting to torque specs as I went.
I did try to remove the dip stick tube, which would have help in getting the pan back on, but I couldn't get it out and figured I would have ended up bending or breaking it trying to. After reading the threads about replacing those, I didn't want to go there. I've been driving a couple of miles each day for a week and haven't had any problems since. The oil leak is gone. These threads are great and I grabbed a lot of info from different ones. Thanks to all.
If you do build a second performance engine rather than modify your single existing original cars engine,theres some advantages, that us older geezers have come to appreciate at times.
as a general rule, its best to take your time and build a separate performance engine that you can swap into the car over a weekend, this has several advantages
(1) you will not be tying up the car, in an un-driveable condition waiting for weeks on parts to arrive or waiting on machine work to be done,
and you can always swap the original engine back into the car,
to have the car as dependable transportation while the performance engines being built or worked on.
(2) you can sell either engine separately from the car itself and still have a drive-able car.
(3)having your performance engine out on an engine stand certainly makes it far easier to work on.
(4) having a second engine available allows you to drive the car while you make repairs on the original engine
(5) if you screw something up, your not effectively stuck with a non-driveable car for long.
(6) with some experience you,ll find an engine swap between two similar engines can be done in a day , or at most a weekend by yourself, with a skilled and experienced local buddy, a long afternoon!
Last edited by a moderator: