"I am trying to figure out the best way to set up my ignition timing and posted a question there, where someone else was asking about BBC timing too. I understand the manifold vacuum to the distributor advance, but what should the settings be? Right now, I have 12 initial, 24 mechanical, and 14 vacuum advance. So at idle I have 26, and I was concerned that was too high. Any advice you can give me? Get an adjustable vacuum advance and lower the amount to, say, 10?"
watch video
http://www.youtube.com/watch?v=UYGU7mTw ... r_embedded
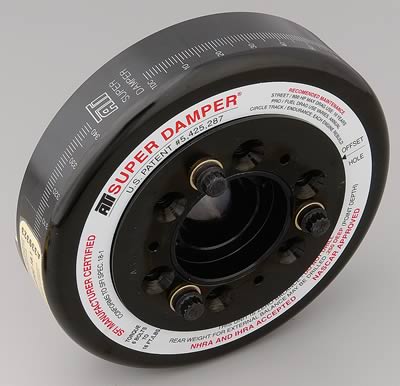
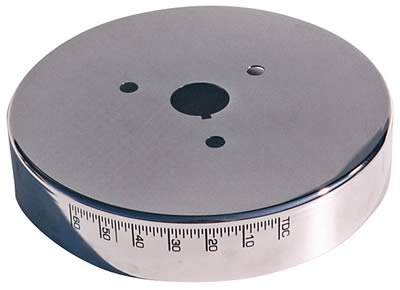
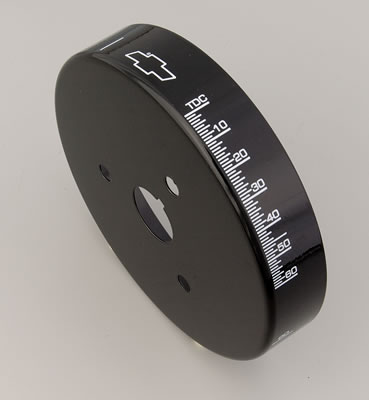
Ok lets start with the basics, you need to verify the TOP DEAD CENTER on the damper is correct and the timing tabs correctly located.
you don,t really care where the timing IS as long as its correct and you don,t get into detonation which will damage the engine.
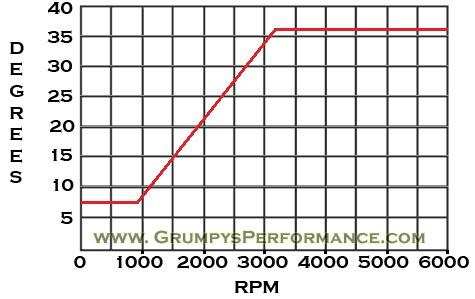
ideally your take the distributor to a decent ignition specialty shop to have it curved, ideally youll want the ignition to be someplace in the 8-12 degrees advanced at idle speed (800rpm-1000rpm, )Im most cases,and smoothly advance to about 35-37 degrees total advance at about 3200rpm, ignition spark should be bright blue and impressive, if its, weak,narrow, yellow or red theres a problem so research the cause, verify the coil and voltage
the following linked info will help, and yes reading thru the sub-linked info is very useful
http://www.gmhightechperformance.com/te ... index.html
http://www.youtube.com/watch?v=YdIGZ-tV ... re=related
viewtopic.php?f=70&t=1135
viewtopic.php?f=70&t=875
viewtopic.php?f=70&t=232
viewtopic.php?f=70&t=1015
viewtopic.php?f=70&t=967
viewtopic.php?f=70&t=232&p=277#p277
http://www.centuryperformance.com/ignit ... g-219.html
viewtopic.php?f=70&t=1809
watch the video
http://www.youtube.com/watch?v=YdIGZ-tV ... re=related
short answer
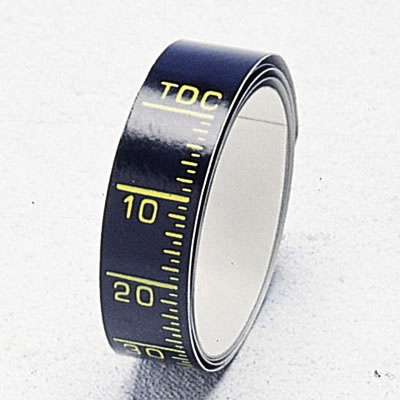
once your TDC is correct and youve installed the correct timing tape, you bring the engine rpms up to 3200rpm on the tach and set the timing at about 36 degrees advanced, them drop it back down to idle and see where you are at idle speed, this virtually eliminates alot of calculating and mistakes that get introduced if your trying to set the ignition timing advance from the timing at idle.
obviously an LT1 regulates its own ignition timing and uses knock sensor, and programmable CPU input and the crank sensor unlike the L98 with it HEI but both system need you to check /verify they are operating correctly.
link to more info on finding TDC and seating a distributor
http://forum.grumpysperformance.com/viewtopic.php?f=70&t=967
links may help
http://garage.grumpysperformance.com/index.php?threads/finding-top-dead-center.967/
http://garage.grumpysperformance.com/index.php?threads/timing-tabs-and-indicators.1015/
http://garage.grumpysperformance.co...ying-your-real-advance-curve.4683/#post-12672
http://garage.grumpysperformance.com/index.php?threads/shiming-a-distributor.251/
http://garage.grumpysperformance.co...ouble-shooting-rebuilding-hei-ignitions.2798/
http://garage.grumpysperformance.com/index.php?threads/distrib-won-t-seat-correctly.9231/
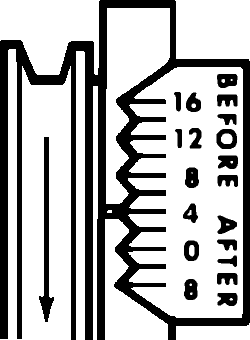
step one, pull the #1 plug and place the tip of your finger over the plug hole and rotate the engine until you feel COMPRESSION build as the number one cylinder, piston starts its compression stroke as the mark on the damper gets close to the timing tab, then remove your finger and continue turning the engine until the timing line on the damper aligns with the timing tab (0) TDC
once thats done the engine should not rotate any more until the distributor is seated correctly.
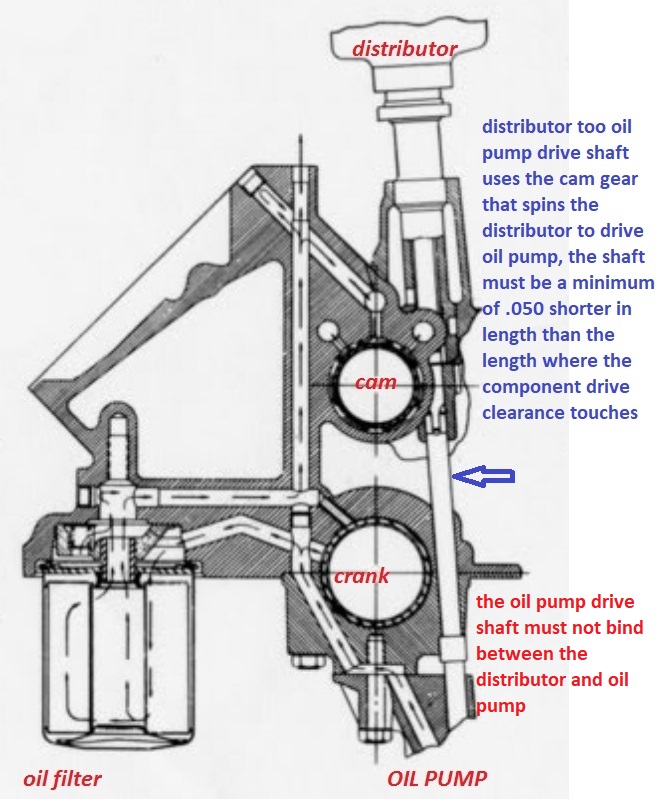
once thats lined up you drop the distributor into the engine so the rotor on the distributor points at the #1 cylinder when it seats and you install and lightly tighten the clamp and connect the wires, connect the timing light and set the timing at about 6-8 degrees BTDC at idle as a start point., if the distributor won,t fully seat the oil pump drive shaft needs to be turned a few degrees with a long large flat blade screw driver and re-try seating it while, it might take several tries until it lines up, it will seat into the distributor base gear once the oil pump drive aligns with the oil pump slot in the distributor gear base
watch video
http://www.youtube.com/watch?v=UYGU7mTw ... r_embedded
Ok lets start with the basics, you need to verify the TOP DEAD CENTER on the damper is correct and the timing tabs correctly located.
you don,t really care where the timing IS as long as its correct and you don,t get into detonation which will damage the engine.
ideally your take the distributor to a decent ignition specialty shop to have it curved, ideally youll want the ignition to be someplace in the 8-12 degrees advanced at idle speed (800rpm-1000rpm, )Im most cases,and smoothly advance to about 35-37 degrees total advance at about 3200rpm, ignition spark should be bright blue and impressive, if its, weak,narrow, yellow or red theres a problem so research the cause, verify the coil and voltage
the following linked info will help, and yes reading thru the sub-linked info is very useful
http://www.gmhightechperformance.com/te ... index.html
http://www.youtube.com/watch?v=YdIGZ-tV ... re=related
viewtopic.php?f=70&t=1135
viewtopic.php?f=70&t=875
viewtopic.php?f=70&t=232
viewtopic.php?f=70&t=1015
viewtopic.php?f=70&t=967
viewtopic.php?f=70&t=232&p=277#p277
http://www.centuryperformance.com/ignit ... g-219.html
viewtopic.php?f=70&t=1809
watch the video
http://www.youtube.com/watch?v=YdIGZ-tV ... re=related
short answer
once your TDC is correct and youve installed the correct timing tape, you bring the engine rpms up to 3200rpm on the tach and set the timing at about 36 degrees advanced, them drop it back down to idle and see where you are at idle speed, this virtually eliminates alot of calculating and mistakes that get introduced if your trying to set the ignition timing advance from the timing at idle.
obviously an LT1 regulates its own ignition timing and uses knock sensor, and programmable CPU input and the crank sensor unlike the L98 with it HEI but both system need you to check /verify they are operating correctly.
link to more info on finding TDC and seating a distributor
http://forum.grumpysperformance.com/viewtopic.php?f=70&t=967
links may help
http://garage.grumpysperformance.com/index.php?threads/finding-top-dead-center.967/
http://garage.grumpysperformance.com/index.php?threads/timing-tabs-and-indicators.1015/
http://garage.grumpysperformance.co...ying-your-real-advance-curve.4683/#post-12672
http://garage.grumpysperformance.com/index.php?threads/shiming-a-distributor.251/
http://garage.grumpysperformance.co...ouble-shooting-rebuilding-hei-ignitions.2798/
http://garage.grumpysperformance.com/index.php?threads/distrib-won-t-seat-correctly.9231/
step one, pull the #1 plug and place the tip of your finger over the plug hole and rotate the engine until you feel COMPRESSION build as the number one cylinder, piston starts its compression stroke as the mark on the damper gets close to the timing tab, then remove your finger and continue turning the engine until the timing line on the damper aligns with the timing tab (0) TDC
once thats done the engine should not rotate any more until the distributor is seated correctly.
once thats lined up you drop the distributor into the engine so the rotor on the distributor points at the #1 cylinder when it seats and you install and lightly tighten the clamp and connect the wires, connect the timing light and set the timing at about 6-8 degrees BTDC at idle as a start point., if the distributor won,t fully seat the oil pump drive shaft needs to be turned a few degrees with a long large flat blade screw driver and re-try seating it while, it might take several tries until it lines up, it will seat into the distributor base gear once the oil pump drive aligns with the oil pump slot in the distributor gear base
Last edited by a moderator: