TBucket Engine Project (Dart SHP)

Indycars

Administrator
Staff member
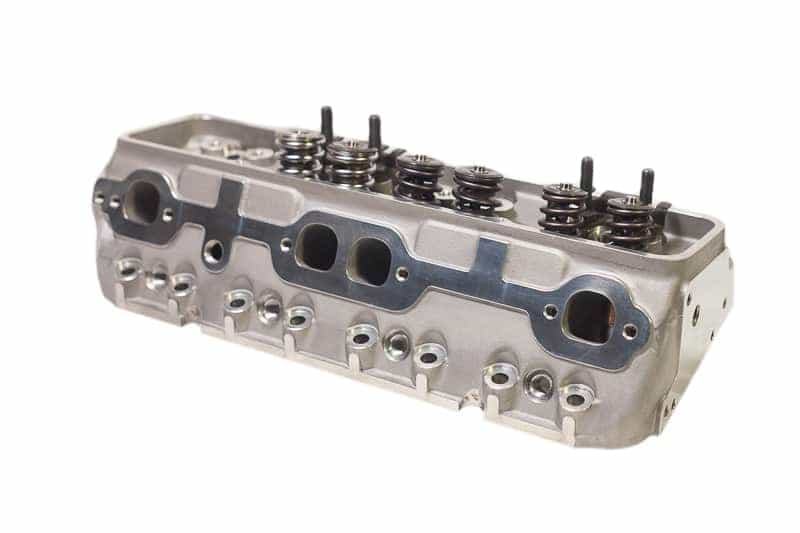
It's time to get this party started! Last night I picked up some of my parts, the only thing left to come in, is the Mahle piston and rings. This is just the first order, mostly the things I need right now to get started. It's been over ten years since I've driven this car and I am SOOO ready to get it back on the street.

Some tools are coming in today, such as:
- KD 3/8" (10-100 ftlbs)Torque Wrench
http://www.toolsource.com/micrometer-to ... 93417.html
KD_3460_TorqueWrench.jpg
- 6" long mandrel for the 1/4" Die Grinder to use cartridge rolls.
http://www.abrasivesupply.com/Standard_ ... /cm9xl.htm
Mandrel-6inch.jpg

- I already have these cartridge rolls, for the mandrel above.
CartridgeRolls02.jpg
CartridgeRolls01.jpg

- Unitized 6" Wheel for the bench grinder. Used for deburring and polishing.
http://www.abrasivesupply.com/ProductDe ... ode=882178
UnitizedWheel-6inch.jpg

I guess nothing is perfect, the die grinder should take care of these imperfection. Looks like they used a chisel to knock some casting slag out.
DartSHP_Block131.JPG


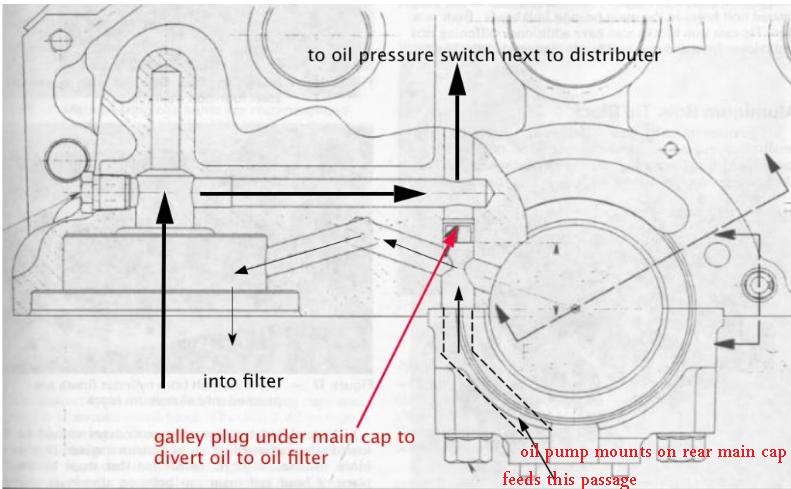
I cut off the mount from my stock oil pump to use for a template on the rear main cap. I suppose the Melling 10552 oil pump will fit the same. Something to think about!
DartSHP_Block123_Markup.jpg
DartSHP_Block116.JPG
DartSHP_Block127.JPG
DartSHP_Block129.JPG

 
Last edited:
I'm impressed with both the projects potential and your skill with a camera, for some unknown reason I never seem to get really clear detailed photos when I'm behind the camera.

theres ALWAYS ways to improve any combo,and I,d point that out here, it will take you a few hours but read thru these links and sub links, Ill post, but doing that will save you months and hundreds of dollars,
keep in mind you will be building a high performance street/strip engine NOT a race car engine ,
so you won,t want to concentrate on peak hp,
but your better off concentrating on durability and an
IMPRESSIVELY HIGH AND BROAD TORQUE CURVE,

IN THE mid range and upper mid rpm range power band
.
One of the huge secrets that gets over looked or ignored by a great many guys building their first few engine combos is that your not generally going to want to build an engine to maximize peak power,
but if you have experience, you'll spend a good deal more time and effort,
in carefully selecting components to match the intended application.
You'll concentrate on anvil like durability and a wide impressive torque curve in a useable rpm band.

THERE'S A HUGE DIFFERENCE IN THE WHOLE ARCHITECTURE REQUIRED BETWEEN A GREAT STREET/STRIP ENGINE,
and an ALL OUT RACE ENGINE
we will discuss your options and related procedures, at each point and the logical route to take to build a performance engine matching your application.
starting with a DART aftermarket block is a GREAT first step as that blocks far stronger than OEM 350-400 small block castings.
keep in mind your goal in building a good street/strip engine is not to produce the max possible horsepower, but too produce a DURABLE low maintenance combo that will produce far more power than a stock engine and require minimal maintenance, and not require constant tuning and adjustments.
you should be able to put together a 383-406 SBC that produces 450-500 hp yet still has decent drive-ability characteristics.
remember your concentrating on a high durability low maintenance combo that has impressive torque and operates in the rpm band you can effectively use on the street, you won,t be building a true race engine here.
Id also point out that youll want to lubricate any valve you install in a valve guide and verify the valve train clearances very carefully, and use the correct valve springs and add the correct valve seals installed


now it will take you several hours too a few days, or longer to read these links and sub links but it will provide a huge back ground base of info to work with and in the long run save you a good deal of cash and wasted effort
READ THE THREAD THRU TO THE END AND BE AWARE IT, AND ALL OTHER THREADS ARE CONSTANTLY UPDATED WITH NEW LINKS AND INFO


http://garage.grumpysperformance.com/index.php?threads/finding-a-machine-shop.321/#post-55314

viewtopic.php?f=52&t=5078

viewtopic.php?f=32&t=430

viewtopic.php?f=44&t=38

viewtopic.php?f=69&t=9930

viewtopic.php?f=51&t=125

viewtopic.php?f=69&t=9930

viewtopic.php?f=52&t=181

viewtopic.php?f=53&t=2726

viewtopic.php?f=53&t=852

viewtopic.php?f=53&t=247

viewtopic.php?f=53&t=509

viewtopic.php?f=50&t=428

viewtopic.php?f=52&t=1070

viewtopic.php?f=71&t=741

viewtopic.php?f=69&t=519

viewtopic.php?f=52&t=5078

http://www.chevyhiperformance.com/tech/ ... ewall.html

viewtopic.php?f=69&t=261&p=1382&hilit=fast+weight#p1382

viewtopic.php?f=87&t=3404&p=8992&hilit=fast+weight#p8992

http://garage.grumpysperformance.com/index.php?threads/valve-springs.9613/

http://garage.grumpysperformance.co...-springs-get-compressed-when-installed.11356/
 
Last edited by a moderator:
grumpyvette said:
I'm impressed with both the projects potential and your skill with a camera, for some unknown reason I never seem to get really clear detailed photos when I'm behind the camera.


theres ALWAYS ways to improve any combo,and I,d point that out here, it will take you a few hours but read thru these links and sub links, Ill post, but doing that will save you months and hundreds of dollars,
keep in mind you will be building a high performance street/strip engine NOT a race car engine ,
so you won,t want to concentrate on peak hp,
but your better off concentrating on durability and an
IMPRESSIVELY HIGH AND BROAD TORQUE CURVE,
IN THE mid range and upper mid rpm range power band.
One of the huge secrets that gets over looked or ignored by a great many guys building their first few engine combos is that your not generally going to want to build an engine to maximize peak power,
but if you have experience, you'll spend a good deal more time and effort,
in carefully selecting components to match the intended application.
You'll concentrate on anvil like durability and a wide impressive torque curve in a useable rpm band.
THERE'S A HUGE DIFFERENCE IN THE WHOLE ARCHITECTURE REQUIRED BETWEEN A GREAT STREET/STRIP ENGINE,
and an ALL OUT RACE ENGINE
we will discuss your options and related procedures, at each point and the logical route to take to build a performance engine matching your application.
starting with a DART aftermarket block is a GREAT first step as that blocks far stronger than OEM 350-400 small block castings.
keep in mind your goal in building a good street/strip engine is not to produce the max possible horsepower, but too produce a DURABLE low maintenance combo that will produce far more power than a stock engine and require minimal maintenance, and not require constant tuning and adjustments.
you should be able to put together a 383-406 SBC that produces 450-500 hp yet still has decent drive-ability characteristics.
remember your concentrating on a high durability low maintenance combo that has impressive torque and operates in the rpm band you can effectively use on the street, you won,t be building a true race engine here.
Id also point out that youll want to lubricate any valve you install in a valve guide and verify the valve train clearances very carefully, and use the correct valve springs and add the correct valve seals installed

now it will take you several hours too a few days, or longer to read these links and sub links but it will provide a huge back ground base of info to work with and in the long run save you a good deal of cash and wasted effort
READ THE THREAD THRU TO THE END AND BE AWARE IT, AND ALL OTHER THREADS ARE CONSTANTLY UPDATED WITH NEW LINKS AND INFO

http://garage.grumpysperformance.co...needed-for-383-sbc-assembly.16041/#post-96770


http://www.chevyhiperformance.com/tech/ ... ewall.html

viewtopic.php?f=69&t=261&p=1382&hilit=fast+weight#p1382

viewtopic.php?f=87&t=3404&p=8992&hilit=fast+weight#p8992

PartList.JPG
ScatForgedCrank120.JPG
ScatParts117.JPG
ScatParts121.JPG
 
Last edited by a moderator:
nearly the same setup as i got at home for nearly one year and still everything is boxed (only the lifters they are submerged in oil )
keep us posted on every thing you do with pics and all the info so i can at last start building mine
good luck withthe build
 
jteu2002 said:
nearly the same setup as i got at home for nearly one year and still everything is boxed (only the lifters they are submerged in oil ) keep us posted on every thing you do with pics and all the info so i can at last start building mine good luck with the build
What's keeping you from getting started???

I plan on updating with pictures as I go along, but it's going to be next spring or maybe summer before I'm done and ready to drive. The car needs some attention also, so I'm not just working on the engine.
 
have you decided on...components or are you open to discussing those and maybe taking a few experienced suggestions?
have you selected any parts yet ?
a cam yet?
lifters yet?
rocker stud girdle?
valve covers?
carb?

whats the car weight?
the transmission? (converter stall speed?)
rear gearing?
weight?
header specs?
any and ALL other info you might have ????
have you checked the blocks measurements?
Dart blocks tend to be far better than O.E.M. but you still need to check measurements!
OBVIOUSLY we would ideally need to discuss your options and how you'll proceed at each step, and obviously you'll be making your own choices but I can sure tell you from my experience what combos I've used that worked exceptionally well.
the first few rule's of GRUMPY'S engine assembly

(1) THINK THINGS THROUGH CAREFULLY ,
WRITE DOWN A LIST OF COMPONENTS ,

MAKE DARN SURE THE LIST IS COMPATIBLE WITH,
and AT LEAST SEMI-REASONABLY PRICED WITHIN YOUR BUDGET.
FOR WHAT YOU INTEND TO BUILD AND RESEARCH THE RELATED MACHINE WORK,

RESEARCH CAREFULLY THE COMPONENT INSTALLATION AND INTENDED USE ,
AND POWER BAND THE PARTS WILL REQUIRE

AND FIND AN EXPERIENCED MENTOR.

(2) if in doubt, about how to do anything, on an engine, do some detailed research,
find and compare at least 3-5 valid trust worthy sources info,
read the instructions over again, several time's very carefully
and if available watch several related videos.

(3) if any component will not easily function as designed or requires a good bit of physical force to install ,
or your not 100% sure your doing something CORRECTLY

STOP, FIND OUT EXACTLY HOW THE PARTS SUPPOSED TO FIT AND FUNCTION,& WHY! YOUR HAVING PROBLEMS
theres a reason, and you better verify your clearances are correct , and your following the instructions before you proceed.

(4) never assume the parts you purchased can be used without carefully , cleaning them prior too,
checking the physical condition, verifying clearances and using the correct sealant, lubricants etc.


(5) the quality of a component is generally at least loosely related to the cost to produce it,
and the amount of detailed research and quality machine work that went into its production.
if you got a significant reduced price, theres typically a reason.
it might simply be because a new improved part superseded the one you purchased,
but it might be a far lower quality imported clone with lower quality materials and machine work.
its the purchasers responsibility to research quality.

(6) if you did not do the work personally or at least take the effort to verify it was done correctly and personally verify clearances

ITS almost a sure thing that it was NOT done , correctly, and yes that mandates you fully understand what your looking at,
and how the components are supposed to function and have high quality precision measuring tools.

(7) ITS ALMOST ALWAYS FASTER AND LESS EXPENSIVE , AND PRODUCES BETTER RESULTS IF YOU,
BUY FEWER HIGH QUALITY PARTS & DO THINGS CORRECTLY THE FIRST TIME


you might want to read thru these links


http://www.small-block-chevy.com/assemblyspec.html

http://www.brodix.com/uncategorized/ik-dyno

ID strongly suggest you keep firmly in mind that doing your math home work and selecting and correctly installing a few high quality well matched components , goes a long way towards building a durable high performance engine and its best to concentrate on maximizing the engines torque curve in the mid rpm range, up to the engines useful rpm red-line, and gearing the drive train to match that intended power band!
If your building a high performance street driven cars engine, ID try hard to build a combo that allows you to stay under about 4200 feet per minute in piston speed, maximizing the engines displacement, getting the dynamic compression close to 8:1 and carefully checking valve train clearances, and geometry.
building an engine with a Quench distance that falls in the .038-.044" range, and matching the cam duration, lift and LSA to the intended power band, and having headers that are designed to amplify cylinder scavenging in that power band, and carefully thinking through and installing a 7-8 quart baffled oil pan and windage screen along with use of high quality bearings, and valve train components, with carefully verified clearances ,goes a long way towards maintaining better long term durability!
YOU'LL tend to get what you pay for! in both parts quality and machine work precision, You'll almost never regret buying and carefully installing a few better quality forged rotating assembly parts or double or triple checking clearances, but you'll frequently wonder "W.T.F. WAS I THINKING"
if you buy cheap components or fail to verify clearances , if your bargain priced parts fail under stress!
do your reading and research home work before you buy parts!
if your not 110% sure of what you need stop and ask questions and get answers from several sources before proceeding on!


http://www.wallaceracing.com/Calculators.htm

each build has its strong and weak points but all try to maximize the mid range torque curve
http://www.airflowresearch.com/articles ... 5/A-P1.htm

http://www.airflowresearch.com/articles ... 5/A-P1.htm

http://www.airflowresearch.com/articles ... 1/A-P1.htm

http://www.chevyhiperformance.com/tech/ ... ewall.html
 
Last edited by a moderator:
Indycars said:
jteu2002 said:
nearly the same setup as i got at home for nearly one year and still everything is boxed (only the lifters they are submerged in oil ) keep us posted on every thing you do with pics and all the info so i can at last start building mine good luck with the build
What's keeping you from getting started???

I plan on updating with pictures as I go along, but it's going to be next spring or maybe summer before I'm done and ready to drive. The car needs some attention also, so I'm not just working on the engine.

i only have time on saterdays for starters and i think once cleaned the engine that it will rust to quick and it will
end up rusted before i can continue to build it up it is going to take several weeks if i only have one day a week to work on it . i now wash it scrub and wash it again dry it an spray WD 40 ore simular
 
Last edited by a moderator:
Grumpy Wrote:
have you decided on...
a cam yet?

Not yet, only a general idea that it will have a lift of about .550 and a duration of 230ish @ 0.050. I've sent in the camshaft recommendation form to Crower. Their response was short and they never called me back as requested. The email said, "USE CAM# 00426 JERRY ". [ Spec's are Lift=.570/.584 & Dur=250/252 @0.050, LSA=112 ]
I didn't have much luck with CompCams either. I have yet to have a conversation with a live person yet about this. I bought DynoSim5 with Pro Tools and plan on using this to help me with this decision, along with all inputs that I receive.
Here is the form I sent to Crower.


CrowerCamRecForm_RMiller.jpg

lifters yet?
Only that they will be hydraulic rollers.

rocker stud girdle?
I was hoping with the 7/16" rocker studs, that this will not be a required component. If there is a chance of valve train failure and therefore a very costly event, I would of course rethink this. I'm pushing the limits of my budget.

valve covers?
I assume they will have to be taller to clear the rockers, but no decision yet.

carb?
Not a specific model, but it would be 750 CFM, Vacuum Secondaries, Holley Style

whats the car weight?
I did a dirty approximation by weighing everything I could on a bathroom scale, for the chassis I did one wheel at time, which is real iffy. The engine I looked it up on the interent. Anyway I came up with 1400 lbs, but most people on the TBucket forum report theirs weigh around 1800 lbs. I've been using 1800 lbs as my weight when asked.

the transmission? (converter stall speed?)
TH350 that is in need of a rebuild. DorianL may have motivated me to try this myself, but I do know a person that could easily do this for me, cost would be about $650 ballpark number. Torque converter is yet to be purchased, so that will come after all the decision about the engine. I'm expecting it to be 2400-2800 RPM.

rear gearing?
Ford 9" Posi trac, 3.7:1 ratio. Twenty-Eight (28") tall tires.

header specs?
1 5/8" Primaries, 3 1/2" collector. They look like this, except they will also have a 18" extension/turnout: http://www.summitracing.com/parts/PTE-H8070/

any and ALL other info you might have ????
Engine will be internally balanced.
Undecided about rocker ratio for the COMP Cams Ultra Pro Magnum Rocker Arms. Like the picture below.


RockerArms - CompCams Ultra ProMagnum.jpg
 
Last edited:
given the info stated ,let me know what CRANE AND CROWER SUGGEST, but keep in mind for a street driven car will in most cases be much better matched to a cam thats maximizing the 1800rpm-6000rpm power band, and having a strong 3000rpm-6000rpm plus power band, peak horsepower is a bit less important in a street cars engine that having extended durability and a strong mid rpm torque curve
in an 1800 lb T-bucket ID SELECT SOMETHING SIMILAR TO THESE, with a 3000rpm-3200rpm stall converter, keep in mind your not trying to maximize just the peak horsepower numbers , having bragging rights and impressive peak horse power numbers is cool , but its having instantly responsive and massive torque that allows the car to destroy the tires at the blip of the throttle and still have the ability to cruise on trips that makes the car really fun to drive!
I've tried dozens of engine combos , and while every choice is a compromise in some area, you can build a very nice engine if you concentrate on massive mid rpm torque, and a power curve that allows you to produce that power in the 3000rpm-6400rpm power band.
Id suggest you call crower and crane and talk to their tech guys, but youll be looking in the 232-240 degree intake duration @ .050 lift range in a hydraulic roller cam in an engine built to do what your looking to do, in most cases, I,d suggest the CRANE OR CROWER CAMS LINKED TO BELOW, as a good match to the application suggested...yes the cam suggested by crower , the #00426 is a solid roller cam, and it will without doubt produce better peak hp, but it will also be noticeably less street drive friendly,(especially if matched to an automatic transmission without a high stall converter, that will be mandatory to allow a cam with that much duration to function efficiently) so you'll need to decide what route to take and what your willing to compromise. keep in mind the cylinder heads, intake, manifold design, headers, displacement, compression ratio ETC. all effect the results, and you'll want to make some educated choices, but getting a selection of parts that will produce a wide power band, and rock solid durability, will be one key element to a good combo.

this info might be useful
http://www.brodix.com/heads/ikdyno.php

viewtopic.php?f=69&t=182&p=4788#p4788

http://www.brodix.com/heads/ik210dyno.php

http://www.cranecams.com/product/cart.p ... il&p=24191


386-310-4875
( crane 119691)
crane119691.jpg


I'VE used this CROWER CAMS 00471 HYDRAULIC ROLLER ,SEVERAL TIMES IN PREVIOUS BUILDS WITH GOOD RESULTS
http://www.crower.com/chevy-262-400-ser ... ircle.html
Phone 619.661.6477
( crower 00471s)
crower00471.jpg

Ive built at least 7, 383-and-406 SBC based engine builds now, in the last 10-12 years with darn near the exact same combo, of crower roller cam,similar brodix heads,similar compression,roller rockers and while the engines only differed in factors like the headers , ignitions,or intake manifold used I can,t remember any of them having any issues as long as premium octane fuel was used and all produced decent power in the rpm band your cars going to operate in,and they all worked in reasonably light cars,(under 3200lbs) to produce decent performance , some were automatics, most used a 3200 rpm stall converter and 3.73:1-to-3.90:1 rear gears and similar tire heights, you can drop the dynamic compression by re-indexing the cam to 2-4 degrees retarded from split over lap and youll generally pick up 200-300 rpm of useable power on the upper rpm range and loose a bit of off idle torque
viewtopic.php?f=44&t=10553&p=44949&hilit=retard+bushing#p44949
this is how as an engine builder you gain experience, in that you see the result of each change you make and look at how each components being selected or modified effects those results, and in most cases use that accumulated experience looking at those results to further refine ind improve the combo further, and yes once you find an exceptionally effective combo if your smart you take notes and record what worked best so in the future you can use that info
having a REV-KIT that retains the lifters in their bores, to maintain oil pressure, even if the rocker comes loose or push rods breaks is a good idea
revkit1.jpg
 
Last edited by a moderator:

Picked up the last of my first parts order on Friday, the Mahle pistons with rings came
in. Looking at the rings and how they will be orientated I made these observations in
the picture below.

DSC00154_ShowRingBevel_Crop.jpg


Took a few pictures of a piston, most notable to me was how short they are compared
to the stock cast pistons. The support for the last oil rail gets very thin as it passes
over the wrist pin. If you look closely I think you can see what I'm talking about.

DSC00159Piston.jpg
DSC00158Piston.jpg
 
Last edited:
Spent several hours measuring the Scat crankshaft today, good thing I'm not trying to make a living doing this. :roll: First thing I had to do was remind myself how to read a micrometer. Also getting a CONSISTENT feel for the drag of the micrometer was a learning experience, which will continue to get better as I use the micrometer more through out this project. Well anyway here are my results, it will be interesting to see how they compare to what the machine shop gets.

EngineClearanceDocumentationPicture.jpg
EngineClearanceDocumentation01.jpg

EngineClearanceDocumentation01.jpg

 
Last edited:
thats about standard for most scat cranks ,Ive seen,(BETTER THAN MANY CRANKS I SEE) and theres no reason not to use it, after a careful cleaning to remove any trash it might have picked up during machining or packaging or transport,and most SCAT FORGED CRANKS ARE MUCH BETTER than many of the import cranks I see guys buy of EBAY or many of the less expensive sources
A FEW VIDEOS TO HELP YOUR ASSEMBLY


http://www.youtube.com/watch?v=r1PO26ZqUEs

http://www.youtube.com/watch?v=sQhNIiPyTB4


http://www.youtube.com/watch?v=iuj9nfQ-LRY

http://www.youtube.com/watch?v=HrtQVhcTPFc

http://www.youtube.com/watch?v=ypQwgm1H2NU

http://www.youtube.com/watch?v=-VwsbEg7Z4I

http://www.youtube.com/watch?v=bcMuttJ9RFc

http://www.youtube.com/watch?v=1LcYEZwOIQQ
 
Last edited by a moderator:
Figured it was time to update my project. Finally finished some other projects related to the car and got started deburring the DART SHP block. I'm not done yet, but have a good start on things. Every machined surface had a razor sharp edge, so there is plenty to do inside and out on the block.

The first picture shows the tools I used in the following pictures. Sometimes its hard to see where I've been working so anywhere you see the red arrows, I've done work. The main caps were all done with the Unitized Wheel on the bench grinder and the hand file. All the main saddles in the block were done with the hand file.


GrindingTools220.JPG
MainCaps217.JPG
MainCaps210.JPG
MainCaps209.JPG
DSC00215.jpg
DSC00214.JPG
DSC00212.jpg
 
Last edited:
its refreshing to see someone take a bit of time to clean up the casting flash and smooth and clean out a block before assembly.
I see many guys make the huge mistake of assuming the casting is ready to assembly as it comes out of the crate!
Id suggest a good cleaning, and careful inspection, and rodding out the internal oil passages,with a rifle bore brush and installing brass freeze plugs ,with good sealant, plus installing new cam bearings, and beveling all the oil feed hole entrances and exits to the bearings a bit to smooth flow and use of an epoxy based paint to seal the blocks micro pores before assembly is advised.

be sure you clean and accurately measure all parts before assembly, check clearances


http://www.hotrod.com/how-to/engine/181 ... g-install/

http://garage.grumpysperformance.com/index.php?threads/bearing-clearances.2726/#post-7077

http://garage.grumpysperformance.co...hrust-bearing-failure-info-related-info.1138/

http://garage.grumpysperformance.com/index.php?threads/causes-of-bearing-failure.2727/#post-13056

http://garage.grumpysperformance.com/index.php?threads/bearing-clearances.2726/#post-7077

http://garage.grumpysperformance.com/index.php?threads/bearing-clearances.2726/#post-26599

http://garage.grumpysperformance.com/index.php?threads/rotating-assembly-bearings.9527/


Last edited by a moderator:
grumpyvette said:
its refreshing to see someone take a bit of time to clean up the casting flash and smooth and clean out a block before assembly.
I see many guys make the huge mistake of assuming the casting is ready to assembly as it comes out of the crate!
Id suggest a good cleaning, and careful inspection, and rodding out the internal oil passages,with a rifle bore brush and installing brass freeze plugs ,with good sealant, plus installing new cam bearings, and beveling all the oil feed hole entrances and exits to the bearings a bit to smooth flow and use of an epoxy based paint to seal the blocks micro pores before assembly is advised.
![/color][/size]
 
Once I got started I couldn't help myself, I just could not decide on a good place to stop......so I didn't !!! I'm finished with the block now and want to use the warm day coming on Thursday to clean it up, suppose to get to 68 degrees. Should make for a nice smooth paint job on the inside and out. There were a few places I couldn't get to but mainly the cam tunnel.

TimingAreaAfterCompare02.jpg
ValleyPolished01.jpg
BottomEndPolished01.jpg
BlockSidePolished01.jpg
 
Last edited:
when I paint blocks, after degreaseing and cleaning them, I coat the bearing seat surfaces, and bores and decks with a q-tip and some Vaseline to prevent paint sticking to those surfaces, Ive found that a set of 16 rubber corks with screw eyes on a bead chain help prevent lifter bores from getting paint in them

keychain.gif


cork.jpg


http://www.hometrainingtools.com/rubber ... E-STOP01C/

B00004Z0NK.01.MZZZZZZZ.jpg


viewtopic.php?f=51&t=125

be aware that head bolts enter the block coolant passages,
so if you failed to dip the bolt threads in sealant when they were assembled,
through the heads coolant can seep up along the head bolts,
into the area under the valve cover

btw read this


80057.jpg

80063.jpg


both of these work great at sealing head bolt threads,
http://garage.grumpysperformance.com/index.php?threads/bare-minimum-tools.11026/#post-51843

http://garage.grumpysperformance.com/index.php?threads/rod-bolt-mics-stretch-gauges.989/#post-51199

http://garage.grumpysperformance.com/index.php?threads/precision-measuring-tools.1390/#post-44530

http://garage.grumpysperformance.com/index.php?threads/decking-or-truing-up-the-block-deck.16152/

http://garage.grumpysperformance.co...ing-tools-abrasives-sources.10683/#post-46207

http://garage.grumpysperformance.com/index.php?threads/starter-tool-set.6032/#post-18696

http://garage.grumpysperformance.com/index.php?threads/what-hand-tools-to-buy.4069/#post-10827

http://garage.grumpysperformance.co...te-but-it-will-get-you-started.834/#post-4891
 
Last edited by a moderator:
I coat the bearing seat surfaces, and bores and decks with a q-tip and some Vaseline to prevent paint sticking to those surfaces
Sound like you are painting inside of the lower end, around the bottom of the cylinders and main webbing......is that right???

I saw your cork idea earlier and liked it, so I already have them.
 
Indycars said:
I coat the bearing seat surfaces, and bores and decks with a q-tip and some Vaseline to prevent paint sticking to those surfaces
Sound like you are painting inside of the lower end, around the bottom of the cylinders and main webbing......is that right???

I saw your cork idea earlier and liked it, so I already have them.


yes I paint all the non-machined surfaces to lock in micro crud in the castings. a good epoxy base high temp engine paint can provide a smoother surface that speeds oil flow rates back to the sump and locks in micro trash in the blocks cast iron micro pores that tends to help keep the bearings surfaces cleaner.
be very sure you clean and brush out the blocks internal oil passages with a rifle bore brush and use solvent and high pressure air to remove crud well before you start painting the block.

oilpasse1.jpg

oilpasse2.jpg

oilpasse3.jpg

oilpasse4.jpg

95159.gif

borebrush.jpg

borerod.jpg

borerodg.jpg

carbclean.jpg


these links contain a great deal of related & useful info

http://garage.grumpysperformance.co...g-block-for-stroker-assembly.2855/#post-77609

http://garage.grumpysperformance.com/index.php?threads/small-base-circle-cams.3810/#post-72554

http://garage.grumpysperformance.co...ing-parts-and-a-logical-plan.7722/#post-71181

http://garage.grumpysperformance.com/index.php?threads/another-383-build.12786/page-2#post-66126

http://garage.grumpysperformance.com/index.php?threads/bits-of-383-info.38/page-2#post-61958

http://garage.grumpysperformance.co...-for-new-383-sbc-cam-instal.13109/#post-68326


http://garage.grumpysperformance.com/index.php?threads/bits-of-383-info.38/page-2#post-61958

http://garage.grumpysperformance.co...tion-of-crank-durring-short-blk-assembly.852/

http://garage.grumpysperformance.com/index.php?threads/another-rings-end-gap-question.14994/

http://garage.grumpysperformance.com/index.php?threads/oil-system-mods-that-help.2187/

http://garage.grumpysperformance.com/index.php?threads/valve-train-clearances-and-problems.528/

http://garage.grumpysperformance.co...e-springs-and-setting-up-the-valve-train.181/
 
Last edited by a moderator:
Back
Top