TBucket Engine Project (Dart SHP)

yeah, if done correctly that should easily out live the t-bucket:D
 
Got my water pump back from C&B Pump Rebuilders in OKC. They charged $40 for the rebuild.
I will prep the bottom of the pump and paint with Por-15 if I have enough left over to cover the
bare metal.

Next was to check the cam timing cover to water pump clearance. I did my checking WITHOUT a
pump gasket (between pump & block) to give me a small margin of safety.

FP31_WaterPumpGasket.JPG

I had to grind the bolt heads down until the highest point now is the raised center of the cover.

FP31_WaterPumpCoverBolt_00463.jpg

FP31_WaterPumpCoverBolt_00460.jpg

With the timing cover in place, I bolted the pump on and checked the clearance with some newspaper.
The paper slide out with NO drag on it ...... perfect!!!

I have the thicker 0.1 inch gaskets, but i won't need them. This would have put the water pump pulley
out of alignment with the crank and alternator pulleys, not a big deal, but one less thing to think about.

FP31_WaterPumpToTimingCoverClearance_00459.jpg

FP31_TimingCover_00467.jpg
 
Rick/ I don,t remember you posting a link to purchase that timing chain cover you purchased?
some of the people reading through the thread are sure to want to follow and duplicate your efforts
 
btw the multi part timing chain covers that allow a faster cam change are available at a not much increased price for some 1966-1990 BBC applications
https://www.summitracing.com/parts/cca-312/overview/
and sbc
$265
https://www.summitracing.com/parts/cca-310
cca-312_w.jpg
 
Looking good again Rick. I'm hoping for NO LEAKS.
The pic posted above is not the final install, but below is AND I hope your are right !!! Some times you
have to make a decision and go with it !!! It not like there is a cross member under my pan.

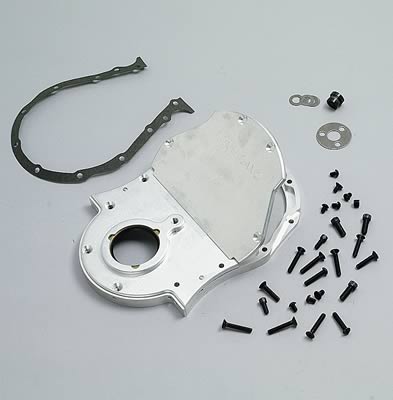
So Comp Cams spend another .03 cents to make another pointer.....jess!! After I spend over $250 for their
timing cover. Their pointer was 5/16 inch (0.313") away from my balancer (Fluidampr 62260D 6-1/4" OD
Gold Harmonic Damper), creating a situation for a significant parallax error. Buy a top notch timing cover
and it's terrible at it's sub-functions. Sure Wish I had a Formula 1 Budget !!! My pointer has .025 inches
of clearance. The hard part was estimating how much the bend would take out of the total distance.

FP32_TimingPointerCampare_00488.jpg

So I had to make a pointer, looked at the materials I had and decided to make it from some 1/8
aluminum flat bar.

FP32_TimingPointer_00473.jpg
FP32_TimingPointer_00476.jpg
FP32_TimingPointerFinished_00477.jpg

I put the crank setting at TDC just before I took the Moroso Degree Wheel off, but it was hard to
tell if I was able to install the balancer without disturbing TDC. So I went back with the piston
stop and verifying TDC with balancer installed. When it checked out, installed the new ARP
balancer bolt with RED 262 Loctite. It took 6-8 times cleaning the threads of both the bolt and
crank. Just another 30 minutes, but it's just another XXX minutes everytime I do something ....
and I Know What Everyone Is Saying ...why does it take him SOOO long to get anything done.
Ok, but I think it will not leave me on the side of the road, 3 hours from help.

There are several things that are not talked about, but the pics are in this post !!!

FP32_TimingPointerInstalled_00479.jpg


Then why not polish the CompCams cover, the 1st part was already installed, but I did take a another 60 minutes
to polish the outer part of the cover. Now it's far from a nice piece piece of polishing, but from 5 feet it doesn't
look too bad. Besides it's pretty much behind the water pump. Applied SharkHide to both the cover and pointer.

FP32_TDC_CheckWithNewPointer_00484.jpg
FP32_TimingPointerPolishedTimingCover_00485.jpg

I have several more pics, but that pretty much covers what I did.
.
 
Last edited:
its well made, unique ,custom fabricated components,
like that pointer, that add both class and value to a better quality hot-rod

BTW GREAT QUALITY PHOTOS:D
 
Your way is certainly much simpler than the pointer I made. I wonder if it would work on my
cover, it does look pretty close to the horizontal seam in the middle.

I did use your tip for sealing the balancer to crankshaft/keyway.
 
I like your pointer Rick. Keep it.
I made the one above from a long metric stainless screw.
I drill & tap the timing cover for the appropriate size thread, and use red Loctite.
 
I saw a thing on YouTube this guy made a template and drilled his balancer/crankshaft and drove a dowel in, 2 of them 180 degrees apart. Said it secures the balancer better.
 
I took two days of vacation to work on the TBucket engine. As you might expect I had a glitch
when I wanted to run a thread chaser thru all the threaded holes. I think after the machine
shop did their cleaning thing, it made some threads more susceptible to galling. I sure am glad
I found the problem before installing the head. Much easier to fix off the car.

FP33_ChasingThreads_00491.jpg


On the passenger side head exhaust ports, cylinders 2 and 8 had problems, 8 being
the worse.

Fp33_ExhaustThreadFailure_#8-#2_00508.jpg

Fp33_ExhaustThreadFailure_#8-#2_00510.jpg


I located a 3/8-16 HeliCoil Kit at O’Reilly’s. I already had the 25/64 inch drill bit that is not
included in the kit. Depending on what instructions I read, they differed on whether to use
Red Loctite. When it came time to install the HeliCoil, I used Red Loctite.

FP33_HeliCoil_00512.jpg
FP33_HeliCoilInstallation_00514.jpg

Since you don't want the insert to be too close to the top, I drilled the #2 hole just a
little deeper. I needed another 1/2 turn on the insert, to ensure that when I tightened
the header down it did not pull top thread of the insert out.
 
on aluminum head's its almost alway's best to use studs to secure headers when you can,
as a stud has the threads full length engaged and very low stress , and significantly more surface area spreading the load,
than a bolt will ever allow,don,t forget too use anti-seize on the stud threads
shop around, the cost of the studs are not as high if you shop carefully, try a local bolt supply or hardware store.

http://garage.grumpysperformance.com/index.php?threads/header-gaskets.1045/page-2#post-55418
https://www.jegs.com/p/ARP/ARP-Exhaust-Header-Studs/744890/10002/-1
11118322.jpg

https://www.fastenal.com/products/details/11118322;jsessionid=GFJnzZ+7+LoV4LCjDOCC8Gb5.b9408a77-0eb9-3dd2-aa63-3c743b855037?r=~|categoryl1:"609389 Fleet 9and Automotive"|~ ~|categoryl2:"609999 Tire 9and Wheel End Products"|~ ~|categoryl3:"609867 Double End Studs"|~


mor-38350_w.jpg


lockn1.jpg


lockn2.jpg

antiseize.jpg

headerstuds.jpg

I would strongly suggest BOTH stainless bolts studs and the use of ANTI SEIZE on the threads
arp-434-1301_w.jpg
 
Last edited:
Back
Top