TBucket Engine Project (Dart SHP)

I love stainless, but it's hardly visible .... so what's the advantage of SS over Black Oxide. They
have similar tensile strength.

Why such a wide price difference, all 4 kits look they would work? 12 point would help since
they have a smaller diameter and fit in a smaller space. I can justify $60, but $112 is hard to
swallow for just 12 Studs. One says it's a Hex and the other says External Hex, have no idea
what the difference would be. The pics are no help.
https://www.summitracing.com/parts/arp-420-1402/overview/

Some have a course thread 3/8-16 for the head a fine thread for the header side, so it looks
from the pictures supplied. I suppose the advantage there is fine threads will not come loose
as easy as a course thread.

I could go with these if they would fit/work with a 5/16 or a 3/8 inch flange. I want to change
headers in the future and they might have a thicker 3/8 inch flange.
 
Stainless steel will not corrode as easily.
Since you do not drive the T in the rain ever Black oxide steel is Ok.

$80 dollars last time I bought an ARP stainless Big Block Chevy Header stud kit.
Used 4 studs for the TA.
Tried all studs. Made it impossible to get the headers on.
 
I'm wondering what the heck the machine shop used to clean your heads that damaged/weakened the threaded holes?
There are certain chemicals that you don't use on aluminum.
 
I'm wondering what the heck the machine shop used to clean your heads that damaged/weakened the threaded holes?
There are certain chemicals that you don't use on aluminum.
I guess that's possible. It didn't hurt ALL the threaded holes or any surfaces.
 
One reason for deciding on the Edelbrock Performer RPM heads for my 302 was that the exhaust holes already came heli-coiled.
 
.
Going back together with the intake manifold and maintaining the port match I had done
during the engine assembly the first time was easy with a reference Roll Pin. It was just a
matter of using the roll pin again to index the new gaskets.

I started by using a couple of bolts to hold the NEW gasket in place and visually aligned
the gasket to the ports.

The photo below is from the original procedure, therefore the holes from the roll pin are
already there.

FP34_PortMatchGasket_00933.jpg

You will need roll pins that stick out above the surface 0.030 to 0.040 inches. Too short
and you can not get a hold them for removal.

FP34_PortMatchRollPin_00518.jpg

With roll pins in place and the new gaskets aligned while being held in place by two bolts, I
tapped the gasket directly above the roll pins.

FP34_PortMatchRollPin_00519.jpg

You can see below how the roll pin leaves it's impression in the gasket.

FP34_PortMatchRollPinImpression_00520.jpg

Now it's just a matter of making a hole in the gasket. In the original procedure I used a leather
hole punch, but this time I used a 3/32 inch drill.

FP34_PortMatchDrillGasket_00496.jpg

When I install the intake manifold permanently for the last time, I use some longer roll pins.
The longer pins will make the manifold index over the pins and be in perfect alignment as the
manifold is lowered into place.

NOTE: Too long of a roll pin will keep the manifold from fully seating on top of the gaskets. You
must do several dry runs to see if the manifold will go into place with your length of roll pin. I
started with 1/2 inch pins, but had to shorten all four of them to roughly 7/16 inch before the
manifold would completely seat against the gaskets.

FP34_PortMatchGasketAligned_00499.jpg


For the original port matching procedure with lots of photos use
the link below:

http://garage.grumpysperformance.co...cedure-step-by-step-guide-with-pictures.5378/

.
 
upload_2018-4-28_19-41-55.png

Rick, I don't care for the looks of these threads. They are already flat.
Make sure whatever bolts you are using are long enough to grab as many of those threads as possible, without bottoming out.
And use anti-seize. The hi-temp nickel stuff, not food grade.
Or even better - studs.
 
I got my ARP studs and Nichol anti-seize in, but that was the least of my problems. Drilling and
tapping one thread in cylinders #2 and #8 did not work out so well. The slightest mis-alignment
with a total of 6 studs makes for a very hard time getting the header over those studs. I had to put
the headers on without those 2 studs and install them after the header. But that did work for cylinder
#8. I tried one ARP bolt that I already had for headers and even with the smaller wrench size that
didn't work. So I finally used an Allen bolt and turned the head down until there was very little shoulder
left, that did work.

FP37_ARP_StudNut_vs_Bolt_Size_00529.jpg

There was no way a washer was going to fit, not even the shoulder on the bolt would fit. So I had
to turn those those down to almost no shoulder.

FP37_Cylinder#8_Different_00528.jpg

FP37_ARP_HeaderStudNutModification_00527.jpg

On the driver side it was easier, but no washers and the nut shoulders had to be turned down
again. I also had to sacrifice a 12 point socket to make a special tool since there is so little clearance
between the header tube and the nut. I was getting to the point that if I turned the socket down
any smaller I was afraid it would split when torquing the nuts.

FP37_12PtSocketModificationForHeaders_00530.jpg
 
wow, Its always amazed me how little it takes and how often, similar stuff happens,
RICK, your doing a great job!
theres always some reason that what should have been a rather simple operation, becomes a P.I.T.A.
any decent mechanic or engine builder rapidly becomes aware that there's an endless list of reasons,
why that "15 minute job" the customer thinks hes paying for took 2-4 hours and cost more than expected!
its also a contributing factor in why a few guys that you pay too work on cars ,
occasionally do amazingly crappy work, just to get it out the door!
thus, its also a huge reason why most guys that own or built a nice car,
are forced too learn how to do much of the work on the cars they own,
too prevent , crap quality shop work,

done by guys that really don,t give a crap,
if something fails as long as its a day or so later and miles away,
even if you paid them big bucks too do the job correctly.
one more reason selecting the correct machine shop ,
that you should be owning and knowing how to use, precision measuring tools,matters,
and knowing what your looking at maters


http://garage.grumpysperformance.com/index.php?threads/building-custom-headers.961/#post-56850

http://garage.grumpysperformance.com/index.php?threads/finding-a-machine-shop.321/#post-59253

http://garage.grumpysperformance.com/index.php?threads/precision-measuring-tools.1390/#post-68850

http://garage.grumpysperformance.com/index.php?threads/building-custom-headers.961/page-2#post-72336

http://garage.grumpysperformance.co...y-in-building-a-good-engine.11682/#post-54682

http://garage.grumpysperformance.co...ting-started-in-the-car-hobby.339/#post-60187

http://garage.grumpysperformance.co...-t-do-stupid-stuff-get-decent-equipment.1669/

http://garage.grumpysperformance.com/index.php?threads/bits-of-tig-welding-info.295/
 
Last edited:
Thanks! But this means I will have to pull the heads again to get those two threads I did straightened
out. I thought the drill would follow the hole that was there, but obviously the aluminum is too soft.

Will of course have all 12 done when I do. It should work for now, but when I get some new headers,
then that will be when I have to pull the heads again.
Its really hard to get dead on Rick by Hand. You did Ok.
Takes A Bridgeport Vertical Mill or A Waton Hornizontal Mill to be dead on accuracy.
I use my best Bud Mopar Bob when I want dead on accuracy.
I worked in the same machine shop with him 20 years ago now.

If need be drill out the offending stud bolt hole in the header flange 1 or 2 letter size drill bit size larger.
She will go together just fine.
 
Its really hard to get dead on Rick by Hand. You did Ok.

If need be drill out the offending stud bolt hole in the header flange 1 or 2 letter size drill bit size larger.
She will go together just fine.
Thanks!

Actually I did that on the passenger side, just forgot to mention it in my post.
 
This just happened 30 minutes ago with my legs under the exhaust !!!

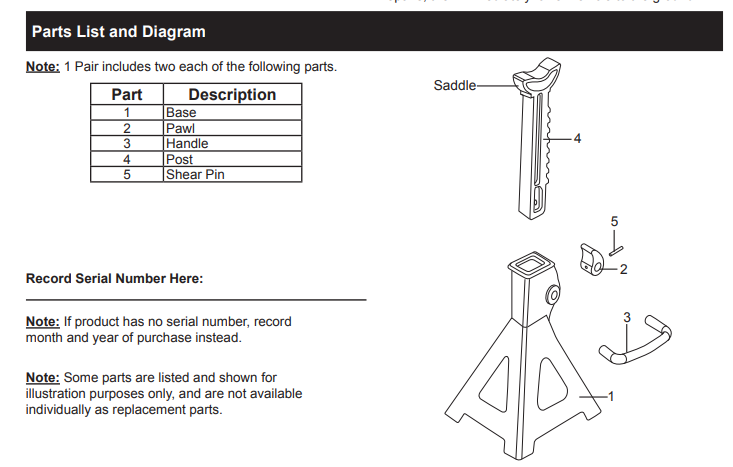
The jack stand didn't fail, it must have only been engaged about 1/2 way on one tooth. I was pulling
the rear suspension bolt at the front under the body and yanking on it to get the bolt out. When it did
give way it went all the way to the bottom, instead of the next tooth down.

FP38_JackStandFailure_00531.jpg
 
I'm glad you were not injured! and yeah, if you don't fully seat the ratchet teeth its very possible to have it slip,
and Ive seen several jack stands where the weld on, or roll pinned connection, that release handle and ratchet pawl, have broken as it was a small flimsy roll pin, or only marginally & crappy tack welded,
making it more difficult to determine true pawl engagement depth, you can drill out that roll pin to a significantly larger diam or weld as a repair

those jack stands are strong but not fool proof
https://manuals.harborfreight.com/manuals/61000-61999/61599.pdf

pawl12.png
 
Last edited:
Yow! That is scary! I guess I should make a habit of shaking the car after I put it on stands.
Wouldn't hurt to notice the position of the handle before and did it return to the same position
with the car on the stand. Not sure if it that big of a difference to notice.

The wife said SHUCKS, when I told her and I was standing up ! :confused:
 
This is what I was replacing when the car fell. Figured after over 35 years I should replace them, they
were chromed and that can cause Hydrogen Embrittlement.

FP39_RearRodEnd_00532.jpg

FP39_RearRodEnd_00533.jpg
 
Back
Top