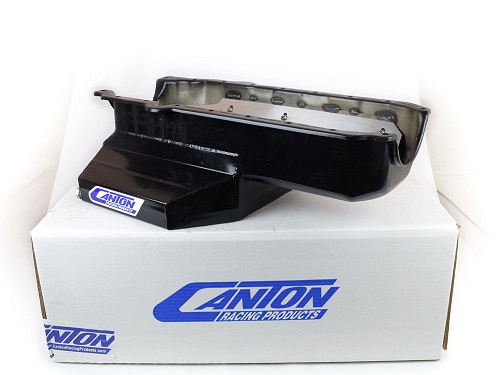
those oil pans generally work out well...
IF the front cross member allows the required clearance for the pans installation
be aware theres
right and left dipsticks
and thick and thin front seals,
and one and two piece rear seals
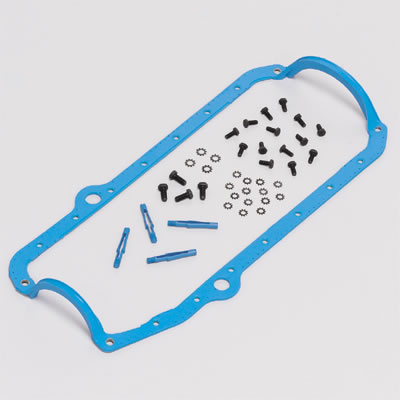
ONE PIECE OIL PAN GASKETS
1974 and earlier pans had a shallower/thinner front gasket opening where the pan meets the timing chain cover and 1975 and later used a deeper/thicker pan gasket in this area, the 1985 and some other blocks used the right hand dip stick further complicating things
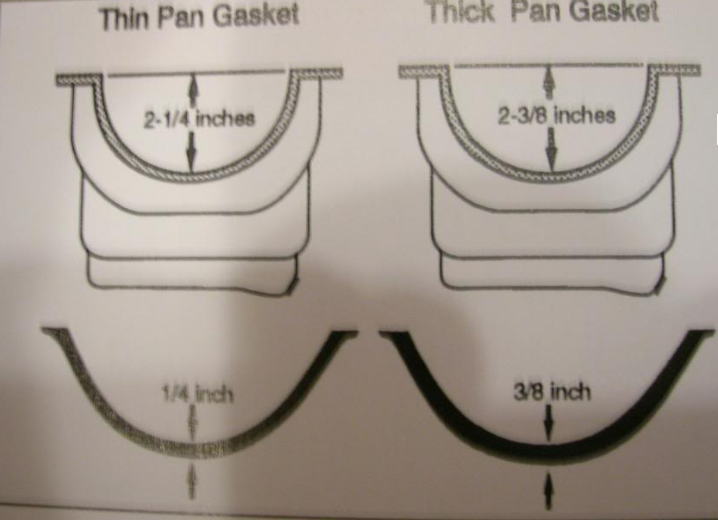
theres two common gasket thickness measurements,Put a straight edge across the front of the oil pan and measure down to the lowest part of where the seal rests directly centered under the crank,the distance from the strait edge to the lower front oil pan is the measurement you need,. It's the oil pan that determines thick or thin seal, not the timing cover.
IVE GENERALLY HAD THE BEST RESULTS WITH ONE PIECE OILPAN GASKETS AND USING STUDS
http://www.summitracing.com/parts/mor-38360
http://www.summitracing.com/parts/mor-38350
2-1/4" = thin seal
2-3/8" = thick seal
HERES A BASIC LIST
(SBC)
SMALL BLOCK FELPRO
Fel Pro #375-OS34510T
Replacement Oil Pan Gasket
PermaDryPlus
1975-85 SBC 262-400
Right-hand dipstick
this while deal is not that difficult
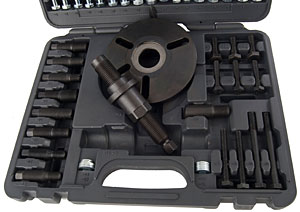
youll obviously need a damper puller tool
http://garage.grumpysperformance.com/index.php?threads/harmonic-balancer.3554/#post-53706
http://garage.grumpysperformance.com/index.php?threads/damper-honing.4975/#post-13912
http://www.jegs.com/i/JEGS-Performance-Products/555/W89711/10002/-1
Fel Pro #375-1880
H/P Oil Pan Gasket
PermaDryPlus
1975-79 SBC 262-400 (side rails cut for Strokers)
9/64" thick
Thick Front Seal
Left-hand dipstick
Fel Pro #375-1881
H/P Oil Pan Gasket
PermaDryPlus
1980-85 SBC 262-400 (side rails cut for Strokers)
9/64" thick
Thick Front Seal
Right-hand dipstick
Fel Pro #375-1882
H/P Oil Pan Gasket
PermaDryPlus
SB-Chevy & race blocks with straight side rails
9/64" thick
Thick Front Seal
Fel Pro #375-1885
H/P Oil Pan Gasket
PermaDryPlus
1957-74 SBC 262-400
9/64" thick
Thin Front Seal
Left-hand dipstick
Fel Pro #375-OS-34509T
Replacement Oil Pan Gasket
PermaDryPlus
1957-74 SBC 262-400
Thin Front Seal
Left-hand dipstick
Fel Pro #375-OS34500R
Replacement Oil Pan Gasket
Rubber-coated/steel core
1986-99 SBC 305-350
Fel Pro #375-OS34510T
Replacement Oil Pan Gasket
PermaDryPlus
1975-85 SBC 262-400
Right-hand dipstick
HERES A BASIC LIST
(BBC)
Fel Pro #375-1884R
H/P Oil Pan Gasket
PermaDryPlus
1965-90 BBC 396-454
3/32" thick
Fel Pro #375-OS34407R
Replacement Oil Pan Gasket
Rubber-coated/steel core
1991-2000 BBC 454
Fel Pro #375-1893 (THREE PIECE)
H/P Oil Pan Gasket
Rubber-coated/steel core
1965-90 BBC 396-454
1991-Up BBC 454-572
Side rails cut to clear rods
Fel Pro #375-1863
Replacement Oil Pan Gasket
Rubber-coated multipiece
Donovan-Merlin blocks
BIG BLOCK MOPAR
Fel Pro #375-1834
H/P Oil Pan Gasket
Rubber-coated/steel core
1958-79 361-440 & Hemi
3/32" thick
http://www.jegs.com/webapp/wcs/stores/s ... 4_-1_10197
http://www.jegs.com/i/Milodon/697/41000/10002/-1
TWO PIECE REAR SEAL
OS34509T: Thin seal
OS34510T: Thick seal
BOTH LEFT HAND DIPSTICK
looks like you need the #OS34509T: Thin seal,if you need a thin front seal
but that only comes in left hand
so you might be forced to use
the older 4 piece design if you need a thin seal and right hand dip stick
Right-hand dipstick
375-1818
have the Felpro catalog and they show 5 SBC one piece gasket part numbers:
PN1881 1980-85 thick front seal RH dipstick; side rails trimmed for strokers
PN1880 1975-79 thick front seal LH dipstick; side rails trimmed for strokers
PN1885 1957-74 thin front seal LH dipstick
PN1882 Thick front seal straight side rails; side rails trimmed for strokers
PN1886 1986-97 thick front seal, one 1pc rear main seal GM bowtie short deck block
________
per jegs #'s FEL-PRO SMALL BLOCK CHEVY
1957-1975 1 piece 37.99 #1885
1986-1997 1 piece 39.99 #1886
MR.GASKET SMALL BLOCK CHEVY
1975-1985 1 piece 27.99 #6560
1986-1996 1 piece 27.99 #6561
http://www.jegs.com/webapp/wcs/stores/s ... 2_47050_-1
one-piece main seal blocks use this one:
OS34500R
Which type you use is dependent on your oil pan, not the block or timing cover.
BBC LISTED ALSO
http://www.jegs.com/webapp/wcs/stores/s ... 4_-1_10197
http://store.summitracing.com/egnsearch ... 5&y=8&x=43
http://garage.grumpysperformance.co...main-seal-in-a-gen-i-chevy-v8.1718/#post-4257
keep in mind on big blocks theres mark IV, mark V and MARK VI oil pan gaskets
Grumpy, what should you torque the bolts to and in what pattern?
this should help, (I generally snug the bolts up on the oil pan by feel and don,t over tighten them, and I generally use a small 1/4" drive ratchet to do so, not a tq wrench, (I think its 14-15 ft lbs or 165-170 inch lbs if you want to get technical) Im sure theres a specification, your supposed to use but Ive seldom had any problems just snugging them up by the feel with a short 1/4" drive ratchet.) I generally tighten in stages and constantly circle the pattern, I think the main problem occur when guys OVER TIGHTEN and crush the gaskets, snug but not tight works, if the gaskets being squished out noticeably between the block and pan lip, your more than likely over tightening the bolts, heres where experience comes into play, if your not sure use a inch rated tq wrench at 170 inch lbs
http://www.digitalcorvettes.com/forums/showthread.php?t=81323
http://www.small-block-chevy.com/assemblyspec.html
http://www.gmpartsdirect.com/performanc ... D=968.html
http://www.sallee-chevrolet.com/oilsystem/index.cfm
http://garage.grumpysperformance.co...epair-leaking-oil-pan-drain.13652/#post-70344
BTW oil pan rails are flimsy on some oil pans
ID check the oil pan rails are not bent/warped and if you need to use some black silicone sealant, but Ive never yet had that be necessary, most leaks are the result of EITHER the gasket not being seated correctly or over tightening the bolts bending oil pan.
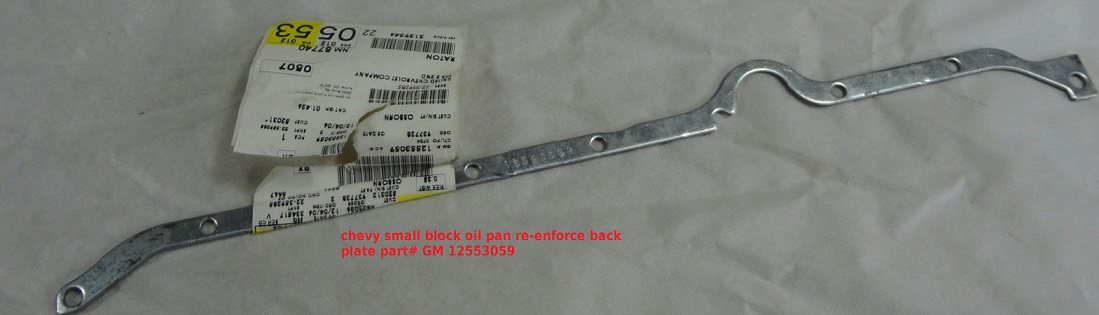
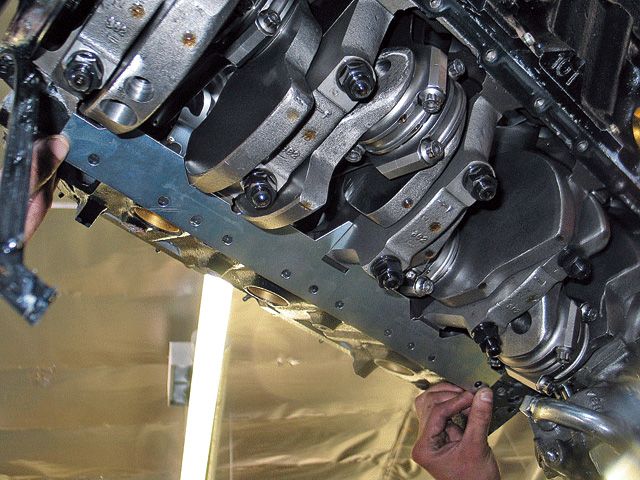
On oil pans I prefer studs, and an oil pan back plate
you might want to Use with P/N 12553058 RH and P/N 12553059 LH oil pan reinforcement plates to distribute the bolt stress on the oil pan rail for 1985 and earlier oil pans P/N 14088501 (LH) and P/N 14088502 (RH).1986 and newer
always use the manufacturers suggested installation instructions, as some applications or gasket types REQUIRE different lubes or sealants but heres a rough guide, you need to carefully clean and degrease any contact areas where sealants are to be used.
heres a rough guide to help select the correct sealants
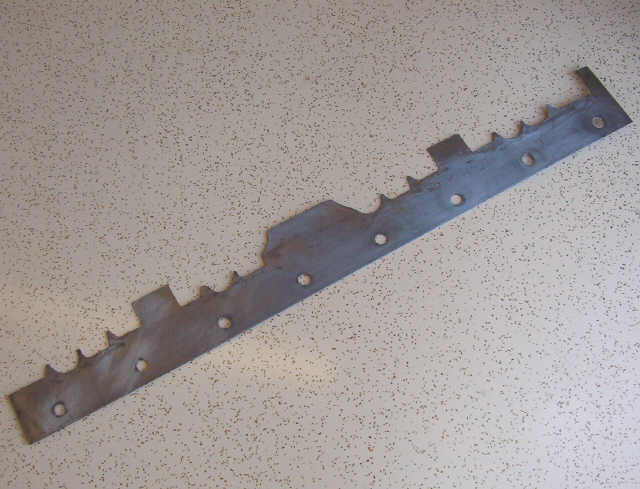
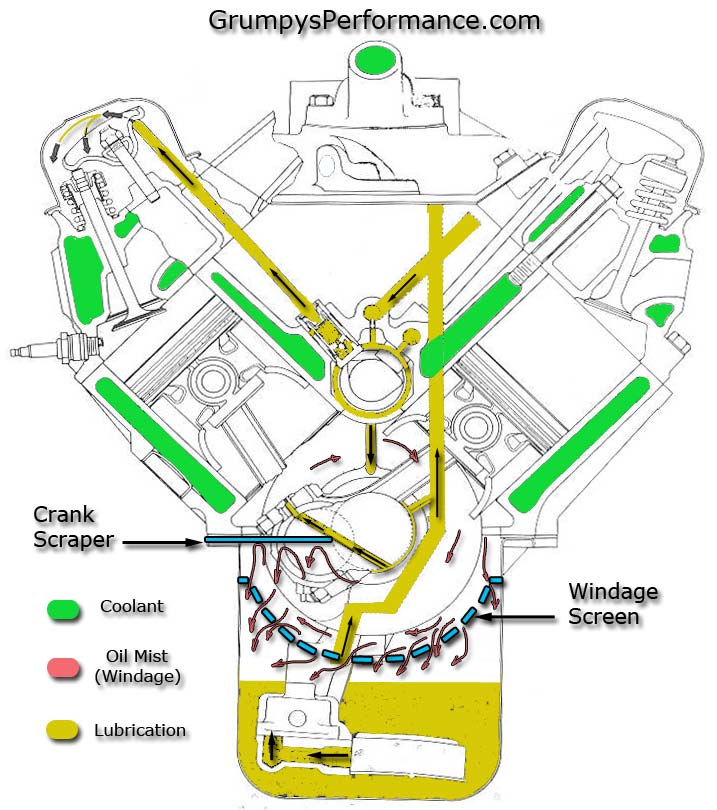
yes any component needs to be properly installed, I've seen something similar happen a few times in the past, (persistent slow oil leaks) when guys were using a crank scraper sandwiched between the oil pan gasket and the block,
when guys simply forgot to spray both of the crank scraper surfaces and the block and gasket surface with some sealant like copper coat. hot oil is DESIGNED and formulated to seep into and through small cracks , and if there's no sealant blocking that hot liquid penetrating oil, it will eventually find its way through micro cracks in the area between two metal surfaces, so you,ll want to coat both sides of the gasket and crank scraper with a thin coat of spray sealant just prior to oil pan assembly
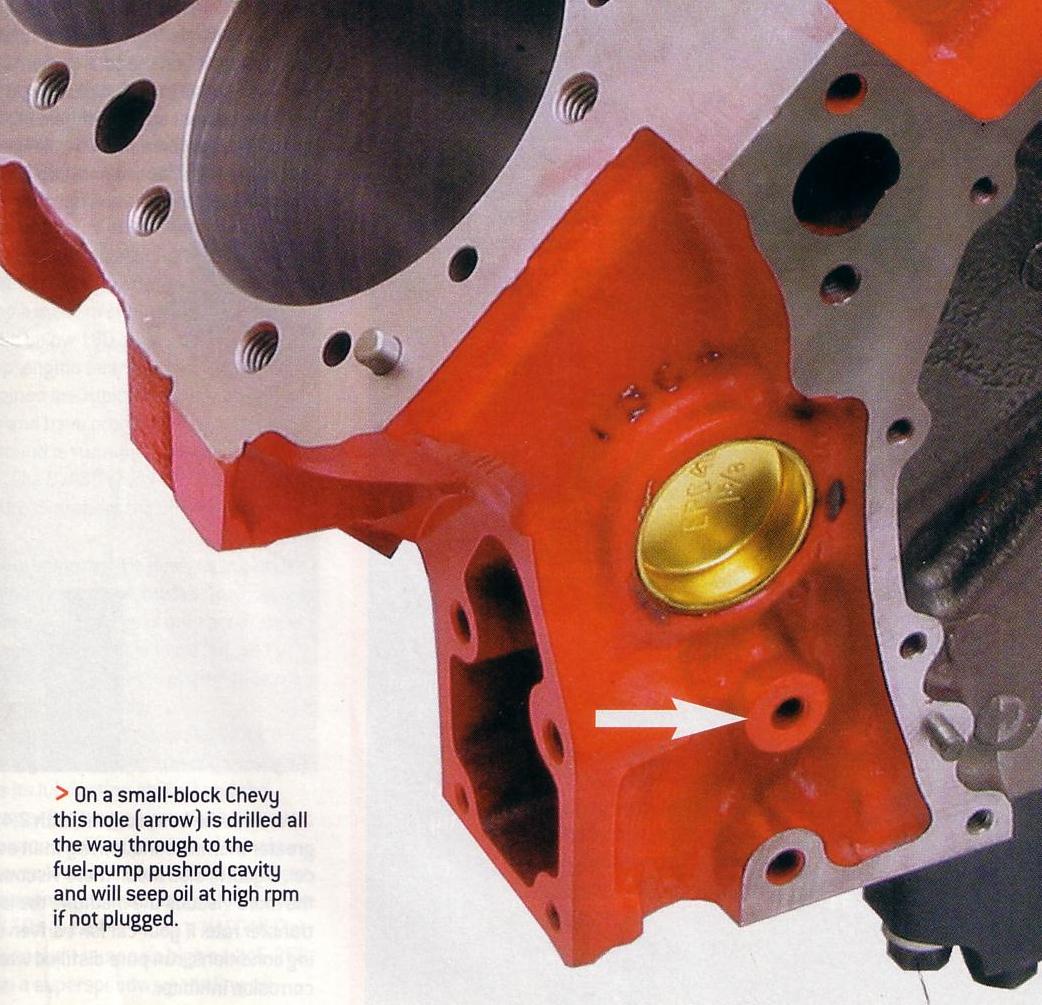
If you find you have an oil leak from the front of a chevy engine don,t assume its the front cover or lower timing cover seal leaking, be damn sure thats where the actual oil leak is, your oil pan and front cover and oil pan gasket being used, may not be properly matched to each other causing the leak, its very easy to buy a universal chevy sbc oil pan that may not match your year block or indicated fron seal but I find in many cases, its the front crank seal OR that common oil leak, from a lose or missing bolt, in the block ( read through all the links) and don,t ignore the fuel pump to block gasket as a potential oil leak point or valve cover of front intake rail gasket
this while deal is not that difficult
youll obviously need a damper puller tool
http://garage.grumpysperformance.com/index.php?threads/harmonic-balancer.3554/#post-53706
http://garage.grumpysperformance.com/index.php?threads/damper-honing.4975/#post-13912
http://www.jegs.com/i/JEGS-Performance-Products/555/W89711/10002/-1
http://garage.grumpysperformance.com/index.php?threads/tracking-down-an-oil-leak.1430/#post-3168
http://garage.grumpysperformance.co...l-pan-gasket-still-small-leak.3084/#post-8194
http://garage.grumpysperformance.com/index.php?threads/oil-pan-gaskets.206/#post-390
http://garage.grumpysperformance.co...ain-seal-in-a-gen-i-chevy-v8.1718/#post-11956
http://garage.grumpysperformance.co...stalling-the-intake-manifold-distributor.464/
http://garage.grumpysperformance.co...pans-that-fit-the-c4-corvette.3071/#post-8131
http://garage.grumpysperformance.co...ece-oil-pan-gasket-thickness.4578/#post-12188
http://garage.grumpysperformance.com/index.php?threads/oil-pan-gaskets.206/#post-1154
http://forum.grumpysperformance.com/viewtopic.php?f=51&t=1718&p=4257&hilit=+rear+seal#p4257
http://garage.grumpysperformance.co...ain-seal-in-a-gen-i-chevy-v8.1718/#post-33369
http://garage.grumpysperformance.co...-pan-gasket-still-small-leak.3084/#post-11971
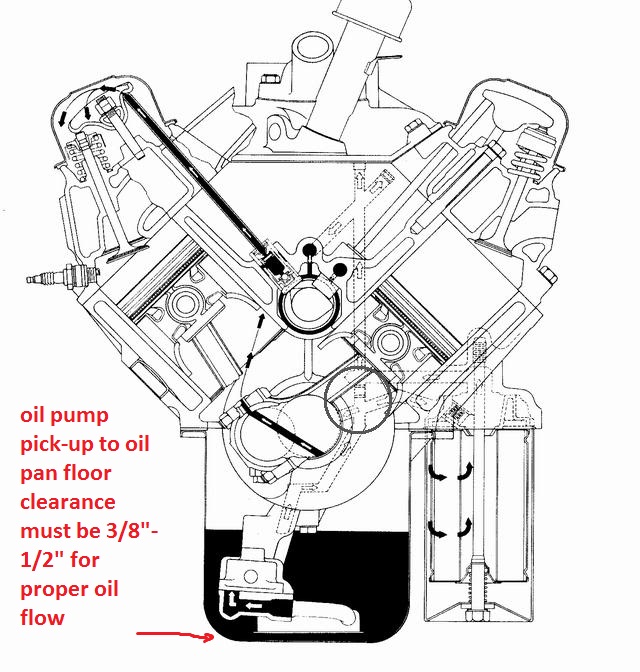
http://garage.grumpysperformance.co...ling-an-oil-pump-pick-up-tube.1800/#post-4597
http://garage.grumpysperformance.co...oving-gaskets-the-wrong-way.10464/#post-43934
http://garage.grumpysperformance.com/index.php?threads/which-sealant-goes-where.700/#post-43768


")