You are using an out of date browser. It may not display this or other websites correctly.
You should upgrade or use an alternative browser.
You should upgrade or use an alternative browser.
Unforgiven Project
- Thread starter Unforgiven
- Start date
I remembered, I have Unforgiven's phone number so I texted him.
He is busy on the honey do list or there will be NO funds for the truck come this winter if he is
not finished. He is moving several hundred tons of rock preparing to pour concrete for their
driveway. Fixing facial and draining a pond on their property. He is planning on coming back
when he is done with the list.
JohnHancock
Well-Known Member
Good to hear. I like blown projects.
Unforgiven
solid fixture here in the forum
I'M BACK BOY'S!!!! I was hit hard with that Honey To Do list from hell! Doctor said that it was like coming down with a cold.... just have to let it run its coarse and keep working and I would be fine. He said not to worry cause most men get hit with it sooner or later. He did recommend a bigger bottle of ADVIL though!
Wife had told me that the truck was on hold till I made good on the list. It started out with installing a sidewalk in front of the house.. Been putting that off since 1998.. haha. Before the sidewalk got poured,I had to install a 60' gutter (put that off also since 98), then i had to dig a 300' thrench and install a pipe for the gutter to drain into, cause the downspout had to drain under the concrete. Then i prepped for a 24' x 30' apron in front of the garage only to find that I had to add 50 ton of crushed concrete and 20 ton of fine gravel to give me a 6" fall from the garage out to the end of the apron. After I got the gravel down and graded I realized that now my driveway which is 300' long...needed to be brought up about 30".... This created a huge finacial problem cause I need 600 more ton of gravel to level it all out. Well ... I convinced her that we should wait till springtime to pour the concrete cause the gravel I just graded out for the apron needed to settle.. If I poured over it now, it would surely crack the apron next year. She agreed and added more to the list... We had to drain our 1 acre pond and rent a backhoe to clean all the fragmitties and cattails out, and rebuild the beach area. That worked out well cause I trailered about 2 hundred yards of pond yuck back to my rifle range hill that needed to be angled in a different direction because some one built a house on the other side of the 40 acre woods that was directly behind the original 800 yard hill I had made back in 1998. I was so concerned when I drained the pond cause I did not want to lose any of the fish that were in there.. I have 30-36" catfish, 5lb largemouth bass, and bluegill the size of my hands.. they are more of my wifes pets than just fish.. she likes to stand on the dock and throw fish pellets out and watch them feed.. so we (my brother) and I were very careful in the cleaning operation..
Well... after a couple weeks the water started to come back up. It was still hot as far as the weather went. I had walked out to the pond after work and noticed that I had two giant alge blooms taking over the pond!!! In my haste to eliminate the bloom...for some reason I had mixed 1/2 gallon of round up, along with Cutrine pond chemical to kill the blooms. I have done this for many years when treating the pond.. Two dats later I was in the kitchen and noticed a huge object out at the ponds edge. So I grabbed my binoculars and seen it was a turkey buzzered. I quickly walked out to see why he was there and discovered all our fish were dead!!!! What a stinking mess that was! After I gathered about what seemed like two hundred pounds of rotten fish and got them burried I looked into what had happened to these 20 year old fish and why they all died. I quickly realized that what I had put in the pond to kill the alge blooms was in a concentrate form !!! Instead of the 2 gallon mix that I had made.. I found that I only was suppose to use a few onces!!! I messed up BIG time!!
I spent all day trying to figure out what I was going to say to the wife,cause I accidently just killed her fish!!!
After banishing me from our bedroom, and the house in general for about a week, she added more to the list....
No man should have to endure the agony of what I have been through! I now have to reside the house cause she is bored with the color of it!
Well ... there were many more smaller P.I.T.A. things that got finished and a few new ones added but I have went as far down the list as I could before winter sets in..come springtime I will finish the driveway and pour that apron. She is very happy with the sidewalk so that gave me some breathing room. The big surprise to me was that she had bought the new parts I needed to put the motor in the truck back together for a birthday I had back in October!!!!
Coty and I have cutt enough wood to heat his house and mine for about two months , so that is out of the way now.
Unforgiven
solid fixture here in the forum
I am definitly feeling my age Rick.LOL
JohnHancock
Well-Known Member
Welcome back! You did a wonderful list with only I booboo!
Unforgiven
solid fixture here in the forum
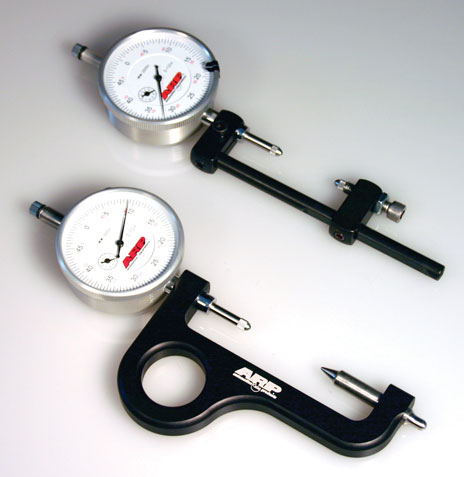
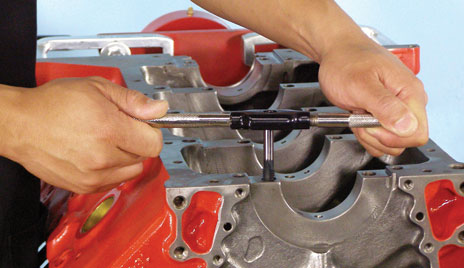
I did get to make a couple new tools in what little spare time I had.
I am taking NO chances of over stretching those rod bolts this time!
I also needed to check and balance my new rods so I made this tool....

Damn thing actually worked really well! I checked it against the known weights I had from the origanal rods and it was spot on!
I am taking NO chances of over stretching those rod bolts this time!
I also needed to check and balance my new rods so I made this tool....
Damn thing actually worked really well! I checked it against the known weights I had from the origanal rods and it was spot on!
Unforgiven
solid fixture here in the forum
Welcome back! You did a wonderful list with only I booboo!
LOL ! Thank you.... That one boo-boo I thought was going to cost my life though! She said that next spring I need to head over to the fish farm and replace the catfish that she enjoyed feeding so much. I have to admit it was kinda neat to see them swimming on top and skimming the surface with their mouths wide open.
Unforgiven
solid fixture here in the forum
What did you use for the scale? Cost much?
Rick , I purchased the scale thru Norther Tool. It measures in lbs, oz's, and grams. It goes up to 5000 grams. The cost was just under $30
Unforgiven
solid fixture here in the forum
I found that if I kept the table a tad loose instead of bottoming out tight, and hot gluing the fixture to the glass table, that the wooden rollers i made would align easier for a repeatable check. It took some getting use to as far as making it all repeat. But I just kept messing around with a known weight on one of the originals until I tuned it for repeatability before attemping to alter the new rods. I am very happy with the setup. I found out how to make it from a You tube vidio.
I have less than $40 into the whole unit.
I have less than $40 into the whole unit.
Unforgiven
solid fixture here in the forum
Thank you Gumpy! I made it out of 3/4" thick aluminum . I have all kinds of indicators in my tool box so it was just a matter of choosing one.
Unforgiven
solid fixture here in the forum
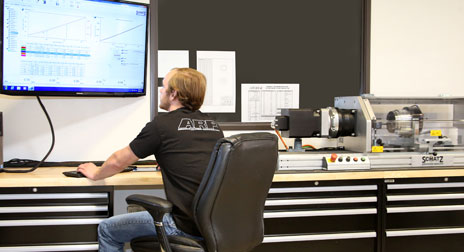
You guys think that was kinda cool.....I had mentioned to Rick through text about a new project I am starting over the winter.
Coty and I have been kicking around this idea of having duplicate mini me trucks to go to the events we attend. Since we have all the required tools,
Tube benders, welders, torches, plasma cutter and such. I am making a machine to duplicate our trucks exactly down to approx 1/4 scale.
This machine will allow me to build a mold for a fiberglass body to install on a fully tube frame suspension that we will fabricate also. We will power it
with small 40hp motor.
Here is a pic of what I have designed up so far. Mind you the design is not complete yet but you can get the idea. I will start a new thread on this project starting with how I build the machine all the way to mini truck completion. OK.. Rick, I can't seem to get the pic to rotate. LOL
Last edited by a moderator:
Unforgiven
solid fixture here in the forum
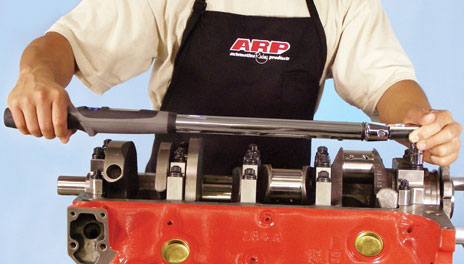
I am starting the rebuild of the motor tonight, and am getting ready to have the rods sent out to be checked and resized. I would greatly appreciate some advice on my thought process concerning the rod bolts.
We all know the last build failed do to an assembly error and I don't want to repeat the mistakes.
I ended up buying two new rods and pistons...among other items.. I also upgraded the rod bolts from ARP 8740 to ARP2000's.
I was on the phone with SCAT and then I called ARP for some info ....this is what they said......
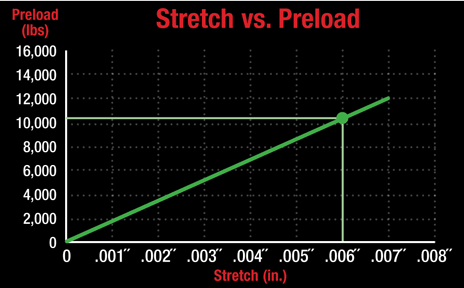
Scat told me that they use TORQUE VALUES (70LBS) to size their big end on the rods. I am not to exceed .005 stretch. They told me I
would likely see a stretch value of between .003 and .004 when torqued to 70 lbs. If I pull past 70lbs I will distort the big end out of round.
Also, if I stretch beyond .005 the bolt would need to be replaced. I asked if the .005 value represented 100% of yield, and he said yes.
HMMM...OK
I then called ARP and wanted a second opinion on the yield point. They could not give me the info because the rod bolts were made to Scats specifications. But... he said that their values where different... than what they make to Scat specs. ARP uses stretch values.
I had mentioned to ARP that being that I have upgraded to the ARP2000 from the 8740 series... I need to resize the rods. He agreed.
My thoughts are ... as I mentioned to ARP... are this.....I HAVE TO RESIZE THE RODS ANYWAY
Scat uses torque to size the rods.... I feel that if .005 stretch is 100% yield before elasticity comes into play and I have to resize the rods anyway...
Why could I not use a stretch gauge and set all the rods to .004 stretch, which would put them at 80% to yield , which would be in the safe zone for the bolt not to go past it's yield when at higher RPMS.?
I would mark and record all the bolts in the relaxed position first, then record the torque value and the placement of each bolt on a log chart for future reference. I can mark the bolt and rod so there would be no doubt as to where it's position was on each rod.
Now by doing this... I feel the clamping force would be even ..... or would it?
Example: on the same rod... one bolt would have taken 70LBS to reach .004 stretch, while the other bolt may take 90LBS to reach .004 stretch.
Would the clamping forces be different because of the torque? Or..would they be the same because of the stretch?
What are your thoughts on this. Am I confusing clamp loads with proof loads?
We all know the last build failed do to an assembly error and I don't want to repeat the mistakes.
I ended up buying two new rods and pistons...among other items.. I also upgraded the rod bolts from ARP 8740 to ARP2000's.
I was on the phone with SCAT and then I called ARP for some info ....this is what they said......
Scat told me that they use TORQUE VALUES (70LBS) to size their big end on the rods. I am not to exceed .005 stretch. They told me I
would likely see a stretch value of between .003 and .004 when torqued to 70 lbs. If I pull past 70lbs I will distort the big end out of round.
Also, if I stretch beyond .005 the bolt would need to be replaced. I asked if the .005 value represented 100% of yield, and he said yes.
HMMM...OK
I then called ARP and wanted a second opinion on the yield point. They could not give me the info because the rod bolts were made to Scats specifications. But... he said that their values where different... than what they make to Scat specs. ARP uses stretch values.
I had mentioned to ARP that being that I have upgraded to the ARP2000 from the 8740 series... I need to resize the rods. He agreed.
My thoughts are ... as I mentioned to ARP... are this.....I HAVE TO RESIZE THE RODS ANYWAY
Scat uses torque to size the rods.... I feel that if .005 stretch is 100% yield before elasticity comes into play and I have to resize the rods anyway...
Why could I not use a stretch gauge and set all the rods to .004 stretch, which would put them at 80% to yield , which would be in the safe zone for the bolt not to go past it's yield when at higher RPMS.?
I would mark and record all the bolts in the relaxed position first, then record the torque value and the placement of each bolt on a log chart for future reference. I can mark the bolt and rod so there would be no doubt as to where it's position was on each rod.
Now by doing this... I feel the clamping force would be even ..... or would it?
Example: on the same rod... one bolt would have taken 70LBS to reach .004 stretch, while the other bolt may take 90LBS to reach .004 stretch.
Would the clamping forces be different because of the torque? Or..would they be the same because of the stretch?
What are your thoughts on this. Am I confusing clamp loads with proof loads?
Unforgiven
solid fixture here in the forum
Thanks for rotating the pic Rick..LOL
Your torque values will be closer together if you torque every bolt 5-6 times before doing your final torque. This smooths out any burrs on the threads, you will have more consistent torque values. Also using the ARP moly grease will help. This might put your mind at ease just a little.
But the final say is the bolt stretch.

https://arp-bolts.com/p/technical.php [ Click on the "Installation" tab ]
Fastener Installation Overview
The importance of tightening fasteners to their required preload cannot be emphasized enough. If a fastener is not tightened properly, the fastener will not apply the required preload on the application it is being used for and may become susceptible to failure. Conversely, if a fastener is overtightened and stretched too much, it becomes susceptible to failure by exceeding it's maximum yield point. There are three generally accepted methods employed to determine how much tension is exerted on a fastener:
The Stretch Factor
It is important to note that in order for a fastener to function properly it must be "stretched" a specific amount. The material's ability to "rebound" like a spring is what provides the clamping force. If you were to simply "finger-tighten" a bolt there would be no preload. However, when you apply torque or rotate a fastener a specific amount and stretch it, you will be applying clamping force. The amount of force or preload you can achieve from any bolt or stud depends on the material being used and its ductility, the heat treat, and the diameter of the fastener. Of course, every fastener has a "yield" point! The yield point or yield strength of a fastener is the point at which the fastener has been overtightened and stretched too much, and will not return to its original manufactured length. As a rule of thumb, if you measure a fastener and it is .0005˝ (or more) longer than its original length it has been compromised and must be replaced.
Another factor that must be considered is heat! Heat, primarily in aluminum, is another problem area. Because the thermal expansion rate of aluminum is far greater than that of steel it is possible to stretch a fastener beyond yield as the aluminum expands under heat. An effective way of counteracting material expansion is through producing a more flexible bolt.
Using a Stretch Gauge
We highly recommend using a stretch gauge when installing rod bolts and other fasteners, where it is possible to measure the length of the fastener. It is the most accurate way of measuring preload of any bolt. Simply follow manufacturer's instructions, or use the chart in the our catalog for ARP rod bolts.
When using a stretch gauge it's best to measure the fastener prior to starting and monitor overall length during installation. When the bolt has stretched a specified amount, the correct preload or clamping force has been applied. We recommend that you maintain a chart of all rod bolts and make a note of the fastener length prior to installation and after any disassembly. If there is a permanent increase of .0005˝ or more in length, there is a deformation and the bolt should be replaced. You can download a sample rod bolt stretch monitoring chart by clicking here.
Using a Torque Wrench
There are a number of things to consider when using a torque wrench. The "friction factor" changes from one cycle to the next. That is, friction is at its highest value when the fastener is first tightened. Each subsequent time the fastener is torqued and loosened, the amount of friction lessens. Eventually the friction levels out and becomes fairly consistent for all following repetitions.
Three basic elements that contribute to the friction factor:
The Lubricant is the Key
The main factor in determining friction in a threaded fastener is the lubricant used, and therefore influences the torque required for a particular installation. One of the most overlooked aspects of choosing a fastener assembly lubricant is…the lubricant's ability to "control" the normal function of friction inherent in all high performance engine fasteners. As discussed earlier in this section, friction is at its highest point when a new fastener is first tightened. This "friction" inhibits the fasteners ability to achieve the required preload on the first several cycles. In fact, ARP's in-house Research and Development department has proven that new fasteners using motor oil and other commonly used lubricants such as Moly and EPL typically require 5-7 cycles before final torquing to level out the initial friction and achieve the required preload. Slicker lubricants may reduce the required torque by as much as 20-30% to achieve the desired preload, but compromise in areas of major importance such as preload repeatability, and may yield the fastener prematurely. Typically, the slicker the lubricant, the greater the "preload scatter" or preload error there will be during installation.
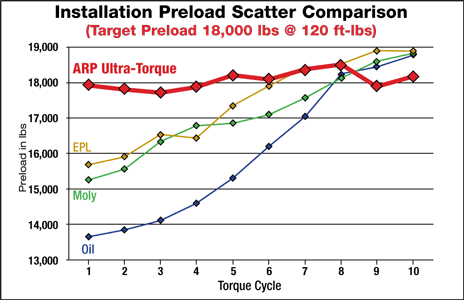
The bottom line: Preload repeatability and preload consistency from a fastener to fastener perspective, should be the number one consideration when choosing a fastener assembly lubricant. Remember even the best fastener is only as good as its installation. Preload repeatability is the foundation for maintaining round housing bores, and preload consistency ensures the same preload from one fastener to another across a large area, such as the deck surface of a cylinder block. These two fundamentals are the cornerstone of every successful fastener installation and that's why ARP's engineering team set out to develop the "ultimate" fastener lubricant. The result of several years of extensive R&D is a remarkable new assembly lube called ARP Ultra-Torque®. As shown in the graph above, ARP Ultra-Torque® clearly provides the repeatability and preload consistency that no other fastener assembly lubricant on the market can provide today.
Fastener Surface Finish and Condition of Receiving Threads
In addition to the lubricant used, friction is affected by the surface finish of the fastener itself and the condition of the receiving threads. For example, black oxide behaves differently than a polished fastener so it’s important to follow the torque recommendations with each fastener kit. Then there's the very real problem of burrs and debris in the bolt holes that can significantly affect the amount of torque required to achieve the recommended preloads. All bolt holes should be thoroughly cleaned using special "Chaser Taps" to optimize the threads before installation.
Torque Wrench Accuracy

It is possible for even the most expensive torque wrenches to lose accuracy over time. Rough use or repeated loosening of fasteners using your torque wrench as a "breaker bar" will exacerbate the loss of accuracy. In fact, ARP field technicians have seen a wide range of torque wrench reading errors as much as 15-30%. This just emphasizes the importance of treating torque wrenches with the utmost of respect and having them checked periodically for accuracy.
The Torque Angle Method
Since the amount that a bolt or nut advances on the thread per degree of rotation is determined by the thread pitch, it would appear that any amount of stretch in a given bolt or stud can be accurately predicted be measuring the degrees of turn from the point where the underside of the bolt head or nut face contacts the work surface. Termed the "torque angle" method, this procedure has long been the standard of civil engineering. It has been suggested that torque angle is a relatively simple and valid procedure to use in "blind" installations—where it is not possible to physically measure the actual bolt stretch.
ARP has conducted extensive evaluations of the torque angle method, and concluded that – for high performance engine applications – it is suitable only when calibrated for each installation.
Our investigation has proven that installed stretch is dependent not only on the pitch of the thread and the degree of rotation, but also on the amount of compression of the clamped components, the type of lubrication, the length of the male fastener, and the amount of engaged thread. It's important to note that for the same degree of rotation, the amount of bolt stretch will be critically different between an aluminum or cast iron cylinder head, or when installing a steel main cap on a cast iron or aluminum block. Furthermore, there is a significant difference in stretch between the long and short cylinder head bolts or studs on the same head. The torque angle method can be accurate – but only if each individual application has been previously calibrated by direct measurement of bolt stretch. If you do employ the torque angle method, it's best to begin calibrating rotation from some small measured torque rather than the first point of contact with the work face. To achieve optimum accuracy, always use ARP Ultra-Torque® fastener assembly lubricant whenever possible.
Click here to download a printable rod bolt stretch monitoring chart
But the final say is the bolt stretch.
https://arp-bolts.com/p/technical.php [ Click on the "Installation" tab ]
Fastener Installation Overview
The importance of tightening fasteners to their required preload cannot be emphasized enough. If a fastener is not tightened properly, the fastener will not apply the required preload on the application it is being used for and may become susceptible to failure. Conversely, if a fastener is overtightened and stretched too much, it becomes susceptible to failure by exceeding it's maximum yield point. There are three generally accepted methods employed to determine how much tension is exerted on a fastener:
- Using a torque wrench
- Measuring the amount of stretch
- Torque angle (rotating the fastener a predetermined amount)
The Stretch Factor
It is important to note that in order for a fastener to function properly it must be "stretched" a specific amount. The material's ability to "rebound" like a spring is what provides the clamping force. If you were to simply "finger-tighten" a bolt there would be no preload. However, when you apply torque or rotate a fastener a specific amount and stretch it, you will be applying clamping force. The amount of force or preload you can achieve from any bolt or stud depends on the material being used and its ductility, the heat treat, and the diameter of the fastener. Of course, every fastener has a "yield" point! The yield point or yield strength of a fastener is the point at which the fastener has been overtightened and stretched too much, and will not return to its original manufactured length. As a rule of thumb, if you measure a fastener and it is .0005˝ (or more) longer than its original length it has been compromised and must be replaced.
Another factor that must be considered is heat! Heat, primarily in aluminum, is another problem area. Because the thermal expansion rate of aluminum is far greater than that of steel it is possible to stretch a fastener beyond yield as the aluminum expands under heat. An effective way of counteracting material expansion is through producing a more flexible bolt.
Using a Stretch Gauge
We highly recommend using a stretch gauge when installing rod bolts and other fasteners, where it is possible to measure the length of the fastener. It is the most accurate way of measuring preload of any bolt. Simply follow manufacturer's instructions, or use the chart in the our catalog for ARP rod bolts.
When using a stretch gauge it's best to measure the fastener prior to starting and monitor overall length during installation. When the bolt has stretched a specified amount, the correct preload or clamping force has been applied. We recommend that you maintain a chart of all rod bolts and make a note of the fastener length prior to installation and after any disassembly. If there is a permanent increase of .0005˝ or more in length, there is a deformation and the bolt should be replaced. You can download a sample rod bolt stretch monitoring chart by clicking here.
Using a Torque Wrench
There are a number of things to consider when using a torque wrench. The "friction factor" changes from one cycle to the next. That is, friction is at its highest value when the fastener is first tightened. Each subsequent time the fastener is torqued and loosened, the amount of friction lessens. Eventually the friction levels out and becomes fairly consistent for all following repetitions.
Three basic elements that contribute to the friction factor:
- Most importantly - The fastener assembly lubricant
- The condition of the receiving threads
- The surface finish of the fastener
The Lubricant is the Key
The main factor in determining friction in a threaded fastener is the lubricant used, and therefore influences the torque required for a particular installation. One of the most overlooked aspects of choosing a fastener assembly lubricant is…the lubricant's ability to "control" the normal function of friction inherent in all high performance engine fasteners. As discussed earlier in this section, friction is at its highest point when a new fastener is first tightened. This "friction" inhibits the fasteners ability to achieve the required preload on the first several cycles. In fact, ARP's in-house Research and Development department has proven that new fasteners using motor oil and other commonly used lubricants such as Moly and EPL typically require 5-7 cycles before final torquing to level out the initial friction and achieve the required preload. Slicker lubricants may reduce the required torque by as much as 20-30% to achieve the desired preload, but compromise in areas of major importance such as preload repeatability, and may yield the fastener prematurely. Typically, the slicker the lubricant, the greater the "preload scatter" or preload error there will be during installation.
The bottom line: Preload repeatability and preload consistency from a fastener to fastener perspective, should be the number one consideration when choosing a fastener assembly lubricant. Remember even the best fastener is only as good as its installation. Preload repeatability is the foundation for maintaining round housing bores, and preload consistency ensures the same preload from one fastener to another across a large area, such as the deck surface of a cylinder block. These two fundamentals are the cornerstone of every successful fastener installation and that's why ARP's engineering team set out to develop the "ultimate" fastener lubricant. The result of several years of extensive R&D is a remarkable new assembly lube called ARP Ultra-Torque®. As shown in the graph above, ARP Ultra-Torque® clearly provides the repeatability and preload consistency that no other fastener assembly lubricant on the market can provide today.
Fastener Surface Finish and Condition of Receiving Threads
In addition to the lubricant used, friction is affected by the surface finish of the fastener itself and the condition of the receiving threads. For example, black oxide behaves differently than a polished fastener so it’s important to follow the torque recommendations with each fastener kit. Then there's the very real problem of burrs and debris in the bolt holes that can significantly affect the amount of torque required to achieve the recommended preloads. All bolt holes should be thoroughly cleaned using special "Chaser Taps" to optimize the threads before installation.
Torque Wrench Accuracy
It is possible for even the most expensive torque wrenches to lose accuracy over time. Rough use or repeated loosening of fasteners using your torque wrench as a "breaker bar" will exacerbate the loss of accuracy. In fact, ARP field technicians have seen a wide range of torque wrench reading errors as much as 15-30%. This just emphasizes the importance of treating torque wrenches with the utmost of respect and having them checked periodically for accuracy.
The Torque Angle Method
Since the amount that a bolt or nut advances on the thread per degree of rotation is determined by the thread pitch, it would appear that any amount of stretch in a given bolt or stud can be accurately predicted be measuring the degrees of turn from the point where the underside of the bolt head or nut face contacts the work surface. Termed the "torque angle" method, this procedure has long been the standard of civil engineering. It has been suggested that torque angle is a relatively simple and valid procedure to use in "blind" installations—where it is not possible to physically measure the actual bolt stretch.
ARP has conducted extensive evaluations of the torque angle method, and concluded that – for high performance engine applications – it is suitable only when calibrated for each installation.
Our investigation has proven that installed stretch is dependent not only on the pitch of the thread and the degree of rotation, but also on the amount of compression of the clamped components, the type of lubrication, the length of the male fastener, and the amount of engaged thread. It's important to note that for the same degree of rotation, the amount of bolt stretch will be critically different between an aluminum or cast iron cylinder head, or when installing a steel main cap on a cast iron or aluminum block. Furthermore, there is a significant difference in stretch between the long and short cylinder head bolts or studs on the same head. The torque angle method can be accurate – but only if each individual application has been previously calibrated by direct measurement of bolt stretch. If you do employ the torque angle method, it's best to begin calibrating rotation from some small measured torque rather than the first point of contact with the work face. To achieve optimum accuracy, always use ARP Ultra-Torque® fastener assembly lubricant whenever possible.
Click here to download a printable rod bolt stretch monitoring chart
Unforgiven
solid fixture here in the forum
I do use that ARP ultra torque.. The torque values I used above were for an example.
Rick... are you agreeing with me that it is better to achieve an equal stretch on each bolt , and disregard the torque wrench?
Rick... are you agreeing with me that it is better to achieve an equal stretch on each bolt , and disregard the torque wrench?