Loves302Chevy
"One test is worth a thousand expert opinions."
1984 Trans Am - problems killed the newly built 334 engine after only 19,000 miles when I parked it 15 years ago. Removed engine New Year's Eve 2013 (almost 2 years ago) and have been resurrecting it since.
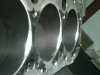
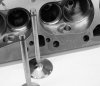
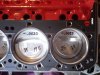
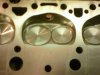
Long story short: the Total Seal rings never sealed, the engine developed what sounded like a lifter tick that I never could find, and eventually shavings from the failed camshaft and lifters went through the engine and chewed up the oil pump, imbedded in all of the bearings and pistons skirts, and put vertical grooves in the cylinder walls - causing the engine to spray oil out of the tailpipe. The crankshaft needed grinding, and the connecting rods will have to be checked because the bearings fall out of cylinders 2-7 - only 1 and 8 still hold themselves in the rod. DETONATION IS THE CAUSE OF THE ROD BEARINGS LOSING THEIR CRUSH - ESPECIALLY ON THE UPPER (ROD) HALF. (A .002" hone on the rods' big end and special bearings solved this.) Also, all of the valve lock grooves were hammered, even on lifters & lobes that still looked fine. I found that the retainers were hitting the valve seals. My heads were not what I ordered. They are World Products S/R Torquer 305 heads that I ordered gasket-matched. That was correct, but 15 years later I found that they had 2.02 and 1.6 valves and some poor choice, really thick valve seals that did not fit the guide properly. But these came from RHS, so I figured that they know more than I did and bolted them on.
For more info, see these past posts:
http://garage.grumpysperformance.co...e-stock-oil-pan-on-gen1-sbc.10211/#post-40892
http://garage.grumpysperformance.com/index.php?threads/not-your-grandmothers-305-chevy-heads.10178/
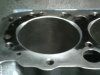
I dingle ball honed the block and notched the tops of the bores, plucked the grit from the piston skirts, grooved the lifter bores, and did many oiling system mods.
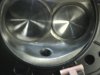
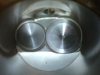
So for this time around, I used Delphi/Eaton chilled iron face hydraulic tappets, switched from Total Seal rings to Hastings Moly, changed from all 1.6 to 1.6 I / 1.5 E roller tip rockers, and the heads got new valve guide liners, new SS valves, a valve seat touchup, and 6 months of porting & polishing.
The 334 combo: .030 over 305 block (.005 deck), 2 pc seal Renegade 383 cast steel crank, Lunati LHA1 4340 5.7" bushed street/race rods (good for 450 HP @ 7000 rpm), Keith Black KB186 Hyperutectic 10 to1 pistons, Hastings Moly rings, 8" Streetdamper (external), and .035 thicker SFI 153 tooth flexplate with counter-balance plate added, Crane Powermax 2050 (formerly CompuCam) hydraulic flat-tappet: http://www.cranecams.com/product/cart.p ... il&p=23791, 1.6 / 1.5 roller-tip rockers, Weiand 8000 intake, and (will be) Edelbrock 1904 Quadrajet carb (modified by myself with help and parts from Cliff's HP).
The car is a 1984 TransAm (4000#) with turbo 700R4, either a 2050 or 2200 rpm converter, 4.10 posi, and 28" tires.
Break-in oil was 5 quarts of SM Castrol HD30 plus an 8 oz bottle of Crane Cams Superlube.
12/06/2015 334 rev. 2.0 Break-In on engine test stand
header mufflers only – but it was remarkably quiet
Engine fired immediately and rpm brought up to 2900 rpm with 32° total timing. Oil pressure was 45 psi (HOT).
Was very uneventful – no leaks, knocks, ticks, or strange sounds. Just possibly a very small rocker arm tick in the area of cyl #7. Ran this way for 20 minutes, then backing the speed down in steps approaching IDLE over the next 25 minutes. Engine vacuum was a rock steady 22” and the engine was really smooth and VERY RESPONSIVE to the throttle (rev limiter at 3200 rpm). Vacuum stayed at 22” until about 1100 rpm where the centrifugal advance was minimal and the vacuum finally began to drop. With a slightly fluctuating IDLE of 850 rpm and the initial timing now set to 12°, the vacuum hovered around 16” and the lope from the camshaft was revealed. At this idle and with the turbo mufflers slid on, you could now hear the rocker arm tick at #7 better. Edelbrock 1406 carb (from 302) mixture screws turned in ½ turn each (was 2 ¼) and only the idle speed screw was adjusted. With turbo mufflers added, screws are at 1 ½ turns each.
While checking the dipstick after I was done, as I wiped the stick, the paper towel showed very shiny metallic looking bits. It was the chrome flaking off the stick. So, I drained and strained the oil. Aside from being dark from the cam and moly lubes, there was NOTHING in it – not even on the Neodymium magnetic drain plug. Changed to original dipstick. Heated Elgin valve springs in oven to 235°F and soaked them in the drained and 2 times strained break-in oil before dumping it back into the engine. Second run will be after I do a compression test, tighten #7 tick, and make sure all the pushrods are rotating.. Third run will be after I change over to the running valve springs.
Desktop Dyno/Drag 2003 says 399 hp @ 6000, 405 TQ @ 4500, and qtr mile of 13.004 sec at 112.5 mph.
Thanks to Grumpy, Randy, 87vette81big, and all who gave me invaluable advice. Hey Grumpy, I did read all those links you sent and used nearly all of your advice, as well as a few tricks of my own. BTW, I also have that 3" neodymium magnet stuck to the end of my oil filter.
Long story short: the Total Seal rings never sealed, the engine developed what sounded like a lifter tick that I never could find, and eventually shavings from the failed camshaft and lifters went through the engine and chewed up the oil pump, imbedded in all of the bearings and pistons skirts, and put vertical grooves in the cylinder walls - causing the engine to spray oil out of the tailpipe. The crankshaft needed grinding, and the connecting rods will have to be checked because the bearings fall out of cylinders 2-7 - only 1 and 8 still hold themselves in the rod. DETONATION IS THE CAUSE OF THE ROD BEARINGS LOSING THEIR CRUSH - ESPECIALLY ON THE UPPER (ROD) HALF. (A .002" hone on the rods' big end and special bearings solved this.) Also, all of the valve lock grooves were hammered, even on lifters & lobes that still looked fine. I found that the retainers were hitting the valve seals. My heads were not what I ordered. They are World Products S/R Torquer 305 heads that I ordered gasket-matched. That was correct, but 15 years later I found that they had 2.02 and 1.6 valves and some poor choice, really thick valve seals that did not fit the guide properly. But these came from RHS, so I figured that they know more than I did and bolted them on.
For more info, see these past posts:
http://garage.grumpysperformance.co...e-stock-oil-pan-on-gen1-sbc.10211/#post-40892
http://garage.grumpysperformance.com/index.php?threads/not-your-grandmothers-305-chevy-heads.10178/
I dingle ball honed the block and notched the tops of the bores, plucked the grit from the piston skirts, grooved the lifter bores, and did many oiling system mods.
So for this time around, I used Delphi/Eaton chilled iron face hydraulic tappets, switched from Total Seal rings to Hastings Moly, changed from all 1.6 to 1.6 I / 1.5 E roller tip rockers, and the heads got new valve guide liners, new SS valves, a valve seat touchup, and 6 months of porting & polishing.
The 334 combo: .030 over 305 block (.005 deck), 2 pc seal Renegade 383 cast steel crank, Lunati LHA1 4340 5.7" bushed street/race rods (good for 450 HP @ 7000 rpm), Keith Black KB186 Hyperutectic 10 to1 pistons, Hastings Moly rings, 8" Streetdamper (external), and .035 thicker SFI 153 tooth flexplate with counter-balance plate added, Crane Powermax 2050 (formerly CompuCam) hydraulic flat-tappet: http://www.cranecams.com/product/cart.p ... il&p=23791, 1.6 / 1.5 roller-tip rockers, Weiand 8000 intake, and (will be) Edelbrock 1904 Quadrajet carb (modified by myself with help and parts from Cliff's HP).
The car is a 1984 TransAm (4000#) with turbo 700R4, either a 2050 or 2200 rpm converter, 4.10 posi, and 28" tires.
Break-in oil was 5 quarts of SM Castrol HD30 plus an 8 oz bottle of Crane Cams Superlube.
12/06/2015 334 rev. 2.0 Break-In on engine test stand
header mufflers only – but it was remarkably quiet
Engine fired immediately and rpm brought up to 2900 rpm with 32° total timing. Oil pressure was 45 psi (HOT).
Was very uneventful – no leaks, knocks, ticks, or strange sounds. Just possibly a very small rocker arm tick in the area of cyl #7. Ran this way for 20 minutes, then backing the speed down in steps approaching IDLE over the next 25 minutes. Engine vacuum was a rock steady 22” and the engine was really smooth and VERY RESPONSIVE to the throttle (rev limiter at 3200 rpm). Vacuum stayed at 22” until about 1100 rpm where the centrifugal advance was minimal and the vacuum finally began to drop. With a slightly fluctuating IDLE of 850 rpm and the initial timing now set to 12°, the vacuum hovered around 16” and the lope from the camshaft was revealed. At this idle and with the turbo mufflers slid on, you could now hear the rocker arm tick at #7 better. Edelbrock 1406 carb (from 302) mixture screws turned in ½ turn each (was 2 ¼) and only the idle speed screw was adjusted. With turbo mufflers added, screws are at 1 ½ turns each.
While checking the dipstick after I was done, as I wiped the stick, the paper towel showed very shiny metallic looking bits. It was the chrome flaking off the stick. So, I drained and strained the oil. Aside from being dark from the cam and moly lubes, there was NOTHING in it – not even on the Neodymium magnetic drain plug. Changed to original dipstick. Heated Elgin valve springs in oven to 235°F and soaked them in the drained and 2 times strained break-in oil before dumping it back into the engine. Second run will be after I do a compression test, tighten #7 tick, and make sure all the pushrods are rotating.. Third run will be after I change over to the running valve springs.
Desktop Dyno/Drag 2003 says 399 hp @ 6000, 405 TQ @ 4500, and qtr mile of 13.004 sec at 112.5 mph.
Thanks to Grumpy, Randy, 87vette81big, and all who gave me invaluable advice. Hey Grumpy, I did read all those links you sent and used nearly all of your advice, as well as a few tricks of my own. BTW, I also have that 3" neodymium magnet stuck to the end of my oil filter.
Attachments
-
 SUNP0013.jpg850.2 KB · Views: 14
 -
 SUNP0018.jpg839 KB · Views: 12
 -
 SUNP0028.jpg877.6 KB · Views: 11
 -
 SUNP0011.jpg765.7 KB · Views: 10
 -
 SUNP0064.jpg686.3 KB · Views: 12
 -
 porting an S R Torquer head.jpg30.7 KB · Views: 11
 -
 almost there.jpg174.1 KB · Views: 14
 -
 combustion chamber.jpg153.4 KB · Views: 11
 -
 geometry zero lift.jpg162.1 KB · Views: 12
 -
 geometry max lift.jpg151.8 KB · Views: 15