Valve, Spring and Seal Removal

Indycars

Administrator
Staff member

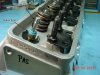
The edge of the valve that interfaces with the keeper is very sharp and I want to remove the valve. Should I just pull the valve thru the seal, fully expecting to replace it or should the sharp edge be removed???

Also how do you remove the seal ??? Now I assume I could just grab it with some pliers and carefully remove it, but is there a better way ???


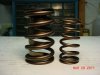
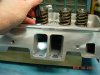
Seems I remember some valve springs have coils that are closer together on one end. Do they still do that ???
After looking at these springs, I can't detect anything that would indicate a top or bottom to them, anything I should be aware of when I reassemble the heads ???


Attachments

  • ValveStem&Seal0603.jpg
    ValveStem&Seal0603.jpg
    71.4 KB · Views: 212
  • ValveSpringSideView0599.jpg
    ValveSpringSideView0599.jpg
    40.5 KB · Views: 211
types of valve springs do differ and in a few cases the common strait springs can be assembled either side up, its best to verify with the spring supply source
theres a good deal of related info in the links below

viewtopic.php?f=52&t=4283&p=11290#p11290

viewtopic.php?f=52&t=181

http://www.racingsprings.com/Store/Prod ... egoryID=13

http://www.enginebuildermag.com/Article ... _much.aspx

http://www.carcraft.com/techarticles/vo ... index.html

http://www.jegs.com/p/Comp-Cams/Comp-Ca ... 7/10002/-1

viewtopic.php?f=52&t=1716&p=4250&hilit=beehive#p4250

http://www.cylinderheadsupply.com/valve ... nAodymUULA

http://www.youtube.com/watch?v=PR8cDaum7ss

http://www.cylinderheadsupply.com/valve ... izing.html

http://www.superchevy.com/technical/eng ... index.html

http://www.articleclick.com/Article/Usi ... ool/952814

http://www.streetperformance.com/m/cats ... -tool.html

http://www.phatperformanceparts.com/Pro ... lick=37735

https://www.goodson.com/technical_suppo ... Guides.pdf

http://www.summitracing.com/search/Part ... ing-Tools/
hrs-92040_w.jpg


DS-198921.jpg


Comp Cams Valve Guide Cutting Tool
Upgrading your camshafts to get more horsepower is a good idea. But here's the catch- if you're going to upgrade your camshafts, you have to do so as well for the rest of your valve train, especially the valve guides. The thing is, you're going to need bigger springs to be able to handle your aggressive camshafts. You'll need to modify your valve guides. What you need is the Comp Cams Valve Guide Cutting Tool. What you really want is to shorten your valve guides. This is to accommodate the high valve lift brought by your new camshafts. The shorter the valve guide, the more valve lift and the less stressed your valve springs will be. Professional, or even seasoned street drivers, know all too well the problems associated with improper valve train setup. The more strain you put on your springs, the more likely that they'll bottom out, or worse, even break under high engine speeds. You'll also likely experience 'valve float' wherein your valve springs can't pull back your valves at high rpm's (revolutions per minute), so you lose power. So make sure you set things up correctly with the Comp Cams Valve Guide Cutting Tool. This ultra tough tool works with three different-sized arbors. No matter how many valve guides you go through, this tool will cut them clean as a whistle. No more second guessing with your valve train setup. Do things right the first time around with the Comp Cams Valve Guide Cutting Tool.

http://www.rpmmachine.com/pioneer-valve ... ools.shtml

http://www.jegs.com/i/Comp+Cams/249/4720/10002/-1#

http://www.vtwinmfg.com/catalogs/cyr/pdf/1249.pdf

viewtopic.php?f=52&t=1159&p=2362#p2362

ValveSpringClearance.gif

valvespringinstalled.gif
 
Well if I'm going to replace the valve seals, is there a type or material that's considered to be the best. As long as it doesn't take half on NASA's budget.

I was surprised that I needed a 17mm socket to remove the studs. The threads in the head are 7/16-14 and valve adj thread are 7/16-20. One of the studs I had to tap the socket on with a soft hammer. I tried cleaning up the 17mm surface with a fine file, but it just seems to be a few thousands bigger. The socket still needs help to go all the way over the hex. Makes me wonder if these studs are from China.
 
I suppose it could be, but it's the only 1 out 8 for that head. I measured
trying to get a typical measurement on the suspected stud and another one from the same
head. I came up with about 0.004" difference across the flats, not sure if that's significant or not.

You can see how how much I did with a file, before the measurement you see.
Makes me think about going ahead and ordering the ARP studs. Guess I'll wait and see what I find out about the other head.
----------------------------------------------------------------------------------

Another thing I noticed is that all rocker studs for the intakes are drilled all the way in to the
port. I supposed this is typical, but should I use a sealer or anti-seize compound on the threads ???
 

Attachments

  • DSC00604Resized.JPG
    DSC00604Resized.JPG
    37.9 KB · Views: 195
  • DSC00605Resized.jpg
    DSC00605Resized.jpg
    30.7 KB · Views: 195
  • DSC00606Resized.jpg
    DSC00606Resized.jpg
    36.2 KB · Views: 195
  • DSC00607Resized.jpg
    DSC00607Resized.jpg
    48 KB · Views: 195
some guys use thread locker compound (lock-tite) on those rocker stud threads as it tends to reduce the potential the threads get loose or oil getting sucked thru the threads , and some guys clean and degrease the threaded hole under the studs lower end,,and turn the head up-side-down and use a finger tip load of J&B weld, paste mixed with aluminum dust to plug the lower threaded hole and then after it hardens they dremel the surface in the roof of the intake port to match the current port roof contour but in most cases its not critical, and many guys are hesitant due to the very small potential for the epoxy plug to work loose and fall into the port with the likely major damage result if that ever did happen (never seen or heard of it happening)
 
grumpyvette said:
some guys use thread locker compound (lock-tite) on those rocker stud threads as it tends to reduce the potential the threads get loose or oil getting sucked thru the threads , and some guys clean and degrease the threaded hole under the studs lower end,,and turn the head up-side-down and use a finger tip load of J&B weld, paste mixed with aluminum dust to plug the lower threaded hole and then after it hardens they dremel the surface in the roof of the intake port to match the current port roof contour but in most cases its not critical, and many guys are hesitant due to the very small potential for the epoxy plug to work loose and fall into the port with the likely major damage result if that ever did happen (never seen or heard of it happening)
Would BLUE Loctite be right for this application ???
Would you ever use RED Loctite on aluminum threads ???
 
Back
Top