1966 Chevelle Project

That Hencho en Mexico block is NOT the block to use for any performance build.

THANK YOU I was hoping someone caught that.....If you see in the pic of that block, the core shift is horrendous for the lifter holes.!
I was not sure what to do with the block, I don't know if it even would be worth just installing a re-ring kit on the pistons and have the crank turned.

I really did not pay that much attention to it at first..even when I posted the pics of it... I just figured I would have
it checked out and build a nice street engine with it. BUT, I was looking at the pic the other day and realized the core shift. When I got home
I really studied the block and thats what kinda deflated my idea of building it up.
Grumpy unwittingly has kinda come to my rescue with his push to build a BBC.. Which is ALL new territory for me.
 
Is this something I would want to start with... the guy is local and wants $1000
454 2 wheel drive and stick shift truck. not sure on the year.
But I think that having all the brackets on the engine might be a plus..


183343897_4184195708340424_121626684081517939_n.jpg
 
If you can't start the engine and do a few tests, seems like you might as well go to the Casino and try your luck there. hehehe !
 
id sure want to hear it run, look for problems, do a compression test and verify the casting numbers before spending that amount on any BBC
 
Hello men!!!! It's been awhile since I been around.. Hope everyone is still healthy.

WELL..... I had to go back to square one with the car...... I was having a hell of a time trying to get the trunk pan square with the frame and
front pan... It was NOT happening.
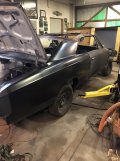
I pulled the body again and this time I actually took it to my buddies place to check the frame. We had to pull the drivers rail forward 1"
...and pull both rails 3/4" to the drivers side. After 3 hours we got the frame square to 1/32" which is close enough for me!
FRAME STRAITENER.jpg

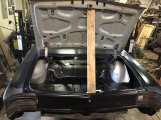
When I got it back home...both the front pan and trunk pan fell into place! Now it was on to fixing the passanger fresh air box and toe kick pan.

here are some before and after pics.

AIR BOX W REINFORCEMENT PLATE OFF.jpg
NEW FLOOR ROUGHED IN.jpg

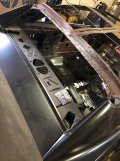
I stopped short of welding in the new rocker panel. The floor,reinforcement plate, inner air box wall, and rocker panel all get sandwiched and welded together at this point. I weld just enough , and screwed the rest in place so I can make final adjustments to the rocker panel when I start fitting the quarter panel.

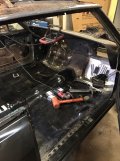
So, now I moved to the back...I re installed the door and removed the passanger quarter panel , package tray, tail panel, and wheel housings.
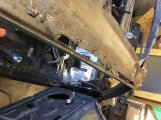
I first had to repair the inner structure before I could continue on. Here is a pic of the rot I found under the quarter panel.

INNER QUARTER.jpg

Here is my fix.. note I had to make the extension that connects the structure to the wheel house.
wheel housing support.jpg structure fix.jpg

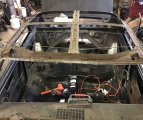
I then screwed the new package tray and a new tar extension in place, then fitted the wheel housings . The 2x4 pice of wood is there to supoort the rear until the support structure is tacked together. The next pic is the quarter panel in place after the 10th time being put on and taken off.

new wheel housings.jpg panel pre fit.jpg

the door gaps are about .280 now. I know I can close them up some.. but I think the quarter panel is close to being home!
gap.jpg Yes... I will be re skinning the doors..The frames are good, the skins are gone. I installed new hinge bushings before I re-hung the door. Alesia and I have purchased all the replacement panels and then some!! My barn is a complete disaster with saving all the old metal and having all the new metal still in boxes piled up all over in the barn...Not to mention there are now 5 SBC engines (some with trannies) in there somewhere too!

Well... That's about it for now... I will try and keep up posting.
 
Hello guys,
Been plugging along on the car. It don't look like much but I have hit a milestone I had set.
The driver inner quarter structure looked the same as the passenger side. I did not get pics
but I cut away and fabbed up the same pieces as I have already shown on the passenger side.

Had to fit and refit the quarter panels about a dozen times before everything lined up. I had to have my buddy Fred
(who is a body man by trade) come over again to double check my work.
I was having a hard time on the passenger side. Any move that I made would either open or close the door gaps.
The door seemed to be soft at the hinges to me. It seemed that if you lifted or pushed down on the door...it would change hieght
positions up to 1/4".
Fred said that even though I had alot of good clamping on the panels....it would still not be solid until it was fully welded together.

So as he helped me get the trunk deck lined up and level with the quarters, he had discovered that the trunk gutter near the tail panel
was stamped out of location a tad. This was holding the quarter to trunk deck gap open more than we liked. So we spent about an hour
reshaping the gutter on the tail panel so it would allow the quarter to close in tighter. Lots of tedious work that when done...you could not tell
we accomplished anything if you were not there. But the result was we had moved the quarter panel about an 1/8" inward and the trunk gaps were spot on. The only issue that I have now is on the rear driver side of the deck lid..The radius on the lid is smaller than the replacement quarter
panel radius. Fred and I both agree that the deck lid can be reshaped on the radius to fit better.

At this point the entire rear section was in place and square. Fred said I was good to go to start welding in down permanently.
He had lent me his spot welder so I did not have to plug weld everything. Some key structural places were needed to be plug weld
for security by the spot welder was so nice.

After I welded the rear into place and got the rockers welded in, I still noticed that the passenger door did not feel solid still.
I thought maybe at the bottom of the airbox where there are 4 pieces that come together....maybe I missed something.

It took a few days of exploring but I had found the issue..... The hinge supports inside the air box were about 1/16" away from
the inner panel. I could slide my machinist scale between them. I had missed the plug welding the inner panel to the hinge support
before I installed the thicker reinforcement plate.. Luckily I had left the outside of the lower (cowl) airbox open for access so it was an easy fix to weld it in place. That was the whole weak door issue. It is now rock solid like the driver side.

So at this point I have replaced all metal from the firewall to the tail panel.

I ended up cutting the roof skin off because I could see no way of addressing the rust issues without it gone.
After removal I had discovered that the structure was not that bad. Only a few spots needed attention. The main source of rot
that I was seeing underneath was the drip rail flange that mounted to the structure as you can see in the pic below.

While I have the skin off, I am going to tighten up the screw holes for the visor mounts, and epoxy spray the structure inside and out.

I am waiting on another delivery from Second Skin for sound deadening material and thermo mats. I want to get these on the roof skin before I install it.

The next stage is to reskin the doors and apply the Second Skin to those also. The whole car is getting the treatment actually.

At that point...The car will be complete from the fire wall back. I have to address a small hole in the fenders so at least I don't have to replace those. They can be repaired.

We talked with TMI for our interior.... They are going to make the entire custom interior including Two complete bucket seats.
They told us that it is a 16-18 week after we make the purchase. Might be our Christmas gift to each other this year.

Well that's about it for the update..Here are a few pics of where I'm at...
 

Attachments

  • IMG_1997.JPG
    IMG_1997.JPG
    219 KB · Views: 7
  • IMG_1998.JPG
    IMG_1998.JPG
    121.2 KB · Views: 5
  • IMG_1999.JPG
    IMG_1999.JPG
    81 KB · Views: 5
  • IMG_1996.JPG
    IMG_1996.JPG
    97.1 KB · Views: 5
  • VFBG3617.JPG
    VFBG3617.JPG
    100.7 KB · Views: 7
  • IMG_2005.JPG
    IMG_2005.JPG
    105.6 KB · Views: 7
Any thoughts of putting a roll cage in the car, this would certainly be a good
time to do it???

I can't imagine the patience it must take to get these panels and gaps set correctly,
I must commend you for such excellent work !!!
.
 
Thank You Rick.

I thought about a roll cage...but she insists that the car has to be built for the street only.
No straight line runs for this car. ;)

She wants reliability, with great handling , and a car that will have no problem getting out of it's own way
and sound good doing it.

I am seriously considering building the 327 that it came with and install the little blower on top, and install a smaller crank pulley
so the boost would actually not build as fast in the lower RPM range like the bigger 7" does. But I think the fuel mileage would suffer
by hopping up such a small engine compared to finding a 396-427 BBC. It seems I would not have to do much
to a BBC for hop ups, and still might get good mileage.
Not sure what to do yet on the engine. But I would like to see somewhere around 450-500HP of usable
street manners.

I'm not looking for Preis gas mielage... I hope to have somewhere in the middle to upper teens.
I am thinking about a 700R4 with a 3.31:1 rear. I see that Sonnex make an input carrier that drops the 3.06 ratio
to 2.84. This seems like it would help keep the rpm's in the power band when it shifts to second. Though I'm not sure
I need this in a street car.

But... This will be a conversation for later in the build. For now I just focus on the metal work to get done.

Yes... the gaps were kicking my butt. It is amazing how tweeking something in the rear can have major effects on the front.
Even welding something down solid can change things. Had this happen too. But overall... Alesia and I are happy with the outcome so far.
 
I am thinking about a 700R4 with a 3.31:1 rear.
Not trying to talk you out of the 200, but I believe the 700 is going to be easier to find parts for.

It's not hard to get 427 inches out of a small block these days and might be easier to work on than a BBC. But it's going to cost more to do it that way. Just some thoughts!
 
Would'nt the 427SBC be considered a radical build though...It seems I might be crossing the reliability line
if I did that. I DO have the block to build something like that though.
 
Dang it Rick....Your going to get me in trouble with Alesia. :wink:

You got me thinking about a SBC 427 now.

I wonder if that small blower would still work on top with say 9.5:1 compression. She really does like the look.
She plans on attending car shows and has always liked the blowers.
Can't buy a bigger one though....I have to use what I have in the barn.

Would prolly sound good.

Would definitely have great low end torque.

Would have enough to get out of it's way on the highway.

Might get upwards of 14 MPG's

Could do it for less than $4000 if I keep the blower. Only looking at a rotating assy and bigger heads plus machine time.

We should keep this idea on the forum only for now..:nodding:
 
Would'nt the 427SBC be considered a radical build though...It seems I might be crossing the reliability line
if I did that.
I don't see why you would say that, 427cuin is 427 cuin no matter how you get it and your block is plenty stout for 500 HP.

Why would you need bigger heads, run what got for now. Go bigger later if you think you need it then. Easier to swallow a $2K a couple of years later. But if you ever think 600+ HP is in the cards later, then don't waste your time on a SBC, just go BIG now.
 
I am not sure but I think the 4" stroke would not be great on the cylinder walls .
I think I may need my machine guy raise the cam tunnel. Did not think of that earlier

Anyway...its a discussion for the future..
 
just watching the car rebuild progress makes me think back to a 1964 tempest I helped a friend restore,
it took several years, and while its turned out to be an excellent restoration,
I don't think my friend ever wanted to remember the time and effort it took!
on the plus side he eventually became a very good welder and gained impressive auto body skills...
skills he told me he gained in the process, that he was rather reluctant to use simply because he admitted he never would have started the restoration if he knew going into it, that the car would have required the extensive restoration it eventually did!
on the plus side hes still driving the car, and says he will never sell it... he put far to much time and money into the car, and knows ,
most people would never appreciate, that the cars build to far higher quality than the OEM factory would have ever done!
yeah he hits a few car shows and hes been offered serious money for the car,
by the few people that look over the restoration and appreciate the detail work.
 
Last edited:
Back
Top