200-4r Rebuild Questions

Thanks for the info. I’ll let you know but I’ll need to get new 636 and 651.
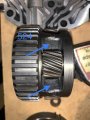
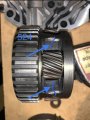
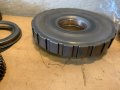
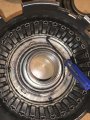
Got the wave spring 651 and front front planet carrier 636 in your box. Inspected several 636 carriers and
the 6th one looked good, see photos below. Clearances are noted in the photo.

FP07_FrontPlanetCarrier_636_Sold_01970.jpg
FP07_FrontPlanetCarrier_636_Sold_01971.jpg
FP07_FrontPlanetCarrier_636_Sold_01972.jpg

Not the best picture for drilling into 646 in the book.
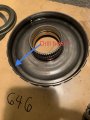
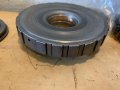
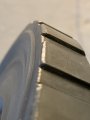
None of his pics are very good, but he is drilling in the corner or as close as possible. Just try to stay off
the surface for the clutch plates.

I’d like to build a 400HP tranny now but I haven’t finished reading everything I need to.
OK, just wanted to make sure what you are trying to do so I can advise accordingly.

Dave Husek said the KC5 valve body can be made to be good but I’m not sure how or what he meant by that.
Ask if he has a kit and instructions for installing the kit. Or you might want to use CK kit, he provides a
manual for the installation that's 22 pages. Then I noted on the ATSG diagram all the changes. I can't
attach the PDF file (to big) but a graphic is below. If you want, I can send you another link to my NAS
so you can download the PDF file and make it as big as you need to read everything.

FP07_ATSG_ValveBodyWithCKP_Notes.jpg

I’m debating on getting another $200 salvage yard tranny.

It was certainly helpful when I built mine, but it all depends on your budget for this project.
.
 
Sure, send me a link.
I was able to press out a pin on my old front planetary gear (636) and used the washers to make the clearance correct for one of the spider gears on 524 but I noticed what look like cracks. What do you think?

Is the 1/16” hole supposed to be 90 degrees from the stock hole? Why not 180 (on the opposite side)? Drill in the corner at same height from the bottom as the stock hole? If the small hole is just supposed to be in the corner then I’ll use my electric drill with a cobalt drill bit.

Also, do you like the modification on the pump to drill 236 0.045-0.067”? The smallest bit I have it 0.0625”.
 

Attachments

  • D63C9BE7-4FB6-448A-8DD6-5F16E6A4C432.jpeg
    D63C9BE7-4FB6-448A-8DD6-5F16E6A4C432.jpeg
    134.3 KB · Views: 4
  • E75FED9D-B601-4DCE-9F63-63F2F487DA1B.jpeg
    E75FED9D-B601-4DCE-9F63-63F2F487DA1B.jpeg
    120.1 KB · Views: 4
Last edited:
but I noticed what look like cracks. What do you think?
Really hard to tell something like that from a photo. Shouldn't cost much to have it tested.

Is the 1/16” hole supposed to be 90 degrees from the stock hole? Why not 180 (on the opposite side)? Drill in the corner at same height from the bottom as the stock hole? If the small hole is just supposed to be in the corner then I’ll use my electric drill with a cobalt drill bit.
It doesn't matter where you drill around the circumference.The other hole you are referring to is
to apply pressure thru the VB. I made sure mine was flat and smooth by using a file. The hole
where the cup plug seals is also where you will apply air pressure to test the lip seal on the
Low/Reverse Clutch Piston 649.

LoReverseClutchAssemblyPort_4173.jpg
RubberCupPlugLocation_4178.jpg

Also, do you like the modification on the pump to drill 236 0.045-0.067”? The smallest bit I have it 0.0625”.
If it's in CK's book, then I made that modification and I like the way the trans has shifted and performed. You
certainly could buy something smaller, but the 0.0625 falls within the stated range.
.
 
My 524 doesn’t look normal to me. I thought at first it was just the way it was cast. It doesn’t look like the one in the video. Do you have any spare 524s? In the meantime I’ll try to get some magnaflux and test it for cracks. The clearances were fine except for the one I corrected.

Never mind about the insulated switch. It’s in the CK book.

I am planning on using a lockup torque converter. I’ve read a few ways to do it with the brake switch but I haven’t determined the best and easiest way to do it yet.
 

Attachments

  • 47D81613-24DD-489F-9ADA-6AD28EFC3085.jpeg
    47D81613-24DD-489F-9ADA-6AD28EFC3085.jpeg
    134.3 KB · Views: 1
  • 795AB368-7DEE-475B-B682-04718EEAFBFA.jpeg
    795AB368-7DEE-475B-B682-04718EEAFBFA.jpeg
    130.7 KB · Views: 1
Do you have any spare 524s?
Yes, I have two. One is a new rebuilt one from CK and the other one is brand news still in the
original box.

I am planning on using a lockup torque converter. I’ve read a few ways to do it with the brake switch but I haven’t determined the best and easiest way to do it yet.
The easiest way is to have it on a switch, you turn it on when you want. You might try the vacuum
switch, it didn't work well for the TBucket, but it's so light. You might have better luck. The other
ways get more complicated and require playing with the system unless you purchase something.
The website below has some good info, you might already know about it.

http://www.rowand.net/Shop/Tech/LockupTCCWiring.htm
 
Are you planning on doing the Dual Feed to the Direct Clutch ? See CK book, chapter 4-c, page 72.

What car is this trans going to be used in ?
 
I read about dual feeding the direct clutch but I thought I probably didn’t need to do it in my application. I’m putting the trans in a 1964 El Camino with a stock 350 but planning on adding a little more power down the road.

Pictured is some wear on 646 I didn’t share earlier. I sanded it down a little with a dremel.

By the way, 647 is a "housing to case spacer". I don't think I had one.
 

Attachments

  • 92EE76AE-CEE4-4397-8604-D1355721F4AE.jpeg
    92EE76AE-CEE4-4397-8604-D1355721F4AE.jpeg
    92.2 KB · Views: 4
  • 31CBF334-9655-4E82-84DC-EC3320235EB5.jpeg
    31CBF334-9655-4E82-84DC-EC3320235EB5.jpeg
    101.9 KB · Views: 3
  • 777D95C9-2206-4F71-AA84-55AB2A978565.jpeg
    777D95C9-2206-4F71-AA84-55AB2A978565.jpeg
    50.3 KB · Views: 3
Last edited:
Pictured is some wear on 646 I didn’t share earlier. I sanded it down a little with a dremel.
Is this the extra 1/16" bleed hole you drilled ? I would rather see it more in the corner and on
the front facing surface. The hole you drilled will be blocked by the case. Mine look a lot nicer
on the edges where you had to grind. You might consider buying a 3/64" drill bit. Cost would
be $5.

FP08_BleedHoleInLowRevClutchHousing.jpg
FP08_LowReverseClutchHousing646Drilled_3779.jpg

By the way, 647 is a "housing to case spacer". I don't think I had one.

They call it a spacer, but it seems to be a snap ring that goes in the case.
See CK Book, pages 19 and 87.

FP08_HousingToCaseSpacer_647_04167.jpg
 
Is this the extra 1/16" bleed hole you drilled ? I would rather see it more in the corner and on
the front facing surface. The hole you drilled will be blocked by the case. Mine look a lot nicer
on the edges where you had to grind. You might consider buying a 3/64" drill bit. Cost would
be $5.

Yes, this is the hole I drilled. I couldn't find the hole you drilled in your original thread. I purchased a 3/64" drill bit yesterday. Will it be ok to have three holes in 646 lo/reverse housing assembly?
 
I've compiled a list of some recommended modifications by CK.

Drill pump drain back holes 0.25”, pg. 33
236 drill cup plug to 0.045", pg 29
507-508 drill 8 holes through steels 0.125", pg. 49..........may drill 4 holes
534 machine down to 1.630" (remove 0.080"), adds extra friction plate between two steels, pg. 49
539 Dual feeding direct clutch, remove middle seal of center support (537), plug oil feed hole (538) w/ spare check ball from salvaged governor, pg. 72
604 drill 0.060" bleed hole at 45 degree angle, pg. 60.............maybe the most difficult mod
633 enlarge existing holes to 0.150" and add holes, pg. 81
636 lube hole 0.125", pg. 80
646 drill 0.060"bleed hole in corner, pg. 85
651 add extra wave spring, pg. 85
56 enlarge holes 8, 14 to 0.140" and 18 to 0.125" and 28 to 0.110" and 27 to 0.180" in valve body plate, pg. 111

Crosshatch steel plates with emory cloth on side that touches friction plates.
 
"Will it be ok to have three holes in 646 lo/reverse housing assembly?"

I would rather not. I said the case would block the hole you drilled, but there is no way to know
how much and it might change over time. So it could have zero effect or it might be too much of
a bleed. Below is the one I could send in your Care Package.

It looks like the thrust washer 643 failed, although it looks bad it should not be effected functionally.
The thrust washer doesn't even come close to that roughed up surface.

FP09_LowRevClutchHousing_646_Sold_01974.jpg
FP09_LowRevClutchHousing_646_Sold_01975.jpg
FP09_LowRevClutchHousing_646_Sold_01976.jpg
.
 
I really appreciate the details discussed,
info presented, and numerous ,posted clear detailed photos gentlemen
 
I drilled a 0.0465 bleed hole in 604. I think you said it took you 30 minutes. It only took me 30 seconds with a dremel. Maybe I did it wrong.
 

Attachments

  • 8863D22E-703A-4C79-928C-2C77169D575D.jpeg
    8863D22E-703A-4C79-928C-2C77169D575D.jpeg
    200.5 KB · Views: 4
The machinist said he had to use a long drill bit and therefore could not apply much pressure
since the bit was flexing.

From your one photo of the Direct Clutch Drum, it looks different than mine. I can't identify
the recessed area where the piston goes. Where I show the hole in mine.

This is what mine looks like.

FP11_DirectClutchDrumDrilledHole_604_03426.jpg
FP11_DirectClutchDrumDrilledHole_604_03431.jpg
.
 
The lighting and angle of my picture isn’t the best but seeing your photo I think they’re the same.

I got a notification today that there was a ‘86 Monte Carlo at LKQ pick a part. I was able to get off work early and get it.

Sprayed it with oven cleaner.

Do you know if the part of the case that the valve body sits on is the same in these transmissions or does the Monte Carlo and Grand National have something special with the case?
 

Attachments

  • 3DCED8A3-9656-4880-A17D-15689AE32CD7.jpeg
    3DCED8A3-9656-4880-A17D-15689AE32CD7.jpeg
    138.4 KB · Views: 4
I got a notification today that there was a ‘86 Monte Carlo at LKQ pick a part. I was able to get off work early and get it.

What did you have to pay for it ???


CRF 85-88 LG4 305 powered Monte Carlos/Pont Gr Prix

The special valve bodies usually have a purple strip on them also.

TH-200-R4 ID's:

ID Year(s) Application

KZF ** Olds 442/Hurst

CZF ** Monte SS

BRF ** GN/T-Type/Turbo Regals

Do you know if the part of the case that the valve body sits on is the same in these transmissions or does the Monte Carlo and Grand National have something special with the case?
The worm casting in the case is the same for all 200-4R trans. See above for the best VBs.
 
Back
Top