The question comes up rather frequently when I suggest buying or modifying oil pans as to "WHY BOTHER?" well its simply the fact that most stock oil pans were designed simply to be the cheapest to manufacture component that would function on an engine that would rarely be spinning over 3500rpm. IF YOU HAVE PRICED A WELL DESIGNED CUSTOM OIL PAN FOR MANY CARS YOU'LL BE SHOCKED AT THE DIFFERENCE IN COST THAT THE BETTER OIL PAN DESIGNS COMMAND!
and its a fact that a custom oil pan could easily cost you close to $800 plus
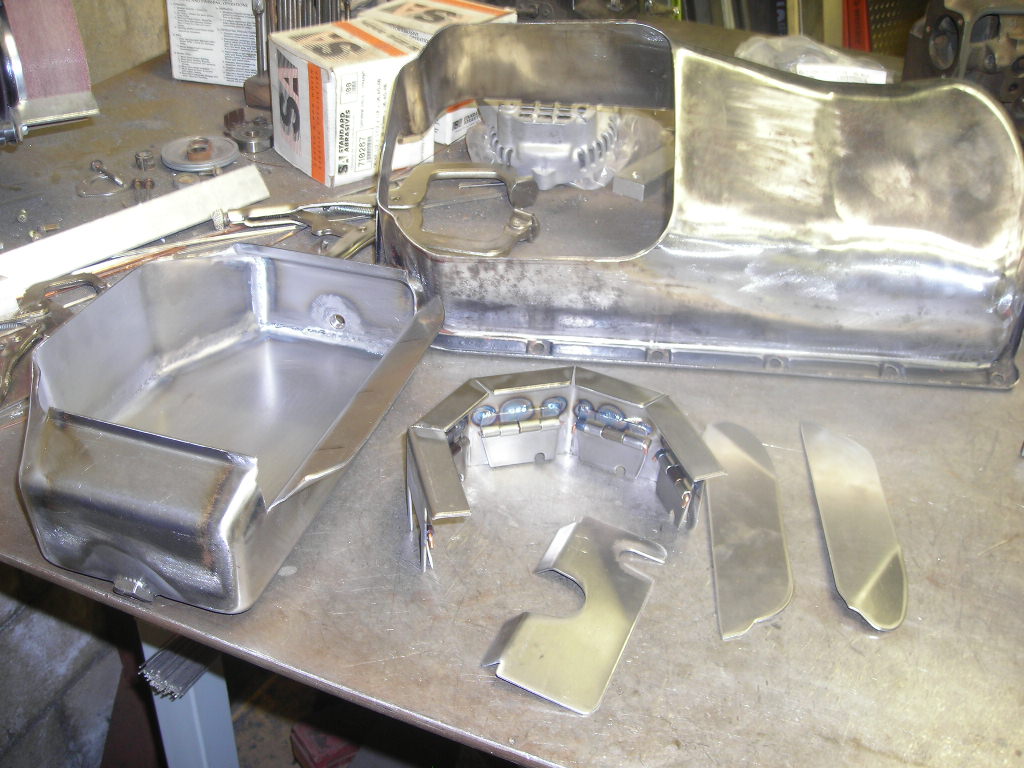
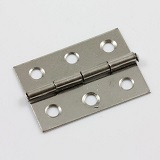
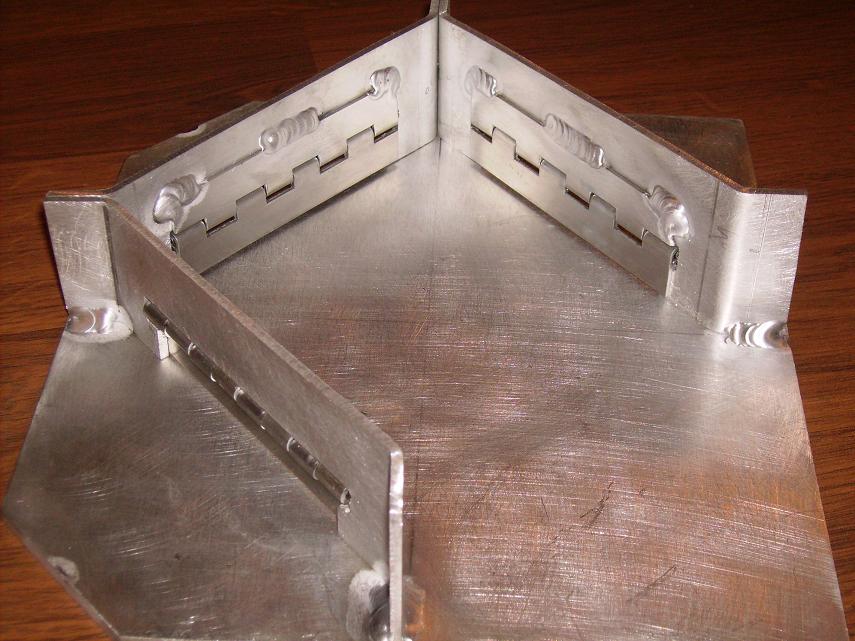
If you don't know how to weld and don't own a decent welder, I've generally used poster board and tape to , cut, and test fit and make patterns for baffles then use sheet steel a few small hinges and a mig or TIG welder to install baffles in existing oil pans, but on many occasions Ive modified and cut oil pans and modified 30 caliber ammo cans to make extended or higher volume oil sumps.
your frequently going to pay a great deal more than someone who can fabricate parts in this hobby
(its one of the reasons I learned to use a tig welder and purchased a nice MIG welder)
yes if you shop carefully you may find a bargain, as the prices and features , and quality of fit and finish, vary a great deal between manufacturers, and keep in mind your not limited to what you can purchase, across the counter at the local speed shop or thru mail order, there's the option to custom fabricate or modify existing components to exactly fit your application.
you'll frequently find that a decent price on a 6-7-8 quart baffled oil pan with your idea of the ideal capacity and road clearance is rather hard to locate and many times guys just don't have the $400-$600 THAT THE BETTER QUALITY OIL PANS COST OVER THE COUNTER.
yes there's almost always some oil pans listed for the more common cars for under $100, but they may not provide the capacity or baffling you may desire.
now I build several engines a year for myself or close friends and many of us own corvettes, which have generally minimal road clearance issues and can seldom use an oil pan deeper than about 7.5" and 7" is the preferred max sump depth, this limits choices when you want a minimum of 6-7 quart capacity.
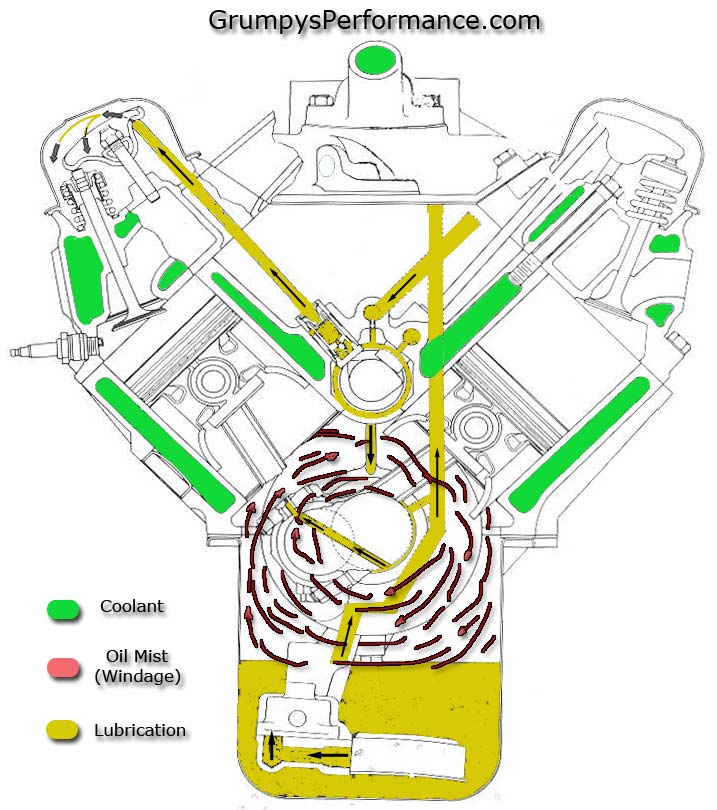
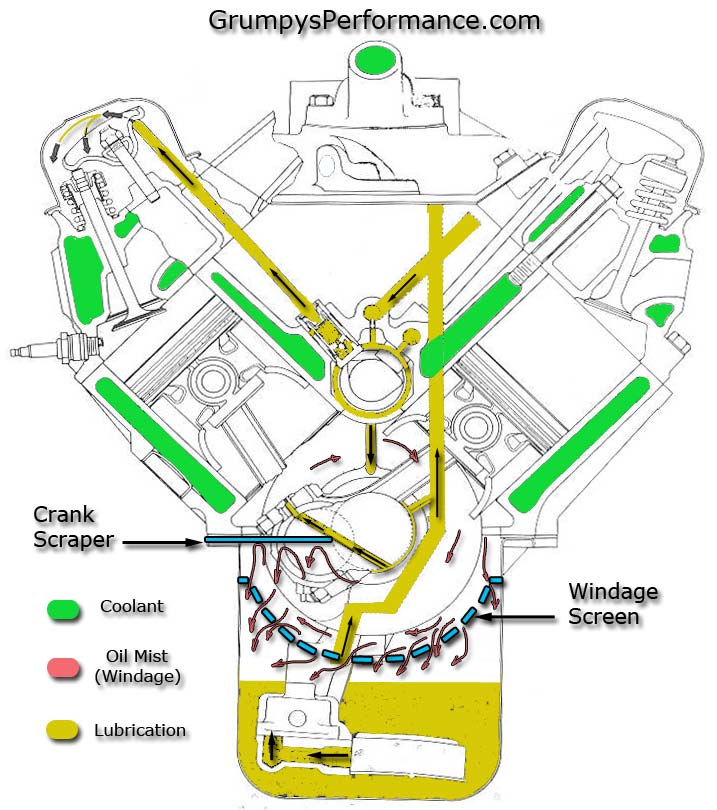
well, you BOTHER to modify an oil pan because a constant dependable supply of pressurized, comparatively cool oil, flowing over , and lubricating the moving surfaces of your engine is mandatory to maintaining its continuing dependable function, and durability, failure to maintain adequate pressurized oil flow results in rapid wear and parts failure the basic design of the stock oil pan,was never intended to be ideal on an engine producing significantly more horsepower or spinning at significantly higher rpms or once subjected to high lateral inertial loads that performance use of a car and, use of a baffled high capacity oil pan with a windage screen, makes mandatory, if durability is important. a high performance engine requires a much different set of operational conditions to be considered to be incorporated into its design, first is the obvious higher average operational rpm, power band which will require a windage tray so oil will not be constantly carried around inside the lower engine block with the spinning rotating assembly , and beat to a froth, next will be baffle to prevent inertial loads from uncovering the oil pump pick-up under hard braking,acceleration and lateral side loads , that would allow oil in an UN-baffled oil pan to slosh away from the oil pump pick-up, dropping oil pressure, next is generally several extra quarts of capacity to help insure both cooling and supply under high rpm loads
http://www.milodon.com/oil-pans/road-race-oil-pans.asp
 www.summitracing.com
http://www.enginelabs.com/news/canton-r ... e-secrets/
www.summitracing.com
http://www.enginelabs.com/news/canton-r ... e-secrets/
Id also point out two very common mistakes made are the failure to carefully measure clearances and ask questions about what will fit and what won,t fit, for example most headers are designed to fit with the stock oil pans, and may not fit correctly with every custom oil pan, so verify your headers fit before spending $450-$600 on a custom oil pan, or , $1200 on headers that may not clear that new custom oil pan, or find out if either component might require a remote mount oil filter location, or inquire if the oil pan or headers require a mini starter, in short do some research home work, don,t assume everything will fit every application, and yes a bit of custom cutting and fabrication skill, and careful welding can and does frequently make fitting a high capacity baffled oil pan with custom headers workable where lack of the ability to modify an oil pan may prevent their use together, having the ability to custom fabricate and modify parts is near mandatory in this hobby
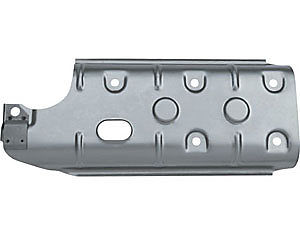
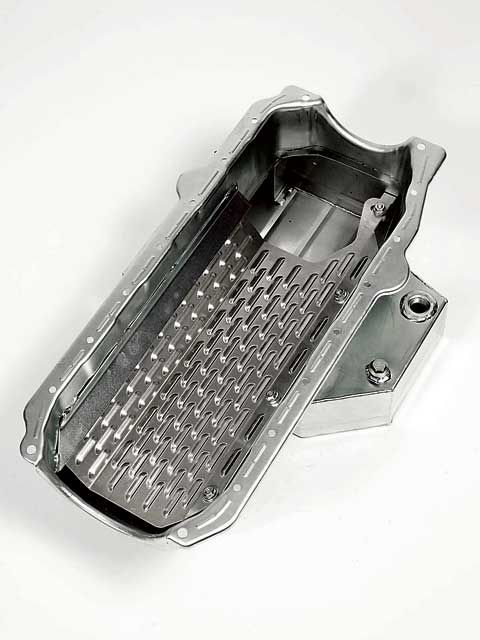
a custom oil pan design is USUALLY not really about the amount of oil ,it holds as much as controlling the rapid return of oil to the sump so its constantly covering the oil pump pick-up. correctly designed baffles route the oil flow directly to the oil pump pick-up and restrict oil flow away from the oil pump, under inertial loads like hard braking that could starve the pump of oil without the baffles controlling oil flow
just some info, you might need,
depending on the oil pump used, rpms and clearances a chevy V8 will generally push some where between 2 and 6 gallons a minute thru the oil passages, your average oil pan sump holds at most 3 quarts ,while the engines running, and there's generally about 2 or a bit more quarts in the upper engine, (lifter gallery, heads)while the engines running, so when you induce high inertial loads is common for the oil pump pick up to become uncovered even in a baffled oil pan for a few seconds as that 2-3 quarts in the sump slams forward and back in the sump, because remember , lets say your engines only pumping 3 gallons a minute, and there's got to be at least 2 quarts in the sump to keep the oil pump pick-up covered under high inertial loads, its only going to take a few seconds at most under those conditions to suck air into the oil pump. obviously having a baffled 7-8 quart oil pan has advantages under those conditions as there's a good deal larger (SAFETY MARGIN) in the amount of oil present over the oil pump pick-up is you use the higher capacity BAFFLED oil pan with its better oil control and larger sump capacity,, windage screen combo, adding an oil cooler and a larger oil filter can add significant oil capacity.
crank case pressure and oil control issues are not necessarily the same issue.
crank case pressure is usually the result of blow bye or cylinder pressure getting by the ring seal,on the power or compression strokes, ring design,piston design, cylinder wall prep, use of a deck plate while honing the bores and correct installation all effect ring seal.
but oil control issues can easily be aggravated or even caused by not having a correctly designed baffled oil pan, windage tray and crank scraper in a high rpm engine.or by improperly installed gaskets. REMEMBER the object or goal in building and maintaining the lubrication system is too maintain a 100% dependable pressurized cooling flow of lubricant to the bearings, rockers,valves etc.one more in an endless list of reasons that owning a welder and having learned a few sheet metal fabrication skills is a huge asset in this sport/hobby.
most of us are not rich, and while its easy to spend money and it takes time and effort and some skill to fabricate there's also a good deal of satisfaction in knowing you have built custom components for your car that meet or exceed most of what's out there available to purchase.
http://www.speedwaymotors.com/Small-Blo ... ,3512.html
http://www.speedwaymotors.com/Speedway- ... ,3509.html
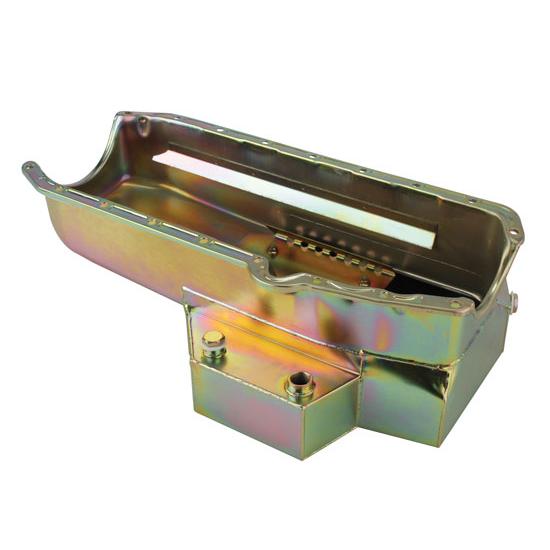
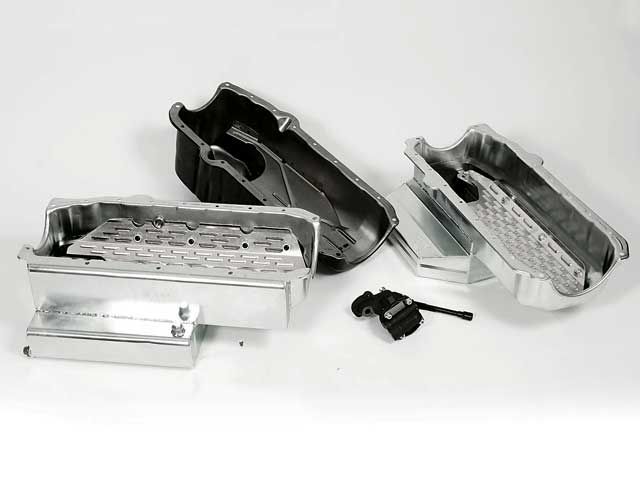
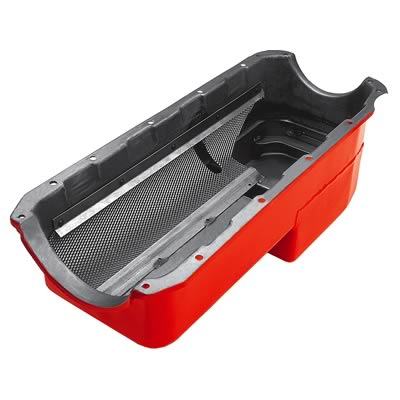
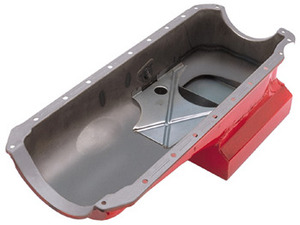
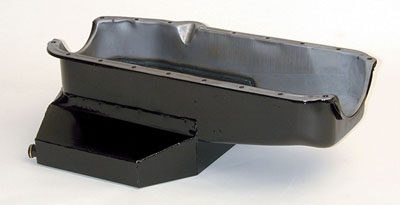
most of the time Ill start with a fairly cheap pan like this and just add several quarts of additional sump capacity and a windage screen
keep in mind ,if your welding a drain bung, on the oil pan,
mounting the bung outside allows the oil , in the oil pan,
too fully drain if the bungs correctly located,
but if the bung is welded inside the oil pan,
the oil level in the pan up to the bung height won't drain completely,
yeah the tapped amount might be small,
but a rapid full drain tends to flush out small metallic trash ,
that a raised internal bung traps and holds.
yeah use a magnetic oil drain plug and a decent size ring magnet on the oil filter
https://www.kjmagnetics.com/proddetail.asp?prod=RY0X04
http://garage.grumpysperformance.com/index.php?threads/magnets.120/#post-76605
http://garage.grumpysperformance.com/index.php?threads/inspecting-filter.4611/#post-12336
http://garage.grumpysperformance.co...h-the-oil-when-a-cam-failed.11542/#post-53330
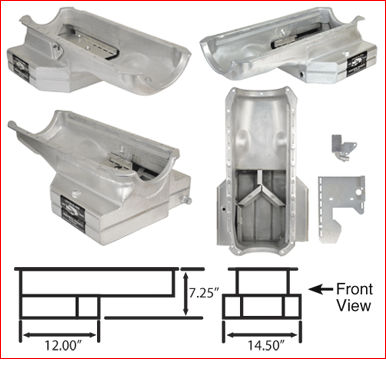
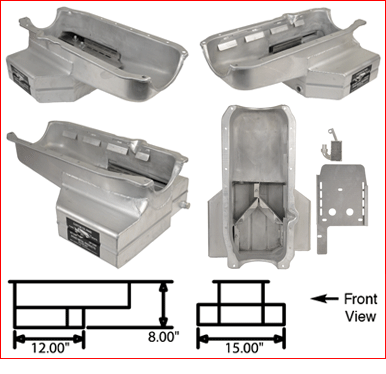
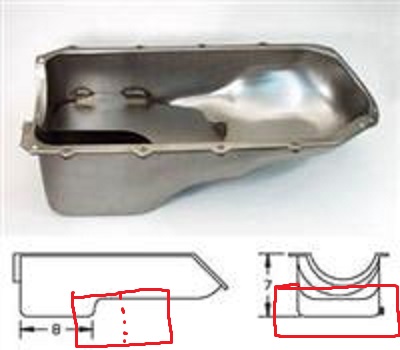
Sump formula
L x W x D x .0172 = capacity in Qts
_

generic oil pan fab video
IF YOUR GOING TO BE INVOLVED IN HOT RODDING CARS YOU WILL BENEFIT FROM OWNING AND KNOWING HOW TO USE A MIG OR TIG WELDER
http://garage.grumpysperformance.com/index.php?threads/tips-on-mig-welding.14225/#post-72253
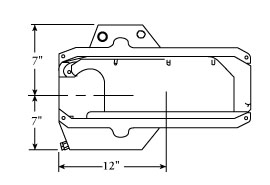
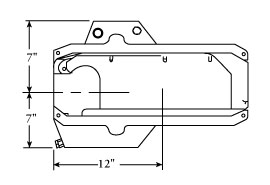
when buying a corvette oil pan ground clearance is tight, a baffled 7"-7.5" deep oil pan thats designed for YOUR block that holds 7 quarts is generally the best choice youll need to know which side the dip sticks on and the gaskets thickness used so as questions before ordering to insure you get the correct oil pan for your application
SHOP CAREFULLY , WHEN YOU GO TO BUY AN OIL PAN<AND ASK LOTS OF QUESTIONS ABOUT WHAT WILL FIT YOUR CAR CORRECTLY AND ASK FOR SUGGESTIONS ON MATCHING COMPONENTS OR PARTS THAT WON,T FIT
MILODON,
http://www.milodon.com/
CHAMP
http://www.champpans.com/products/c/oil-pans/
CANTON,
https://www.cantonracingproducts.com/category/1501/Chevy-SS--Road-Race-Oil-Pans/1.html
MOROSO
http://www.moroso.com/
AVIAID
http://aviaid.com/shopsite_sc/store/html/ws_oilpns_sbc.html
http://www.ebay.com/itm/Chevy-Small...ash=item5888ff955f:g:mm4AAOSwDN1USU-o&vxp=mtr
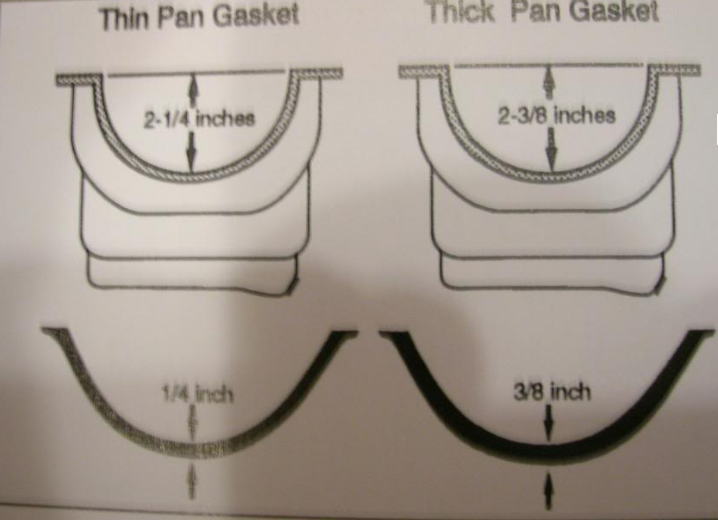
http://forum.grumpysperformance.com/viewtopic.php?f=54&t=206&p=390&hilit=+seal+thick+pan#p390
http://garage.grumpysperformance.co...s-on-building-a-383-sbc-stroker.428/#post-524
http://garage.grumpysperformance.com/index.php?threads/oil-system-mods-that-help.2187/
http://garage.grumpysperformance.com/index.php?threads/building-a-custom-wet-sump-oil-pan.65/
http://garage.grumpysperformance.com/index.php?threads/whats-a-windage-tray-do.64/
http://garage.grumpysperformance.co...alling-connecting-rods-pistons.247/#post-1745
http://www.enginelabs.com/engine-tech/holding-oil-choosing-right-high-performance-oil-pan/
https://www.chevydiy.com/oil-lubrication-systems-guide-big-block-chevy-engines/
www.summitracing.com
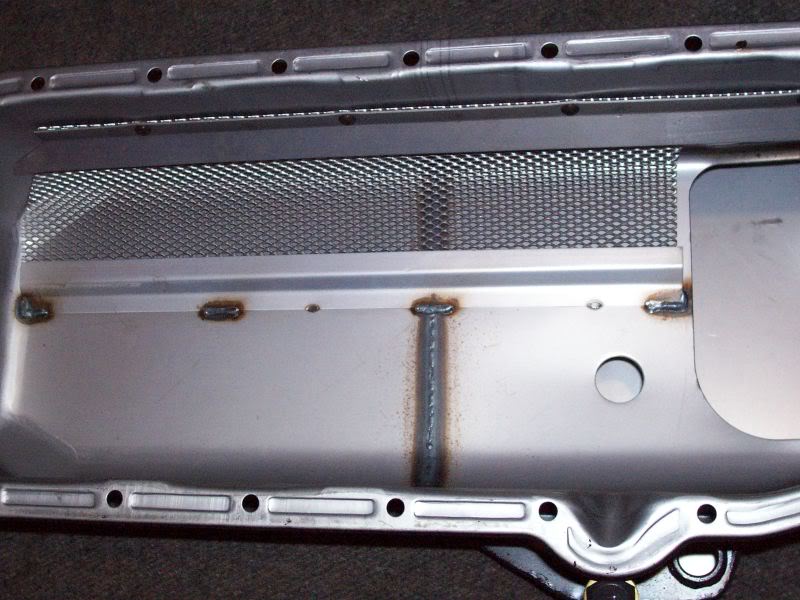
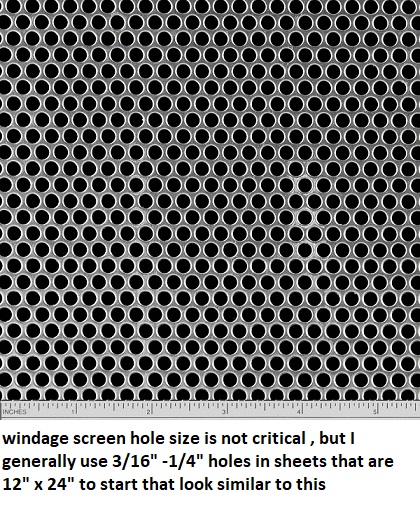
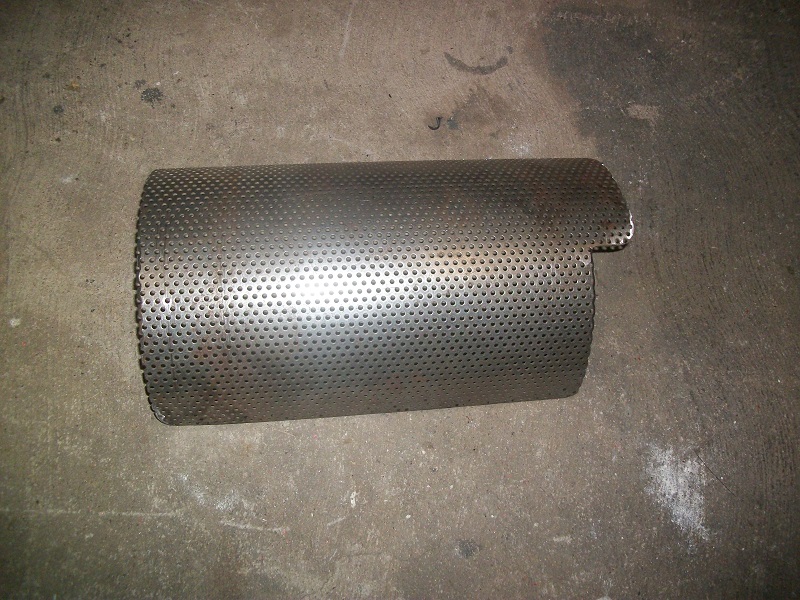
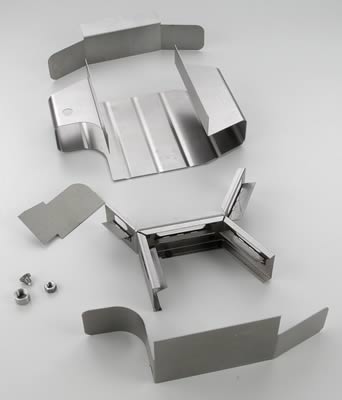
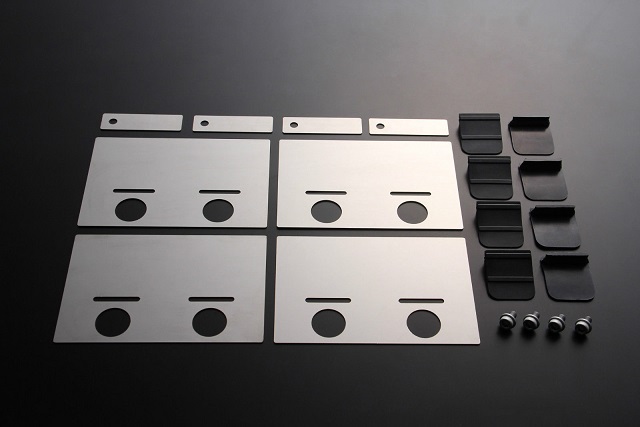
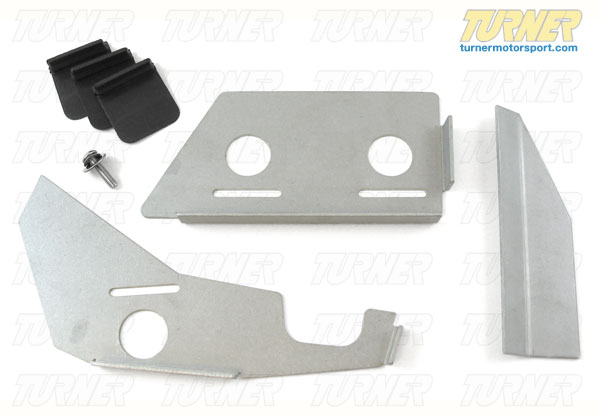
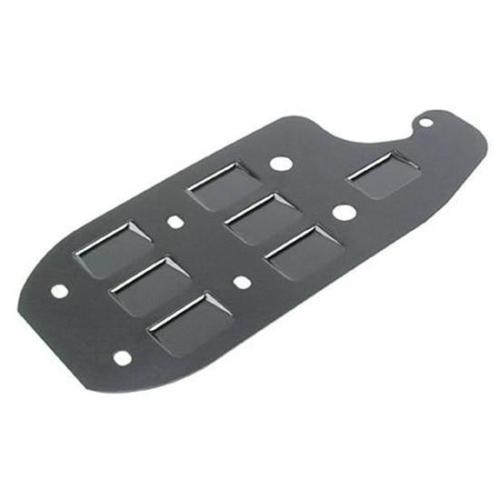
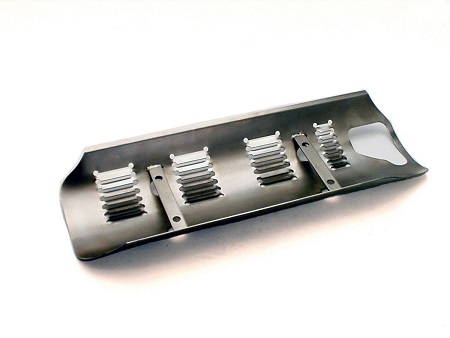
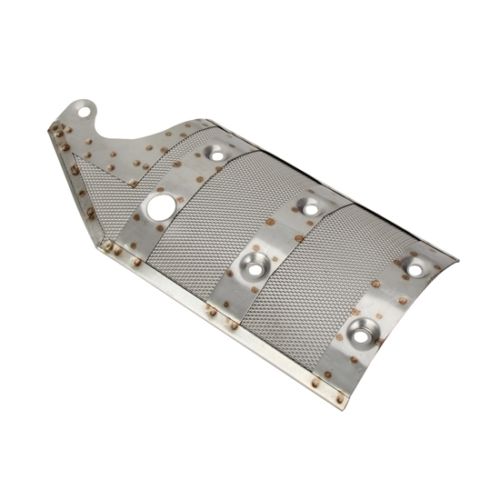
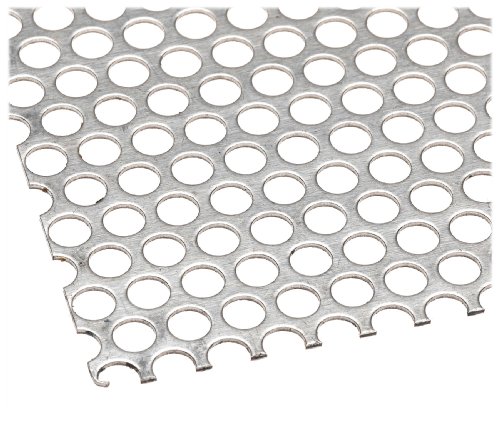
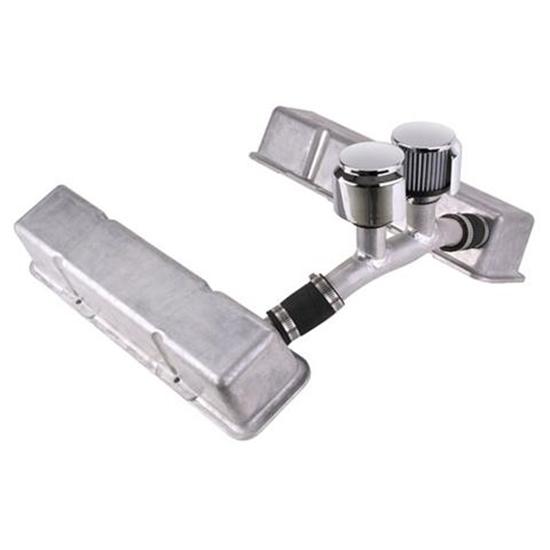
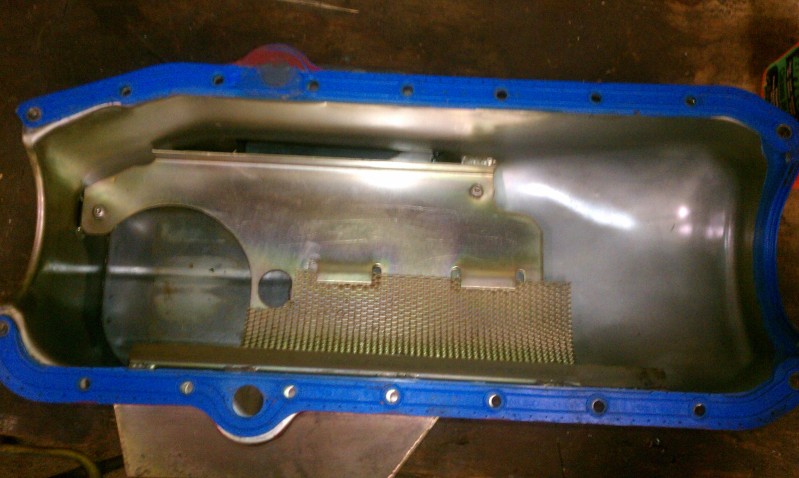
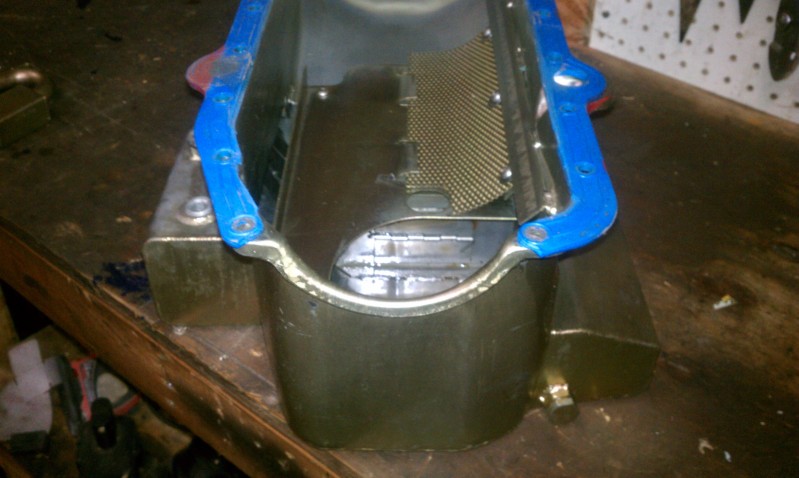
a very effective custom built windage tray can be fabricated for most oil pans from perforated steel, if you have minimal metal working and measuring skills
http://www.summitracing.com/parts/CTR-15-240/
WELDING INFO HERE
http://www.carcraft.com/techarticles/cc ... an_baffle/
http://www.billetfab.com/wp-content/upl ... atalog.pdf
http://dickmillerracing.com/images/Cran ... irdles.pdf
http://pitstopusa.com/i-5069643-canton- ... stick.html
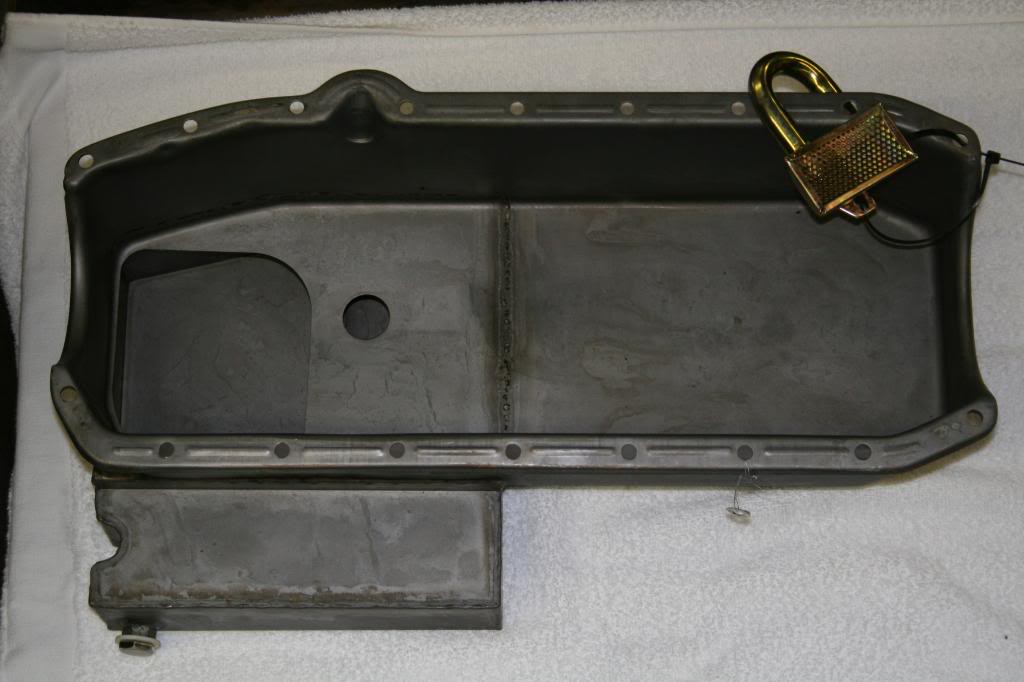
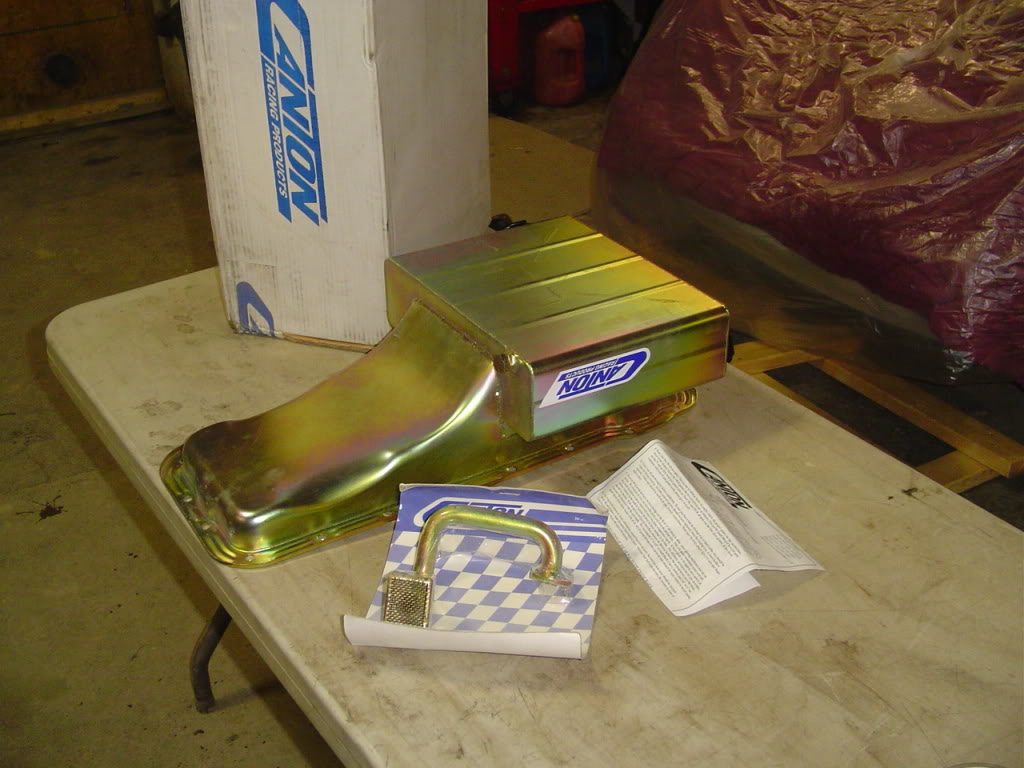
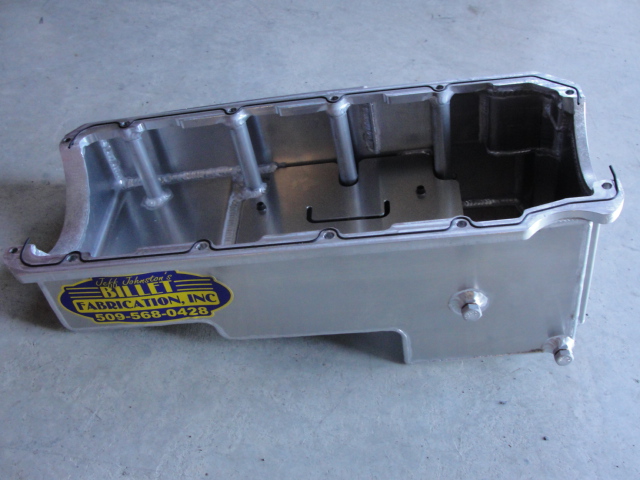
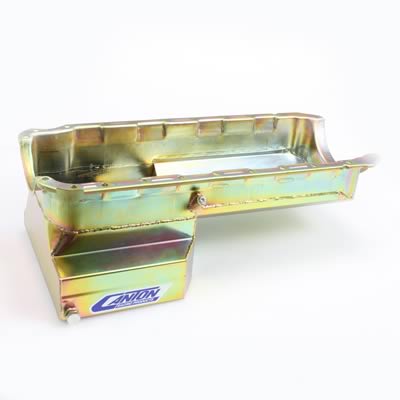
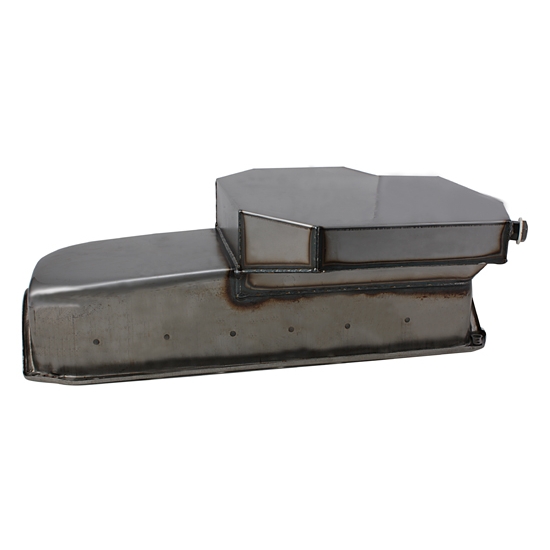
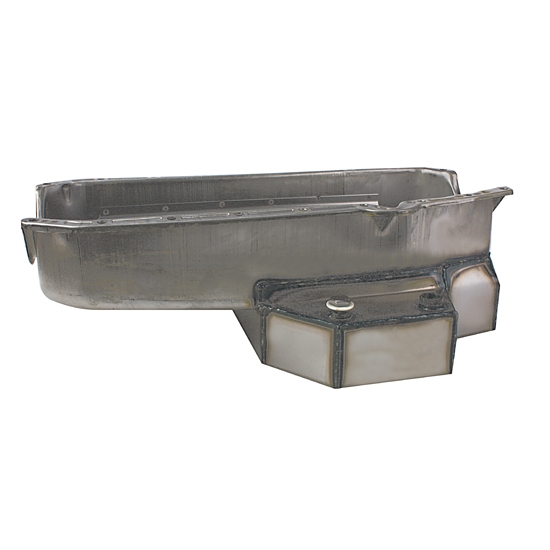
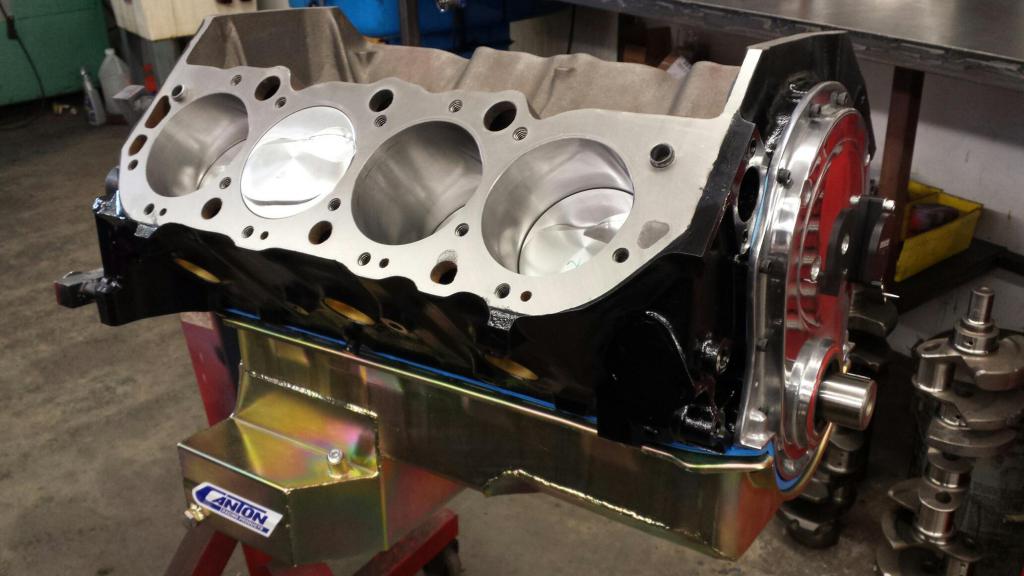
Ive got a custom built 10 quart oil pan on my 383. similar to this canton oil pan, Im retired on a fixed income, but have the tools, skills and time so I custom made a decent oil pan,
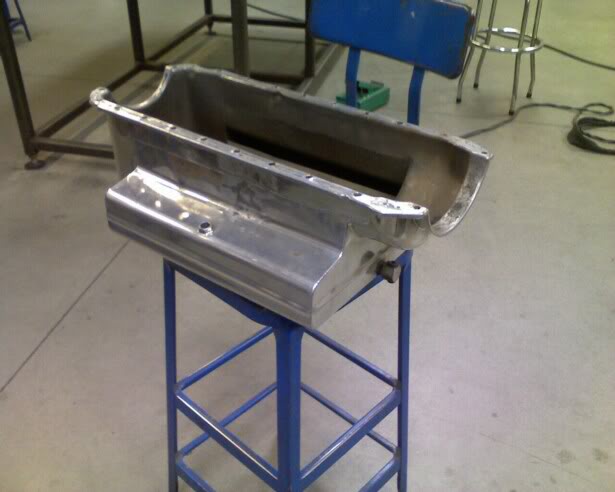
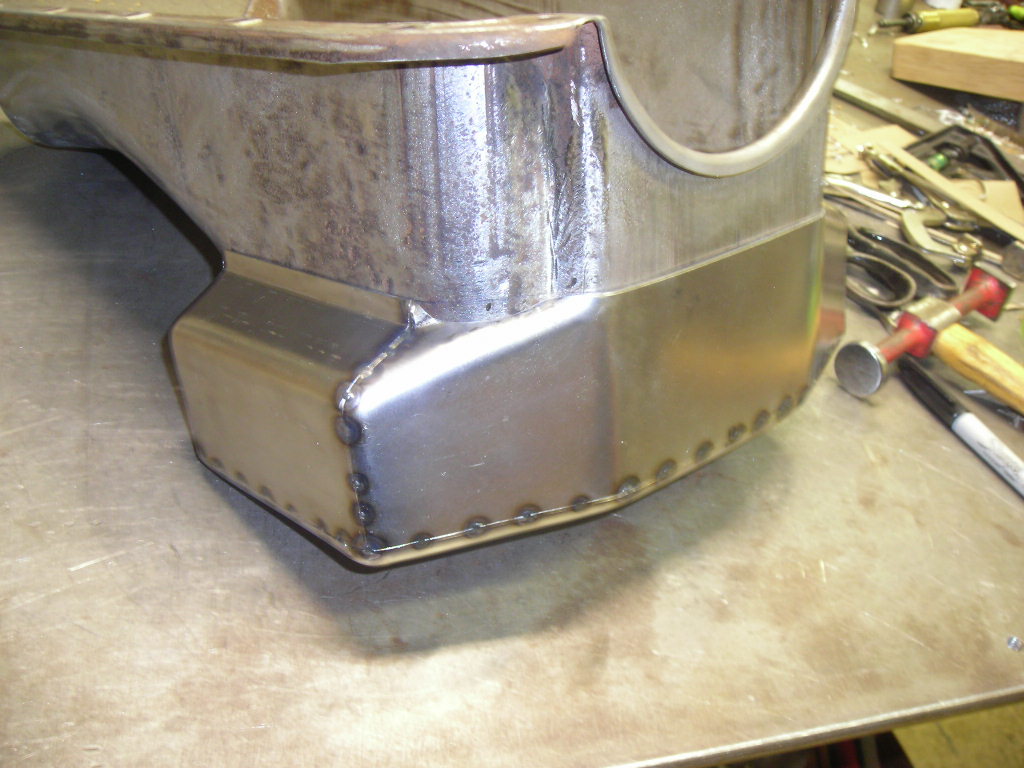
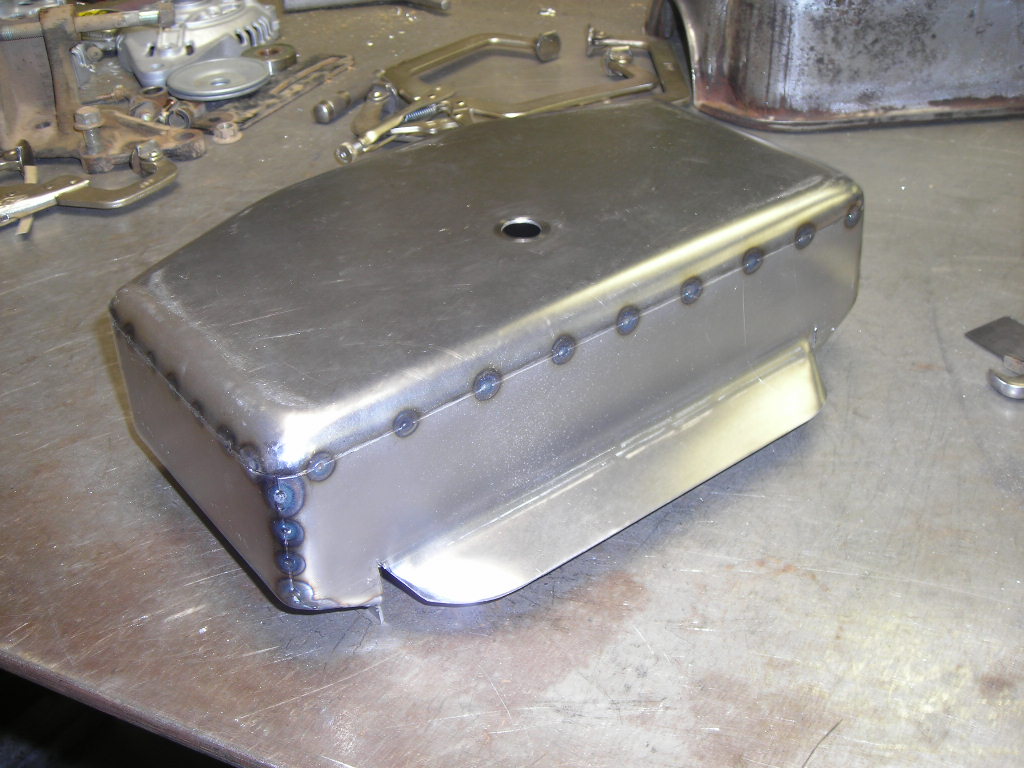
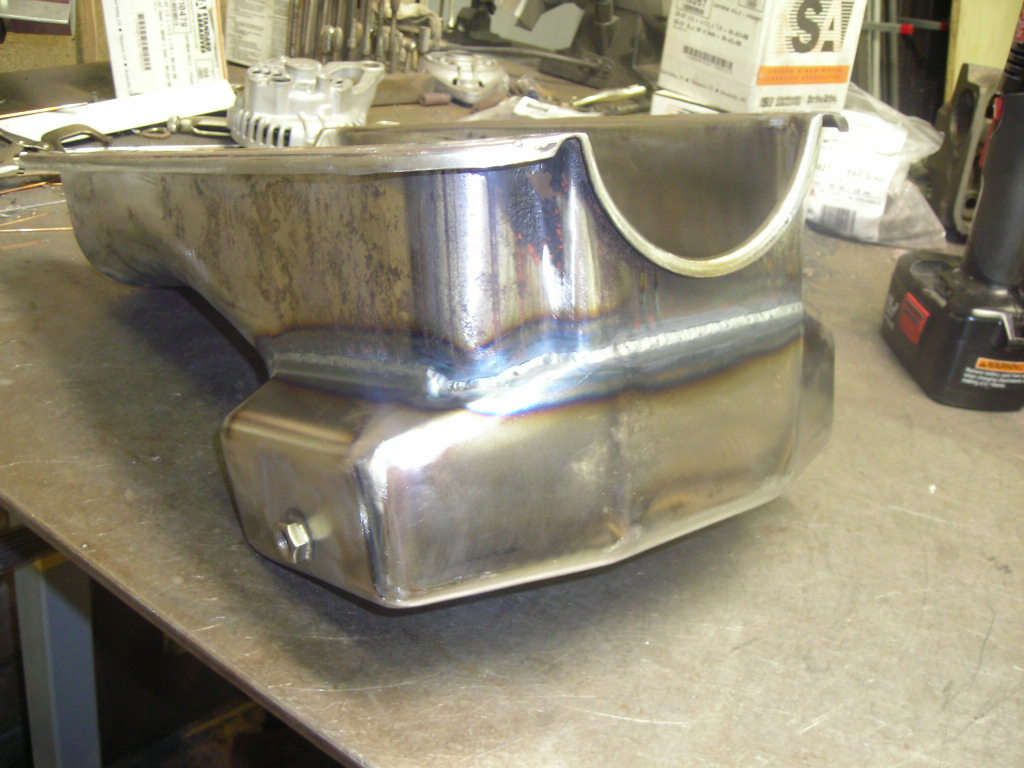
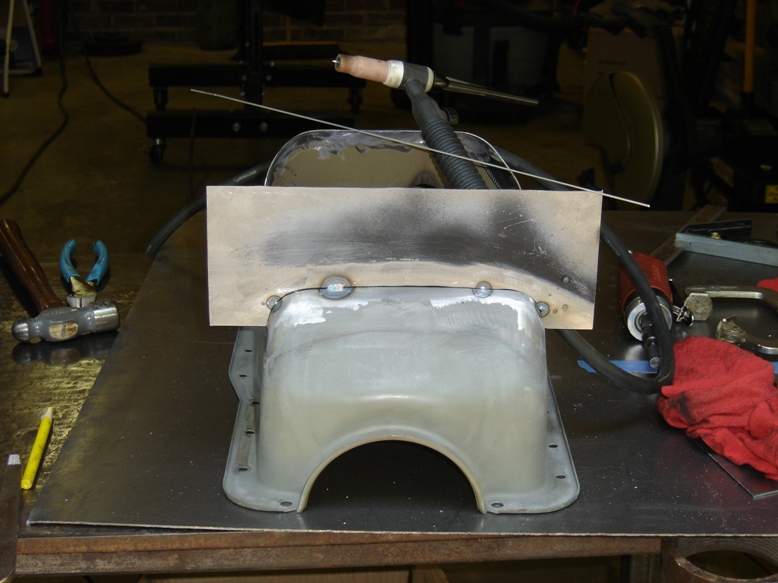
I basically took my stock pan , cut the lower 3" off the sump off and custom made an extended sump similar to this oil pan a friend had purchased but I extended the sump forward to within 1.3" of the front K member,and 7.5" deep thus increasing capacity, but making it a P.I.T.A. to remove the engine with the oil pan still attached,
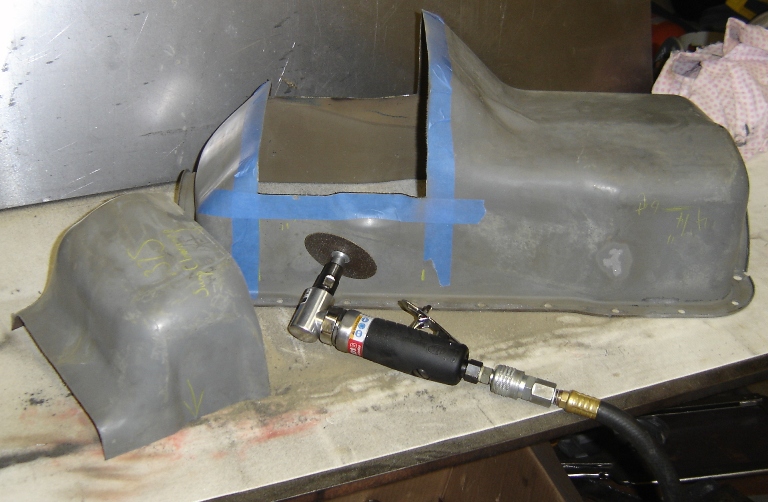
its amazing what you can fabricate with a decent TIG welder and use of poster board and duct tape as a pattern, you can purchase sheet steel very cheaply, and I have a better oil pan than the $300-$500 designs, at under $200
I usually used 8 quarts of 10w30 mobile 1 and a quart of MARVEL MYSTERY OIL in my engine, but lately the cost of synthetic oil has increased so much that, I swapped to VALVOLINE , so I now use 10W30 Valvoline VR1 as its rated a bit better and its a bit cheaper, and with about $76 an oil change even at the lower cost ....
READ THE LINKS
http://forum.grumpysperformance.com/viewtopic.php?f=54&t=65
http://forum.grumpysperformance.com/viewtopic.php?f=54&t=2187
http://forum.grumpysperformance.com/viewtopic.php?f=54&t=64
http://forum.grumpysperformance.com/viewtopic.php?f=54&t=3536
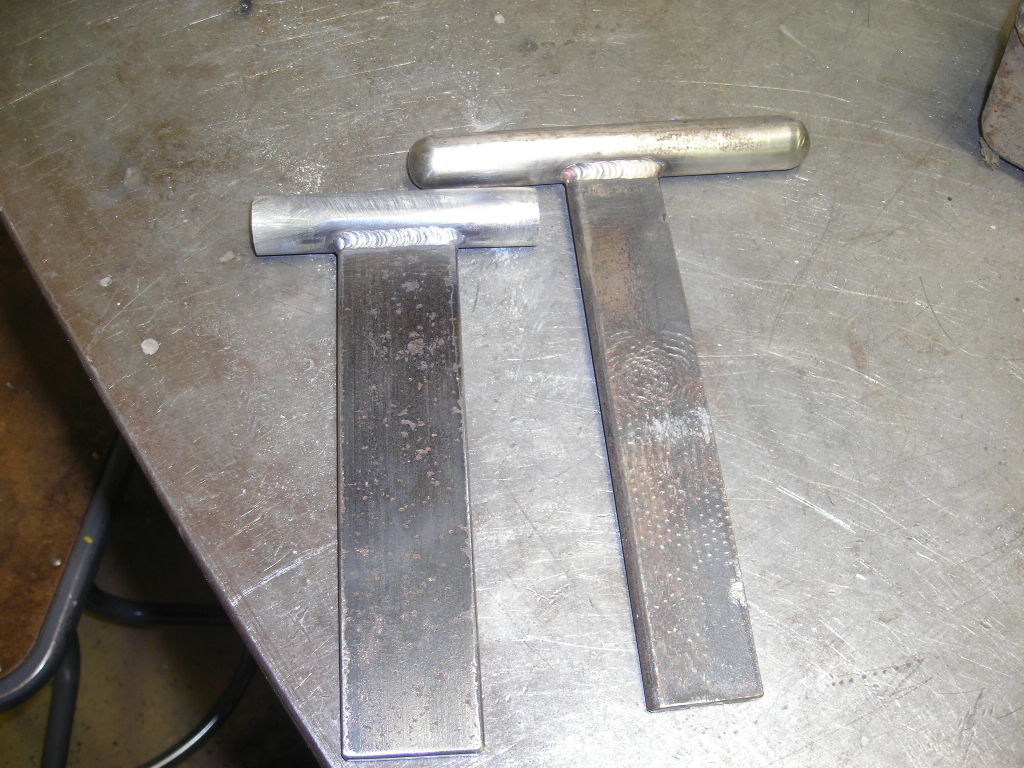
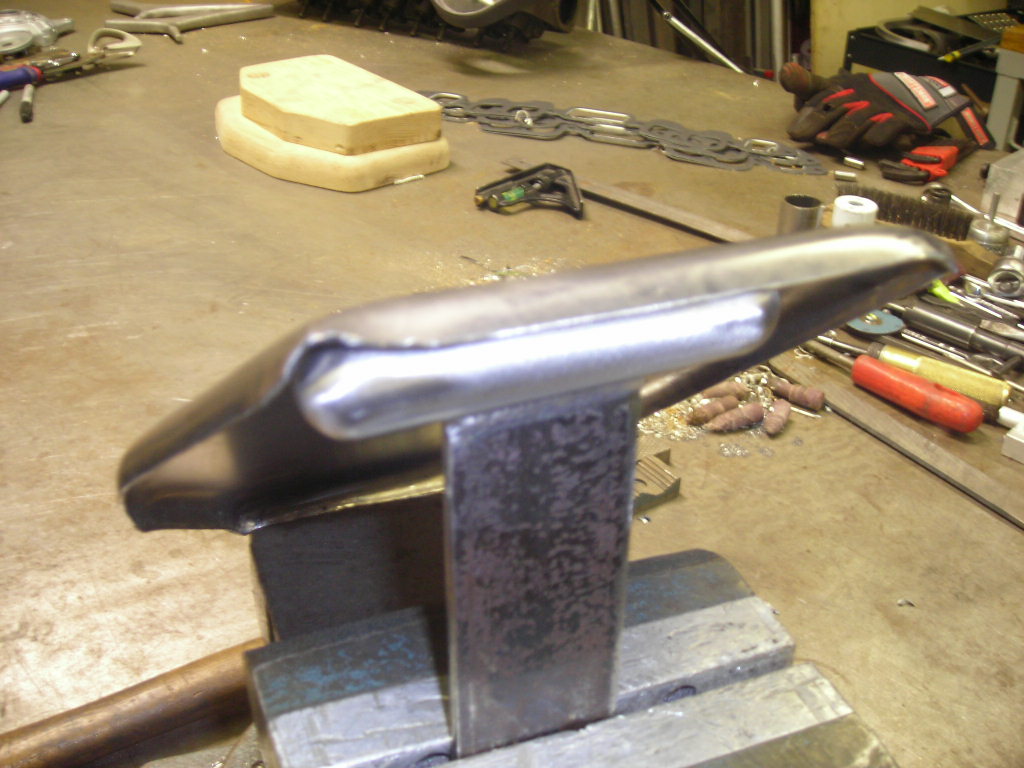
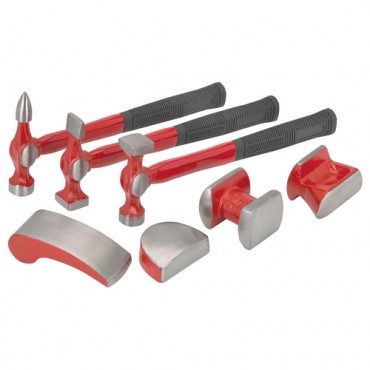
now youll need a few tools, but you can do a great deal with a decent set of tin snips a die grinder and a set of hammers and dollys for working metal and having several extra old oil pans to use as a source of pre-bent metal can sure help, and this is one area a 110 volt mig may be a good choice, but ID prefer TIG.
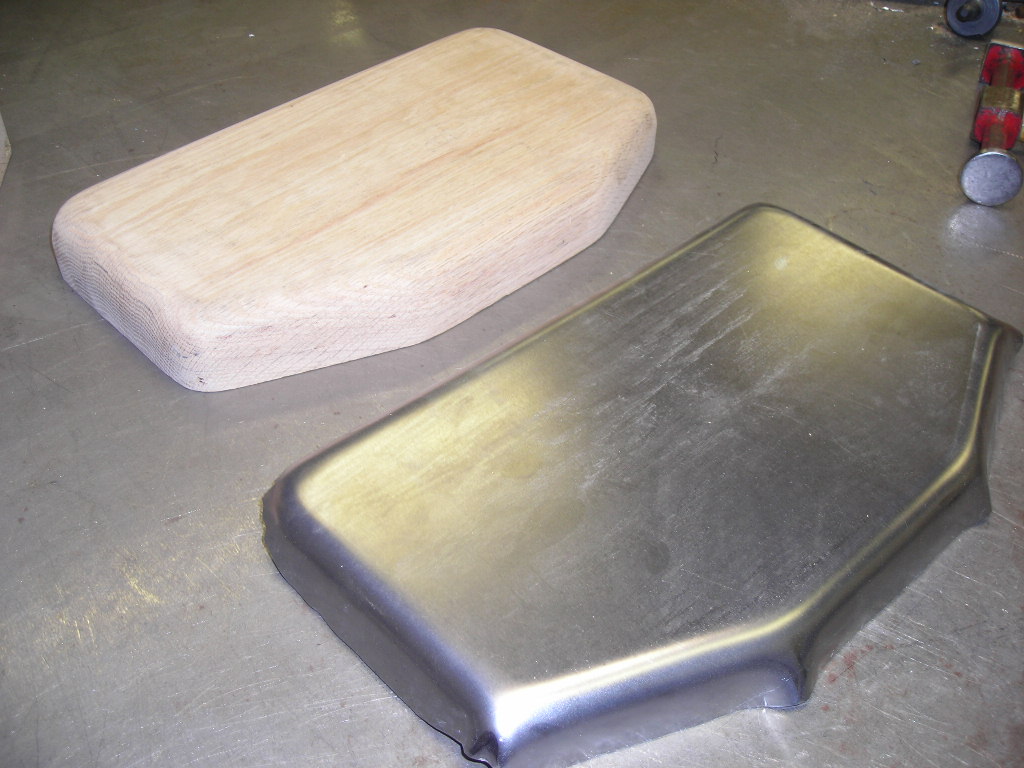
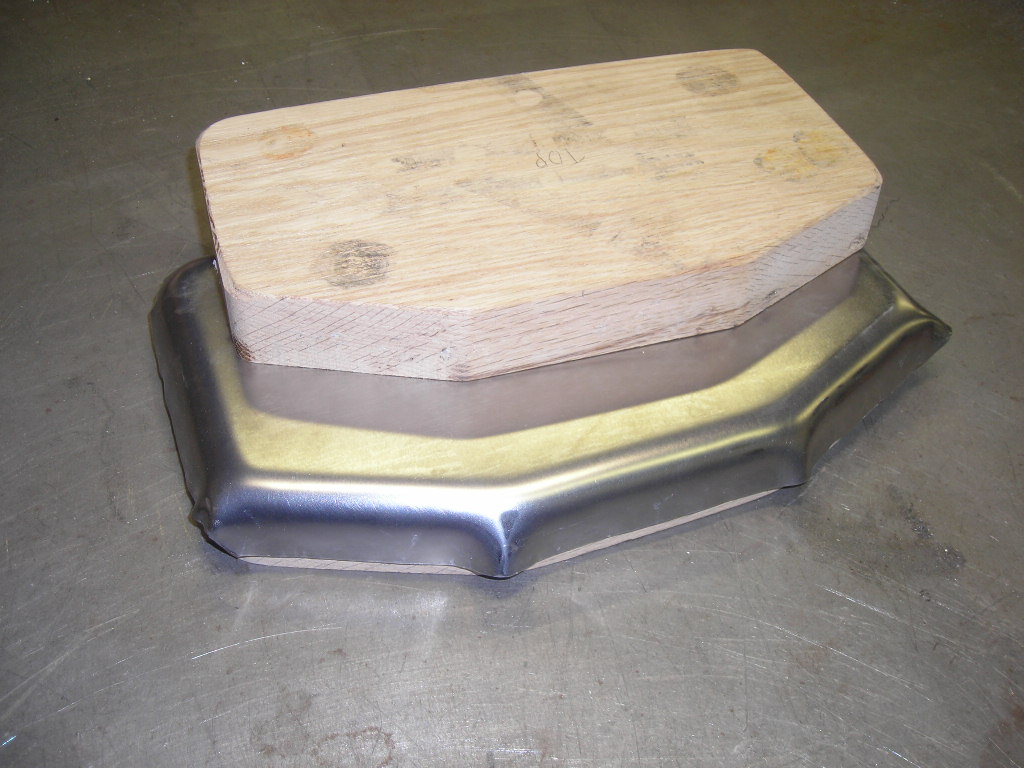
make patterns from poster board and tape as its far easier to correct that material or make mods to the design patterns with tape and scissors, and measure carefully, fold, tape and trial fit the card board patterns before cutting and transferring the correct tested and finished pattern to sheet steel. remember to measure for oil filter, header and frame clearance and oil pump pick-up placement, connecting rod and dip-stick clearance,etc. and road clearance and remember to allow easy access to the oil pan mount bolts
remember you must leave room to easily access all the fastener bolts that hold the oil pan to the block,
leave room to access the oil filter and drain plug,
and leave clearance for suspension, flex-plate or flywheel, room to mount the starter, and access its fasteners and electrical connectors, and fabricate the oil pan to clear, headers , k-frame, and maximize road to oil pan clearance
SHOP CAREFULLY , WHEN YOU GO TO BUY AN OIL PAN<AND ASK LOTS OF QUESTIONS ABOUT WHAT WILL FIT YOUR CAR CORRECTLY AND ASK FOR SUGGESTIONS ON MATCHING COMPONENTS OR PARTS THAT WON,T FIT
MILODON,
http://www.milodon.com/
CHAMP
http://www.champpans.com/products/c/oil-pans/
CANTON,
https://www.cantonracingproducts.com/category/1501/Chevy-SS--Road-Race-Oil-Pans/1.html
MOROSO
http://www.moroso.com/
AVIAID
http://aviaid.com/shopsite_sc/store/html/ws_oilpns_sbc.html
STEFS
http://www.stefs.com/products/oilpans/circletrackwetsump.htm
HAMBURGERPERFORMANCE
http://www.hamburgersperformance.com/
KEVKO
https://kevko.myshopify.com/
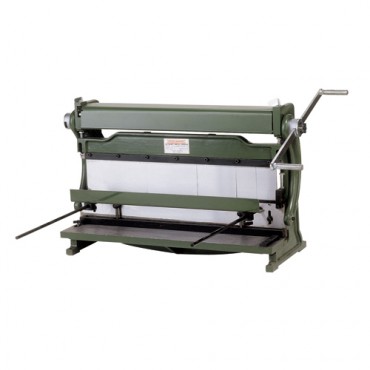
http://www.harborfreight.com/7-piece-bo ... 31277.html
http://www.harborfreight.com/30-inch-sh ... -5907.html
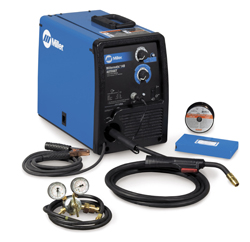
http://www.welders-direct.com/merchant2 ... ode=907335
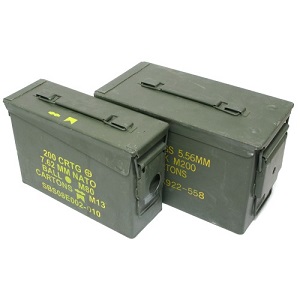
30 cal ammo cans are about 6" tall 10"wide and 3.5" deep
50 cal ammo cans are about 6.5" tall 11"wide and 5.5" deep
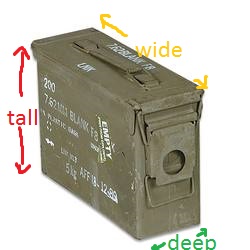
theres roughly 58 cubic inches in a quart, ,so a 30 cal can in theory holds an additional 3.5 quarts of oil capacity
and a 50 cal ammo can welded into a sump, if its full depth is used in theory adds 6.5 quarts if its full capacity is utilized, knowing things like this, is why owning a good MIG or TIG welder and having fabrication skills is a worth while skill and tool set to acquire
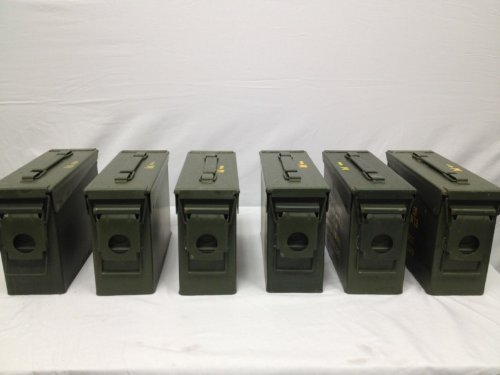
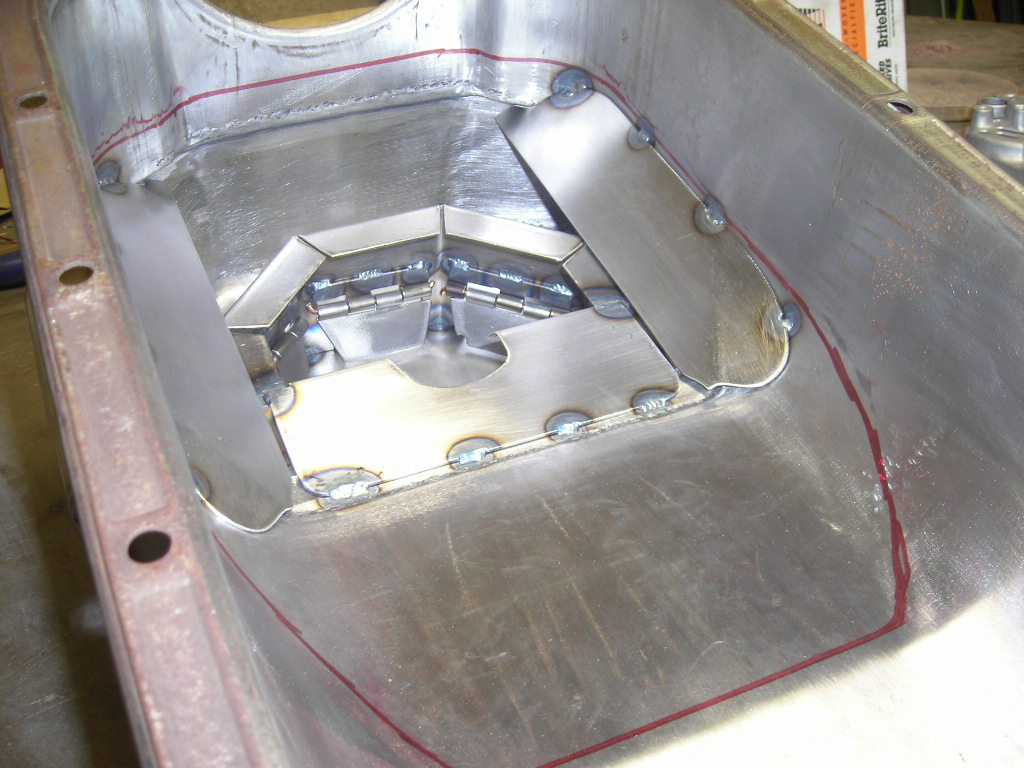
IVE purchased two-to-six of these 30 cal ammo cans several times as a cheap source of heavy gauge steel to cut and modify into a custom made oil pan sumps , careful measurements a good band saw and a TIG OR MIG welder, plus a couple old oil pans, some perforated 1/16" steel sheet, some small steel hinges, to practice on, and lots of pictures to get ideas from, can go a long way to improving your skill at improving both your welding and saving you a good deal of cash on custom fabricated baffled oil pans, ideally you can make it difficult for oil in the sump to flow away from the oil pump in the sump as the car accelerates and brakes but allow oil to easily flow to the oil pump,
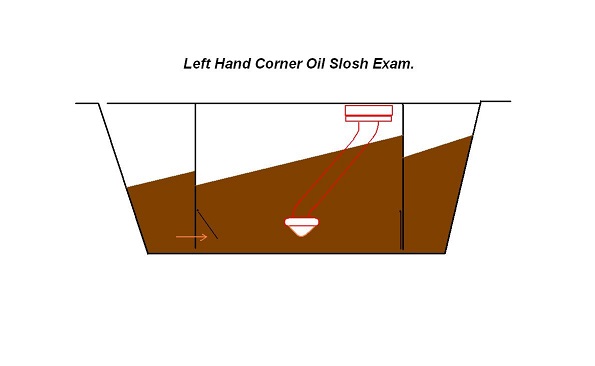
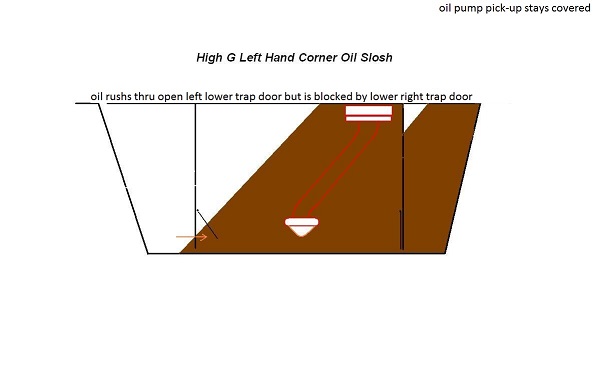
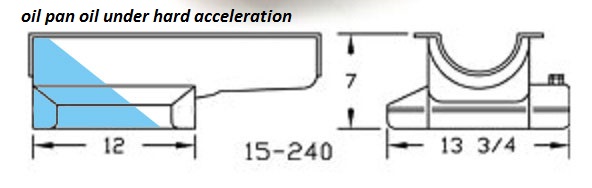
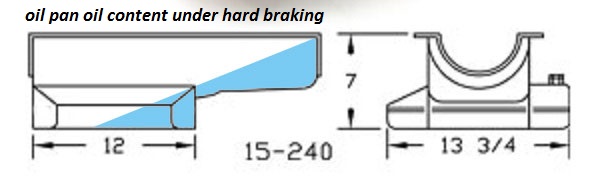
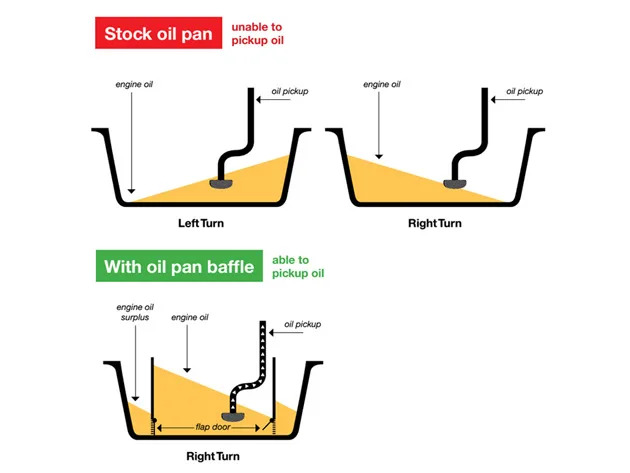
IF you've wondered why I suggest buying and using a well designed BAFFLED oil pan with 7-8 quart capacity its to prevent the oil from uncovering the oil pump pick-up under performance use.
without control baffles oil sloshes away from the oil pump pick-up
WITH CORRECTLY DESIGNED BAFFLES AND GATES OIL FLOW UNDER ACCELERATION AND BRAKING AND TURNS IS CONTROLLED AND DIRECTED TO THE OIL PUMP

any time you allow an unsupported section of the oil pump pick-up to not have a welded or properly bolted external support bracing,
you can almost depend on constant flexing to eventually cause durability issues.
a good many engines benefit from having a bolt on external brace to the engines windage screen, if you think in three dimensions vs just two this can be done rather easily.
https://www.chevydiy.com/chevy-big-block-performance-lubrication-system-guide/

https://www.enginelabs.com/engine-tech/engine/useful-tips-installing-oil-pans-right-way/
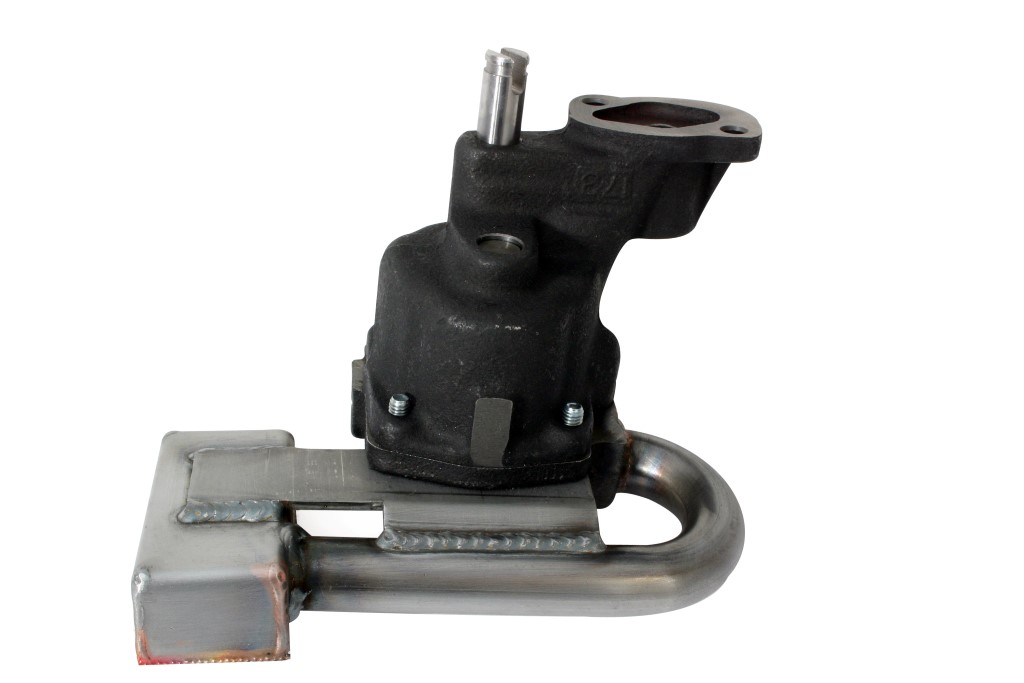
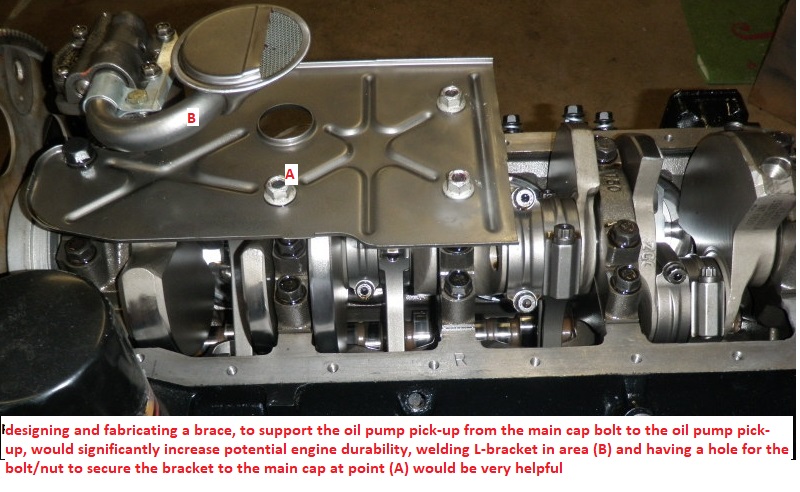
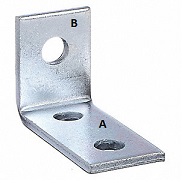
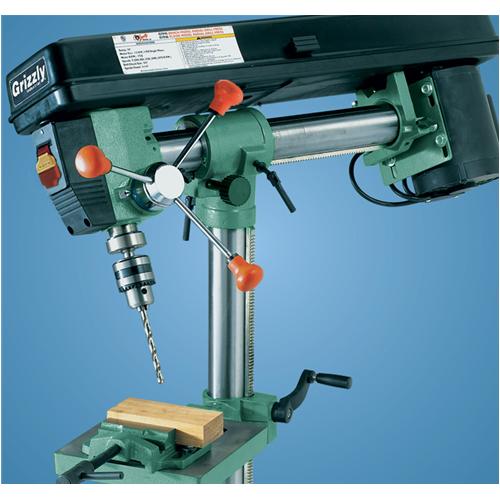
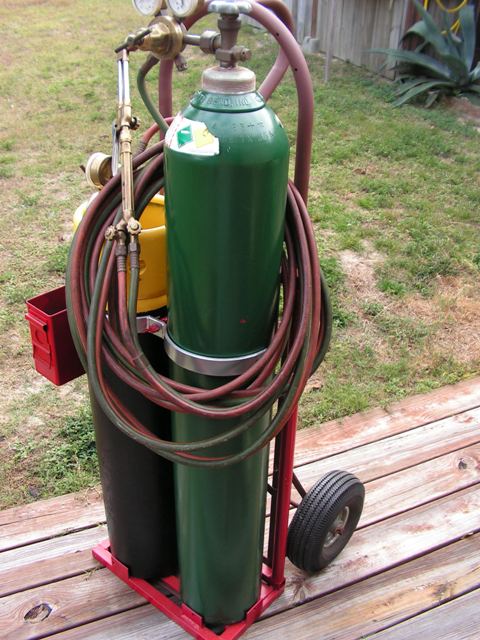
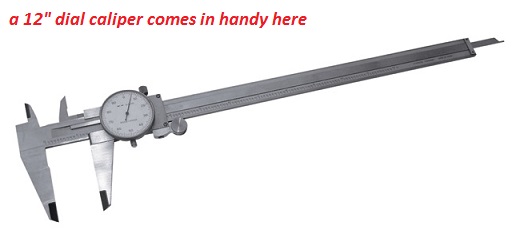
one more in an ENDLESS LIST of reasons any serious shop needs to have access to a decent welder (A OXY-ACETYLENE TORCH in this case) a drill press and a dial caliper could allow you to fabricate a $1 l-bracket that could easily be the difference between a $10-$15K engine living a long trouble free life vs a very expensive self destructing engine , lesson in why adding a $1 brace would be almost mandatory
http://www.colemanracing.com/Oil-Pan-10-QT-Big-Block-Chevy-P4093.aspx
http://www.custompartnet.com/wu/sheet-metal-forming
If your engine has several breathers and your leaking oil its most likely an oil control or gasket issue, best addressed with a 7-8 quart baffled oil pan, windage screen and crank scraper, tall cast valve covers and isolated breathers that will control oil return flow back to the sump in the engine.
now if your engine rarely sees the high side of 3500rpm this is basically not a big issue for most applications, but if you regularly spin an engine over 6000rpm this can frequently be something youll want to look into as oil control becomes far more important.
IF your having oil control or blow-bye issues you might want to do a leak down test to verify your ring seal and bore condition, and think about a decent baffled 7-8 quart, road racing oil pan design and running 6 quarts of oil,as that puts a good deal less stress on the oil control and having the oil drains holes in the heads and block checked for restrictions won,t hurt either.
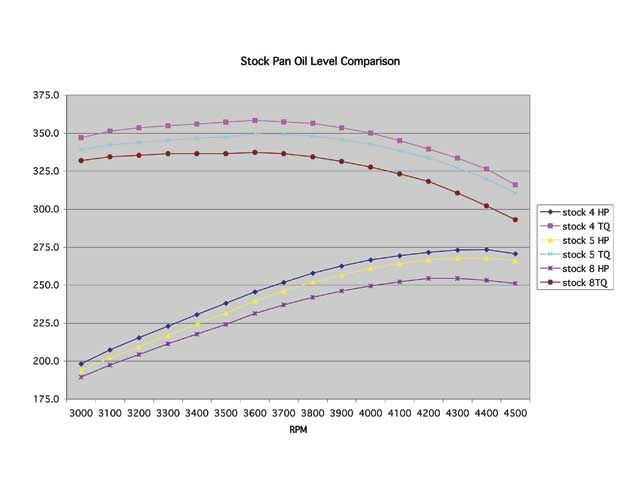
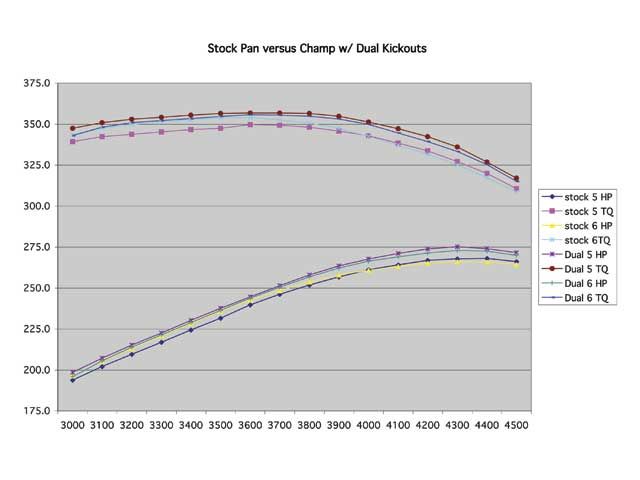
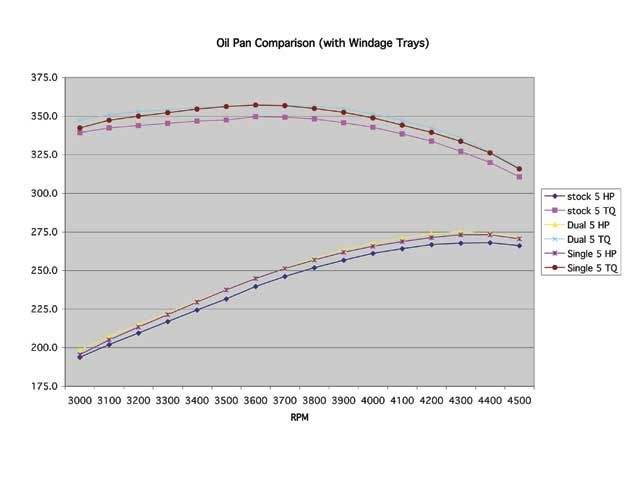
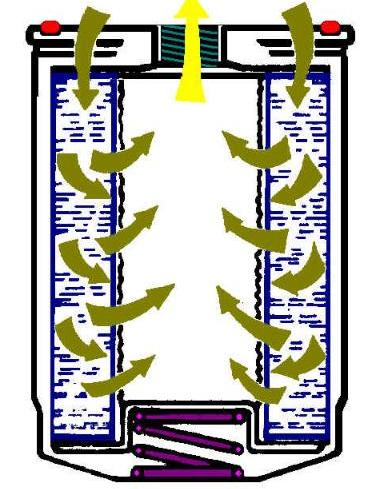
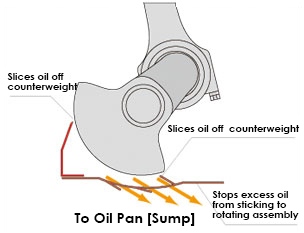
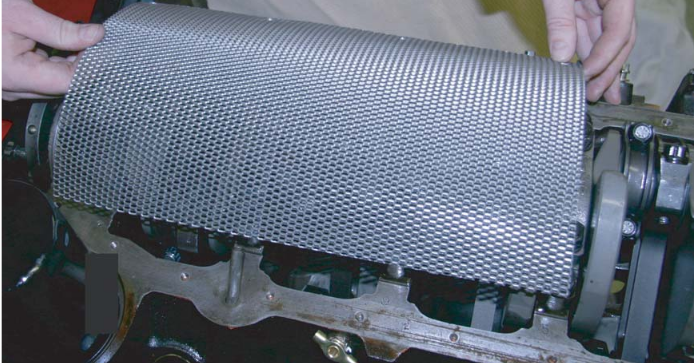
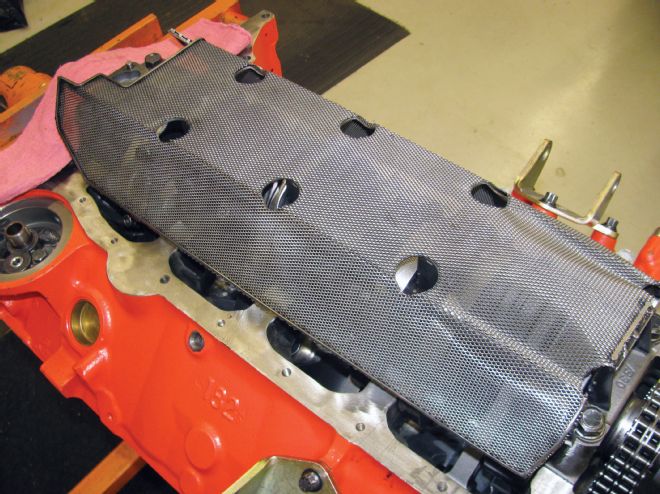
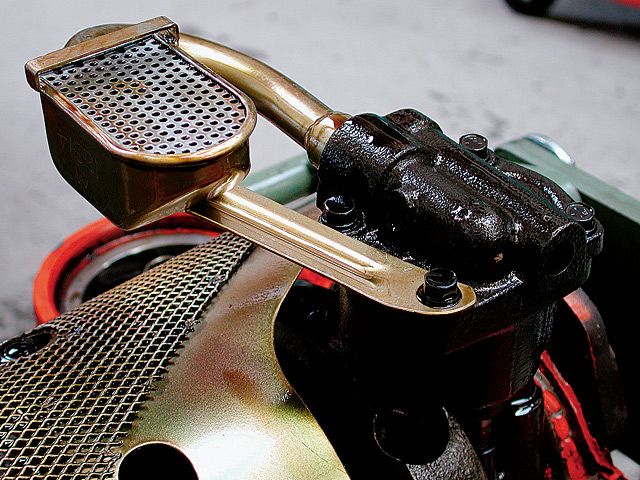
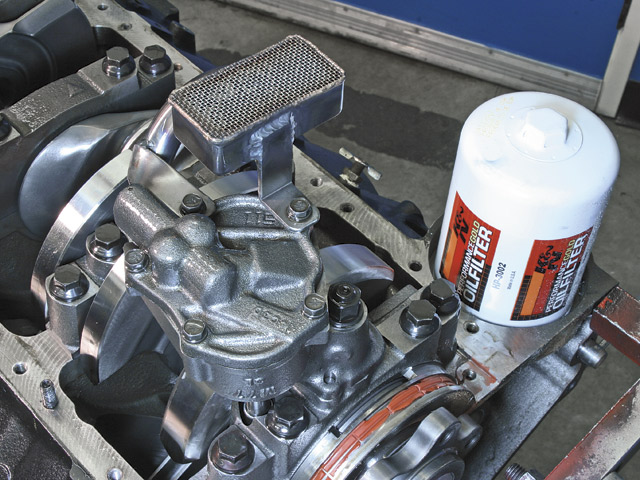
ADDING A WELL DESIGNED WINDAGE SCREEN SPEEDS OIL RETURN SPEEDS . AND EFFICIENCY TO THE ENGINE SUMP
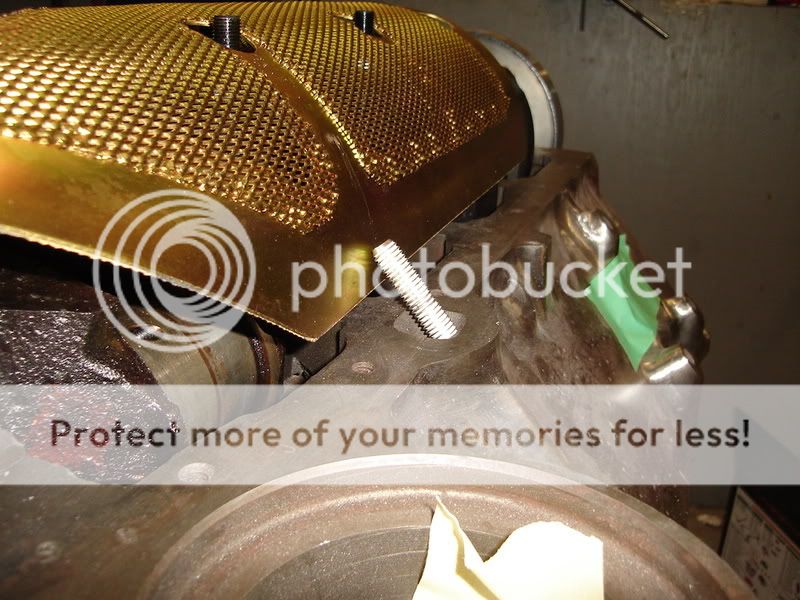
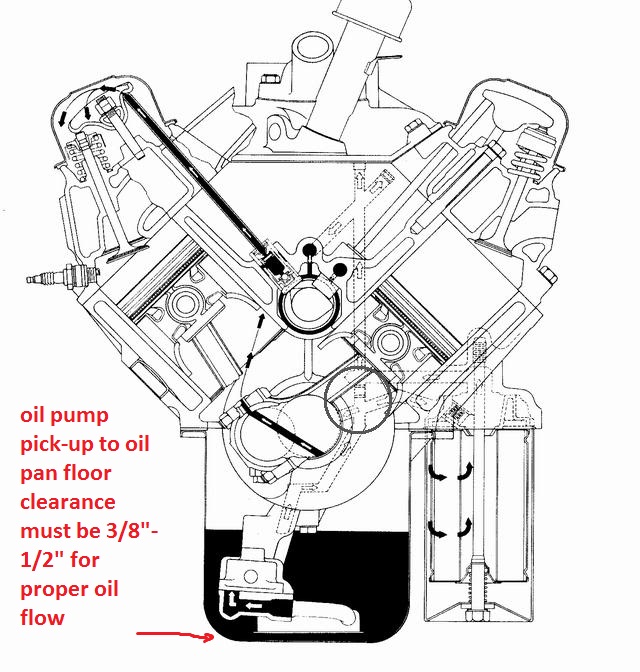
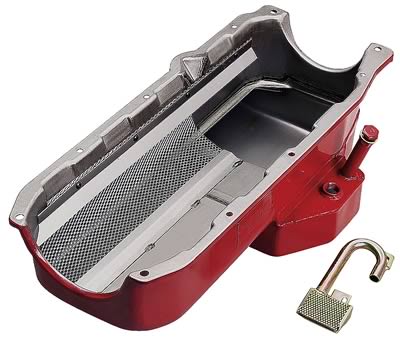
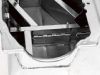
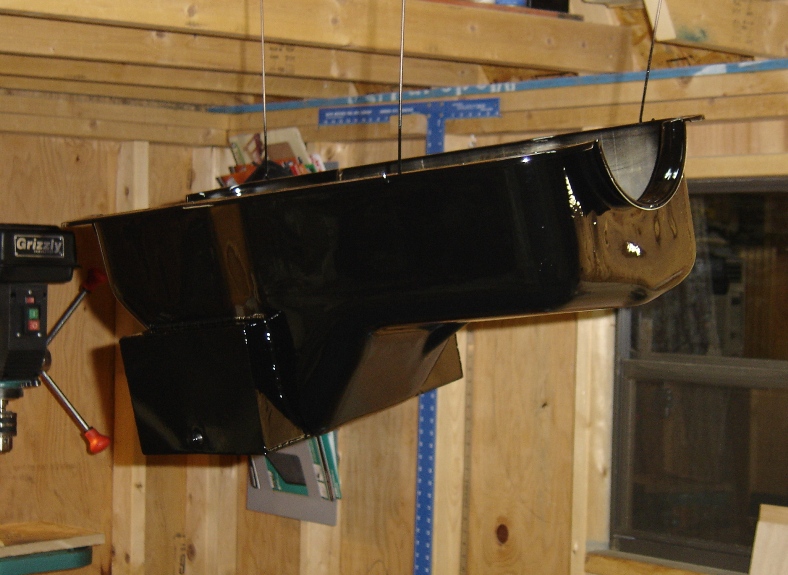
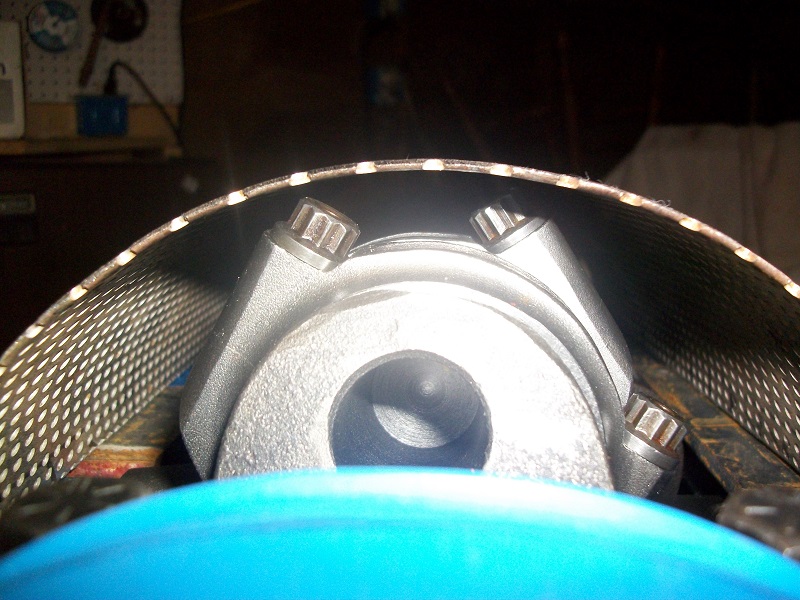
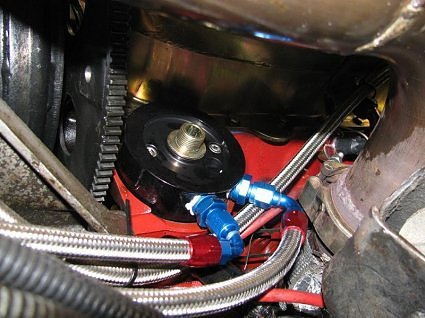
running an engine like this picture above ,with just an open oil pan, tends to waste 4-8 hp or more at higher rpms and may over load the rings with oil on the cylinder walls, and cause the bearings to get intermittent oil pressure
http://garage.grumpysperformance.com/index.php?threads/magnets.120/#post-49772
you'll ALWAYS want to shop around and ask lots of questions before you purchase an oil pan, find out the capacity, depth and if it fits your cars frame/suspension, and if there's any headers or starters that are required or that won't fit with the oil pan, verify the correct oil pump and pick-up part numbers, verify all the clearances.
BEFORE ORDERING, remember , oil pans even on SBC engines vary with year and application, there's right and left hand dip stick blocks and one and two piece rear seals
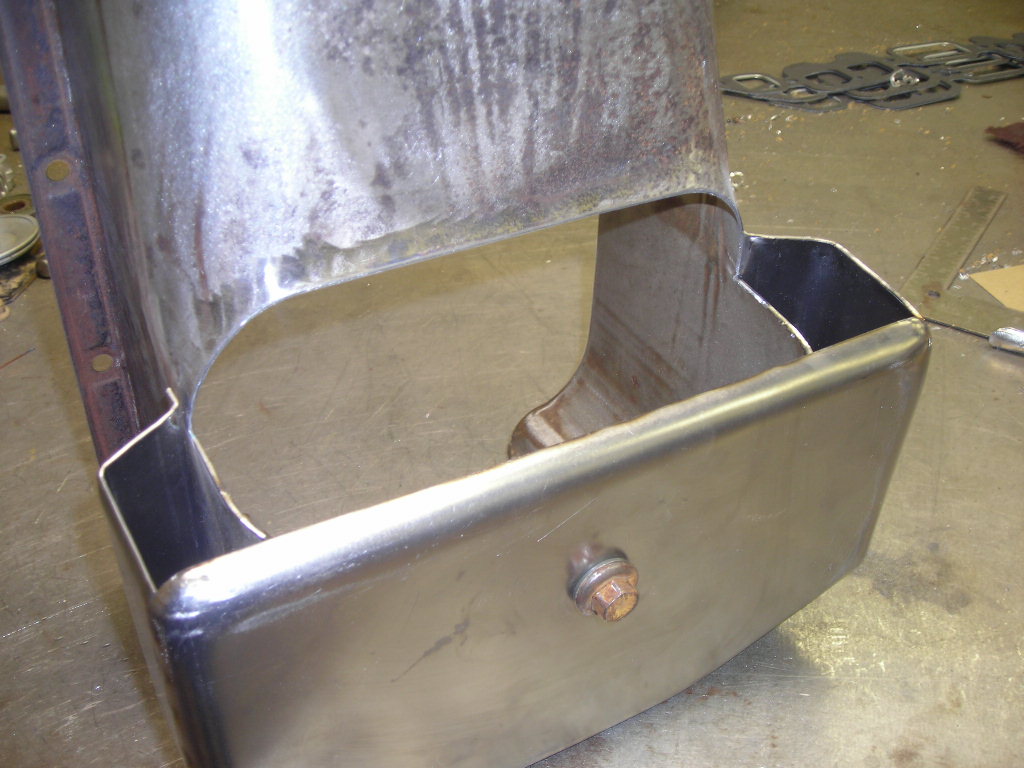
and you have the option if you can weld thin sheet steel or aluminum , you can do what I do, buy one of the pans below, and modify it , for a C4 corvette ,at the MINIMUM your need to cut the front lower edge lower corner ,1" wide at a 45 degree angle, and re-weld in a plate so it clears the front cross member, on some pans.
EXAMPLE
heres a basic choice, on the midwestmotorsportsinc.com pan,
http://www.midwestmotorsportsinc.com/in ... parent=277
http://kmjperformance.com/kevko-108...o-oil-pan-circle-track-350-400-imca-usra.html
having a good high capacity baffled oil pan on your engine adds considerably to its potential durability and potential life span
drivers side dipstick
http://www.moroso.com/catalog/categoryd ... code=11330
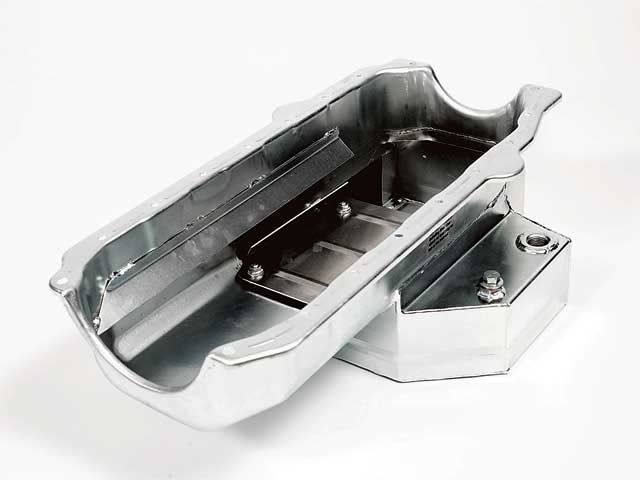
the cantons a bolt-in deal, now I also extended the sump forward until it was within 3" of the front of the oil pan, to increase the capacity to 10 qts, remember you want to keep the sumps oil level in the running engine well below the windage screen lower edge and a closely fitted crank scraper, and the correct internal baffles in the oil pan, helps with the oil control issues
another good example of why a shop welder is so valuable, you can build a decent oil pan for under 1/2 the price you can buy one for
http://www.midwestmotorsportsinc.com/order_part.php?item=15120K&line=MWM
read
http://www.circletrack.com/techarticles ... index.html
OR
http://canton.carshopinc.com/produc...1-120?osCsid=1864652061e9b34e7648e188bb985ecf
Canton Oil Pans
11-120 and 11-120T Oil Pans
http://www.jegs.com/p/JEGS-Performance- ... 4/10002/-1
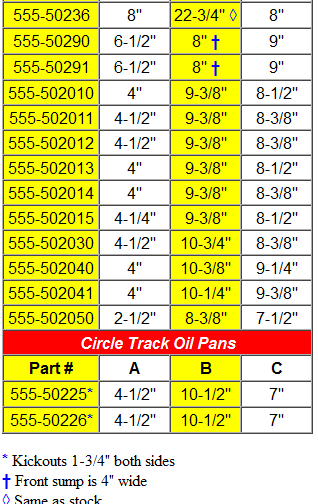
http://www.jegs.com/SizeCharts/555-OilPanChart.html

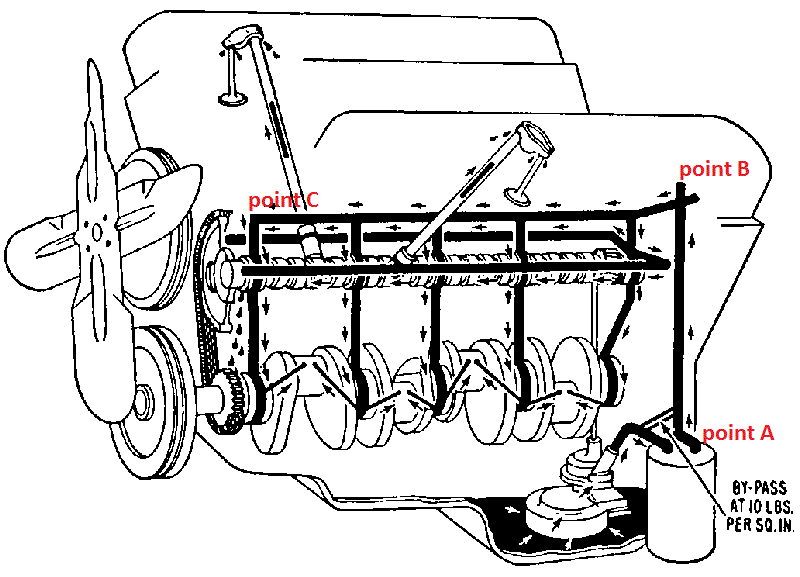
Id also point out that, if you properly set up an engine's oil system, open the oil drain holes and use the proper oil pan, windage screen and crank scraper, its virtually impossible , in a well designed engine to run the engine "long enough to pump all the oil upstairs."
as with a properly designed baffled oil pan, with a carefully fitted and clearanced windage screen and crank scraper, the oil pump simply reaches a flow rate pumping oil out of about 100 or so potential lubricant flow leakage points
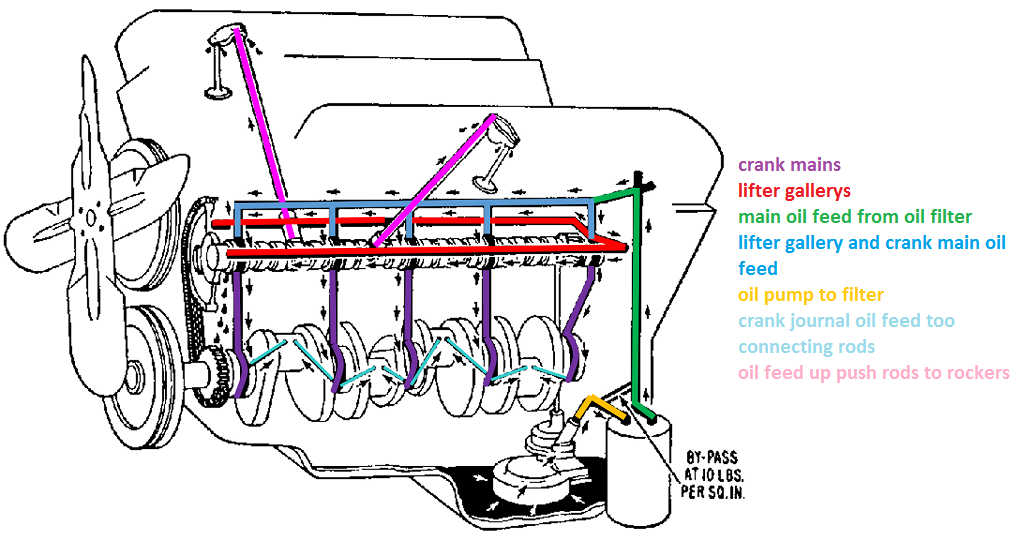
http://garage.grumpysperformance.com/index.php?threads/whats-a-windage-tray-do.64/
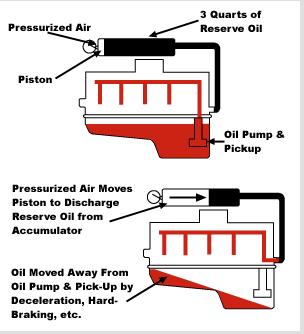
theres zero doubt an accusump oil feed is a good insurance policy to maintain oil pressure at the bearings, but simply having a 7-8 quart baffled oil pan,properly clearanced, windage screen and crank scraper will insure the oil pressure remains consistent , mostly due to the fact that theres always going to be enough oil over the oil pump pick-up, simply because theres really no room to pack most of the available oil volume in the upper engine ,plus the fact that hot oil flows well.
OIL PRESSURE read on the oil pressure gauge is a MEASURE of RESISTANCE to oil flow, you can REDUCE the pressure the gauge reads by either increasing the engine clearances or REDUCING the oil viscosity (thickness) so it flows thru the clearances faster with less resistance.(OR INSTALLING A SLIGHTLY WEAKER OIL PUMP BYE_PASS SPRING,that limits the pump pressure before it allows some oil to re-circulate back through the bye-pass valve ,from the high pressure back to the low pressure side of the pump impellers, but only the max pressure you reach is limited by the bye-pass spring,in your oil pressure bye pass circuit and its that spring resistance determines the point where the bye-pass circuit, opens and limits max oil pressure, but the bye-pass circuit has zero to do with anything else, if its functioning correctly,
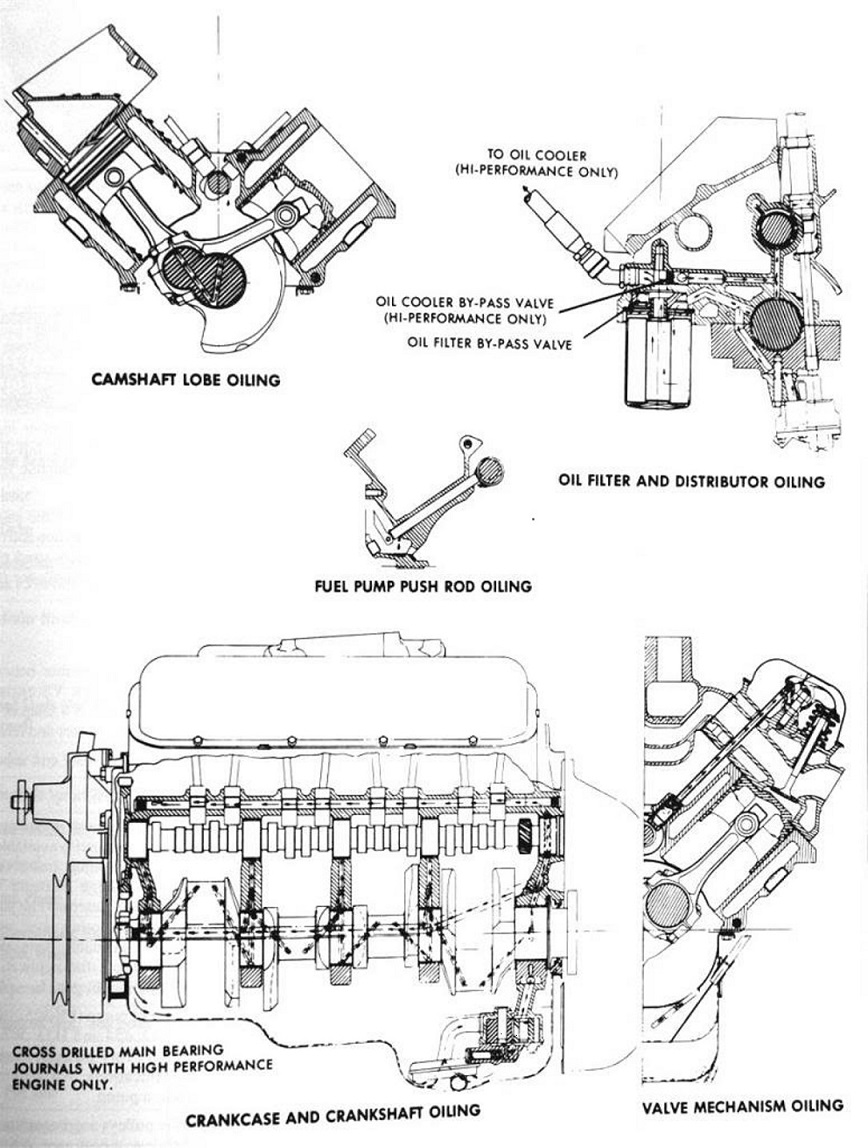
there are many oil leakage points(100) in a standard Chevy engine.
16 lifter to push rod points
16 push rod to rocker arm points
32 lifter bores 16 x 2 ends
10 main bearing edges
9 cam bearing edges
16 rod bearing edges
2 distributor shaft leaks
1 distributor shaft to shim above the cam gear(some engines that have an oil pressure feed distributor shaft bearing.)
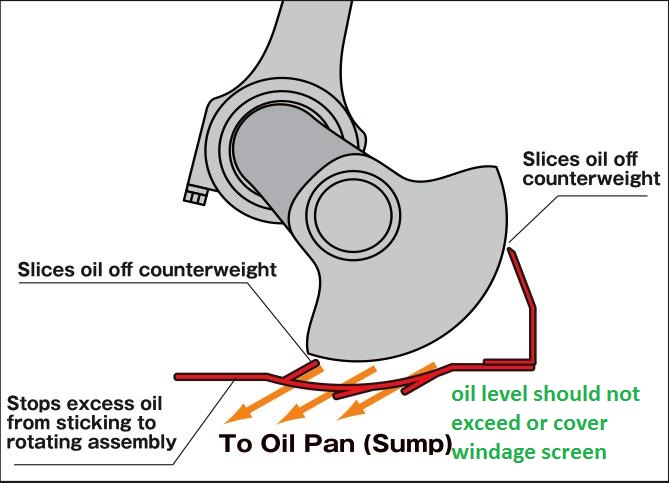
once oil exits the bearings or valve train it flows mostly by gravity back to the oil pan sump, but a properly designed windage screen and crank scraper correctly clearanced allows the spinning crank/rotating assembly to act like a directional pump that drags the vast majority of the oil flow back to the sump, by design.
http://garage.grumpysperformance.com/index.php?threads/whats-a-windage-tray-do.64/
http://garage.grumpysperformance.com/index.php?threads/oil-system-mods-that-help.2187/
http://garage.grumpysperformance.com/index.php?threads/basic-info-on-your-v8-lube-system.52/
theres a great deal of related info in these threads
http://www.livermoreperformance.com/can ... _pans.html
http://www.chevelles.com/techref/ScreenInstall.pdf
you don,t need to spend big bucks on a baffled road racing oil pan if you can weld , measure and fabricate, keep in mind a higher capacity baffled oil pan and windage screen are good insurance against oil related problems.
on a CORVETTE the ground to lower block clearance better not exceed 7.5" with 7.25 being better and 7" about ideal for road clearance, but be aware that factors like the suspension, K-MEMBER and other under car obsticals unique to that model will influence your selection and so will your stroke and windage tray height or main caps so ASK QUESTIONS BEFORE you buy I GENERALLY BUY A DECENT CIRCLE TRACK DESIGN PAN then MODIFY it to the application,as its far easier than starting from scratch, adding or moving the sump,baffles etc. BTW you can use tape and poster,cardboard to mock up ideas and potential changes, and use as patterns when folding the sheet steel you actually use in the oil pans modification, but be sure to work with the starter exhaust and suspension clearances being checked frequently,and access to the pan bolts in mind, these circle track pans generally make an excellent starting point, and these guys are great to deal with
the minimum sump depth, its far faster to modify a circle track style pan as a starting point, but you can start with any pan, use cardboard to make a pattern first then cut and fold the sheet steel later using the pattern after you verify it clears all the k-members,starters, filters etc
if your over heating the oil,first suggestion swap to a decent synthetic oil in the 10w30 range or at least the thinnest viscosity that maintains 20 psi at hot idle temps, as SYNTHETICS don,t generally start breaking down until about 280F PLUS while mineral base oils tend to start degrading after repeated 250F use, and the thinner the oil the faster it circulates thru the clearances, and the faster heats absorbed and transferred out off the hotter components
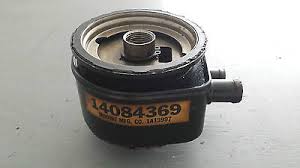
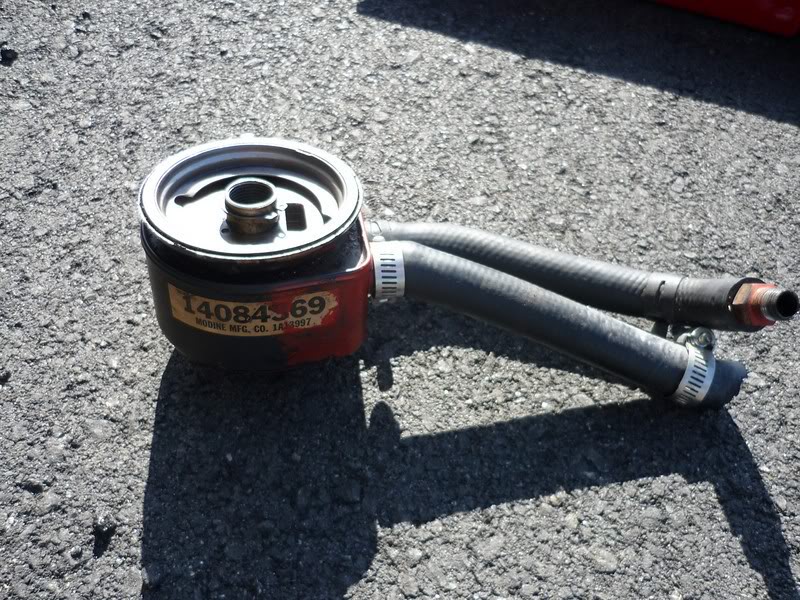
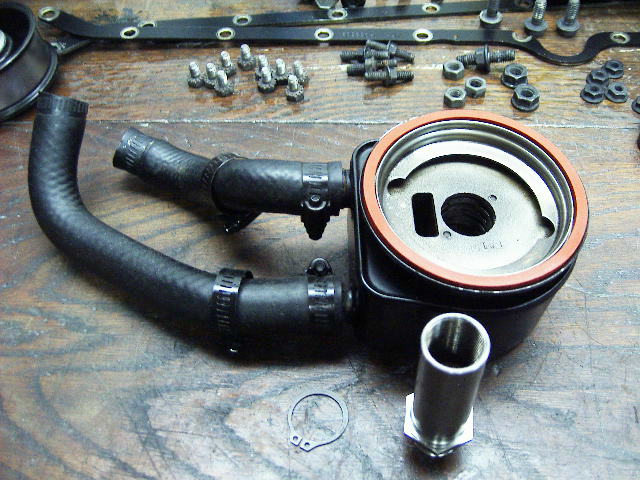
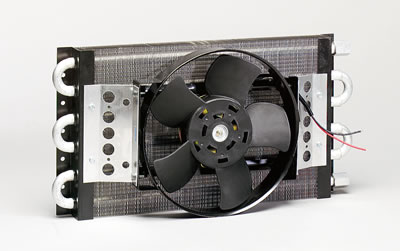
and Id need to know more about the complete engine parts list, clearances, etc. but Id sure want to verify the fuel/air ratio is at about 12.6:1 not alot leaner and your ignition timing was carefully checked to not be a couple degrees advanced from ideal., and that your running a 7-8 quart oil pan, heres the oil cooler I use and I had to install a thermal switch or it OVER COOLED my engine oil in FLORIDA where average outside air temps closer to 90F
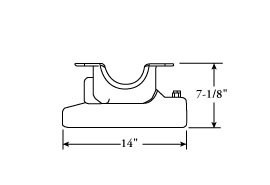
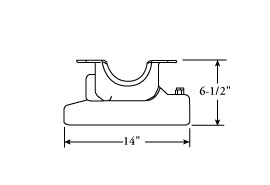
my oil pan looks vaguely similar to this,you should be looking for a 7"-7.5" max pan depth on a C4 corvette
http://canton.carshopinc.com/produc...1-120?osCsid=1864652061e9b34e7648e188bb985ecf
Canton Oil Pans
11-120 and 11-120T Oil Pans

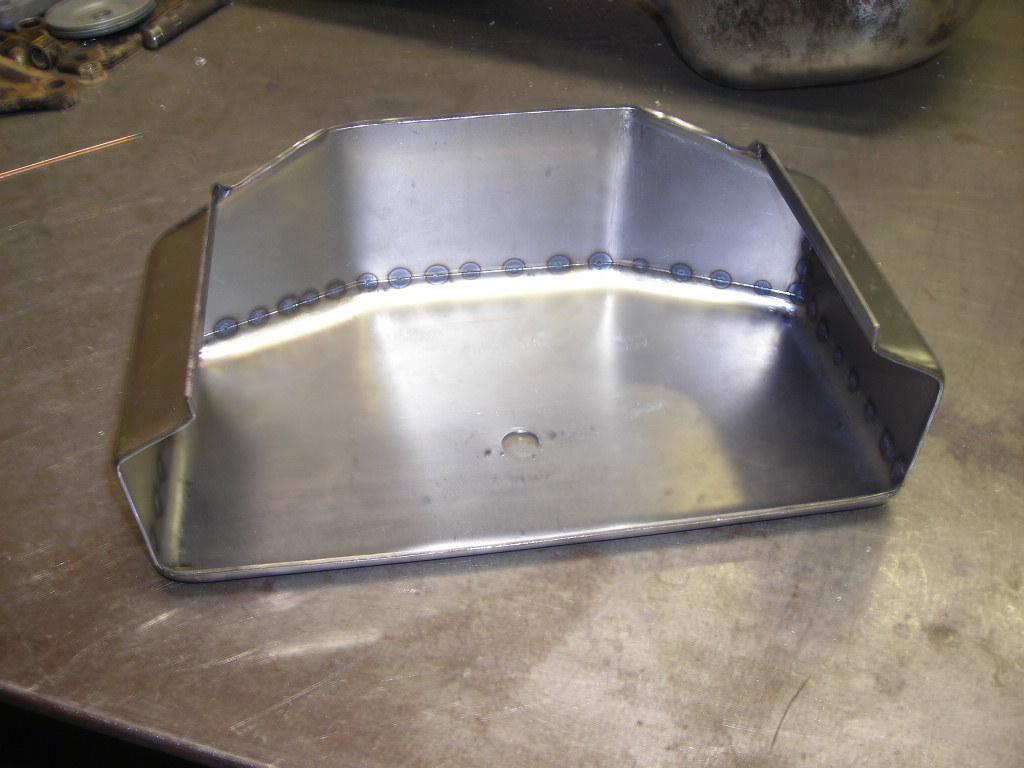
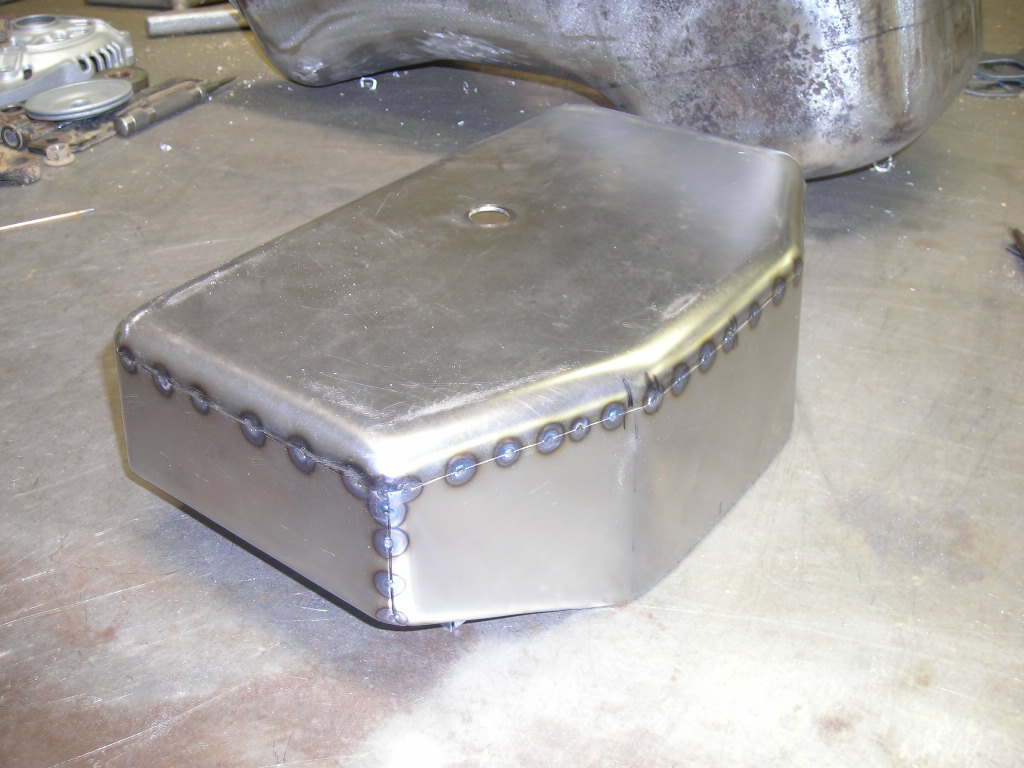
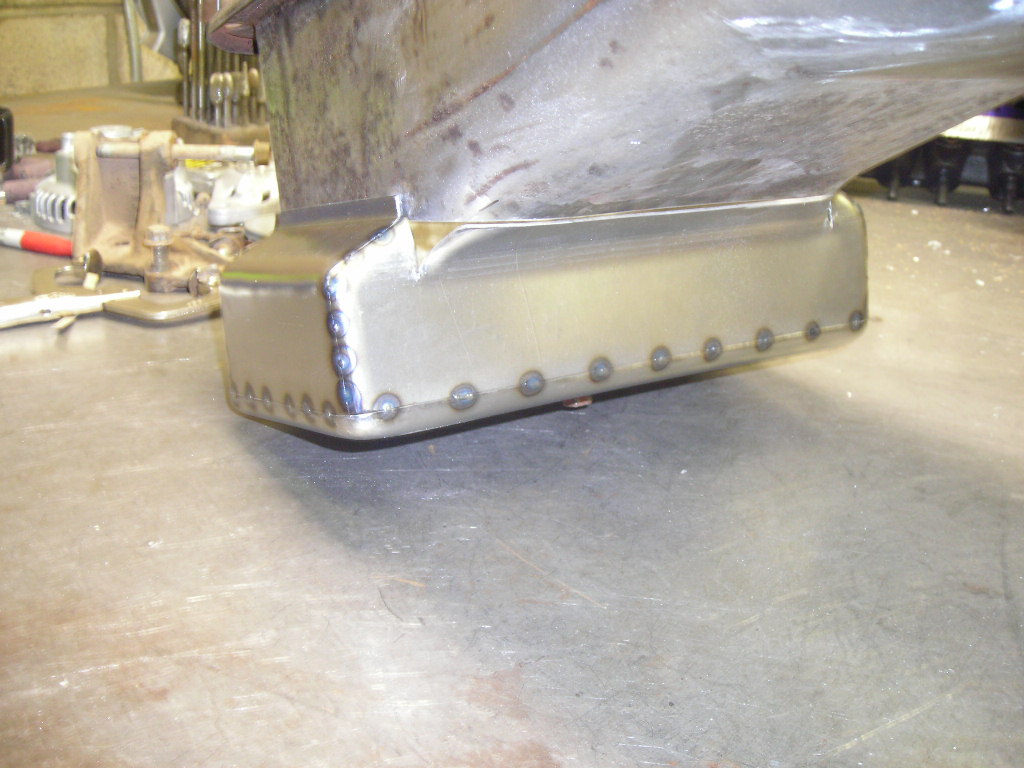
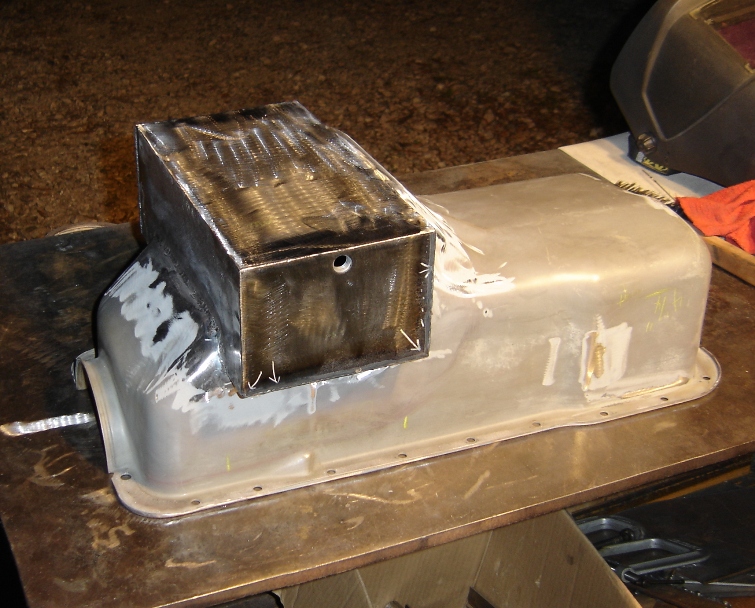
but I extended the sump forward until it was 3" from the front of the pan with 14 ga steel and a tig welder to add about 4 inches extra to the sump to get 10 qt capacity, naturally a custom sump requires you to measure for header and suspension clearances, don,t forget to leave access for the oil filter and starter
http://www.summitracing.com/parts/PRM-1 ... mage=large
http://www.midwestmotorsportsinc.com/order_part.php?item=7101R&line=WYS
http://www.midwestmotorsportsinc.com/order_part.php?item=15120&line=MWM
keep in mind the oil pump and pick up take up some of that volume , and that in a running engine theres about 2 quarts in the upper engine in the heads, oil passages,lifter galley etc. not counting the oil filter which could hold an additional quart plus in some cases

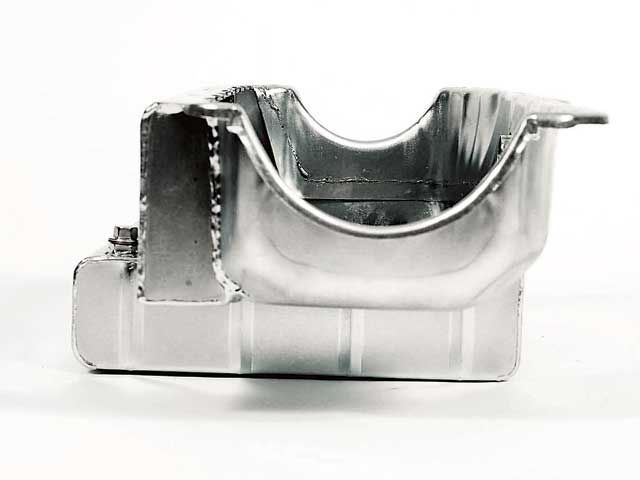
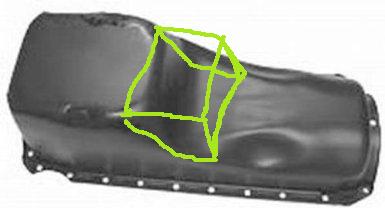
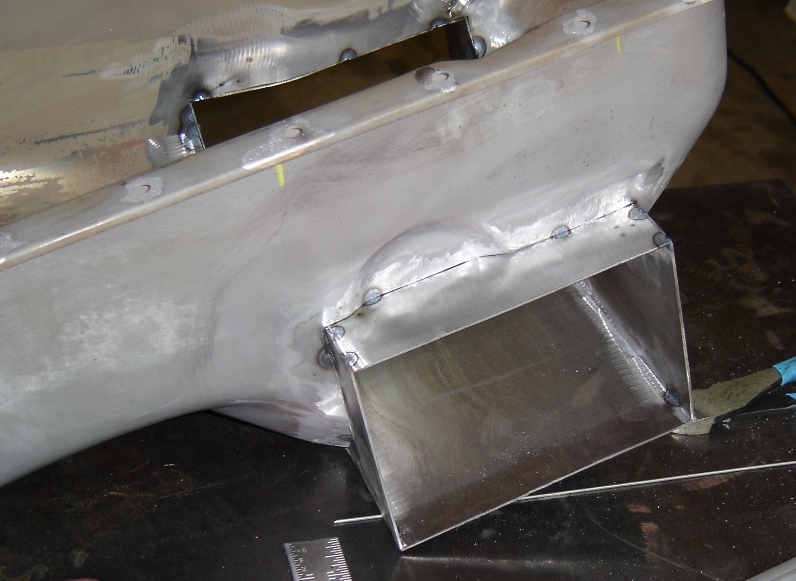
for example on my vette I needed to cut and weld a patch of a 1" wide 45 degree bevel on the front lower edge, as the pans orriginal lower front edge hit the k-frame , the sump to clear the K-MEMBER clearance needed that mod. and I extend the sump forward 4",added baffles and add a second side sump, to get to the 10qt volume I wanted in my race engine
heres a factory version for $240 without the forward extended sump but with the side sump, keep in mind your times worth something, but you can build a decent racing oil pan for under $120 vs $240 for the smaller capacity factory version

http://www.midwestmotorsportsinc.com/order_part.php?item=CP100LT&line=MWM
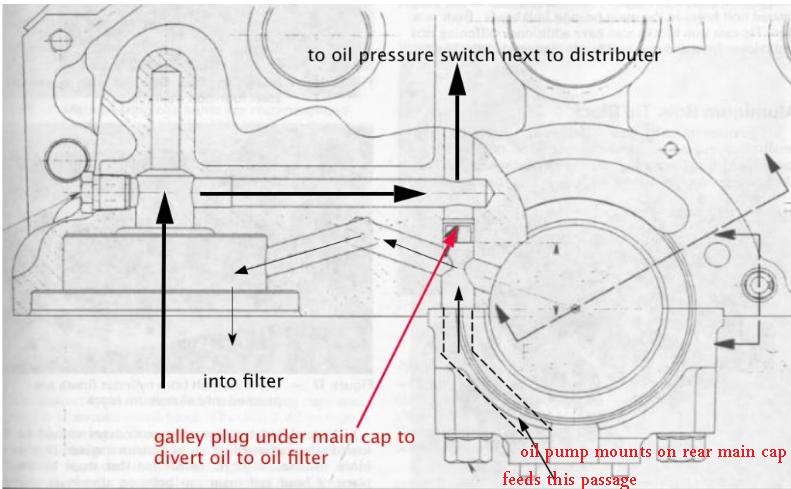
first gen small block oiling
LSI/LS6 OIL ROUTING THRU BLOCK
BEST NOT AS A BEGINNERS FIRST WELDING PROJECT , BUT IF YOU HAVE SOME EXPERIENCE AND SKILL ITS FAR FROM DIFFICULT, be sure to weld while the pans mounted to the block if you can to minimize warping due to heat distortion
http://store.summitracing.com/partdetail.asp?autofilter=1&part=MOR-21950&N=700+0&autoview=sku
Moroso 21950
http://www.qmpracing.com/qmpcatalog/product_info.php?products_id=15879
READ
http://rehermorrison.com/tech-talk-74-t ... liability/

BTW
http://www.digitalcorvettes.com/forums/showthread.php?t=81091
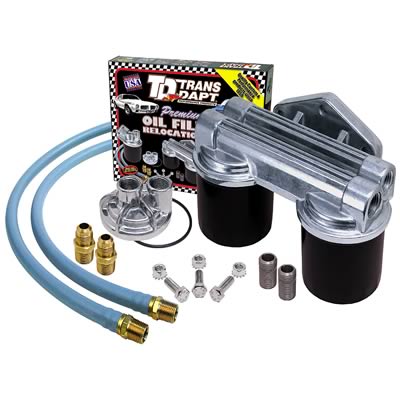
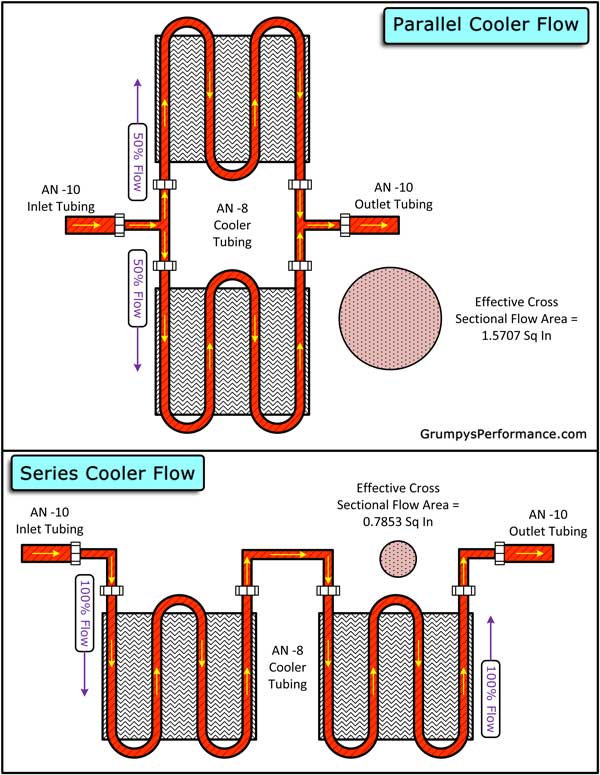
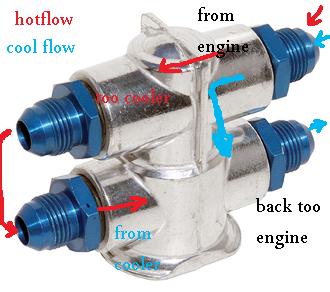
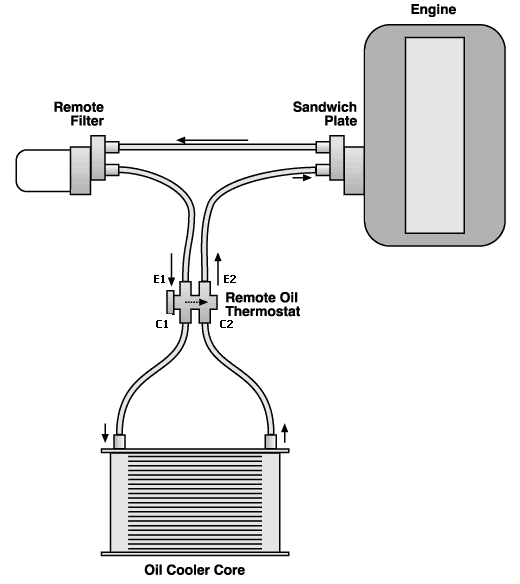
BTW HERES AN IMPORTANT TIP, IF YOUR INSTALLING A REMOTE OIL COOLER,IT is really common for guys to use lines that are far to small, that restrict flow oil flow or select a transmission or oil cooler that has to small of internal passages, shop carefully you want a MINIMUM of 1/2, or AN8 line size and 5/8" or AN10 is BETTER
think about it, your measuring the oil pressure in most cases AFTER its been thru the cooler and returned to the oil passages in the block, oil leaves the oil pump and its routed to the oil filter where the oil filter adapter routes it thru the oil cooler and back to the adapter then into the block, your measuring the restricted oil flow after its returned to the block, if the lines or cooler passages restrict oil flow its potentially a problem for lubrication of the moving parts if pressure or oil volumes reduced
and its a fact that a custom oil pan could easily cost you close to $800 plus
If you don't know how to weld and don't own a decent welder, I've generally used poster board and tape to , cut, and test fit and make patterns for baffles then use sheet steel a few small hinges and a mig or TIG welder to install baffles in existing oil pans, but on many occasions Ive modified and cut oil pans and modified 30 caliber ammo cans to make extended or higher volume oil sumps.
your frequently going to pay a great deal more than someone who can fabricate parts in this hobby
(its one of the reasons I learned to use a tig welder and purchased a nice MIG welder)
yes if you shop carefully you may find a bargain, as the prices and features , and quality of fit and finish, vary a great deal between manufacturers, and keep in mind your not limited to what you can purchase, across the counter at the local speed shop or thru mail order, there's the option to custom fabricate or modify existing components to exactly fit your application.
you'll frequently find that a decent price on a 6-7-8 quart baffled oil pan with your idea of the ideal capacity and road clearance is rather hard to locate and many times guys just don't have the $400-$600 THAT THE BETTER QUALITY OIL PANS COST OVER THE COUNTER.
yes there's almost always some oil pans listed for the more common cars for under $100, but they may not provide the capacity or baffling you may desire.
now I build several engines a year for myself or close friends and many of us own corvettes, which have generally minimal road clearance issues and can seldom use an oil pan deeper than about 7.5" and 7" is the preferred max sump depth, this limits choices when you want a minimum of 6-7 quart capacity.
well, you BOTHER to modify an oil pan because a constant dependable supply of pressurized, comparatively cool oil, flowing over , and lubricating the moving surfaces of your engine is mandatory to maintaining its continuing dependable function, and durability, failure to maintain adequate pressurized oil flow results in rapid wear and parts failure the basic design of the stock oil pan,was never intended to be ideal on an engine producing significantly more horsepower or spinning at significantly higher rpms or once subjected to high lateral inertial loads that performance use of a car and, use of a baffled high capacity oil pan with a windage screen, makes mandatory, if durability is important. a high performance engine requires a much different set of operational conditions to be considered to be incorporated into its design, first is the obvious higher average operational rpm, power band which will require a windage tray so oil will not be constantly carried around inside the lower engine block with the spinning rotating assembly , and beat to a froth, next will be baffle to prevent inertial loads from uncovering the oil pump pick-up under hard braking,acceleration and lateral side loads , that would allow oil in an UN-baffled oil pan to slosh away from the oil pump pick-up, dropping oil pressure, next is generally several extra quarts of capacity to help insure both cooling and supply under high rpm loads
http://www.milodon.com/oil-pans/road-race-oil-pans.asp
Hamburger's Performance 1488 Hamburger's Performance Econo Series Oil Pans | Summit Racing
Free Shipping - Hamburger's Performance Econo Series Oil Pans with qualifying orders of $109. Shop Oil Pans at Summit Racing.
Id also point out two very common mistakes made are the failure to carefully measure clearances and ask questions about what will fit and what won,t fit, for example most headers are designed to fit with the stock oil pans, and may not fit correctly with every custom oil pan, so verify your headers fit before spending $450-$600 on a custom oil pan, or , $1200 on headers that may not clear that new custom oil pan, or find out if either component might require a remote mount oil filter location, or inquire if the oil pan or headers require a mini starter, in short do some research home work, don,t assume everything will fit every application, and yes a bit of custom cutting and fabrication skill, and careful welding can and does frequently make fitting a high capacity baffled oil pan with custom headers workable where lack of the ability to modify an oil pan may prevent their use together, having the ability to custom fabricate and modify parts is near mandatory in this hobby
a custom oil pan design is USUALLY not really about the amount of oil ,it holds as much as controlling the rapid return of oil to the sump so its constantly covering the oil pump pick-up. correctly designed baffles route the oil flow directly to the oil pump pick-up and restrict oil flow away from the oil pump, under inertial loads like hard braking that could starve the pump of oil without the baffles controlling oil flow
just some info, you might need,
depending on the oil pump used, rpms and clearances a chevy V8 will generally push some where between 2 and 6 gallons a minute thru the oil passages, your average oil pan sump holds at most 3 quarts ,while the engines running, and there's generally about 2 or a bit more quarts in the upper engine, (lifter gallery, heads)while the engines running, so when you induce high inertial loads is common for the oil pump pick up to become uncovered even in a baffled oil pan for a few seconds as that 2-3 quarts in the sump slams forward and back in the sump, because remember , lets say your engines only pumping 3 gallons a minute, and there's got to be at least 2 quarts in the sump to keep the oil pump pick-up covered under high inertial loads, its only going to take a few seconds at most under those conditions to suck air into the oil pump. obviously having a baffled 7-8 quart oil pan has advantages under those conditions as there's a good deal larger (SAFETY MARGIN) in the amount of oil present over the oil pump pick-up is you use the higher capacity BAFFLED oil pan with its better oil control and larger sump capacity,, windage screen combo, adding an oil cooler and a larger oil filter can add significant oil capacity.
crank case pressure and oil control issues are not necessarily the same issue.
crank case pressure is usually the result of blow bye or cylinder pressure getting by the ring seal,on the power or compression strokes, ring design,piston design, cylinder wall prep, use of a deck plate while honing the bores and correct installation all effect ring seal.
but oil control issues can easily be aggravated or even caused by not having a correctly designed baffled oil pan, windage tray and crank scraper in a high rpm engine.or by improperly installed gaskets. REMEMBER the object or goal in building and maintaining the lubrication system is too maintain a 100% dependable pressurized cooling flow of lubricant to the bearings, rockers,valves etc.one more in an endless list of reasons that owning a welder and having learned a few sheet metal fabrication skills is a huge asset in this sport/hobby.
most of us are not rich, and while its easy to spend money and it takes time and effort and some skill to fabricate there's also a good deal of satisfaction in knowing you have built custom components for your car that meet or exceed most of what's out there available to purchase.
http://www.speedwaymotors.com/Small-Blo ... ,3512.html
http://www.speedwaymotors.com/Speedway- ... ,3509.html
most of the time Ill start with a fairly cheap pan like this and just add several quarts of additional sump capacity and a windage screen
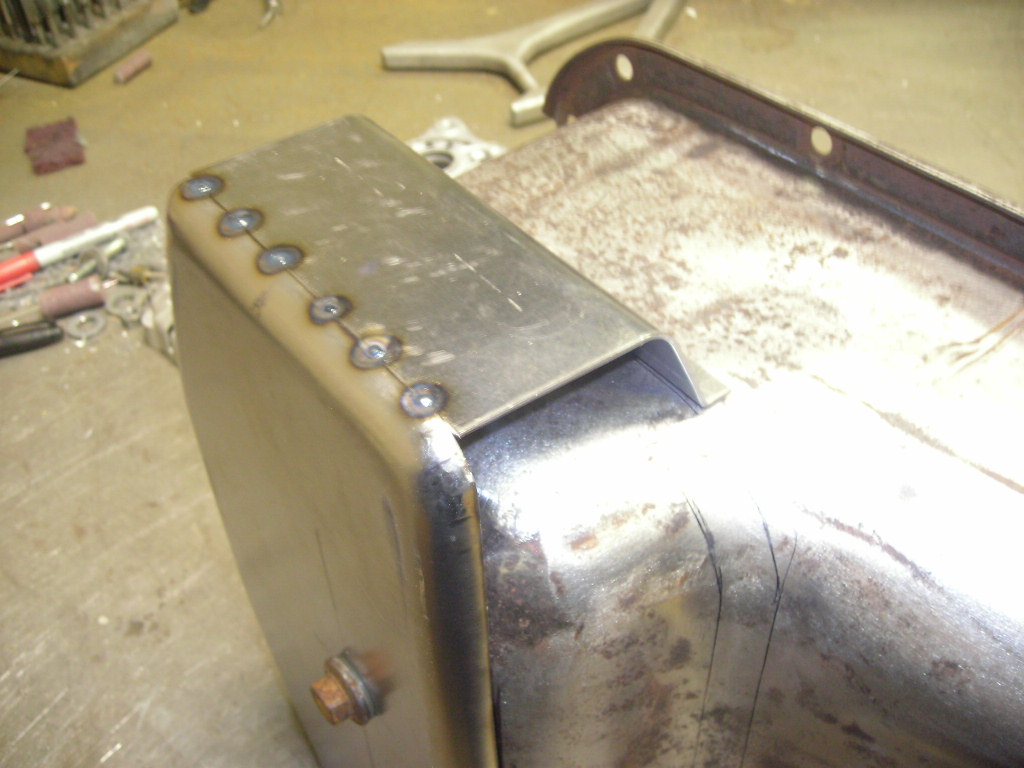
keep in mind ,if your welding a drain bung, on the oil pan,
mounting the bung outside allows the oil , in the oil pan,
too fully drain if the bungs correctly located,
but if the bung is welded inside the oil pan,
the oil level in the pan up to the bung height won't drain completely,
yeah the tapped amount might be small,
but a rapid full drain tends to flush out small metallic trash ,
that a raised internal bung traps and holds.
yeah use a magnetic oil drain plug and a decent size ring magnet on the oil filter
https://www.kjmagnetics.com/proddetail.asp?prod=RY0X04
http://garage.grumpysperformance.com/index.php?threads/magnets.120/#post-76605
http://garage.grumpysperformance.com/index.php?threads/inspecting-filter.4611/#post-12336
http://garage.grumpysperformance.co...h-the-oil-when-a-cam-failed.11542/#post-53330
Sump formula
L x W x D x .0172 = capacity in Qts
_
IF YOUR GOING TO BE INVOLVED IN HOT RODDING CARS YOU WILL BENEFIT FROM OWNING AND KNOWING HOW TO USE A MIG OR TIG WELDER
http://garage.grumpysperformance.com/index.php?threads/tips-on-mig-welding.14225/#post-72253
when buying a corvette oil pan ground clearance is tight, a baffled 7"-7.5" deep oil pan thats designed for YOUR block that holds 7 quarts is generally the best choice youll need to know which side the dip sticks on and the gaskets thickness used so as questions before ordering to insure you get the correct oil pan for your application
SHOP CAREFULLY , WHEN YOU GO TO BUY AN OIL PAN<AND ASK LOTS OF QUESTIONS ABOUT WHAT WILL FIT YOUR CAR CORRECTLY AND ASK FOR SUGGESTIONS ON MATCHING COMPONENTS OR PARTS THAT WON,T FIT
MILODON,
http://www.milodon.com/
CHAMP
http://www.champpans.com/products/c/oil-pans/
CANTON,
https://www.cantonracingproducts.com/category/1501/Chevy-SS--Road-Race-Oil-Pans/1.html
MOROSO
http://www.moroso.com/
AVIAID
http://aviaid.com/shopsite_sc/store/html/ws_oilpns_sbc.html
http://www.ebay.com/itm/Chevy-Small...ash=item5888ff955f:g:mm4AAOSwDN1USU-o&vxp=mtr
http://forum.grumpysperformance.com/viewtopic.php?f=54&t=206&p=390&hilit=+seal+thick+pan#p390
http://garage.grumpysperformance.co...s-on-building-a-383-sbc-stroker.428/#post-524
http://garage.grumpysperformance.com/index.php?threads/oil-system-mods-that-help.2187/
http://garage.grumpysperformance.com/index.php?threads/building-a-custom-wet-sump-oil-pan.65/
http://garage.grumpysperformance.com/index.php?threads/whats-a-windage-tray-do.64/
http://garage.grumpysperformance.co...alling-connecting-rods-pistons.247/#post-1745
http://www.enginelabs.com/engine-tech/holding-oil-choosing-right-high-performance-oil-pan/
https://www.chevydiy.com/oil-lubrication-systems-guide-big-block-chevy-engines/
Hamburger's Performance 1488 Hamburger's Performance Econo Series Oil Pans | Summit Racing
Free Shipping - Hamburger's Performance Econo Series Oil Pans with qualifying orders of $109. Shop Oil Pans at Summit Racing.
a very effective custom built windage tray can be fabricated for most oil pans from perforated steel, if you have minimal metal working and measuring skills
http://www.summitracing.com/parts/CTR-15-240/
WELDING INFO HERE
http://www.carcraft.com/techarticles/cc ... an_baffle/
http://www.billetfab.com/wp-content/upl ... atalog.pdf
http://dickmillerracing.com/images/Cran ... irdles.pdf
http://pitstopusa.com/i-5069643-canton- ... stick.html
Ive got a custom built 10 quart oil pan on my 383. similar to this canton oil pan, Im retired on a fixed income, but have the tools, skills and time so I custom made a decent oil pan,
I basically took my stock pan , cut the lower 3" off the sump off and custom made an extended sump similar to this oil pan a friend had purchased but I extended the sump forward to within 1.3" of the front K member,and 7.5" deep thus increasing capacity, but making it a P.I.T.A. to remove the engine with the oil pan still attached,
its amazing what you can fabricate with a decent TIG welder and use of poster board and duct tape as a pattern, you can purchase sheet steel very cheaply, and I have a better oil pan than the $300-$500 designs, at under $200
I usually used 8 quarts of 10w30 mobile 1 and a quart of MARVEL MYSTERY OIL in my engine, but lately the cost of synthetic oil has increased so much that, I swapped to VALVOLINE , so I now use 10W30 Valvoline VR1 as its rated a bit better and its a bit cheaper, and with about $76 an oil change even at the lower cost ....
READ THE LINKS
http://forum.grumpysperformance.com/viewtopic.php?f=54&t=65
http://forum.grumpysperformance.com/viewtopic.php?f=54&t=2187
http://forum.grumpysperformance.com/viewtopic.php?f=54&t=64
http://forum.grumpysperformance.com/viewtopic.php?f=54&t=3536
now youll need a few tools, but you can do a great deal with a decent set of tin snips a die grinder and a set of hammers and dollys for working metal and having several extra old oil pans to use as a source of pre-bent metal can sure help, and this is one area a 110 volt mig may be a good choice, but ID prefer TIG.
make patterns from poster board and tape as its far easier to correct that material or make mods to the design patterns with tape and scissors, and measure carefully, fold, tape and trial fit the card board patterns before cutting and transferring the correct tested and finished pattern to sheet steel. remember to measure for oil filter, header and frame clearance and oil pump pick-up placement, connecting rod and dip-stick clearance,etc. and road clearance and remember to allow easy access to the oil pan mount bolts
remember you must leave room to easily access all the fastener bolts that hold the oil pan to the block,
leave room to access the oil filter and drain plug,
and leave clearance for suspension, flex-plate or flywheel, room to mount the starter, and access its fasteners and electrical connectors, and fabricate the oil pan to clear, headers , k-frame, and maximize road to oil pan clearance
SHOP CAREFULLY , WHEN YOU GO TO BUY AN OIL PAN<AND ASK LOTS OF QUESTIONS ABOUT WHAT WILL FIT YOUR CAR CORRECTLY AND ASK FOR SUGGESTIONS ON MATCHING COMPONENTS OR PARTS THAT WON,T FIT
MILODON,
http://www.milodon.com/
CHAMP
http://www.champpans.com/products/c/oil-pans/
CANTON,
https://www.cantonracingproducts.com/category/1501/Chevy-SS--Road-Race-Oil-Pans/1.html
MOROSO
http://www.moroso.com/
AVIAID
http://aviaid.com/shopsite_sc/store/html/ws_oilpns_sbc.html
STEFS
http://www.stefs.com/products/oilpans/circletrackwetsump.htm
HAMBURGERPERFORMANCE
http://www.hamburgersperformance.com/
KEVKO
https://kevko.myshopify.com/
http://www.harborfreight.com/7-piece-bo ... 31277.html
http://www.harborfreight.com/30-inch-sh ... -5907.html
http://www.welders-direct.com/merchant2 ... ode=907335
30 cal ammo cans are about 6" tall 10"wide and 3.5" deep
50 cal ammo cans are about 6.5" tall 11"wide and 5.5" deep
theres roughly 58 cubic inches in a quart, ,so a 30 cal can in theory holds an additional 3.5 quarts of oil capacity
and a 50 cal ammo can welded into a sump, if its full depth is used in theory adds 6.5 quarts if its full capacity is utilized, knowing things like this, is why owning a good MIG or TIG welder and having fabrication skills is a worth while skill and tool set to acquire
IVE purchased two-to-six of these 30 cal ammo cans several times as a cheap source of heavy gauge steel to cut and modify into a custom made oil pan sumps , careful measurements a good band saw and a TIG OR MIG welder, plus a couple old oil pans, some perforated 1/16" steel sheet, some small steel hinges, to practice on, and lots of pictures to get ideas from, can go a long way to improving your skill at improving both your welding and saving you a good deal of cash on custom fabricated baffled oil pans, ideally you can make it difficult for oil in the sump to flow away from the oil pump in the sump as the car accelerates and brakes but allow oil to easily flow to the oil pump,
IF you've wondered why I suggest buying and using a well designed BAFFLED oil pan with 7-8 quart capacity its to prevent the oil from uncovering the oil pump pick-up under performance use.
without control baffles oil sloshes away from the oil pump pick-up
WITH CORRECTLY DESIGNED BAFFLES AND GATES OIL FLOW UNDER ACCELERATION AND BRAKING AND TURNS IS CONTROLLED AND DIRECTED TO THE OIL PUMP
any time you allow an unsupported section of the oil pump pick-up to not have a welded or properly bolted external support bracing,
you can almost depend on constant flexing to eventually cause durability issues.
a good many engines benefit from having a bolt on external brace to the engines windage screen, if you think in three dimensions vs just two this can be done rather easily.
https://www.chevydiy.com/chevy-big-block-performance-lubrication-system-guide/
Oil Pans - Chevrolet - Street, Drag, Road Race
Kevko Racing Oil Pans and Components located in Fairmont, Minnesota Manufacturers high performance oil pans, valve covers, pickup tubes for circle track racing, drag racing, off-road racing or any performance vehicle. Kevko has been building quality engine products since 1986.
kevkoracing.com
https://www.enginelabs.com/engine-tech/engine/useful-tips-installing-oil-pans-right-way/
one more in an ENDLESS LIST of reasons any serious shop needs to have access to a decent welder (A OXY-ACETYLENE TORCH in this case) a drill press and a dial caliper could allow you to fabricate a $1 l-bracket that could easily be the difference between a $10-$15K engine living a long trouble free life vs a very expensive self destructing engine , lesson in why adding a $1 brace would be almost mandatory
http://www.colemanracing.com/Oil-Pan-10-QT-Big-Block-Chevy-P4093.aspx
http://www.custompartnet.com/wu/sheet-metal-forming
If your engine has several breathers and your leaking oil its most likely an oil control or gasket issue, best addressed with a 7-8 quart baffled oil pan, windage screen and crank scraper, tall cast valve covers and isolated breathers that will control oil return flow back to the sump in the engine.
now if your engine rarely sees the high side of 3500rpm this is basically not a big issue for most applications, but if you regularly spin an engine over 6000rpm this can frequently be something youll want to look into as oil control becomes far more important.
IF your having oil control or blow-bye issues you might want to do a leak down test to verify your ring seal and bore condition, and think about a decent baffled 7-8 quart, road racing oil pan design and running 6 quarts of oil,as that puts a good deal less stress on the oil control and having the oil drains holes in the heads and block checked for restrictions won,t hurt either.
ADDING A WELL DESIGNED WINDAGE SCREEN SPEEDS OIL RETURN SPEEDS . AND EFFICIENCY TO THE ENGINE SUMP
running an engine like this picture above ,with just an open oil pan, tends to waste 4-8 hp or more at higher rpms and may over load the rings with oil on the cylinder walls, and cause the bearings to get intermittent oil pressure
http://garage.grumpysperformance.com/index.php?threads/magnets.120/#post-49772
you'll ALWAYS want to shop around and ask lots of questions before you purchase an oil pan, find out the capacity, depth and if it fits your cars frame/suspension, and if there's any headers or starters that are required or that won't fit with the oil pan, verify the correct oil pump and pick-up part numbers, verify all the clearances.
BEFORE ORDERING, remember , oil pans even on SBC engines vary with year and application, there's right and left hand dip stick blocks and one and two piece rear seals
and you have the option if you can weld thin sheet steel or aluminum , you can do what I do, buy one of the pans below, and modify it , for a C4 corvette ,at the MINIMUM your need to cut the front lower edge lower corner ,1" wide at a 45 degree angle, and re-weld in a plate so it clears the front cross member, on some pans.
EXAMPLE
heres a basic choice, on the midwestmotorsportsinc.com pan,
http://www.midwestmotorsportsinc.com/in ... parent=277
http://kmjperformance.com/kevko-108...o-oil-pan-circle-track-350-400-imca-usra.html
having a good high capacity baffled oil pan on your engine adds considerably to its potential durability and potential life span
drivers side dipstick
http://www.moroso.com/catalog/categoryd ... code=11330
the cantons a bolt-in deal, now I also extended the sump forward until it was within 3" of the front of the oil pan, to increase the capacity to 10 qts, remember you want to keep the sumps oil level in the running engine well below the windage screen lower edge and a closely fitted crank scraper, and the correct internal baffles in the oil pan, helps with the oil control issues
another good example of why a shop welder is so valuable, you can build a decent oil pan for under 1/2 the price you can buy one for
http://www.midwestmotorsportsinc.com/order_part.php?item=15120K&line=MWM
read
http://www.circletrack.com/techarticles ... index.html
OR
http://canton.carshopinc.com/produc...1-120?osCsid=1864652061e9b34e7648e188bb985ecf
Canton Oil Pans
11-120 and 11-120T Oil Pans
http://www.jegs.com/p/JEGS-Performance- ... 4/10002/-1
http://www.jegs.com/SizeCharts/555-OilPanChart.html
Id also point out that, if you properly set up an engine's oil system, open the oil drain holes and use the proper oil pan, windage screen and crank scraper, its virtually impossible , in a well designed engine to run the engine "long enough to pump all the oil upstairs."
as with a properly designed baffled oil pan, with a carefully fitted and clearanced windage screen and crank scraper, the oil pump simply reaches a flow rate pumping oil out of about 100 or so potential lubricant flow leakage points
http://garage.grumpysperformance.com/index.php?threads/whats-a-windage-tray-do.64/
theres zero doubt an accusump oil feed is a good insurance policy to maintain oil pressure at the bearings, but simply having a 7-8 quart baffled oil pan,properly clearanced, windage screen and crank scraper will insure the oil pressure remains consistent , mostly due to the fact that theres always going to be enough oil over the oil pump pick-up, simply because theres really no room to pack most of the available oil volume in the upper engine ,plus the fact that hot oil flows well.
OIL PRESSURE read on the oil pressure gauge is a MEASURE of RESISTANCE to oil flow, you can REDUCE the pressure the gauge reads by either increasing the engine clearances or REDUCING the oil viscosity (thickness) so it flows thru the clearances faster with less resistance.(OR INSTALLING A SLIGHTLY WEAKER OIL PUMP BYE_PASS SPRING,that limits the pump pressure before it allows some oil to re-circulate back through the bye-pass valve ,from the high pressure back to the low pressure side of the pump impellers, but only the max pressure you reach is limited by the bye-pass spring,in your oil pressure bye pass circuit and its that spring resistance determines the point where the bye-pass circuit, opens and limits max oil pressure, but the bye-pass circuit has zero to do with anything else, if its functioning correctly,
there are many oil leakage points(100) in a standard Chevy engine.
16 lifter to push rod points
16 push rod to rocker arm points
32 lifter bores 16 x 2 ends
10 main bearing edges
9 cam bearing edges
16 rod bearing edges
2 distributor shaft leaks
1 distributor shaft to shim above the cam gear(some engines that have an oil pressure feed distributor shaft bearing.)
once oil exits the bearings or valve train it flows mostly by gravity back to the oil pan sump, but a properly designed windage screen and crank scraper correctly clearanced allows the spinning crank/rotating assembly to act like a directional pump that drags the vast majority of the oil flow back to the sump, by design.
http://garage.grumpysperformance.com/index.php?threads/whats-a-windage-tray-do.64/
http://garage.grumpysperformance.com/index.php?threads/oil-system-mods-that-help.2187/
http://garage.grumpysperformance.com/index.php?threads/basic-info-on-your-v8-lube-system.52/
theres a great deal of related info in these threads
http://www.livermoreperformance.com/can ... _pans.html
http://www.chevelles.com/techref/ScreenInstall.pdf
you don,t need to spend big bucks on a baffled road racing oil pan if you can weld , measure and fabricate, keep in mind a higher capacity baffled oil pan and windage screen are good insurance against oil related problems.
on a CORVETTE the ground to lower block clearance better not exceed 7.5" with 7.25 being better and 7" about ideal for road clearance, but be aware that factors like the suspension, K-MEMBER and other under car obsticals unique to that model will influence your selection and so will your stroke and windage tray height or main caps so ASK QUESTIONS BEFORE you buy I GENERALLY BUY A DECENT CIRCLE TRACK DESIGN PAN then MODIFY it to the application,as its far easier than starting from scratch, adding or moving the sump,baffles etc. BTW you can use tape and poster,cardboard to mock up ideas and potential changes, and use as patterns when folding the sheet steel you actually use in the oil pans modification, but be sure to work with the starter exhaust and suspension clearances being checked frequently,and access to the pan bolts in mind, these circle track pans generally make an excellent starting point, and these guys are great to deal with
the minimum sump depth, its far faster to modify a circle track style pan as a starting point, but you can start with any pan, use cardboard to make a pattern first then cut and fold the sheet steel later using the pattern after you verify it clears all the k-members,starters, filters etc
if your over heating the oil,first suggestion swap to a decent synthetic oil in the 10w30 range or at least the thinnest viscosity that maintains 20 psi at hot idle temps, as SYNTHETICS don,t generally start breaking down until about 280F PLUS while mineral base oils tend to start degrading after repeated 250F use, and the thinner the oil the faster it circulates thru the clearances, and the faster heats absorbed and transferred out off the hotter components
and Id need to know more about the complete engine parts list, clearances, etc. but Id sure want to verify the fuel/air ratio is at about 12.6:1 not alot leaner and your ignition timing was carefully checked to not be a couple degrees advanced from ideal., and that your running a 7-8 quart oil pan, heres the oil cooler I use and I had to install a thermal switch or it OVER COOLED my engine oil in FLORIDA where average outside air temps closer to 90F
my oil pan looks vaguely similar to this,you should be looking for a 7"-7.5" max pan depth on a C4 corvette
http://canton.carshopinc.com/produc...1-120?osCsid=1864652061e9b34e7648e188bb985ecf
Canton Oil Pans
11-120 and 11-120T Oil Pans
but I extended the sump forward until it was 3" from the front of the pan with 14 ga steel and a tig welder to add about 4 inches extra to the sump to get 10 qt capacity, naturally a custom sump requires you to measure for header and suspension clearances, don,t forget to leave access for the oil filter and starter
http://www.summitracing.com/parts/PRM-1 ... mage=large
http://www.midwestmotorsportsinc.com/order_part.php?item=7101R&line=WYS
http://www.midwestmotorsportsinc.com/order_part.php?item=15120&line=MWM
keep in mind the oil pump and pick up take up some of that volume , and that in a running engine theres about 2 quarts in the upper engine in the heads, oil passages,lifter galley etc. not counting the oil filter which could hold an additional quart plus in some cases
for example on my vette I needed to cut and weld a patch of a 1" wide 45 degree bevel on the front lower edge, as the pans orriginal lower front edge hit the k-frame , the sump to clear the K-MEMBER clearance needed that mod. and I extend the sump forward 4",added baffles and add a second side sump, to get to the 10qt volume I wanted in my race engine
heres a factory version for $240 without the forward extended sump but with the side sump, keep in mind your times worth something, but you can build a decent racing oil pan for under $120 vs $240 for the smaller capacity factory version
http://www.midwestmotorsportsinc.com/order_part.php?item=CP100LT&line=MWM
first gen small block oiling
LSI/LS6 OIL ROUTING THRU BLOCK
BEST NOT AS A BEGINNERS FIRST WELDING PROJECT , BUT IF YOU HAVE SOME EXPERIENCE AND SKILL ITS FAR FROM DIFFICULT, be sure to weld while the pans mounted to the block if you can to minimize warping due to heat distortion
http://store.summitracing.com/partdetail.asp?autofilter=1&part=MOR-21950&N=700+0&autoview=sku
Moroso 21950
http://www.qmpracing.com/qmpcatalog/product_info.php?products_id=15879
READ
http://rehermorrison.com/tech-talk-74-t ... liability/
BTW
http://www.digitalcorvettes.com/forums/showthread.php?t=81091
BTW HERES AN IMPORTANT TIP, IF YOUR INSTALLING A REMOTE OIL COOLER,IT is really common for guys to use lines that are far to small, that restrict flow oil flow or select a transmission or oil cooler that has to small of internal passages, shop carefully you want a MINIMUM of 1/2, or AN8 line size and 5/8" or AN10 is BETTER
think about it, your measuring the oil pressure in most cases AFTER its been thru the cooler and returned to the oil passages in the block, oil leaves the oil pump and its routed to the oil filter where the oil filter adapter routes it thru the oil cooler and back to the adapter then into the block, your measuring the restricted oil flow after its returned to the block, if the lines or cooler passages restrict oil flow its potentially a problem for lubrication of the moving parts if pressure or oil volumes reduced
Last edited by a moderator: