Richard454;2377466 said:Here's a step by step installation I put together-
Had a lot of questions...so I thought I'd "condense" all the info...
C3 Vacuum to Electric headlights
PREFACE
I'm not the first guy to do this conversion....but have looked at all the others -and feel this is the most cost effective-cleanest and least modification required of all the others out there.
History-
Killer Lights- using the mid 90's Firebird/Trans Am head light actuators was -I believe -the first real kit out there. Great idea-BUT requires a controller and the motors have plastic gears that should to be replaced.
Fast forward several years- several linear actuated kits were offered- but at around $1k-just too expensive in my book- there's a lot of other mods I would like to do w/ that kind of money.
The Mercury Cougar and Pontiac GTO guys started using the Ford Probe motors several years ago- ...Then a guy at another forum started a thread using the same motors. I though it was a great idea- but needed some refining. Using the stock Probe actuator arm - you had to cut up the headlight housing. The conversion also required a C4 headlight switch. I simplified & redesigned the actuator arm- using threaded rod-w/ a stock actuator rod end. I figured out several different ways to wire -not requiring a new headlight switch- but rather just a $5 relay.
Late one night last winter- I had a couple Ford Probe motors in my hand and was going to figure it out. I took some Simpson Post Caps (used for outdoor deck building) laying around in my basement...a jig saw -drill-and file- and I had a really cool set of troublefree FAST electric headlights.
Tools Needed
Typical wrenches/sockets/hand tools
Ruler/Tape measure
Drill and bits (unibit is a plus )
5/16 18 tap (can do w/o see text)
Grinder and/or Cutoff wheel
Wirestrippers/crimp
Optional-but helpful-
Vise/file/centerpunch
Getting started-
On the bench
TEST your motors- I got mine out of a junkyard- and had about an 20% DOA when I got them back home.
Probe Motors
I am referencing the wires BEFORE the connector- colors change left to right AFTER the connector - Simply hook the wire to a 12v battery (or jumpbox) WHITE w/ RED strip to positive- BLACK wire to groundNext- one at a time touch the YELLOW wire to the +12-should either hear a click or arm will turn 180º- then touch the RED wire to the +12 and arm will move 180º. If the motor didn't move when you touched the YELLOW wire- it should move when you touch it again...If not -recheckwiring -then the motor might be bad
Miata Motors
I am referencing the wires BEFORE the connector- colors change left to right AFTER the connector- Simply hook the wire to a 12v battery (or jumpbox) BROWN to positive- BLACK wire to ground- Next- one at a time touch the RED /YELLOW wire to the +12-should either hear a click or arm will turn 180º- then touch the RED/GREEN wire to the +12 and arm will move 180º. If the motor didn't move when you touched the RED/YELLOW wire- it should move when you touch it again...If not -recheck wiring -then the motor might be bad.
Preparing for installation-
Drilling out the arm-
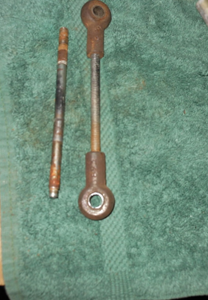
Remove the arm from the motor- 14mm- might need to pry with a screwdriver since shaft has a spline. You will need to cut off or grind off the ball- I DO NOT recommend drilling it out because the actual "throw" of the Corvette headlight system is LESS then the Probe's or Miata's. I found that 1¼" center to center is what you need.
Drill out to fit a 1/4 20 bolt or you can drill and tap a counter head for a trick look.
Heim joint-
A few options here-
A) Drill and tap to fit the course thread (5/16 18 ) on the OEM clevis pin.
B) Get a carb stud - one side is coarse thread the other is fine 5/16. Then just get a 5/16 18 coupler and connect it to the threaded rod.
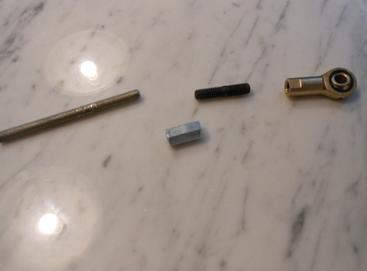
C)Use an OEM Clevis pin- used in the headlight assembly and it's already threaded to 5/16 18.
D)Take apart the assembly- springs and replace the clevis pin w/ a heim joint (3/8 24) and attach both with 3/16 24 threaded rod
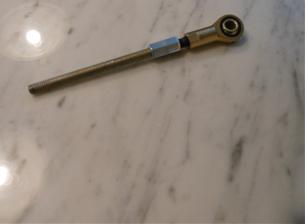
Threaded rod-
Depending on how you have assembled the heim joint- you will need about 6 3/8" center to center
On the Car
Pull the hood!!!
Either scribe around the bolts or drill a small hole in hinge/trough hood to help align when putting it back on. It's in the way- Can you do it w/o removing it? Let me know how it works out for you!!!
Removing the actuator-
There are several write ups on this- penetrating oil is your friend. You can also remove all those hoses and valves.
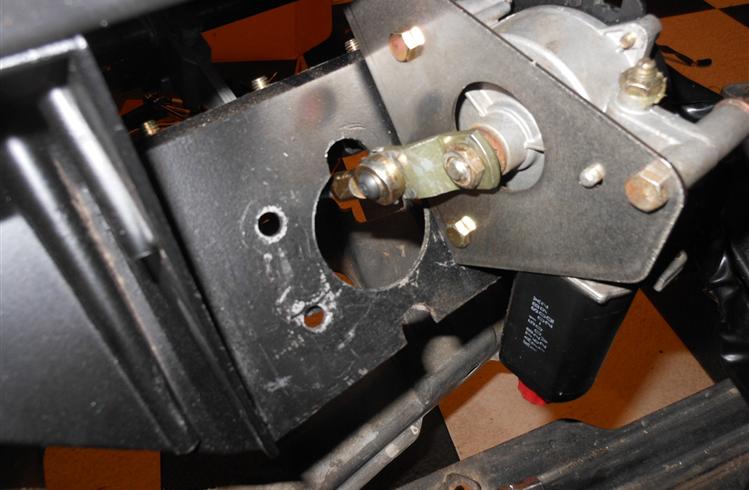
Mounting the Motor-
To the brackets You can either mount them 'inside' or 'outside'. Mounting them inside gives you a little bit more clearance in front of radiator.
Put bolts through the base of the bracket first- then mount the motor to the bracket. If you are using a Miata motor- you will need to drill an additional hole- since only 2 out of 3 holes line up.
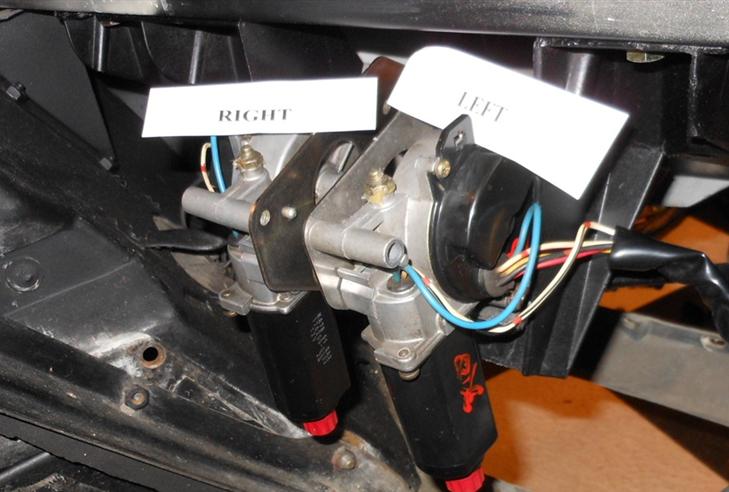
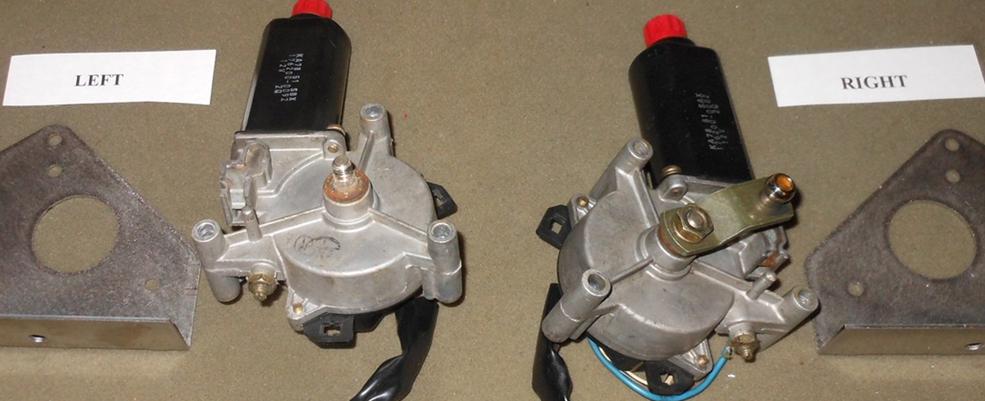
Bolting down the motor- I have shown for comparison the left and right motors and brackets. You can mount the left motor on the driver's side - and we'll call that on the inside- gives you more clearance. Or you can mount the right motor on the drivers side on the 'outside.' For additional support- you can use the lower motor bolt (one of the three) -drill a hole in the housing and attach a longer bolt-will get rid of any flex in the bracket. Removing the top two springs also seems to help in the flex issue. Remember this system was designed to hold the headlights in position if there was a vacuum variation (example WOT). The electric motor will act as a brake.

Modding the Headlight Assembly
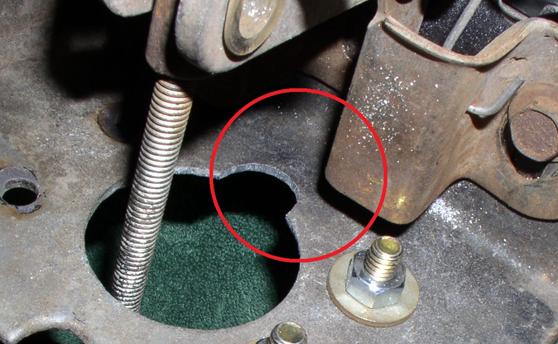
Come up a little more than ¼ inch of the opening-center up and drill a small hole. Can either upsize drill bits to ½" or use a unibit. The material (potmetal) is soft-easy to drill and can actually be broken w/ a pair of pliers. You can file the hole-and even make it look like it was always there by making look like the lower factory cutout.
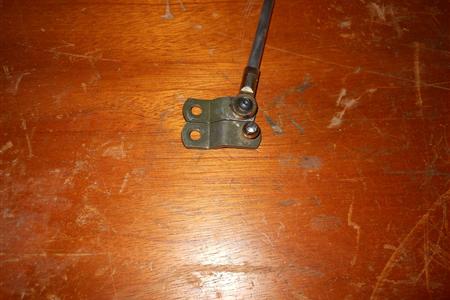
Attaching Rod Linkage- Screw in the threaded rod attached to the heim joint. Open headlight by pulling down on the lower bracket-BE CAREFUL- this assembly like to pinch fingers. When it's in full upright position- turn the rod in till the arm is extended to it's full length- longest travel and the motor's spline lines up w/ the arm. Bolt it down at that point. Picture show headlight at full UP position
Modding the Headlight Assembly Come up a little more than ¼ inch of the opening-center up and drill a small hole. Can either upsize drill bits to ½" or use a unibit. The material (potmetal) is soft-easy to drill and can actually be broken w/ a pair of pliers. You can file the hole-and even make it look like it was always there by making look like the lower factory cutout.
Put bolts through the base of the bracket first- then mount the motor to the bracket. If you are using a Miata motor- you will need to drill an additional hole- since only 2 out of 3 holes line up.
Manual test for clearance- Turn the red knob CLOCKWISE to lower the headlights. Look and listen for any binding- mainly checking for rod clearance. If needed you may have to remove some more material. Continue turning till the headlights are back up. now your are ready to go live!!!
Wiring the motors- This is where you have several options.
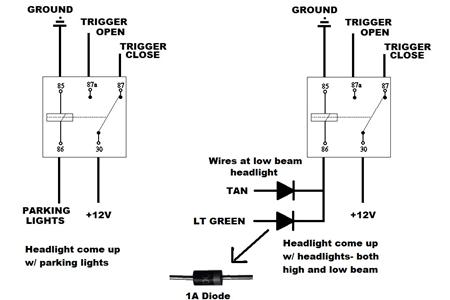
Lights come on with the headlights
1-Use the stock C3headlight switch- a relay and wire to the dimmer switch. OR
Can use a couple of diodes and wire directly off the headlight -no having to run wire to cabin to the dimmer switch

2-Use the C4 headlight switch(no relay required) and wire directly to the light switch
Lights come on with the parking lights
Simply connect trigger wire to parking light and use a relay
Service Switch
If running the C4 - add SPDT between the blue wire off the switch and the trigger wire for the motors.
Running the relay- wire a SPDT switch between the trigger wire -and a +12volt source to operate the headlights
Let me know what you think-
Richard
Last edited: