You are using an out of date browser. It may not display this or other websites correctly.
You should upgrade or use an alternative browser.
You should upgrade or use an alternative browser.
New TBucket Front Suspension and Brakes
- Thread starter Indycars
- Start date
The shape of the spindles was harder to polish since I couldn’t spin them like I did the brake adapters. The first pic is what I started with, the next two pics are what I used to smooth the surface, cartridge rolls and unitized wheels on my die grinder. Also in the third pic is the 8-inch buffer I just purchased at HF.


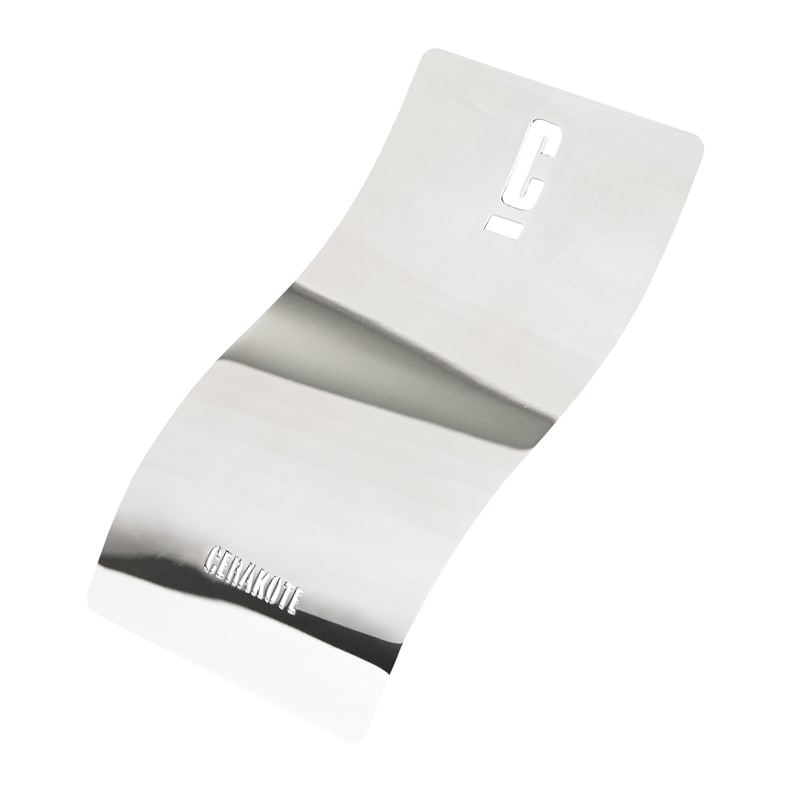
Spindles with King Pins
Speedway 1949-1954 Chevy Car Modified Spindles w/ King Pins
The good thing about the unitized wheels is that as they wear, their shape changes and you can use that to your advantage. You have to be willing to stop working one area and move to another more conducive to the shape you have. You can also take it off the arbor and swap ends giving you a sharp corner again. The cartridge rolls ONLY SPIN one direction.
I know what you’re thinking, two things! First, these are made of steel and they are going to rust. For that I’m going to spray them with clear Cerakote, either MC-5100 or MC-160. We will see how this works out, if it does hold up over time it looks just like chrome, but way cheaper!!! The Cerakote MC-5100 has been on my trailer (aluminum) for over a year now and still looks great.
Secondly, they are hardly visible, the brake rotor and caliper are going to block the view of the spindle. For this I have no good answer …… I guess because I can!


The Harbor Freight buffer has all the power that I need and runs smooth, I'm happy for $140
https://www.harborfreight.com/8-in-stationary-buffer-58827.html
Abrasives
https://www.3m.com/3M/en_US/p/d/b40071661/
http://www.abrasivesupply.com/default.asp
Lehigh Valley Abrasives | Flap Discs, Surface Conditioning Discs, Abrasive Sanding Discs, PSA Disc Rolls, Surface Conditioning Belts and Metalworking Abrasive Sanding Belts
Specialty Abrasives and Tools for Industrial Use - Abrasive Specialties Inc
Want to try out the Unitized Wheels, this kit would be good place to start.
https://www.rshughes.com/p/3M-Scotc...In-3-In-Diameter-Included-18245/048011_18245/
https://www.rshughes.com/p/Standard...Wheel-Variety-Kit-Variety-33027/051115_33027/
Pferd Cartridge Rolls
https://www.amazon.com/dp/B079GJ37R2?psc=1&ref=ppx_yo2ov_dt_b_product_details
https://www.amazon.com/dp/B079GH75T9?psc=1&ref=ppx_yo2ov_dt_b_product_details
.
Spindles with King Pins
Speedway 1949-1954 Chevy Car Modified Spindles w/ King Pins
The good thing about the unitized wheels is that as they wear, their shape changes and you can use that to your advantage. You have to be willing to stop working one area and move to another more conducive to the shape you have. You can also take it off the arbor and swap ends giving you a sharp corner again. The cartridge rolls ONLY SPIN one direction.
I know what you’re thinking, two things! First, these are made of steel and they are going to rust. For that I’m going to spray them with clear Cerakote, either MC-5100 or MC-160. We will see how this works out, if it does hold up over time it looks just like chrome, but way cheaper!!! The Cerakote MC-5100 has been on my trailer (aluminum) for over a year now and still looks great.
Secondly, they are hardly visible, the brake rotor and caliper are going to block the view of the spindle. For this I have no good answer …… I guess because I can!
The Harbor Freight buffer has all the power that I need and runs smooth, I'm happy for $140
https://www.harborfreight.com/8-in-stationary-buffer-58827.html
Abrasives
https://www.3m.com/3M/en_US/p/d/b40071661/
http://www.abrasivesupply.com/default.asp
Lehigh Valley Abrasives | Flap Discs, Surface Conditioning Discs, Abrasive Sanding Discs, PSA Disc Rolls, Surface Conditioning Belts and Metalworking Abrasive Sanding Belts
Specialty Abrasives and Tools for Industrial Use - Abrasive Specialties Inc
Want to try out the Unitized Wheels, this kit would be good place to start.
https://www.rshughes.com/p/3M-Scotc...In-3-In-Diameter-Included-18245/048011_18245/
https://www.rshughes.com/p/Standard...Wheel-Variety-Kit-Variety-33027/051115_33027/
Pferd Cartridge Rolls
https://www.amazon.com/dp/B079GJ37R2?psc=1&ref=ppx_yo2ov_dt_b_product_details
https://www.amazon.com/dp/B079GH75T9?psc=1&ref=ppx_yo2ov_dt_b_product_details
.
thanks for a VERY impressive post & the related pictures of course
thanks for the informative and visually informative post RICK,
your taking the time and effort to post those picture's and the obvious quality of the work can't help but be impressive
YOU'VE CONSTANTLY IMPRESSED ME WITH YOUR ATTENTION TO DETAIL AND PHOTOGRAPHIC SKILLS!
I really wish you were located about 10 minutes away at most,
so if you needed help or you needed some access to tools etc. we could swap skills
besides it would result in the need to buy more tools... and I'm a tool junkie at heart
Last edited:
Thanks !Absolutely amazing they look like they are chrome plated
but never got that kind of results from steel parts
Being that they are NOT SS, then they will rust, so that's why I will spray they with some Cerakote MC-5100 to keep the oxygen from contacting the surface. I've used Cerakote on many metals including plain steel. It's impervious to brake fluid, alcohol, acetone. I've tested it with acetone and in contact for 30 minutes absolutely NO affect. It's been on my aluminum trailer fenders and diamond plate for over a year and still look the same as when I sprayed them. It feel like a non-stick skillet to the touch, so dirt has a hard time staying put. I have verified the self leveling properties several times, it worked just like the video shows below. No thinning required and easy clean up. If you can't tell I'm sold on this product.
After a year it's looks just same.
Cerakote - CERAKOTE CLEAR - ALUMINUM
Shop Cerakote CERAKOTE CLEAR - ALUMINUM MC-5100. Find the coating that fits your application. Choose from a wide variety of coatings with specific attributes and specialties.


.
I've found it confusing when trying to figure out what Unitized Wheel (UW) I needed and where to order it from. They have a rating that determine their hardness (Density #), Material and Grade. It's all coded into an abbreviation used in the description many times such as "2SMED".


For all the UW I've used so far I have needed the "936 Mandrel". If you can swing it, get two. It's quick and easy to change out the wheel by hand. For some of the harder densities, you might need a tool to hold the collet. If you want to use some of the 2-3 inch UW that are ~ 1/4" wide to dress some welds, then you will want the "990 Mandrel".

My recommendation to get started would be the two highlighted in GREEN below. But use a cartridge roll before you get to the 6A MED.

There are certainly lots more possibilities, see below. I've used 1/8" hole and I believe the 1/4" might also work with the 936 mandrel. I ordered some 1/4" wide UW with a 1/4" hole to try.

I ordered from Grove Industrial today, they charged $23 for S&H, but no tax outside of Texas.
Home | Groves Industrial
3M™ 13713 EXL High Performance Unitized Wheel, 1 in Dia Wheel, 3/16 in Center Hole, 1 in W Face, Fine Grade, Silicon Carbide Abrasive | Groves Industrial
Scotch-Brite™ 048011-01561 CP-UW Cut and Polish Unitized Wheel, 2 in Dia Wheel, 1/4 in Center Hole, 1/4 in W Face, Fine Grade, Aluminum Oxide Abrasive | Groves Industrial
Scotch-Brite™ 048011-09548 EXL High Performance Convolute Wheel, 6 in Dia, 1 in Center Hole, 1/2 in W Face, Fine Grade, Silicon Carbide Abrasive | Groves Industrial
Scotch-Brite™ 048011-65018 DP-UW Deburr and Finish Pro Unitized Wheel, 2 in Dia Wheel, 1/4 in Center Hole, 1/4 in W Face, Medium Grade, Ceramic Abrasive | Groves Industrial
Scotch-Brite™ 048011-65020 DP-UW Deburr and Finish Pro Unitized Wheel, 2 in Dia Wheel, 1/4 in Center Hole, 3/4 in W Face, Medium Grade, Ceramic Abrasive | Groves Industrial
3M™ Twist-Lok™ 048011-09493 Pad Holder, 4-3/4 in L, 3-1/2 in W/Dia, Plastic | Groves Industrial
.
For all the UW I've used so far I have needed the "936 Mandrel". If you can swing it, get two. It's quick and easy to change out the wheel by hand. For some of the harder densities, you might need a tool to hold the collet. If you want to use some of the 2-3 inch UW that are ~ 1/4" wide to dress some welds, then you will want the "990 Mandrel".
My recommendation to get started would be the two highlighted in GREEN below. But use a cartridge roll before you get to the 6A MED.
There are certainly lots more possibilities, see below. I've used 1/8" hole and I believe the 1/4" might also work with the 936 mandrel. I ordered some 1/4" wide UW with a 1/4" hole to try.
I ordered from Grove Industrial today, they charged $23 for S&H, but no tax outside of Texas.
Home | Groves Industrial
3M™ 13713 EXL High Performance Unitized Wheel, 1 in Dia Wheel, 3/16 in Center Hole, 1 in W Face, Fine Grade, Silicon Carbide Abrasive | Groves Industrial
Scotch-Brite™ 048011-01561 CP-UW Cut and Polish Unitized Wheel, 2 in Dia Wheel, 1/4 in Center Hole, 1/4 in W Face, Fine Grade, Aluminum Oxide Abrasive | Groves Industrial
Scotch-Brite™ 048011-09548 EXL High Performance Convolute Wheel, 6 in Dia, 1 in Center Hole, 1/2 in W Face, Fine Grade, Silicon Carbide Abrasive | Groves Industrial
Scotch-Brite™ 048011-65018 DP-UW Deburr and Finish Pro Unitized Wheel, 2 in Dia Wheel, 1/4 in Center Hole, 1/4 in W Face, Medium Grade, Ceramic Abrasive | Groves Industrial
Scotch-Brite™ 048011-65020 DP-UW Deburr and Finish Pro Unitized Wheel, 2 in Dia Wheel, 1/4 in Center Hole, 3/4 in W Face, Medium Grade, Ceramic Abrasive | Groves Industrial
3M™ Twist-Lok™ 048011-09493 Pad Holder, 4-3/4 in L, 3-1/2 in W/Dia, Plastic | Groves Industrial
.
Last edited:
once again! a really great and rather amazingly informative post and info you posted THANKS RICK,
its amazing how often I see post like this and think ..
while mentally kicking myself
hell I know that, what have I failed to post this previously??
its amazing how often I see post like this and think ..
while mentally kicking myself
hell I know that, what have I failed to post this previously??
Got with my nephew that has a lathe large enough to spin my SS 29" radius rods and bore the inside for a .001" to .0015" interference fit of the threaded tube ends (TTE). I must say this is largely a ,measure both , then trial fit and then put our heads together until we both are saying yes kinda thing. The lathe was new to him, so it's accuracy was an unknown. The TTE had a .001" variation in their diameters.
I put the TTE in the freeze and used the MAP torch to heat the SS tubes to about 400°F - 500°F (Dull Red) and then put them together and used the 2 lb hammer to drive the TTE into the tube. I found that the tubes at that temperature would stretch and the TTE would spin freely until the temp dropped to about 350°F, then they got tight.
Not shown are the thread bolts in the TTE for driving them into the tube. I did not hit the TTE directly!


The TTE with the hex nuts have a left hand thread and those without are right hand thread. Unfortunately they didn't make a 7/8" OD with a .095" wall, therefore I had to make the .083" wall work.
1/2” LH Threaded Tube End for 7/8" X .083 Wall Tubing ⋆ S&W Race Cars
1/2” RH Threaded Tube End for 7/8" X .083 Wall Tubing ⋆ S&W Race Cars
.
I put the TTE in the freeze and used the MAP torch to heat the SS tubes to about 400°F - 500°F (Dull Red) and then put them together and used the 2 lb hammer to drive the TTE into the tube. I found that the tubes at that temperature would stretch and the TTE would spin freely until the temp dropped to about 350°F, then they got tight.
Not shown are the thread bolts in the TTE for driving them into the tube. I did not hit the TTE directly!
The TTE with the hex nuts have a left hand thread and those without are right hand thread. Unfortunately they didn't make a 7/8" OD with a .095" wall, therefore I had to make the .083" wall work.
1/2” LH Threaded Tube End for 7/8" X .083 Wall Tubing ⋆ S&W Race Cars
1/2” RH Threaded Tube End for 7/8" X .083 Wall Tubing ⋆ S&W Race Cars
.
Last edited:
while the heat shrink fit might work for awhile ID darn sure MIG or TIG WELD the part connection
constant hammering, due to road vibration, car weight, etc. on a heat shrunk connection may induce eventual slippage
as a rule of thumb, heat shrink/interference fit will require about a .001 difference in diameter per inch of tube diameter for the 500F-600F heated part to clamp on the cooled internal clamped part
The shrink fit is 3-5 times more effective than a press fit, because, the small irregularities on the surfaces are smeared smooth on the press fit, not so on the shrink fit., as minor irregularities between the part surfaces tend to increase the hold strength marginally
A 300 F temp change on 2" steel is 0.004 inches (or 0.102 mm).
A 520 F temp change on 2" steel is 0.007 inches (or 0.180 mm).
A 300 C temp change on 50 mm steel is 0.183 mm (or 0.007 inches).
A 150 C temp change on 50 mm steel is 0.092 mm (or 0.004 inches).

constant hammering, due to road vibration, car weight, etc. on a heat shrunk connection may induce eventual slippage
as a rule of thumb, heat shrink/interference fit will require about a .001 difference in diameter per inch of tube diameter for the 500F-600F heated part to clamp on the cooled internal clamped part
The shrink fit is 3-5 times more effective than a press fit, because, the small irregularities on the surfaces are smeared smooth on the press fit, not so on the shrink fit., as minor irregularities between the part surfaces tend to increase the hold strength marginally
Linear Thermal Expansion Coefficient of Steel
amesweb.info
A 300 F temp change on 2" steel is 0.004 inches (or 0.102 mm).
A 520 F temp change on 2" steel is 0.007 inches (or 0.180 mm).
A 300 C temp change on 50 mm steel is 0.183 mm (or 0.007 inches).
A 150 C temp change on 50 mm steel is 0.092 mm (or 0.004 inches).
Last edited:

Clamped the two steering arms together and drilled the first hole thru both arms, then I took them apart and finished drilling them. Since they were already polished, I used masking tape to protect the surfaces.

I made a big mistake by using a ceramic wax on the adapters wanting to marvel at my polishing work before shooting them with Cerakote. Even thou I thought I used Acetone and I'm certain I used Hot water and Dawn dish soap and washed them, I still had trouble.
Since there is NO chemical that will take Cerakote off, I had to sand it off. Which gave me another opportunity to do an even better job this time. I didn't spin them with the drill press, but did it the old fashion way .... by hand!!!
Yes that's right .... Brake Kleen, Acetone, Alcohol and Brake Fluid will not touch Cerakote MC-5100 once it's cured, this means you have about 5-10 minutes at most to use Acetone

My hanger for the steering arm was some 12 gauge solid wire with insulation ..... another mistake I made. Previous paint flaked off while I was handling it during shooting and fell into the Cerakote so I had to do one of those over also.
The one steering arm and two brake adapters turned out to be my best parts !!!


No matter how hard I try you can still see scratches ...... oh well !

I still have to polish the hubs, not totally sure how I'm going to go about this shape. My only thoughts are using cross buffs to get into all those dead end corners, mainly on the back side. Cross Buffs are not cheap.
Or I could just take it to my guy in Blanchard Oklahoma, he did my gas tank (Coors Beer Keg). Now there's a thought!!!

Cross Buff Link:
www.amazon.com/gp/product/B07H42ZHMD/ref=ppx_yo_dt_b_search_asin_title?ie=UTF8&psc=1
.
I made a big mistake by using a ceramic wax on the adapters wanting to marvel at my polishing work before shooting them with Cerakote. Even thou I thought I used Acetone and I'm certain I used Hot water and Dawn dish soap and washed them, I still had trouble.
Since there is NO chemical that will take Cerakote off, I had to sand it off. Which gave me another opportunity to do an even better job this time. I didn't spin them with the drill press, but did it the old fashion way .... by hand!!!
Yes that's right .... Brake Kleen, Acetone, Alcohol and Brake Fluid will not touch Cerakote MC-5100 once it's cured, this means you have about 5-10 minutes at most to use Acetone
My hanger for the steering arm was some 12 gauge solid wire with insulation ..... another mistake I made. Previous paint flaked off while I was handling it during shooting and fell into the Cerakote so I had to do one of those over also.
The one steering arm and two brake adapters turned out to be my best parts !!!
No matter how hard I try you can still see scratches ...... oh well !
I still have to polish the hubs, not totally sure how I'm going to go about this shape. My only thoughts are using cross buffs to get into all those dead end corners, mainly on the back side. Cross Buffs are not cheap.
Or I could just take it to my guy in Blanchard Oklahoma, he did my gas tank (Coors Beer Keg). Now there's a thought!!!
Cross Buff Link:
www.amazon.com/gp/product/B07H42ZHMD/ref=ppx_yo_dt_b_search_asin_title?ie=UTF8&psc=1
.
Strictly Attitude
solid fixture here in the forum
Very cool Rick
Rich I have a question about polishing wheels , pads and buffing bonnets do you wash them ? I am trying to wash a couple pads and a buffing wheel 3inch one. Have you ever cleaned yours and with what ? I used liquid laundry detergent and Simple Green and have them soaking right now but it doesn't seem to be doing much so I will try another combo until I find something that works or give up
I've never tried cleaning them with a wet solution, but I can see where that might not work.
I like to use a file card and run that thru polishing wheels with the motor/wheel running, if you don't have a file card you can try a screw driver. Just be aware that his will fill up the file card with strands from the wheels/pads. The file card would not work on a bonnet, at least what I picture has a bonnet.
Hope that helps!!!
I have tried with a file card , screwdriver but I am trying to get the wheel/pad clean just to see if there is a difference after being cleaned or I could just be wasting my time but it won't be the first time one of my brainstorm ideas didn't work and I'm sure it wont be the last