selecting a distributor for your application

grumpyvette

Administrator
Staff member
distributor.jpg

1962-72diagram.gif

http://www.msdignition.com/pdf_catalog/ ... 69-111.pdf

MSD Ignition
El Paso, TX
915/855-7123
http://www.msdignition.com
testing ignition coil
http://www.aa1car.com/library/ignition_coils.htm
rather than rebuild your old and probably well worn Chevy distributor you might want to look into upgrading to a new ball bearing shaft distributor with modern electronics and a matched ignition., theres also the option of selecting a small diam. cap & external coil version as it provides more physical clearance for some intake designs like EFI, tunnel ram and cross ram intake designs

https://www.customwiresets.com/product.php?productid=16162&cat=0&page=1&featured


viewtopic.php?f=70&t=1179

http://www.msdignition.com/page.aspx?id=3206

PROVIDED its not defective if your buying it used?

the reason I point that out is theres a few total slimeballs that sell burnt out components at swap meets, so your almost always better off buying ignition components that are NEW rather than used.
the MSD 6AL ignition
is just fine for most street/strip application when matched with the correct components
http://www.msdignition.com/Products...SD-6AL_Ignition_Control_with_Rev_Control.aspx

http://garage.grumpysperformance.co...ei-distributors-ignition-advance-curve.16425/

or in some cases
http://www.holley.com/HiOctn/ProdLine/A ... 0-160.html

http://www.msdignition.com/Products...SD-6AL_Ignition_Control_with_Rev_Control.aspx

http://www.msdignition.com/Products...hevy_V8_with_Internal_Module_Distributor.aspx

http://store.summitracing.com/partdetail.asp?autofilter=1&part=TAY-79226&N=700+115&autoview=sku

related info
viewtopic.php?f=55&t=444&p=5682&hilit=+dual+quads#p5682

viewtopic.php?f=70&t=1320&p=2867&hilit=vertex#p2867

viewtopic.php?f=70&t=2798

http://garage.grumpysperformance.co...ouble-shooting-rebuilding-hei-ignitions.2798/

http://www.summitracing.com/parts/HLY-890-160/

viewtopic.php?f=70&t=840

NEED OFFSET DRIVE

http://www.goodvibesracing.com/magneto_ ... drives.htm

http://www.goodvibesracing.com/magneto_ ... drives.htm


DualPoint03.jpg

dualpoint1.jpg

this was a great choice in the 1960s but technology has made it rather obsolete


viewtopic.php?f=70&t=2798

viewtopic.php?f=70&t=5425

viewtopic.php?f=70&t=3797

viewtopic.php?f=70&t=251

viewtopic.php?f=70&t=1179

viewtopic.php?f=70&t=232

I make this info stuff easy to find
 
Last edited by a moderator:
just like in every other component you select for an engine build youll need too shop carefully, theres a wide range in both quality and price .
some of the older chevy factory distributors can be refurbished to be excellent choices, and some of the newer after market distributors are cheap junk, so do some research, look for features that are important to you like roller bearings or replaceable bushings, and readily available replacement parts and tech support. I,d also suggest you look carefully at the distributor body and cap diam.... as many applications like with injection,dual quads, tunnel rams, etc. can make the selection of a small diam. or even a distributor-less ignition mandatory

http://www.carid.com/1991-chevy-corvett ... 77161.html

http://www.summitracing.com/parts/pnx-d ... l/corvette

http://www.summitracing.com/parts/pnx-d ... l/corvette

http://www.summitracing.com/parts/acc-6 ... l/corvette

http://static.speedwaymotors.com/pdf/547-8203.pdf
HERES THE ONE I USE
http://www.summitracing.com/parts/HLY-890-160/
keep in mind youll need a small base distributor to clear a holley stealth ram based intake, or several other similar aftermarket intakes that won,t allow the large cap hei distributor to fit and function
THINK LOGICALLY ,ISOLATE AND TEST,NEVER ASSUME!
PULL THE TROUBLE CODES AND USE THE SHOP MANUAL AS A GUIDE,

YOU may be amazed at the number of times a bad sensor or loose wire, bad ground or blown fuse is the problems cause.
I've seen guys rush out and spend hundreds of dollars on parts,too fix a problem, take a great amount of effort to tear apart the dash or other area and once the new parts installed it still won't work, so forced to do further research at that point they only then find a blown fuse or corroded electrical connection.(that was the true initial cause)


viewtopic.php?f=50&t=3110&p=12074&hilit=multi+meter#p12074
image_6238.jpg

http://www.harborfreight.com/5-in-1-dig ... 98674.html

If your having ignition issues and you think its a distributor related issue, as always ISOLATE AND TEST
the first thing Id have tried in that case, if it was my car,
would have been to swap in a known good spare distributor,
(A small base circle HEI is
preferred as it fits more applications)
and it certainly won,t hurt to have two test distributors,
why? well its a rather quick and rather simple way to isolate the problems source.
too find out if its a distributor or other component of the ignition system.
once you know its a distributor or a different component your 1/2 way to solving the problem
now I know someone will point out the fact that you might not have a good spare distributor handy,
thats one reason to visit your local salvage yard,
in most cases you can find one in decent shape for less than $30 to use as a spare for testing.


YOULL NEED THIS ADAPTER FOR SOME
http://www.eficonnection.com/eficonnect ... ItemId=792
BILLETECH PERFORMANCE-CHEVY V8 HEI/EST 60109

Click on the "billetech late model fuel inj." link to return to the previous page.
Categories » accel distributors » billetech late model fuel inj.

60109.jpg


https://www.skipwhiteperformance.co...-late-efi-tbi-throttle-body-350-6652-r_79836/
I have no proof these are better or WORSE, than the other options but the price looks good so I have to wonder if they are junk or everyone else just marks the similar distributor up considerably more once its re-boxed and re-labeled

Distributors:

Depending on the year of your TPI engine will depend on the type of distributor that was used. In 1985-86 "F" body (Camaro-Firebird) and 1985-1991 "Y" Body (Corvette), the distributor was the familiar looking large cap HEI distributor. Upon closer examination of the original distributor you will see it's cap is held down by 4 screws. The more common HEI distributors, if you have another 1974-86 small block Chevy to compare, is held with 4 latches. Another difference is the 4 wire EST connector to the wiring harness. While the common HEI has the prongs with two outer slots facing up, the HEI used on the TPI engines, has one of these slots facing to the outside.

You can use the common HEI on your TPI for the years mentioned above, but you will have to swap the connector at the harness or find the connectors at a salvage yard, which can be found on the 1985-86 3.8L V6 found on the FWD vehicles or on the 4.1L V8 Cadillac motors.

lg_HEI_2.jpg


Shown above is the large cap HEI distributor, this one is the common variety which the cap is latched instead of being held by four screws. These can have the est connector modified to work on your TPI engine perfectly.

The next distributor was on the 1987 through 1992 Camaro-Firebird TPI engines. This is what I call the "small cap" HEI, which uses a remote mounted coil, typically is bolted to the intake manifold. You will note this is the time period, Chevrolet switched to the roller cam motor, and this distributor was used on these engines.

sm._HEI.jpg


Shown above is the "small cap" HEI with coil.

coil_and_wiring.jpg


The remote coil has two connectors. The gray connector is the 12V coil power supply, the large pink wire goes to ignition "on" power for the distributor, the white wire can be hooked to a tachometer. The black connector has the smaller pink and white wires which goes to the two wire connector on the ignition module on the distributor.

distributor_conn..jpg


EST connectors that send the ignition signal back to the ecm, The one of the left is for the "small cap" HEI, the center one is for the "common" large cap HEI, note the two outer prongs with slots facing up. The connector on the right is the "TPI" distributor connector (1985-86 only), used with with screw down caps. Note one prong with slot facing up, the prong on the far left has a slot but is facing towards the left.

tbi-tpi_distributor_compare.jpg


Be careful in pulling a small cap HEI to use. The distributor to the left is used on the 1987-1992 Camaro/Firebird. Note the smaller base as compared to the distributor on the right, these larger base distributors were used on some 1991-1993 "B" body TBI equipped engines, such as the Chevy Caprice and Buick Roadmaster. They use the TBI throttle bodies which are held down with two studs for the air cleaner, and the manifolds are machined for the large base distributor they use. They will not interchange.

DISTRIBUTOR GEAR APPLICATIONS

There has been a lot of controversy concerning the interchange of the distributors using a large cap HEI on a 1987 and later block and using a small cap distributor on earlier blocks. It used to be on the safe side, use the large coil in cap HEI on the pre-87 blocks and the smaller remote coil HEI on the 1987 and later engines. Now with the aftermarket coming to the rescue for those who want to use the different distributors due to firewall clearance issues, availability, etc. it is possible to use the distributor of your choice, but you must use the proper distributor gear based on the material the cam distributor gear is made of.

Crane cams makes the proper distributor gears for the roller and non-roller blocks.

General rule is to use a bronze alloy gear for a steel distributor gear on the camshaft (most factory roller cams follow this route). For an cast iron cam use a irondistributor gear (all non roller cams and some later aftermarket roller cams use an iron distributor gear on camshaft.

Crane cams does make a coated steel distributor they say is superior to the bronze alloy gear with a OEM life span. It can be found at this URL through Jeg's performance parts: http://www.jegs.com

Part # 270-11951-1

Coated Steel Distributor Gear
Chevrolet
90° V-6 1978-86, 200 thru 262
V-8 1955-87, 262-thru 400 .491'' Dia. shaft
V-8 1965-90, 396 thru 502
  • .491'' Dia.
Crane also makes a iron gear that fits the small HEI distributor for use in an earlier non-roller cam application.

Part# 270-11970-1

Iron Distributor Gear
Chevrolet
90° V-6 1985-91, 262 For GM HEI
V-8 1985-99, 305-350 For GM HEI .427'' Dia. shaft
V-8 1991-00, 454-502 For GM HEI
If you want to use the bronze alloy gear it is part # 270-11988-1 for the small HEI (.427" dia. shaft)

For the large HEI it is part # 270-11990-1 (.491" dia. shaft)

your current distributor can usually be easily modified by a local machine shop with a lathe for an adjustable slip collar by carefully machining off the current one and adding a slip collar, if you need to make distributor gear to cam gear engagement or oil pump drive shaft length changes
MOR-26217_QQ.jpg


sbcoilh5b.jpg

dpd3.jpg

BBCbottCustomax.jpg

the tall deck block requires a longer reach distributor shaft thats about 0.28 longer thus the need for the adjustable collar on the distributor adding the extra reach to get the oil pump drive and drive gears to properly align and mesh.

http://www.summitracing.com/parts/MOR-26217/?rtype=10

https://www.customwiresets.com/product.php?productid=16162&cat=0&page=1&featured
chevys+ignition_distributors.jpg


SMALL AND LARGE HEI DISTRIBUTORS

http://www.eficonnection.com/eficonnect ... ItemId=792


smalltolarge.jpg

BILLETECH PERFORMANCE-CHEVY V8 HEI/EST
use of and taking the time and effort, when building or repairing the wiring on any custom car, to install a $5 -$7, UNIQUE for each electrical component , quick connect indexed water resistant screw-up proof, male/female connector combo, that allow's you too quickly connector remove a distributor or other component from the cars wire harness and re-install it with little chance of screwing up the electrical connections is almost always a good idea

4pinwe.jpg

4pinwe1.jpg

http://ampperformance.com/i-1198424...r-950-distributor-wiring-harness-adapter.html

* Complete ready to run
* Distributor gear compatible with flat tappet cams and OEM hydraulic roller camshafts

ACCEL BilleTech late model replacement distributors are the perfect replacement for the factory distributor in your late model car or truck. All BilleTech distributors feature: 6061 T6 Billet aluminum housing. Centerless ground steel shaft. 10,000 RPM bearing upper with oil lite bushing lower. ACCEL performance electronic pick up and module (where noted). High dielectric strength cap, balanced rotor for trouble free performance. Brass cap contacts. Iron or steel distributor gear compatible with flat tappet cams and OEM hydraulic roller camshafts. May be used with an ACCEL, Mallory, Crane, Holley or Jacobs Electronics CD ignition system. Fits Chevrolet V8 engines with HEI/EST remote mount coil applications include 1987-93 Cars and 1987-95 Trucks.

Model Number: 60109

You must select an option

890160.jpg


heres the small base computer controlled distributor I selected for use with my custom ported and fabricated EFI intake
http://www.summitracing.com/parts/HLY-890-160/

this ACCEL DISTRIBUTOR looks similar, but check with accel for compatibility
I would not be a bit surprised to find out that accel previously built the HOLLEY distributors and relabeled them for HOLLEY
http://www.accel-ignition.com/ProductDe ... election=1

http://static.summitracing.com/global/i ... r10209.pdf

Holley's performance billet distributors are built with premium components to deliver consistent and reliable ignition performance under the most extreme racing conditions. The distributors are capable of performing to whatever rpm levels an engine is designed to achieve. They feature 8 degree vacuum advance and 28 degree mechanical advance settings, with 32 degrees of total advance, a magnetic pick-up, output wires for connecting to the magnetic input of most aftermarket CD ignitions, and caps and rotors that utilize brass inserts for improved electrical conductivity. Their stout billet aluminum housings work in conjunction with centerless-ground, case-hardened 0.500 in. shafts for increased durability. Caged needle bearings at the top and bottom of the housing create longevity and reliable operation up to 12,000 rpm.

Brand Holley
Manufacturer's Part Number 890-160
Part Type Distributors
Product Line Holley Performance Billet Distributors
Summit Racing Part Number HLY-890-160
UPC 090127481103

Computer-Controlled Compatible Yes
Trigger Style Hall effect
Advance Type Electronic
Cap Style Male/HEI
Mechanical Tach Drive No
Slip Collar No
Ignition Box Required No
Distributor Rotor Rotation Clockwise
Housing Material Billet aluminum
Housing Finish Natural
Quantity Sold individually.
Marine Use No

Stealth ram /msd 6A /Holley # 890-160 distributor
Ignition wiring


MSD 6A
First Two wire connector
Small orange----------coil positive
Small black------------coil negative

Magnetic pickup (NOT USED)

Single Heavy red----------battery positive +

Single Heavy black------- battery NEGATIVE/GROUND

Second Two wire connector
Small white---------small white from two pin plug on holley 890-160 AND splice in small tan Chevy tach pick-up from harness
Small red------------small red on Holley two pin plug and splice in heavy pink from Chevy harness


HOLLEY 890-160 distributor
FOUR PIN PLUG
Smaller Four pin plug on distributor plugs to ( Holley #534-138 adapter* ) then large plug on adapter plugs to larger 4 pin factory harness

http://ampperformance.com/i-1198424...r-950-distributor-wiring-harness-adapter.html


HOLLEY 890-160 distributor
TWO PIN PLUG
(see MSD CONNECTION INFO ABOVE)

*these adapters are very easy to make from salvage yard parts(wire plug connectors)


looking for a bit more info or a dyno result?

http://www.eecis.udel.edu/~davis/z28/winter01/dyno/dyno031229/webpage031229.html

sure heres ONE, but its a bit deceptive, a decent single plane intake with the correct throttle body and injectors can EASILY support 500 hp in a 383 sbc when matched to decent heads and cam ETC.


heres the intake I used with 36 lb injectors, a crane 119651 roller cam and extensively ported 195cc trickflow heads on my vette.

http://www.cranecams.com/product/cart.php?m=product_detail&p=24187

hly-9901-101-1.jpg


hly-9900-172_w.jpg


HLY-112-577.jpg


890160.jpg


heres the small base computer controlled distributor I selected for use with my custom ported and fabricated EFI intake
http://www.summitracing.com/parts/HLY-890-160/

HERE what DD2000 guessed at it really made just a bit less near 470hp
viewtopic.php?f=32&t=430

CRN-1000-1511.jpg

http://www.summitracing.com/parts/CRN-1 ... |Year|1985

small cap distributors measure approximately 4" in diam.
chevroletsmallbodyhei.jpg

LARGE cap distributors measure approximately 5.25" in diam.
smallvslargehei.jpg


http://www.davessmallbodyheis.com/
 
Last edited by a moderator:
timingtab.gif

prorot.jpg

heifire.jpg


Dan85Vette posted this info


Got it up and running in no time. The small cap really cleans up one of the most crowded spots on the C4.
the TPI F-body distributors will drop in a early c4

You need a small cap to HEI harness adapter and a pigtail/ plug for the coil wires unless you make something from junkyard parts


smalltolarge.jpg


If your converting from a OEM large cap HEI in your corvette to the smaller cap design distributor,you should have a small cap to factory plug adapter?
http://ampperformance.com/i-1198424...r-950-distributor-wiring-harness-adapter.html
capsdv.jpg

http://www.hawksmotorsports.com/distributor-connector-87-92-tpi-tbi-small-cap-hei/
smallcapadh.jpg


Still need to mount the external coil, which I'll be doing off the wiper motor bolt with a bent L-bracket. Then I just need to tighten up the loose wires.

I absolutely hate wiring, so using the harnesses from EFI Connection made this a stress-less job. Only had two wires to slice, the Tach and Battery which go into the pigtail that connects to the coil.

The distributor came with cam lube for the lower gear, and the coil comes with basic mounting hardware. The harnesses come in wire loom and decent length for varying mounting locations.

Parts Check:

* MSD-8366 Distributor
http://www.summitracing.com/parts/MSD-8366/

* MSD-8226 External Coil
http://www.summitracing.com/parts/MSD-8226/

* Large to Small HEI Distributor Harness
http://www.eficonnection.com/eficonnect ... ItemId=792
PN: 100-00447
* Coil Connector Pigtail - Gray
http://www.eficonnection.com/eficonnect ... ItemId=790
PN: 100-00445
* Coil to Small Cap Distributor Harness
http://www.eficonnection.com/eficonnect ... ItemId=789
PN: 100-00444
* Plug Wire for coil

http://easyautodiagnostics.com/gm/4.3L-5.0L-5.7L/distributor-mounted-icm-tests-1
disy1.jpg

disy2.jpg


btw this is a rather cool custom touch, (VIDEO LINK BELOW ) you can swap to an HEI cap with wire routing that doesn,t look like crap
http://easyautodiagnostics.com/gm/4.3L-5.0L-5.7L/distributor-mounted-icm-tests-1

http://www.summersbrothersracing.co...LF-CUT-DRIVE-FLANGE-BIG-BLOCK-CHEVY_p_30.html

http://www.accel-ignition.com/Products/ ... edCap.aspx

https://www.eficonnection.com/eficonnection/24xSBC.aspx
 
Last edited by a moderator:
http://www.professional-products.com/distributor.php

http://www.corvettemagazine.com/tec...ette-tachometer-drive-cross-gear-replacement/

http://garage.grumpysperformance.com/index.php?threads/lots-of-wiring-info-diagrams.317/#post-83877

The new Powerfire Ignition System represents the latest state-of-the-art technology in ignitions. Look at this list of terrific features coupled with a price that can’t be matched for any other top of the line ready-to-run ignition system:

• Easy 3-wire install with no external spark box necessary.
• Precision CNC machining and hand assembled construction.
• Patent pending positive lock manual advance/retard knob. Distributor can be accurately advanced or retarded in 1/2-degree increments on the fly by turning the external adjustment knob. Each click of the knob provides a 1/2-degree change to total ignition timing. This makes getting an accurate setting extremely easy.
• Accurate super hot spark all the way through 10,000 RPM.
• Hardened steel .50” diameter steel shaft with sealed roller bearing upper support and bronze bushed lower support for extreme stability at maximum rpm.
• Powerful magnetic pickup and CNC machined reluctor pickup.
• Fully adjustable advance mechanism with easy to use spring and bushing design for a nearly infinite advance curve.
• POWERFIRE module built in for drop-in reliability from 50 to 10,000 RPM.
• Hot cranking spark as low as 50 RPM.
• Black anodized base with laser etched timing marks for easy visibility.
• High quality injection molded caps with brass terminals for long life and conductivity.

http://www.summitracing.com/parts/PFS-30000/

pfs-30000_w.jpg


http://static.summitracing.com/global/i ... ctions.pdf

viewtopic.php?f=70&t=1015&p=16924&hilit=timing+tabs#p16924

viewtopic.php?f=70&t=4683&p=12672&hilit=timing+tabs#p12672

I have yet to see one but its an interesting concept, and as always the links hold a good deal more related info

http://www.jegs.com/InstallationInstruc ... -6852M.pdf

ppdist.jpg


http://www.dragstuff.com/techarticles/MSDchipvalues.html

http://www.jegs.com/i/MSD-Ignition/121/8746/10002/-1

yes you'll want too open and read the links and quotes
Volt/Ohm Meter measured values of Automer RPM Pills
rpm
3000 = 1880 Ohms
5000 = 3590 Ohms
5200 = 3790 Ohms
5400 = 3980 Ohms

From Darell
3000 = 1900 Ohms
5800 = 4400 Ohms
6000 = 4600 Ohms
7000 = 5680 Ohms
8000 = 6860 Ohms

To use round numbers (and only be off by 10-20 rpm), I determined the approximate formula in the 5000-6500 range to be:
RPM - 1400 = Resistance
or
RPM = 1400 Ohms + Resistance

So
5000 rpm = 1400 + 3600, so I need 3600 ohms of resistance for 5000 rpm
5500 rpm = 1400 + 4100, so I need 4100 ohms of resistance for 5000 rpm
etc.

What I did was put a variable potentiometer (10K) in and set it to 3600 ohms (5000 rpm).
From then on, each ohm of resistance = 1 rpm added to 5000 rpm. Units are now interchangeable.
The output from the pot goes to 3 of teh DIP switches. They are 0, 500, and 100, so if one is selected, that output would then be 5000, 5500, or 6000 rpm. That value goes into the other 5 DIP switches which have values of 100, 200, 300, 400, and 500.

The outut is then 5000 rpm (3600 ohms) PLUS 0, 500, or 1000 PLUS 100, 200, 300, 400, or 500. That gives the opportunity for any 100 rpm increment from 5100 (switches 6 and 1) to 6500 rpm (switches 8 and 5).
5100 rpm = 6 and 1 (5000+0+100)
5800 rpm = 7 and 3 (5000+500+300)
6500 rpm = 8 and 5 (5000+1000+500)

To get the resitance values, I used a number of resistors (they add in series and divide in parallel) on a circuit board. I put the whole thing in a small (~1.5"x3") box and cut the switch box out and a hole for the pot. I then spliced into the two wires in teh shift light that go to the place where the pill plugs in. I used copper phone line. I ran the wires down the A pillar and out underneath the seat and place the box there.

Realistically, you could use 7 adjustable pots for the resistance values instead of resistors, or just use one pot and no switches or resistors, but you need a VOM to read the resistance everytime you want to set it. I like being able to flip a switch at any time and change the light value.

A while back someone talked about making their own MSD chips using a Radio Shack adjustable resistor.

Since an MSD rpm chip is nothing more than a resistor in a fancy plastic case with two prongs, all you would need to know is the resistance value for each rpm level.

I just bought two adjustable chips. Not the Radio Shack type, ones already in a case. There are made by Shiftnoid (electric shifter company) and are sold by Jegs. they have a small screw in one end and adjust all the way from 0-12,000 rpm. Problem is that the screw has no scale on it. It comes set at 6000 and for every 1/4 turn of the screw it moves the rpm level by 100. Would be easy to get lost if you didn't know what the chip was set at. Also would be easy to lose count of the 1/4 turns if making a large adjustment.

I figured it would be easier and more accurate to set it by measuring the resistance. Borrowed a friend's chips and measured both his and mine. Used my digital multimeter set on the 20K ohm scale. Feel free to copy the list and I would appreciate it if anyone has any numbers to add. Would really appreciate those numbers below 4000. I use the lower chips in my MSD two step to control starting line rpm in my drag car.

RPM Resistance
3000 1.91
3400 2.21
4000 2.70
4600 3.21
5000 3.58
5200 3.77
5400 3.95
5600 4.16
5800 4.35
6000 4.57
6300 4.88
6500 5.10
6600 5.20
6700 5.32
6800 5.43
6900 5.55
7000 5.65
7400 6.12
7600 6.38
7800 6.63
8000 6.89
8600 7.69
8800 7.97
9000 8.27

It appears the scale is .10-.11 for every 100 rpm for most of the range, but is closer together below 4000 and wider apart at the top end of the range. Also may be some variance in the chips themselves. Example: I checked 3 different 6600 rpm chips . Resistance of 5.19, 5.20, 5.21.
Here's a list of resistance values for anyone interested in making their own MSD chips. 1/4 watt resisters work just fine.


RPM Kilo-OHMS
1400 = .491
1500 = .639
1600 = .819
1800 = .947
2000 = 1.161
2200 = 1.364
2400 = 1.50
2500 = 1.58
2600 = 1.70
2800 = 1.78
3000 = 1.906
3200 = 2.062
3400 = 2.222
3600 = 2.385
RPM Kilo-OHMS

3800 = 2.551
5000 = 3.63
5200 = 3.82
5400 = 4.02
5600 = 4.20
5800 = 4.41
6000 = 4.62
6200 = 4.82
6400 = 5.04
6600 = 5.26
6800 = 5.46
7000 = 5.72
8000 = 6.96


To make an adjustable RPM switch get a 6 position rotory switch with detents from an electronics store. Then solder in the resistors for the desired RPM levels. Use it in conjuction with a two step to control launch RPM. It works great. I found that when you launch the car 1,000 RPM below converter stall the car hits real hard as you take advatage of the flashing.

Below is the resistance ratings for Autometer chips for their shift lights.

  • RPM kohms
  • 3000 = 1.897
  • 5600 = 4.22
  • 5800 = 4.44
  • 6000 = 4.64
  • 6200 = 4.85
  • 6400 = 5.08
 
Last edited by a moderator:
http://members.shaw.ca/corvette.84/sequencer.html

http://www.megamanual.com/ms2/GM_7pinHEI.htm

https://www.eficonnection.com/eficonnection/default.aspx

https://www.eficonnection.com/eficonnection/24xLT1.aspx

https://www.eficonnection.com/eficonnection/24xBBC.aspx

http://garage.grumpysperformance.co...m-with-how-your-c4-corvette-runs-badly.15212/

vortecdist1.jpg

vortecdist2.gif

vortecdist3.jpg


https://www.fuelairspark.com/chevy-small-big-block-dual-sync-billet-distributor.html

autowiz said:
forcing the pump to fight dead head pressure is only going to complicate whatever problem you are already having. The C4 was GM's time to figure out electronic fuel injection. You should be happy you do not have their first attempt, the cross-fire fuel system that was used for just 2 years. the last of the c3 and the first of your c4. Then in 1985 the first year of your tuned port was a whole mess too. This was because there was a separate module just to interpret the mass air flow sensor and send the signal to the pcm. This maf module is out of production and even if it could be found they had an extremely high failure rate utterly killing the 1985 corvette unless you convert to a carb or aftermarket fuel injection

The maf module was so problematic that gm dumped the mass air flow sensor completely and went to Speed Density fueling with a map sensor only for a handful of years and then in the early 90's came back with both mass air flow sensor and manifold absolute pressure sensor and the ecu is constantly comparing the 2 for accuracy and diagnostics. This is the point where electronic fuel injection became stable for GM. and it happened right around the time of the LT motor being put in the C4.

There were some other strange things that were done by GM in these years as they struggled to figure things out. One problem was GM was caring too much about oil temp. And they drove the cooling fans based off of their firm belief in letting the oil achieve a temp that would allow the moisture to steam up and leave the crankcase. And so most C4's from the 80's and even into the early 90's in proper stock form will not even turn the coolant fan on until 238f is achieved in the coolant.

Also GM thought that linking fuel pump power to the engine's oil pressure was a great safety feature. Their thinking was if the oil pressure went away, the fuel would shut off saving the engine from imminent failure. What this looks like is a fuel pump relay driven by the PCM that lights the fuel pump when you turn on the key for a 2 second prime, and then an oil pressure switch that when closed sends power directly to the fuel pump. This has been the culprit of countless gremlins on these cars. This creates extremely long cranking times intermittent issues and even stalling on worn motors that drop oil pressure too low at idle.

And then we come to wiring. GM had to put so much copper in each of these Corvettes. At their peak in 1993 the Chevrolet Corvette had right around 200lbs of copper in each car and if you took all the wire out and stretched it end to end you would have over 2 miles of wire. That is a lot of 30+ year old connections to break down from fretting / micro motion. This problem drove GM to create and invent GMLAN. A novel way to drastically reduce the amount of wires and connections in each vehicle by letting modules communicate on 2 networks. A 1 wire low speed network for unimportant stuff and accessories and a 2 wire high speed network for all the important stuff like communications between the engine controller, abs unit, airbags, stuff that needs big information and fast. And for diagnostics here the stuff that talks on high speed usually also communicates on low speed.

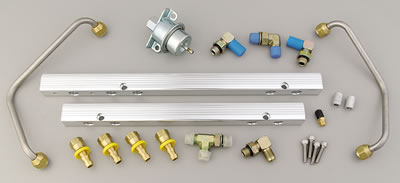
There is a very good reason the aftermarket fuel injection companies have put together specific retrofit kits for these early GM fuel systems. They help. And from the time it goes in you don't fight with it anymore.
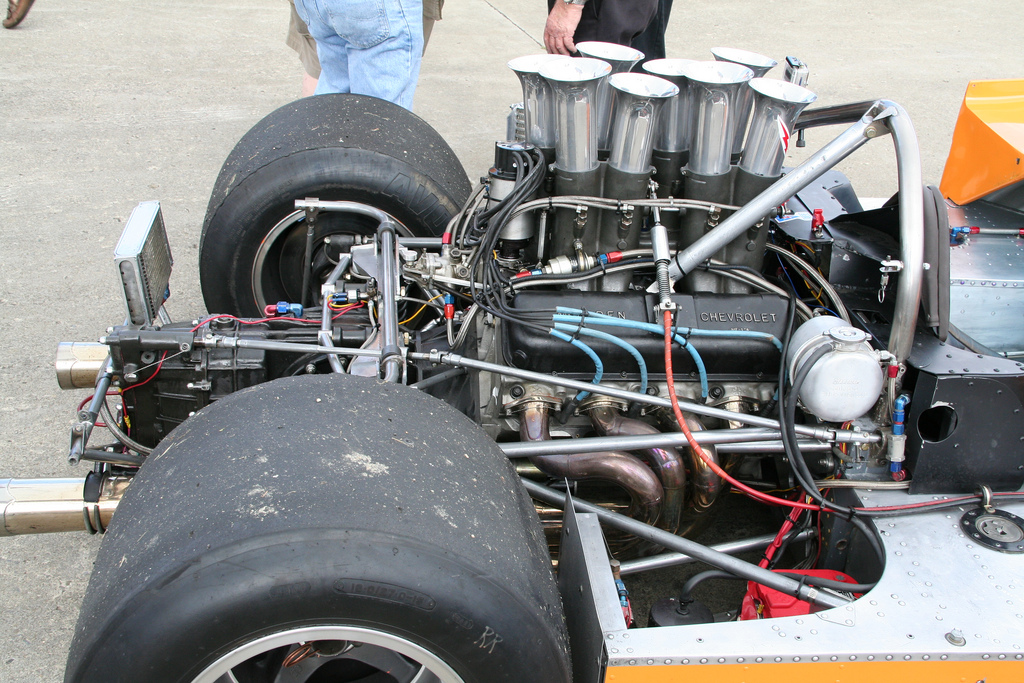
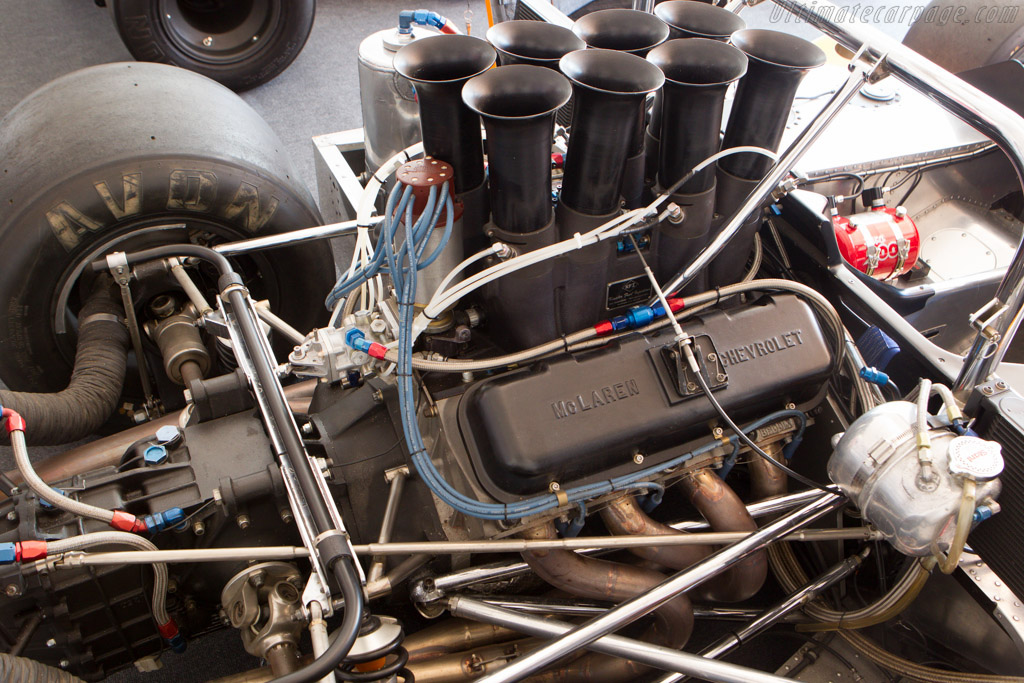
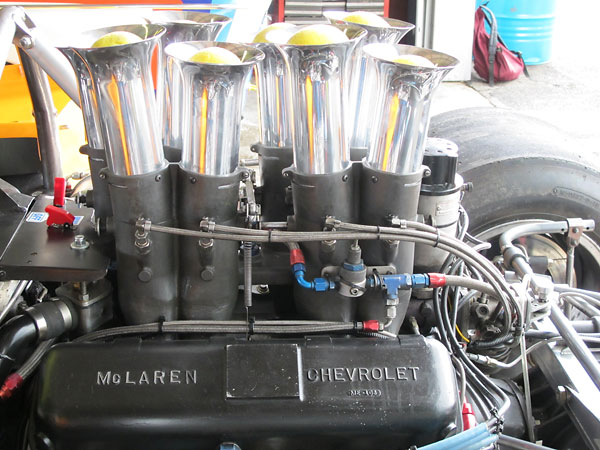
There is also another thing here I would like to point out about these early control systems. The cross fire in '82 & '84 had 2 fuel injectors. So it's controller had 2 injector drivers. One fuel injector fired each bank. These were low impedence(peak and hold) fuel injectors we do not use today. Their drivers in the pcm had to be robust for their operation. When your tuned port came out GM added 8 fuel injectors as you see but made no changes to the controller. They used these 2 robust drivers to drive 4 injectors each simultaneously. Thus achieving bank fueling. This allows fuel/air mix to collect at the head of the closed intake valve and begin to separate from the atomized mix.


Sequential fuel injection is where we have a crankshaft position sensor and a camshaft position sensor and we have 8 fuel injector drivers and we time the opening of each fuel injector to the opening of that cylinder's intake valve. There are nothing but upsides to sequential fueling. From power production to efficiency to emissions to cleanliness of the intake and valves. So great and profound was sequential fueling when it came on the scene that it what everything made today is.


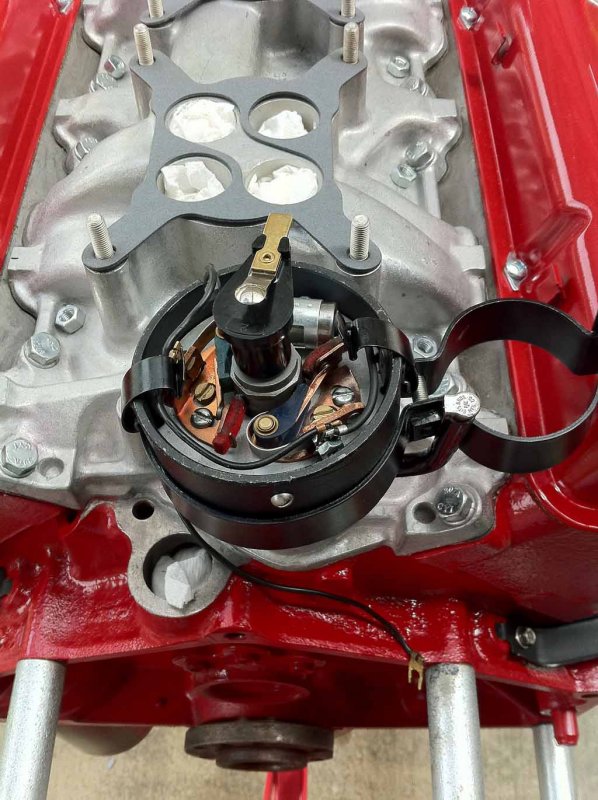
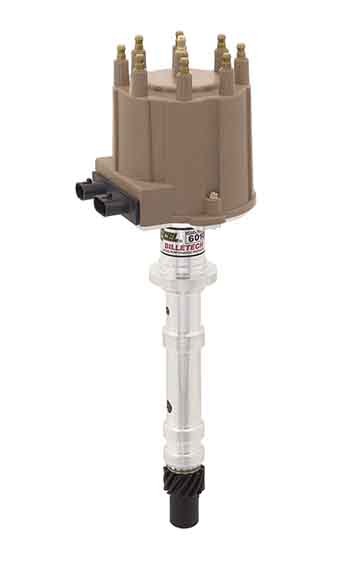
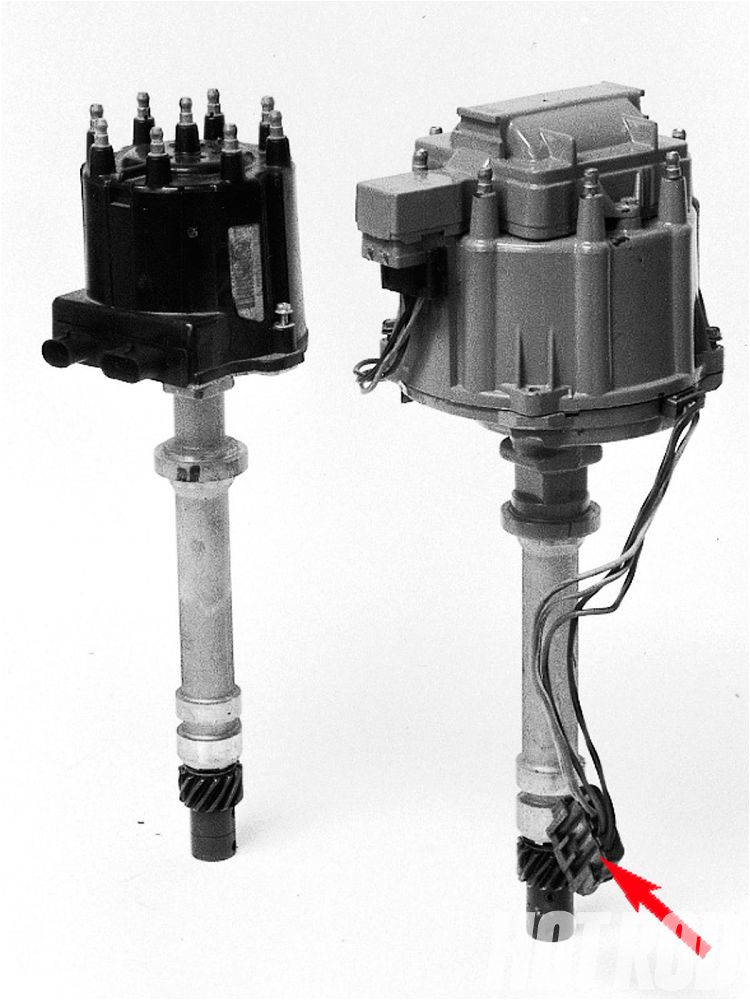
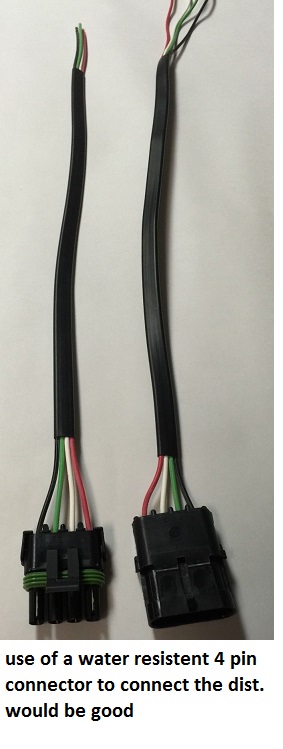
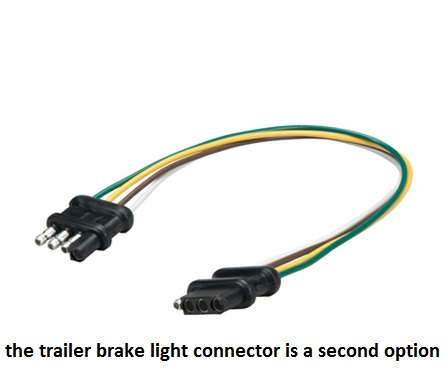
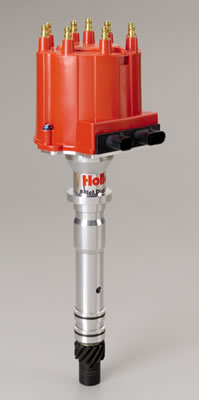
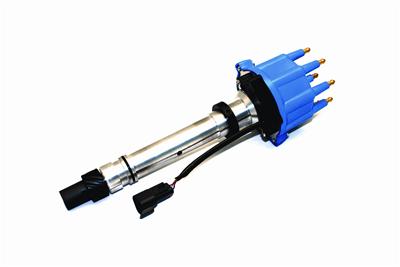
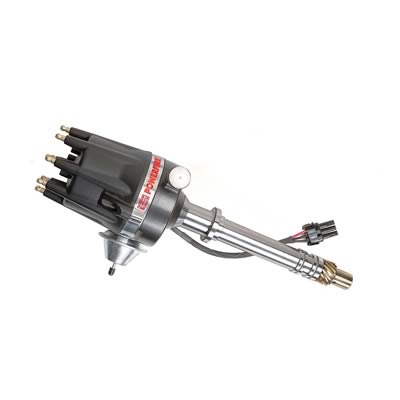
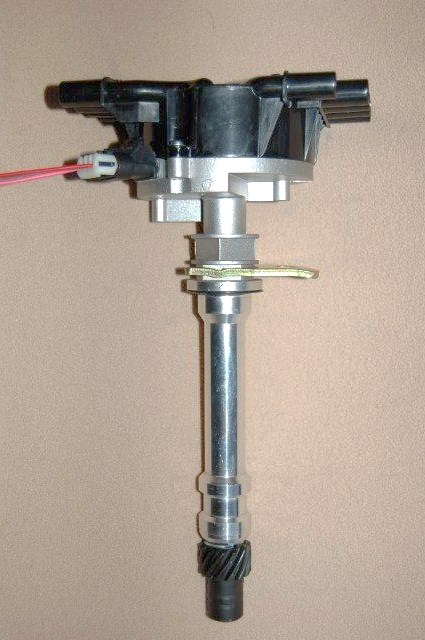
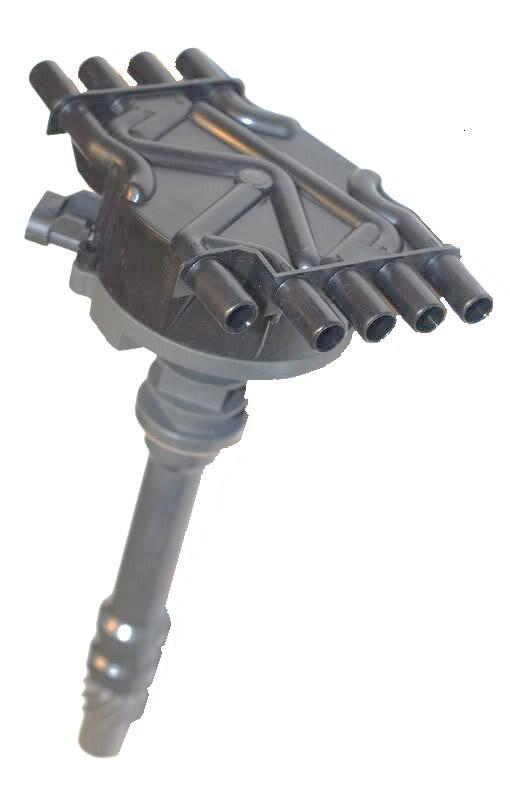
FAST makes a 'dual sync' distributor that provides both a cam and a crank signal back to the fast controller. This dual sync distributor with the multiport retrofit would allow you to achieve modern day fueling with your older Tuned Port fuel system. Here is that distributor: https://www.fuelairspark.com/chevy-s...stributor.html

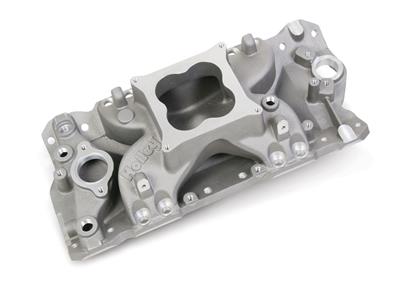
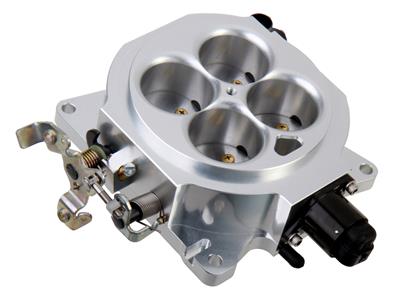
IF you were not interested in the more cost effective route of the multi port retrofit and wanted the fuel system that were gonna make the most power that you would feel driving then you should consider dumping the tuned port all together. Just unbolt everything toss it all even the lower intake. And rebuild with an edlebrock intake for a carb. Whichever you like. If you got a cam and are good past 6k rpm then get the victor jr. single plane, or get the performer RPM if you have the stock cam and valvetrain. And then get the FAST easy efi 2.0 kit with their carb replacing throttle body. This throttle body flows an industry leading 1150cfm. It has 8 fuel injectors built into it and claims 1200hp support all on it's own. The runners and throttle body on your tuned port will never flow these numbers no matter what you do. So if you were not looking to just solve your problems but wanted to make yourself some of that Lemonade we all love so much you might consider an Edlebrock intake and a FAST 30400-kit: https://www.fuelairspark.com/ez-efi-...-base-kit.html

I have set this up on a few C3's here:
https://www.digitalcorvettes.com/for...d.php?t=242889
Here:
https://www.digitalcorvettes.com/for...d.php?t=255809
And here:
https://www.digitalcorvettes.com/for...d.php?t=292602

The setup with their throttle body always impresses. Every single time. And all of their stuff is labeled and engraved made in the USA.
Quote:
Originally Posted by 1963SS
I used to think that also but the oil pressure switch is wired parallel with the fuel pump. I believe it's a backup if the fuel pump relay were to fail. The fuel pump signal from the ECM energizes the relay and that supplies power to the pump. This is true on the LT1 Vettes, not real sure about an '89.

It is wired in parallel because the ecu only supplies power to the relay for the 2 second prime. When the car is running the relay is not energized and power for the pump comes from the oil pressure switch. There is even a bad part that came with the cars and a TSB on replacing them if they are a certain color plastic. I will look for this bulliten and post here.

Later years and your LT switched away from this and the relay stays energized while the car runs. This is because GM learned that powering the fuel pump from the oil pressure switch was a bad idea. Very bad. But there is nothing that can be done with an ECU that will only energize a relay for prime. The LT ecu's can not be used here because they require low and high res pulses from the optispark. These early fuel systems sere just problematic. And the entire generation of a car has suffered a certain rep for unreliability as a direct result.


Even the opti was in and of itself a disaster. And All optispark was not sequential. The LT1 was the same bank firing as the tuned port. Only the LT4 with the red intake at the very end of the sbc's life had just touched sequential fueling. So many seals and a water pump within inches of an optical sensor. How can reliability ever be had out of that? And that was when GM finally got the right answer. CKP position sensor and a CMP position sensor. No distributor. Sequential fueling precise ignition timing without concerns about max timing adjustments allowed before jumping to adjacent towers.
Quote:
Originally Posted by 1963SS
I'm probably just getting old but I thought the FP relay was energized for 2 seconds and then again when it sees reference pulses from the distributor either cranking or running. What if the 2 second prime is used up because the car had to crank for 5 seconds. That may not be enough time for the oil pressure relay to close and the car would never start. Logically, that doesn't make a lot of sense. You'd have to keep turning the key off and on after 3-4 seconds. Kinda illogical to an old Hillbilly.
I know, right? Well we didn't start off with the knowledge. And GM's Tuned Port was an early fuel system from a time before GM understood that the relay should always be energized. The pump gets its prime and then the car cranks until oil pressure closes the switch. This made for start n stall and long crank time conditions as the cars packed on the age and wear. And this made GM quickly move to having their ecu's just keep the relay energized. And there have been no problems since. But he has an early fuel system.


This has also brought about the solution to long cranking times as cycling the key twice before cranking to make the car start right up. How many early C4 owners know this trick?
 
Last edited:
autowiz said:
You are right 94, 95, 96 were all sequential. Well 1993 could have came both ways then. I vividly remember the 8th digit entry of the vin as selecting between sequential or port fueling for one of them. But that still doesn't make it a good fuel system, lol. Optispark as a whole represented GM's shift from reading engine positioning off of the camshaft to reading engine positioning off the crankshaft. And that was a bad idea. Because it is easy to know where the crank is when you read off the cam. 2x the number of desired teeth on the wheel and you are there. But it is impossible to know what stroke the engine is on when you are only reading the crankshaft. You can play with which stroke you fire the ignition system on during cranking to get a logical detection that you can struggle to remember the whole time the car is running. Ya know, or you can fire the coil every time the piston comes up. waste spark style. On compression and on exhaust. And the exact same applies with the fuel injectors. You can time their opening to that cylinder's tdc but you gotta fire it on both the intake and the combustion strokes. So really if we wanna be technical about it all it is more of a semi sequential than it is sequential fueling as we understand it today.

http://garage.grumpysperformance.co...m-with-how-your-c4-corvette-runs-badly.15212/
 
Thank you for all that information Grumpy!

I am in the process of searching for the rite distributor to go with the MSD 6a BTM control box.
I was looking at the "in house" JEGS brand SSR-11. It seems to be a nice dizzy... but I need to do further research on it.
Your posts are helping me understand a few more things pertaining to a dizzy.
 
Vintage Mallory Magnetic pickup Drag Race model if you can find yet.
Discontinued.

MSD Pro Billet Race model no vacuum advance. I would lock it.
 
Did some research last night on MSD.
Thier Millijoules energy rating is skewed Grumpy.

It looks like Vintage Vertex Magnetos and Mallory Mags have same Fire power as modern MSD Mags.
Right at the spark plug gap where it counts.
 
The Points Magnetos are more efficient and deliver way hotter spark than electronic Mags.
Any CD ignition system.
Lacking the bells and whistles toys gadget guys want old school tech that I think is still superior all out race to Win the Money.

Low Po EFI Crank trigger coil on plug Ok.
Spark duration and fire power still does not match a Good set up Vertex Mag.
 
Question: How would you pull timing out when under boost, using a vertex magneto .
Right now you can not 100% dependable.
Problem I face with Nitrous on T/A.
It's Vertex OAC mag equipped.
Sold off the MSD 6AL And Pro Billet distributor a long time ago now.
Was still made all in USA MSD...Vintage 1996 era bought new by me.

Some private Vertex Mag black boxes made or were for Nitrous and Boost retard.
I can not testify 1st hand how reliable.

Have to manual move Mag timing back and retard timimg.
Best to lock out the mag no advance.
Easy for me to do have the service tools.
Like set to 20-21 degrees BTDC.
That's it.
Hit the Nitous hang on.
Boost step on the gas hang on.

All the old timers did Gasser Era into early 1980s.
 
There was a Rotophase distributor.
Ultra rare now.
Pulled timing back with raised engine rpms.
Retard mechanism was all Gear drive.
 
Thanks Brian.. I was researching some on the magnetos today and found that they do not like wet conditions.
This would be a red flag for me, I play in water and mud up to 5' deep.
I will prolly forgo the magneto and use the standalone 6BTM box and a Billet magnetic pick up dizzy.
 
Question: How would you pull timing out when under boost, using a vertex magneto .
Taylor Vertex had a Prototype ready to be released in 2004 Thier Mag all electronic programamble.
I was waiting.
Called 1 day and talked to the Engineer.
Got cancelled.

MSD got to big.

They decided to stick with Nostalgia Drag Racing.
 
Thanks Brian.. I was researching some on the magnetos today and found that they do not like wet conditions.
This would be a red flag for me, I play in water and mud up to 5' deep.
I will prolly forgo the magneto and use the standalone 6BTM box and a Billet magnetic pick up dizzy.
They just need a Rain boot Cover a Vertex mag.
Taylor Vertex has.
So does Moroso.
Like a Condom....!
Slips over the cap and wires.
Water proof.

Used on TA that way.
Shaker scoop.
Old MSD every time it rained the MSD got wet.
Misfired.
Vertex did not.

Run that Olds V8 Vertex Mag on the 1963 Pontiac Gp.
Has a Vertex condom cover.
Driven in heavy rain. Does not miss a beat.

Vertex Mag cover was designed for Dirt Track racers.
They Race in the rain still if into Race.
No giving up !
 
Back
Top