8
87vette81big
Guest
Poor Grumpy.
He has a Group of Race Hotrodders that are Sex Krazed Too.
He has a Group of Race Hotrodders that are Sex Krazed Too.


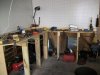
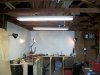
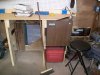
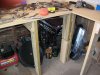
Looking better all the time Bob!!!busterrm said:I am going to put peg board along one side and probably both eventually.
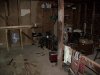
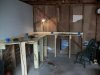
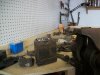
Thanks Rick, I am in process of wiring the 110 outlets, well running the romex for the wiring. I have one wall with pegboard and fixing to go get another for the south wall. Once its up I am going to build shelves on that wall, in the pictures the south wall is on the right. The next door neighbor was put in a institution, and her daughter is selling everything, she gave me the light in the corner, it has one of those retractable arms and a magnifying glass too.Indycars said:Looking better all the time Bob!!!busterrm said:I am going to put peg board along one side and probably both eventually.
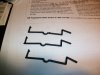
BTW, I have a bunch of hooks for peg board that I will never use if you
want them. Be nice to get them out of my way and put them to use.
The holes are 1/4 and they're on a 1 inch center. Thanks Rick, much appreciated. Sooner I get my Geerage up and functioning the quicker I can start up on the Nova Engine.Indycars said:
How far apart are each hole in the peg board?
What's the diameter of each hole?
Just want to make sure these hooks will work before I ship them. I put one of
each kind in the foreground.Assuming they don't cost more to ship than they
can be bought for.
PM me your address so I will have it.
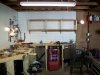
busterrm said:Indycars will be happy to know that I have storage for beer in my garage now.
hope Indycars sent me the pegboard hooks and I will organize my tools and power tools soon.
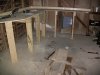
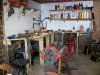
Its a old standard 2 car garage. So I am not real sure the total size. I have 2 windows I plan on mounting a window unit a/c and the other will be where my exhaust fan will be located.chromebumpers said:What size are you working with? 20' X 16'? Instead of grandpa's pegboard it would look much better and up to date with slatboard covering the walls. Look for some discontinued style (for inexpensive) ceiling tiles that you staple on the tongue edge (no tracks) for the ceiling to stop the sound bouncing and loud machine echo from hammering or grinding & so on (trust me, well worth the consideration). CL always seems to have several sellers for that stuff. Are you considering some sort of exhaust fan? plan for that now. I see a lot of people regret later they missed something and it's too much work later to fix.
I don't know what is behind or above those walls but before you cover the walls be sure to install fire-stops due to your expected use of that room. Just my 2 cents