I post these links to allow you gentlemen to quickly diagnose problems
having a few basic meters,gauges etc. helps
http://garage.grumpysperformance.co...tor-putting-out-low-voltage.12221/#post-59512
http://garage.grumpysperformance.com/index.php?threads/85-with-flicker-on-dash-and-radio.13593/

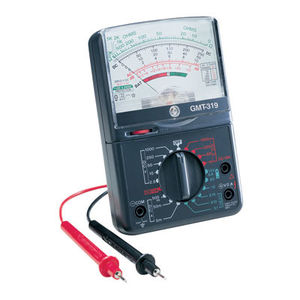
MULTI METER

INFRARED TEMP GUN
TIMING LIGHT

COMPRESSION GAUGE
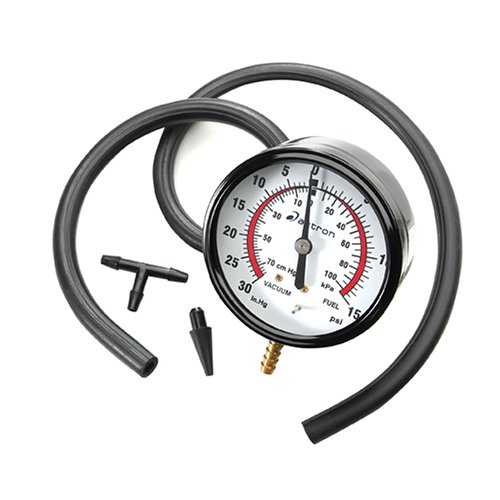
PRESSURE/VACUUM GAUGE

every mechanic needs an ANALOG multi meter for testing capacitors with a micro farad scale, AND a DIGITAL MULTI METER
Most alternators fail when they can,t keep the battery charged , most defective battery's fail to maintain 12-13 volts or retain a charge, usually reading less than 12 volts or drop off very rapidly under load, If your getting over 15 volts at the battery Id suggest re-testing,THE VOLTAGE REGULATOR SHOULD PREVENT VOLTAGE OVER about 14.7 volts,while the engine runs, the first step would be to remove the fan belt temporarily for a short duration test, and start the engine with the MULTI meter to see what the battery is actually doing under load VS what the alternator is producing.
keep in mind voltage regulators can fail, and many G.M. alternators have internal voltage regulators
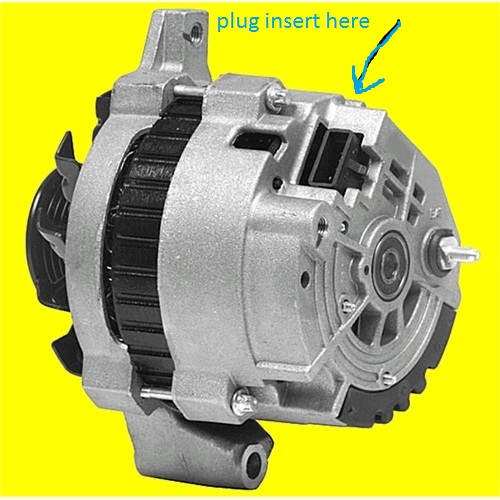
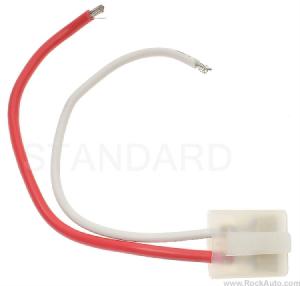
the electrical connection plug is subject to corrosion and heat damage so its condition and wiring pigtail should be inspected and the voltage regulator tested.
immediately after start-up the alternator should be charging between 13.8 and 14.3 volts and gradually drop as the battery charges up. but keep in mind most alternators don,t produce full potential voltage at idle rpms, it will require the engine speed be increased to 1800rpm-2300rpm with some applications to get full potential output.
if the battery stays under 12 volts and only reads higher than 14 volt with the alternator connected its more than likely the alternators internal voltage regulator is working but the battery is weak,, its also a good idea to have more than a single multi meter to confirm voltage or resistance readings, if they seem really odd.
http://www.harborfreight.com/5-in-1-dig ... 98674.html
https://www.dbelectrical.com/alternators/automotive/chevrolet/corvette/5-7-liter/
swapping to a 200 amp alternator will frequently improve the operation of both the cars ignition and electric cooling fans
https://www.summitracing.com/parts/tff-8173nep/applications/year/1996
TYPICAL ACCESSORY CURRENT DRAW (AMPS)
Lights
Headlights (high beam)40
Headlights (low beam) 10-22
Tail Lights 8
Safety
Emergency brake light 4
Emergency flasher 15
Turn signals 10-15
Windshield wipers 6-20
Horn 15
Brake lights 15-20
Running lights 8
Ignition
Winter starting 225-500
Summer starting 100-400
Approx. Avg. 300
Courtesy
Cigarette lighter 15-20
Interior lights 10-15
Instrument panel lights 4
Entertainment
Radio 10
Stereo Tape 10
Electric antenna 20
Comfort
Air conditioner 10
Heater 20-30
Defroster 15-30
Electric seat 20
Electric windows 20-30
TYPICAL ACCESSORY CURRENT DRAW (AMPS)
Typical Current Loads for Automotive Systems, Lighting and Accessories:
Engine Idling (no lights or accessories on) - 35 to 50 amps. This will vary depending on the number of cylinders (more cylinders draw more power for the fuel injectors and coils), the type of fuel injectors (some draw higher amp loads than others), the type of ignition system (single coil or multi-coil), the amp draw of the PCM, and the fuel pump (the amp draw will be higher with higher pressure systems).
Engine Off (nothing on) - 40 to 50 milliamps (power drain by modules in sleep mode, antitheft system and keyless entry)
Ignition Coil (single oil-filled coil older vehicle) - 3 to 4 amps.
Ignition Coil (single DIS coil newer vehicle) - 5 to 6 amps.
Ignition Coil (coil-on-plug) - 6 amps per coil.
Ignition System (primary circuit) - 6 to 20 amps.
Fuel Injectors - 4 to 6 amps peak, 1 amp hold
Electric Fuel Pump (depends on pressure and flow) - 4 to 12 amps
Electric Cooling Fan (depends on size) - 6 to 30 amps
Headlights (halogen low beam) - 8 to 9 amps per pair
Headlights (halogen high beam) - 9 to 10 amps per pair
Headlights (halogen high and low beams combined) - 17 to 19 amps
Headlights (High Energy Discharge) - 12 to 14 amps during initial start, 7 to 8 amps once bulbs are hot
Headlights (LED) - 0.6 to 1 amps per bulb
Small bulbs (incandescent) - 0.3 to 0.4 amps per bulb
Small bulbs (LED) - 0.04 to 0.06 amps per bulb
Starter Motor - 200 to 350 amps
500 Watt Sound System - 42 amps
Electric Rear Window Defroster - 10 to 20 amps
Windshield wipers - 2 to 10 amps depending on load
Heated Seats - 3 to 4 amps per seat
Power Windows - 3 amps
Electric Power Steering - 2 to 40 amps depending on load
Air Conditioner Compressor Clutch - 2.5 to 5 amps
Heater A/C blower motor (depends on load, size and speed setting) - 2 to 30 amps
heres a cheap yet effective multi meter
start by checking your battery cable connections ,one or more corroded or loose connection,s are a common problem
your battery should read in the 12.4-12.6 average to as high as 13 volts before starting the engine, you should see no more than about 14.8 volts with the engine running 13.4-14.5 volts is common, from an alternator under load, IE the radio and air conditioner and head lights on. verify the belts not slipping because if the belt slips it won,t read correctly, you should normally see at least 0.75-1.75 volts over the battery charge level with the car running, under load, 1.75 volts charge is about normal so if your battery reads 12.6 volts, before you start the car you would expect to see about 14.5 volts while it idles
just a point many guys seem to over look, the fans run on electricity and a higher amp capacity alternator provides a good deal more current to spin those cooling fans, Ive seen several cars with marginal cooling that had that cooling issue disappear once a 160-200 amp alternator replaced the stock alternator, the increased current allowed the cooling fans to spin a good deal faster at low engine speeds and the result was more efficient cooling.
AND yes obviously the QUALITY and CARE taken in battery selection and maintenance MATERS, as does the company GUARANTEE
http://shop.advanceautoparts.com/p/...080024-P?searchTerm=optima+battery#fragment-3
http://www.summitracing.com/parts/tff-8173nep/applications/year/1996
https://www.dbelectrical.com/alternators/automotive/chevrolet/corvette/5-7-liter/
http://garage.grumpysperformance.co...uys-don-t-look-at-the-clues.11176/#post-50293
http://www.youtube.com/watch?v=arv0hutl ... re=related
http://aspwholesale.com/index.php?act=v ... uctId=5159
http://www.dbelectrical.com/p-4436-corv ... -7888.aspx
http://www.dbelectrical.com/c-4913-200-amp.aspx
viewtopic.php?f=53&t=2044&p=5451#p5451
http://test.autometer.com/sites/default/files/2650-791X-10rH.pdf
http://www.powermastermotorsports.com/f ... ators.html
http://www.ehow.com/how_7658994_trouble ... nator.html
but ID sure look carefully at the battery and battery cable connections and engine grounds because thats frequently a major factor when you see problems like low voltage and voltage that changes frequently
read the linked, and sub linked info
Ive installed the linked 200 amp alternator now on several corvettes, you need to add a larger gauge wire but it tends to make the fans cool better and the ignition spark hotter the engine runs smoother and generally well worth the time and expense
yes I know you don,t want to look thru the links, DO IT ANYWAY, it will lead to answers
http://www.youtube.com/watch?v=w5TkStVW ... re=related
http://www.summitracing.com/parts/tff-8173nep/applications/year/1996
http://www.alternatorparts.com/cs130_sbpage1.htm
http://www.madelectrical.com/catalog/alt-1.shtml
http://autorepair.about.com/od/glossary ... rnator.htm
http://www.dbelectrical.com/p-4436-corv ... -7888.aspx
http://www.youtube.com/watch?v=FTGz0PKI ... re=related
viewtopic.php?f=36&t=2412
http://www.madelectrical.com/electrical ... sing.shtml
http://www.madelectrical.com/electrical ... wire.shtml
viewtopic.php?f=50&t=3110&p=16799#p16799
http://www.youtube.com/watch?v=yFCT-YZb ... re=related
viewtopic.php?f=36&t=1169
http://www.aa1car.com/library/charging_checks.htm
http://www.electronics-cooling.com/...s-in-automotive-alternator-power-electronics/
viewtopic.php?f=70&t=3901&p=10343&hilit=cable+connections#p10343
http://www.ehow.com/how_2283281_test-ca ... power.html
Instructions
Things You'll Need:
http://www.harborfreight.com/ac-dc-digi ... 37772.html
* Volt meter tester. Sold at most auto parts supply stores.
1.
Step 1
The alternator can be tested while the engine is not running and also while the engine is running. The test method is the same but you will get two different readings.
2.
Step 2
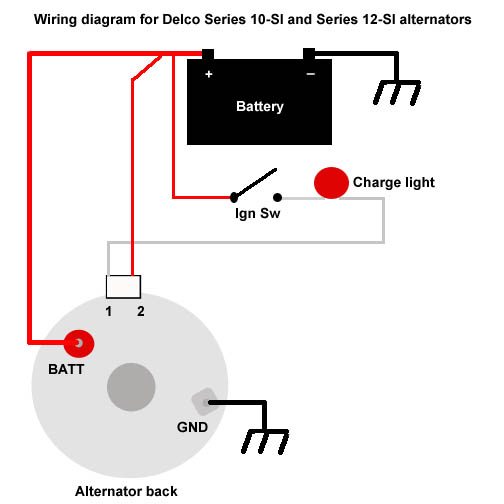
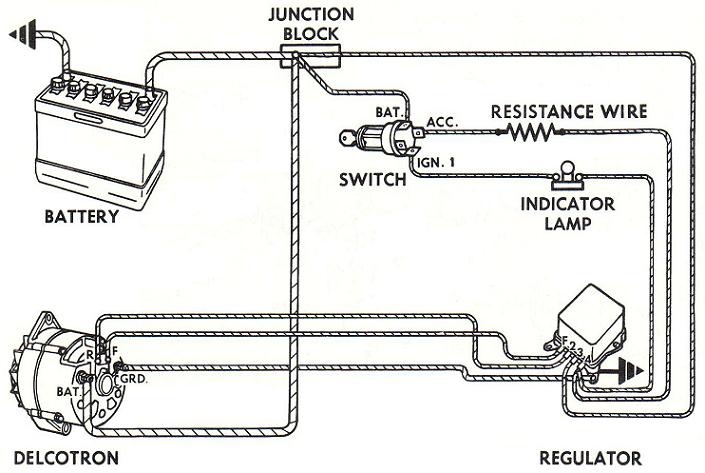
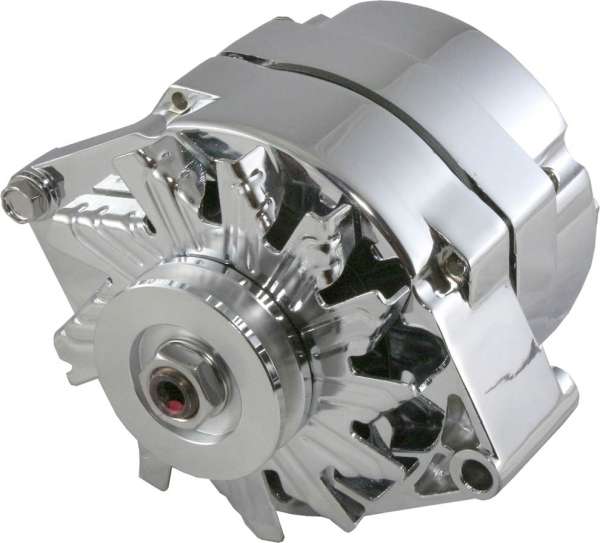
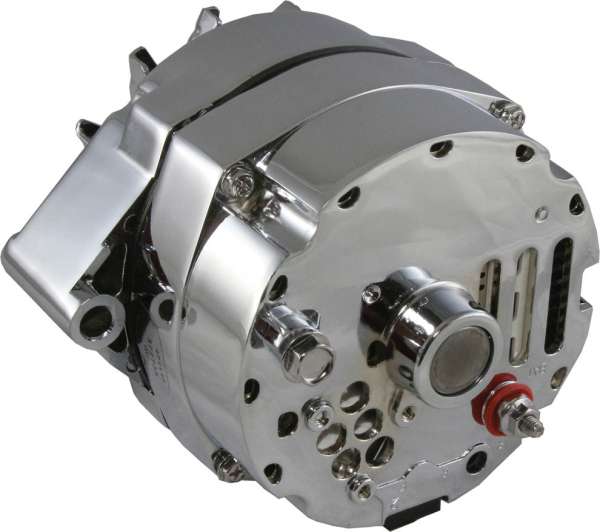
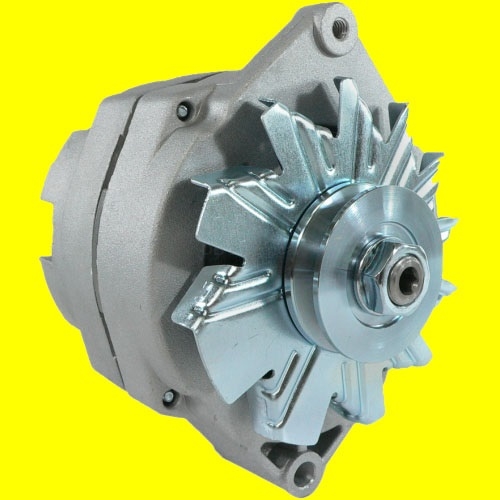
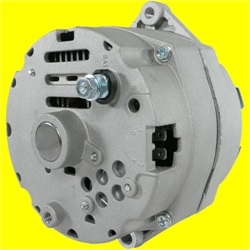
Locate your alternator, which will have a pulley belt attached to it. Picture shows you what a typical alternator looks like.
3.
Step 3
While the engine is "off" check the belt that turns the alternator pulley for tightness. The belt should be tight enough so that when pressed down with your thumb in a center section away from the pulleys, that you have no more than an inch or so of slack in the belt. Also check the condition of the belt looking for any breaks or serious cracks, in which case a new belt may be in order because in order for the alternator to create energy to the battery the alternator pulley must turn smoothly.
4.
Step 4
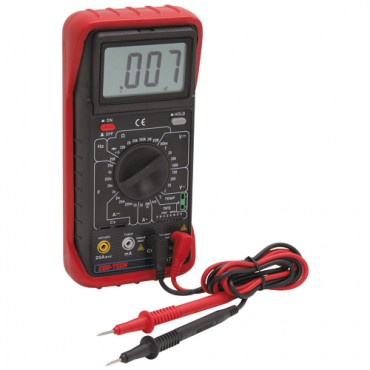
Set your volt meter to the 20 V (volts) setting. See picture for proper setting and to view a typical volt meter tester.
5.
Step 5
Start the engine and be very cautious that you keep your hands, clothing and jewelry away from the moving engine parts, such as fan blades, pulleys and belts. Be "very" aware of these areas and stay clear. Now observe the alternator pulley and be sure that the belt is running straight and turning the pulley without missing or skipping. If it is not, chances are that your belt is damaged or too loose which should be corrected before you can perform a proper test. Sometimes you may be able to create more tension on the belt by adjusting the alternator back further in it's bracket.
6.
Step 6
Assuming the belt is turning the alternator pulley you can now set the volt meter down out of the way safely and yet still have a good view of it with while both of your hands are busy.
7.
Step 7
You want to touch the "red" positive cable probe from the volt meter onto the red terminal connector coming out of the rear of the alternator. This terminal would typically have a heavier wire attached to it. Now with the black cable probe coming from the volt meter, which is your grounding source, find a nearby ground which could be a nut or bolt on the frame or firewall of the car. Try and find a ground that is bare metal and paint free. Do not ground to the alternator itself.
8.
Step 8
Your volt meter should now give you a reading. If you are not getting a reading chances are that you are not touching the red terminal firmly enough or have not found a proper ground. The meter may jump around with readings for the first few moments but if the alternator is working properly you should end up with a reading of 14 volts or more with the engine running.
9.
Step 9
If your readings for your alternator are not satisfactory than that would mean that the alternator is not providing proper power to your battery and a new alternator may be in order or possibly the wiring at the alternator may be loose or corroded or maybe you have a bad pulley belt or possibly the voltage regulator may be faulty in which case you may want to have a professional check out for further confirmation.If you are confident with your test, simply replace the alternator.
viewtopic.php?f=36&t=8493&p=29779#p29779
Tips & Warnings
*
A weak battery can burn out an alternator before it's time since it would be constantly working hard trying to keep power in the battery.
*
Always check that you have sound corrosion free connections at the alternator before performing the electrical test.
*
ALWAYS be very cautious when you are working on the engine while the car is running. Double check that there are no rags or tools lying around within the engine compartment and remove any necklaces, bracelet's, ties or loose clothing that may get caught up in a moving part.
Who Can Help
Read more: How to Test Your Car Alternator for Power | eHow.com http://www.ehow.com/how_2283281_test-ca ... z0tlTHcalX
Here are some simple tests you can use to check it:
ALTERNATOR CIRCUIT VOLTAGE DROP TESTS
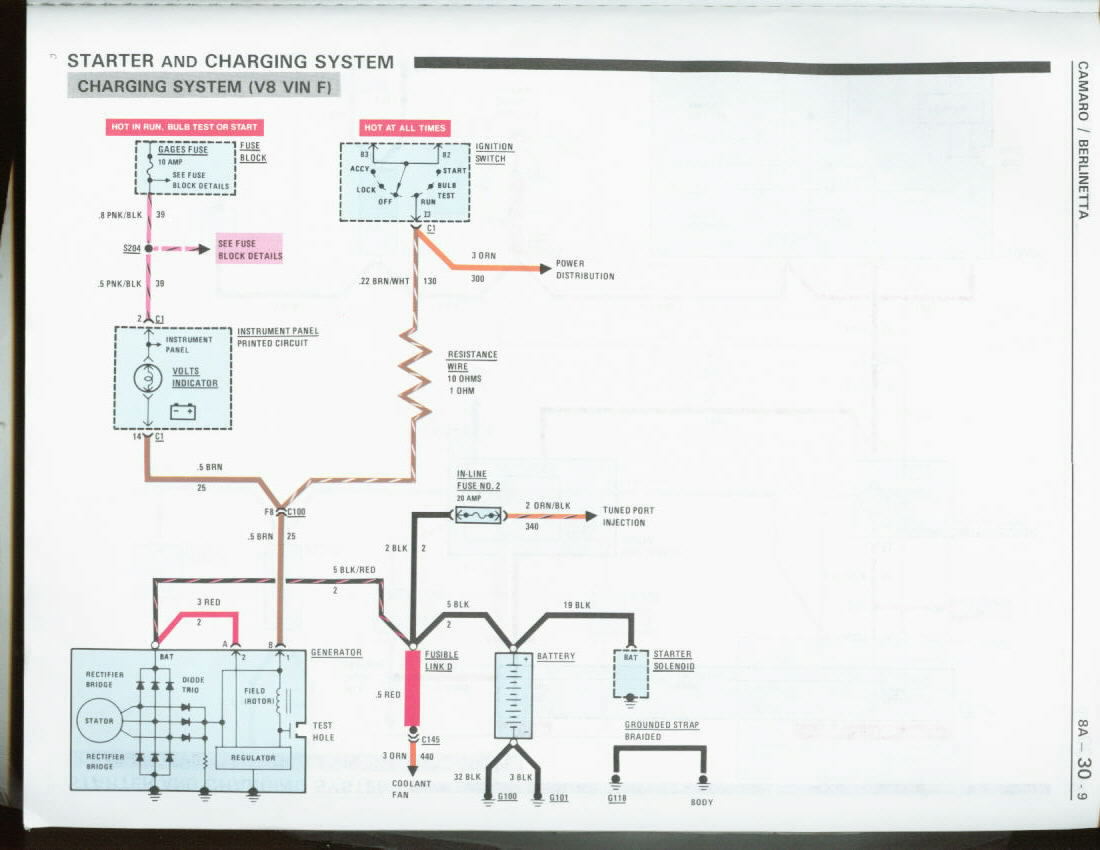
The first test you should do is check the differance in voltage between the alternator and the battery. With the engine running, hook the ground terminal of the voltmeter to battery ground. Check the voltage on the battery terminal of the alternator and then the battery positive terminal. A difference of 0.4 volts is acceptable. Any more than that indicates you have undersized wiring or bad connections. Here are some more tests.
With the engine idling, touch one test lead of your voltmeter to the battery positive (+) post, and the other test lead to the BAT (B+) terminal on the alternator. Ideally, the voltmeter should read less than 0.2 volts.
If you see a voltage reading greater than 0.2 volts, it means there is excessive resistance somewhere in the circuit causing a voltage drop in the wiring circuit. Check all the wiring connections (use electronics cleaner to clean connections), and make sure the terminal connectors on the ends of the wires are clean and tight.
A negative side ground circuit test is made by touching one voltmeter test lead to the alternator housing, and the other test lead to the negative battery post (not the terminal clamp) with the engine running and charging system loaded. If good, the voltage drop should be 0.2 volts or less. If higher, inspect and clean all ground connections as needed. Also, check for broken, loose or missing ground straps between the engine and body.
Checking for voltage drops in a circuit is a good way to find hidden problems that may be causing a charging problem. Voltage drop tests must be done while the engine is idling with a charging load on the system. In other words, there must be voltage flowing through the circuit for the voltage drop test to detect a problem. Voltage always follows the path of least resistance, so if the connection being tested has too much resistance some of the voltage will flow through the voltmeter and create a small voltage reading.
Voltage drops on the positive side can cause undercharging.
Voltage drops on the negative side can cause overcharging (fools the voltage regulator into thinking the battery is low).
Alternators are designed to maintain battery charge, not to recharge a dead battery. If the battery is run-down or dead, therefore, it should be recharged with a battery charger before the vehicle is driven, or before a replacement alternator is installed. This will minimize the stress on the charging system and reduce the risk of overheating and failure.
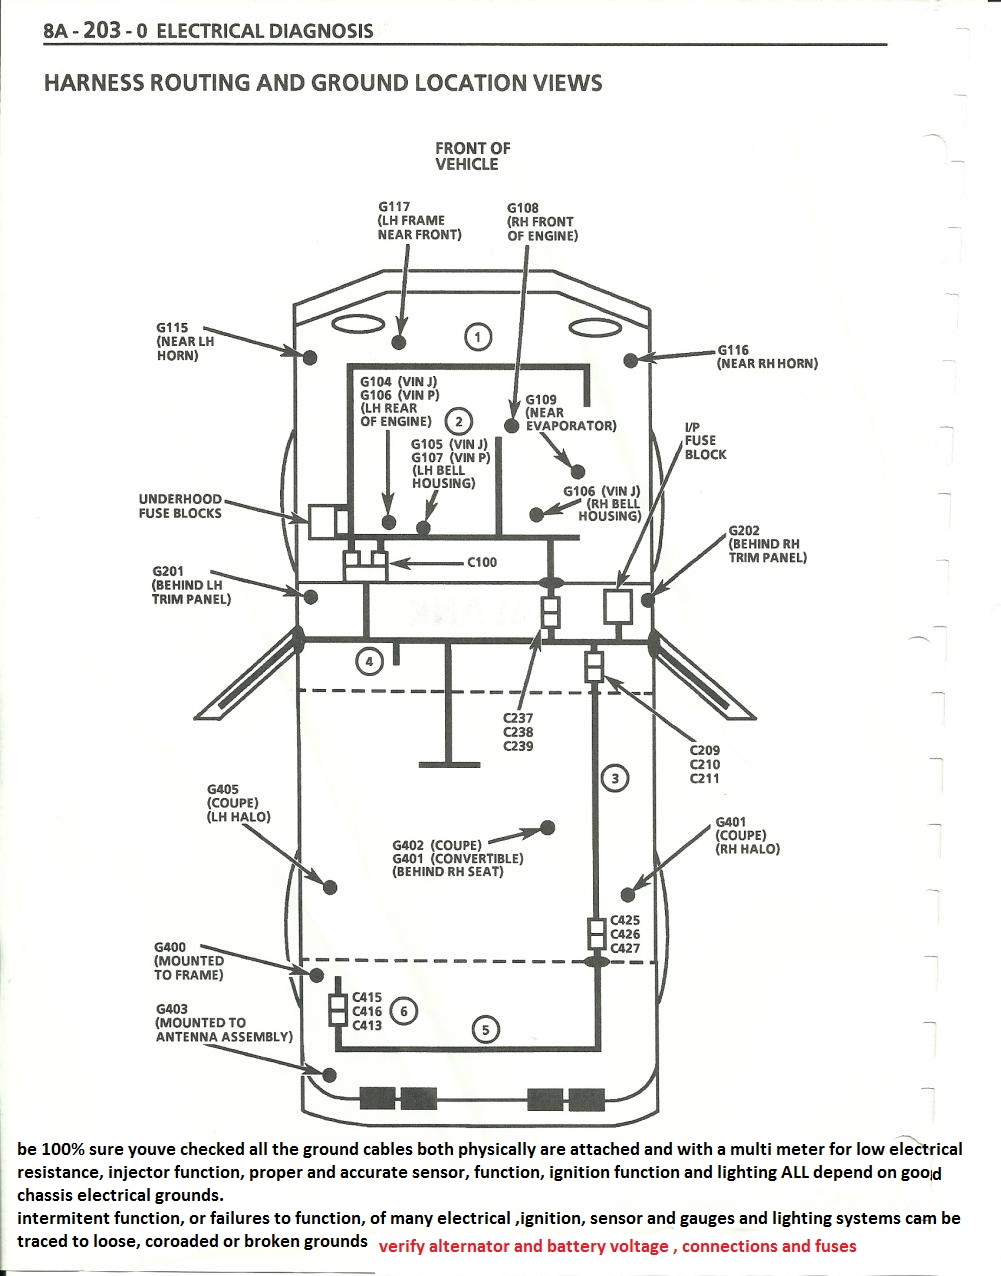
BTW FAULTY GROUNDS, IN MANY CARS AND ESPECIALLY NEWER CORVETTES CAUSE MANY ELECTRICAL ISSUES SO IF YOU HAVE INTERMITTENT ELECTRICAL ISSUES CHECK THEM CAREFULLY
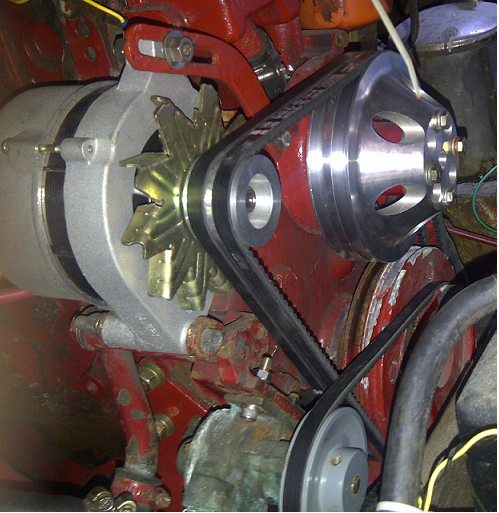
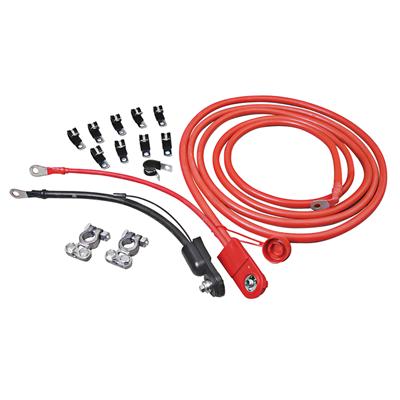
I upgraded to a 200 amp rated alternator on my 1985 corvette, I also per the instructions that came with the alternator,upgraded the cable gauge too a serious GAUGE copper connection cable, I ran a new 2 ga from the alternator output stud

I learned decades ago to swap to a 140 amp-200 amp alternator,
as the stock 75-105 amp alternators on muscle cars and earlier corvettes are marginal at best/
if you shop carefully they can usually be found locally at some alternator re-builders for under $150
both my corvettes have 200 amp versions purchased NEW for under $250
while that may be over-kill to some I find the electric fans on the corvette and ignition and head lights work noticeably better
http://www.ecklerscorvette.com/corvette-alternator-140-amp-chrome-power-master-1969-1982.html
http://www.dbelectrical.com/p-4516-high-output-chevy-3-wire-alternator-140-amp-65-85.aspx
directly to the battery positive terminal ,then ran an extra 2 ga ground from the battery neg to the cars frame and a new ground ribbon cable

between the frame and engine block.
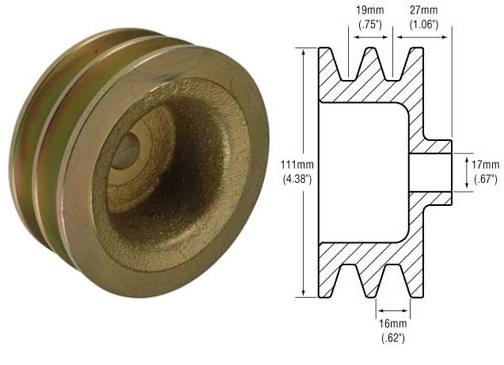
the result was far more than anticipated, the engine ran smoother at all rpm level, the cooling fans ran noticeable faster at idle and the engine ran cooler, the ignition spark also seemed to be stronger and brighter and the electrical arc,s snap sound louder when you pulled a plug wire off a plug to test spark on an idling engine, keep in mind the alternator pulley tends to be about 1/3rd smaller or even less than the crank pulley diameter, so that the alternator spins at least 1200rpm , below that 1200 rpm many alternators don,t put out nearly a full charge
http://www.summitracing.com/parts/SUM-G1198/?rtype=10
http://www.powermastermotorsports.com/f ... ators.html
viewtopic.php?f=53&t=2044&p=5451#p5451
http://www.eficonnection.com/eficonnection/default.aspx
http://www.dbelectrical.com/p-4416-new- ... -11se.aspx
http://www.dbelectrical.com/p-4416-new- ... -11se.aspx
HERES SOME INFO POSTED ELSWARE
"Most grounds that seem to cause sensor reading or display or gauge issues are on the drivers side of the block above the oil filter or on the rear of the drivers side cylinder head . There are also a few on the frame under the battery tray , and a couple on the top of the frame about 12" back from the radiator, housing.,as well as one on the drivers side behind the kick panel and one passenger side behind kick panel. There are more Ones under the battery tray are the most likely to be corroded in my experience.
(see display diagram posted above)
LCD dash ground is behind drivers kick panel . There are also several electrical grounds down just above the oil filter and one behind the passenger kick panel for the ECM. and a couple on the rear of the drivers side cylinder head, Grounds are a constant issue on most c4's. Hope this helps."
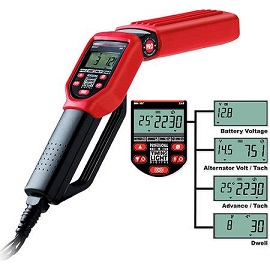
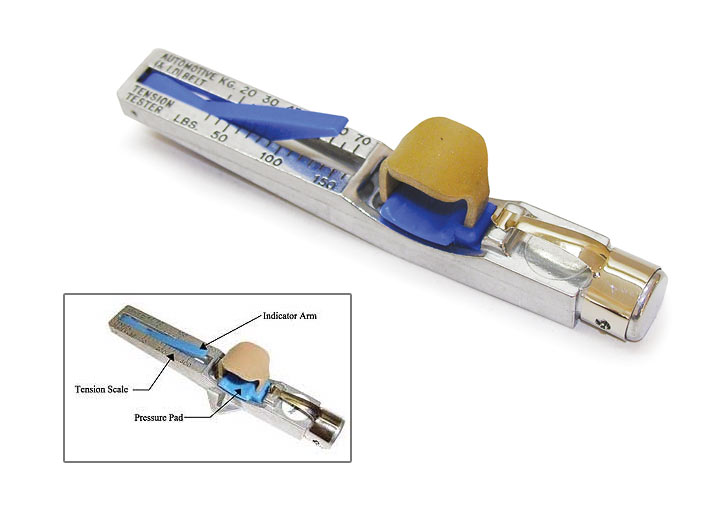
ONLY US OLD GEEZERS WOULD MORE THAN LIKELY SEE A CRICKET GAUGE AND EVEN RECOGNIZE WHAT ITS USED FOR
https://www.centuryperformance.com/foru ... -Coil-Tech
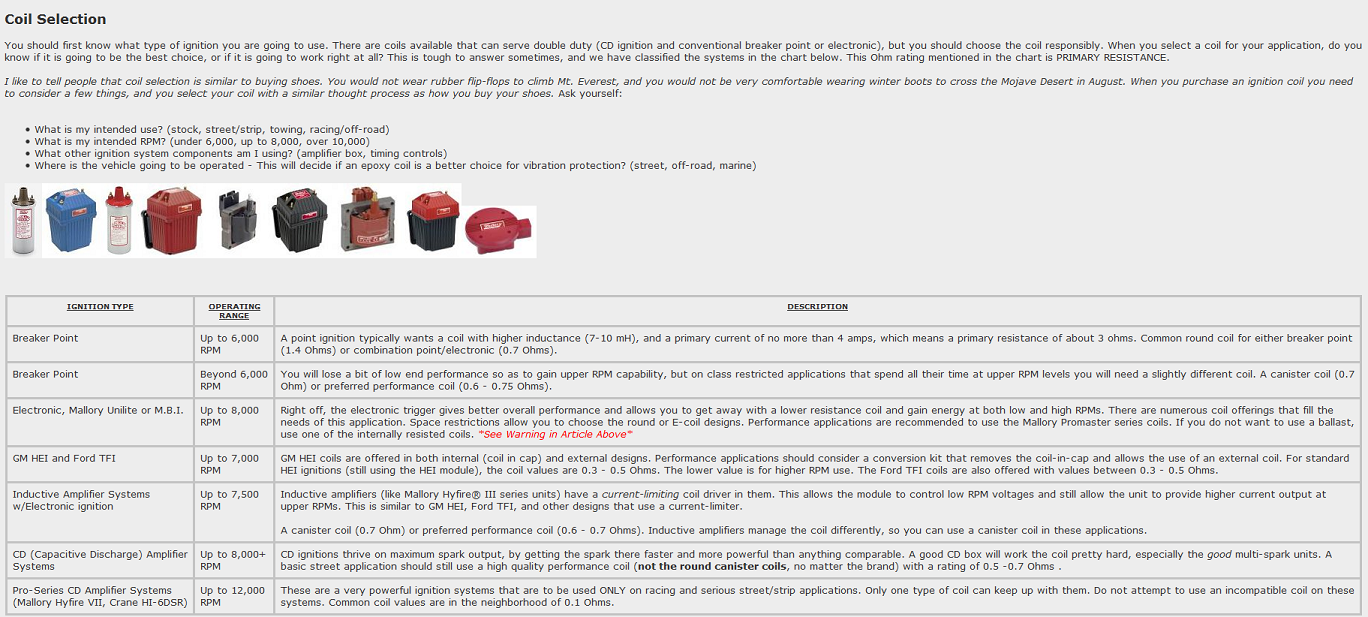
ONE FACTOR THATS RARELY UNDERSTOOD ,is that you need consistent voltage and current values to keep a consistently effective ignition working as its designed and in many cars the stock alternator is MARGINAL at best at supplying the ignitions needs, Ive seen some rather remarkable improvements in engine performance at times when upgrading the alternator from a stock 110-120 amp OEM type to the 200 amp aftermarket alternators in several muscle cars and corvettes
http://www.globaldenso.com/en/products/ ... tions.html
having a few basic meters,gauges etc. helps
http://garage.grumpysperformance.co...tor-putting-out-low-voltage.12221/#post-59512
http://garage.grumpysperformance.com/index.php?threads/85-with-flicker-on-dash-and-radio.13593/
I found this a bit interesting
https://garage.grumpysperformance.com/index.php?threads/lt1-lt4-1992-96-corvette-engine-related.14574/#post-112095 https://garage.grumpysperformance.com/index.php?threads/curing-that-problem-with-how-your-c4-corvette-runs-badly-or-wont-start.15212/#post-105777...
garage.grumpysperformance.com
MULTI METER
INFRARED TEMP GUN
TIMING LIGHT
COMPRESSION GAUGE
PRESSURE/VACUUM GAUGE
every mechanic needs an ANALOG multi meter for testing capacitors with a micro farad scale, AND a DIGITAL MULTI METER
Most alternators fail when they can,t keep the battery charged , most defective battery's fail to maintain 12-13 volts or retain a charge, usually reading less than 12 volts or drop off very rapidly under load, If your getting over 15 volts at the battery Id suggest re-testing,THE VOLTAGE REGULATOR SHOULD PREVENT VOLTAGE OVER about 14.7 volts,while the engine runs, the first step would be to remove the fan belt temporarily for a short duration test, and start the engine with the MULTI meter to see what the battery is actually doing under load VS what the alternator is producing.
keep in mind voltage regulators can fail, and many G.M. alternators have internal voltage regulators
the electrical connection plug is subject to corrosion and heat damage so its condition and wiring pigtail should be inspected and the voltage regulator tested.
immediately after start-up the alternator should be charging between 13.8 and 14.3 volts and gradually drop as the battery charges up. but keep in mind most alternators don,t produce full potential voltage at idle rpms, it will require the engine speed be increased to 1800rpm-2300rpm with some applications to get full potential output.
if the battery stays under 12 volts and only reads higher than 14 volt with the alternator connected its more than likely the alternators internal voltage regulator is working but the battery is weak,, its also a good idea to have more than a single multi meter to confirm voltage or resistance readings, if they seem really odd.
http://www.harborfreight.com/5-in-1-dig ... 98674.html
https://www.dbelectrical.com/alternators/automotive/chevrolet/corvette/5-7-liter/
swapping to a 200 amp alternator will frequently improve the operation of both the cars ignition and electric cooling fans
https://www.summitracing.com/parts/tff-8173nep/applications/year/1996
TYPICAL ACCESSORY CURRENT DRAW (AMPS)
Lights
Headlights (high beam)40
Headlights (low beam) 10-22
Tail Lights 8
Safety
Emergency brake light 4
Emergency flasher 15
Turn signals 10-15
Windshield wipers 6-20
Horn 15
Brake lights 15-20
Running lights 8
Ignition
Winter starting 225-500
Summer starting 100-400
Approx. Avg. 300
Courtesy
Cigarette lighter 15-20
Interior lights 10-15
Instrument panel lights 4
Entertainment
Radio 10
Stereo Tape 10
Electric antenna 20
Comfort
Air conditioner 10
Heater 20-30
Defroster 15-30
Electric seat 20
Electric windows 20-30
TYPICAL ACCESSORY CURRENT DRAW (AMPS)
Typical Current Loads for Automotive Systems, Lighting and Accessories:
Engine Idling (no lights or accessories on) - 35 to 50 amps. This will vary depending on the number of cylinders (more cylinders draw more power for the fuel injectors and coils), the type of fuel injectors (some draw higher amp loads than others), the type of ignition system (single coil or multi-coil), the amp draw of the PCM, and the fuel pump (the amp draw will be higher with higher pressure systems).
Engine Off (nothing on) - 40 to 50 milliamps (power drain by modules in sleep mode, antitheft system and keyless entry)
Ignition Coil (single oil-filled coil older vehicle) - 3 to 4 amps.
Ignition Coil (single DIS coil newer vehicle) - 5 to 6 amps.
Ignition Coil (coil-on-plug) - 6 amps per coil.
Ignition System (primary circuit) - 6 to 20 amps.
Fuel Injectors - 4 to 6 amps peak, 1 amp hold
Electric Fuel Pump (depends on pressure and flow) - 4 to 12 amps
Electric Cooling Fan (depends on size) - 6 to 30 amps
Headlights (halogen low beam) - 8 to 9 amps per pair
Headlights (halogen high beam) - 9 to 10 amps per pair
Headlights (halogen high and low beams combined) - 17 to 19 amps
Headlights (High Energy Discharge) - 12 to 14 amps during initial start, 7 to 8 amps once bulbs are hot
Headlights (LED) - 0.6 to 1 amps per bulb
Small bulbs (incandescent) - 0.3 to 0.4 amps per bulb
Small bulbs (LED) - 0.04 to 0.06 amps per bulb
Starter Motor - 200 to 350 amps
500 Watt Sound System - 42 amps
Electric Rear Window Defroster - 10 to 20 amps
Windshield wipers - 2 to 10 amps depending on load
Heated Seats - 3 to 4 amps per seat
Power Windows - 3 amps
Electric Power Steering - 2 to 40 amps depending on load
Air Conditioner Compressor Clutch - 2.5 to 5 amps
Heater A/C blower motor (depends on load, size and speed setting) - 2 to 30 amps
heres a cheap yet effective multi meter
start by checking your battery cable connections ,one or more corroded or loose connection,s are a common problem
your battery should read in the 12.4-12.6 average to as high as 13 volts before starting the engine, you should see no more than about 14.8 volts with the engine running 13.4-14.5 volts is common, from an alternator under load, IE the radio and air conditioner and head lights on. verify the belts not slipping because if the belt slips it won,t read correctly, you should normally see at least 0.75-1.75 volts over the battery charge level with the car running, under load, 1.75 volts charge is about normal so if your battery reads 12.6 volts, before you start the car you would expect to see about 14.5 volts while it idles
just a point many guys seem to over look, the fans run on electricity and a higher amp capacity alternator provides a good deal more current to spin those cooling fans, Ive seen several cars with marginal cooling that had that cooling issue disappear once a 160-200 amp alternator replaced the stock alternator, the increased current allowed the cooling fans to spin a good deal faster at low engine speeds and the result was more efficient cooling.
AND yes obviously the QUALITY and CARE taken in battery selection and maintenance MATERS, as does the company GUARANTEE
http://shop.advanceautoparts.com/p/...080024-P?searchTerm=optima+battery#fragment-3
http://www.summitracing.com/parts/tff-8173nep/applications/year/1996
https://www.dbelectrical.com/alternators/automotive/chevrolet/corvette/5-7-liter/
http://garage.grumpysperformance.co...uys-don-t-look-at-the-clues.11176/#post-50293
http://www.youtube.com/watch?v=arv0hutl ... re=related
http://aspwholesale.com/index.php?act=v ... uctId=5159
http://www.dbelectrical.com/p-4436-corv ... -7888.aspx
http://www.dbelectrical.com/c-4913-200-amp.aspx
viewtopic.php?f=53&t=2044&p=5451#p5451
http://test.autometer.com/sites/default/files/2650-791X-10rH.pdf
http://www.powermastermotorsports.com/f ... ators.html
http://www.ehow.com/how_7658994_trouble ... nator.html
but ID sure look carefully at the battery and battery cable connections and engine grounds because thats frequently a major factor when you see problems like low voltage and voltage that changes frequently
read the linked, and sub linked info
Ive installed the linked 200 amp alternator now on several corvettes, you need to add a larger gauge wire but it tends to make the fans cool better and the ignition spark hotter the engine runs smoother and generally well worth the time and expense
yes I know you don,t want to look thru the links, DO IT ANYWAY, it will lead to answers
http://www.youtube.com/watch?v=w5TkStVW ... re=related
http://www.summitracing.com/parts/tff-8173nep/applications/year/1996
http://www.alternatorparts.com/cs130_sbpage1.htm
http://www.madelectrical.com/catalog/alt-1.shtml
http://autorepair.about.com/od/glossary ... rnator.htm
http://www.dbelectrical.com/p-4436-corv ... -7888.aspx
http://www.youtube.com/watch?v=FTGz0PKI ... re=related
viewtopic.php?f=36&t=2412
http://www.madelectrical.com/electrical ... sing.shtml
http://www.madelectrical.com/electrical ... wire.shtml
viewtopic.php?f=50&t=3110&p=16799#p16799
http://www.youtube.com/watch?v=yFCT-YZb ... re=related
viewtopic.php?f=36&t=1169
http://www.aa1car.com/library/charging_checks.htm
http://www.electronics-cooling.com/...s-in-automotive-alternator-power-electronics/
viewtopic.php?f=70&t=3901&p=10343&hilit=cable+connections#p10343
http://www.ehow.com/how_2283281_test-ca ... power.html
Instructions
Things You'll Need:
http://www.harborfreight.com/ac-dc-digi ... 37772.html
* Volt meter tester. Sold at most auto parts supply stores.
1.
Step 1
The alternator can be tested while the engine is not running and also while the engine is running. The test method is the same but you will get two different readings.
2.
Step 2
Locate your alternator, which will have a pulley belt attached to it. Picture shows you what a typical alternator looks like.
3.
Step 3
While the engine is "off" check the belt that turns the alternator pulley for tightness. The belt should be tight enough so that when pressed down with your thumb in a center section away from the pulleys, that you have no more than an inch or so of slack in the belt. Also check the condition of the belt looking for any breaks or serious cracks, in which case a new belt may be in order because in order for the alternator to create energy to the battery the alternator pulley must turn smoothly.
4.
Step 4
Set your volt meter to the 20 V (volts) setting. See picture for proper setting and to view a typical volt meter tester.
5.
Step 5
Start the engine and be very cautious that you keep your hands, clothing and jewelry away from the moving engine parts, such as fan blades, pulleys and belts. Be "very" aware of these areas and stay clear. Now observe the alternator pulley and be sure that the belt is running straight and turning the pulley without missing or skipping. If it is not, chances are that your belt is damaged or too loose which should be corrected before you can perform a proper test. Sometimes you may be able to create more tension on the belt by adjusting the alternator back further in it's bracket.
6.
Step 6
Assuming the belt is turning the alternator pulley you can now set the volt meter down out of the way safely and yet still have a good view of it with while both of your hands are busy.
7.
Step 7
You want to touch the "red" positive cable probe from the volt meter onto the red terminal connector coming out of the rear of the alternator. This terminal would typically have a heavier wire attached to it. Now with the black cable probe coming from the volt meter, which is your grounding source, find a nearby ground which could be a nut or bolt on the frame or firewall of the car. Try and find a ground that is bare metal and paint free. Do not ground to the alternator itself.
8.
Step 8
Your volt meter should now give you a reading. If you are not getting a reading chances are that you are not touching the red terminal firmly enough or have not found a proper ground. The meter may jump around with readings for the first few moments but if the alternator is working properly you should end up with a reading of 14 volts or more with the engine running.
9.
Step 9
If your readings for your alternator are not satisfactory than that would mean that the alternator is not providing proper power to your battery and a new alternator may be in order or possibly the wiring at the alternator may be loose or corroded or maybe you have a bad pulley belt or possibly the voltage regulator may be faulty in which case you may want to have a professional check out for further confirmation.If you are confident with your test, simply replace the alternator.
viewtopic.php?f=36&t=8493&p=29779#p29779
Tips & Warnings
*
A weak battery can burn out an alternator before it's time since it would be constantly working hard trying to keep power in the battery.
*
Always check that you have sound corrosion free connections at the alternator before performing the electrical test.
*
ALWAYS be very cautious when you are working on the engine while the car is running. Double check that there are no rags or tools lying around within the engine compartment and remove any necklaces, bracelet's, ties or loose clothing that may get caught up in a moving part.
Who Can Help
Read more: How to Test Your Car Alternator for Power | eHow.com http://www.ehow.com/how_2283281_test-ca ... z0tlTHcalX
Here are some simple tests you can use to check it:
ALTERNATOR CIRCUIT VOLTAGE DROP TESTS
The first test you should do is check the differance in voltage between the alternator and the battery. With the engine running, hook the ground terminal of the voltmeter to battery ground. Check the voltage on the battery terminal of the alternator and then the battery positive terminal. A difference of 0.4 volts is acceptable. Any more than that indicates you have undersized wiring or bad connections. Here are some more tests.
With the engine idling, touch one test lead of your voltmeter to the battery positive (+) post, and the other test lead to the BAT (B+) terminal on the alternator. Ideally, the voltmeter should read less than 0.2 volts.
If you see a voltage reading greater than 0.2 volts, it means there is excessive resistance somewhere in the circuit causing a voltage drop in the wiring circuit. Check all the wiring connections (use electronics cleaner to clean connections), and make sure the terminal connectors on the ends of the wires are clean and tight.
A negative side ground circuit test is made by touching one voltmeter test lead to the alternator housing, and the other test lead to the negative battery post (not the terminal clamp) with the engine running and charging system loaded. If good, the voltage drop should be 0.2 volts or less. If higher, inspect and clean all ground connections as needed. Also, check for broken, loose or missing ground straps between the engine and body.
Checking for voltage drops in a circuit is a good way to find hidden problems that may be causing a charging problem. Voltage drop tests must be done while the engine is idling with a charging load on the system. In other words, there must be voltage flowing through the circuit for the voltage drop test to detect a problem. Voltage always follows the path of least resistance, so if the connection being tested has too much resistance some of the voltage will flow through the voltmeter and create a small voltage reading.
Voltage drops on the positive side can cause undercharging.
Voltage drops on the negative side can cause overcharging (fools the voltage regulator into thinking the battery is low).
Alternators are designed to maintain battery charge, not to recharge a dead battery. If the battery is run-down or dead, therefore, it should be recharged with a battery charger before the vehicle is driven, or before a replacement alternator is installed. This will minimize the stress on the charging system and reduce the risk of overheating and failure.
BTW FAULTY GROUNDS, IN MANY CARS AND ESPECIALLY NEWER CORVETTES CAUSE MANY ELECTRICAL ISSUES SO IF YOU HAVE INTERMITTENT ELECTRICAL ISSUES CHECK THEM CAREFULLY
I upgraded to a 200 amp rated alternator on my 1985 corvette, I also per the instructions that came with the alternator,upgraded the cable gauge too a serious GAUGE copper connection cable, I ran a new 2 ga from the alternator output stud
I learned decades ago to swap to a 140 amp-200 amp alternator,
as the stock 75-105 amp alternators on muscle cars and earlier corvettes are marginal at best/
if you shop carefully they can usually be found locally at some alternator re-builders for under $150
both my corvettes have 200 amp versions purchased NEW for under $250
while that may be over-kill to some I find the electric fans on the corvette and ignition and head lights work noticeably better
http://www.ecklerscorvette.com/corvette-alternator-140-amp-chrome-power-master-1969-1982.html
http://www.dbelectrical.com/p-4516-high-output-chevy-3-wire-alternator-140-amp-65-85.aspx
directly to the battery positive terminal ,then ran an extra 2 ga ground from the battery neg to the cars frame and a new ground ribbon cable
between the frame and engine block.
the result was far more than anticipated, the engine ran smoother at all rpm level, the cooling fans ran noticeable faster at idle and the engine ran cooler, the ignition spark also seemed to be stronger and brighter and the electrical arc,s snap sound louder when you pulled a plug wire off a plug to test spark on an idling engine, keep in mind the alternator pulley tends to be about 1/3rd smaller or even less than the crank pulley diameter, so that the alternator spins at least 1200rpm , below that 1200 rpm many alternators don,t put out nearly a full charge
http://www.summitracing.com/parts/SUM-G1198/?rtype=10
http://www.powermastermotorsports.com/f ... ators.html
viewtopic.php?f=53&t=2044&p=5451#p5451
http://www.eficonnection.com/eficonnection/default.aspx
http://www.dbelectrical.com/p-4416-new- ... -11se.aspx
http://www.dbelectrical.com/p-4416-new- ... -11se.aspx
HERES SOME INFO POSTED ELSWARE
"Most grounds that seem to cause sensor reading or display or gauge issues are on the drivers side of the block above the oil filter or on the rear of the drivers side cylinder head . There are also a few on the frame under the battery tray , and a couple on the top of the frame about 12" back from the radiator, housing.,as well as one on the drivers side behind the kick panel and one passenger side behind kick panel. There are more Ones under the battery tray are the most likely to be corroded in my experience.
(see display diagram posted above)
LCD dash ground is behind drivers kick panel . There are also several electrical grounds down just above the oil filter and one behind the passenger kick panel for the ECM. and a couple on the rear of the drivers side cylinder head, Grounds are a constant issue on most c4's. Hope this helps."
ONLY US OLD GEEZERS WOULD MORE THAN LIKELY SEE A CRICKET GAUGE AND EVEN RECOGNIZE WHAT ITS USED FOR
https://www.centuryperformance.com/foru ... -Coil-Tech
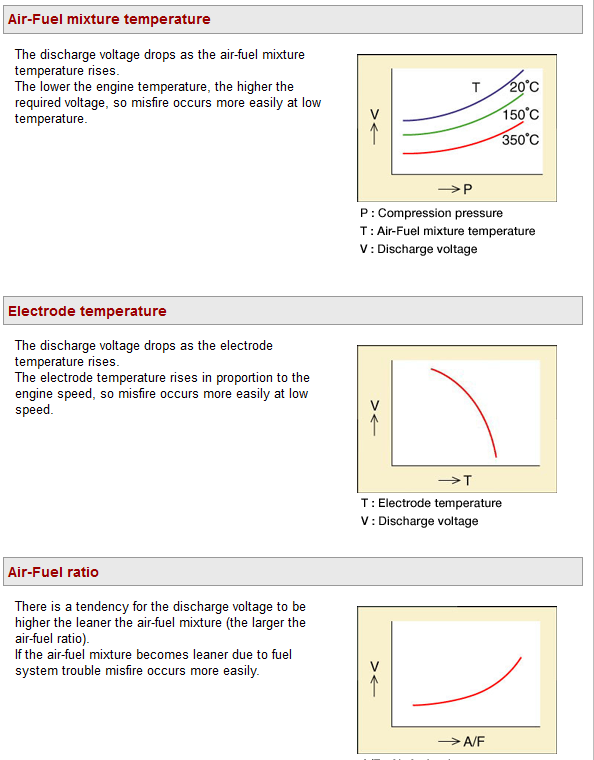
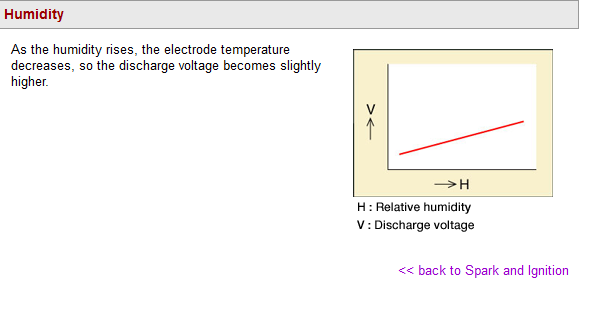
ONE FACTOR THATS RARELY UNDERSTOOD ,is that you need consistent voltage and current values to keep a consistently effective ignition working as its designed and in many cars the stock alternator is MARGINAL at best at supplying the ignitions needs, Ive seen some rather remarkable improvements in engine performance at times when upgrading the alternator from a stock 110-120 amp OEM type to the 200 amp aftermarket alternators in several muscle cars and corvettes
http://www.globaldenso.com/en/products/ ... tions.html
Last edited by a moderator: