Holley Tuning How-To
look at this first
http://www.racingsecrets.com/article_racing-13.html
http://www.moparmusclemagazine.com/tech ... index.html
I cannot take credit for the information posted below. This information has been made public on the internet so I assume reposting it here is not a problem.
it helps a great deal to know what your working with , each carb has good and bad points

EDELBROCK

HOLLEY

QUADRAJET
How to Tune a Holley
(basic)
by Lars Grimsrud
Colorado Corvette Crazies (CCC)
The Ultimate Corvette Tuning & Beer Drinking Fraternity
Lafayette, CO
This tech paper will discuss basic set-up and tuning of Holley vacuum secondary carbs for optimum street performance and drivability.
Overview
Holley carbs have been used by hot rodders for many decades now. Holley offers a very tuneable, modular carb design, yet it’s surprising how few people understand the basic tuning principles and procedures for these carbs. This tech paper will discuss some basic tuning procedures and techniques to help you get your setup optimized a little better.
Holley carbs have several operating systems, all of which can be tuned independently. Often, an improper setup of one system will give false indications of a problem in another system. Attempting to cure Holley
problems by tuning the wrong system results in a really messed up carb, and a lot of frustration for tuners and car owners.
Holleys have the following basic operating systems:
Idle System
Accelerator System
Main Metering System
Power System
Secondary System
These systems at times overlap in their operation. Not only does each system need to be properly tuned, but its timing and “overlap†with other systems is critical to proper performance.
Tech Tip #1
Before you go trying to fix all the errors of the previous carb tuner, set your carb up to the stock Holley spec for your carb List Number (stamped into the front of the air horn). Holley does a pretty decent job of supplying a ready-to-run carb, so the jetting, pump cam, shooter sizing, and spring rates are usually pretty close. This will give you a good baseline starting point for your tuning process. You can either call your local Holley distributor for the stock specs on your List Number carb, or go to this website to check out the
baseline configuration:
http://www.mortec.com/carbs.htm
Tech Tip #2
When buying tuning parts for your Holley you have two choices:
Obviously, Holley offers original parts at the Holley price. I highly recommend original Holley rebuild kits, gaskets, and power valves. BG, or Barry Grant, also makes parts for Holleys, and offers them at a fraction of the Holley price. BG is a great source for items such as the accelerator pump cam kits.
Tech Tip #3
Virtually all musclecars (with a only a few notable exceptions) came from the factory with a dual plane intake manifold, also known as a “180-degree†manifold. A dual plane intake is characterized by having two separate sides (right and left) which feed two different “levels†inside the manifold. Half of the cylinders are “fed†from the one level, and the other half are “fed†from the second level. A dual plane manifold promotes higher intake velocity at lower rpm, improving low-end torque and low-end throttle response. A dual plane manifold also promotes very good vacuum at idle and at low speed.
At very high rpm, a dual plane manifold will loose some efficiency. For this reason, there are single plane manifolds available. Known also as “360-degree†manifolds, the single plane manifolds typically have large intake runners and a large, open plenum under the carb. Very good for high-rpm use, these manifolds can be a real challenge to tune for low-end, street rpm use. A single plane manifold will typically significantly reduce vacuum, and this causes several problems.
Intake vacuum is used by the carb as a “signal†for many different events to occur. As vacuum is reduced, caused by large plenum intakes and large overlap cams, the vacuum “range†becomes much more narrow.
The carb tuner must make the various events occur within this narrow tuning range, while hitting a much more narrow “tolerance†for overlapping events to occur. Typically, a large-plenum intake will require richer main jetting and a richer pump shot to avoid a lean stumble hesitation upon initial acceleration. The idle transition may even require extensive recalibration of the idle restrictors – not an operation for the doit-yourselfer.
My recommendation: don’t use a single plane intake on a street driven car unless you have a lot of cubic inches and you’re willing to put in a lot of time tuning the idle transition. If you’re experiencing an off-idle stumble on a car with a single plane manifold, your problem may be in the manifold and not with the carb. Consider spending the $$ for a dual plane intake and saving yourself some frustration.
Tech Tip #4
Which way to tune the accelerator pump – richer or leaner?
Hesitation, stumble, or backfire is usually indicative of a lean condition.
“Lazy throttle†is usually indicative of a rich condition.
A rich condition may also be accompanied by a small puff of black smoke upon initial acceleration.
Tech Tip #5
When removing the float bowl, pull one of the lower float bolt screws first. Place a small container, such as the plastic cap off of a spray paint can, under the float bowl, and catch the fuel as it drains out. When you put it all back together, you can use a small kitchen funnel (just don’t tell your wife about it) to pour the drained fuel back into the bowl by dumping the fuel down the bowl vent tube (the tube sticking up right at the choke).
Tech Tip #6
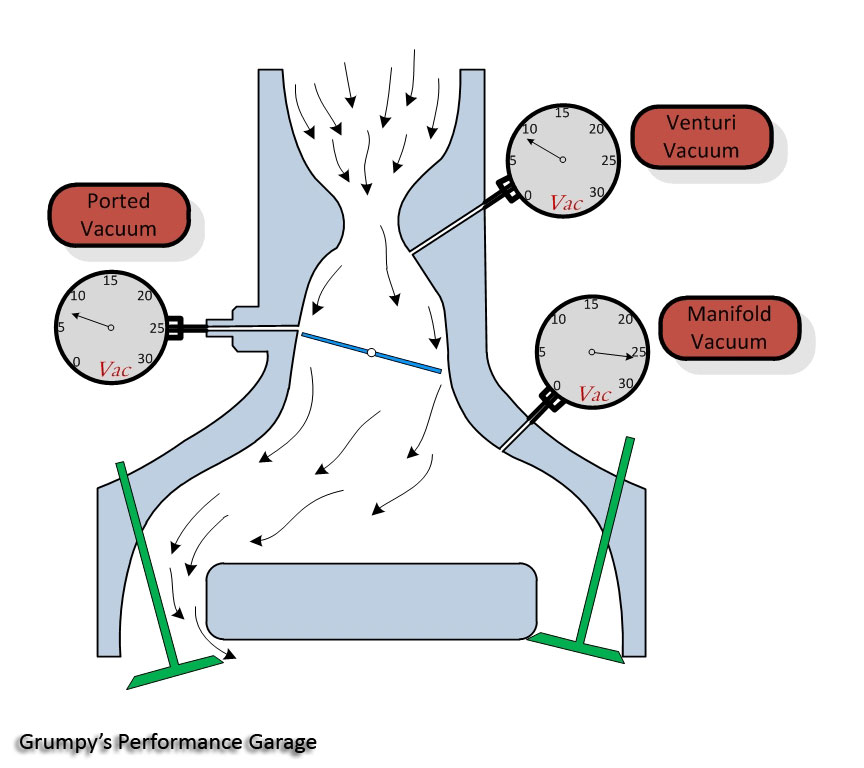
When using a Holley on a car with a bumpy cam, it is often necessary to screw the idle speed screw in far enough that the ported vacuum slot in the throttle bore is uncovered, producing significant ported vacuum to the distributor vacuum advance at idle. When the engine is rev’ed up, the vacuum source advances the timing, as it should. When the throttle is closed, the rpm will very gradually bleed down as vacuum advance gradually fades: the engine will not settle down immediately to the correct idle speed. To eliminate this problem, you can adjust the secondary opening screw to allow the secondary throttle plates to be cracked open a little more than the spec requirement. This will bleed a little air through the secondaries at idle, increasing idle speed and allowing the primaries to be closed down to correct the ported vacuum problem.
Tools and Equipment Required
As a minimum, you will need the following tools:
1. Vacuum Gauge
2. Small cup to drain fuel into
3. Screwdrivers
4. Box end wrenches
5. Spark plug removal tools
6. Rags
Procedure
Here is my recommended sequence and procedure for doing a basic Holley set-up:
1. Bench-Set the Idle Speed
Even though most “street†Holley carbs only have idle mixture screws on the primary metering block, almost all Holleys have an idle fuel transfer passage that discharges idle fuel on the secondary side as well as on the primary side. This means that the carb meters idle fuel and idle air through all 4 of the throttles – primary and secondary. For this system to work properly, it is absolutely critical that all 4 of the throttle blades ALWAYS be set at the same setting (NEVER set idle speed by only adjusting the primary idle
speed screw). This will assure that the carb is balanced and working right from the beginning.
Before installing the carb to the engine (if you have installed it, yank it off), turn the carb upside-down on your workbench. The first thing you should notice is the recessed secondary throttle idle speed screw located on the passenger side of the carb: it’s recessed into the throttle plate near the secondary shaft.
Next, if you look at the throttle bores just below the edge of the throttle plates (“butterfliesâ€), you will see a vertical slot. Open the throttles a little to see the whole slot. This slot is called the “transfer slot,†and it provides a fuel discharge transition circuit between the idle circuit (which discharges fuel out of the round idle discharge holes below the throttle plates) and the main metering circuit (which discharges fuel out of the main discharge nozzles once airflow through the venturies is high enough to pull the fuel through the
nozzles). The transition slot receives its fuel from the idle metering supply circuit.
With the throttles fully closed against their idle stop screws (not on the fast idle cam), noting that the secondaries and primaries both have separate idle stop screws, there should be exactly .020†of the transition slot exposed below the primary throttle plates. Use a .020†feeler gauge to measure this: Place the feeler gauge on the throttle plate up against the transition slot and adjust the idle speed screw so that the slot JUST BARELY disappears behind the feeler gauge. At .020†slot exposure, the slot will appear to be a
perfectly square hole. Adjust the primary idle speed screw so that the primary blades are in position.
On Holley carbs that have been in service for a while, the secondary throttle adjustment screw is often partially seized, so you have to use a small screwdriver with a pair of vice grips attached to the shank of the
screwdriver to turn the screw. It’s best to “rock†the screw back and forth to get it loose enough to turn.
The next thing to note is that the secondary transition slots on a Holley are often located higher in the throttle bores than on the primary side: If you try to obtain the .020†transition exposure on the secondary side of a Holley, you will often end up with the secondaries opened significantly more than the primaries.
To avoid this, use the following secondary throttle adjustment on the Holley carbs: After adjusting and setting up the primary throttle blade angle as described above (.020†transition slot exposure), hold the carb
up to a light and look up the bottom of the carb (with the choke blade wide open) – note the amount of “light gap†around the primary throttle blades. Now, adjust the secondary idle speed screw to duplicate the
primary “light gap†on the secondary side. This will usually get the secondary throttle blades close to the transition slot, but you may not have .020†exposure. Idea is to get the same blade angle and airflow through all 4 corners of the carb – the “comparative light gap†method allows you to get this very close.
Once the primary and secondary throttles have been set to this initial idle speed setting (which should make your car idle very close to the correct idle rpm range), it is your job as a tuner to assure that any further idle
speed changes occur by adjusting both of the screws equally from this point on. Never adjust the idle speed by only adjusting the primary screw: if you adjust the primary idle speed by ¼ turn, you MUST adjust the secondary idle speed screw ¼ turn as well. Keep the two throttles adjusted the same.
2. Set the float level.
You’ll be amazed how many people try tuning a Holley without ever checking the float level. An incorrect float level can give you all kinds of symptoms and problems, so get this one set right off the bat. Most Holleys have a sight plug on the side of the float bowls, and have externally adjustable floats. With the
engine HOT and running (float level will change with engine temperature – make sure you’re completely warmed up before setting this), put a rag under the sight plug area and pull the plug. Adjust the float level until fuel just barely starts to dribble out of the plug, then lower it until the dribble barely stops. The slotted screw in the center of the adjustment is the locking feature – loosen it and turn the hex nut CW to lower the float level, CCW to raise it.
3. Make sure your Power Valve is in the ballpark.
Most “stock†Holleys come with a power valve in the 6.5†range. This means that the power valve will open and start dumping fuel into the discharge when manifold vacuum hits 6.5†Hg (Mercury) of vacuum. A lot of cars with big overlap cams, single plane manifolds, or operating at high altitude will not pull 6.5†vacuum with the transmission in “drive.†This means that the power valve is flooding the engine with fuel on very light acceleration right off idle, and you’ll never get the tuning right unless you fix it.
Hook up a vacuum gauge to the intake manifold or to one of the vacuum ports at the base of the carb. With the transmission in “drive†(or in neutral on a manual car), note the vacuum reading. Your power valve should be rated at about 2†below the actual vacuum reading. On a car running at 11†of vacuum in drive, you will need about an 8.5†power valve.
4. Now get the main metering circuit in the ballpark.
Now that your power valve is not flooding you out, you can get the main metering jets tuned in. If your main metering circuit is either too lean or too rich, you will not be able to properly set up the accelerator pump circuit. Trying to fix a bog on acceleration with pump cams and discharge nozzles when the main metering is off is like chasing your tail. The main metering system also affect the idle circuit, so you need to get the main jets in line before going on to the other tuning parameters.
Pop a new set of spark plugs in the engine (don’t use the new Platinum or other exotic metal plugs- they won’t read right). Now take the car out for a drive around a few blocks. Get it up to steady-state cruise rpm, and make a few moderate accelerations. Pull the car back into the garage, allowing it to idle as little as possible. Shut it down and pull a few of the plugs. The plugs should have a very light, off-white or tan color around the nose of the insulator. If you’re pure white (completely clean), you’re probably running
too lean. If you’re picking up black soot, you’re too rich. Raise or lower primary jet sizes by 2 sizes at a time and repeat this test until your plugs are showing the correct color.
5. Tweak your idle mixture screws.
Screw both of the screws in until they gently bottom out, and turn them both out 1 turn. This is a good starting point. With a tach on the engine to monitor rpm, start the engine and turn the screws ½ turn at a time, turning both screws the same amount, until the best rpm reading is observed. Then turn them in 1/8 turn to lean it out just a tad. Once set, I like to shut the engine off and turn both of the screws all the way in, counting the turns, until they gently bottom out again. Just to make sure they’re both set the same. Then back them out to the setting you had.
6. You’re finally ready to fine-tune the accelerator pump circuit.
Many people start by tuning this, and can never get the stumble tuned out of the car. By making sure that the other systems are approximately right, you can now set this system up so that it’s not trying to compensate for other deficiencies. There are two tuning parameters to the accelerator pump circuit: Pump Cam and Discharge Nozzle.
The pump cam, a little plastic, color-coded part located on the throttle shaft with a single screw, will determine the total volume of the pump shot.
The discharge nozzle, or “shooter,†is available in different sizes, and determines the rate of discharge. In other words, it is possible to install a large-volume pump cam, and have a small-diameter “shooter†which
“bleeds†the total volume in over a longer duration. Or you can install a big “shooter†which allows the entire pump shot to be dumped in almost immediately.
There is no real scientific way of coming up with the exact correct combination for these parts. As a rule, of the car stumbles, backfires, or hesitates on initial throttle opening, try a larger shooter (the size is stamped on the body, and they’re available in .001†increments). If the car has a “lazy throttle,†indicative of a rich condition, try a smaller pump cam at first.
7. The last step in the initial tuning process is to set the secondary opening rate.
The secondary opening rate is determined by the spring in the secondary diaphragm. A soft spring will allow the secondaries to open sooner. Install softer springs until the car develops a slight stumble from the opening rate, then go back one spring level. This will allow the secondaries to open as quick as possible while avoiding a stumble.
A common mistake made by “performance†tuners is to remove the secondary diaphragm check ball. The check ball is installed in the secondary diaphragm housing, and helps to control the secondary opening rate. Removal of the ball will result in immediate opening of the secondaries with very little mass air flow through the primaries, with a resultant massive stumble upon acceleration.
You cannot normally get the vacuum secondaries to open by flicking the throttle and rev’ing the rpm with the car in neutral. This is not a valid test of the functionality of the secondaries.
8. Now, if you want to fine-tune the primary jetting, you can do one of three things:
For maximum horsepower, you will need to run the car through a measured distance and note its speed at the end of the distance. Using one of the available performance computers, or running the car at a track, is best for this. The correct size jets are the jets which give the car the highest mph at the end of the measured distance (not the shortest elapsed time). Again, change jet sizes 2 sizes at a time to see if the speed increases or decreases.
For maximum economy, drop the jet size until the car develops a slight stumble upon acceleration, then go up two sizes.
For a really good, scientific way of setting up the jetting, check out this website:
http://www.bob2000.com/carb.htm
http://www.centuryperformance.com/tunin ... g-148.html
http://www.centuryperformance.com/ignit ... g-219.html
http://www.mortec.com/carbtip1.htm
http://www.nastyz28.com/perftune.html
http://www.goldrush.com/~rhuish/temp_data/carbtune.html
http://www.innovatemotorsports.com/foru ... ay.php?f=7
Id start by checking for vacuum leaks and verifying the timing curve
Id start by dropping or raiseing the fuel pressure to 5.5 lbs and verifying your getting a minimum of a 1/2 gallon a minute unrestricted flow
Id start at all four jets #70
Id install a NEW power valve and ID buy several,if your carb uses them, so I could play/exchange/test
start here, theres no sence in guessing
http://www.themotorbookstore.com/holley-carburetors.html
http://www.themotorbookstore.com/motuhocavo2.html
http://www.themotorbookstore.com/holley1.html
http://www.bob2000.com/carb.htm
http://www.mortec.com/carbtip1.htm
http://store.summitracing.com/partdetail.asp?autofilter=1&part=HLY-36-181&N=700+115&autoview=sku
http://www.professionalequipment.co...hermometer-501-ds-42545/infrared-thermometer/
http://www.centuryperformance.com/vacuum.asp
http://www.carcraft.com/techarticles/carb_tuning/
heres where
a infared non-contact thermometer helps diagnose mixture problems very quickly, but youll need one that reads into the 1400F range for the headers for quick diagnoses
http://www.professionalequipment.com/xq/ASP/ProductID.3461/id.22/subID.177/qx/default.htm
temperature range from -58 to 1832°F
I use this one :grin: (above) and youll need to learn how to read plugs (this may help)
http://www.chevytalk.org/threads/showfla...rue#Post1448415
heres A/F
http://www.rbracing-rsr.com/rsrgauge.htm
http://www.mummbrothers.com/SRF_Stuff/Secrets/Driveline/Air_Fuel.htm
http://www.airfuelmeter.com/english/
http://www.innovatemotorsports.com/products/lm1.php
http://thedynoshop.net/prod01.htm
http://www.dawesdevices.com/airfuelmeter.html
http://fastrides.com/articles/DoItYourself_AirFuelRatio_Gauge.html
http://www.fuelairspark.com/Products/Information/AirFuelMeter.asp
http://www.3barracing.com/product_3.htm
a few places to look for plug/ignition info
http://auto.howstuffworks.com/ignition-system.htm
http://www.ngksparkplugs.com/techinfo/spark_plugs/techtips.asp?nav=31000&country=
http://www.gofastzone.com/techtips/sparkplugs/sparkplugs.htm
http://www.acdelco.com/html/pi_plugs_ident.htm
http://www.autolite.com/framer.cgi?page=http://www.autolite.com/products/racing.htm
http://members.uia.net/pkelley2/sparkplugreading.html
http://www.atlanticjetsports.com/_techtalk/00000005.htm
http://www.strappe.com/plugs.html
http://www.babcox.com/editorial/cm/cm59910.htm
http://www.ngksparkplugs.com/techinfo/spark_plugs/partnumberkey.pdf
http://www.nightrider.com/biketech/spkplghnbook.htm
http://www.tsrsoftware.com/sparkplug.htm
http://www.gnttype.org/techarea/engine/plugs.html
http://www.dansmc.com/sparkplugs1.htm
http://www.ngksparkplugs.com/techinfo/spark_plugs/overviewp2.asp
http://www.pajjakid.com/ubipa/sparkplugs.htm
http://www.edelbrock.com/automotive/sparkplugs.html
http://www.bullittarchive.com/Maintenance/Sparkplugoverview/
http://www.powerarc.com/sparkplug.htm
http://www.carcraft.com/techarticles/64378/
http://www.wakularacing.com/TechnicalInfo.htm
http://www.geocities.com/MotorCity/Flats/3877/spark.html
http://www.rmlautomotive.com/ignition.html
http://www.bgsoflex.com/auto.html
http://ourworld.compuserve.com/homepages/JET_AV8R/Vision/Ignition/CDI.HTML
http://www.howstuffworks.com/ignition-system.htm
http://auto.howstuffworks.com/ignition-system1.htm
http://www.familycar.com/Classroom/ignition.htm
http://www.motocross.com/motoprof/moto/secontent/seign/ignprin/ignprin.htm
http://www.northwestautorepair.com/ignitionsystem.htm
http://www.boyleworks.com/ta400/psp/distcurve.html
http://www.chevytalk.com/tech/index.html
heres other options
http://www.davessmallbodyheis.com/
http://www.msdignition.com/
http://www.proformparts.com/catalog/distributors_GM.html
http://www.atlanticspeed.com/store/MSD Chevrolet Distributors.asp
http://www.holley.com/HiOctn/ProdLine/Products/IS/ISD/ISD.html
http://www.performancedistributors.com/gmdui.htm
Spark plug /ignition info
http://www.edelbrock.com/automotive/sparkplugs.html
http://www.ngksparkplugs.com/apps/car_truck_suv/default.asp?nav=60000&country=US
http://www.strappe.com/plugs.html
http://www.applink.net/cct/tips/plugwires.html
http://www.acdelco.com/html/pi_plugs_ident.htm
http://www.atlanticjetsports.com/_techtalk/00000005.htm
http://www.ngkspark.com.au/spark_plug_cross_ref_chart_index3.htm
http://www.strappe.com/plugs.html
http://www.babcox.com/editorial/cm/cm59910.htm
http://www.ngksparkplugs.com/techinfo/spark_plugs/partnumberkey.pdf
http://www.eric-gorr.com/techarticles/sparkplugs.html
http://www.gnttype.org/techarea/engine/plugs.html
http://www.tsrsoftware.com/sparkplug.htm
http://www.racinghelp.com/read_spark_plugs.html
http://www.ngksparkplugs.com/techinfo/spark_plugs/overviewp2.asp
http://www.gofastzone.com/techtips/Spark...20Reference.htm
http://www.geocities.com/zgarage2001/adv...01/advance.html
http://www.hotrod.com/techarticles/43300...harticles/43300
http://www.centuryperformance.com/vacuum....com/vacuum.asp
http://www.custompistols.com/cars/articl...tion_timing.htm
http://chevyhiperformance.com/howto/4567...com/howto/45673
http://www.lmengines.com/Ignition_Timing...tion_Timing.htm
http://www.73-87.com/garage/hei.htm]http.../garage/hei.htm
http://www.bgsoflex.com/auto.html
OPTISPARK info
http://www.gmhightechperformance.com/tech/0310htp_optispark/
http://www.charm.net/~mchaney/optisprk/optisprk.htm
http://www.fierolt1.com/lt1_95_up_OptiReplace.htm
http://www.noid.org/~muttvette/opti.html
http://www.gulicks.com/vette/projects/opti/index.html
http://www.houston-f-body.org/tech/optispark/
http://www.dynotech-eng.com/dynaspark.htm
http://www.corvetteclinicinc.com
http://www.corvettefever.com/howto/16758
look at this first
http://www.racingsecrets.com/article_racing-13.html
http://www.moparmusclemagazine.com/tech ... index.html
I cannot take credit for the information posted below. This information has been made public on the internet so I assume reposting it here is not a problem.
it helps a great deal to know what your working with , each carb has good and bad points
EDELBROCK
HOLLEY
QUADRAJET
How to Tune a Holley
(basic)
by Lars Grimsrud
Colorado Corvette Crazies (CCC)
The Ultimate Corvette Tuning & Beer Drinking Fraternity
Lafayette, CO
This tech paper will discuss basic set-up and tuning of Holley vacuum secondary carbs for optimum street performance and drivability.
Overview
Holley carbs have been used by hot rodders for many decades now. Holley offers a very tuneable, modular carb design, yet it’s surprising how few people understand the basic tuning principles and procedures for these carbs. This tech paper will discuss some basic tuning procedures and techniques to help you get your setup optimized a little better.
Holley carbs have several operating systems, all of which can be tuned independently. Often, an improper setup of one system will give false indications of a problem in another system. Attempting to cure Holley
problems by tuning the wrong system results in a really messed up carb, and a lot of frustration for tuners and car owners.
Holleys have the following basic operating systems:
Idle System
Accelerator System
Main Metering System
Power System
Secondary System
These systems at times overlap in their operation. Not only does each system need to be properly tuned, but its timing and “overlap†with other systems is critical to proper performance.
Tech Tip #1
Before you go trying to fix all the errors of the previous carb tuner, set your carb up to the stock Holley spec for your carb List Number (stamped into the front of the air horn). Holley does a pretty decent job of supplying a ready-to-run carb, so the jetting, pump cam, shooter sizing, and spring rates are usually pretty close. This will give you a good baseline starting point for your tuning process. You can either call your local Holley distributor for the stock specs on your List Number carb, or go to this website to check out the
baseline configuration:
http://www.mortec.com/carbs.htm
Tech Tip #2
When buying tuning parts for your Holley you have two choices:
Obviously, Holley offers original parts at the Holley price. I highly recommend original Holley rebuild kits, gaskets, and power valves. BG, or Barry Grant, also makes parts for Holleys, and offers them at a fraction of the Holley price. BG is a great source for items such as the accelerator pump cam kits.
Tech Tip #3
Virtually all musclecars (with a only a few notable exceptions) came from the factory with a dual plane intake manifold, also known as a “180-degree†manifold. A dual plane intake is characterized by having two separate sides (right and left) which feed two different “levels†inside the manifold. Half of the cylinders are “fed†from the one level, and the other half are “fed†from the second level. A dual plane manifold promotes higher intake velocity at lower rpm, improving low-end torque and low-end throttle response. A dual plane manifold also promotes very good vacuum at idle and at low speed.
At very high rpm, a dual plane manifold will loose some efficiency. For this reason, there are single plane manifolds available. Known also as “360-degree†manifolds, the single plane manifolds typically have large intake runners and a large, open plenum under the carb. Very good for high-rpm use, these manifolds can be a real challenge to tune for low-end, street rpm use. A single plane manifold will typically significantly reduce vacuum, and this causes several problems.
Intake vacuum is used by the carb as a “signal†for many different events to occur. As vacuum is reduced, caused by large plenum intakes and large overlap cams, the vacuum “range†becomes much more narrow.
The carb tuner must make the various events occur within this narrow tuning range, while hitting a much more narrow “tolerance†for overlapping events to occur. Typically, a large-plenum intake will require richer main jetting and a richer pump shot to avoid a lean stumble hesitation upon initial acceleration. The idle transition may even require extensive recalibration of the idle restrictors – not an operation for the doit-yourselfer.
My recommendation: don’t use a single plane intake on a street driven car unless you have a lot of cubic inches and you’re willing to put in a lot of time tuning the idle transition. If you’re experiencing an off-idle stumble on a car with a single plane manifold, your problem may be in the manifold and not with the carb. Consider spending the $$ for a dual plane intake and saving yourself some frustration.
Tech Tip #4
Which way to tune the accelerator pump – richer or leaner?
Hesitation, stumble, or backfire is usually indicative of a lean condition.
“Lazy throttle†is usually indicative of a rich condition.
A rich condition may also be accompanied by a small puff of black smoke upon initial acceleration.
Tech Tip #5
When removing the float bowl, pull one of the lower float bolt screws first. Place a small container, such as the plastic cap off of a spray paint can, under the float bowl, and catch the fuel as it drains out. When you put it all back together, you can use a small kitchen funnel (just don’t tell your wife about it) to pour the drained fuel back into the bowl by dumping the fuel down the bowl vent tube (the tube sticking up right at the choke).
Tech Tip #6
When using a Holley on a car with a bumpy cam, it is often necessary to screw the idle speed screw in far enough that the ported vacuum slot in the throttle bore is uncovered, producing significant ported vacuum to the distributor vacuum advance at idle. When the engine is rev’ed up, the vacuum source advances the timing, as it should. When the throttle is closed, the rpm will very gradually bleed down as vacuum advance gradually fades: the engine will not settle down immediately to the correct idle speed. To eliminate this problem, you can adjust the secondary opening screw to allow the secondary throttle plates to be cracked open a little more than the spec requirement. This will bleed a little air through the secondaries at idle, increasing idle speed and allowing the primaries to be closed down to correct the ported vacuum problem.
Tools and Equipment Required
As a minimum, you will need the following tools:
1. Vacuum Gauge
2. Small cup to drain fuel into
3. Screwdrivers
4. Box end wrenches
5. Spark plug removal tools
6. Rags
Procedure
Here is my recommended sequence and procedure for doing a basic Holley set-up:
1. Bench-Set the Idle Speed
Even though most “street†Holley carbs only have idle mixture screws on the primary metering block, almost all Holleys have an idle fuel transfer passage that discharges idle fuel on the secondary side as well as on the primary side. This means that the carb meters idle fuel and idle air through all 4 of the throttles – primary and secondary. For this system to work properly, it is absolutely critical that all 4 of the throttle blades ALWAYS be set at the same setting (NEVER set idle speed by only adjusting the primary idle
speed screw). This will assure that the carb is balanced and working right from the beginning.
Before installing the carb to the engine (if you have installed it, yank it off), turn the carb upside-down on your workbench. The first thing you should notice is the recessed secondary throttle idle speed screw located on the passenger side of the carb: it’s recessed into the throttle plate near the secondary shaft.
Next, if you look at the throttle bores just below the edge of the throttle plates (“butterfliesâ€), you will see a vertical slot. Open the throttles a little to see the whole slot. This slot is called the “transfer slot,†and it provides a fuel discharge transition circuit between the idle circuit (which discharges fuel out of the round idle discharge holes below the throttle plates) and the main metering circuit (which discharges fuel out of the main discharge nozzles once airflow through the venturies is high enough to pull the fuel through the
nozzles). The transition slot receives its fuel from the idle metering supply circuit.
With the throttles fully closed against their idle stop screws (not on the fast idle cam), noting that the secondaries and primaries both have separate idle stop screws, there should be exactly .020†of the transition slot exposed below the primary throttle plates. Use a .020†feeler gauge to measure this: Place the feeler gauge on the throttle plate up against the transition slot and adjust the idle speed screw so that the slot JUST BARELY disappears behind the feeler gauge. At .020†slot exposure, the slot will appear to be a
perfectly square hole. Adjust the primary idle speed screw so that the primary blades are in position.
On Holley carbs that have been in service for a while, the secondary throttle adjustment screw is often partially seized, so you have to use a small screwdriver with a pair of vice grips attached to the shank of the
screwdriver to turn the screw. It’s best to “rock†the screw back and forth to get it loose enough to turn.
The next thing to note is that the secondary transition slots on a Holley are often located higher in the throttle bores than on the primary side: If you try to obtain the .020†transition exposure on the secondary side of a Holley, you will often end up with the secondaries opened significantly more than the primaries.
To avoid this, use the following secondary throttle adjustment on the Holley carbs: After adjusting and setting up the primary throttle blade angle as described above (.020†transition slot exposure), hold the carb
up to a light and look up the bottom of the carb (with the choke blade wide open) – note the amount of “light gap†around the primary throttle blades. Now, adjust the secondary idle speed screw to duplicate the
primary “light gap†on the secondary side. This will usually get the secondary throttle blades close to the transition slot, but you may not have .020†exposure. Idea is to get the same blade angle and airflow through all 4 corners of the carb – the “comparative light gap†method allows you to get this very close.
Once the primary and secondary throttles have been set to this initial idle speed setting (which should make your car idle very close to the correct idle rpm range), it is your job as a tuner to assure that any further idle
speed changes occur by adjusting both of the screws equally from this point on. Never adjust the idle speed by only adjusting the primary screw: if you adjust the primary idle speed by ¼ turn, you MUST adjust the secondary idle speed screw ¼ turn as well. Keep the two throttles adjusted the same.
2. Set the float level.
You’ll be amazed how many people try tuning a Holley without ever checking the float level. An incorrect float level can give you all kinds of symptoms and problems, so get this one set right off the bat. Most Holleys have a sight plug on the side of the float bowls, and have externally adjustable floats. With the
engine HOT and running (float level will change with engine temperature – make sure you’re completely warmed up before setting this), put a rag under the sight plug area and pull the plug. Adjust the float level until fuel just barely starts to dribble out of the plug, then lower it until the dribble barely stops. The slotted screw in the center of the adjustment is the locking feature – loosen it and turn the hex nut CW to lower the float level, CCW to raise it.
3. Make sure your Power Valve is in the ballpark.
Most “stock†Holleys come with a power valve in the 6.5†range. This means that the power valve will open and start dumping fuel into the discharge when manifold vacuum hits 6.5†Hg (Mercury) of vacuum. A lot of cars with big overlap cams, single plane manifolds, or operating at high altitude will not pull 6.5†vacuum with the transmission in “drive.†This means that the power valve is flooding the engine with fuel on very light acceleration right off idle, and you’ll never get the tuning right unless you fix it.
Hook up a vacuum gauge to the intake manifold or to one of the vacuum ports at the base of the carb. With the transmission in “drive†(or in neutral on a manual car), note the vacuum reading. Your power valve should be rated at about 2†below the actual vacuum reading. On a car running at 11†of vacuum in drive, you will need about an 8.5†power valve.
4. Now get the main metering circuit in the ballpark.
Now that your power valve is not flooding you out, you can get the main metering jets tuned in. If your main metering circuit is either too lean or too rich, you will not be able to properly set up the accelerator pump circuit. Trying to fix a bog on acceleration with pump cams and discharge nozzles when the main metering is off is like chasing your tail. The main metering system also affect the idle circuit, so you need to get the main jets in line before going on to the other tuning parameters.
Pop a new set of spark plugs in the engine (don’t use the new Platinum or other exotic metal plugs- they won’t read right). Now take the car out for a drive around a few blocks. Get it up to steady-state cruise rpm, and make a few moderate accelerations. Pull the car back into the garage, allowing it to idle as little as possible. Shut it down and pull a few of the plugs. The plugs should have a very light, off-white or tan color around the nose of the insulator. If you’re pure white (completely clean), you’re probably running
too lean. If you’re picking up black soot, you’re too rich. Raise or lower primary jet sizes by 2 sizes at a time and repeat this test until your plugs are showing the correct color.
5. Tweak your idle mixture screws.
Screw both of the screws in until they gently bottom out, and turn them both out 1 turn. This is a good starting point. With a tach on the engine to monitor rpm, start the engine and turn the screws ½ turn at a time, turning both screws the same amount, until the best rpm reading is observed. Then turn them in 1/8 turn to lean it out just a tad. Once set, I like to shut the engine off and turn both of the screws all the way in, counting the turns, until they gently bottom out again. Just to make sure they’re both set the same. Then back them out to the setting you had.
6. You’re finally ready to fine-tune the accelerator pump circuit.
Many people start by tuning this, and can never get the stumble tuned out of the car. By making sure that the other systems are approximately right, you can now set this system up so that it’s not trying to compensate for other deficiencies. There are two tuning parameters to the accelerator pump circuit: Pump Cam and Discharge Nozzle.
The pump cam, a little plastic, color-coded part located on the throttle shaft with a single screw, will determine the total volume of the pump shot.
The discharge nozzle, or “shooter,†is available in different sizes, and determines the rate of discharge. In other words, it is possible to install a large-volume pump cam, and have a small-diameter “shooter†which
“bleeds†the total volume in over a longer duration. Or you can install a big “shooter†which allows the entire pump shot to be dumped in almost immediately.
There is no real scientific way of coming up with the exact correct combination for these parts. As a rule, of the car stumbles, backfires, or hesitates on initial throttle opening, try a larger shooter (the size is stamped on the body, and they’re available in .001†increments). If the car has a “lazy throttle,†indicative of a rich condition, try a smaller pump cam at first.
7. The last step in the initial tuning process is to set the secondary opening rate.
The secondary opening rate is determined by the spring in the secondary diaphragm. A soft spring will allow the secondaries to open sooner. Install softer springs until the car develops a slight stumble from the opening rate, then go back one spring level. This will allow the secondaries to open as quick as possible while avoiding a stumble.
A common mistake made by “performance†tuners is to remove the secondary diaphragm check ball. The check ball is installed in the secondary diaphragm housing, and helps to control the secondary opening rate. Removal of the ball will result in immediate opening of the secondaries with very little mass air flow through the primaries, with a resultant massive stumble upon acceleration.
You cannot normally get the vacuum secondaries to open by flicking the throttle and rev’ing the rpm with the car in neutral. This is not a valid test of the functionality of the secondaries.
8. Now, if you want to fine-tune the primary jetting, you can do one of three things:
For maximum horsepower, you will need to run the car through a measured distance and note its speed at the end of the distance. Using one of the available performance computers, or running the car at a track, is best for this. The correct size jets are the jets which give the car the highest mph at the end of the measured distance (not the shortest elapsed time). Again, change jet sizes 2 sizes at a time to see if the speed increases or decreases.
For maximum economy, drop the jet size until the car develops a slight stumble upon acceleration, then go up two sizes.
For a really good, scientific way of setting up the jetting, check out this website:
http://www.bob2000.com/carb.htm
http://www.centuryperformance.com/tunin ... g-148.html
http://www.centuryperformance.com/ignit ... g-219.html
http://www.mortec.com/carbtip1.htm
http://www.nastyz28.com/perftune.html
http://www.goldrush.com/~rhuish/temp_data/carbtune.html
http://www.innovatemotorsports.com/foru ... ay.php?f=7
Id start by checking for vacuum leaks and verifying the timing curve
Id start by dropping or raiseing the fuel pressure to 5.5 lbs and verifying your getting a minimum of a 1/2 gallon a minute unrestricted flow
Id start at all four jets #70
Id install a NEW power valve and ID buy several,if your carb uses them, so I could play/exchange/test
start here, theres no sence in guessing
http://www.themotorbookstore.com/holley-carburetors.html
http://www.themotorbookstore.com/motuhocavo2.html
http://www.themotorbookstore.com/holley1.html
http://www.bob2000.com/carb.htm
http://www.mortec.com/carbtip1.htm
http://store.summitracing.com/partdetail.asp?autofilter=1&part=HLY-36-181&N=700+115&autoview=sku
http://www.professionalequipment.co...hermometer-501-ds-42545/infrared-thermometer/
http://www.centuryperformance.com/vacuum.asp
http://www.carcraft.com/techarticles/carb_tuning/
heres where
a infared non-contact thermometer helps diagnose mixture problems very quickly, but youll need one that reads into the 1400F range for the headers for quick diagnoses
http://www.professionalequipment.com/xq/ASP/ProductID.3461/id.22/subID.177/qx/default.htm
temperature range from -58 to 1832°F
I use this one :grin: (above) and youll need to learn how to read plugs (this may help)
http://www.chevytalk.org/threads/showfla...rue#Post1448415
heres A/F
http://www.rbracing-rsr.com/rsrgauge.htm
http://www.mummbrothers.com/SRF_Stuff/Secrets/Driveline/Air_Fuel.htm
http://www.airfuelmeter.com/english/
http://www.innovatemotorsports.com/products/lm1.php
http://thedynoshop.net/prod01.htm
http://www.dawesdevices.com/airfuelmeter.html
http://fastrides.com/articles/DoItYourself_AirFuelRatio_Gauge.html
http://www.fuelairspark.com/Products/Information/AirFuelMeter.asp
http://www.3barracing.com/product_3.htm
a few places to look for plug/ignition info
http://auto.howstuffworks.com/ignition-system.htm
http://www.ngksparkplugs.com/techinfo/spark_plugs/techtips.asp?nav=31000&country=
http://www.gofastzone.com/techtips/sparkplugs/sparkplugs.htm
http://www.acdelco.com/html/pi_plugs_ident.htm
http://www.autolite.com/framer.cgi?page=http://www.autolite.com/products/racing.htm
http://members.uia.net/pkelley2/sparkplugreading.html
http://www.atlanticjetsports.com/_techtalk/00000005.htm
http://www.strappe.com/plugs.html
http://www.babcox.com/editorial/cm/cm59910.htm
http://www.ngksparkplugs.com/techinfo/spark_plugs/partnumberkey.pdf
http://www.nightrider.com/biketech/spkplghnbook.htm
http://www.tsrsoftware.com/sparkplug.htm
http://www.gnttype.org/techarea/engine/plugs.html
http://www.dansmc.com/sparkplugs1.htm
http://www.ngksparkplugs.com/techinfo/spark_plugs/overviewp2.asp
http://www.pajjakid.com/ubipa/sparkplugs.htm
http://www.edelbrock.com/automotive/sparkplugs.html
http://www.bullittarchive.com/Maintenance/Sparkplugoverview/
http://www.powerarc.com/sparkplug.htm
http://www.carcraft.com/techarticles/64378/
http://www.wakularacing.com/TechnicalInfo.htm
http://www.geocities.com/MotorCity/Flats/3877/spark.html
http://www.rmlautomotive.com/ignition.html
http://www.bgsoflex.com/auto.html
http://ourworld.compuserve.com/homepages/JET_AV8R/Vision/Ignition/CDI.HTML
http://www.howstuffworks.com/ignition-system.htm
http://auto.howstuffworks.com/ignition-system1.htm
http://www.familycar.com/Classroom/ignition.htm
http://www.motocross.com/motoprof/moto/secontent/seign/ignprin/ignprin.htm
http://www.northwestautorepair.com/ignitionsystem.htm
http://www.boyleworks.com/ta400/psp/distcurve.html
http://www.chevytalk.com/tech/index.html
heres other options
http://www.davessmallbodyheis.com/
http://www.msdignition.com/
http://www.proformparts.com/catalog/distributors_GM.html
http://www.atlanticspeed.com/store/MSD Chevrolet Distributors.asp
http://www.holley.com/HiOctn/ProdLine/Products/IS/ISD/ISD.html
http://www.performancedistributors.com/gmdui.htm
Spark plug /ignition info
http://www.edelbrock.com/automotive/sparkplugs.html
http://www.ngksparkplugs.com/apps/car_truck_suv/default.asp?nav=60000&country=US
http://www.strappe.com/plugs.html
http://www.applink.net/cct/tips/plugwires.html
http://www.acdelco.com/html/pi_plugs_ident.htm
http://www.atlanticjetsports.com/_techtalk/00000005.htm
http://www.ngkspark.com.au/spark_plug_cross_ref_chart_index3.htm
http://www.strappe.com/plugs.html
http://www.babcox.com/editorial/cm/cm59910.htm
http://www.ngksparkplugs.com/techinfo/spark_plugs/partnumberkey.pdf
http://www.eric-gorr.com/techarticles/sparkplugs.html
http://www.gnttype.org/techarea/engine/plugs.html
http://www.tsrsoftware.com/sparkplug.htm
http://www.racinghelp.com/read_spark_plugs.html
http://www.ngksparkplugs.com/techinfo/spark_plugs/overviewp2.asp
http://www.gofastzone.com/techtips/Spark...20Reference.htm
http://www.geocities.com/zgarage2001/adv...01/advance.html
http://www.hotrod.com/techarticles/43300...harticles/43300
http://www.centuryperformance.com/vacuum....com/vacuum.asp
http://www.custompistols.com/cars/articl...tion_timing.htm
http://chevyhiperformance.com/howto/4567...com/howto/45673
http://www.lmengines.com/Ignition_Timing...tion_Timing.htm
http://www.73-87.com/garage/hei.htm]http.../garage/hei.htm
http://www.bgsoflex.com/auto.html
OPTISPARK info
http://www.gmhightechperformance.com/tech/0310htp_optispark/
http://www.charm.net/~mchaney/optisprk/optisprk.htm
http://www.fierolt1.com/lt1_95_up_OptiReplace.htm
http://www.noid.org/~muttvette/opti.html
http://www.gulicks.com/vette/projects/opti/index.html
http://www.houston-f-body.org/tech/optispark/
http://www.dynotech-eng.com/dynaspark.htm
http://www.corvetteclinicinc.com
http://www.corvettefever.com/howto/16758
Last edited by a moderator: