http://hackaday.com/2011/01/16/20-fuel-injector-tester/
http://www.dinofab.com/fuel_injector_tester.html
http://www.watkinsmotorsports.com/fuel_ ... emade.aspx
http://garage.grumpysperformance.co...cleaning-dirty-fuel-injectors.1906/#post-5032
http://www.youtube.com/watch?v=q7krEjFm ... re=related
partly clogged injectors tend to reduce power and increase emissions
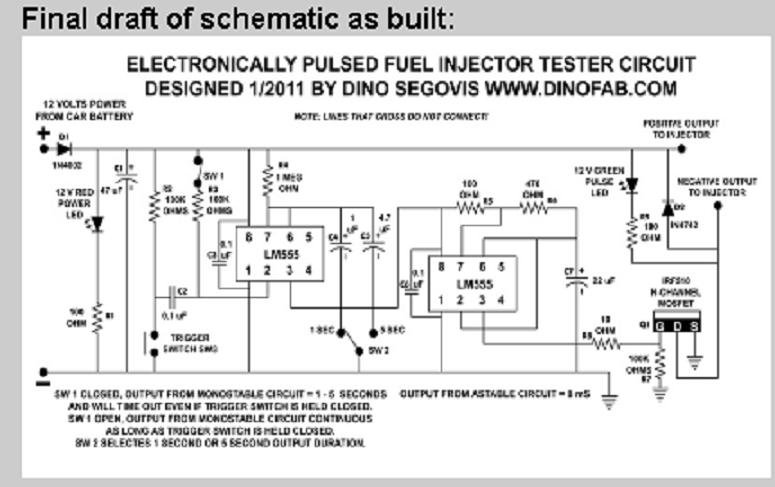
Parts list:
1 - Radio Shack proto type circuit board
2 - 555 timer 8 pin DIP chips
3 - 100 ohm resistors - R1, R5, R9
1 - 470 ohm resistor - R6
3 - 100 K ohm resistors - R2, R3
1 - 10 ohm resistors - R8
1 - Meg ohm resistor - R4
1 - 47 mF capacitor - C1
1 - 22 mF capacitor - C7
3 - 0.1 mF ceramic disc capacitor - C2, C3, C6
1 - 1 mF Tantalum capacitor - C4
1 - 4.7 mF capacitor - C5
1 - 1N4002 diode D1
1 - 1N4742 12v Zener diode - D2
1 - Red LED 12v rated
1 - Green LED 12v rated
1 - N-Channel MOSFET transistor - Q1
Radio shack part #276-2072
1 - Momentary contact switch - SW3
2 - spdt switches - SW1, SW2
2 - Aligator clips
A few feet of double strand wire
1 - Project enclosure box
CAUTION!
Fuel in an open area is not a good idea, USE A LOW-FLAMABLE Parts cleaner to operate your injector flow bench. ALSO, Read and follow all manufacturer precautions and recommendations.
Fuel Injector Rebuild/Clean Process
Follow these simple steps and rebuild them yourself:
The injectors were each visual inspected and then the following injector cleaning process was completed.
1) Clean exterior of injector
Use a soft brush and parts cleaner to remove all exterior debris on the injector. Caution! Never touch any part of the exposed tip on the injector with any sort of physical cleaning device, will use the Ultra Sonic bath to clean this end.
2) Test Injector Coil Resistance
You’ll need to know the specifications for your fuel injector. Check the ohms from one tip of the electronic plug to the other and record readings. Google injector specifications for your specific injectors, one good place is:
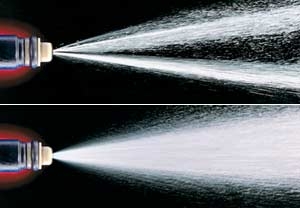
3) Test Injector Flow Pattern
Visually inspect the flow pattern of the injector during operation.
4) Test For Injector Leakage
Visually look at the end of the injector while pressurized and look for leakage.
5) Test Injector Flow/Volume
Using a measuring device measure the amount of fuel delivered during a set amount of cycles. We used a rain gauge for lack of access to a graduated cylinder. It was accurate enough to perform the test and do a comparative analysis of the set of injectors as a whole.
6) Remove Injector screens and o-rings
TIP: The fuel injectors have a small screen with a brass collar around the inside of the top input port. This brass collar is the key to removal. You’ll need to find a course threaded screw just slightly too big and thread into the brass collar. Holding the screw in a vise use a lever, like a screw driver, against the edge of the input port and pry the screen/filter out.
7) Clean Injector Tips in Ultra Sonic Bath
Rig some type of holding device to submerge the tips of the injectors into an ultra sonic bath for a period of an hour or so. Then rinse the injectors for about a third that time.
NOTE: It’s important in most of the little jewelry cleaners you get that you do not lay the injector in the cleaner. The basket isn’t capable of holding the weight and it impedes the cleaning vibrations. We used some cut PVC elbows clamped to a bolt to suspend the tips into the cleaning liquid.
8) Back flush the injectors
This is an important step to make sure any debris dislodged are flushed out of the injector interior prior to installing a new screen. We rigged a pressure port off the side of the rail to blow back through the injector while activating it.
9) Coat inside with oil
Spray inside of injector with a little wd-40 or some other light oil and let run back out. Just prolongs shelf life especially if you’re not going to be using them immediately.
10) Install new filters
Lightly tap the new filter into the injector. It’s best to hold it in your hand and use a small plastic device to tap in.
11) Install new o-rings
Grease them with synthetic grease and slip over injectors.
FINISHED! That’s it; your injectors should be read for service.
Contact Watkinsmotorsports for more info: Email Me for Injector Rebuilding Details
DIY Fuel Injection Links and Related Sites
Mike Rowand, Contributions to DIY Fuel injector cleaning.
Mike Rowand, provides lots of good how to information on fuel injection cleaning and systems in general.
OTC Fuel Injector Pulse Generator
OTC's website, they manufacture the pulse generator I used, follow the link above to visit their site.
Pulse Generator Circuits
A good site to find pulse signal generator wiring diagrams and other related information.
Professional Fuel Injector Rebuild
Want to see how a professional shop does it? Visit Cruzin Performance, they have a great step-by-step fuel injector rebuild with photos. Som of the insperation for my fuel injector flow bench from some of the information found here.
The fuel injectors being used in this mustang are:
Delphi / Lucas
36 lb / hr. Disc Injectors
Part Number Delphi D3165BA (Lucas old 5203002, Lucas New 621037)
Do you need to know how big of injector to use? Read: How to Pick the correct size fuel injectors
These injectors, like half the other parts used to build this mustang, were bought in a package eBay deal. The age and usage on them was unknown at the time of receipt.
After using them for a year or so, we decided they may need to be checked and flow tested. Not having a machine shop on hand or a garage for that matter, we decided to build our own flow bench to see what we could find out about improving the performance of a fuel injector.
We scavenged a fuel injector rail from a 5.0 litter mustang and used a new Summit Racing Fuel pump to feed the system. From there it gets MacGyver, so all the engineers out there with a load of money and equipment please leave now; you might not appreciate the choice of materials used to build this device. Nonetheless, the homemade fuel injector flow bench we created had a very simple material list from stuff we had available. It proved functional and we documented positive results on cleaning several sets of injectors.
basic fuel injector test
(pull your trouble codes and check battery voltage ,alternator output and ignition spark first)
(BTW it rarely hurts to drain old fuel thats over 4 months old and replace the cars fuel filter, then add two different brands of fuel injection cleaner and 6 oz of marvel mystery oil to as full tank of fresh high test gas to the car if its been sitting un-used for very long before you start testing for fuel injection related issues
now Ill assume your battery reads over 12 volts and the starter works, and easily spins the engine
the first step
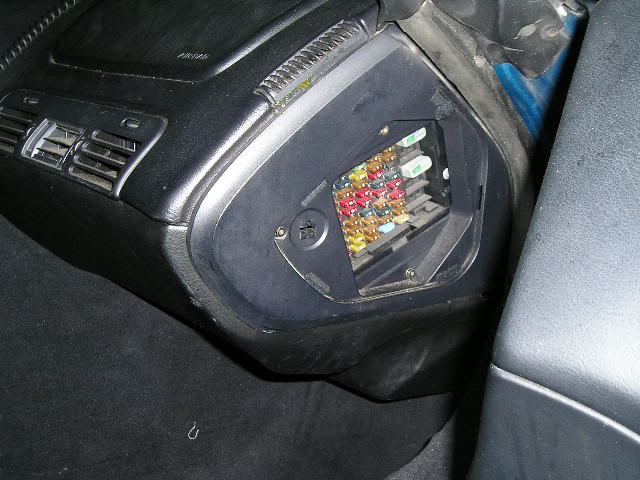
find the fuel rail shrader valve and remove the cap and connect the fuel pressure gauge
if you turn on the ignition key to get the dash and accessories to light up but don,t start the engine,the fuel pump,
should briefly run to pressurize the fuel rail to about 38psi-42 psi,
this should stay at this pressure level for at least 5 minutes minimum, if it drops slowly your fuel rail is leaking fuel.
now the fuel pressure regulator may be defective or leaking, or in very rare cases the fuel pump may be defective ,
but the most likely cause is a fuel injector(s) stuck in the open position.
next pull the injector harness,
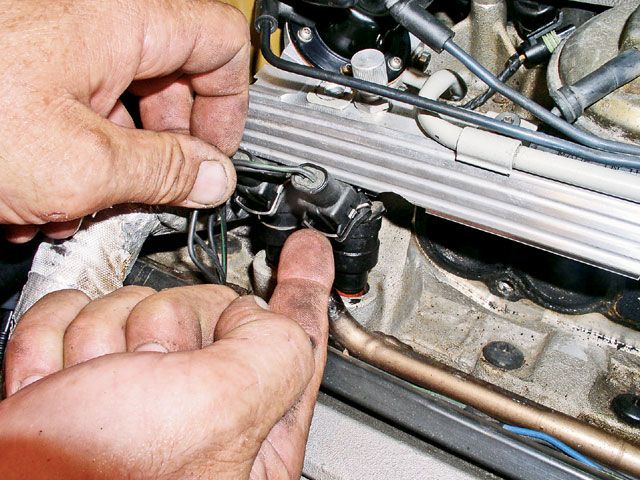
off a single injector at a time, press the wire bar to release the clip, retention, then pull it up and off, the noid light plugs into the harness,
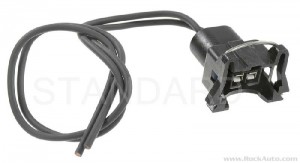
use the spare injector pig tail
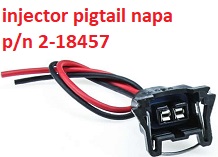
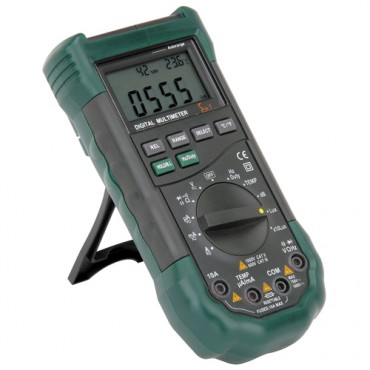
on the now disconnected injector ,connect the multi meter on ohms setting and it should read 11-13 ohms injector on each injector tested.
if it reads under 9 ohms or over 20 ohms its a defective injector
now use a couple 3 ft long test leads connect one too one of the pig tail test leads
https://www.walmart.com/ip/Uxcell-2...-Clips-Test-Jumper-Wire-1-5m-2-Color/45588242
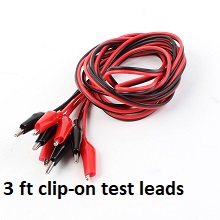
and to 12 volts, connect the other pig tail lead too a different test lead and watch the fuel pressure gauge,with the key out of the ignition , you should have 38-42 psi of fuel rail pressure, watch carefully while you tap the second test lead to ground (the plenum or alternator case works) the fuel pressure should drop as you tap the ground pig tail lead, this verifies the injector function at least partially, if you don,t see the pressure drop the injectors not allowing fuel flow through it and should be replaced.
after you complete each injector test , turn the ignition key on, to re-pressurize the fuel trail and reconnect the harness to the previously tested injector,
repeat the noid light and pig-tail function fuel pressure test on each of the other injectors individually.
youll need a fuel pressure gauge and multi meter
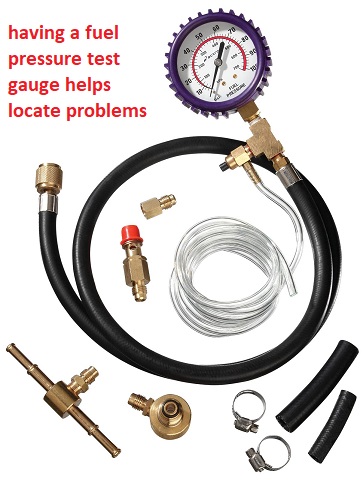
it helps if you have a spare fuel injector pig-tail for testing
having a NOID light injector harness tester wont hurt either
https://www.harborfreight.com/11-piece-noid-light-and-iac-tester-set-97959.html


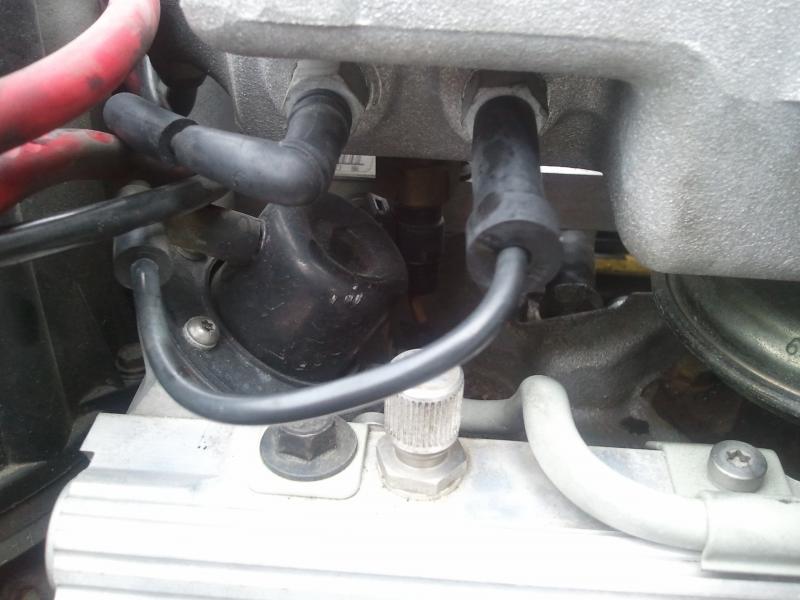
on the TPI and LT1 efi and many other EFI intakes,
theres a shrader valve,
that can be easily accessed to check fuel rail pressure,
dealing in facts you verify is always preferable.
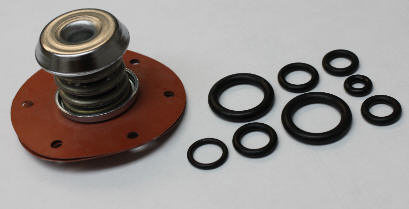
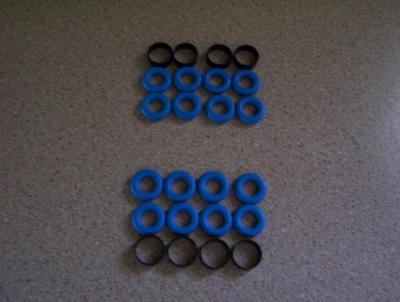
GM part number for the complete fuel rail o-ring kit is 17111696
if your TPI FUEL PRESSURE REGULATOR DIAPHRAGM LEAKS youll find it difficult or impossible to be starting your car
heres a link to the correct o-rings they are light blue
NAPA sells them at times
all the o-rings on the fuel rails and injectors need to be dipped in thin oil so they insert and slide into place with less friction, this tends to greatly reduce the chance of the o-rings ripping, and yes you need the correct o-rings that fit correctly to begin with if you expect the rings to seal correctly
http://tpiparts.net/inc/sdetail/10950/300
17113544 - Injector Seals
17111696 - O-Ring Kit
22514722 - Fuel Inlet O-Ring
22516256 - Fuel Inlet O-Ring
http://garage.grumpysperformance.co...dding-a-fuel-pressure-gauge.15264/#post-88472
http://garage.grumpysperformance.co...njection-at-start-up-problem.7309/#post-24862
http://garage.grumpysperformance.co...oven-facts-if-your-in-doubt.13051/#post-84695
http://garage.grumpysperformance.com/index.php?threads/tpi-fuel-pressure-issue.10385/#post-42943
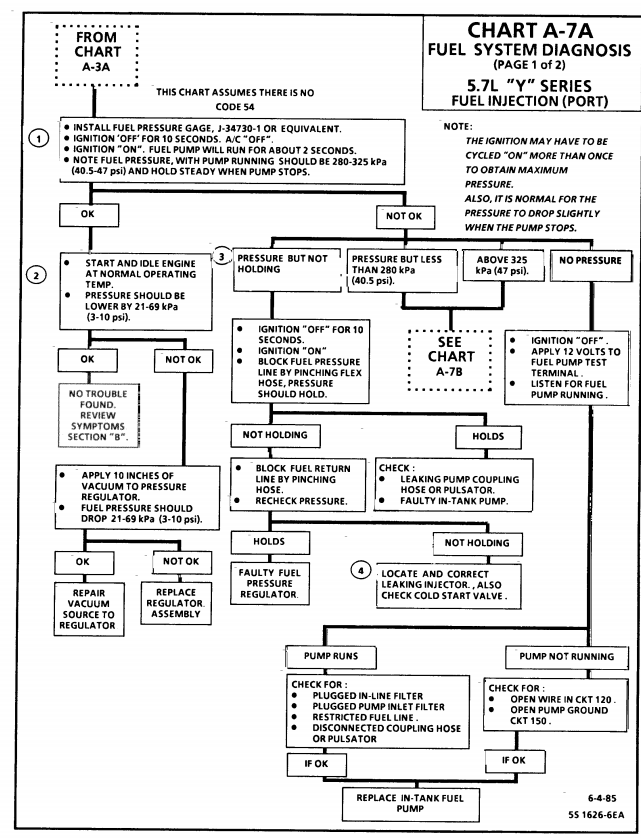
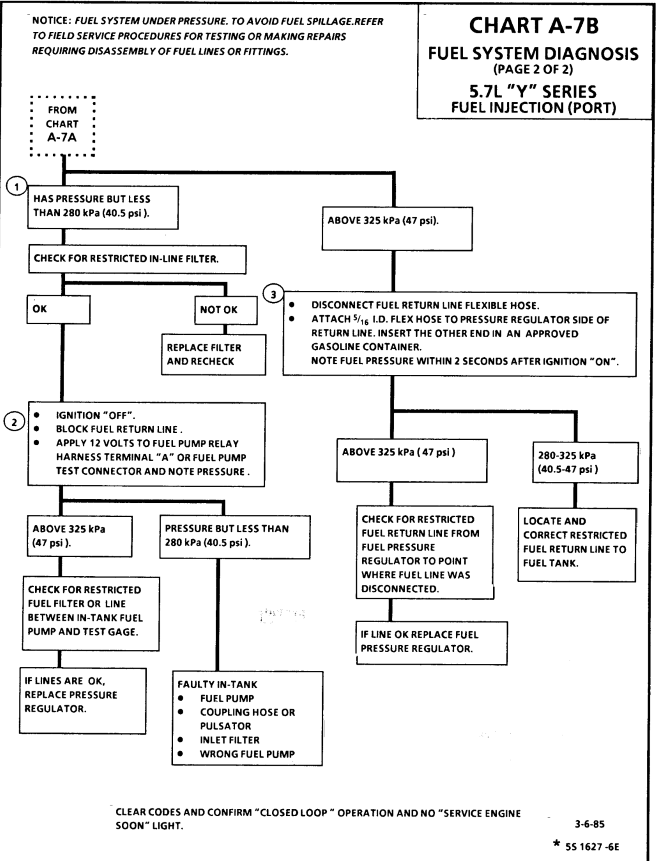
http://garage.grumpysperformance.co...-system-trouble-shooting-flow-chart-info.596/
http://users.erols.com/srweiss/tableifc.htm
http://www.dinofab.com/fuel_injector_tester.html
http://www.watkinsmotorsports.com/fuel_ ... emade.aspx
http://garage.grumpysperformance.co...cleaning-dirty-fuel-injectors.1906/#post-5032
http://www.youtube.com/watch?v=q7krEjFm ... re=related
partly clogged injectors tend to reduce power and increase emissions
Parts list:
1 - Radio Shack proto type circuit board
2 - 555 timer 8 pin DIP chips
3 - 100 ohm resistors - R1, R5, R9
1 - 470 ohm resistor - R6
3 - 100 K ohm resistors - R2, R3
1 - 10 ohm resistors - R8
1 - Meg ohm resistor - R4
1 - 47 mF capacitor - C1
1 - 22 mF capacitor - C7
3 - 0.1 mF ceramic disc capacitor - C2, C3, C6
1 - 1 mF Tantalum capacitor - C4
1 - 4.7 mF capacitor - C5
1 - 1N4002 diode D1
1 - 1N4742 12v Zener diode - D2
1 - Red LED 12v rated
1 - Green LED 12v rated
1 - N-Channel MOSFET transistor - Q1
Radio shack part #276-2072
1 - Momentary contact switch - SW3
2 - spdt switches - SW1, SW2
2 - Aligator clips
A few feet of double strand wire
1 - Project enclosure box
CAUTION!
Fuel in an open area is not a good idea, USE A LOW-FLAMABLE Parts cleaner to operate your injector flow bench. ALSO, Read and follow all manufacturer precautions and recommendations.
Fuel Injector Rebuild/Clean Process
Follow these simple steps and rebuild them yourself:
The injectors were each visual inspected and then the following injector cleaning process was completed.
1) Clean exterior of injector
Use a soft brush and parts cleaner to remove all exterior debris on the injector. Caution! Never touch any part of the exposed tip on the injector with any sort of physical cleaning device, will use the Ultra Sonic bath to clean this end.
2) Test Injector Coil Resistance
You’ll need to know the specifications for your fuel injector. Check the ohms from one tip of the electronic plug to the other and record readings. Google injector specifications for your specific injectors, one good place is:
3) Test Injector Flow Pattern
Visually inspect the flow pattern of the injector during operation.
4) Test For Injector Leakage
Visually look at the end of the injector while pressurized and look for leakage.
5) Test Injector Flow/Volume
Using a measuring device measure the amount of fuel delivered during a set amount of cycles. We used a rain gauge for lack of access to a graduated cylinder. It was accurate enough to perform the test and do a comparative analysis of the set of injectors as a whole.
6) Remove Injector screens and o-rings
TIP: The fuel injectors have a small screen with a brass collar around the inside of the top input port. This brass collar is the key to removal. You’ll need to find a course threaded screw just slightly too big and thread into the brass collar. Holding the screw in a vise use a lever, like a screw driver, against the edge of the input port and pry the screen/filter out.
7) Clean Injector Tips in Ultra Sonic Bath
Rig some type of holding device to submerge the tips of the injectors into an ultra sonic bath for a period of an hour or so. Then rinse the injectors for about a third that time.
NOTE: It’s important in most of the little jewelry cleaners you get that you do not lay the injector in the cleaner. The basket isn’t capable of holding the weight and it impedes the cleaning vibrations. We used some cut PVC elbows clamped to a bolt to suspend the tips into the cleaning liquid.
8) Back flush the injectors
This is an important step to make sure any debris dislodged are flushed out of the injector interior prior to installing a new screen. We rigged a pressure port off the side of the rail to blow back through the injector while activating it.
9) Coat inside with oil
Spray inside of injector with a little wd-40 or some other light oil and let run back out. Just prolongs shelf life especially if you’re not going to be using them immediately.
10) Install new filters
Lightly tap the new filter into the injector. It’s best to hold it in your hand and use a small plastic device to tap in.
11) Install new o-rings
Grease them with synthetic grease and slip over injectors.
FINISHED! That’s it; your injectors should be read for service.
Contact Watkinsmotorsports for more info: Email Me for Injector Rebuilding Details
DIY Fuel Injection Links and Related Sites
Mike Rowand, Contributions to DIY Fuel injector cleaning.
Mike Rowand, provides lots of good how to information on fuel injection cleaning and systems in general.
OTC Fuel Injector Pulse Generator
OTC's website, they manufacture the pulse generator I used, follow the link above to visit their site.
Pulse Generator Circuits
A good site to find pulse signal generator wiring diagrams and other related information.
Professional Fuel Injector Rebuild
Want to see how a professional shop does it? Visit Cruzin Performance, they have a great step-by-step fuel injector rebuild with photos. Som of the insperation for my fuel injector flow bench from some of the information found here.
The fuel injectors being used in this mustang are:
Delphi / Lucas
36 lb / hr. Disc Injectors
Part Number Delphi D3165BA (Lucas old 5203002, Lucas New 621037)
Do you need to know how big of injector to use? Read: How to Pick the correct size fuel injectors
These injectors, like half the other parts used to build this mustang, were bought in a package eBay deal. The age and usage on them was unknown at the time of receipt.
After using them for a year or so, we decided they may need to be checked and flow tested. Not having a machine shop on hand or a garage for that matter, we decided to build our own flow bench to see what we could find out about improving the performance of a fuel injector.
We scavenged a fuel injector rail from a 5.0 litter mustang and used a new Summit Racing Fuel pump to feed the system. From there it gets MacGyver, so all the engineers out there with a load of money and equipment please leave now; you might not appreciate the choice of materials used to build this device. Nonetheless, the homemade fuel injector flow bench we created had a very simple material list from stuff we had available. It proved functional and we documented positive results on cleaning several sets of injectors.
basic fuel injector test
(pull your trouble codes and check battery voltage ,alternator output and ignition spark first)
(BTW it rarely hurts to drain old fuel thats over 4 months old and replace the cars fuel filter, then add two different brands of fuel injection cleaner and 6 oz of marvel mystery oil to as full tank of fresh high test gas to the car if its been sitting un-used for very long before you start testing for fuel injection related issues
now Ill assume your battery reads over 12 volts and the starter works, and easily spins the engine
the first step
find the fuel rail shrader valve and remove the cap and connect the fuel pressure gauge
if you turn on the ignition key to get the dash and accessories to light up but don,t start the engine,the fuel pump,
should briefly run to pressurize the fuel rail to about 38psi-42 psi,
this should stay at this pressure level for at least 5 minutes minimum, if it drops slowly your fuel rail is leaking fuel.
now the fuel pressure regulator may be defective or leaking, or in very rare cases the fuel pump may be defective ,
but the most likely cause is a fuel injector(s) stuck in the open position.
next pull the injector harness,
off a single injector at a time, press the wire bar to release the clip, retention, then pull it up and off, the noid light plugs into the harness,
use the spare injector pig tail
on the now disconnected injector ,connect the multi meter on ohms setting and it should read 11-13 ohms injector on each injector tested.
if it reads under 9 ohms or over 20 ohms its a defective injector
now use a couple 3 ft long test leads connect one too one of the pig tail test leads
https://www.walmart.com/ip/Uxcell-2...-Clips-Test-Jumper-Wire-1-5m-2-Color/45588242
and to 12 volts, connect the other pig tail lead too a different test lead and watch the fuel pressure gauge,with the key out of the ignition , you should have 38-42 psi of fuel rail pressure, watch carefully while you tap the second test lead to ground (the plenum or alternator case works) the fuel pressure should drop as you tap the ground pig tail lead, this verifies the injector function at least partially, if you don,t see the pressure drop the injectors not allowing fuel flow through it and should be replaced.
after you complete each injector test , turn the ignition key on, to re-pressurize the fuel trail and reconnect the harness to the previously tested injector,
repeat the noid light and pig-tail function fuel pressure test on each of the other injectors individually.
youll need a fuel pressure gauge and multi meter
it helps if you have a spare fuel injector pig-tail for testing
having a NOID light injector harness tester wont hurt either
https://www.harborfreight.com/11-piece-noid-light-and-iac-tester-set-97959.html
on the TPI and LT1 efi and many other EFI intakes,
theres a shrader valve,
that can be easily accessed to check fuel rail pressure,
dealing in facts you verify is always preferable.
GM part number for the complete fuel rail o-ring kit is 17111696
if your TPI FUEL PRESSURE REGULATOR DIAPHRAGM LEAKS youll find it difficult or impossible to be starting your car
heres a link to the correct o-rings they are light blue
NAPA sells them at times
all the o-rings on the fuel rails and injectors need to be dipped in thin oil so they insert and slide into place with less friction, this tends to greatly reduce the chance of the o-rings ripping, and yes you need the correct o-rings that fit correctly to begin with if you expect the rings to seal correctly
http://tpiparts.net/inc/sdetail/10950/300
17113544 - Injector Seals
17111696 - O-Ring Kit
22514722 - Fuel Inlet O-Ring
22516256 - Fuel Inlet O-Ring
http://garage.grumpysperformance.co...dding-a-fuel-pressure-gauge.15264/#post-88472
http://garage.grumpysperformance.co...njection-at-start-up-problem.7309/#post-24862
http://garage.grumpysperformance.co...oven-facts-if-your-in-doubt.13051/#post-84695
http://garage.grumpysperformance.com/index.php?threads/tpi-fuel-pressure-issue.10385/#post-42943
http://garage.grumpysperformance.co...-system-trouble-shooting-flow-chart-info.596/
http://users.erols.com/srweiss/tableifc.htm
Last edited by a moderator: