http://www.enginebuildermag.com/Article ... ology.aspx
Looking For Leakers: Crack Detection Technology
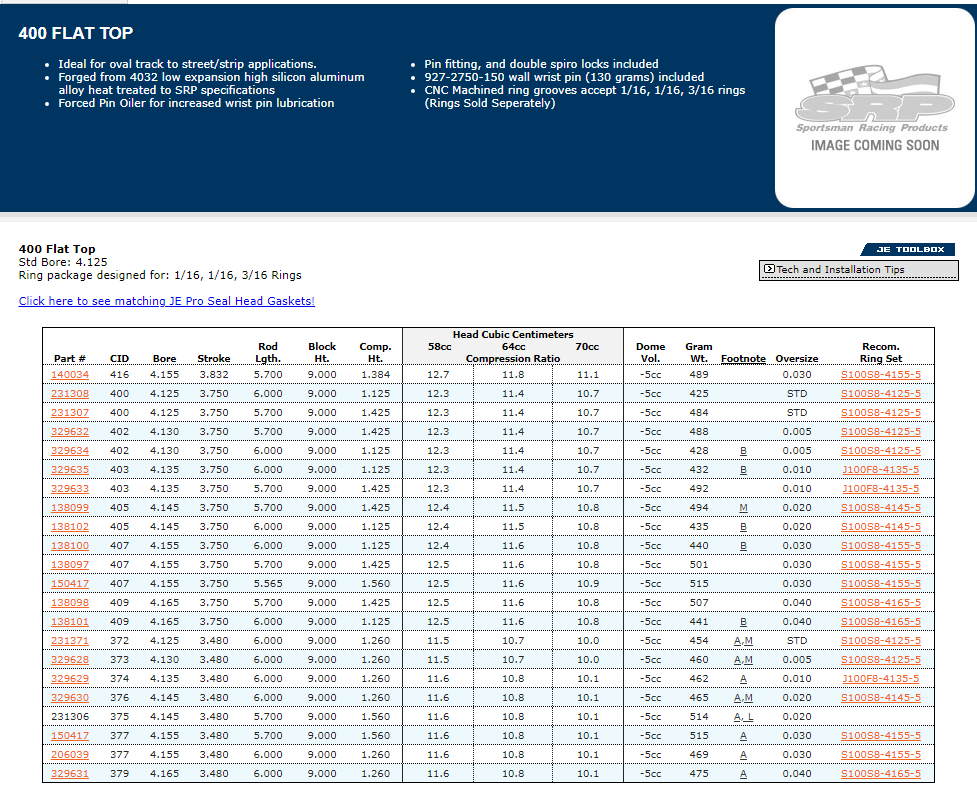
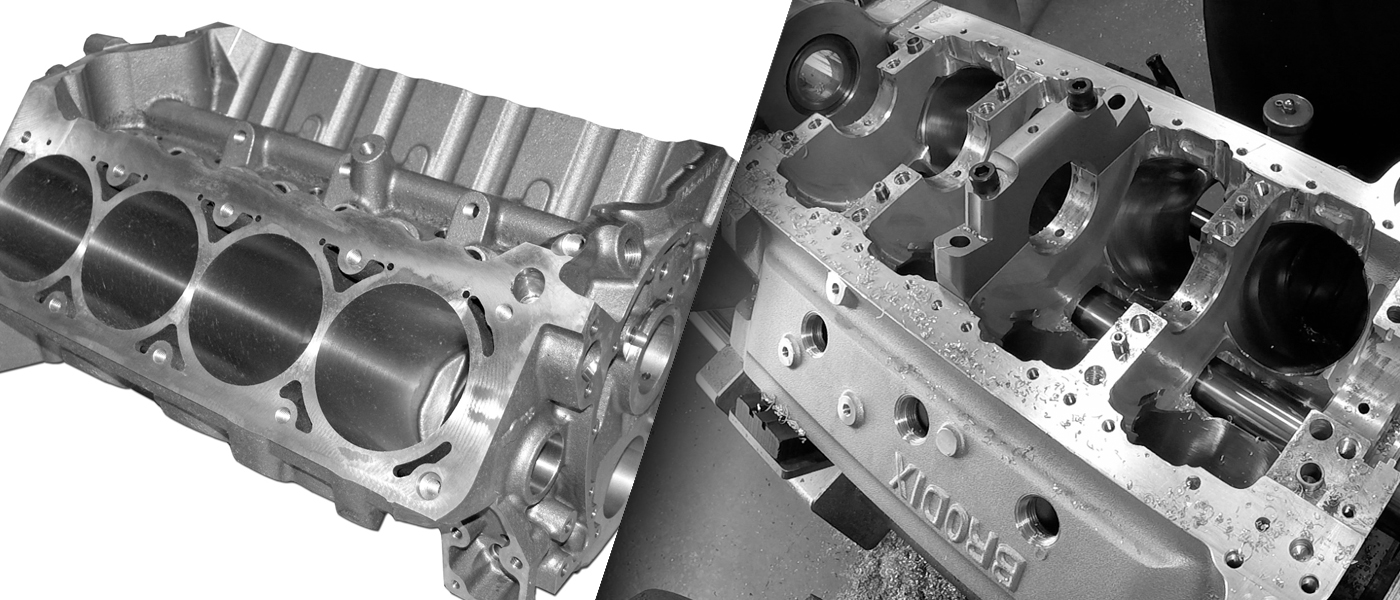
SUMMIT SELLS G.M. BLOCKS you can use to build a 383 for $700 plus shipping , but ID suggest limiting power to about 500 hp with these
http://www.summitracing.com/parts/sum-150100
aftermarket blocks like dart have significantly thicker bore walls, main cap webs, decks, can be ordered with splayed and billet main caps
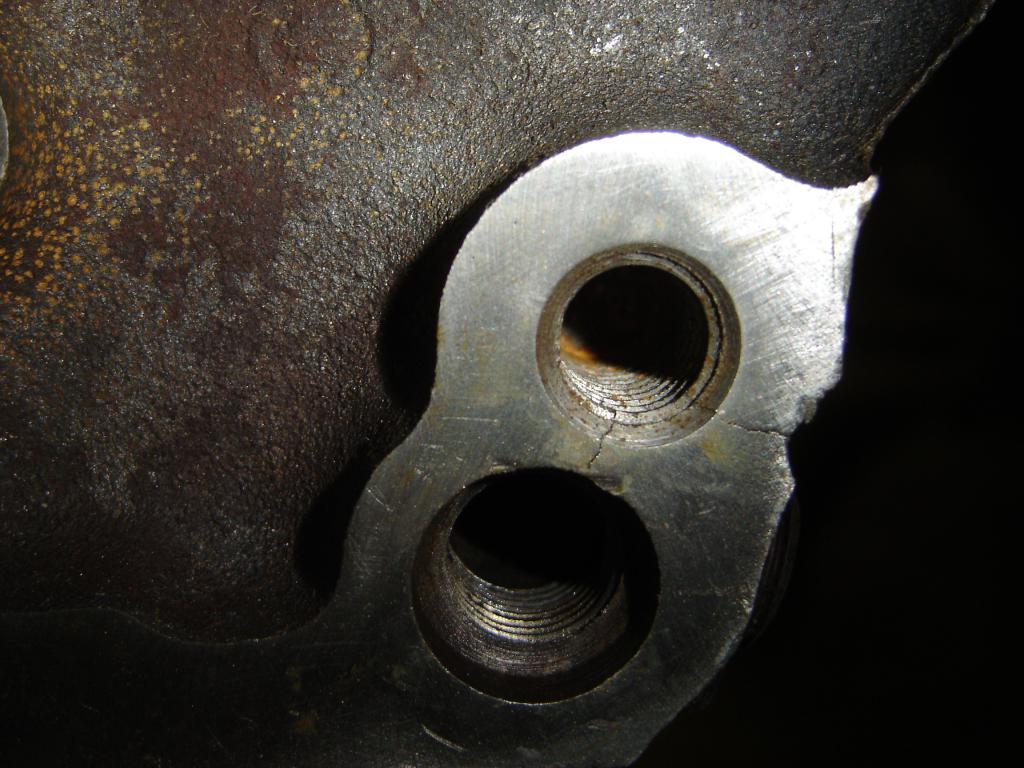
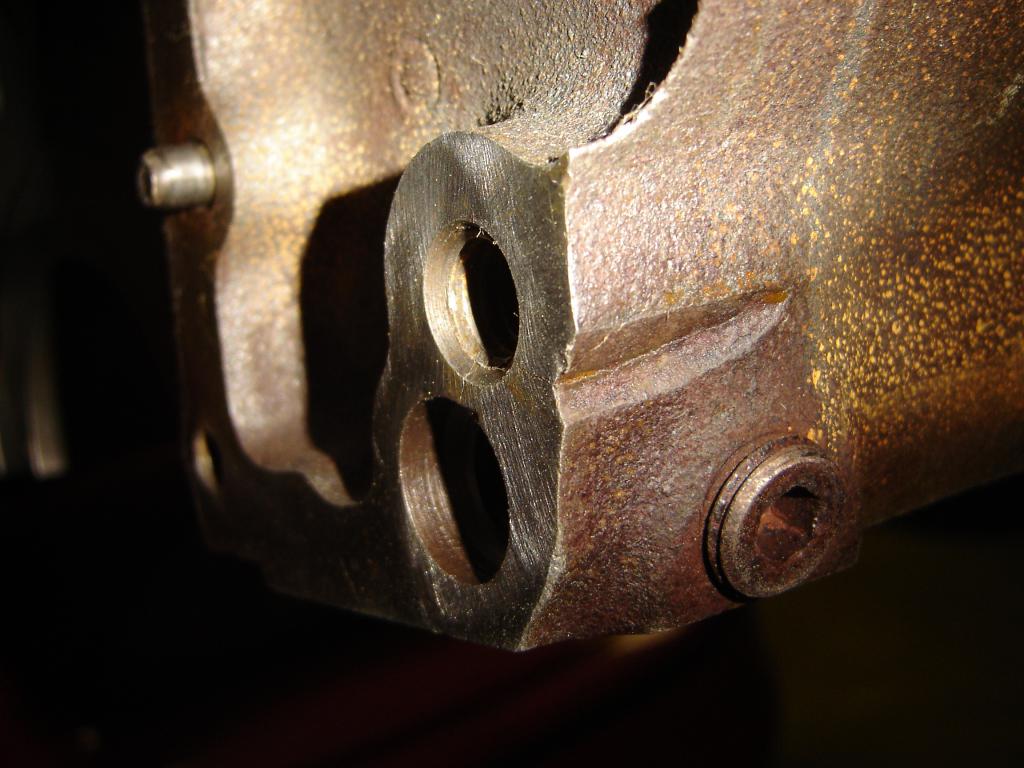
when you have a block magnetically or dye checked for cracks , and sonic tested for bore wall thickness, don,t forget to check lifter bores, and lifter gallery areas, and main cap webs etc. just because its not easy to access does not mean cracks can be ignored

viewtopic.php?f=51&t=3219
OR you can spend a bit more and get a far stronger and thicker casting for about $1550 from DART , keep in mind that all the money spent on machine work, (WHICH CAN EASILY RUN "$1200 or more over the price of the OEM BLOCK" is down the toilet if the block cracks in some areas and a thicker casting ,made from a higher strength alloy is good insurance, and the DART block comes with much of the machine work already done[/color][/b]
http://www.summitracing.com/search/prod ... e%20Blocks
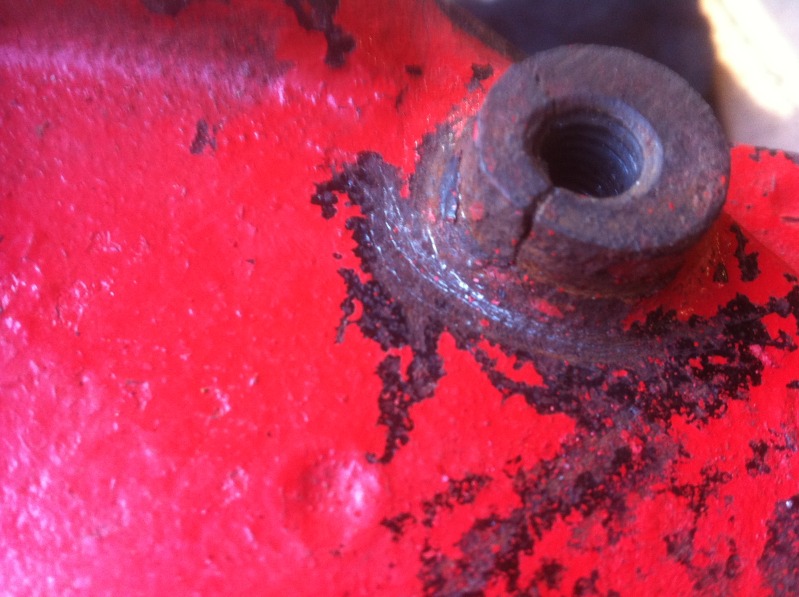
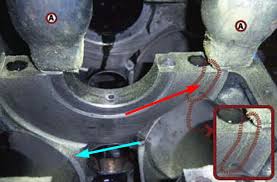
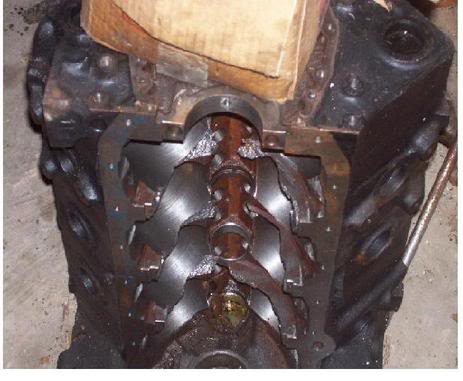
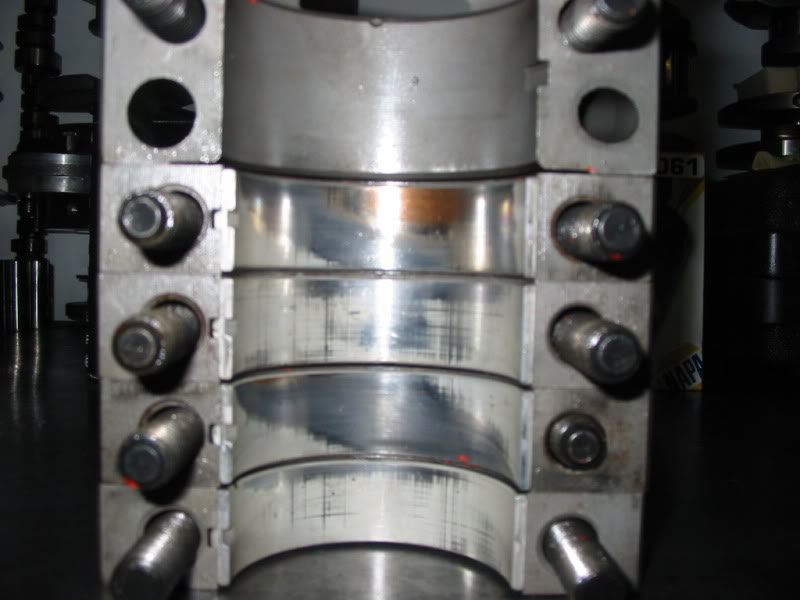
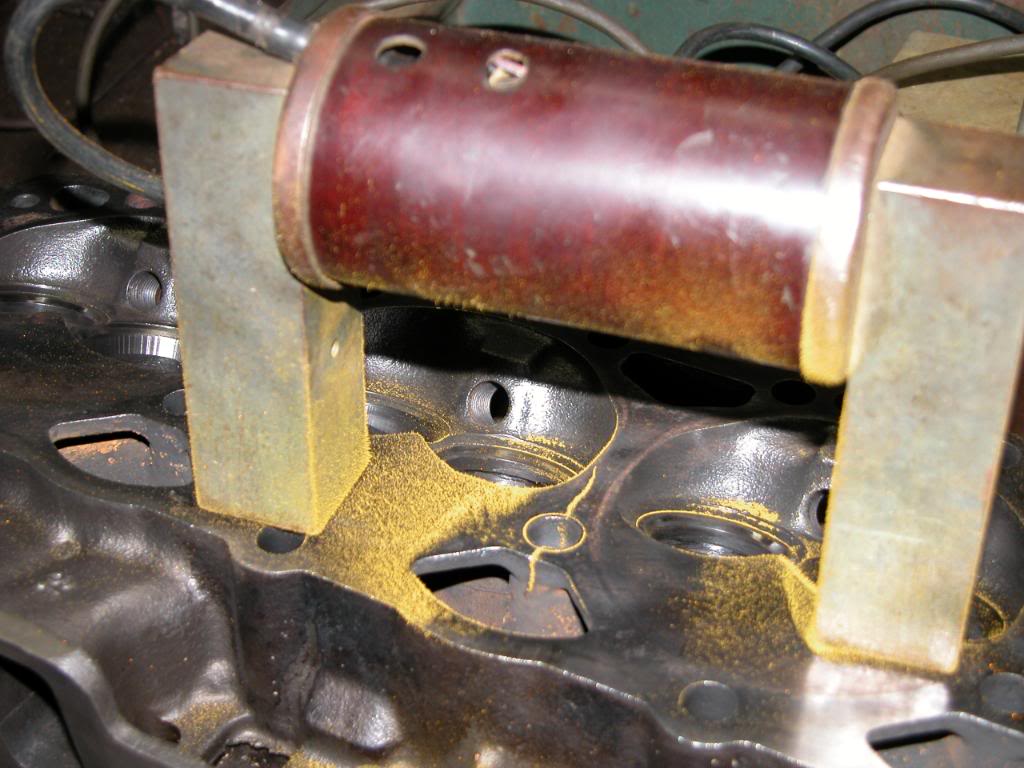
mag check for cracks in the block
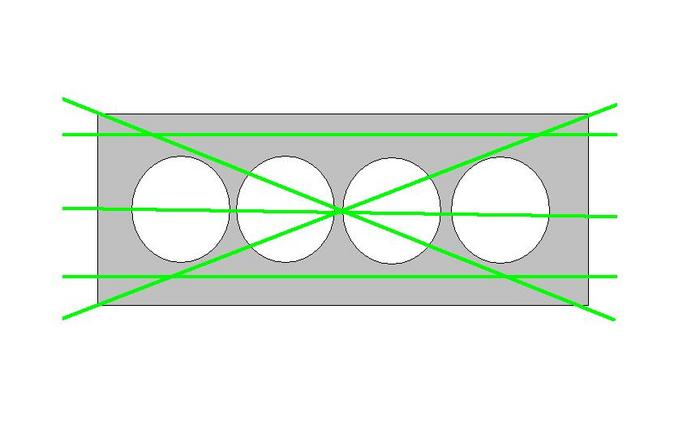
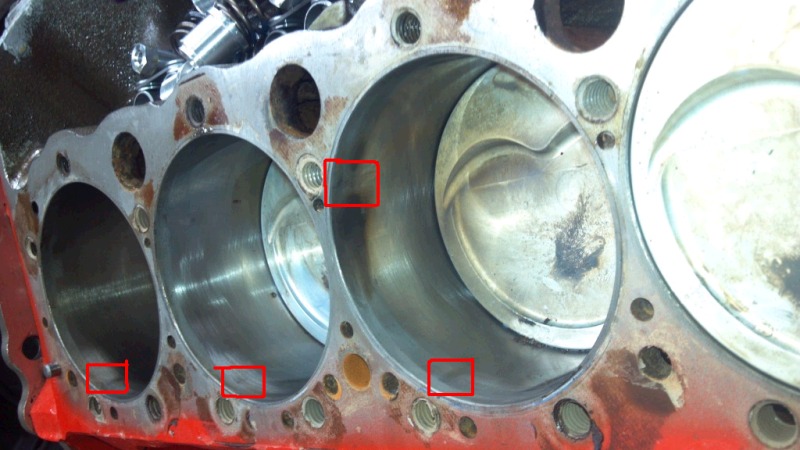
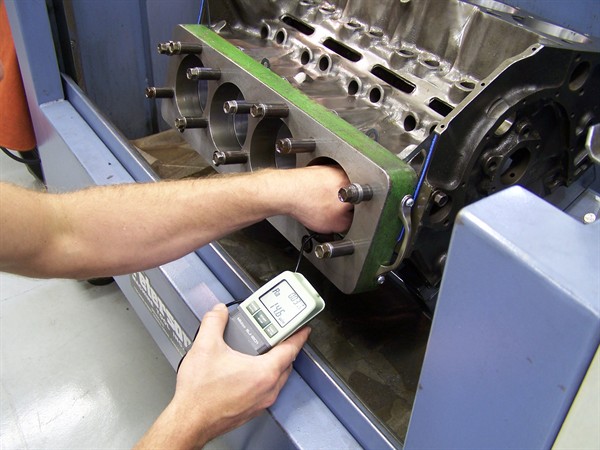
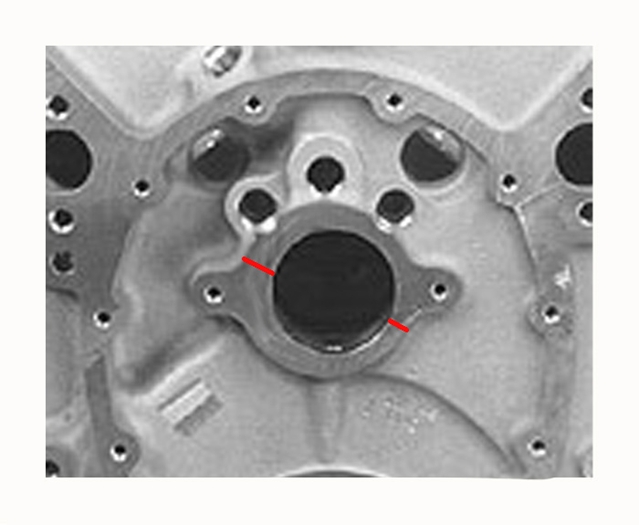
Core shift is a result of a block, cylinder head, or other engine casting shifting in its mold when the molten metal is poured in. When core shift occurs the cylinder bores, lifter bores, main bearing and cam tunnels shift from their blueprinted positions. If the shift is significant, mechanical problems can occur and some cylinder walls may be critically thin. This is especially of concern if the engine is to be used for racing applications.
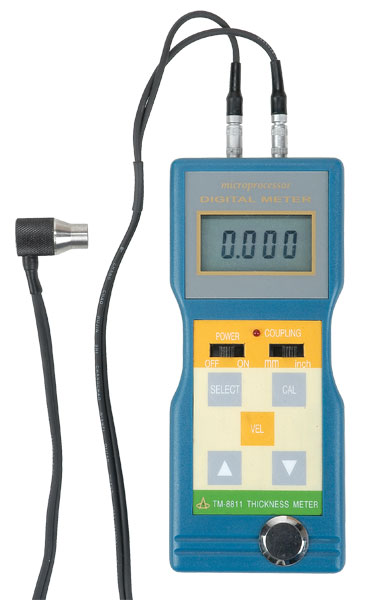
The only way to guarantee cylinder wall thickness is to have the block sonic-tested, but this can be difficult when you go to purchase a used engine.
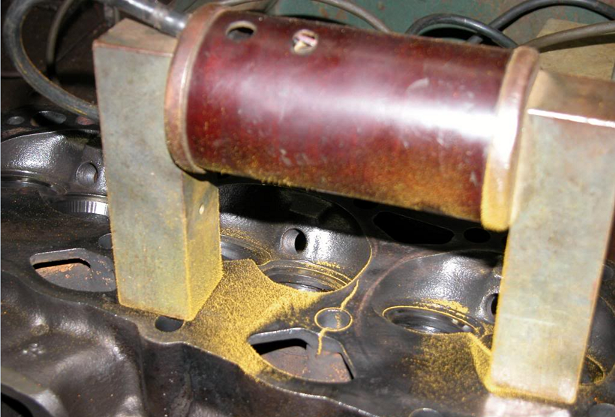
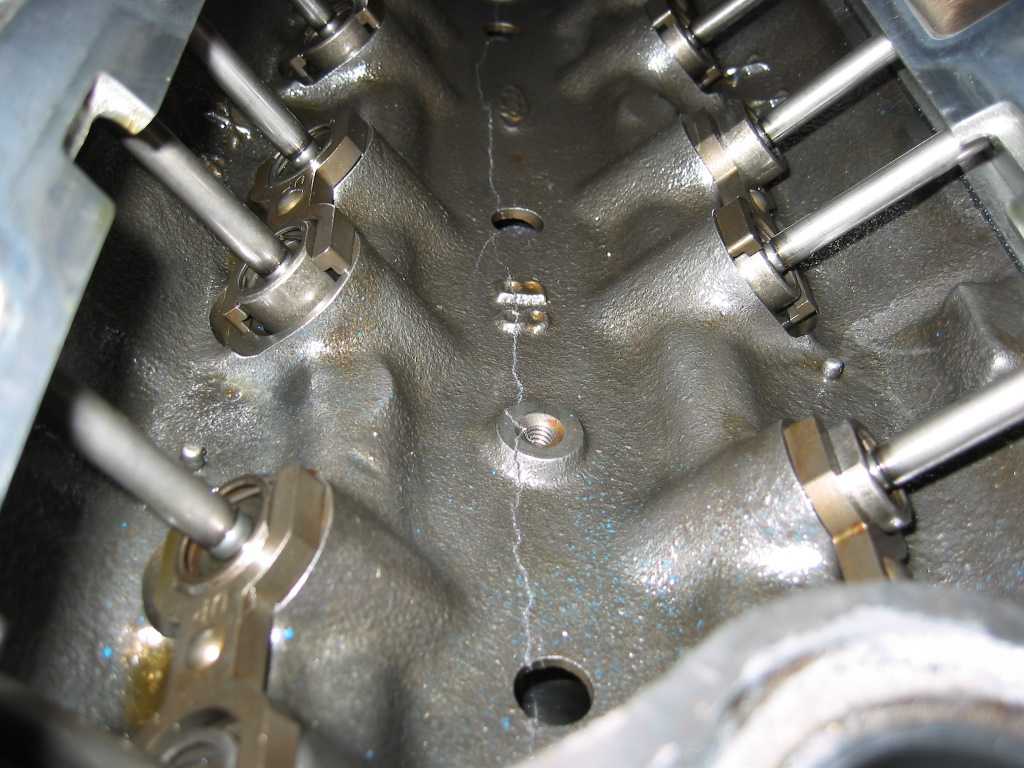
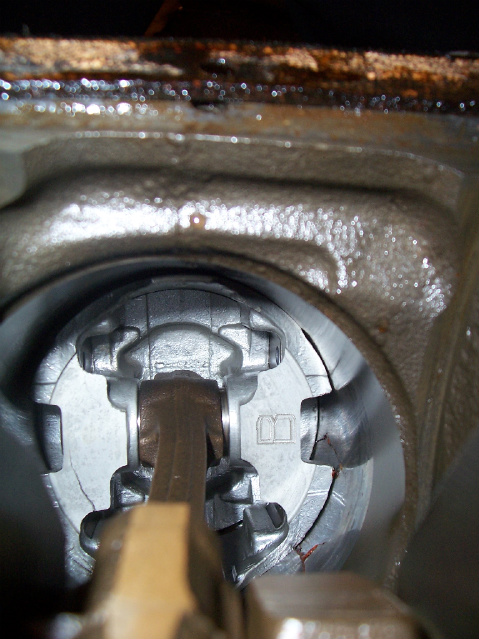
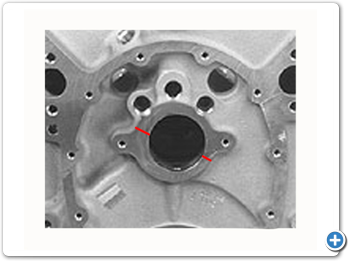 Core shift example
On engines with in-block cams, you can always take a look at the cam bearing bore. If it is noticeably offset in its machined boss, you should suspect core shift.
By Larry Carley
Larry Carley
THE LATEST IN CRACK DETECTION TECHNOLOGY
Crack detection has always been an essential step in the engine building process for identifying parts that have to be replaced or repaired. It’s a way to verify the condition of critical parts like cylinder heads, engine blocks, crankshafts, camshafts and connecting rods, and a smart way to make money, save money and save yourself and your customers a lot of unnecessary grief.
It doesn’t matter if you’re rebuilding a high mileage engine and reusing salvaged components or using brand new parts right out of the box – any highly stressed component or casting that has to withstand high loads, temperatures and/or pressures should always be inspected to make sure it is free from cracks or other defects that could cause it to leak or fail. Making sure parts are free from cracks will help assure maximum engine reliability and minimize your risk of warranty problems because of component failures or leaks.
With today’s high labor costs, you can’t afford to waste a lot of time machining and reconditioning cores and used parts that may be flawed. Though some cracks may not be a concern (depending on their location), others can cause serious problems. And even if a crack isn’t very big or isn’t leaking now, there’s no guarantee it will stay that way.
As a rule, cracks usually spread and only get worse as the miles accumulate. Heat, thermal stress, heavy loads, repeated bending and flexing, metal fatigue, pounding and vibration are all factors that contribute to the formation of cracks and make them grow. So if metal is pulling away from metal, it means an area is experiencing more stress than it can handle. That’s why cracks form in the first place.
If critical parts are not inspected for cracks, there’s no way to know if they will stand up to normal use and abuse. In the case of cylinder heads and blocks, you won’t know if the castings can hold pressure until the engine has been assembled – which means you may have wasted a lot of time and effort if a casting turns out to be a leaker.
Cracks and other flaws such as porosity leaks in castings need to be identified so a decision can be made as to whether repair or replacement is the best option. With hard-to-find and high value cores and parts, the decision may hinge on the extent of the damage. If the part can be repaired economically and with a high degree of success, then it’s probably worth fixing. But if it can’t, you’ll have to factor in the cost to replace it.
Additional payback comes from what you can charge your customers for crack inspection of their parts. Like cleaning, crack detection can be a profitable service in any shop when it is priced right. Some shops may charge $10 to inspect a crank while others will charge $50. Some shops may charge $25 to check a cylinder head while another charges $75. The price you charge should reflect the time invested in the job, the cost of your equipment and any consumable supplies that may be used. Don’t base your price on what the guy down the street charges.
Cracks Everywhere
Cracks are quite common in late model cylinder heads and are often found between valve seats, in exhaust ports, between the spark plug hole and valve seats, around valve guides, between combustion chambers, and even on top of the head.
Thinner castings and higher engine loads are contributing factors, but in many instances the underlying cause is engine overheating due to a cooling system failure (coolant leak, inoperative cooling fan, stuck thermostat, etc.), or a detonation problem (carbon buildup, inoperative EGR valve, too much ignition advance, etc.).
Some heads, such as the Ford 2.9L V6 and Escort 1.6L heads, are notorious for cracking. So, too, are Ford "HSC" (High Swirl Combustion) cast iron heads like those on the 2.3L and 2.5L OHC engines. Others include the General Motors 2.5L "Iron Duke" head, the GM 250 six-cylinder head with an integral exhaust manifold, and 1987 and later Chevy small block V8 "Vortex" heads.
When cracks form between the cooling jacket and combustion chamber, coolant will enter the combustion chamber. Steam is quite effective at decarbonizing the combustion chamber, but it also washes away the lubricant from the rings and cylinder wall, which accelerates wear. If coolant ends up in the crankcase through a crack in a cylinder wall, it can wipe out the bearings.
One "quick check" for coolant leaks in used cylinder heads and blocks is to simply note the appearance of the combustion chambers and pistons when the engine is torn down. If a combustion chamber or piston lacks the normal accumulation of carbon deposits, it probably has a coolant leak in the head or cylinder.
"Dry" cracks that do not leak coolant can also cause trouble. Cracks between or around valve seats in an aluminum head may allow the seats to come loose and fall out. Cracks around valve guides may lead to loosening of the valve guides, which can damage the valves.
Cracks in cranks, cams and connecting rods can lead to breakage of these parts, too. In such cases, you don’t have to look for the crack if the part has already failed. What you do have to look for are any underlying causes that may have contributed to the formation of the crack or caused the component to fail.
For example, most broken camshafts in an OHC cylinder head are not caused by flaws in the camshaft. They’re often caused by engine overheating. The head gets too hot, warps, seizes the cam and causes it to snap.
The same goes for broken crankshafts, except the list of possible causes is longer. Many factors can lead to a broken crank, including an incorrect radius when the crank journals were machined, a severe engine detonation problem, bent connecting rods, a loose main bearing cap, main bore misalignment, a bent crank, a severe engine imbalance or an imbalance in the vibration damper, flywheel, clutch or torque converter.
Though many cracks may be clearly seen once parts have been disassembled and cleaned, other cracks are nearly invisible or may only be seen under special conditions (such as porosity leaks in heads and blocks). Other cracks may be entirely hidden from view, such as those inside a casting.
Never assume a part or a casting is okay just because you can’t see any visible cracks. Always assume there may be cracks.
There are a variety of crack inspection techniques that can be used by themselves or in combination with other techniques to find cracks in castings and other components. These include magnetic particle inspection, various types of penetrating dyes, pressure testing, vacuum testing, ultrasonic (acoustic) testing and even x-rays. All except the last two are commonly used in the automotive industry.
Magnetic Particle Inspection
This technique can be used to find cracks in cast iron or steel alloys that are "ferromagnetic" and can be temporarily magnetized. The magnetic field is created by a permanent magnet, an electromagnet or by passing a part through a large magnetic coil. Tiny iron oxide particles are then sprayed or brushed on the part to reveal any cracks. If there are any cracks in the surface of the part, they will disrupt the magnetic field and act like a pole to attract the iron particles. It’s a quick and easy-to-use test that can be employed to screen cores, machined parts and new parts.
Though some people call this technique "magnafluxing," the term "Magnaflux" is actually a trademark of the Magnaflux Corporation and applies to its magnetic particle detection equipment and process. Even so, there are a number of other companies that make similar equipment for magnetic particle detection.
The iron particles used to detect cracks are finely divided in sizes varying between .125Ë and 60 microns, are easily magnetized but don’t stay that way for long (so they don’t stick together or to the metal being tested). The particles may be in a dry powder or a wet solution. Particles are dyed yellow, white, red, gray, black or with a fluorescent color to improve their visibility against the metal background. With the fluorescent particles, an ultraviolet black light is required to make the particles stand out.
Dry particles may be applied with a squeeze bulb or spray gun. Wet particles may be mixed with an oil- or water-based liquid or paste. The wet particle detection method is more sensitive than the dry method for finding very small cracks, but dry particles are better for finding cracks that may be just under the surface (subsurface flaws).
One of the limitations of this technique is that neither the wet nor dry method can find cracks that are more than about .100Ë to .250Ë below the surface of the metal. Magnetic particle inspection also won’t work on nonferrous metals such as aluminum, magnesium, titanium, nonmagnetic alloys of stainless steel or plastic.
Magnetic particle inspection is most often used to inspect cast iron cylinder heads for surface cracks in and around the combustion chambers, and for inspecting crankshafts, camshafts and connecting rods. But the technique can also be used to check gears, shafts, axles and steering and suspension components for cracks, too.
When checking for cracks, the stronger the magnetic field the more easily it will reveal cracks. For this reason, more powerful electromagnets or magnetic coils may be better than less expensive permanent magnets.
The direction of the magnetic field is also important. The lines of force must cross the crack at an angle to reveal its presence (45 degrees usually works best). If the magnetic field is parallel to a crack, there may not be enough distortion in the field to attract any particles. So if you don’t find a crack when holding the magnets or part one way, rotate or reposition the part or magnets 45 to 90 degrees if possible and repeat the test.
With nonfluorescent particles, you want plenty of light on the part to improve visibility. With fluorescent particles, you need to aim the black light so it illuminates the test area completely. Fluorescent particles are usually easier to see than the nonfluorescent ones. Either way, be careful to keep the light away from the magnets or magnetic coil because the powerful magnetic field may bend and break the filament inside the bulb.
Sometimes cracks can be obscured by casting lines or a rough surface finish on the component that’s being inspected. Parts should have no dirt, oil, grease or carbon on the surface. Parts can be chemically cleaned, spray washed or baked in an oven, but should not be shot blasted prior to inspection because blasting may peen shut small cracks that could reopen later.
Often, castings will show various surface flaws that are not really cracks but only minor surface scratches or imperfections. On these types of defects, you have to make a judgment call as to whether or not what you’re looking at is actually a crack – and if it is, if it is worth worrying about or not. A small hairline crack in a noncritical area of a cylinder head may not be a problem, but a hairline crack in a crankshaft journal or between a spark plug hole and valve seat in a combustion chamber could mean trouble.
Parts should be checked for cracks after they have been cleaned and before they are machined or used for assembly. A second check for cracks should also be made after certain kinds of reconditioning operations have been performed to make sure any original cracks have been eliminated and/or that no new cracks have appeared. This might include rechecking a cast iron head after pinning or welding an existing crack or installing a machined-in valve seat, checking a block after installing a cylinder sleeve, checking a crankshaft after it has been straightened, etc. It’s just added insurance to make sure there are no cracks that might cause problems down the road.
Once parts have been magnetized, they need to be demagnetized after testing. This can be done with bench equipment by passing the part back through the ring a second time. Other times, the field will weaken and dissipate after a little while. Even so, parts should be checked with a "field indicator" to make sure there is no residual magnetism. The last thing you want is a magnetized crankshaft that attracts wear particles to its journal surfaces! One "trick" machinists sometimes use to demagnetize a crankshaft is to "ring" the crank by tapping on the journals.
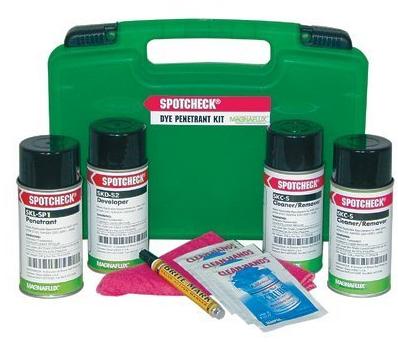
Penetrating Dyes
Another method for finding surface cracks and flaws is to use a penetrating dye. Though used mostly on aluminum parts, this technique also works equally well on cast iron, steel, composite materials and even plastic.
The theory behind this technique is that a very light oil will wick into a crack. It’s the same idea as using penetrating oil to loosen a fastener except that the oil contains a dye. If the oil finds its way into a crack, the dye should then make the crack visible. Some penetrating dyes use fluorescent dyes and a black light to make the cracks stand out while others use a chemical developer to make the dye more visible.
If you’re using a UV light and fluorescent dye, a shroud that blocks ambient light will make it easier to see the cracks. Cracks will glow green under the black light. With ordinary dyes, no special light is needed. Cracks usually stand out as a stark red line against the bright aluminum metal.
Multi-stage penetrating dyes typically use a three-step process to highlight cracks. The surface is first cleaned with a spray-on or wipe-on chemical cleaner. The part is allowed to dry, then the penetrant that contains the dye is sprayed or wiped on and allowed to stand for several minutes. The excess penetrant is then wiped or washed off, leaving behind any penetrant that has found its way into a crack. A developer is then applied to the surface, which lifts and separates the dye from the fissure to reveal and highlight the crack.
Penetrating dyes are an excellent tool for finding surface defects in aluminum cylinder heads and blocks, aluminum connecting rods and other aluminum castings such as intake manifolds and timing covers. It will even work on plastic intake manifolds. Cracks that are hidden in intake or exhaust ports or deeply recessed areas may be difficult to see, so for these kind of situations using a fluorescent dye with a small UV penlight light to illuminate the powder will make the job easier.
Pressure Testing
Like magnetic particle inspection, penetrating dyes only reveal surface cracks. Neither technique will reveal cracks that are below the surface or that are hidden inside a casting. Also, neither of these two techniques can tell you if a crack extends all the way through a casting to the water jacket inside, or if a crack will leak or won’t leak when the cooling system is under pressure. Only pressure testing can do that. Pressure testing is often used in conjunction with these other methods of crack detection to check the integrity of the cooling jackets in the cylinder head and block, and to see if visible cracks are really leakers or not.
A cylinder head or block is pressure tested by first sealing all the water outlets with plugs or cover plates. The casting is then pressurized with air to simulate water pressure inside the engine. The casting may then be submerged in a water tank or sprayed with soapy water to reveal any air leaks. If there are no bubbles, the part is assumed to hold pressure. If there are bubbles, you follow the bubbles to find the leak.
The main advantage of this technique is that it can find leaks other techniques can’t (such as porosity leaks in aluminum castings) — and it can verify the integrity of crack repairs that have been made in heads and blocks to make sure they hold water.
A typical wet (submersible) pressure testing system starts at about $7,000, while the dry systems will cost about $5,500. According to one equipment supplier which makes both types of systems, 99 out of 100 buyers go for the wet system because it’s easier and faster to find the leaks.
With pressure testing, it takes some time to seal up a head or block. You must have the proper equipment to plug or block off all the water outlets in the casting. If you’re only working on certain engines, a pressure tester with dedicated fixturing or plates may be all you need. But if you’re working on a wide range of engines, you’ll need a setup with universal fixturing or a wider assortment of plates and plugs.
One question many engine builders have with regard to pressure testing is how much air pressure should they use? Most experts say 30 to 40 psi is all that’s needed for an accurate test. If a casting is going to leak at all, it’s going to leak at 30 to 40 psi just as it would at a higher pressure. Using excessive air pressure is dangerous because it increases the risk of blowing out an expansion plug. Besides, most cooling systems never see the high side of 15 to 18 psi anyway.
Those who use submersible tanks sometimes have problems keeping the tank water clean after repeated use. Oil and scum from dirty parts can accumulate in the water, and algae may find a hospitable environment in the tank. Using a biocide can kill off the green stuff, and a filtration system can keep the water clean.
Vacuum Testing
Vacuum testing is the same basic idea as pressure testing, except in reverse. Instead of using air pressure to test the cooling jackets for leaks, vacuum is pulled on a cylinder head or block after the water outlets have been plugged. If the casting holds vacuum, there are no leaks. But if it doesn’t, you’ve found a leaker.
Unfortunately, this technique does not use water or dye to pinpoint the leak so you still have to use one of the other techniques to find the leak. It’s mostly a quick check for verifying the integrity of a casting.
Ultrasonic Testing
This is a technique that is more commonly used in industrial and aviation applications, but it can also be used to find internal flaws in castings and other parts. The technology uses sound waves to find cracks. A transponder generates an acoustic signal (up to 25 MHz) that passes into and through the part. Cracks or flaws will reflect some of the sound waves back to the detector, which allows the information to be displayed on the tester.
The advantages of this method of crack detection is that it can find hidden flaws that the other commonly used techniques can’t. As we said earlier, magnetic particle inspection and penetrating dye can only reveal surface defects, and pressure testing and vacuum testing can only reveal cracks and porosity leaks in cooling jackets. A crankshaft with an internal defect could easily pass a Magnaflux test, yet fail on a race track when the stresses of racing expanded the crack and caused the crank to snap, for example.
The best applications for ultrasonic testing include heavy castings, large shafts and expensive parts that may be used for racing or extreme-duty service. Ultrasonics can also be used to check the integrity of welds and welded castings.
Hand-held ultrasonic testers are available for $6,000 to $7,000, and some are available with special pen-like probes for finding cracks in hard-to-reach places.
I would darn sure have the part tested for cracks and flaws before considering use.
RELATED THREADS
 www.performanceracing.com
http://garage.grumpysperformance.com/index.php?threads/sleeving-a-block.1516/#post-3467
Looking For Leakers: Crack Detection Technology
SUMMIT SELLS G.M. BLOCKS you can use to build a 383 for $700 plus shipping , but ID suggest limiting power to about 500 hp with these
http://www.summitracing.com/parts/sum-150100
aftermarket blocks like dart have significantly thicker bore walls, main cap webs, decks, can be ordered with splayed and billet main caps
when you have a block magnetically or dye checked for cracks , and sonic tested for bore wall thickness, don,t forget to check lifter bores, and lifter gallery areas, and main cap webs etc. just because its not easy to access does not mean cracks can be ignored
viewtopic.php?f=51&t=3219
OR you can spend a bit more and get a far stronger and thicker casting for about $1550 from DART , keep in mind that all the money spent on machine work, (WHICH CAN EASILY RUN "$1200 or more over the price of the OEM BLOCK" is down the toilet if the block cracks in some areas and a thicker casting ,made from a higher strength alloy is good insurance, and the DART block comes with much of the machine work already done[/color][/b]
http://www.summitracing.com/search/prod ... e%20Blocks
mag check for cracks in the block
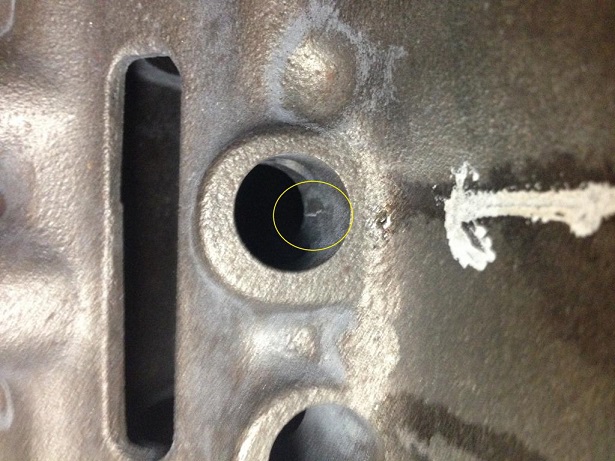
NOT A TA said:For those who never witnessed Magnafluxing this is how its done. Electromagnet is located so the area you want to test is located between the posts. Then some "magic dust" (in my best Cheech impersonation) is puffed ofer the area to be checked and the dust jumps right to the crack. Even if the crack is very small (like the one on my head) it will show right up. The crack in this pic was easily seen by the naked eye but it made for a nice easy pic to display the process. The lightweight head in the pic had been sleeved for the bolt hole previously so thats why theres a circle of magic dust around it. The dust knows it as a crack. This head will be pinned to repair the crack. If the opportunity arises to get pics of "pinning" sometime I'll get some.
Core shift is a result of a block, cylinder head, or other engine casting shifting in its mold when the molten metal is poured in. When core shift occurs the cylinder bores, lifter bores, main bearing and cam tunnels shift from their blueprinted positions. If the shift is significant, mechanical problems can occur and some cylinder walls may be critically thin. This is especially of concern if the engine is to be used for racing applications.
The only way to guarantee cylinder wall thickness is to have the block sonic-tested, but this can be difficult when you go to purchase a used engine.
 Core shift example
On engines with in-block cams, you can always take a look at the cam bearing bore. If it is noticeably offset in its machined boss, you should suspect core shift.
By Larry Carley
Larry Carley
THE LATEST IN CRACK DETECTION TECHNOLOGY
Crack detection has always been an essential step in the engine building process for identifying parts that have to be replaced or repaired. It’s a way to verify the condition of critical parts like cylinder heads, engine blocks, crankshafts, camshafts and connecting rods, and a smart way to make money, save money and save yourself and your customers a lot of unnecessary grief.
It doesn’t matter if you’re rebuilding a high mileage engine and reusing salvaged components or using brand new parts right out of the box – any highly stressed component or casting that has to withstand high loads, temperatures and/or pressures should always be inspected to make sure it is free from cracks or other defects that could cause it to leak or fail. Making sure parts are free from cracks will help assure maximum engine reliability and minimize your risk of warranty problems because of component failures or leaks.
With today’s high labor costs, you can’t afford to waste a lot of time machining and reconditioning cores and used parts that may be flawed. Though some cracks may not be a concern (depending on their location), others can cause serious problems. And even if a crack isn’t very big or isn’t leaking now, there’s no guarantee it will stay that way.
As a rule, cracks usually spread and only get worse as the miles accumulate. Heat, thermal stress, heavy loads, repeated bending and flexing, metal fatigue, pounding and vibration are all factors that contribute to the formation of cracks and make them grow. So if metal is pulling away from metal, it means an area is experiencing more stress than it can handle. That’s why cracks form in the first place.
If critical parts are not inspected for cracks, there’s no way to know if they will stand up to normal use and abuse. In the case of cylinder heads and blocks, you won’t know if the castings can hold pressure until the engine has been assembled – which means you may have wasted a lot of time and effort if a casting turns out to be a leaker.
Cracks and other flaws such as porosity leaks in castings need to be identified so a decision can be made as to whether repair or replacement is the best option. With hard-to-find and high value cores and parts, the decision may hinge on the extent of the damage. If the part can be repaired economically and with a high degree of success, then it’s probably worth fixing. But if it can’t, you’ll have to factor in the cost to replace it.
Additional payback comes from what you can charge your customers for crack inspection of their parts. Like cleaning, crack detection can be a profitable service in any shop when it is priced right. Some shops may charge $10 to inspect a crank while others will charge $50. Some shops may charge $25 to check a cylinder head while another charges $75. The price you charge should reflect the time invested in the job, the cost of your equipment and any consumable supplies that may be used. Don’t base your price on what the guy down the street charges.
Cracks Everywhere
Cracks are quite common in late model cylinder heads and are often found between valve seats, in exhaust ports, between the spark plug hole and valve seats, around valve guides, between combustion chambers, and even on top of the head.
Thinner castings and higher engine loads are contributing factors, but in many instances the underlying cause is engine overheating due to a cooling system failure (coolant leak, inoperative cooling fan, stuck thermostat, etc.), or a detonation problem (carbon buildup, inoperative EGR valve, too much ignition advance, etc.).
Some heads, such as the Ford 2.9L V6 and Escort 1.6L heads, are notorious for cracking. So, too, are Ford "HSC" (High Swirl Combustion) cast iron heads like those on the 2.3L and 2.5L OHC engines. Others include the General Motors 2.5L "Iron Duke" head, the GM 250 six-cylinder head with an integral exhaust manifold, and 1987 and later Chevy small block V8 "Vortex" heads.
When cracks form between the cooling jacket and combustion chamber, coolant will enter the combustion chamber. Steam is quite effective at decarbonizing the combustion chamber, but it also washes away the lubricant from the rings and cylinder wall, which accelerates wear. If coolant ends up in the crankcase through a crack in a cylinder wall, it can wipe out the bearings.
One "quick check" for coolant leaks in used cylinder heads and blocks is to simply note the appearance of the combustion chambers and pistons when the engine is torn down. If a combustion chamber or piston lacks the normal accumulation of carbon deposits, it probably has a coolant leak in the head or cylinder.
"Dry" cracks that do not leak coolant can also cause trouble. Cracks between or around valve seats in an aluminum head may allow the seats to come loose and fall out. Cracks around valve guides may lead to loosening of the valve guides, which can damage the valves.
Cracks in cranks, cams and connecting rods can lead to breakage of these parts, too. In such cases, you don’t have to look for the crack if the part has already failed. What you do have to look for are any underlying causes that may have contributed to the formation of the crack or caused the component to fail.
For example, most broken camshafts in an OHC cylinder head are not caused by flaws in the camshaft. They’re often caused by engine overheating. The head gets too hot, warps, seizes the cam and causes it to snap.
The same goes for broken crankshafts, except the list of possible causes is longer. Many factors can lead to a broken crank, including an incorrect radius when the crank journals were machined, a severe engine detonation problem, bent connecting rods, a loose main bearing cap, main bore misalignment, a bent crank, a severe engine imbalance or an imbalance in the vibration damper, flywheel, clutch or torque converter.
Though many cracks may be clearly seen once parts have been disassembled and cleaned, other cracks are nearly invisible or may only be seen under special conditions (such as porosity leaks in heads and blocks). Other cracks may be entirely hidden from view, such as those inside a casting.
Never assume a part or a casting is okay just because you can’t see any visible cracks. Always assume there may be cracks.
There are a variety of crack inspection techniques that can be used by themselves or in combination with other techniques to find cracks in castings and other components. These include magnetic particle inspection, various types of penetrating dyes, pressure testing, vacuum testing, ultrasonic (acoustic) testing and even x-rays. All except the last two are commonly used in the automotive industry.
Magnetic Particle Inspection
This technique can be used to find cracks in cast iron or steel alloys that are "ferromagnetic" and can be temporarily magnetized. The magnetic field is created by a permanent magnet, an electromagnet or by passing a part through a large magnetic coil. Tiny iron oxide particles are then sprayed or brushed on the part to reveal any cracks. If there are any cracks in the surface of the part, they will disrupt the magnetic field and act like a pole to attract the iron particles. It’s a quick and easy-to-use test that can be employed to screen cores, machined parts and new parts.
Though some people call this technique "magnafluxing," the term "Magnaflux" is actually a trademark of the Magnaflux Corporation and applies to its magnetic particle detection equipment and process. Even so, there are a number of other companies that make similar equipment for magnetic particle detection.
The iron particles used to detect cracks are finely divided in sizes varying between .125Ë and 60 microns, are easily magnetized but don’t stay that way for long (so they don’t stick together or to the metal being tested). The particles may be in a dry powder or a wet solution. Particles are dyed yellow, white, red, gray, black or with a fluorescent color to improve their visibility against the metal background. With the fluorescent particles, an ultraviolet black light is required to make the particles stand out.
Dry particles may be applied with a squeeze bulb or spray gun. Wet particles may be mixed with an oil- or water-based liquid or paste. The wet particle detection method is more sensitive than the dry method for finding very small cracks, but dry particles are better for finding cracks that may be just under the surface (subsurface flaws).
One of the limitations of this technique is that neither the wet nor dry method can find cracks that are more than about .100Ë to .250Ë below the surface of the metal. Magnetic particle inspection also won’t work on nonferrous metals such as aluminum, magnesium, titanium, nonmagnetic alloys of stainless steel or plastic.
Magnetic particle inspection is most often used to inspect cast iron cylinder heads for surface cracks in and around the combustion chambers, and for inspecting crankshafts, camshafts and connecting rods. But the technique can also be used to check gears, shafts, axles and steering and suspension components for cracks, too.
When checking for cracks, the stronger the magnetic field the more easily it will reveal cracks. For this reason, more powerful electromagnets or magnetic coils may be better than less expensive permanent magnets.
The direction of the magnetic field is also important. The lines of force must cross the crack at an angle to reveal its presence (45 degrees usually works best). If the magnetic field is parallel to a crack, there may not be enough distortion in the field to attract any particles. So if you don’t find a crack when holding the magnets or part one way, rotate or reposition the part or magnets 45 to 90 degrees if possible and repeat the test.
With nonfluorescent particles, you want plenty of light on the part to improve visibility. With fluorescent particles, you need to aim the black light so it illuminates the test area completely. Fluorescent particles are usually easier to see than the nonfluorescent ones. Either way, be careful to keep the light away from the magnets or magnetic coil because the powerful magnetic field may bend and break the filament inside the bulb.
Sometimes cracks can be obscured by casting lines or a rough surface finish on the component that’s being inspected. Parts should have no dirt, oil, grease or carbon on the surface. Parts can be chemically cleaned, spray washed or baked in an oven, but should not be shot blasted prior to inspection because blasting may peen shut small cracks that could reopen later.
Often, castings will show various surface flaws that are not really cracks but only minor surface scratches or imperfections. On these types of defects, you have to make a judgment call as to whether or not what you’re looking at is actually a crack – and if it is, if it is worth worrying about or not. A small hairline crack in a noncritical area of a cylinder head may not be a problem, but a hairline crack in a crankshaft journal or between a spark plug hole and valve seat in a combustion chamber could mean trouble.
Parts should be checked for cracks after they have been cleaned and before they are machined or used for assembly. A second check for cracks should also be made after certain kinds of reconditioning operations have been performed to make sure any original cracks have been eliminated and/or that no new cracks have appeared. This might include rechecking a cast iron head after pinning or welding an existing crack or installing a machined-in valve seat, checking a block after installing a cylinder sleeve, checking a crankshaft after it has been straightened, etc. It’s just added insurance to make sure there are no cracks that might cause problems down the road.
Once parts have been magnetized, they need to be demagnetized after testing. This can be done with bench equipment by passing the part back through the ring a second time. Other times, the field will weaken and dissipate after a little while. Even so, parts should be checked with a "field indicator" to make sure there is no residual magnetism. The last thing you want is a magnetized crankshaft that attracts wear particles to its journal surfaces! One "trick" machinists sometimes use to demagnetize a crankshaft is to "ring" the crank by tapping on the journals.
Penetrating Dyes
Another method for finding surface cracks and flaws is to use a penetrating dye. Though used mostly on aluminum parts, this technique also works equally well on cast iron, steel, composite materials and even plastic.
The theory behind this technique is that a very light oil will wick into a crack. It’s the same idea as using penetrating oil to loosen a fastener except that the oil contains a dye. If the oil finds its way into a crack, the dye should then make the crack visible. Some penetrating dyes use fluorescent dyes and a black light to make the cracks stand out while others use a chemical developer to make the dye more visible.
If you’re using a UV light and fluorescent dye, a shroud that blocks ambient light will make it easier to see the cracks. Cracks will glow green under the black light. With ordinary dyes, no special light is needed. Cracks usually stand out as a stark red line against the bright aluminum metal.
Multi-stage penetrating dyes typically use a three-step process to highlight cracks. The surface is first cleaned with a spray-on or wipe-on chemical cleaner. The part is allowed to dry, then the penetrant that contains the dye is sprayed or wiped on and allowed to stand for several minutes. The excess penetrant is then wiped or washed off, leaving behind any penetrant that has found its way into a crack. A developer is then applied to the surface, which lifts and separates the dye from the fissure to reveal and highlight the crack.
Penetrating dyes are an excellent tool for finding surface defects in aluminum cylinder heads and blocks, aluminum connecting rods and other aluminum castings such as intake manifolds and timing covers. It will even work on plastic intake manifolds. Cracks that are hidden in intake or exhaust ports or deeply recessed areas may be difficult to see, so for these kind of situations using a fluorescent dye with a small UV penlight light to illuminate the powder will make the job easier.
Pressure Testing
Like magnetic particle inspection, penetrating dyes only reveal surface cracks. Neither technique will reveal cracks that are below the surface or that are hidden inside a casting. Also, neither of these two techniques can tell you if a crack extends all the way through a casting to the water jacket inside, or if a crack will leak or won’t leak when the cooling system is under pressure. Only pressure testing can do that. Pressure testing is often used in conjunction with these other methods of crack detection to check the integrity of the cooling jackets in the cylinder head and block, and to see if visible cracks are really leakers or not.
A cylinder head or block is pressure tested by first sealing all the water outlets with plugs or cover plates. The casting is then pressurized with air to simulate water pressure inside the engine. The casting may then be submerged in a water tank or sprayed with soapy water to reveal any air leaks. If there are no bubbles, the part is assumed to hold pressure. If there are bubbles, you follow the bubbles to find the leak.
The main advantage of this technique is that it can find leaks other techniques can’t (such as porosity leaks in aluminum castings) — and it can verify the integrity of crack repairs that have been made in heads and blocks to make sure they hold water.
A typical wet (submersible) pressure testing system starts at about $7,000, while the dry systems will cost about $5,500. According to one equipment supplier which makes both types of systems, 99 out of 100 buyers go for the wet system because it’s easier and faster to find the leaks.
With pressure testing, it takes some time to seal up a head or block. You must have the proper equipment to plug or block off all the water outlets in the casting. If you’re only working on certain engines, a pressure tester with dedicated fixturing or plates may be all you need. But if you’re working on a wide range of engines, you’ll need a setup with universal fixturing or a wider assortment of plates and plugs.
One question many engine builders have with regard to pressure testing is how much air pressure should they use? Most experts say 30 to 40 psi is all that’s needed for an accurate test. If a casting is going to leak at all, it’s going to leak at 30 to 40 psi just as it would at a higher pressure. Using excessive air pressure is dangerous because it increases the risk of blowing out an expansion plug. Besides, most cooling systems never see the high side of 15 to 18 psi anyway.
Those who use submersible tanks sometimes have problems keeping the tank water clean after repeated use. Oil and scum from dirty parts can accumulate in the water, and algae may find a hospitable environment in the tank. Using a biocide can kill off the green stuff, and a filtration system can keep the water clean.
Vacuum Testing
Vacuum testing is the same basic idea as pressure testing, except in reverse. Instead of using air pressure to test the cooling jackets for leaks, vacuum is pulled on a cylinder head or block after the water outlets have been plugged. If the casting holds vacuum, there are no leaks. But if it doesn’t, you’ve found a leaker.
Unfortunately, this technique does not use water or dye to pinpoint the leak so you still have to use one of the other techniques to find the leak. It’s mostly a quick check for verifying the integrity of a casting.
Ultrasonic Testing
This is a technique that is more commonly used in industrial and aviation applications, but it can also be used to find internal flaws in castings and other parts. The technology uses sound waves to find cracks. A transponder generates an acoustic signal (up to 25 MHz) that passes into and through the part. Cracks or flaws will reflect some of the sound waves back to the detector, which allows the information to be displayed on the tester.
The advantages of this method of crack detection is that it can find hidden flaws that the other commonly used techniques can’t. As we said earlier, magnetic particle inspection and penetrating dye can only reveal surface defects, and pressure testing and vacuum testing can only reveal cracks and porosity leaks in cooling jackets. A crankshaft with an internal defect could easily pass a Magnaflux test, yet fail on a race track when the stresses of racing expanded the crack and caused the crank to snap, for example.
The best applications for ultrasonic testing include heavy castings, large shafts and expensive parts that may be used for racing or extreme-duty service. Ultrasonics can also be used to check the integrity of welds and welded castings.
Hand-held ultrasonic testers are available for $6,000 to $7,000, and some are available with special pen-like probes for finding cracks in hard-to-reach places.
I would darn sure have the part tested for cracks and flaws before considering use.
RELATED THREADS
Make The Case: Iron vs. Aluminum Engine Blocks
For many racers, choosing which engine block material to invest in often comes down to two factors: cost and strength. But as our two advocates in this month’s column explain, the science behind how these materials behave under the stresses of a motorsports environment—along with steady advances...
http://garage.grumpysperformance.com/index.php?threads/sleeving-a-block.1516/#post-3467
Last edited by a moderator: