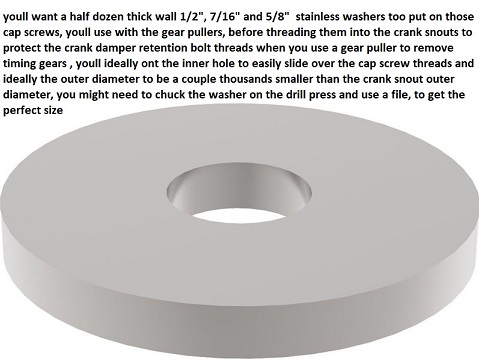
a common problem I see is crank threads that get stripped when the damper is being re-installed, by guys that think the damper can be easily drawn back onto the crank with the retainer bolt.(its too short,, there's not enough threads engaged, and the damper exerts too much resistance too do that successfully in many cases)
yes Ive seen it done a few times successfully...Ive also seen alot of cranks with stripped threads in the snout due to the practice!
having gone thru this several times , Ill point out a few things,
http://www.atiracing.com/products/dampe ... ctions.htm
(1)
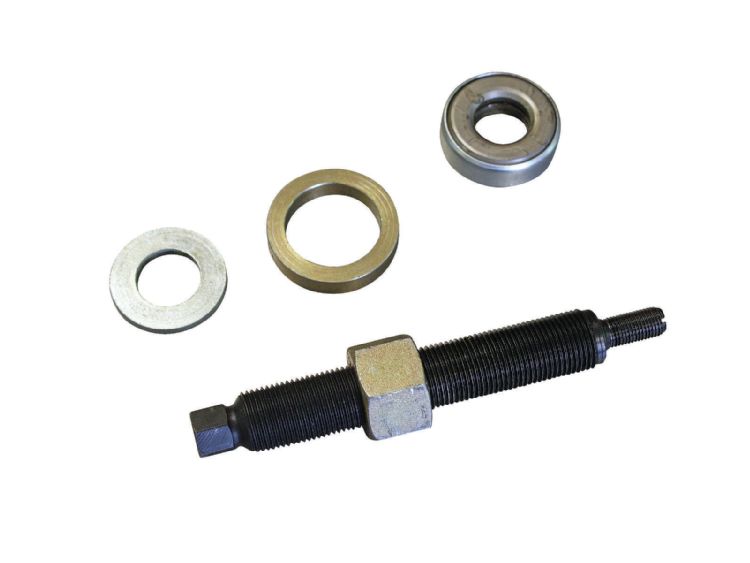
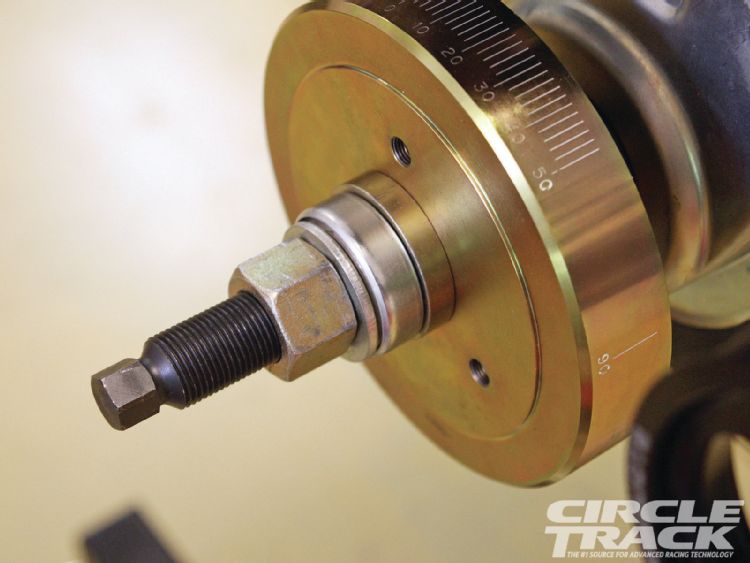
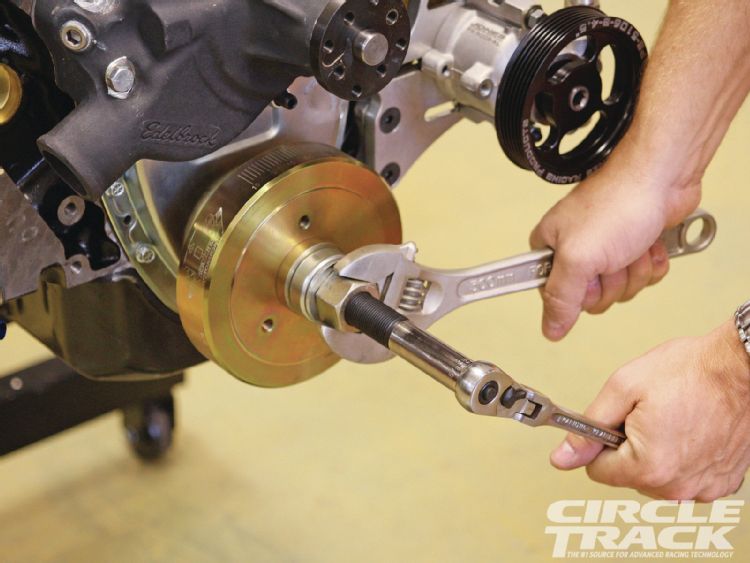
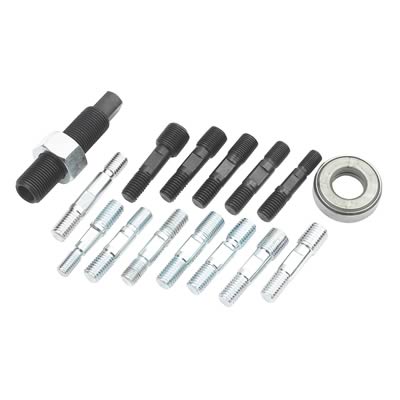
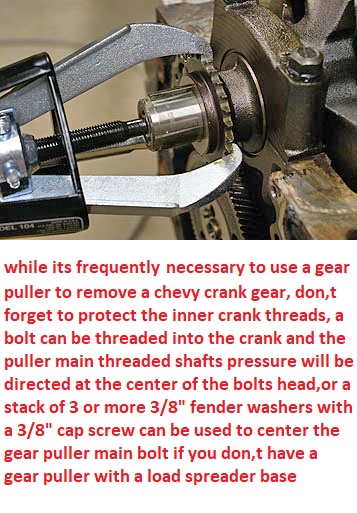
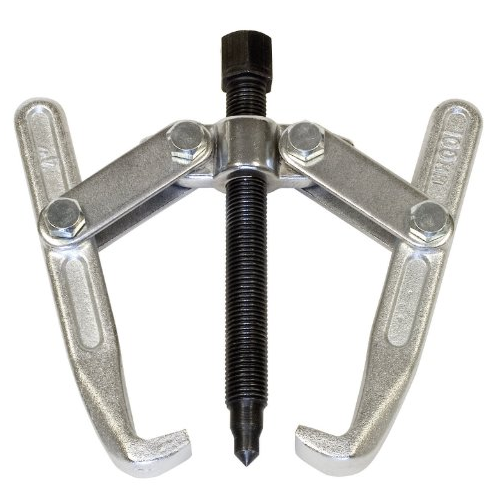
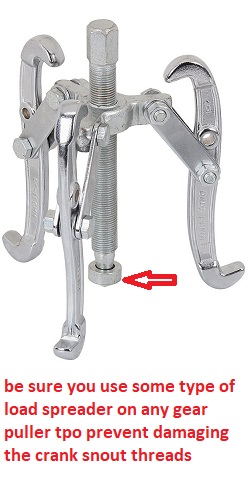
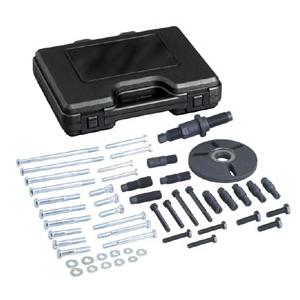
the stripped threads are frequently caused by trying to pull the damper in place using the bolt, (bad idea) you NEED to use the correct tool
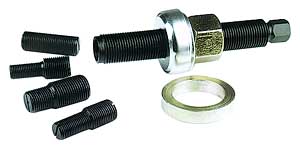

look at the picture carefully
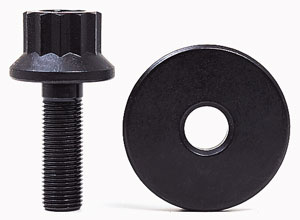
the small 7/16 thread ,on the tool threads into the crank, the damper slips over the tool, the large washer style bearing slips over the tool followed by the solid washer followed by the large nut that threads on the tool, the back of the tool is normally a 9/16 or 5/8 hex this is held with a box end wrench to keep the engine from turning, the large nut is usually a 1 1/8" nut and it is tightened with an open end 1 1/8" wrench or a adjustable wrench against the two washers drawing the damper onto the crank snout! lube the threads on the tool, the inside of the damper and crank snout with oil before starting. the damper will normally slide on about 1/4 of the way bye hand then the tool is needed to draw the damper on the last 3/4 of the distance, don,t over tighten the tool the 7/16" thread will snap off in the crank after the damper bottoms out on the lower timing gear if you do!,
NEVER USE A HAMMER AND BLOCK OF WOOD TO DRIVE THE DAMPER ON, YES THOUSANDS OF GUYS THINK THEY DID IT WITHOUT ANY PROBLEMS BUT...
IT WILL DAMAGE THE THRUST BEARING CLEARANCES,
IT CAN BREAK THE ELASTOMER TORSION RING ON STOCK DAMPERS
IT CAN CAUSE THE INERTIAL RING ON FLUIDAMPER TO BECOME JAMMED INTERNALLY
IT CAN CAUSE THE DAMPER TO FAIL.
IF THE DAMPER FAILS THE CRANK WILL EVENTUALLY BE DAMMAGED
IT GREATLY STRESSES THE CRANK SHAFT
IT CAN DAMAGE THE CRANKS TRANSMISSION PILOT BEARING
IT CAN DAMAGE THE TRANSMISSION
ALMOST EVERY TYPE OF DAMAGE IS NOT SOMETHING THAT SHOWS UP RIGHT AWAY, BUT IT WILL DAMAGE THE PARTS LISTED AND THERE'S THOUSANDS OF GUYS THAT ARE WONDERING WHY THOSE PARTS FAILED 6-24 Months LATER WITH NO CLUE AS TO THE CAUSE!
[ASK YOURSELF THIS QUESTION, IF CRANKSHAFTS THAT ARE A FEW THOUSANDS OUT OF LINE I.E. NOT PERFECTLY STRAIT ARE BENT/ STRAIT WITH A LEAD HAMMER BY CRANK MANUFACTURES (and yes that's how its done) AND CRANKS THAT ARE DROPPED ON A CONCRETE Floor SOMETIMES BEND SLIGHTLY ,(happens all the time) WHAT MAKES YOU THINK THAT BEATING ON THEM WITH A HAMMER AND A BLOCK OF WOOD WONT DAMAGE THEM? AND WHILE WERE AT IT WHAT WOULD YOU DO TO SOME GUY YOU CAUGHT BEATING ON YOUR ENGINE BLOCK WITH A HAMMER? WELL WHAT DO YOU THINK THE CRANKS DOING TO YOUR MAIN CAPS WHEN YOU BEAT ON THE CRANK? PROPERLY USED THAT INSTALLATION TOOL CAN EXERT OVER 15 TONS OF PRESSURE TO SLIDE THE DAMPER ON, IF IT WONT SLIDE ON, THERE'S A PROBLEM! FIND IT AND FIX IT .....DON,T BEAT ON THE DAMPER/CRANK
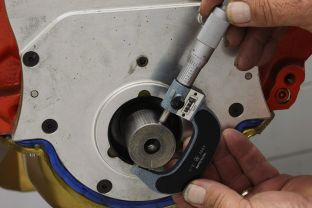
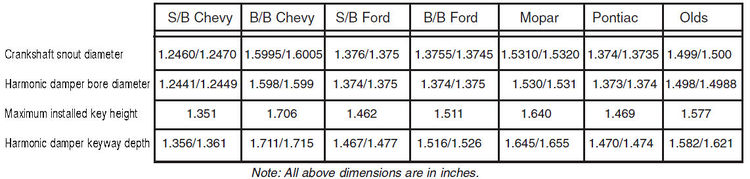
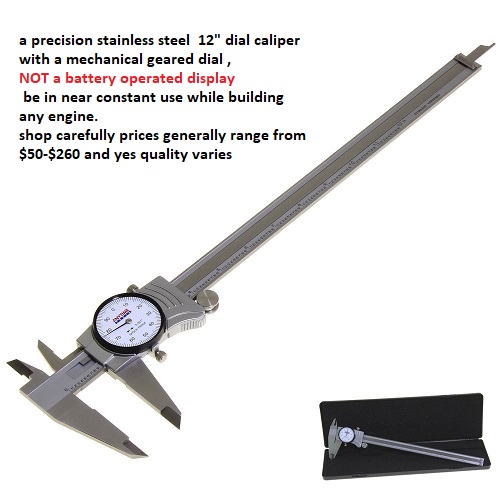
if your having a good deal of a problem, getting a damper to slide onto the crank snout with the correct tool and an oiled crank, you might have the wrong damper so check carefully ,, the next step one is to CAREFULLY measure both the crank snout diam. and damper hub inner diam.in some cases packing the crank in a bag of dry ice and heating the damper in boiling water changes the interference, enough that the crank slides into the damper far easier, and you won,t be the first guy that needs to have a machine shop hone out a damper to allow it to fit
the crank snout should be only about .0005-.001 larger than the hole in the damper
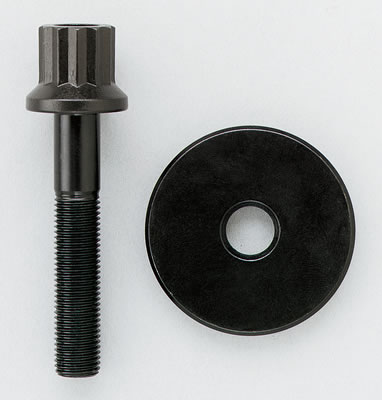
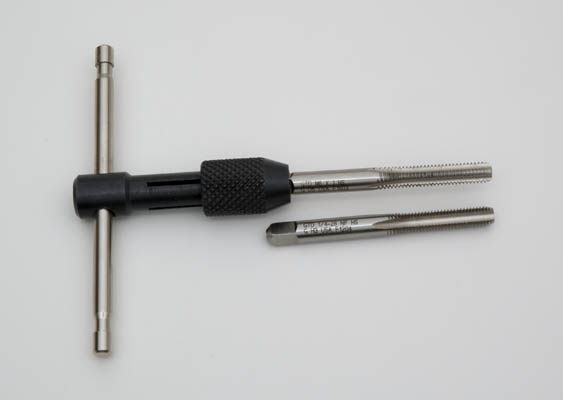
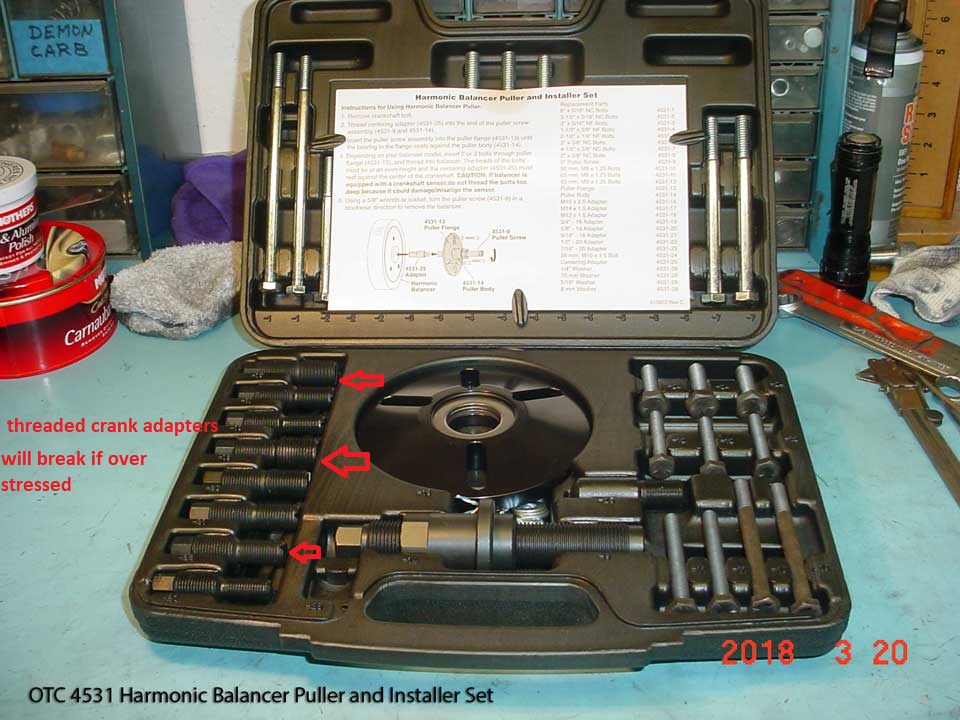
(2) yes if you screw it up you can easily RE-DRILL and RE-THREAD the crank from the 7/16"NF used on the sbc to the 1/2" NF thread used on big block cranks and use a bbc bolt
or if you screw that up there's larger sizes but doing the install correctly avoids the problem
READ THIS THREAD BEFORE TAPING A STRIPPED CRANK
viewtopic.php?f=50&t=902&p=1463&hilit=+puller#p1463
viewtopic.php?f=53&t=1798
yes Ive seen it done a few times successfully...Ive also seen alot of cranks with stripped threads in the snout due to the practice!
having gone thru this several times , Ill point out a few things,
http://www.atiracing.com/products/dampe ... ctions.htm
(1)
the stripped threads are frequently caused by trying to pull the damper in place using the bolt, (bad idea) you NEED to use the correct tool
look at the picture carefully
the small 7/16 thread ,on the tool threads into the crank, the damper slips over the tool, the large washer style bearing slips over the tool followed by the solid washer followed by the large nut that threads on the tool, the back of the tool is normally a 9/16 or 5/8 hex this is held with a box end wrench to keep the engine from turning, the large nut is usually a 1 1/8" nut and it is tightened with an open end 1 1/8" wrench or a adjustable wrench against the two washers drawing the damper onto the crank snout! lube the threads on the tool, the inside of the damper and crank snout with oil before starting. the damper will normally slide on about 1/4 of the way bye hand then the tool is needed to draw the damper on the last 3/4 of the distance, don,t over tighten the tool the 7/16" thread will snap off in the crank after the damper bottoms out on the lower timing gear if you do!,
NEVER USE A HAMMER AND BLOCK OF WOOD TO DRIVE THE DAMPER ON, YES THOUSANDS OF GUYS THINK THEY DID IT WITHOUT ANY PROBLEMS BUT...
IT WILL DAMAGE THE THRUST BEARING CLEARANCES,
IT CAN BREAK THE ELASTOMER TORSION RING ON STOCK DAMPERS
IT CAN CAUSE THE INERTIAL RING ON FLUIDAMPER TO BECOME JAMMED INTERNALLY
IT CAN CAUSE THE DAMPER TO FAIL.
IF THE DAMPER FAILS THE CRANK WILL EVENTUALLY BE DAMMAGED
IT GREATLY STRESSES THE CRANK SHAFT
IT CAN DAMAGE THE CRANKS TRANSMISSION PILOT BEARING
IT CAN DAMAGE THE TRANSMISSION
ALMOST EVERY TYPE OF DAMAGE IS NOT SOMETHING THAT SHOWS UP RIGHT AWAY, BUT IT WILL DAMAGE THE PARTS LISTED AND THERE'S THOUSANDS OF GUYS THAT ARE WONDERING WHY THOSE PARTS FAILED 6-24 Months LATER WITH NO CLUE AS TO THE CAUSE!
[ASK YOURSELF THIS QUESTION, IF CRANKSHAFTS THAT ARE A FEW THOUSANDS OUT OF LINE I.E. NOT PERFECTLY STRAIT ARE BENT/ STRAIT WITH A LEAD HAMMER BY CRANK MANUFACTURES (and yes that's how its done) AND CRANKS THAT ARE DROPPED ON A CONCRETE Floor SOMETIMES BEND SLIGHTLY ,(happens all the time) WHAT MAKES YOU THINK THAT BEATING ON THEM WITH A HAMMER AND A BLOCK OF WOOD WONT DAMAGE THEM? AND WHILE WERE AT IT WHAT WOULD YOU DO TO SOME GUY YOU CAUGHT BEATING ON YOUR ENGINE BLOCK WITH A HAMMER? WELL WHAT DO YOU THINK THE CRANKS DOING TO YOUR MAIN CAPS WHEN YOU BEAT ON THE CRANK? PROPERLY USED THAT INSTALLATION TOOL CAN EXERT OVER 15 TONS OF PRESSURE TO SLIDE THE DAMPER ON, IF IT WONT SLIDE ON, THERE'S A PROBLEM! FIND IT AND FIX IT .....DON,T BEAT ON THE DAMPER/CRANK
if your having a good deal of a problem, getting a damper to slide onto the crank snout with the correct tool and an oiled crank, you might have the wrong damper so check carefully ,, the next step one is to CAREFULLY measure both the crank snout diam. and damper hub inner diam.in some cases packing the crank in a bag of dry ice and heating the damper in boiling water changes the interference, enough that the crank slides into the damper far easier, and you won,t be the first guy that needs to have a machine shop hone out a damper to allow it to fit
the crank snout should be only about .0005-.001 larger than the hole in the damper
(2) yes if you screw it up you can easily RE-DRILL and RE-THREAD the crank from the 7/16"NF used on the sbc to the 1/2" NF thread used on big block cranks and use a bbc bolt
or if you screw that up there's larger sizes but doing the install correctly avoids the problem
READ THIS THREAD BEFORE TAPING A STRIPPED CRANK
viewtopic.php?f=50&t=902&p=1463&hilit=+puller#p1463
viewtopic.php?f=53&t=1798