It was time to change the front struts on my 98 Buick Park Avenue with 72,000 miles. The car would walk around on a choppy road and had too much front suspension compression, sometimes bottoming out when going thru dips in the road.
I choose to use the Monroe QuickStrut, since it's already assembled with a new spring and upper mount and new rubbers. It's a fairly easy job, there were only 7 bolts per side to remove including the brake line support and wheel sensor support.
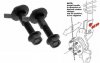
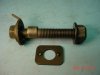
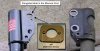
I also wanted to make the Camber adjustable, since it didn't seem to have provisions for such an adjustment. Several companies make a cam bolt that installs in the lower strut mount to steering knuckle. But they didn't seem to fit properly. I would have to grind .100" from the strut, but since this was on a Saturday, I couldn't confirm with Specialty Products if this was the correct action to take. I didn’t use the SP camber adjustment kit. If the Monroe strut didn’t have the elongated hole in the lower mount, they might have worked. But in the end, Ranchwood Autoworks was able to adjust all the different alignment angles, although I’m nut sure how, unless they bend something. So I’m not sure why kits are available.
This is what the kit looks like:
http://www.spcalignment.com/index.php?o ... ;pid=81280
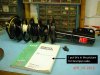
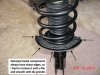
Before I could use the new Monroe strut I had to remove some sharp edges, so I got out a file and my die grinder. Then I shot some black paint on the bare surfaces.
I started the installation by removing the 3 bolts for the upper mount before jacking up the car.
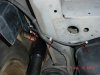
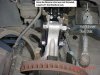
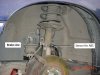
Then I removed the 2 bolts that retain the brake line support and the wire for the ABS sensor.
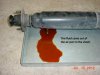
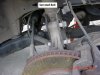
Then I removed the 2 bolts for the lower strut mount. What the manual never tells you is the bolts have a serrated edges, so you will have to drive them out. They did use bolts with an extended tip that has NO threads, so you can hammer on them without messing up the threads. I still left the nut on until they were almost out, then I removed the nut and drove them the rest of the way out. BTW, the nuts are 24mm or a 15/16†wrench fits very well, neither of which I had. But my neighbor did.
One thing Monroe didn’t do was thread the support holes for the brake line and wire for the ABS sensor, so I used bolts and nuts instead. If I had a metric tap set, I would have tried tapping the holes and using the original bolts.
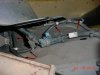
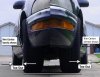
You will also notice in the picture above how much I changed toe-in, just so I could drive it to the shop. That’s 4 turns out for each side, at ~18 threads/in, that's .056" per turn or .222" total. Nearly a 1/4" change per side. Below is the picture I took before I made any adjustments to the toe-in.
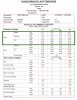
Here is the documentation that I got back from Ranchwood. The Caster was good before they made any changes, but the Camber was WAY OFF. But they were able to adjust it.
I really expected the new struts to help a lot with my problems, but it made only a marginal improvement with the dancing around on a choppy road. I will have to look elsewhere for the instability problem. The amount the front end compresses now is much better when encountering a depression in the road.
Attachments
-
 Alignment-Ranchwood-Autoworks.jpg85.4 KB · Views: 194
 -
 BrakeLine&SensorAttachment_2178.jpg55.4 KB · Views: 194
 -
 CamberAdjustmentKit01-SPC.jpg15.2 KB · Views: 194
 -
 CamberAdjustmentKit02-SPC_2180.jpg27.4 KB · Views: 194
 -
 MonroeVsOEM_LowerStrutMount_wAdapter.jpg51.5 KB · Views: 194
 -
 NewStrut&Manual_2155.jpg57.2 KB · Views: 194
 -
 OldStrutView_2160.jpg43.6 KB · Views: 194
 -
 SerratedBoltLowerMount_2163.jpg46.1 KB · Views: 194
 -
 SharpEdgeRemoved_2171.jpg70.5 KB · Views: 194
 -
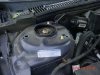 UpperStrutMount_2157.jpg50 KB · Views: 194
 -
 WheelAlign_2173_2174.jpg44.6 KB · Views: 194