these links and this article below gives you some good info
http://garage.grumpysperformance.com/index.php?threads/on-my-3rd-rear-main-seal-bbc.11084/

chevy swapped to one piece rear seals around the 1988 year range in the sbc engines
viewtopic.php?f=53&t=301&p=1815&hilit=+one+piece+crank#p1815
http://www.corvettehacks.com/article5.html
viewtopic.php?f=54&t=473
viewtopic.php?f=54&t=2725&p=7076#p7076
http://www.neow.org/rms1.html
http://www.summitracing.com/parts/FPP-2912/
http://www.summitracing.com/parts/FPP-2900/
viewtopic.php?f=32&t=474&p=585&hilit=+synthetic#p585
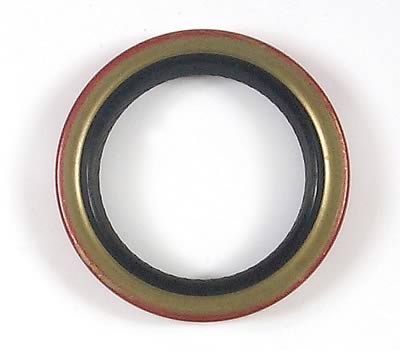
rear seals come in, rubber, silicon rubber,.Fluoroelastomer, and Viton , durability vary,s between brands but roughly in that order,they all work if properly installed but VITON usually lasts the longest
keep in mind the seal lip must be properly installed and the seal lip must ride on a mirror smooth lubricated crank journal, if its to last, no seal will last long on a rough or out of round crank that wears that seal lip
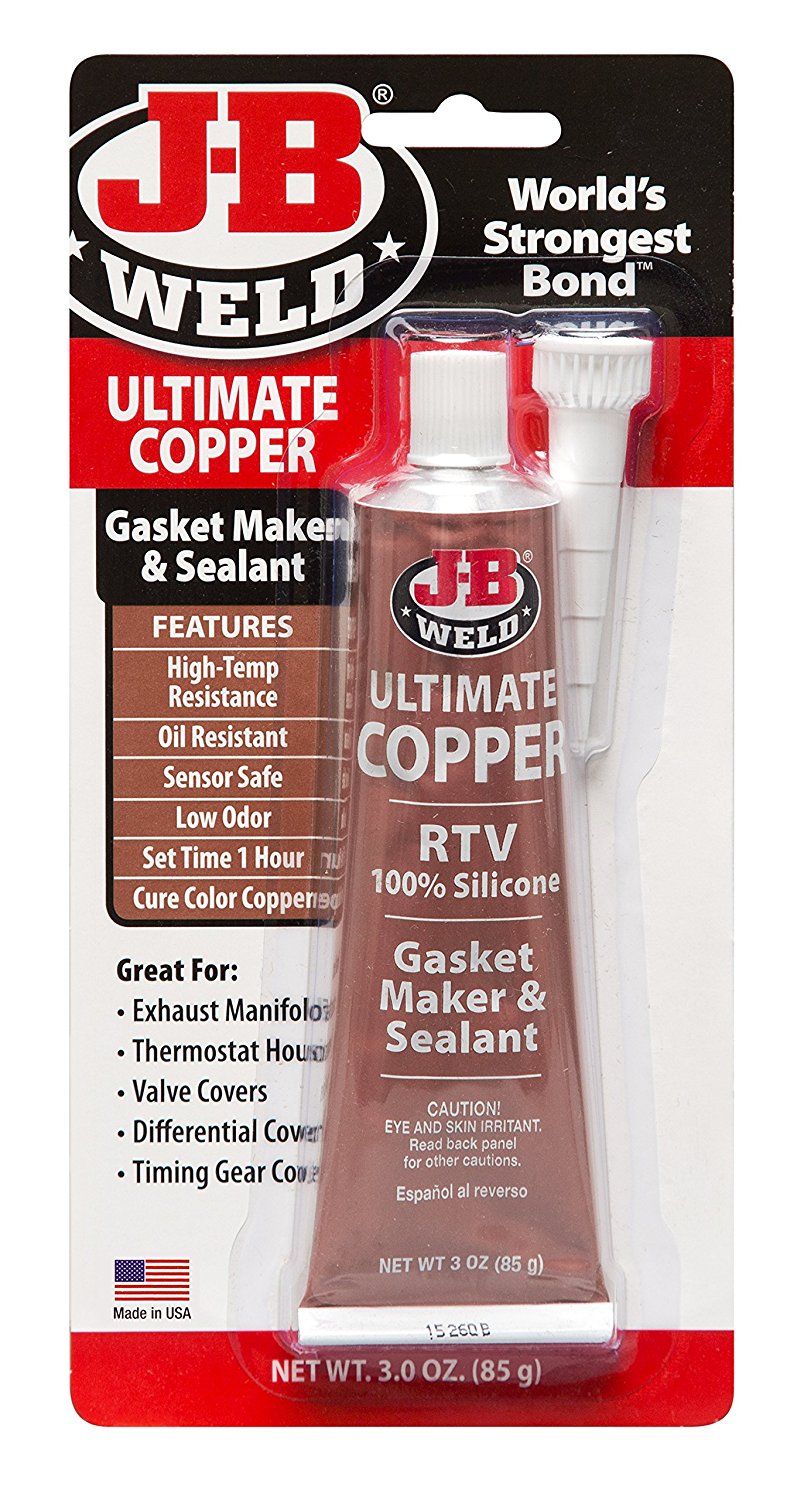
youll occasionally find uses for a high temp rated silicone sealant
like ultra-copper that has about twice the temp tolerance of the common black RTV

http://www.summitracing.com/parts/FEL-BS118291/.. rubber usually GOOD
http://www.summitracing.com/parts/FEL-2900/... Silicone VERY GOOD
http://www.summitracing.com/parts/FEL-2909/ Fluoroelastomer, SLIGHTLY BETTER
http://www.summitracing.com/parts/FEL-2918/..viton SLIGHTLY BETTER STILL IN SOME DESIGNS
http://www.rockauto.com/en/catalog/...350cid+v8,1049666,engine,crankshaft+seal,5604
Top Seal Install ---
IVE installed some rear seals with the ends offset and some flush, Ive never had one leak in 40 plus years, if you have the seal leak its been my experience looking at engines Ive repaired that about 80% of the leaks are due to improper installation and 20% due to rarely if ever doing oil changes so wear was the root cause of the leak due to sludge in the oil
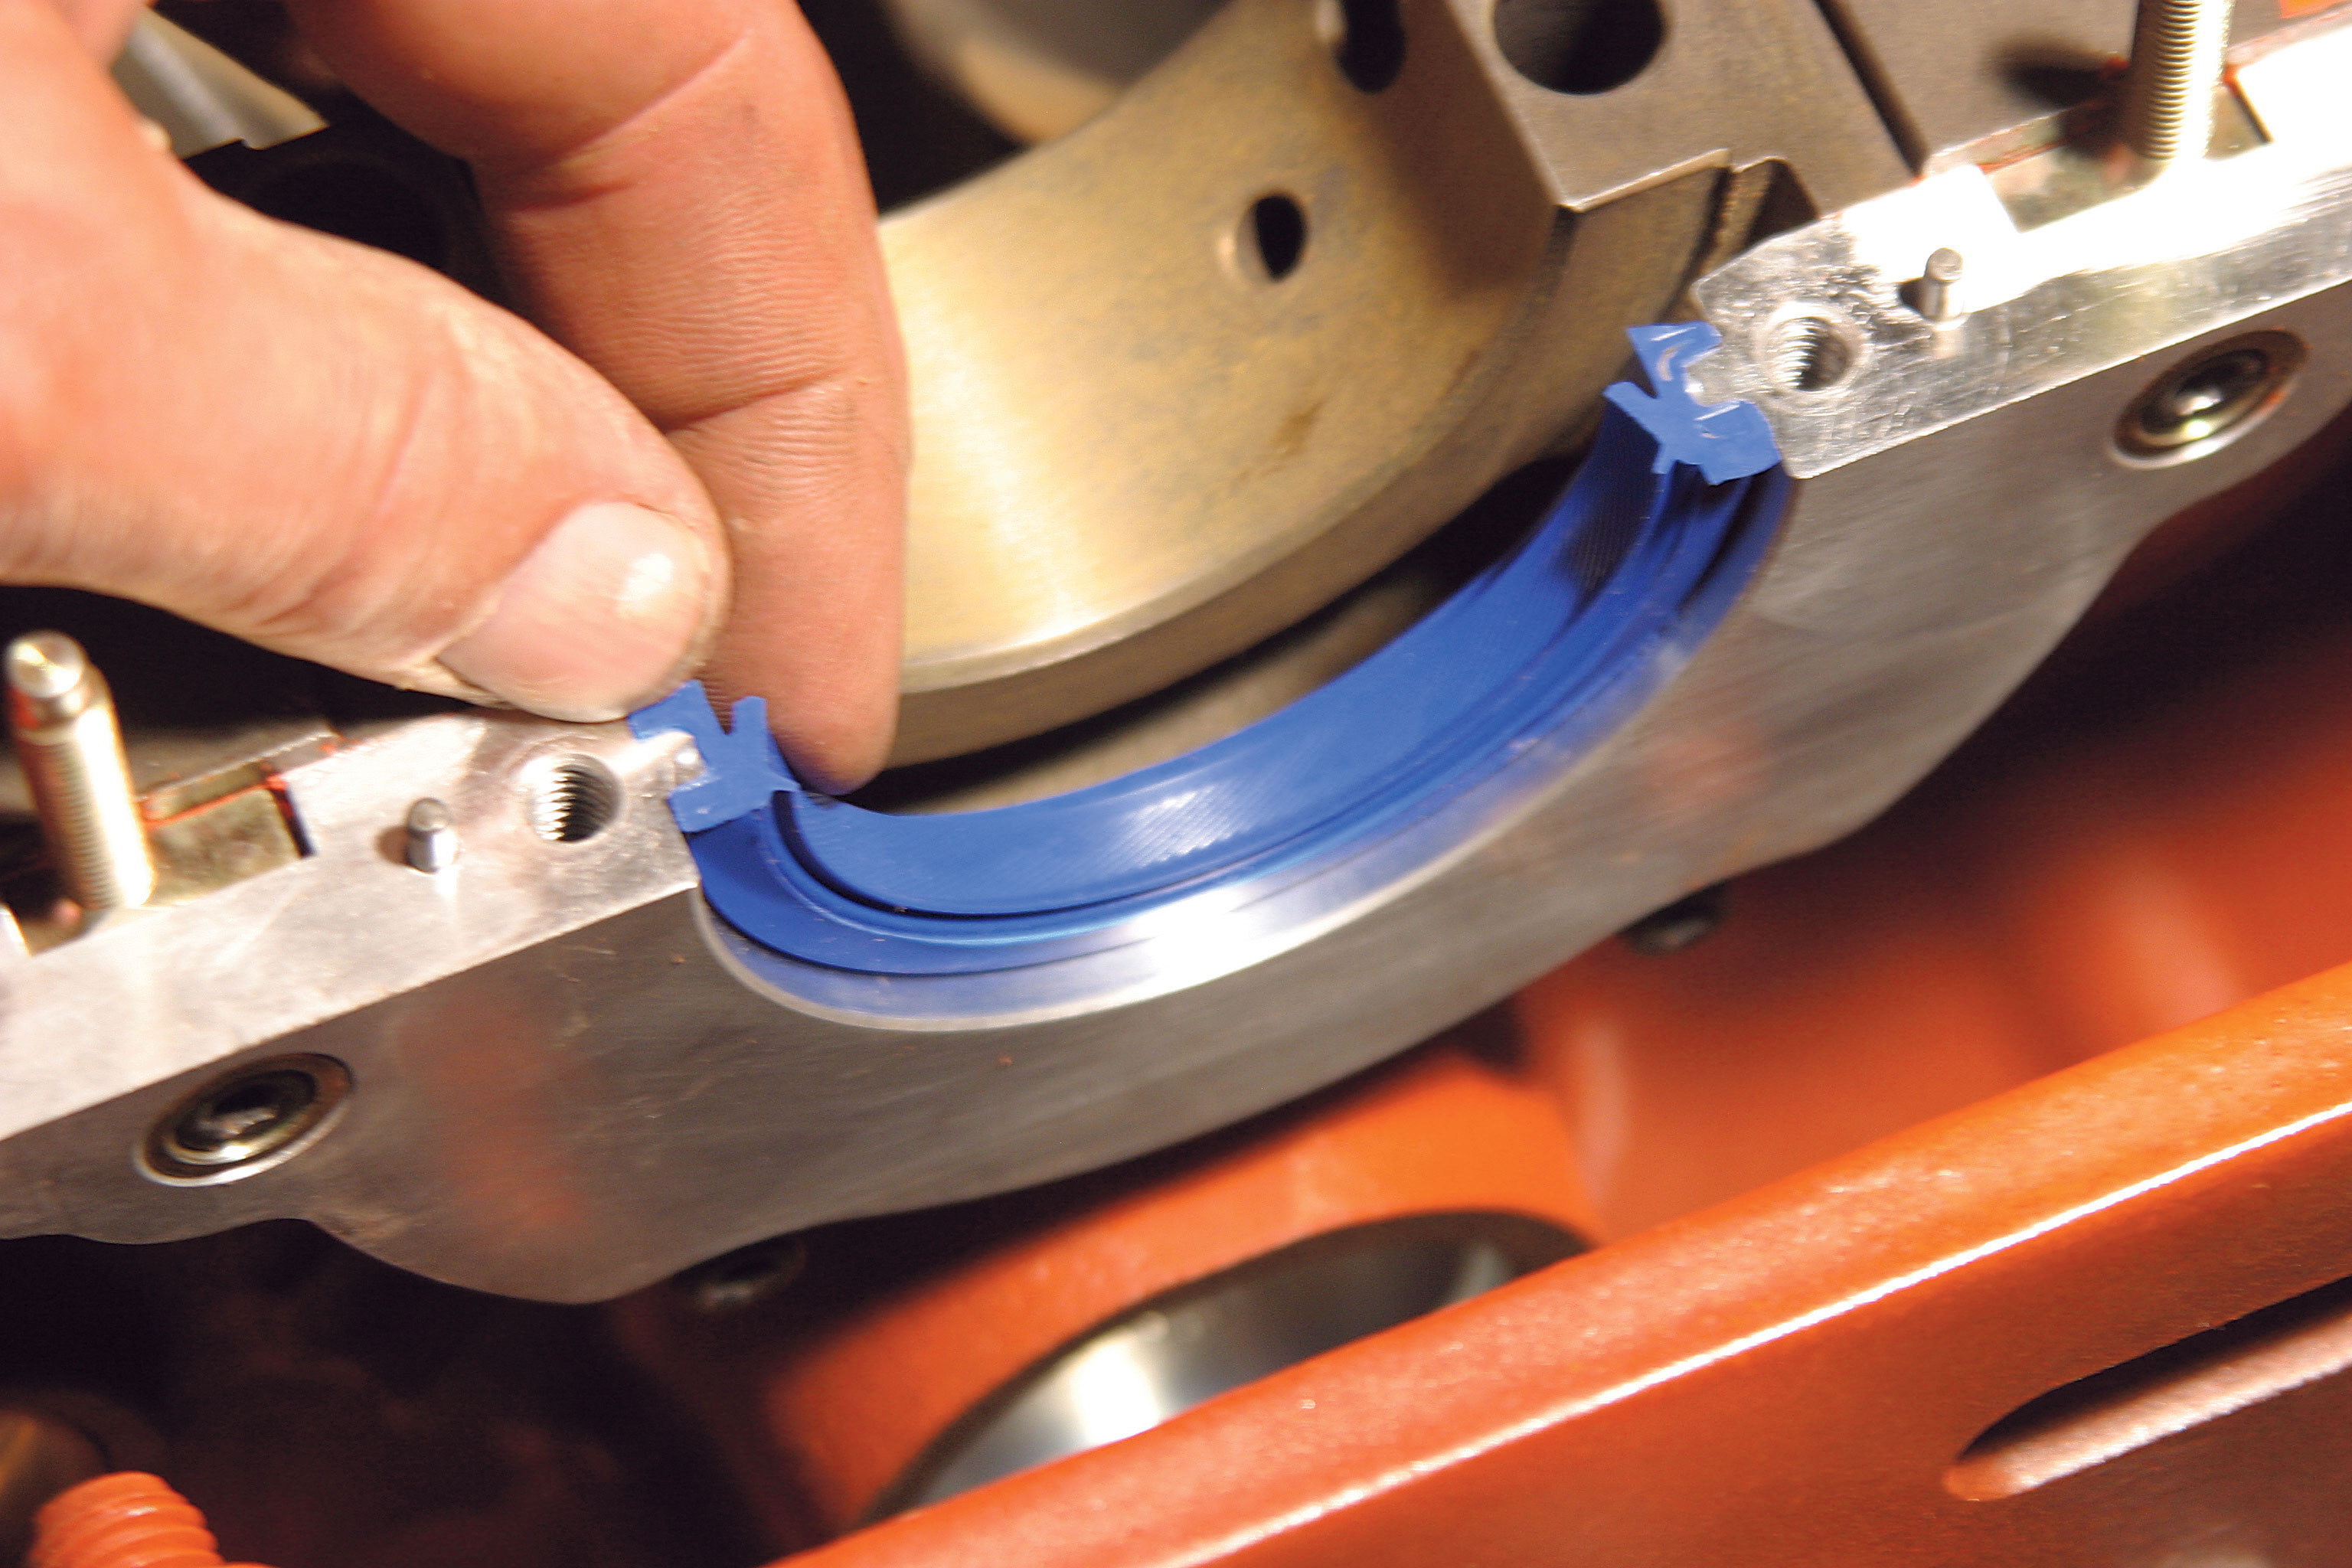
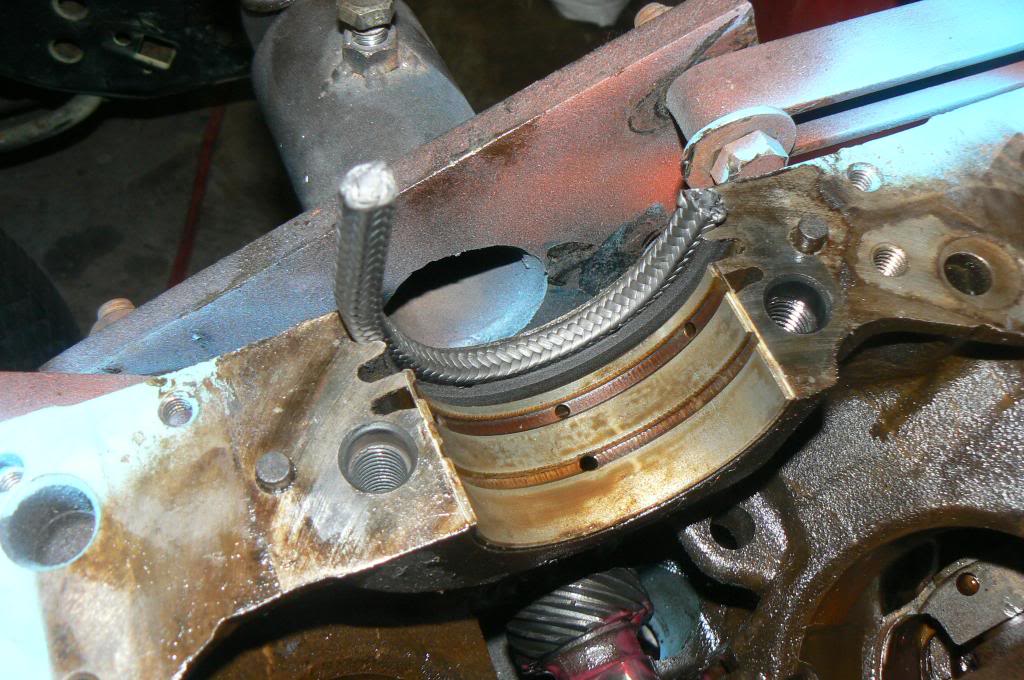
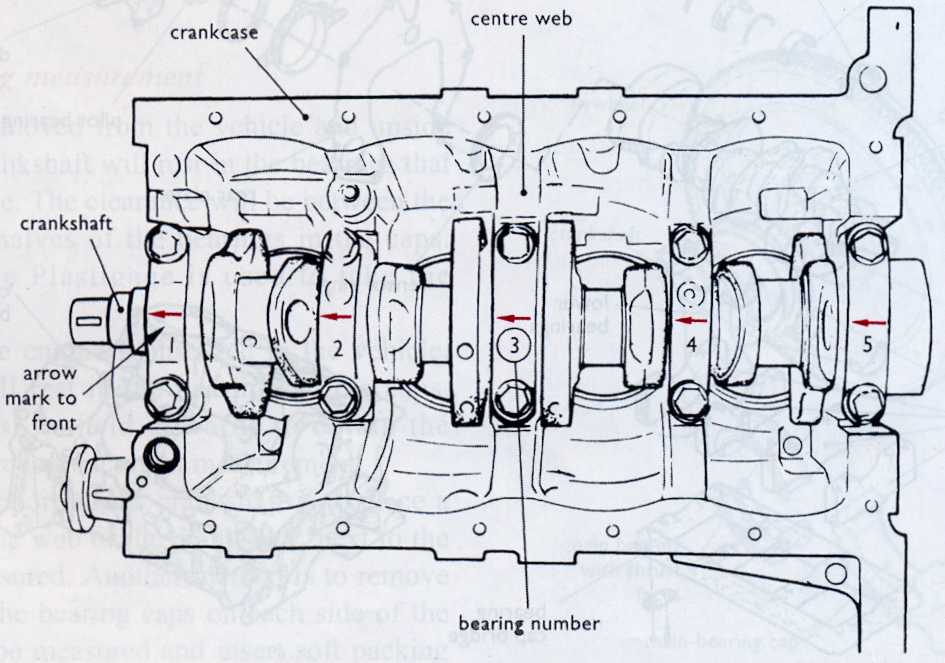
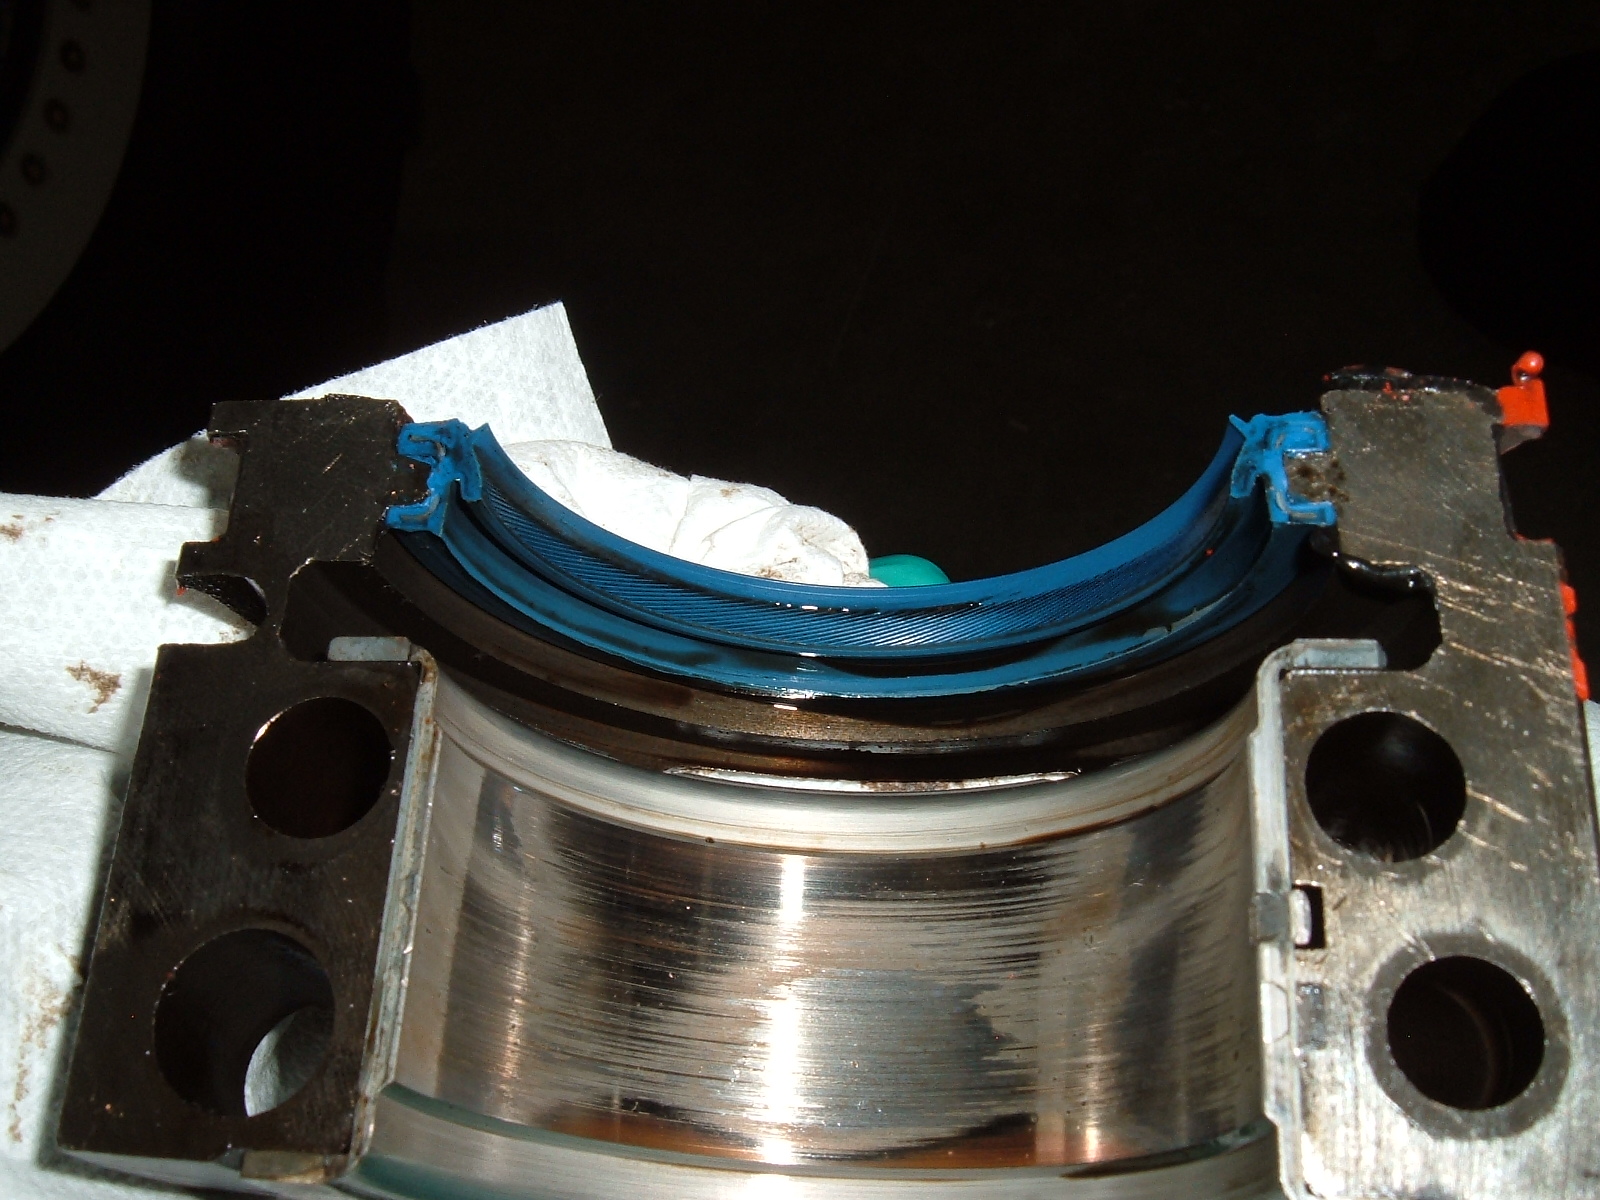
Be sure the lip seal is positioned leaning inward towards the front of the engine, and the rear seals off-set from the main cap parting line by about 1/4" to reduce the tendency to leak oil
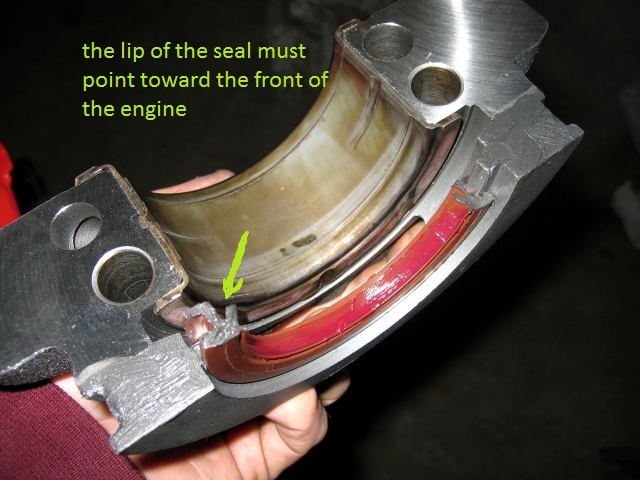
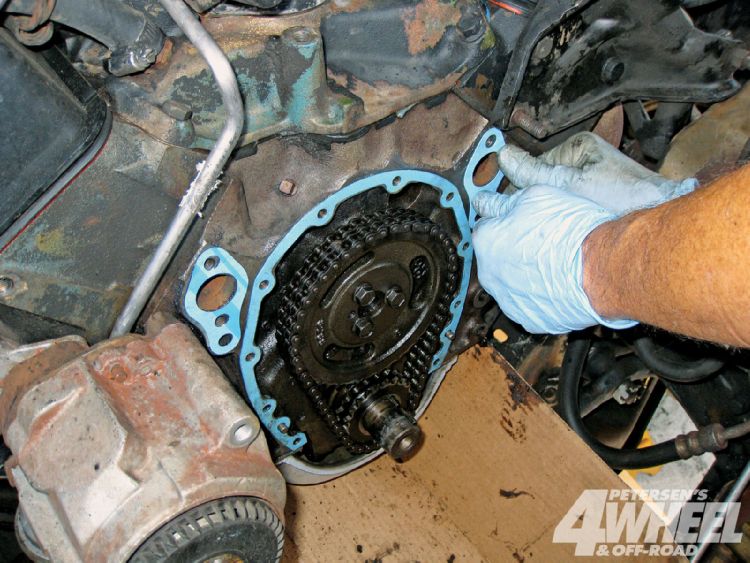
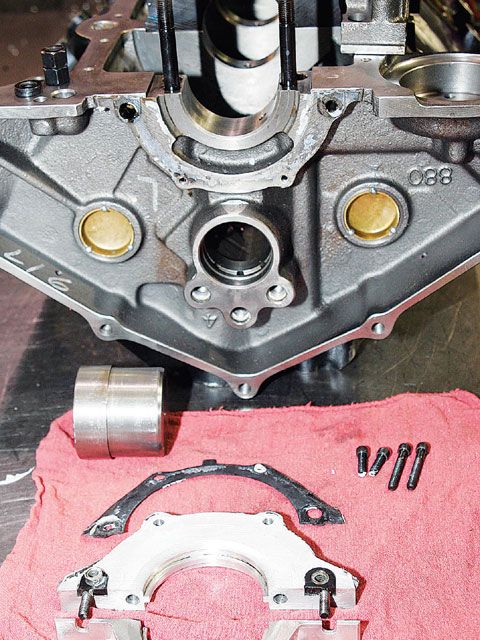
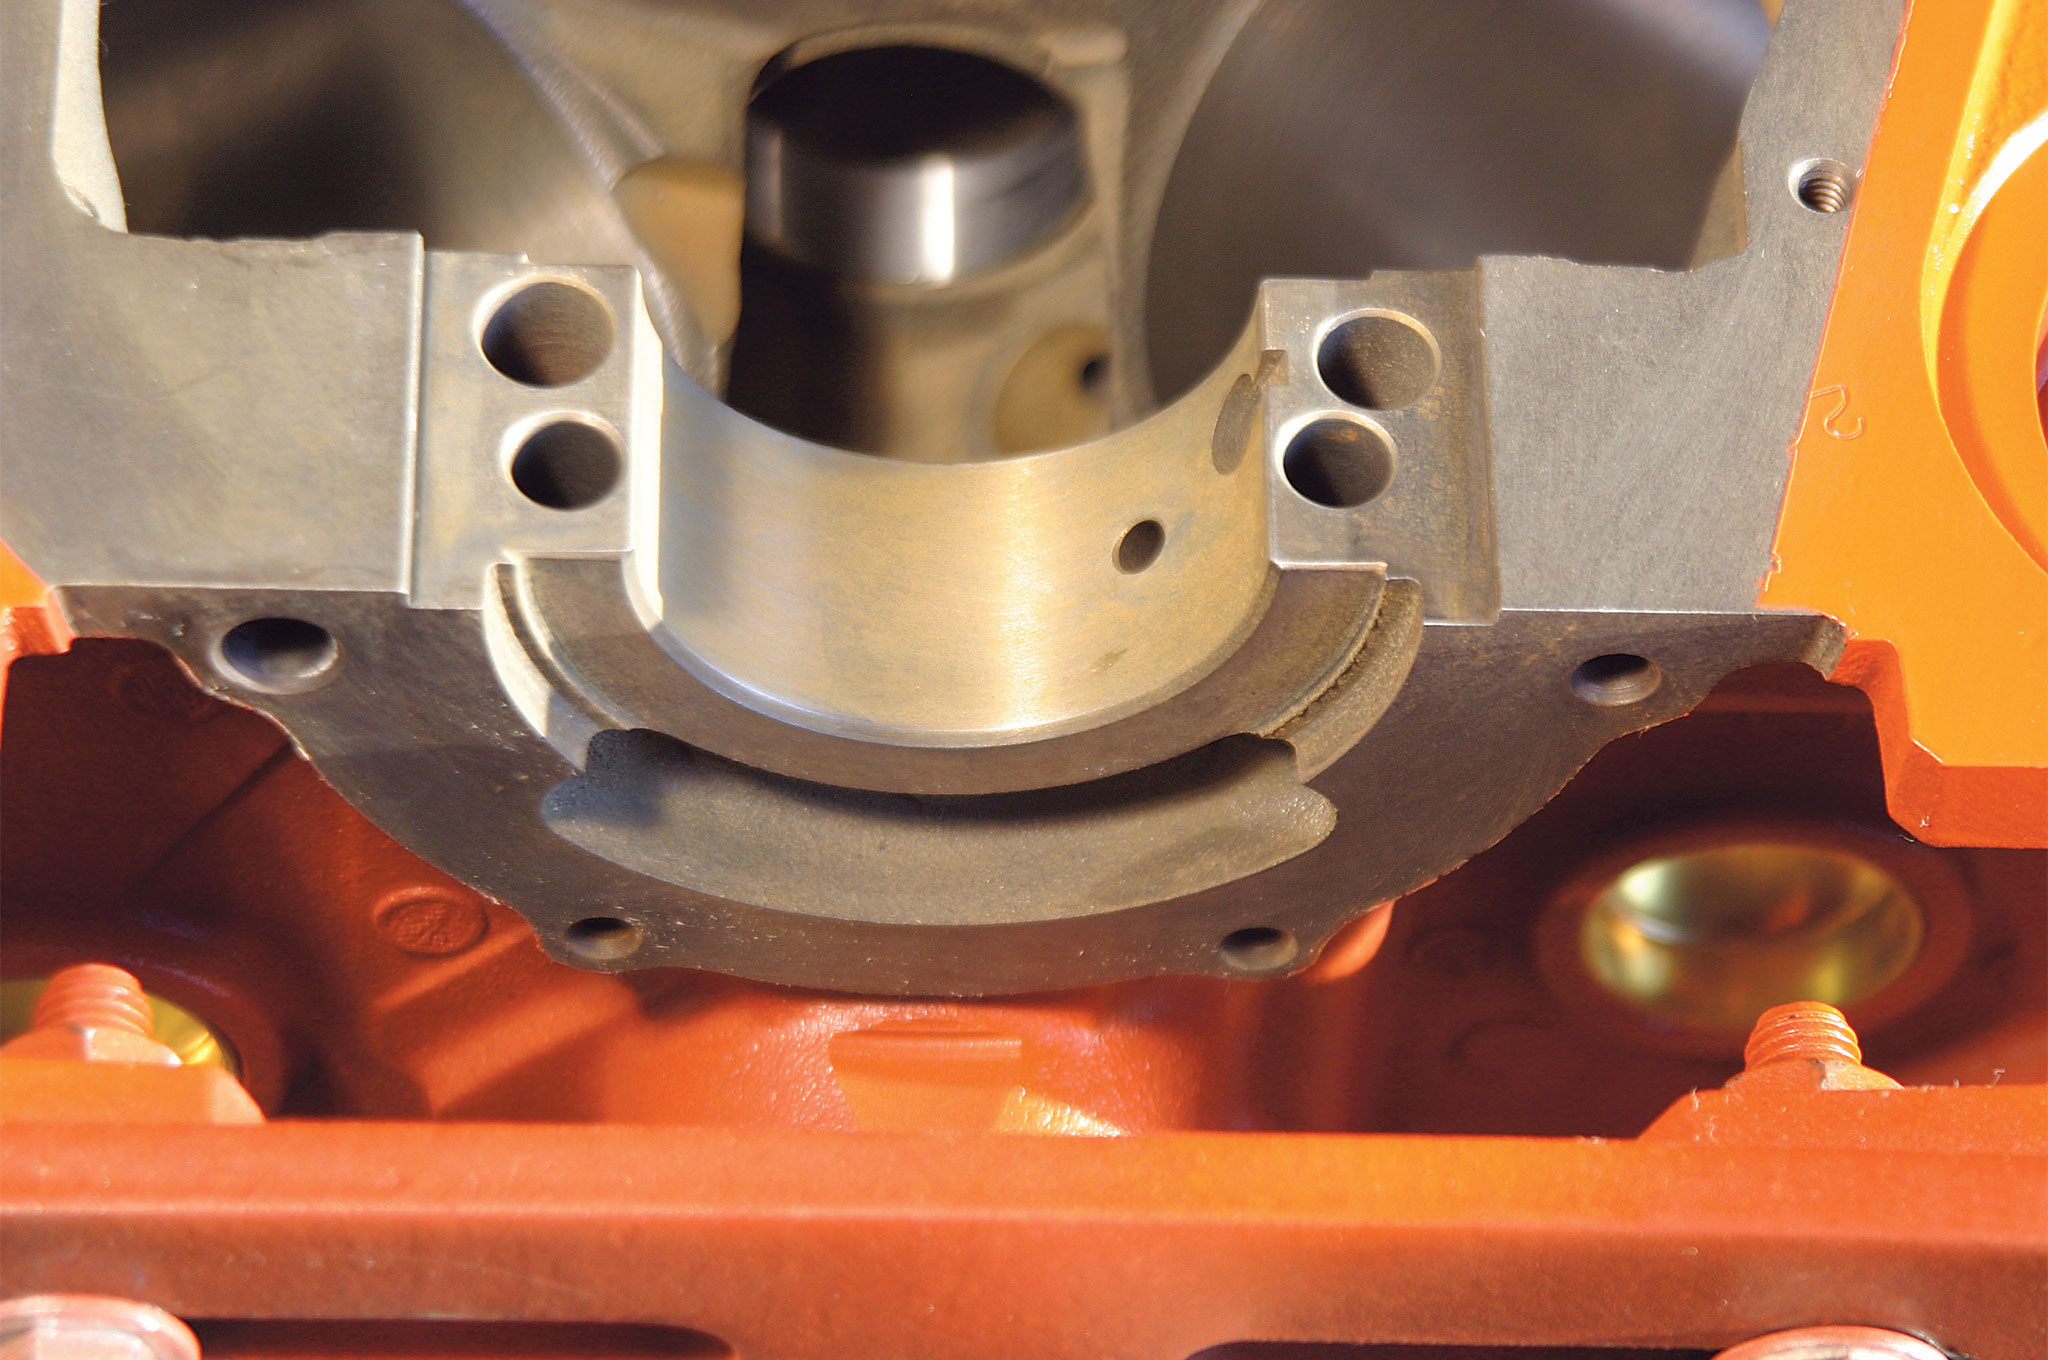
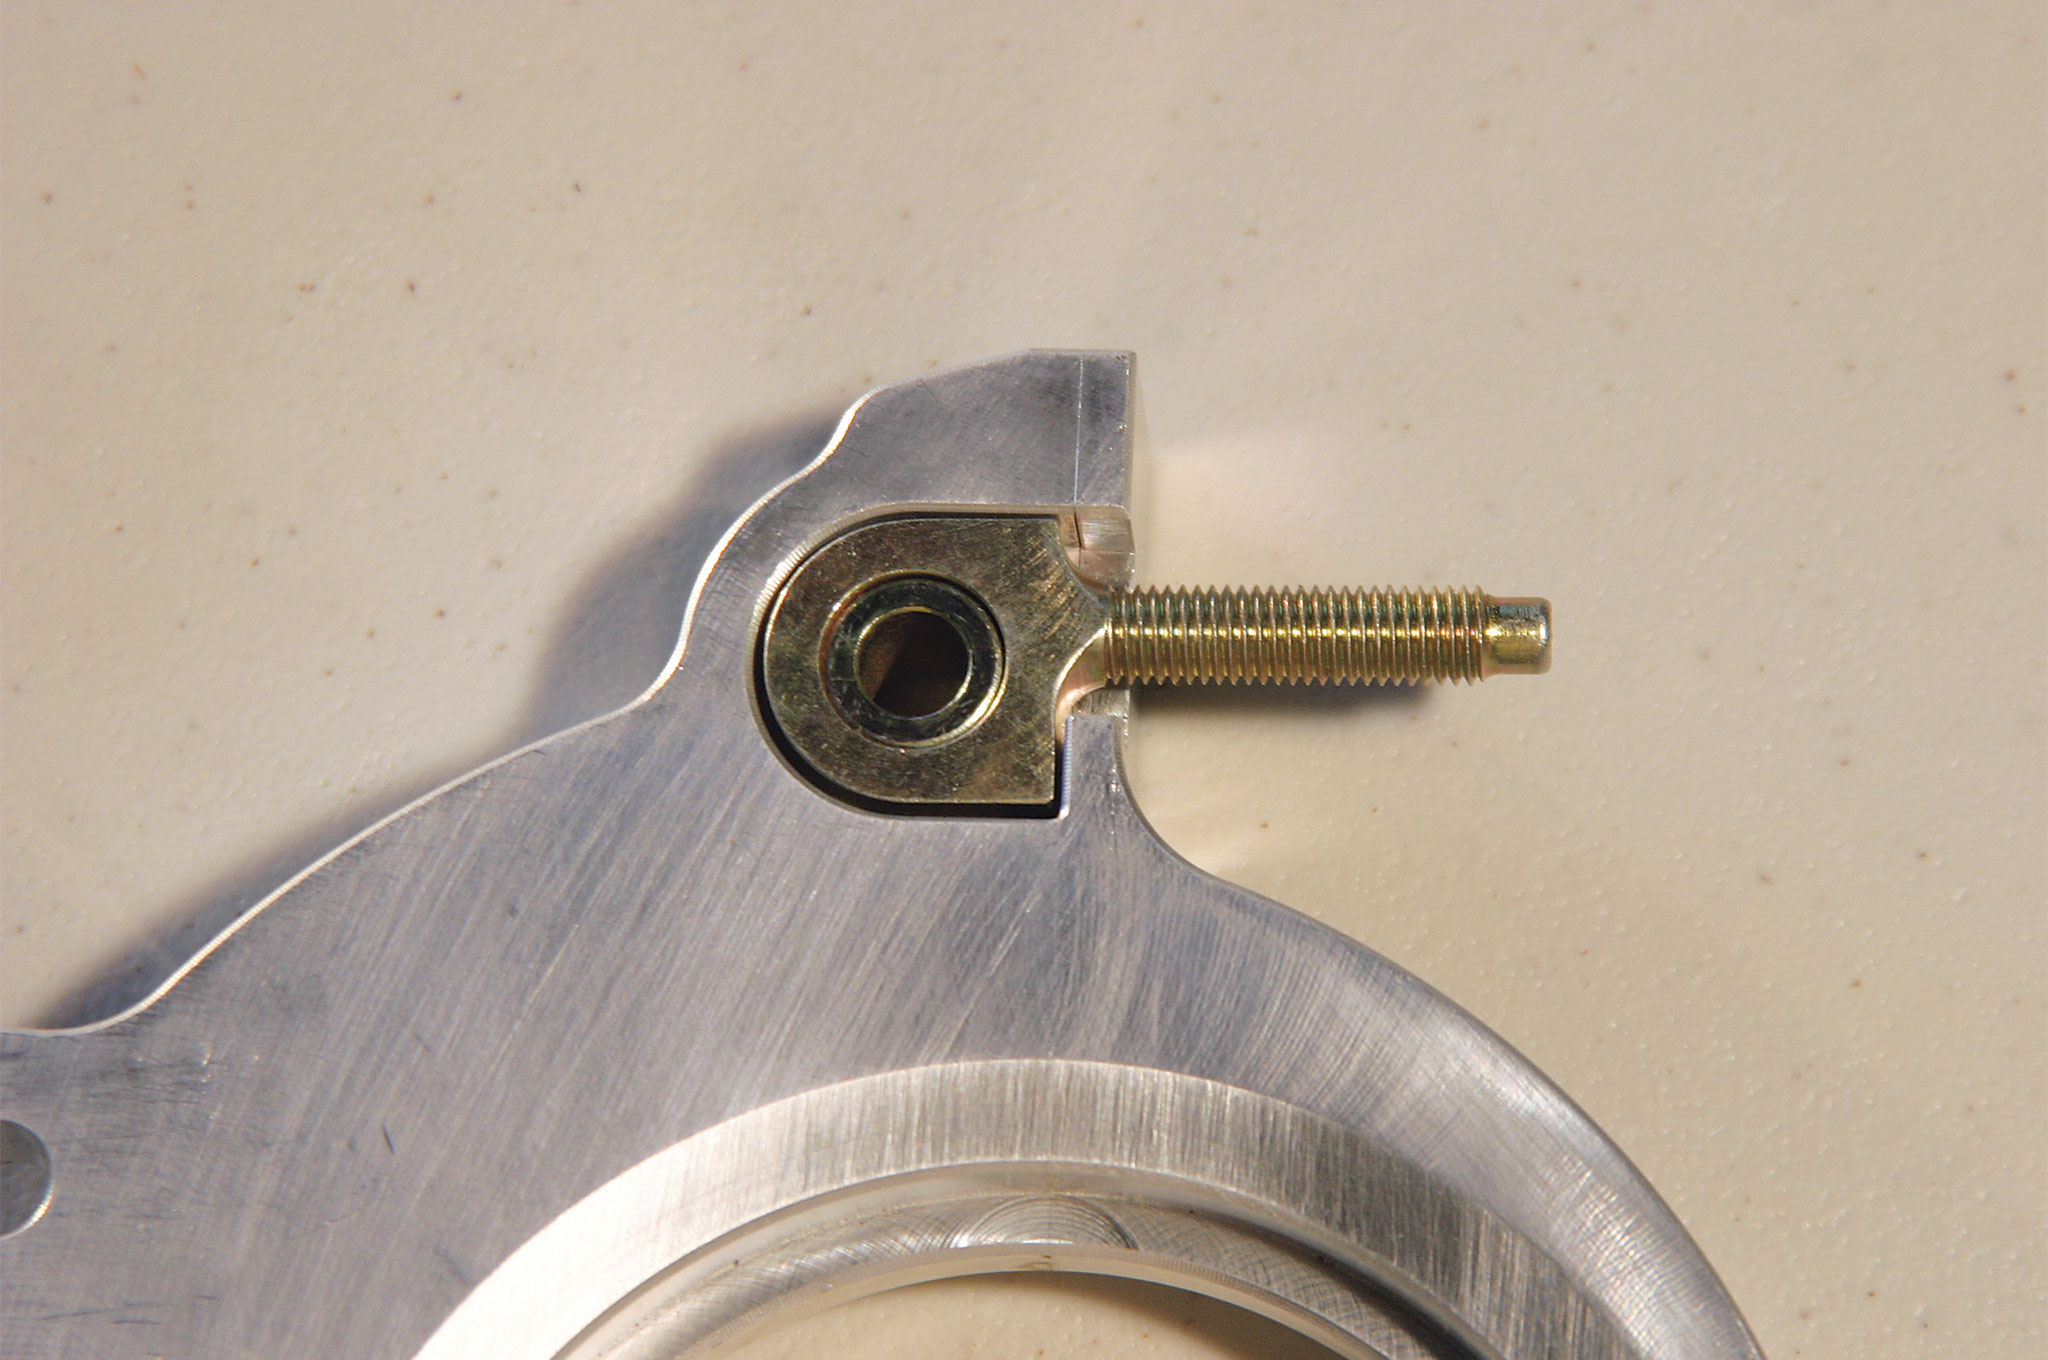
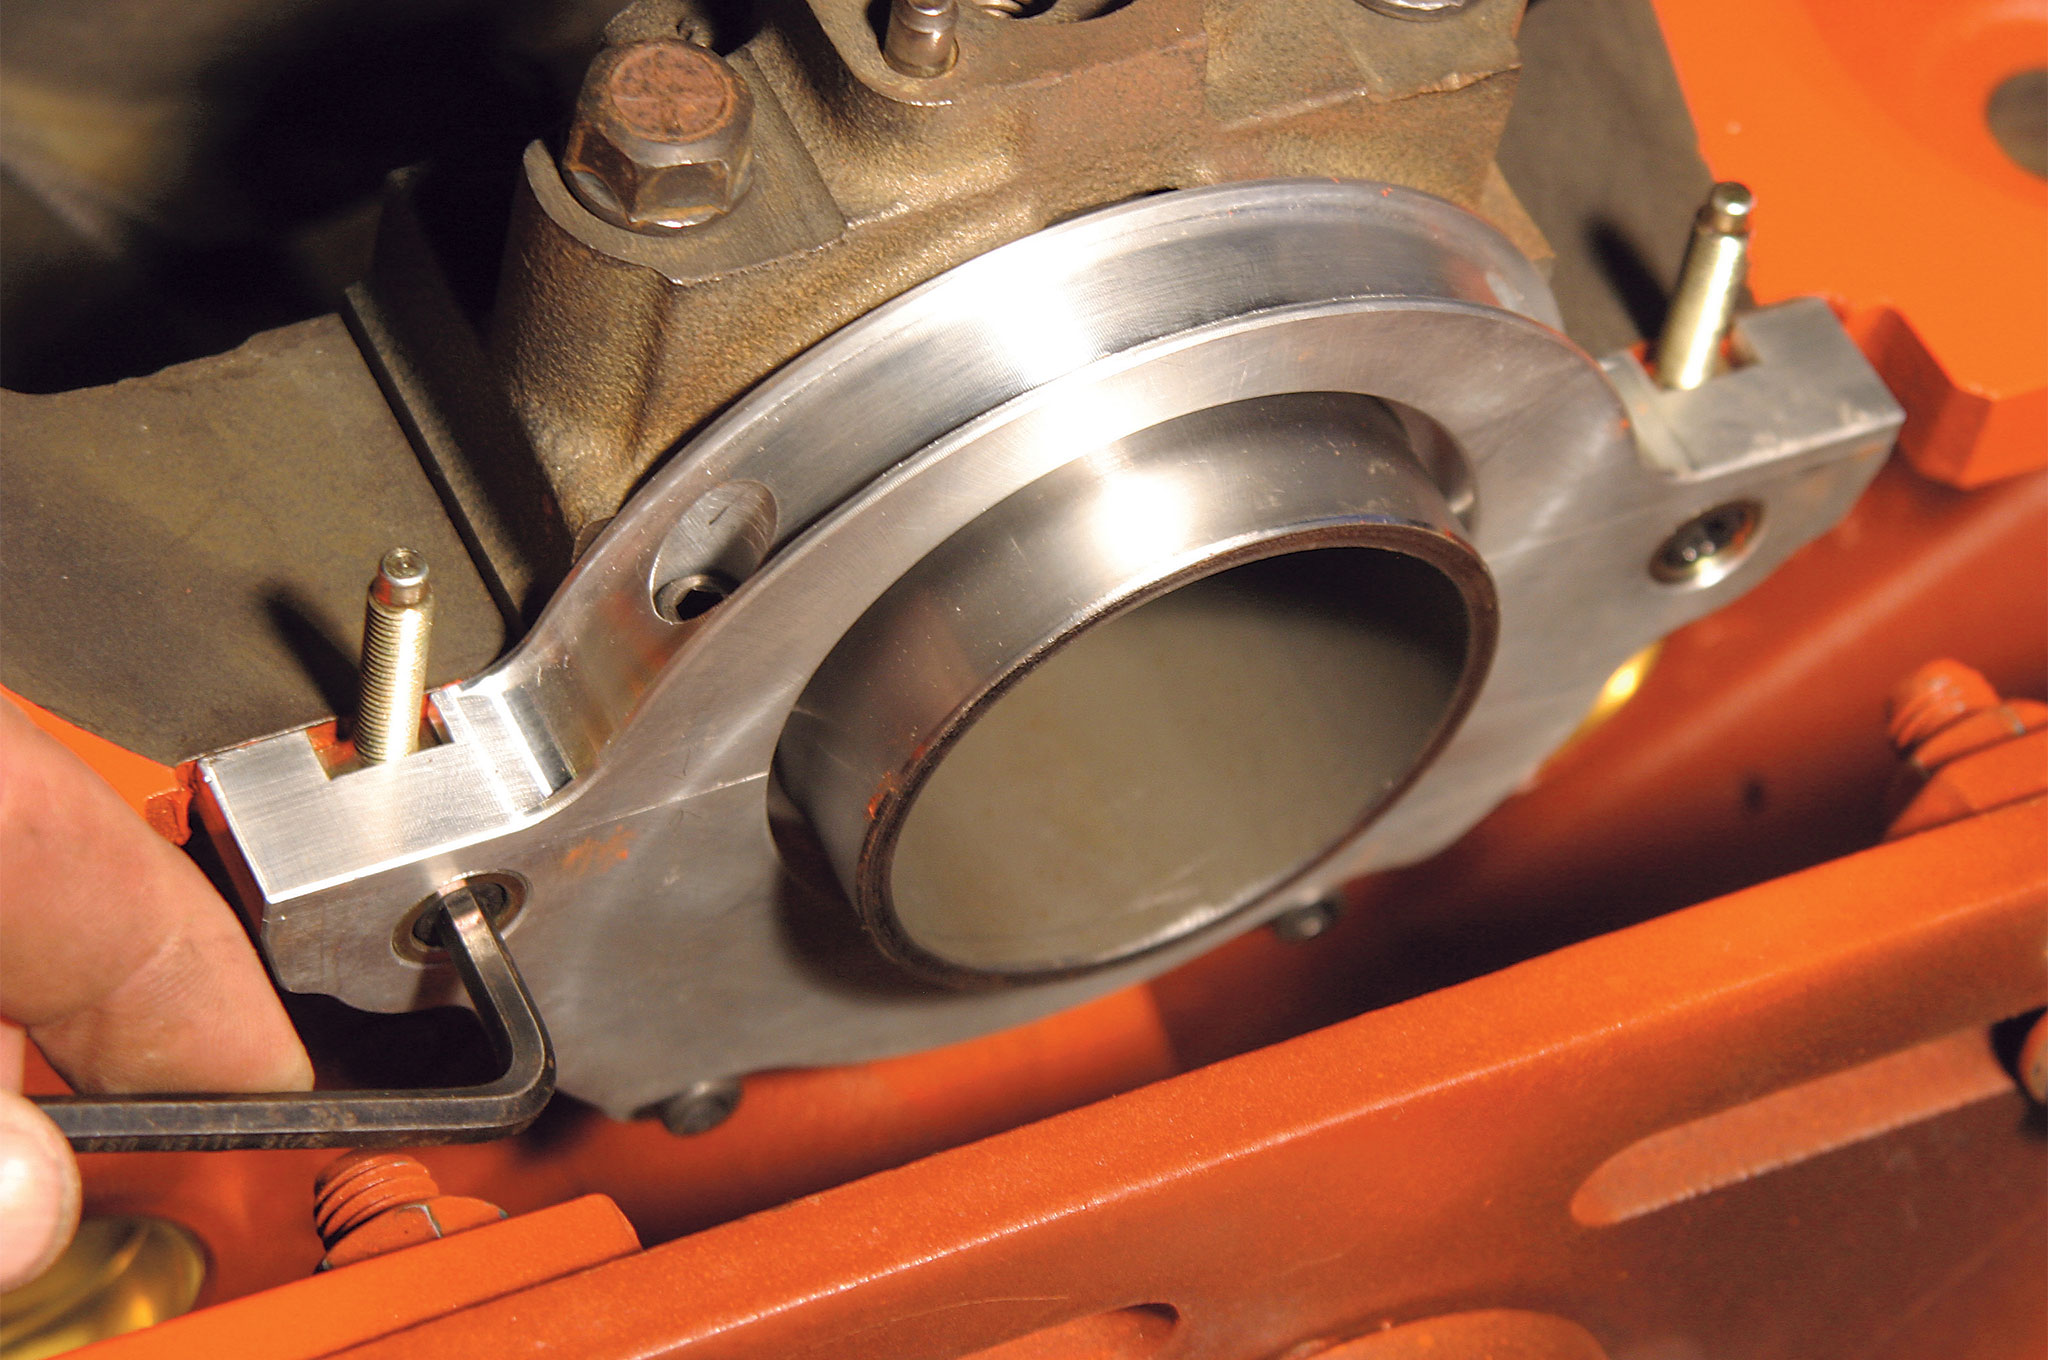
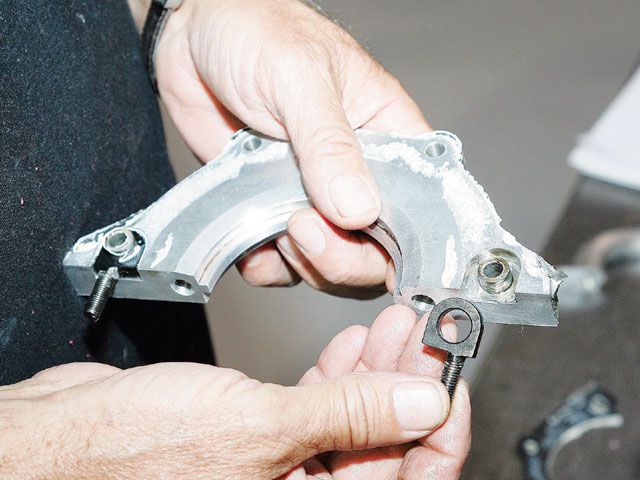
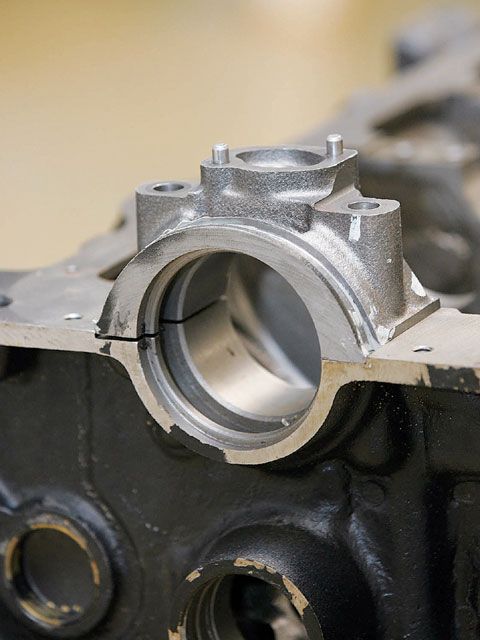
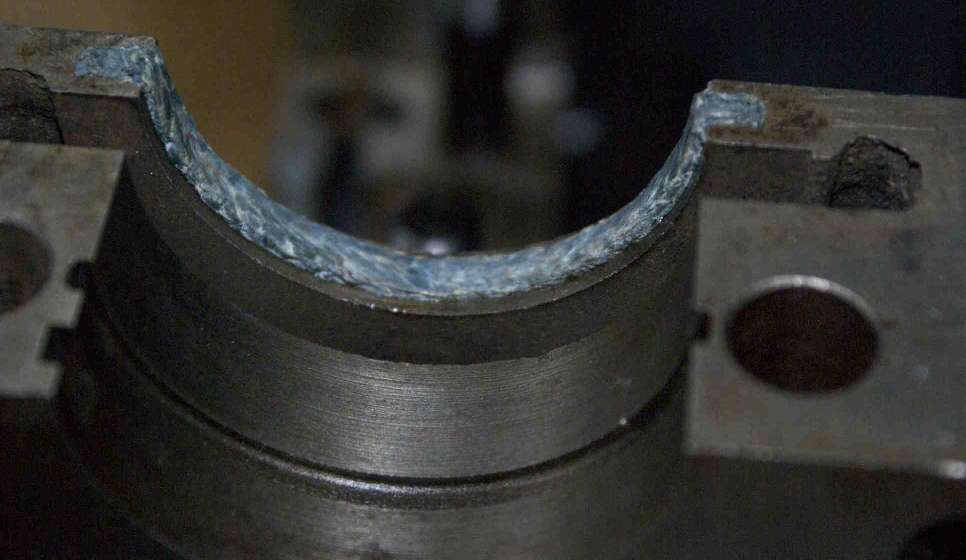
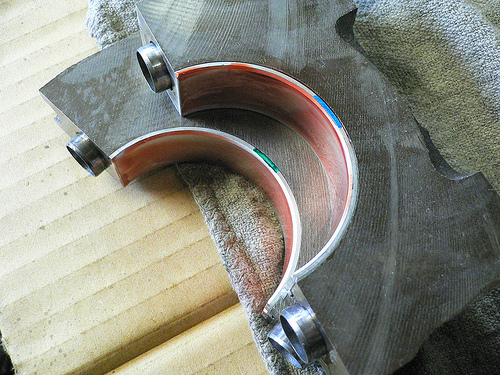
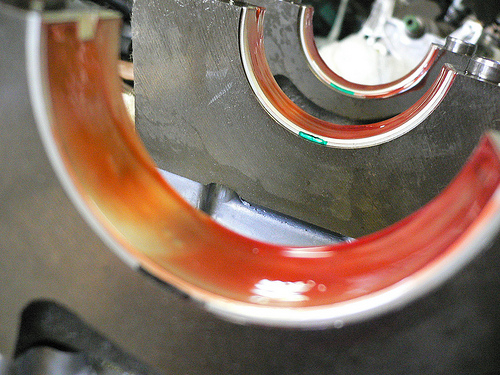
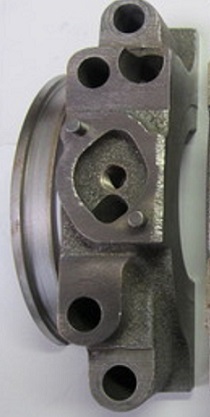
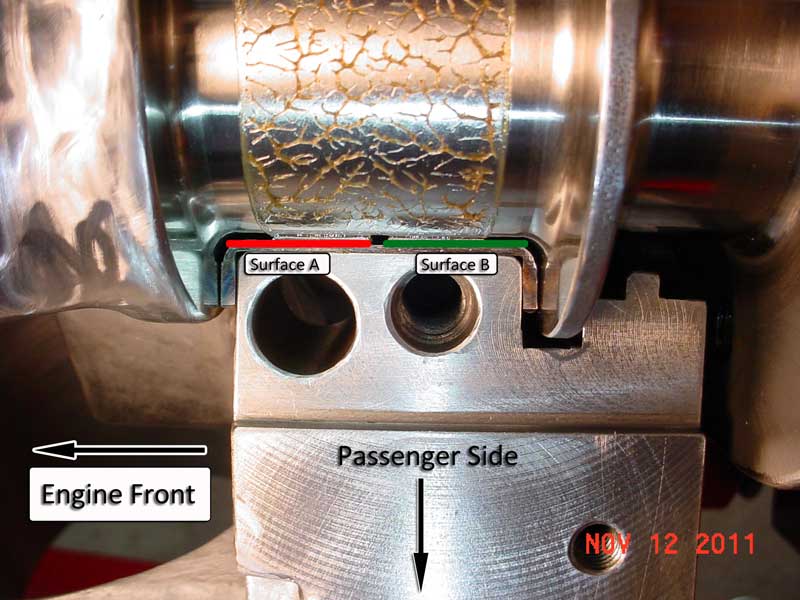
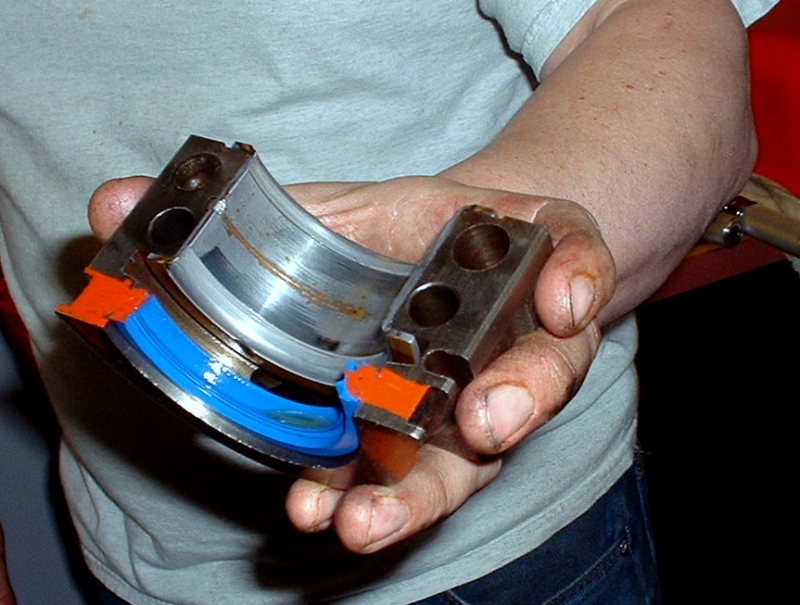
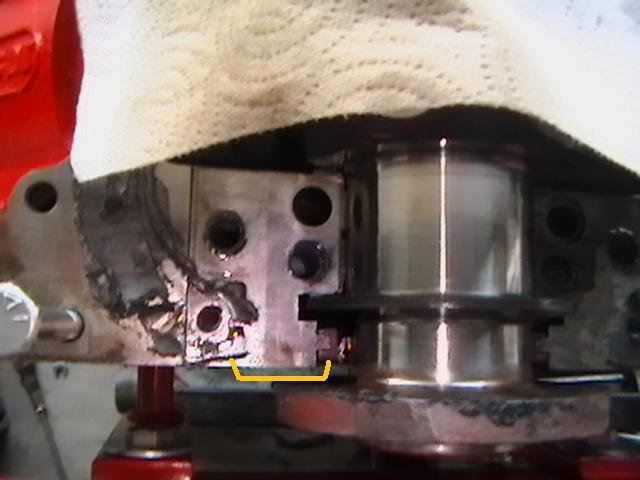
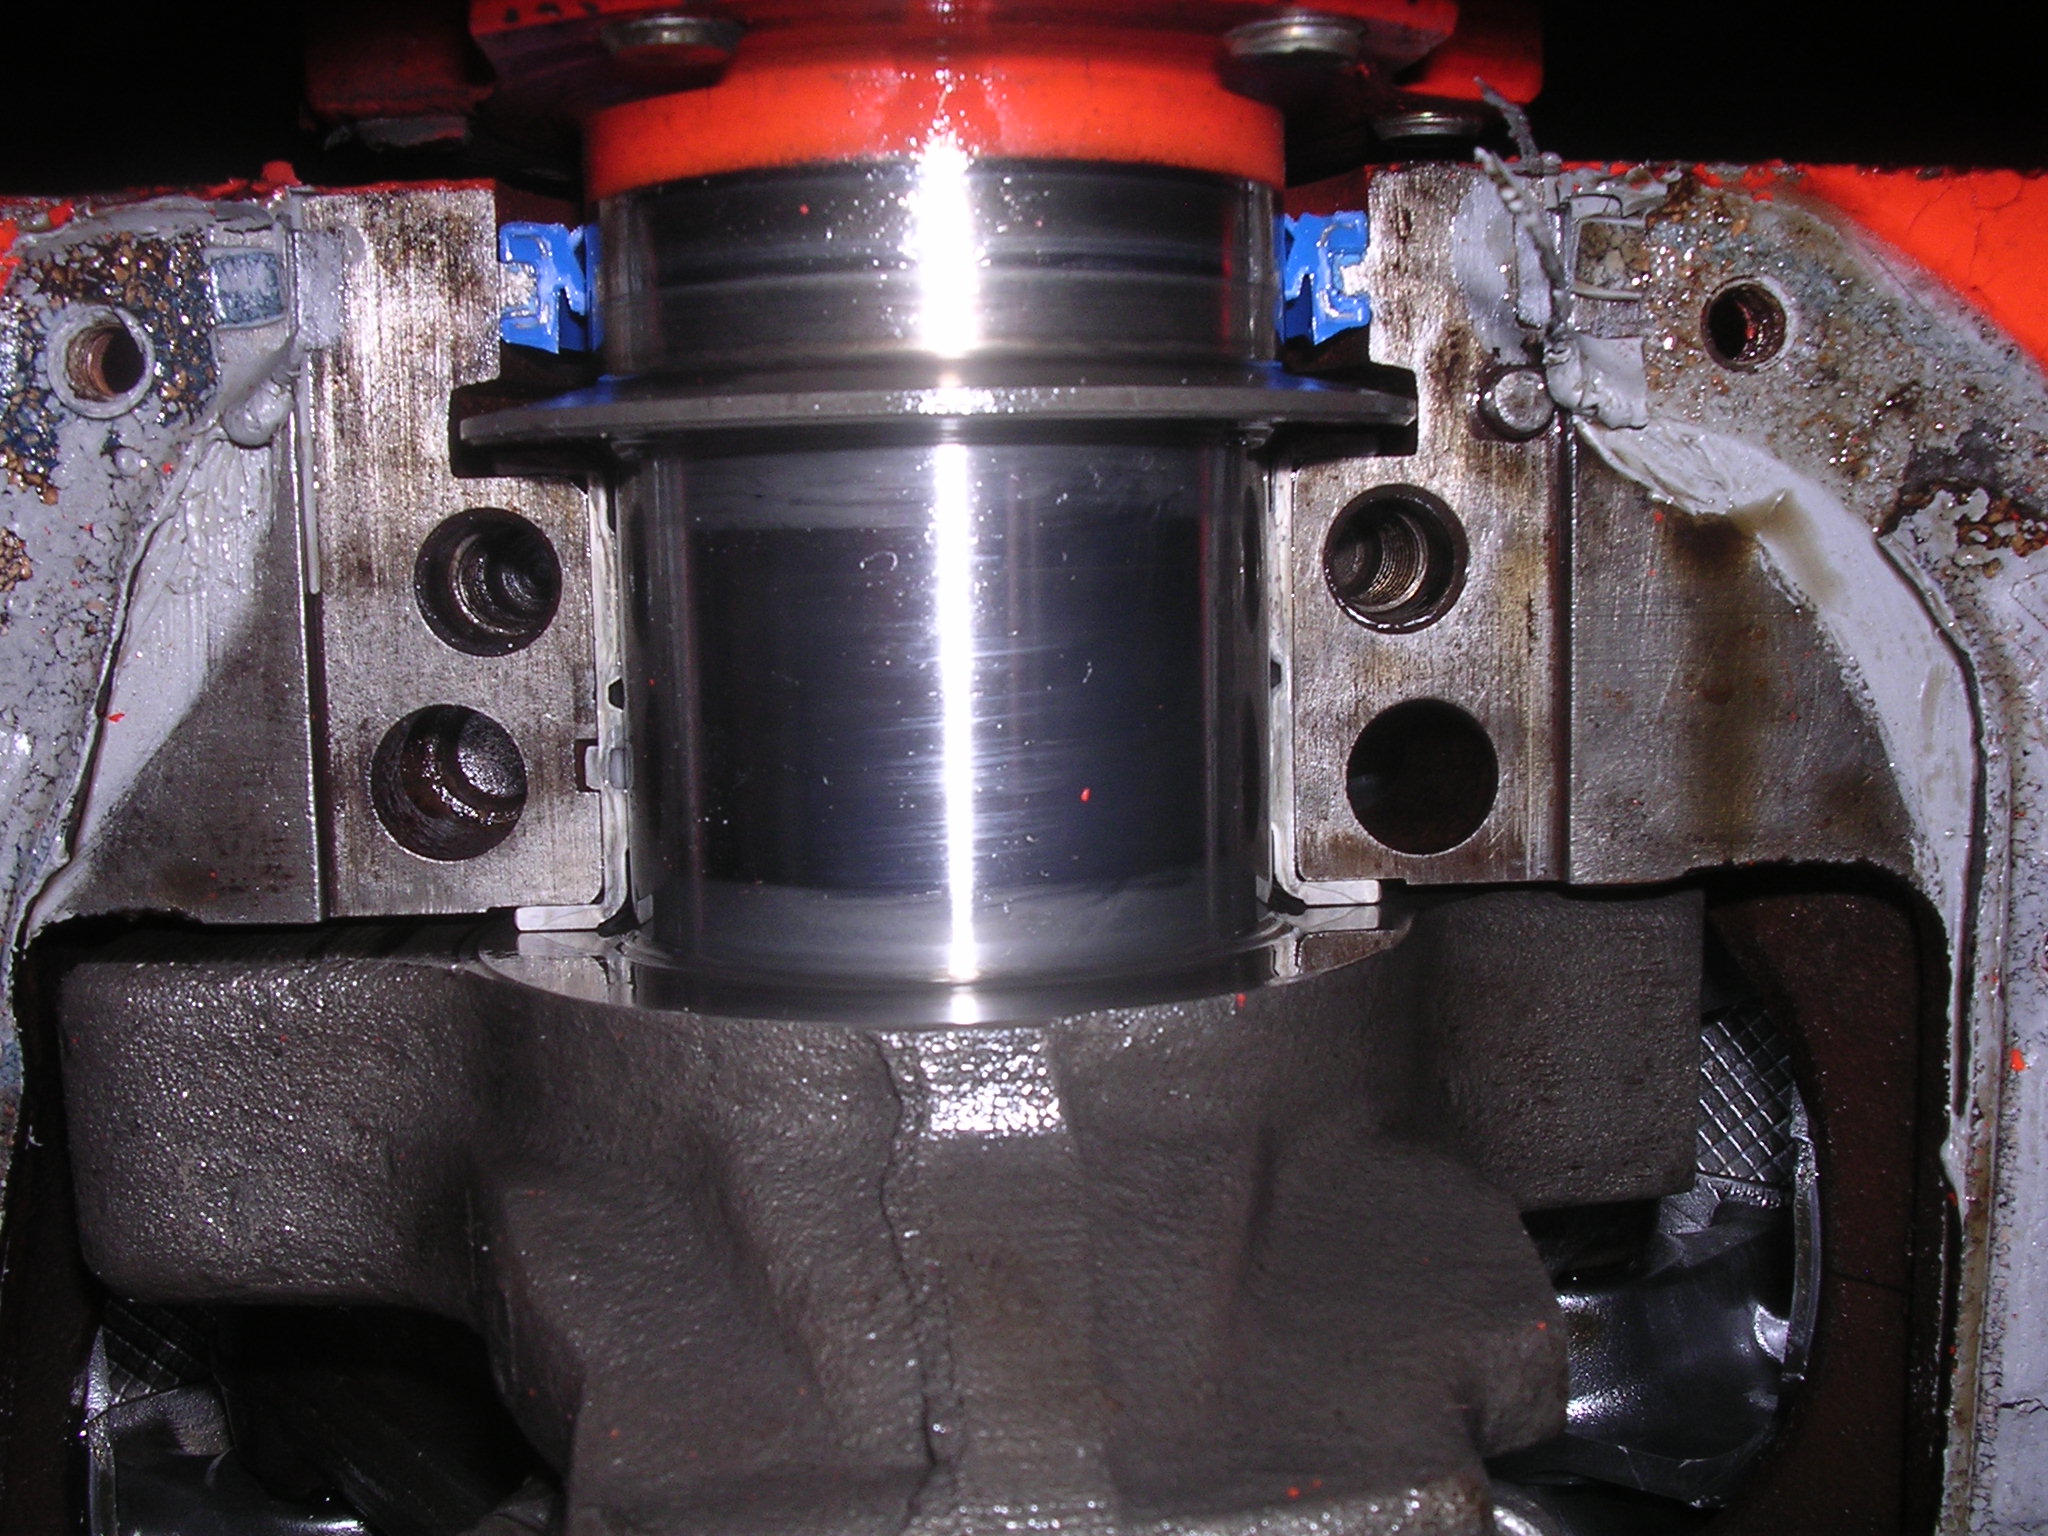
notice the open slot between the rear main cap supporting the oil pump and bearing shell support and the area supporting the rear main seal, this prevents PRESSURIZED oil from the bearings reaching the rear main seal.
the as cast recess in the rear main cap where the oil pump mounts can be rather restrictive and shallow, so a bit of careful mill or grinding work to open up and add some depth certainly helps oil flow if its done carefully
failure to use the correct oil pump,mounting stud, bolt or nut or carefully check clearances when mounting an oil pump can cause problems
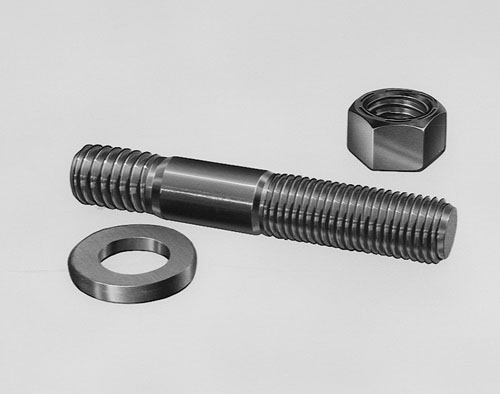
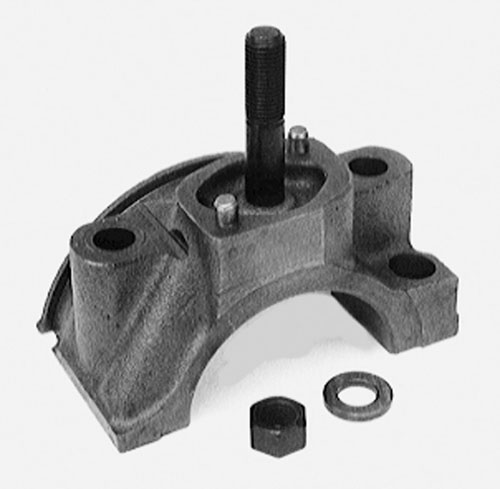
ONE RATHER COMMON MISTAKE IS USING THE WRONG OIL PUMP STUD OR BOLT TO MOUNT THE OIL PUMP AS IF EITHER EXTENDS THRU THE REAR MAIN CAP IT CAN AND WILL BIND ON THE BEARING AND LOCK OR RESTRICT, SMOOTH ROTATION
http://garage.grumpysperformance.co...-bearing-trashed-in-1-2-hour.5141/#post-71921
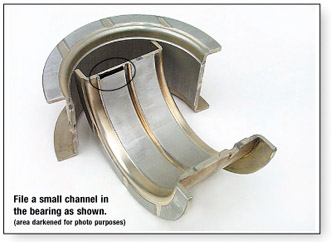
A simple modification to the upper thrust bearing may be beneficial in some engines. Install the upper thrust bearing in the block to determine which thrust face is toward the rear of the engine. Using a small, fine tooth, flat file, increase the amount of chamfer to approximately .040" (1 mm) on the inside diameter edge of the bearing parting line. Carefully file at the centrally located oil groove and stroke the file at an angle toward the rear thrust face only, as shown in the illustration below. It is very important not to contact the bearing surface with the end of the file. The resulting enlarged ID chamfer will allow pressurized engine oil from the pre-existing groove to reach the loaded thrust face. This additional source of oiling will reach the loaded thrust face without passing through the bearing clearance first (direct oiling). Since there may be a load against the rear thrust face, oil flow should be restricted by that load and there should not be a noticeable loss of oil pressure. This modification is not a guaranteed "cure-all". However, the modification should help if all other conditions, such as surface finish, alignment, cleanliness and loading are within required limits.
don't forget the rear surface of the rear seal to block and main cap needs to be sealed, oil tight
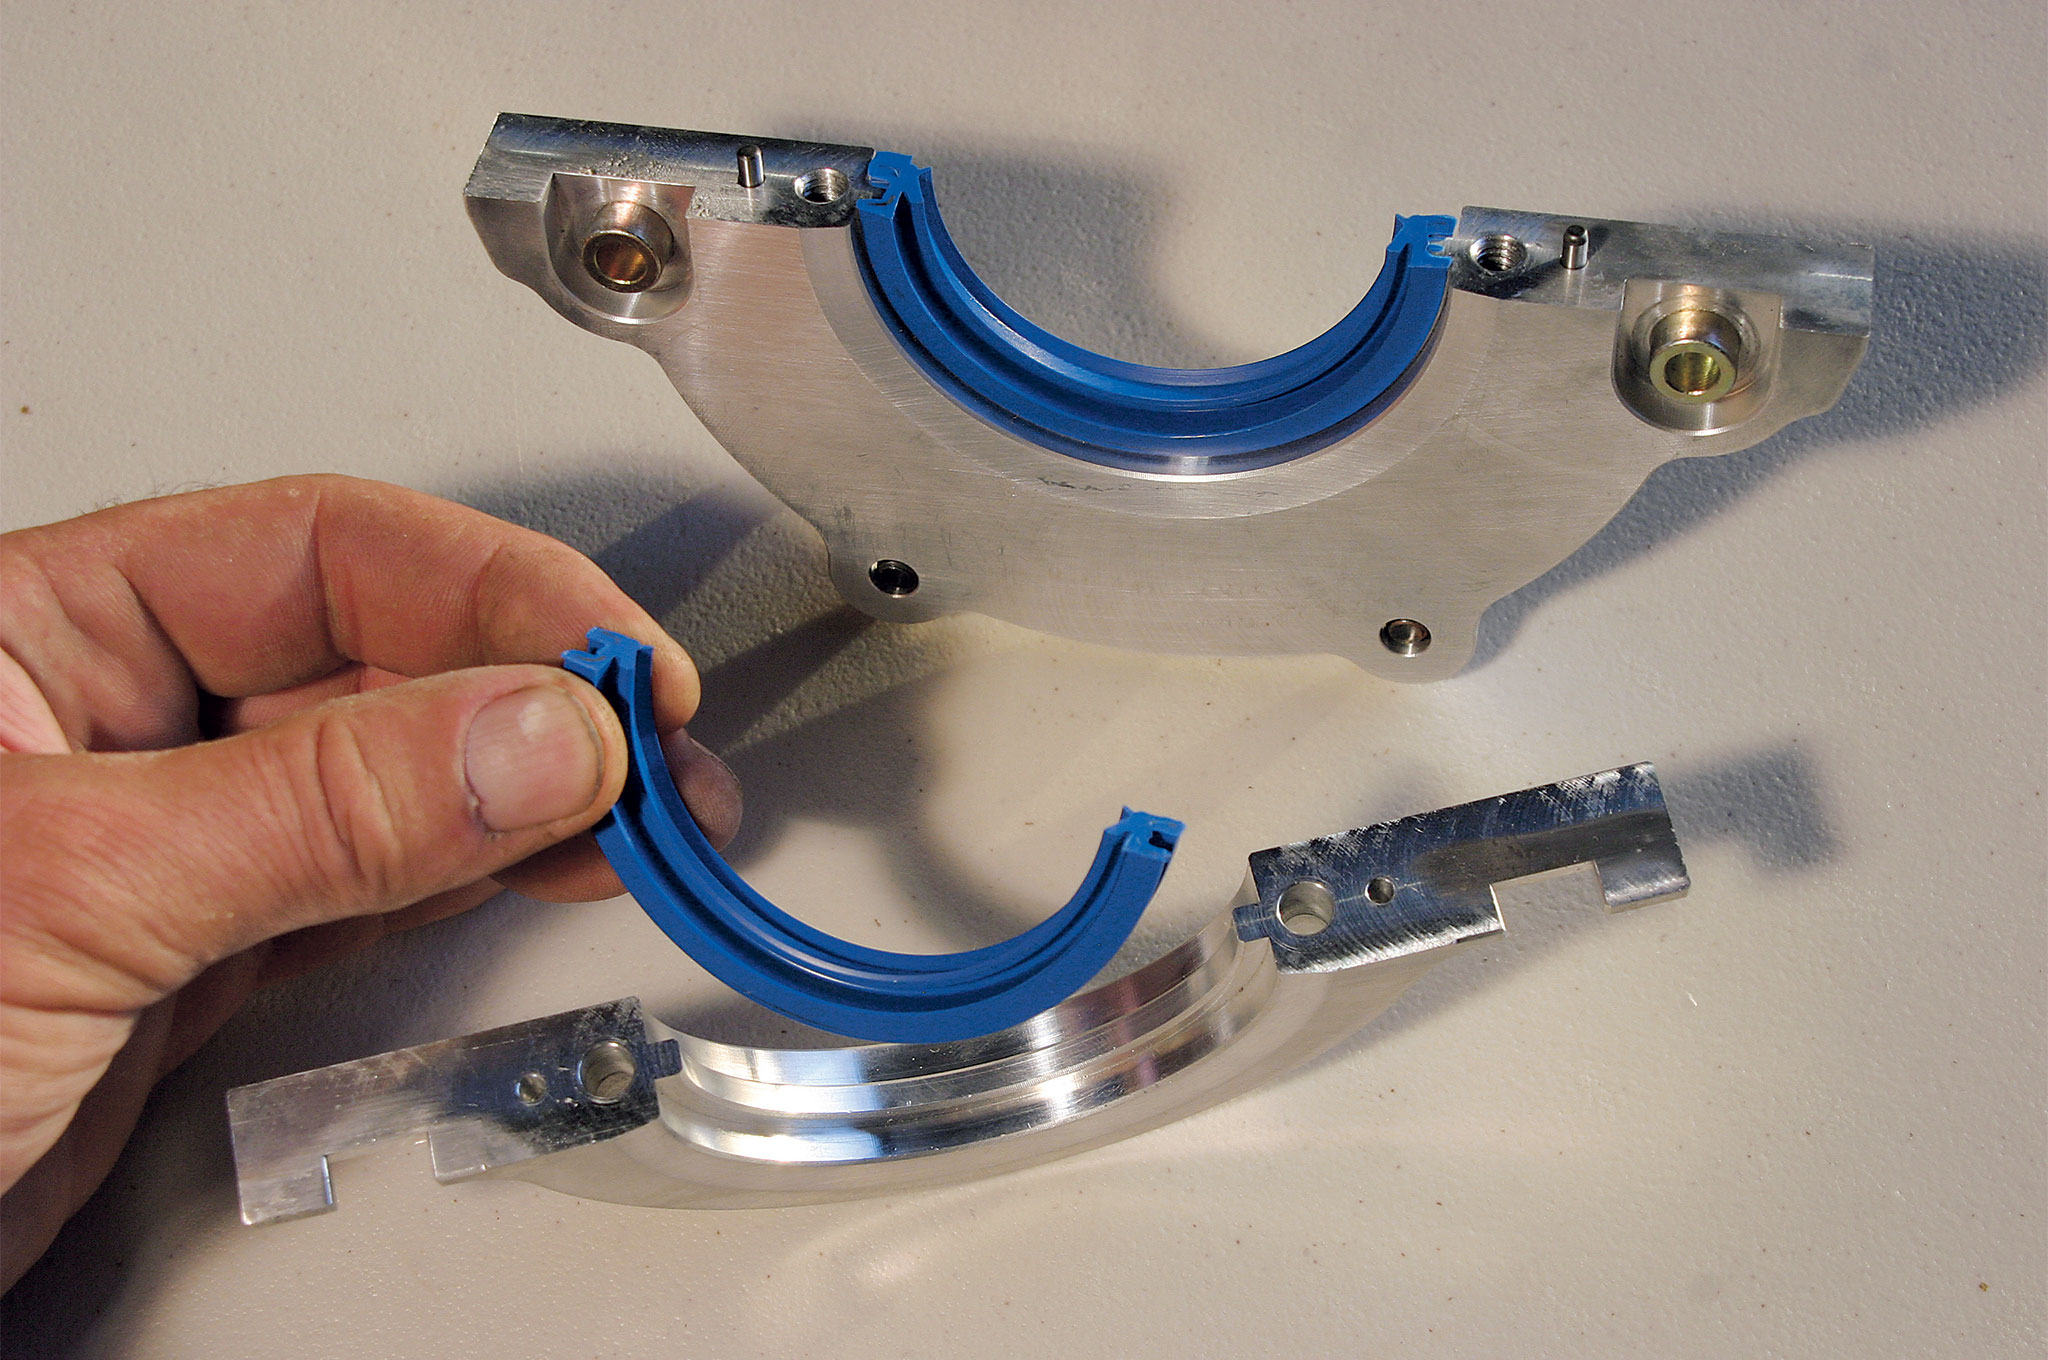
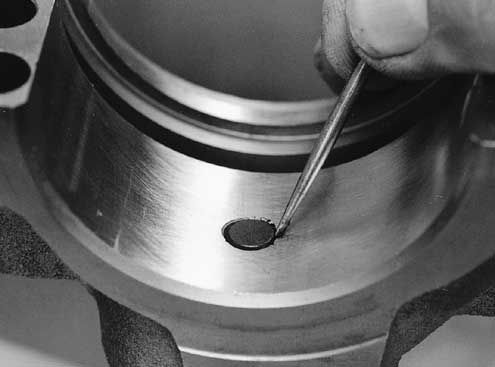
this seal CAN easily be installed backwards - all mating surfaces should be clean and free of oil, but the cranks surface should be lightly oiled to prevent the lip sticking to its surface, a mini- finger tip worth of Vaseline smeared on the crank surface will prevent that
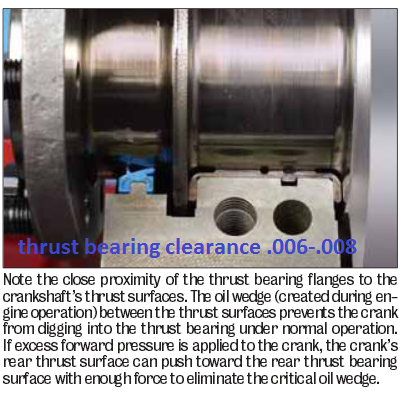
(NOTICE THE DESIGN, and LOCATION,: theres no direct oil pressure, being applied to the rear seal, only oil, mist and blow bye pressure in the oil pan, will exert minimal pressure against the forward facing lip pushing against the lip forcing it to seal against the crank, and lubing the contact point, of the lip so wear is minimized, having a properly functioning PVC and breather combo, helps and having deck plate honed the cylinders and correctly installed the rings limits the crank case pressures)
Use a 1/4 inch offset so the bearing cap parting line does not line up with the main cap seal parting line
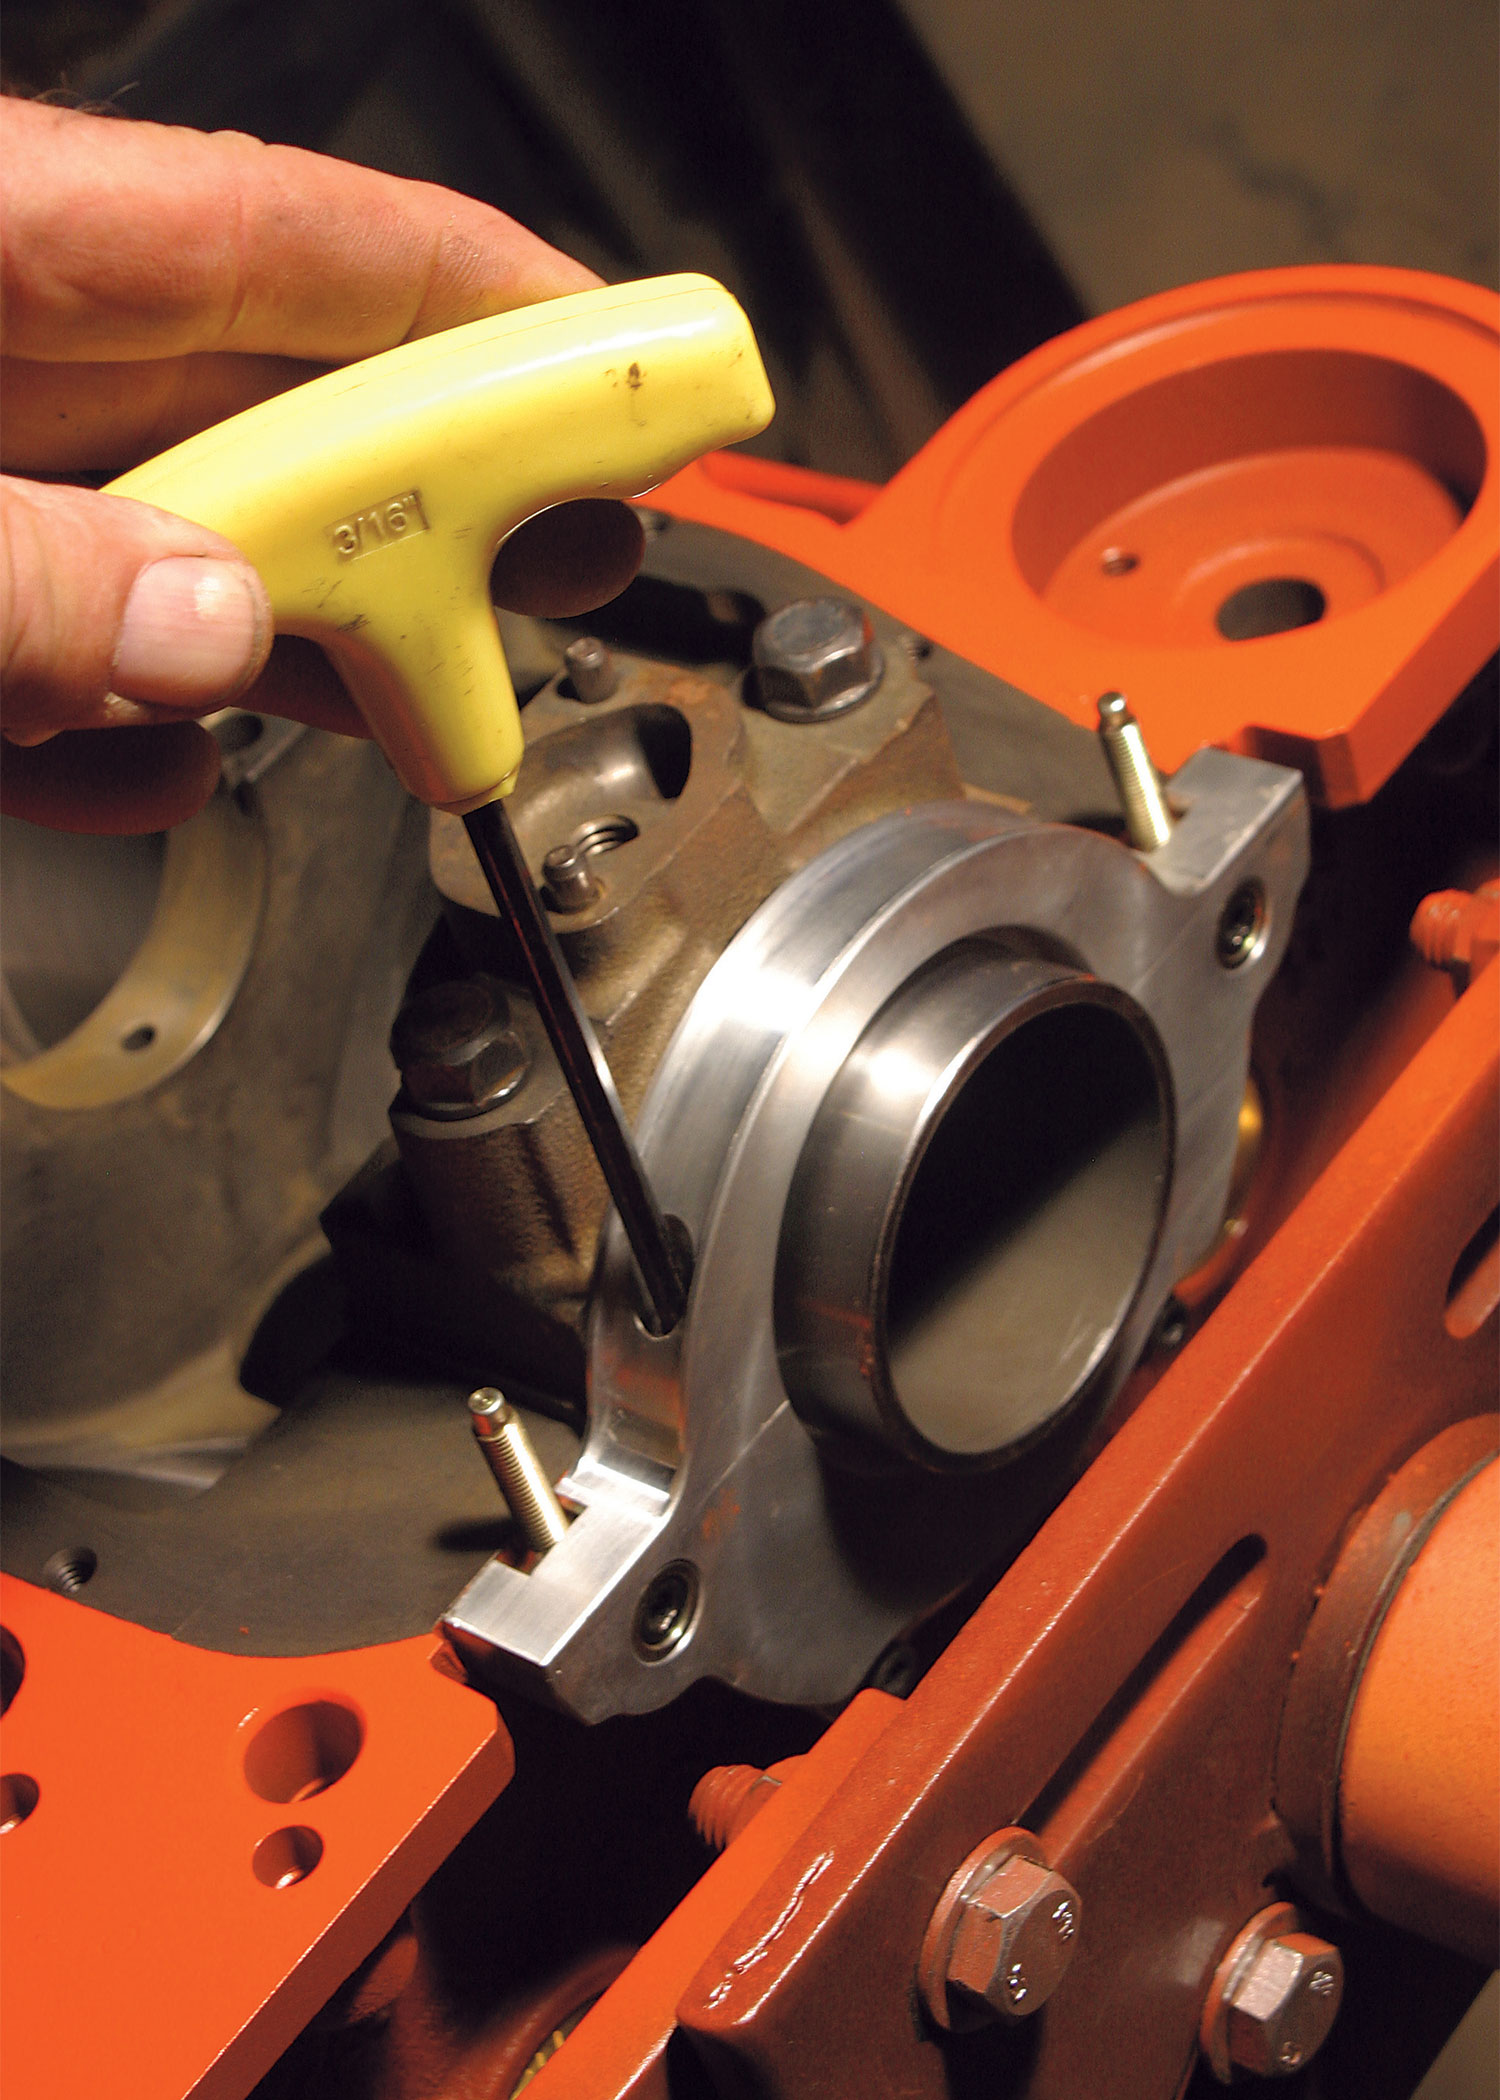
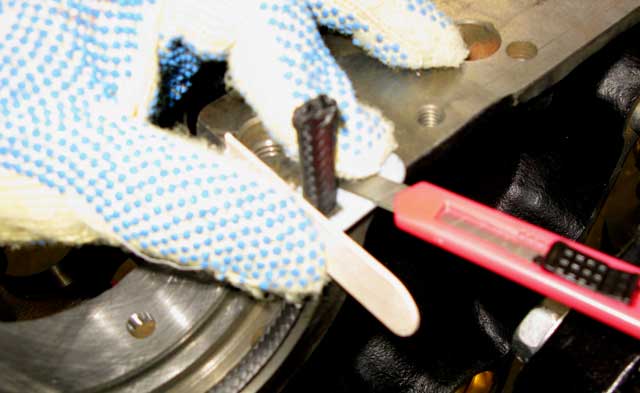
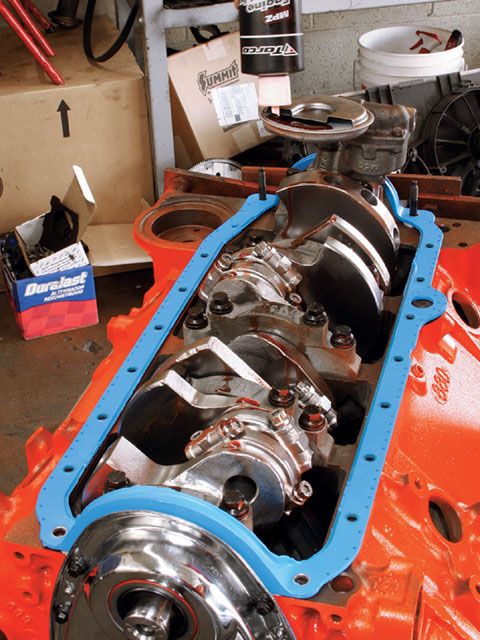
simply push seal up in cylinder case on one end so the other end sticks out 1/4"" and match the other seal half in the rear main cap offset by 1/4 inch - this offset will be on the bearing cap as well, and YES,the pictures below show the ends of the seals installed matching the main cap parting line which IS NOT CORRECTLY DONE, off setting the seal slightly helps prevent leaks
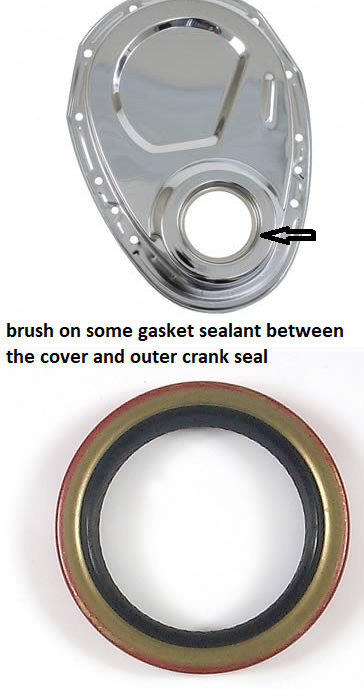
I use a light coat of brush on gasket sealer on the back of the seal in the main cap and block as its an extra precaution limiting leaks, applied just prior to installing them so slight movement has no effect on the sealant sealing the seal to the main cap or block
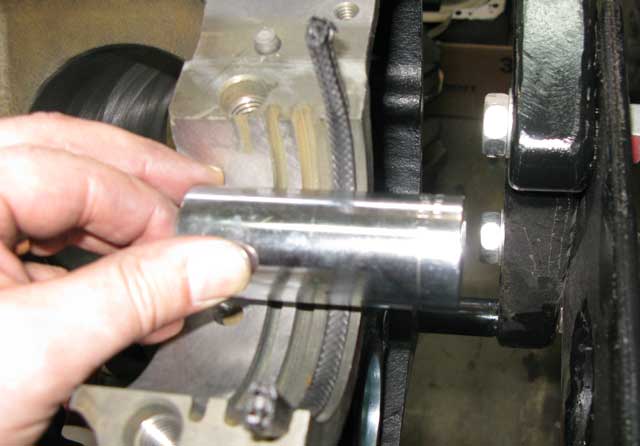
Roll the seal around crankshaft using the tool as a "shoehorn"
Install the other seal half in the bearing cap
Apply sealant (we like Permatex Ultra Copper High Temp RTV Silicone Part No. 81878)
to the bearing cap to case interface, keep the RTV off the seal split line (only on the cap mating surface next to the seal)
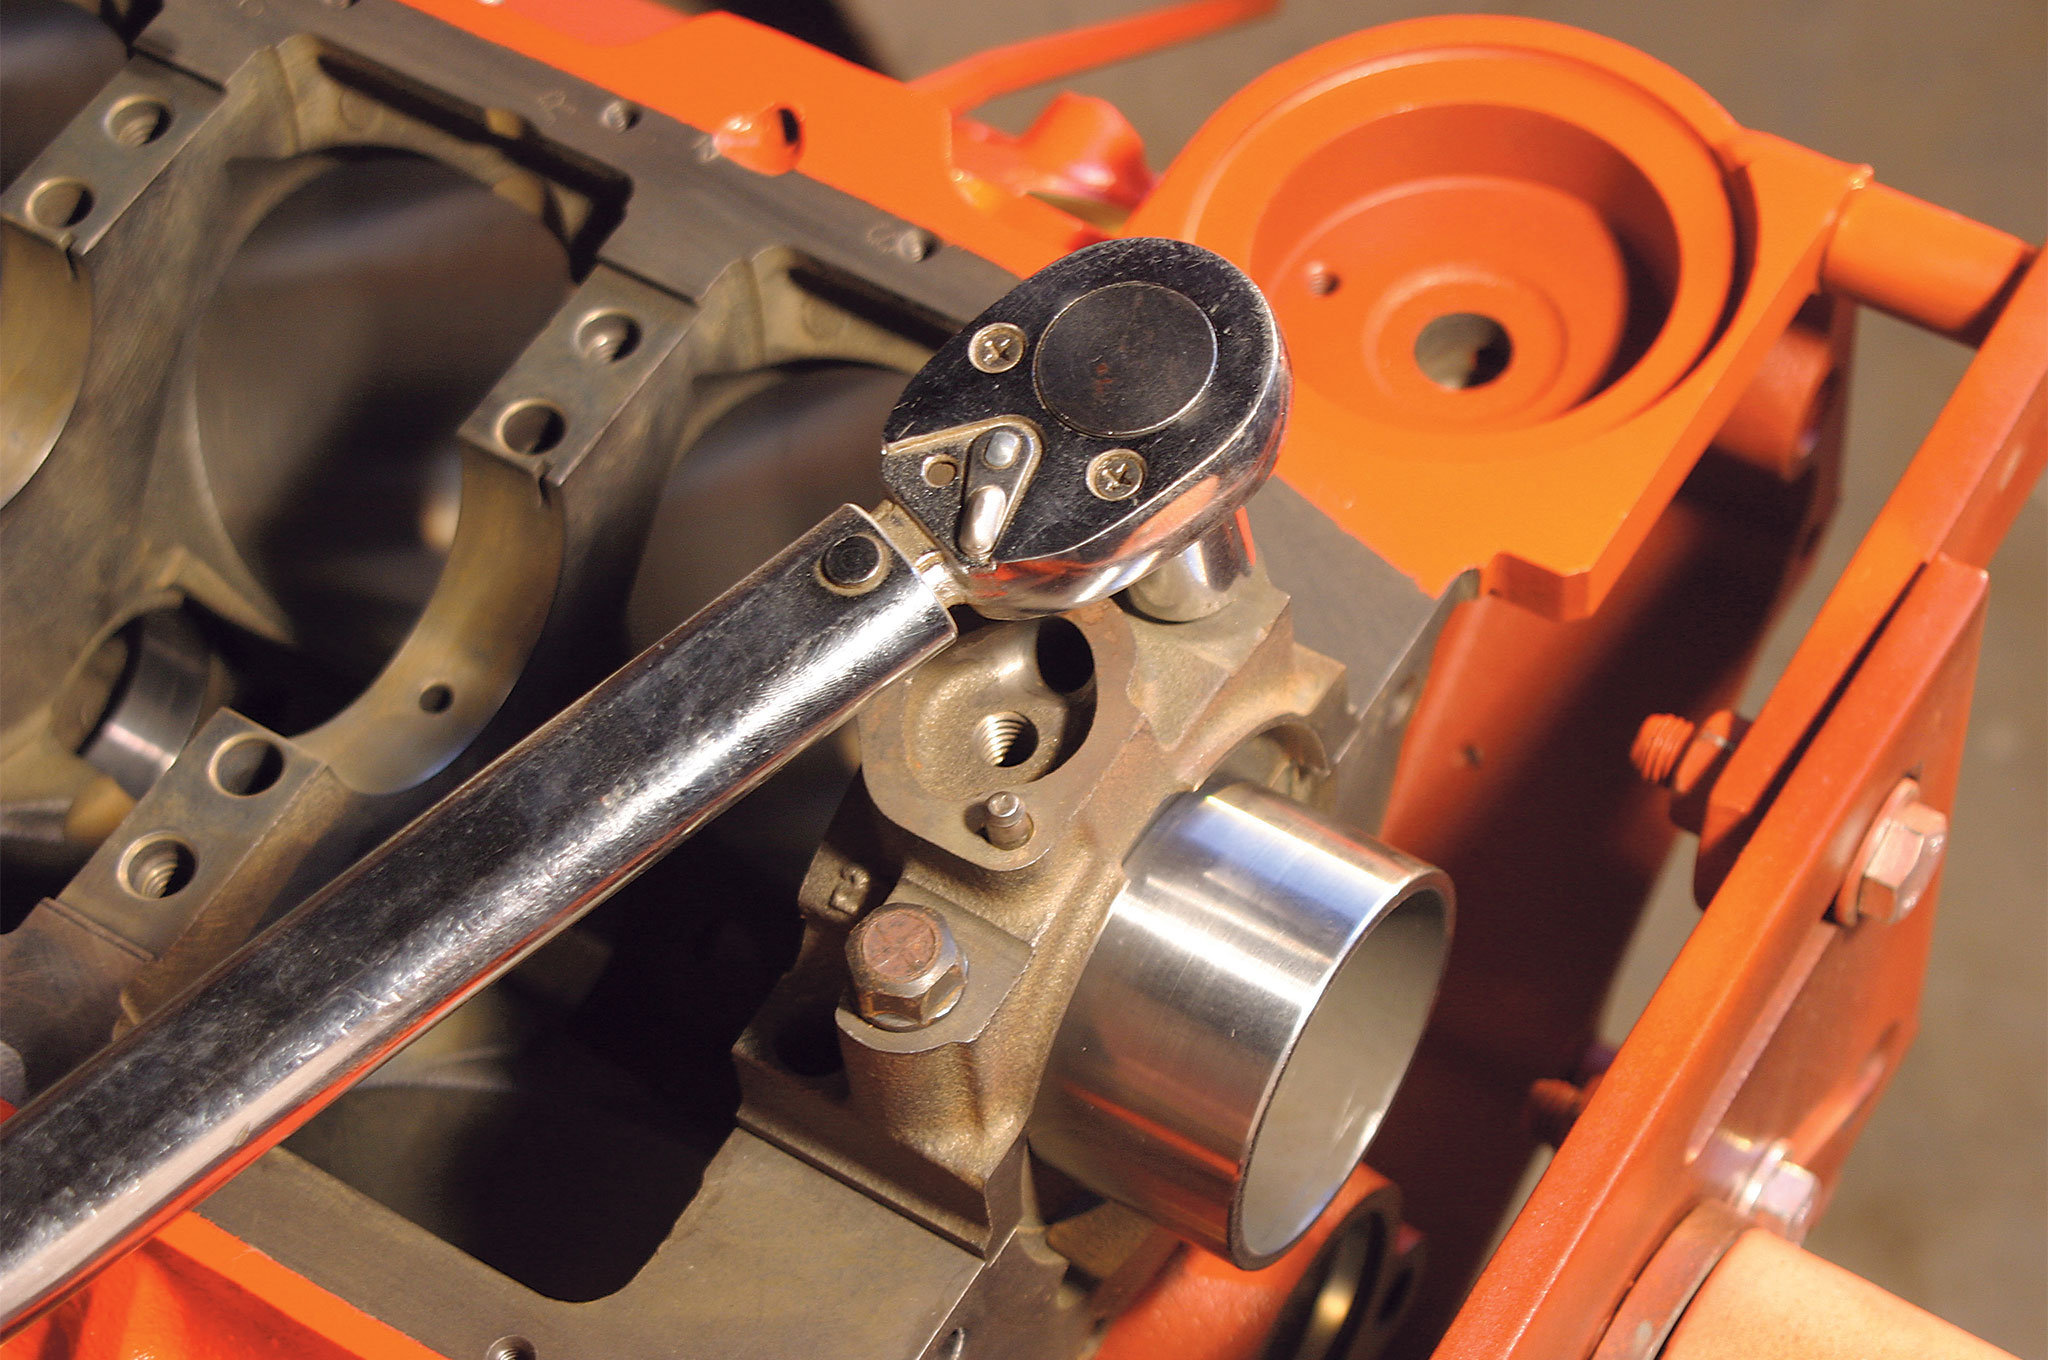
Install the rear main cap and torque to specs.
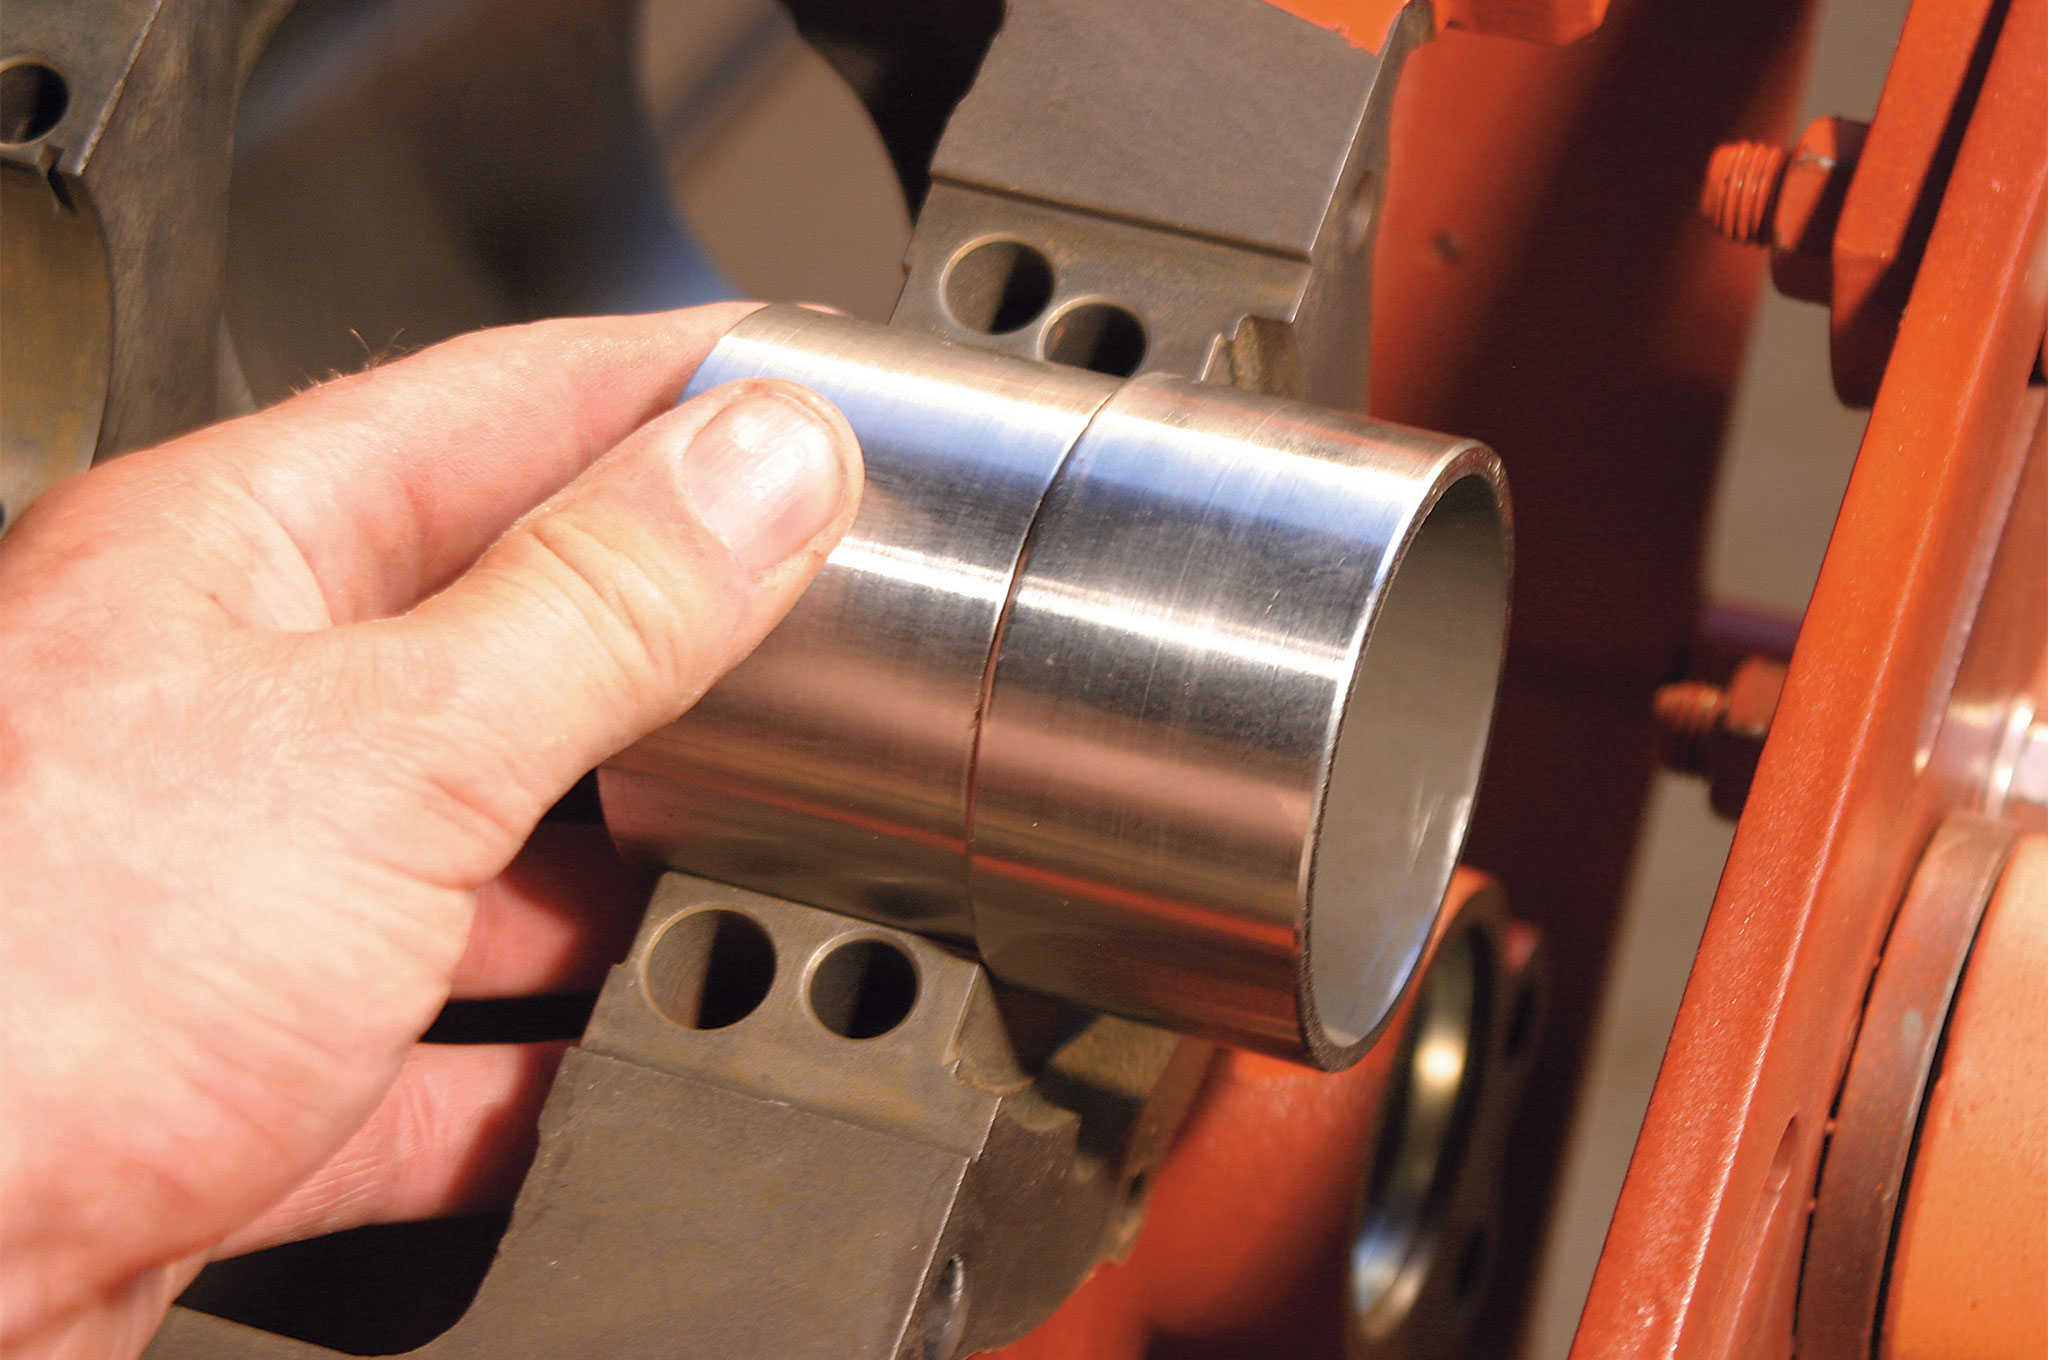
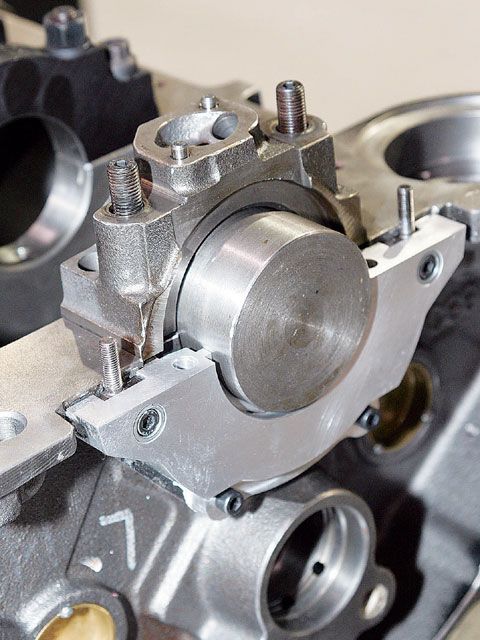
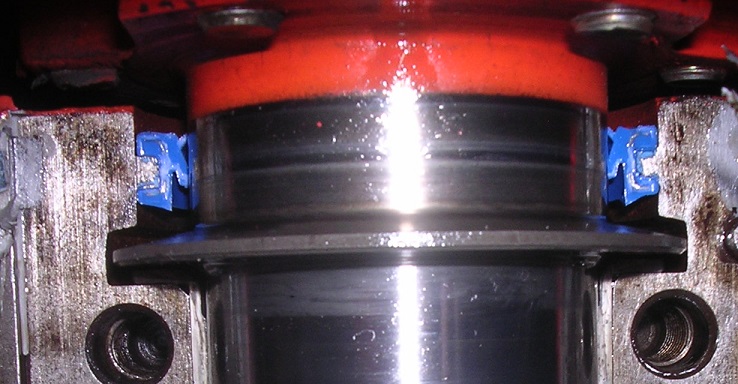
keep in mind theres NO DIRECT OIL PRESSURE ON THE REAR MAIN SEAL, the DRAIN AREA LOCATED BETWEEN the BEARING AND REAR SEAL AT THE REAR OF THE MAIN CAP BEARING (CLEARLY SHOWN IN THE PICTURE )SEPARATES & DRAINS ANY PRESSURIZED OIL INTO THE OIL PAN, the rear main seal forms part of the oil pan gasket perimeter seal, many leaks blamed on the rear main seal are caused by improper rear seal installation (having the lip face to the rear) or failure to place a thin layer of sealant under the rear main cap between the block and main cap, excessive piston ring leakage of compression in the cylinders can cause high crank case pressure that in more extreme cases can cause leaks but the PVC and valve cover breathers should prevent moderate to low leakage from causing problems
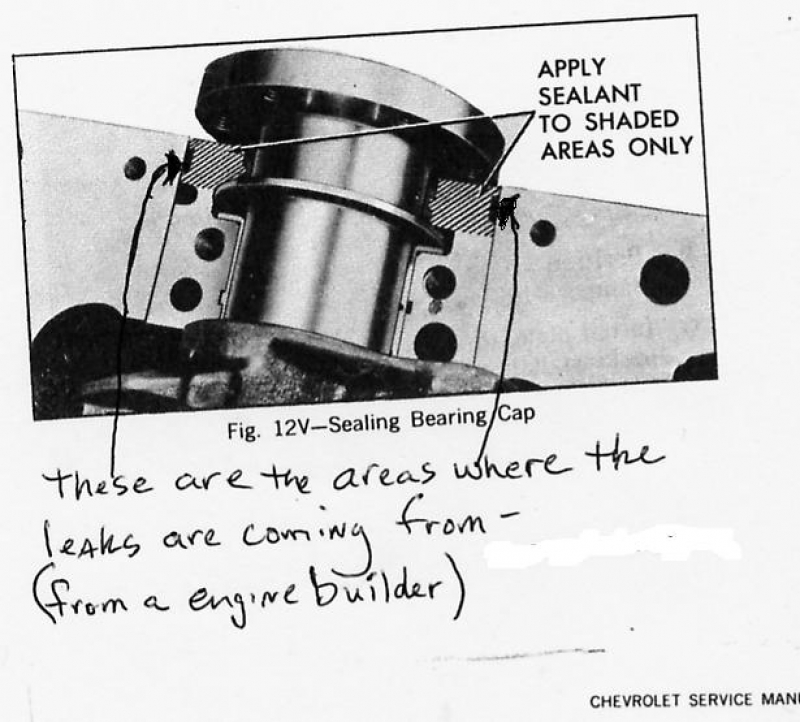
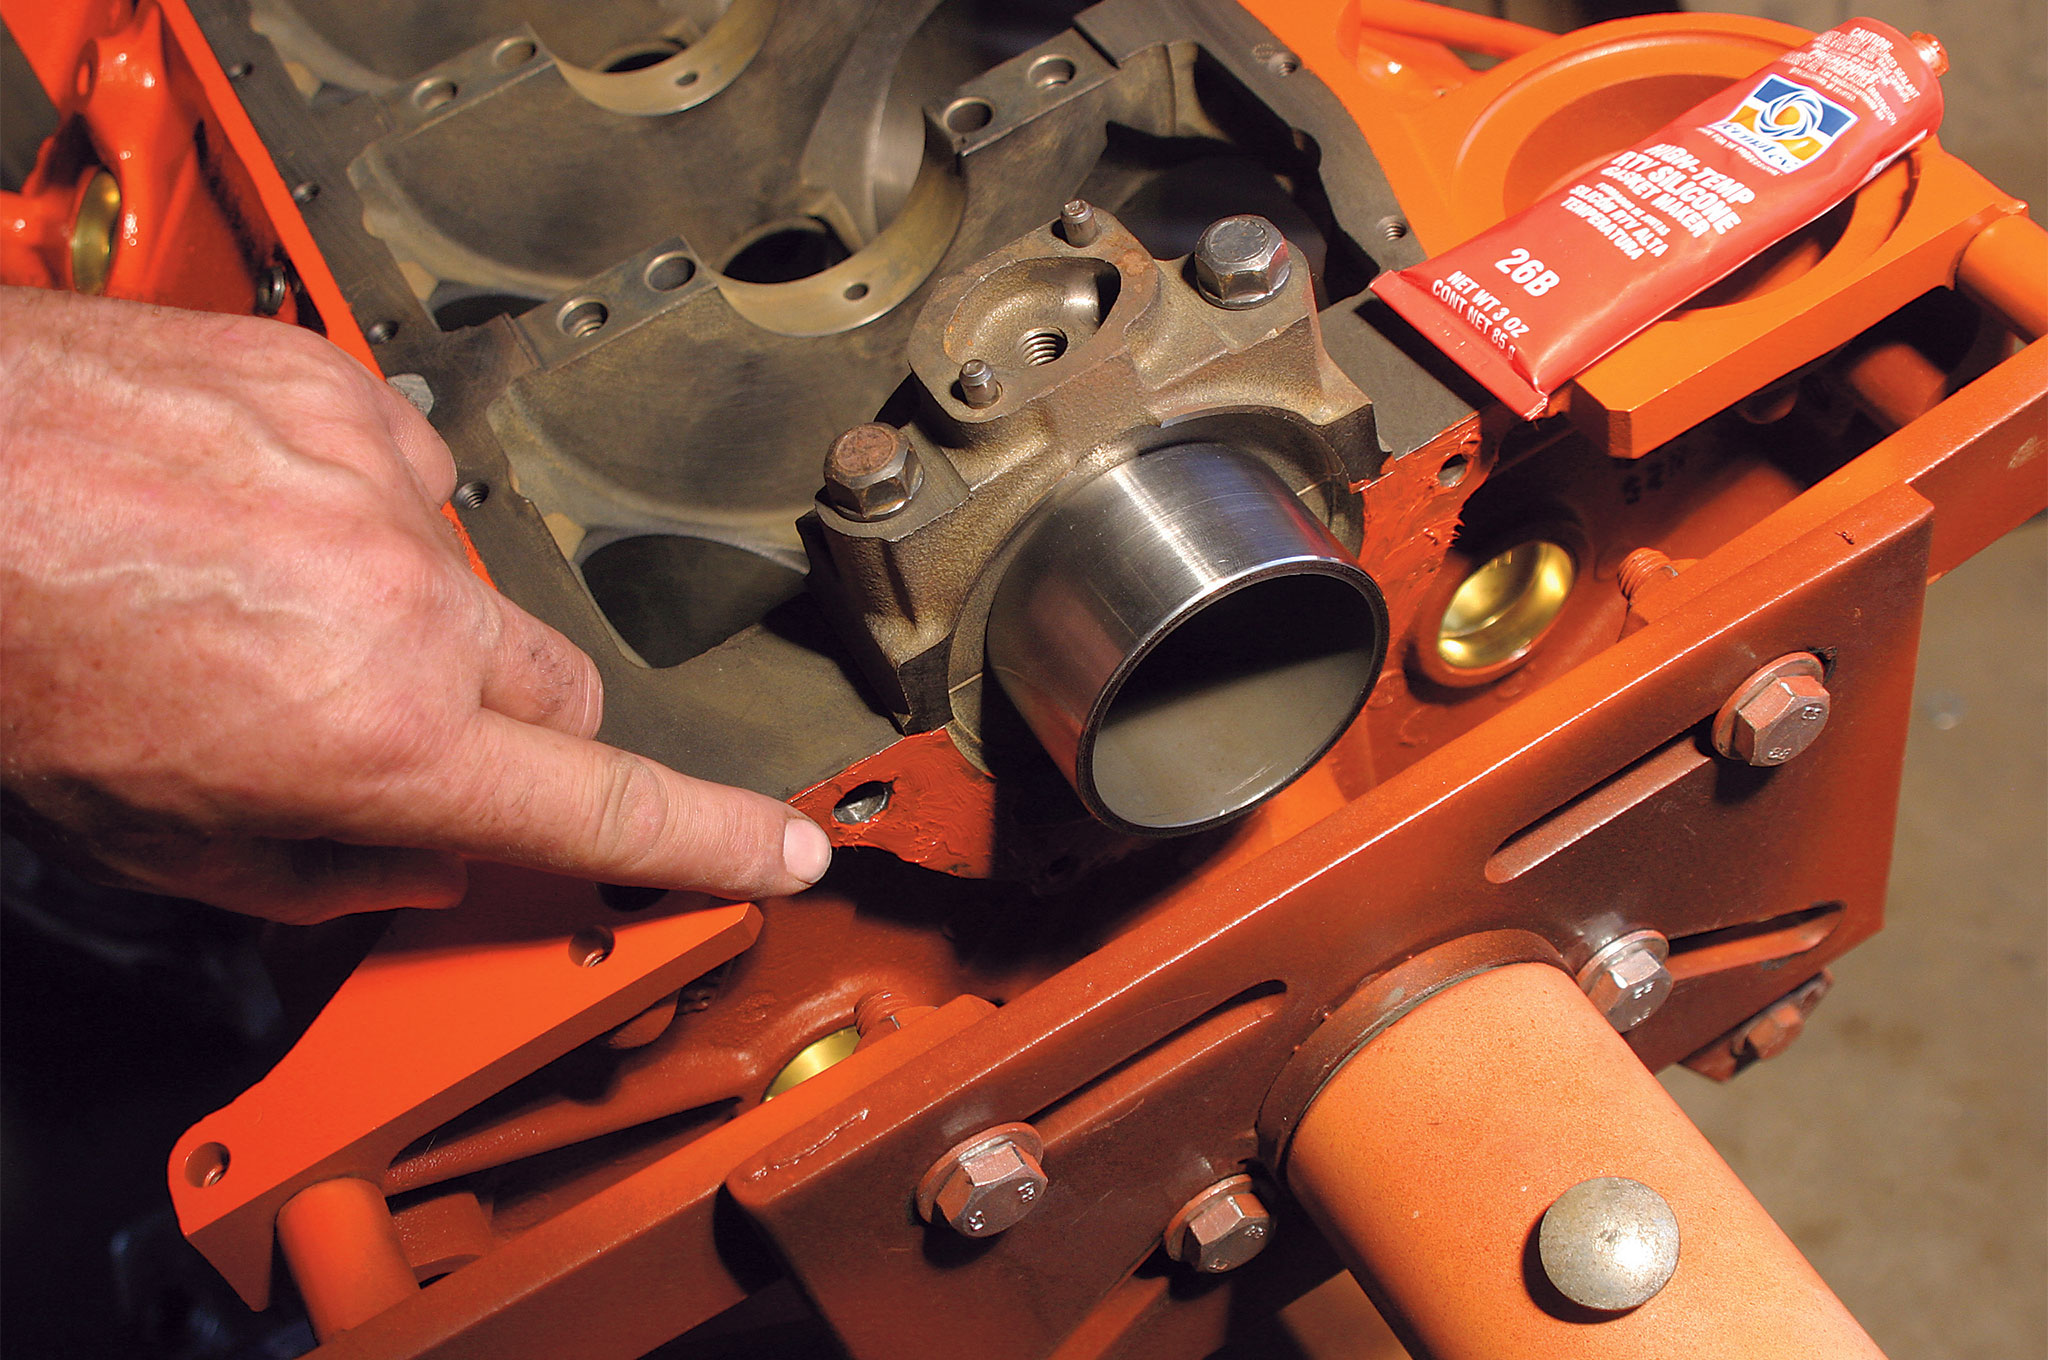
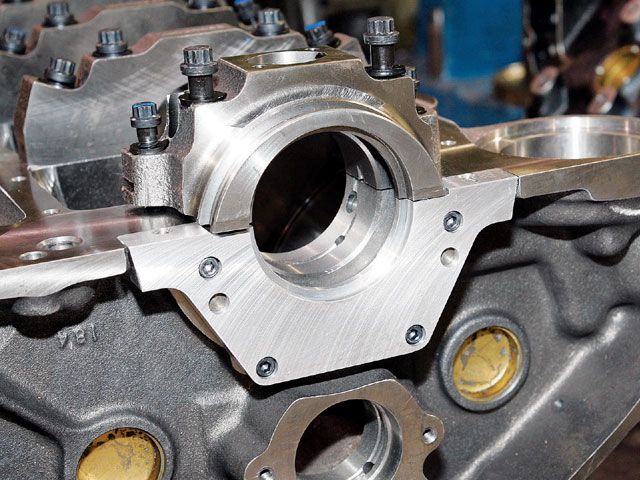
don,t forget a very thin line of sealant under the main cap/block bearing surface or you may have a very slow oil drip from what you think is the rear main seal but its really seeping under the main cap
http://www.pitstopusa.com/detail.aspx?ID=60256
theres always those guys that worry about the rear main seal leaking if the blocks been line honed as that moves the crank location in the block a couple thousands of an inch, the movement is never a problem, if the rear seal is installed correctly AND the surface it seals to is POLISHED to a MIRROR SMOOTH, surface so the seal won,t wear,, the rear crank journals CONCENTRIC, and ROUND, and the seals installed correctly, its un-fortunate but its possible to install the rear seal facing 180 degrees out with the lip facing to the rear which will cause leaks.
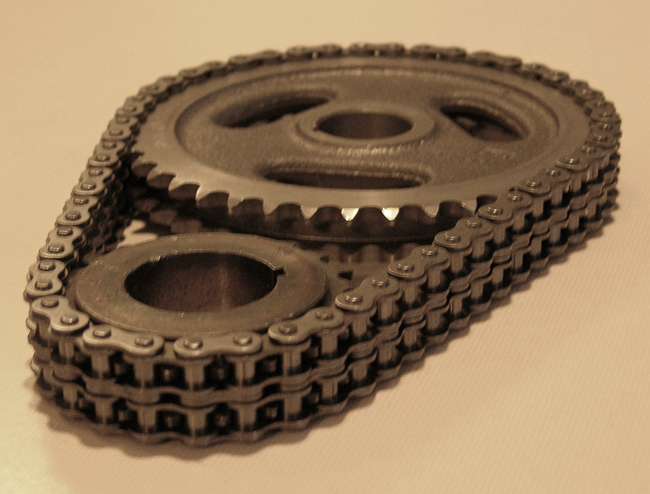
when blocks are align honed its very rare for the crank to be moved more than .005 deeper into the block, as IM sure you know there are slightly shorter timing chains available to compensate,
cloyes is my supplier of choice
tips ?
make sure your using the correct seal design for the journal diam.
use the correct seal with the lip facing to the engine front
use silicone sealant on the ends and off set the ends from the blocks main cap slightly
use the brush on sealant on the contact area between the main cap and block and the rear outward surface on the seal
make sure you degrease the seal mounting surface before snapping it into place with the wet brush on sealant on the back outer surface
lube the lip of the seal that touches the rotating crank with a finger tip of Vaseline
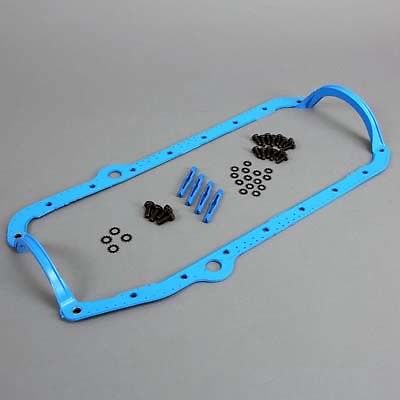
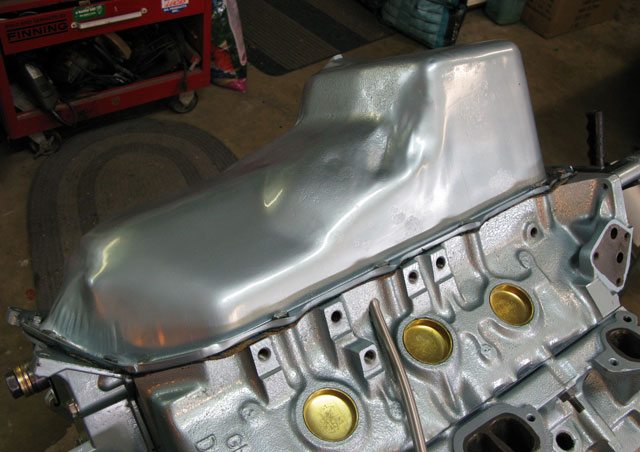
always use a one piece synthetic oil pan gasket, as some oil leaks blamed on rear seals are really faulty rear oil pan gaskets or improperly installed rear oil pan gaskets
KING BEARINGS LISTS THEM IN SEVERAL SIZES, WHY NOT CALL THEM, if they have the correct size youll still need to polish the crank matched surface to prevent further rapid wear
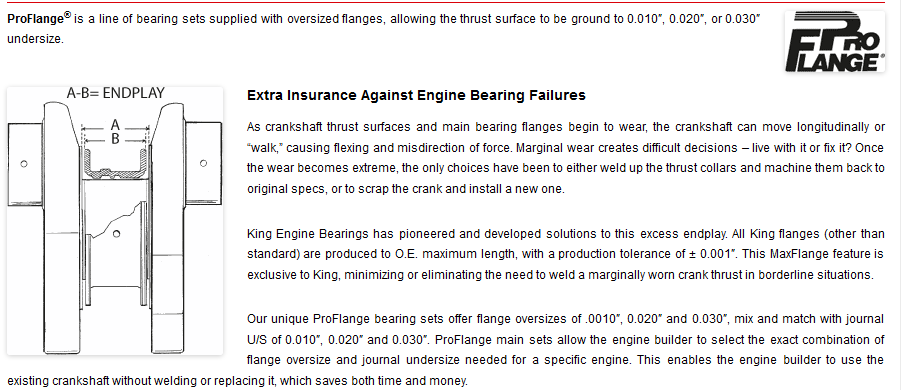
http://kingbearings.com/maxflange_proflange.php
LINK
viewtopic.php?f=54&t=206&p=1154&hilit=+synthetic+gasket#p1154
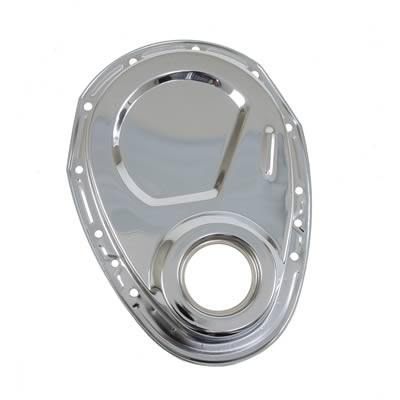
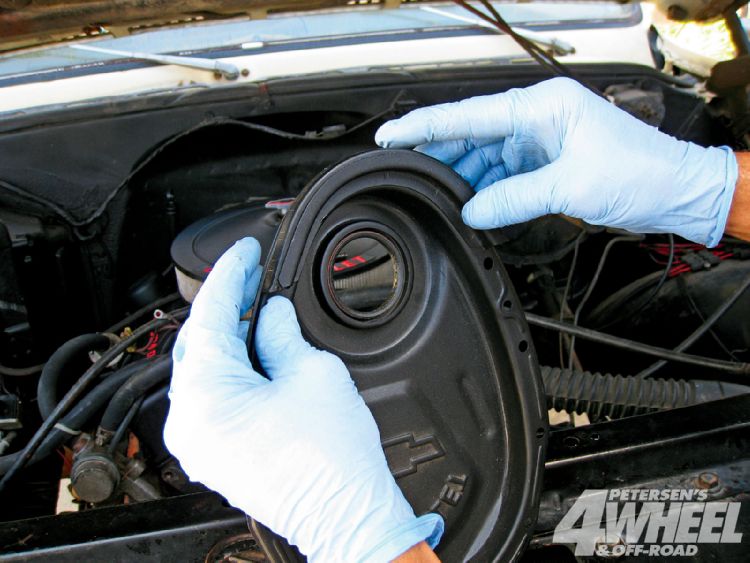
when your trying to prevent oil leaks , on a new engine ,I prefer to do the timing cover first but theres no reason not to install the oil pan gasket immediately after the timing cover
viewtopic.php?f=54&t=206&p=1154&hilit=+synthetic+gasket#p1154
viewtopic.php?f=51&t=1718&p=4257&hilit=rear+seal#p4257
http://garage.grumpysperformance.co...l-pan-gasket-still-small-leak.3084/#post-8194
viewtopic.php?f=54&t=2725&p=7076&hilit=gasket+synthetic#p7076
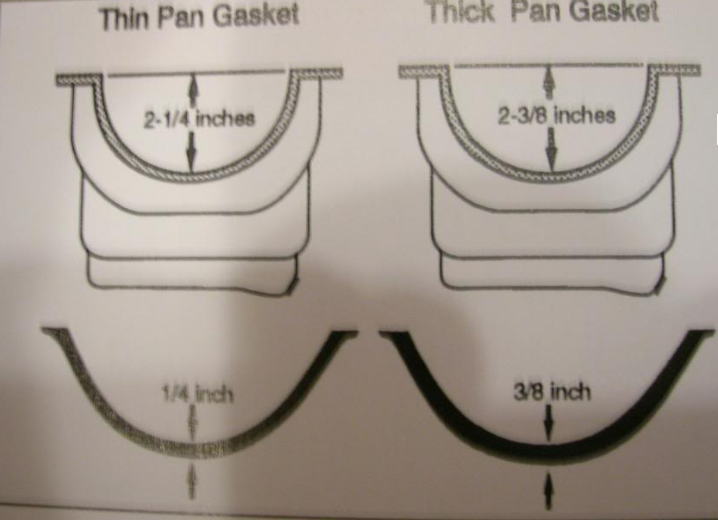
one piece synthetic oil pan gaskets seals are superior to the older separate end piece and side piece design
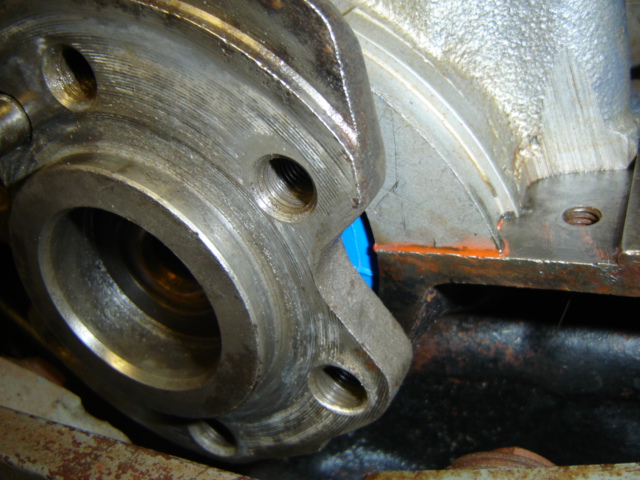
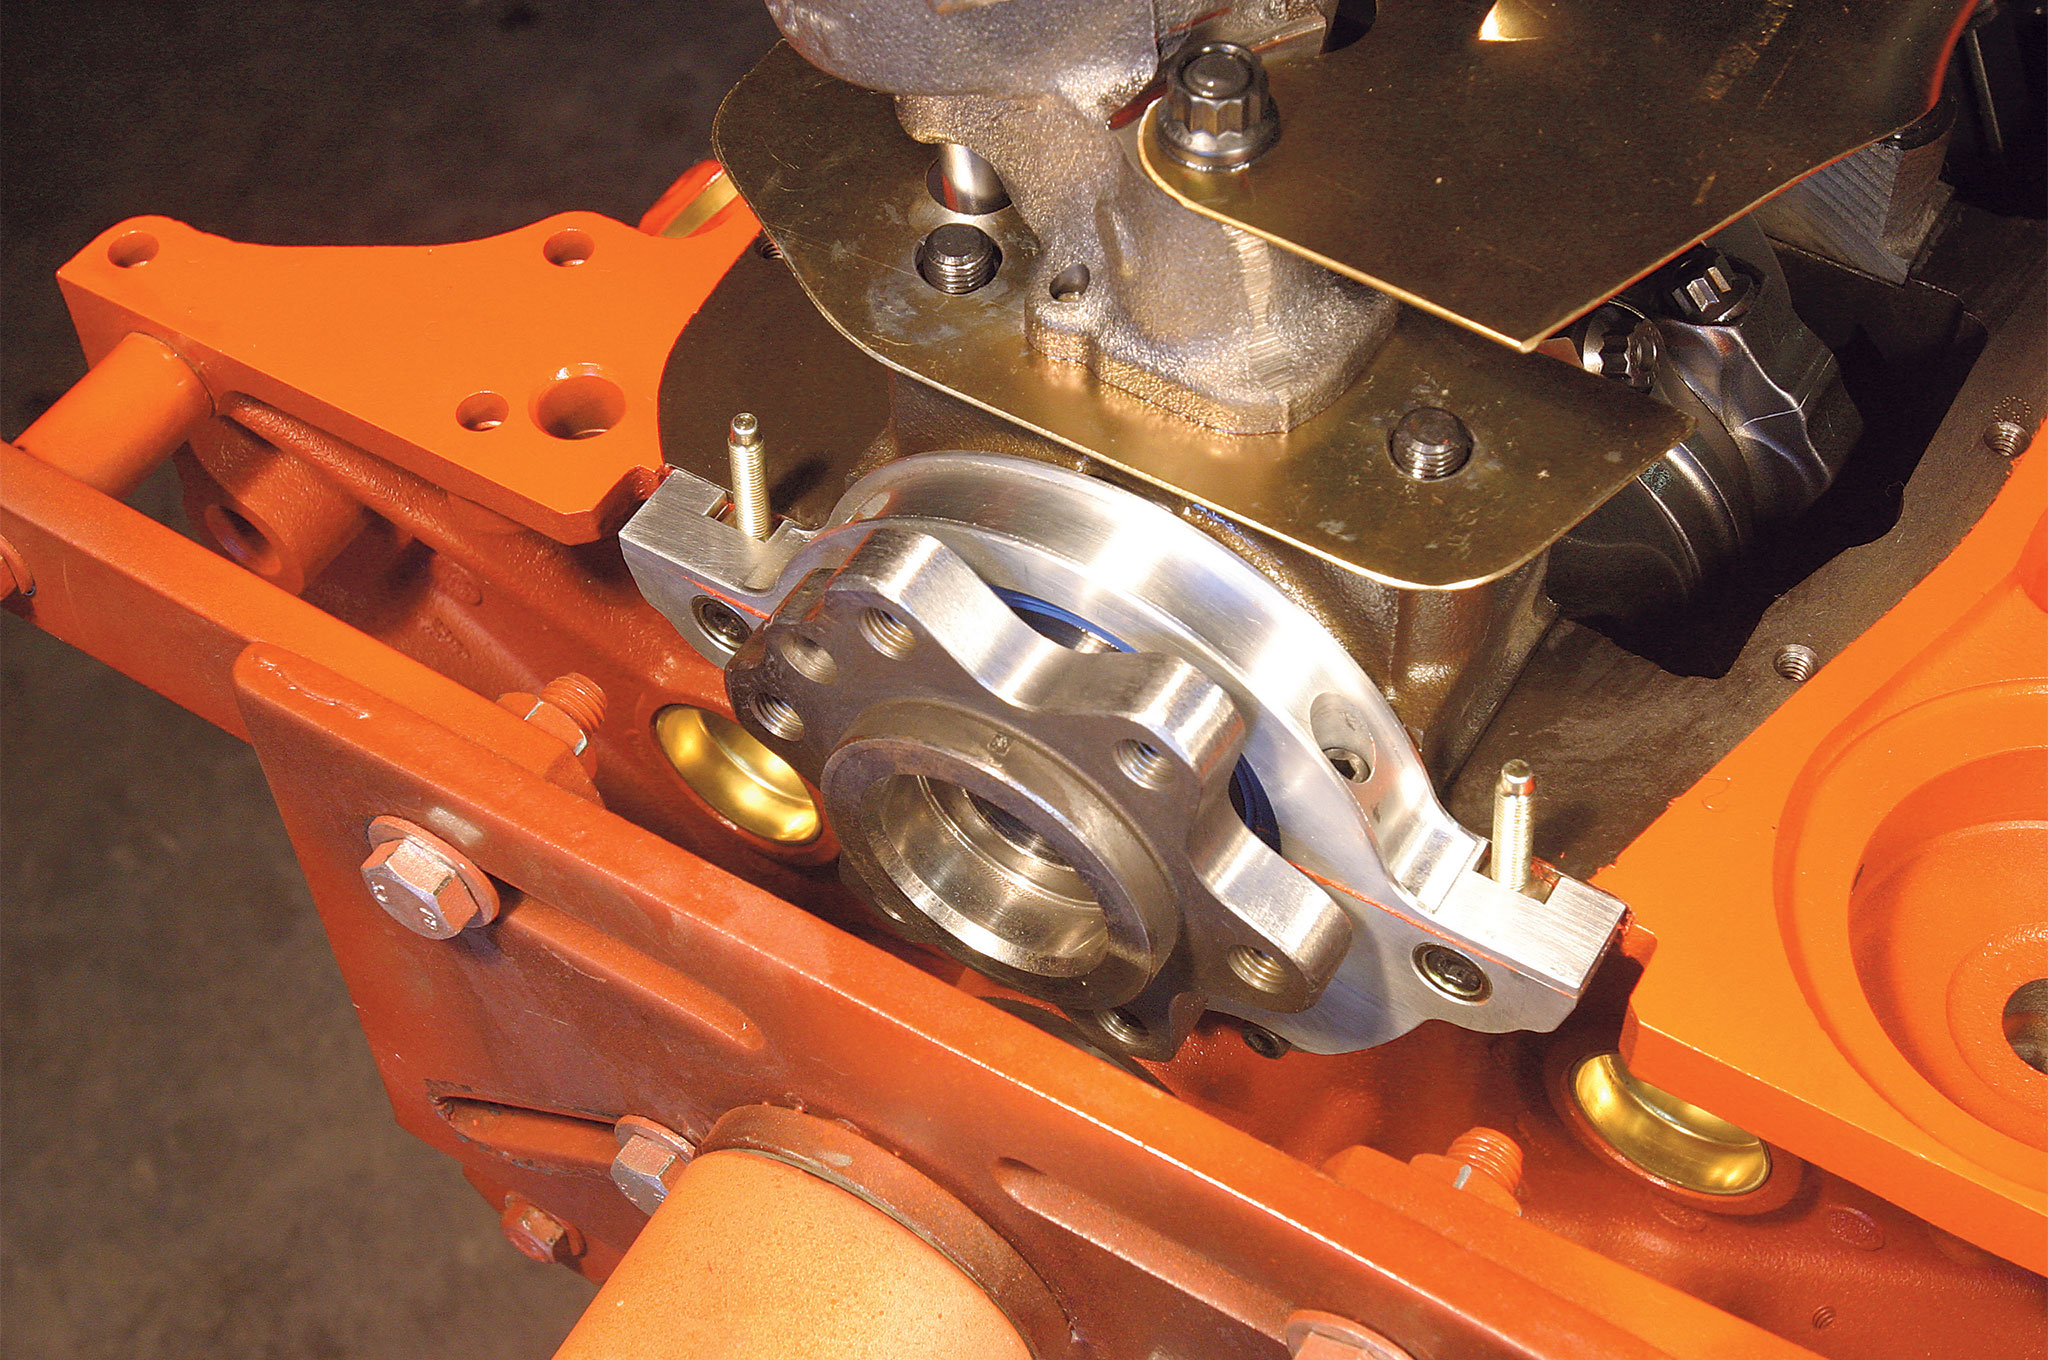
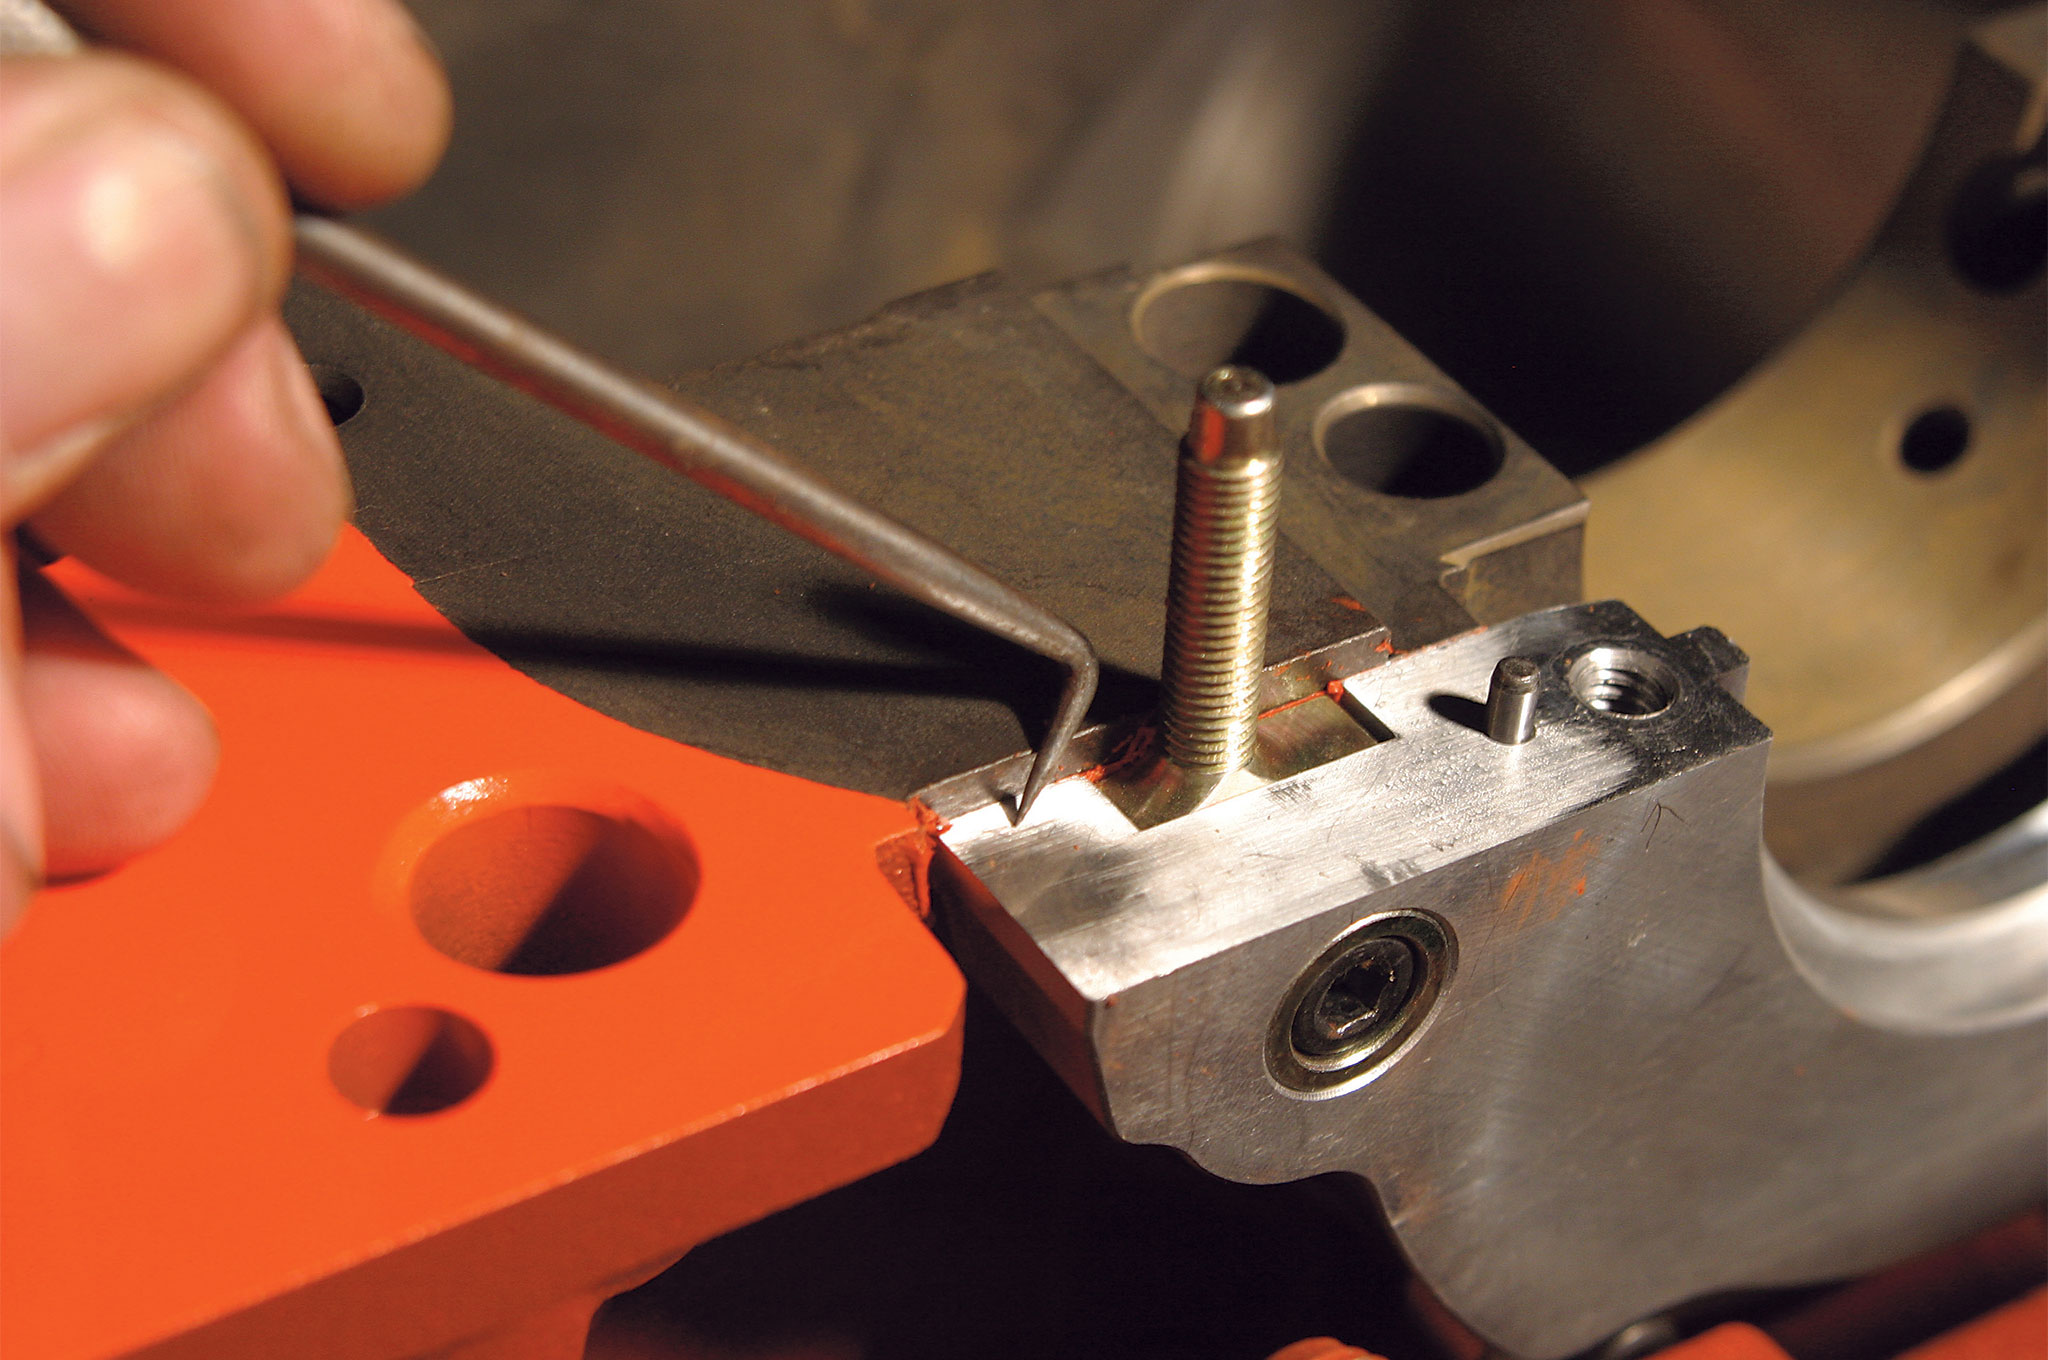
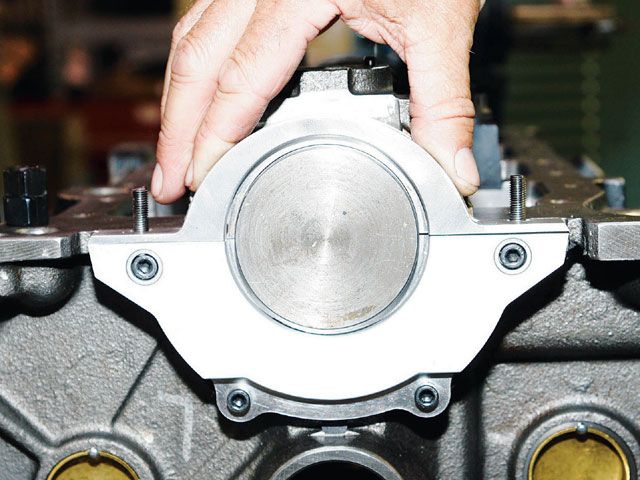
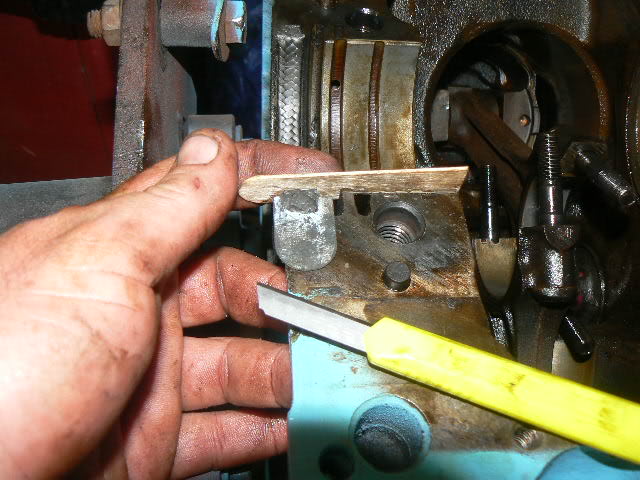
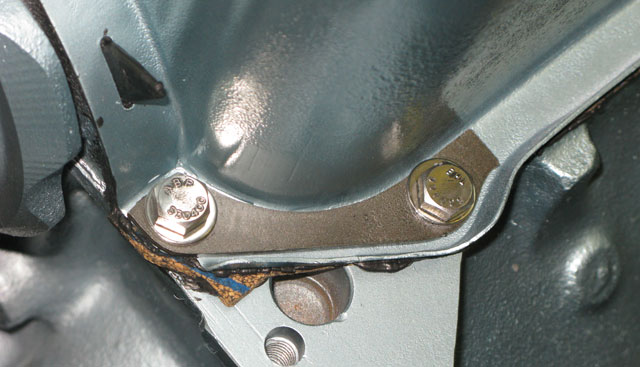
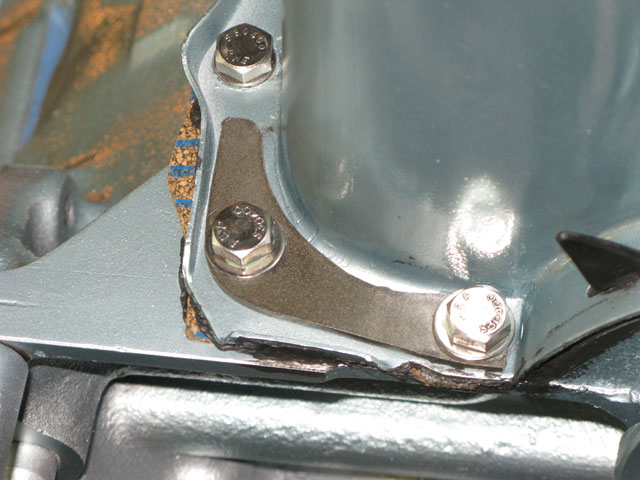
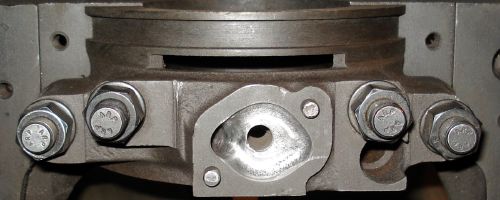
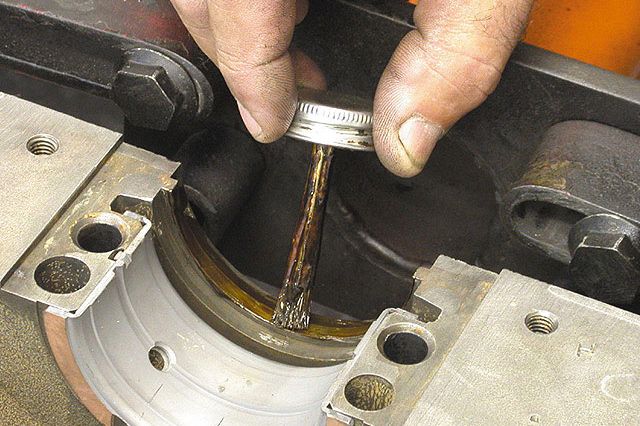
here you can see the thin line of sealant under the rear main cap, thats sometimes overlooked resulting in a slow drip near the rear main seal
http://www.cloyes.com/Default.aspx?TabI ... uage=en-US
now too answer your question, the rear seal must be installed with the inside lip that rides on the crank surface, facing toward the front of the block and the ends of the seal slightly off set from the main cap parting line with a small dab of high heat silicone on both ends of each seal, and the lip covered with moly lube, the slight difference in the block measurement is MEANINGLESS to the seal.
the back of the seal where it snaps onto the block and main cap are usually lightly coated with a non hardening liquid gasket cement (HIGHLY RECOMMENDED) but can be left dry, with a very low risk of leaking, why risk it
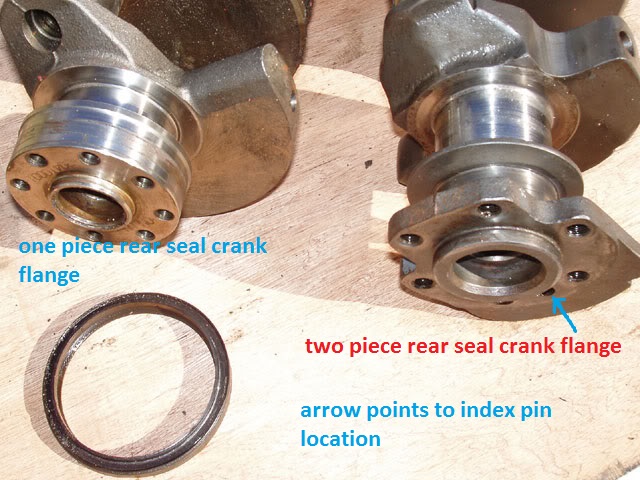
remember between about 1955-1958 a rope seal was used after about 1986 a one piece rear seal design was used on the SBC, to replace the previous two piece rear main seal
read this also
viewtopic.php?f=53&t=301
Lip orientation
The lip on the rear main seal should point toward the crankshaft and not towards the back of the engine. The lip on the seal is designed to allow oil pressure to force the seal against the crankshaft, improving its sealing capability. When the seal is pointed the wrong way, it allows oil pressure to force oil past the seal, resulting in a leak.
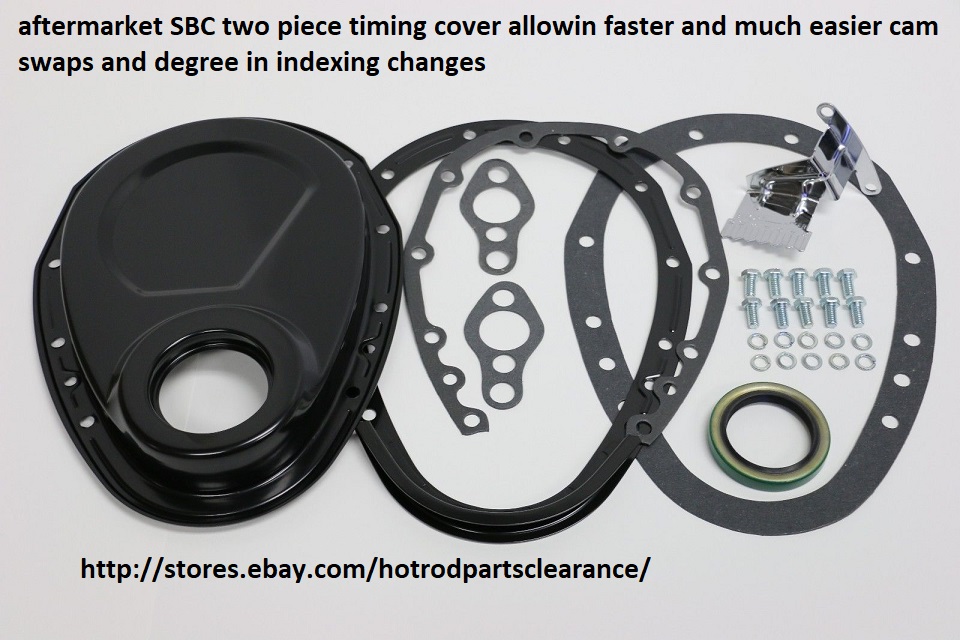
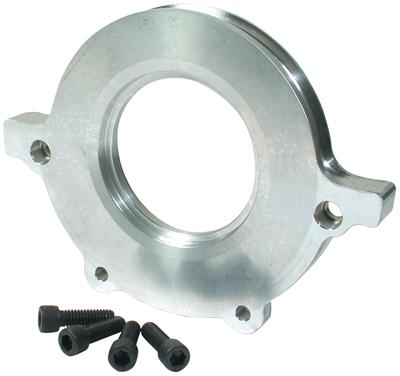
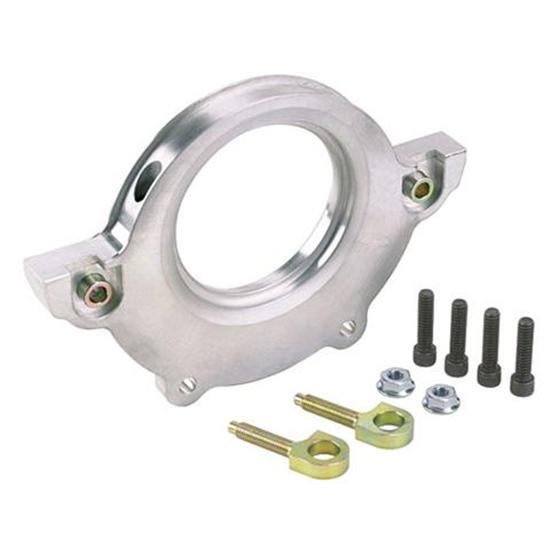
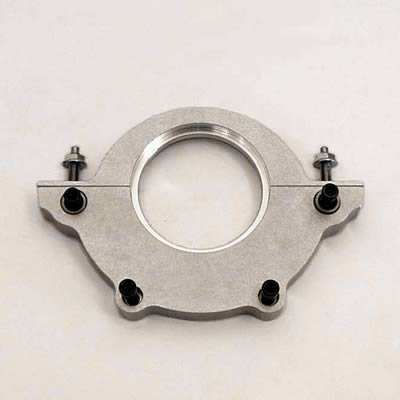
One piece-Two piece seals
Prior to 1986, Chevy engines used a two-piece rear main seal that was prone to occasional leaks. After 1986, Chevy switched to a one-piece seal design to reduce the chances of a leak occurring. One-piece seals are more effective than two-piece seals but are more difficult to service with the engine in the car.These later engines can be converted to use a two-piece seal by using an adapter kit that can be purchased from General Motors and most performance parts stores.
Rope seals
Prior to 1956, Chevy motors used a rope style rear main seal instead of neoprene rubber. These seals were made with asbestos and because this material is no longer available, replacements are made with modern materials that mimic the properties of the old asbestos seals. Chevy engines that use rope style seals cannot be easily converted to use modern neoprene seals and require machining to make the conversion possible.
Lubrication
Rear main seals should not be soaked in oil before installation. Once installed in their seats, and before the cranks is installed, a light coat of engine oil should be wiped across the seal's surfaces where it contacts the crankshaft. This will reduce the chances of seal failure at initial startup by providing lubrication for the new seal until oil pressure builds and begins properly lubricating the seal.
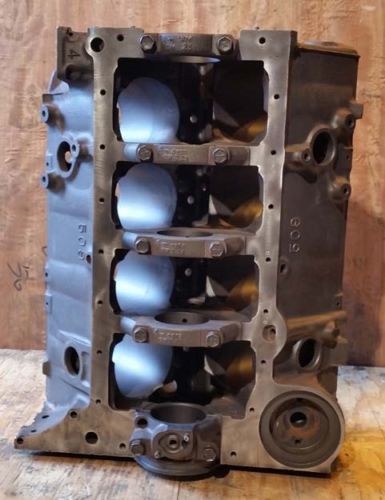
TWO BOLT MAIN CAP BLOCK
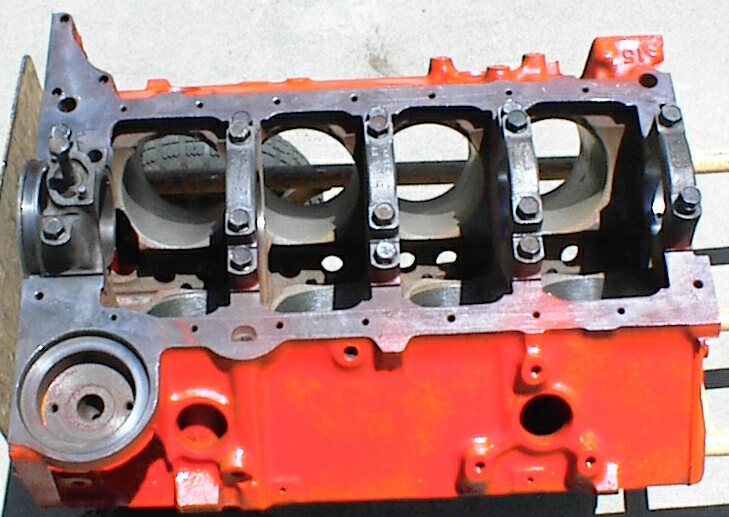
4 bolt SBC block
http://garage.grumpysperformance.com/index.php?threads/on-my-3rd-rear-main-seal-bbc.11084/
chevy swapped to one piece rear seals around the 1988 year range in the sbc engines
viewtopic.php?f=53&t=301&p=1815&hilit=+one+piece+crank#p1815
http://www.corvettehacks.com/article5.html
viewtopic.php?f=54&t=473
viewtopic.php?f=54&t=2725&p=7076#p7076
http://www.neow.org/rms1.html
http://www.summitracing.com/parts/FPP-2912/
http://www.summitracing.com/parts/FPP-2900/
viewtopic.php?f=32&t=474&p=585&hilit=+synthetic#p585
rear seals come in, rubber, silicon rubber,.Fluoroelastomer, and Viton , durability vary,s between brands but roughly in that order,they all work if properly installed but VITON usually lasts the longest
keep in mind the seal lip must be properly installed and the seal lip must ride on a mirror smooth lubricated crank journal, if its to last, no seal will last long on a rough or out of round crank that wears that seal lip
youll occasionally find uses for a high temp rated silicone sealant
like ultra-copper that has about twice the temp tolerance of the common black RTV
http://www.summitracing.com/parts/FEL-BS118291/.. rubber usually GOOD
http://www.summitracing.com/parts/FEL-2900/... Silicone VERY GOOD
http://www.summitracing.com/parts/FEL-2909/ Fluoroelastomer, SLIGHTLY BETTER
http://www.summitracing.com/parts/FEL-2918/..viton SLIGHTLY BETTER STILL IN SOME DESIGNS
http://www.rockauto.com/en/catalog/...350cid+v8,1049666,engine,crankshaft+seal,5604
Top Seal Install ---
IVE installed some rear seals with the ends offset and some flush, Ive never had one leak in 40 plus years, if you have the seal leak its been my experience looking at engines Ive repaired that about 80% of the leaks are due to improper installation and 20% due to rarely if ever doing oil changes so wear was the root cause of the leak due to sludge in the oil
Be sure the lip seal is positioned leaning inward towards the front of the engine, and the rear seals off-set from the main cap parting line by about 1/4" to reduce the tendency to leak oil
notice the open slot between the rear main cap supporting the oil pump and bearing shell support and the area supporting the rear main seal, this prevents PRESSURIZED oil from the bearings reaching the rear main seal.
the as cast recess in the rear main cap where the oil pump mounts can be rather restrictive and shallow, so a bit of careful mill or grinding work to open up and add some depth certainly helps oil flow if its done carefully
failure to use the correct oil pump,mounting stud, bolt or nut or carefully check clearances when mounting an oil pump can cause problems
ONE RATHER COMMON MISTAKE IS USING THE WRONG OIL PUMP STUD OR BOLT TO MOUNT THE OIL PUMP AS IF EITHER EXTENDS THRU THE REAR MAIN CAP IT CAN AND WILL BIND ON THE BEARING AND LOCK OR RESTRICT, SMOOTH ROTATION
http://garage.grumpysperformance.co...-bearing-trashed-in-1-2-hour.5141/#post-71921
A simple modification to the upper thrust bearing may be beneficial in some engines. Install the upper thrust bearing in the block to determine which thrust face is toward the rear of the engine. Using a small, fine tooth, flat file, increase the amount of chamfer to approximately .040" (1 mm) on the inside diameter edge of the bearing parting line. Carefully file at the centrally located oil groove and stroke the file at an angle toward the rear thrust face only, as shown in the illustration below. It is very important not to contact the bearing surface with the end of the file. The resulting enlarged ID chamfer will allow pressurized engine oil from the pre-existing groove to reach the loaded thrust face. This additional source of oiling will reach the loaded thrust face without passing through the bearing clearance first (direct oiling). Since there may be a load against the rear thrust face, oil flow should be restricted by that load and there should not be a noticeable loss of oil pressure. This modification is not a guaranteed "cure-all". However, the modification should help if all other conditions, such as surface finish, alignment, cleanliness and loading are within required limits.
don't forget the rear surface of the rear seal to block and main cap needs to be sealed, oil tight
this seal CAN easily be installed backwards - all mating surfaces should be clean and free of oil, but the cranks surface should be lightly oiled to prevent the lip sticking to its surface, a mini- finger tip worth of Vaseline smeared on the crank surface will prevent that
(NOTICE THE DESIGN, and LOCATION,: theres no direct oil pressure, being applied to the rear seal, only oil, mist and blow bye pressure in the oil pan, will exert minimal pressure against the forward facing lip pushing against the lip forcing it to seal against the crank, and lubing the contact point, of the lip so wear is minimized, having a properly functioning PVC and breather combo, helps and having deck plate honed the cylinders and correctly installed the rings limits the crank case pressures)
Use a 1/4 inch offset so the bearing cap parting line does not line up with the main cap seal parting line
simply push seal up in cylinder case on one end so the other end sticks out 1/4"" and match the other seal half in the rear main cap offset by 1/4 inch - this offset will be on the bearing cap as well, and YES,the pictures below show the ends of the seals installed matching the main cap parting line which IS NOT CORRECTLY DONE, off setting the seal slightly helps prevent leaks
I use a light coat of brush on gasket sealer on the back of the seal in the main cap and block as its an extra precaution limiting leaks, applied just prior to installing them so slight movement has no effect on the sealant sealing the seal to the main cap or block
Roll the seal around crankshaft using the tool as a "shoehorn"
Install the other seal half in the bearing cap
Apply sealant (we like Permatex Ultra Copper High Temp RTV Silicone Part No. 81878)
to the bearing cap to case interface, keep the RTV off the seal split line (only on the cap mating surface next to the seal)
Install the rear main cap and torque to specs.
keep in mind theres NO DIRECT OIL PRESSURE ON THE REAR MAIN SEAL, the DRAIN AREA LOCATED BETWEEN the BEARING AND REAR SEAL AT THE REAR OF THE MAIN CAP BEARING (CLEARLY SHOWN IN THE PICTURE )SEPARATES & DRAINS ANY PRESSURIZED OIL INTO THE OIL PAN, the rear main seal forms part of the oil pan gasket perimeter seal, many leaks blamed on the rear main seal are caused by improper rear seal installation (having the lip face to the rear) or failure to place a thin layer of sealant under the rear main cap between the block and main cap, excessive piston ring leakage of compression in the cylinders can cause high crank case pressure that in more extreme cases can cause leaks but the PVC and valve cover breathers should prevent moderate to low leakage from causing problems
don,t forget a very thin line of sealant under the main cap/block bearing surface or you may have a very slow oil drip from what you think is the rear main seal but its really seeping under the main cap
http://www.pitstopusa.com/detail.aspx?ID=60256
theres always those guys that worry about the rear main seal leaking if the blocks been line honed as that moves the crank location in the block a couple thousands of an inch, the movement is never a problem, if the rear seal is installed correctly AND the surface it seals to is POLISHED to a MIRROR SMOOTH, surface so the seal won,t wear,, the rear crank journals CONCENTRIC, and ROUND, and the seals installed correctly, its un-fortunate but its possible to install the rear seal facing 180 degrees out with the lip facing to the rear which will cause leaks.
when blocks are align honed its very rare for the crank to be moved more than .005 deeper into the block, as IM sure you know there are slightly shorter timing chains available to compensate,
cloyes is my supplier of choice
tips ?
make sure your using the correct seal design for the journal diam.
use the correct seal with the lip facing to the engine front
use silicone sealant on the ends and off set the ends from the blocks main cap slightly
use the brush on sealant on the contact area between the main cap and block and the rear outward surface on the seal
make sure you degrease the seal mounting surface before snapping it into place with the wet brush on sealant on the back outer surface
lube the lip of the seal that touches the rotating crank with a finger tip of Vaseline
always use a one piece synthetic oil pan gasket, as some oil leaks blamed on rear seals are really faulty rear oil pan gaskets or improperly installed rear oil pan gaskets
KING BEARINGS LISTS THEM IN SEVERAL SIZES, WHY NOT CALL THEM, if they have the correct size youll still need to polish the crank matched surface to prevent further rapid wear
http://kingbearings.com/maxflange_proflange.php
LINK
viewtopic.php?f=54&t=206&p=1154&hilit=+synthetic+gasket#p1154
when your trying to prevent oil leaks , on a new engine ,I prefer to do the timing cover first but theres no reason not to install the oil pan gasket immediately after the timing cover
viewtopic.php?f=54&t=206&p=1154&hilit=+synthetic+gasket#p1154
viewtopic.php?f=51&t=1718&p=4257&hilit=rear+seal#p4257
http://garage.grumpysperformance.co...l-pan-gasket-still-small-leak.3084/#post-8194
viewtopic.php?f=54&t=2725&p=7076&hilit=gasket+synthetic#p7076
one piece synthetic oil pan gaskets seals are superior to the older separate end piece and side piece design
here you can see the thin line of sealant under the rear main cap, thats sometimes overlooked resulting in a slow drip near the rear main seal
http://www.cloyes.com/Default.aspx?TabI ... uage=en-US
now too answer your question, the rear seal must be installed with the inside lip that rides on the crank surface, facing toward the front of the block and the ends of the seal slightly off set from the main cap parting line with a small dab of high heat silicone on both ends of each seal, and the lip covered with moly lube, the slight difference in the block measurement is MEANINGLESS to the seal.
the back of the seal where it snaps onto the block and main cap are usually lightly coated with a non hardening liquid gasket cement (HIGHLY RECOMMENDED) but can be left dry, with a very low risk of leaking, why risk it
remember between about 1955-1958 a rope seal was used after about 1986 a one piece rear seal design was used on the SBC, to replace the previous two piece rear main seal
read this also
viewtopic.php?f=53&t=301
Lip orientation
The lip on the rear main seal should point toward the crankshaft and not towards the back of the engine. The lip on the seal is designed to allow oil pressure to force the seal against the crankshaft, improving its sealing capability. When the seal is pointed the wrong way, it allows oil pressure to force oil past the seal, resulting in a leak.
One piece-Two piece seals
Prior to 1986, Chevy engines used a two-piece rear main seal that was prone to occasional leaks. After 1986, Chevy switched to a one-piece seal design to reduce the chances of a leak occurring. One-piece seals are more effective than two-piece seals but are more difficult to service with the engine in the car.These later engines can be converted to use a two-piece seal by using an adapter kit that can be purchased from General Motors and most performance parts stores.
Rope seals
Prior to 1956, Chevy motors used a rope style rear main seal instead of neoprene rubber. These seals were made with asbestos and because this material is no longer available, replacements are made with modern materials that mimic the properties of the old asbestos seals. Chevy engines that use rope style seals cannot be easily converted to use modern neoprene seals and require machining to make the conversion possible.
Lubrication
Rear main seals should not be soaked in oil before installation. Once installed in their seats, and before the cranks is installed, a light coat of engine oil should be wiped across the seal's surfaces where it contacts the crankshaft. This will reduce the chances of seal failure at initial startup by providing lubrication for the new seal until oil pressure builds and begins properly lubricating the seal.
TWO BOLT MAIN CAP BLOCK
4 bolt SBC block
Last edited by a moderator: