Look at my cam

4doorscooter

Active Member
Hey guys I just got my crane 114142 in the mail and I was wondering if what I see is normal. I obviously am a total novice and want to be sure I'm not putting sub standard parts in my engine. The first pic is the 3rd journal down from the cam gear mounting surface. Notice the small groove that runs the entire diameter of the journal is this normal? The second pic shows the bearing journal surface finish. Are the small dots normal? I was thinking these areas were highly polished and looked much shinier. Please let me know if I am good to go or need to return the cam. Thanks guys!!

cam scratch_zpsrsnczbyl.jpg


cam journal_zpsfmaazcjd.jpg
 
Last edited by a moderator:
I never had one look that bad! I thought it was just a poor photo. As for the scratch, do you mean circumference not diameter?
 
Okay so it is bad damnit! Ya sorry it's the circumference the pics are pretty clear actually I guess it's just really that bad!
 
both bearing journals, pictured condition are minor scratches or lack of shiny surface are functionally meaningless,and will have zero effect on the cams expected function, and can safely be ignored if you choose too.
yeah shiny may be impressive, but minor surface imperfections as shown, are absolutely meaningless on the bearing journal surface, I would not waste my time even thinking about swapping out or returning the cam for that reason.

cam%20scratch_zpsrsnczbyl.jpg


cam%20journal_zpsfmaazcjd.jpg


but, if youll feel better with a mirror surface, a couple seconds of pollishing with 600 grit then 1500 grit wet/dry sand paper and lots of WD 40,on the paper then a solvent wash, a rub down with a soft shop rag, and oil coating,
will shine the surface up and won,t hurt a darn thing in the process,
just carefully clean and coat the cam beraings and journals, cam lobes and lifter bases,with moly assembly oil before you install the cam.
It looks like that cams been in storage for quite a while , but theres no structual or surface flaws that would cause any issues , the lobes are coated with a darker finish that helps during break-in, but you will need the MOLY assembly lube and correct clearances and valve adjustment, and rocker geometry
many magnets lose their magnetic pull if heated to 200F
these below won,t

proper magnets trap metallic debris

SmCo Samarium Cobalt Disc Magnets
http://www.magnet4less.com/
enginemagn.jpg


http://www.magnet4less.com/product_...ucts_id=254&osCsid=ckl4nevgdrmireotnegg7jcf36

http://www.magnet4sale.com/smco-magnets-dia-1x3-8-samarium-cobalt-magnets-608-f-temperature/

Samarium Cobalt MAGNETS HELP
http://www.magnet4sale.com/smco-disk-magnet-dia-1x1-4-samarium-cobalt-magnets-608-f-temperature/
magnets are ceramic and glass hard, don,t try to drill or grind them, as they can shatter

http://garage.grumpysperformance.co...ear-articles-you-need-to-read.282/#post-57371

http://garage.grumpysperformance.co...ectly-and-get-it-to-last-cam-install-info.90/

http://garage.grumpysperformance.com/index.php?threads/valve-train-clearances-and-problems.528/

http://garage.grumpysperformance.co...e-springs-and-setting-up-the-valve-train.181/

http://garage.grumpysperformance.com/index.php?threads/breaking-in-a-cam.798/#post-1160

http://garage.grumpysperformance.com/index.php?threads/cam-break-in-procedure.130/#post-728

http://garage.grumpysperformance.co...alling-a-cam-and-breaking-it-in.457/#post-561


cambreakin.jpg

crn-99004.jpg
 
Last edited:
I would, on my personal car without a seconds hesitation
 
Ok cool, good enough for you good enough for me. After I break the cam in for the 30min at 1500 to 3000 rpm how long should I wait before I can run the engine hard? Also crane sent Joe gibbs assembly lube for the cam do you recommend I use that or use a molly past like above?
 
Last edited:
use the moly lube AND the good oil, and you can run it like you stoled it after you correctly adjusted the valves and after about 3-4 hours run time as its either going to be fully lapped in or youll have issues well before that if you failed to read and follow the tips in the links
 
I just got my valve spring shim's in the mail. From what I have read + or - .020 is ok for valve spring height is that accurate? The installed height is 1.7 so does that mean I can go 1.72 or 1.68 if needed?
 
it should be obvious that the more uniform you keep the installed height and clearances the more consistent the valve spring load rates will be, so in general try hard to mix & match components to gain max consitency
 
Oh totally I 100% agree I guess the way I asked that was kinda funky. What I meant was if worst comes to worst is .020 an ok tolerance.
 
I just now came back to this thread, and I guess it's too late for this but initially the pictures loaded as a thumb nails and it really looked like the lobes were ruff as an old cast iron exhaust manifold, or a fine droplet spray covering it. Now it's a big file and looks normal.
 
Hey guys I just got my crane 114142 in the mail and I was wondering if what I see is normal. I obviously am a total novice and want to be sure I'm not putting sub standard parts in my engine. The first pic is the 3rd journal down from the cam gear mounting surface. Notice the small groove that runs the entire diameter of the journal is this normal? The second pic shows the bearing journal surface finish. Are the small dots normal? I was thinking these areas were highly polished and looked much shinier. Please let me know if I am good to go or need to return the cam. Thanks guys!!

cam scratch_zpsrsnczbyl.jpg


cam journal_zpsfmaazcjd.jpg

I see some flash rust on the lobes, I would buff that off too! Have a shiney clean surface, and coat with assembly lube when assembling.
 
I just got my valve spring shim's in the mail. From what I have read + or - .020 is ok for valve spring height is that accurate? The installed height is 1.7 so does that mean I can go 1.72 or 1.68 if needed?
it should be obvious that the more uniform you keep the installed height and clearances the more consistent the valve spring load rates will be, so in general try hard to mix & match components to gain max consistency

Here is what I do to get all the spring heights within .005". But it takes some time.
I have found new valves to be really consistent with their lock groove locations. You will have to measure if using reconditioned valves.
I am going to assume new valves here. I have found the greatest variances in the retainers.
Using the same location for each measurement, insert a valve in the head and using 1 pair of locks, measure all the retainers and write the
measurements down. Then find one that is in the middle of the measurements and call it ZERO. Then mark the others as + or _ however many
thousandths from the zero one. Then repeat the process to measure the pairs of locks, and then again using 1 valve in each location in the head
to measure how much in relation to each other the valve seats (and spring seats if machined) were ground.
You can then mix and match components to get them all within the smallest differences in your targeted installed heights.
 
yes its time consuming but its details like that being looked at,
that eventually add up during an engine build that give you an edge,
over some guy who grabs components out of the box and slaps them together randomly.
it may ,or may not show up on the dyno in a serious gain in peak horse power,
but it will almost always result in a much more durable and less trouble prone engine!
 
I finished installing all my springs yeterday took several hours but got them all within about .004 thanks for all the help so far guys! I have another big question. what oil brand and weight of oil do you guys use for break in and after the cam is broken in? I find so much contradiction on the Web when I look that up. Also what additives do you guys use pertaining to zinc ext. ?
 
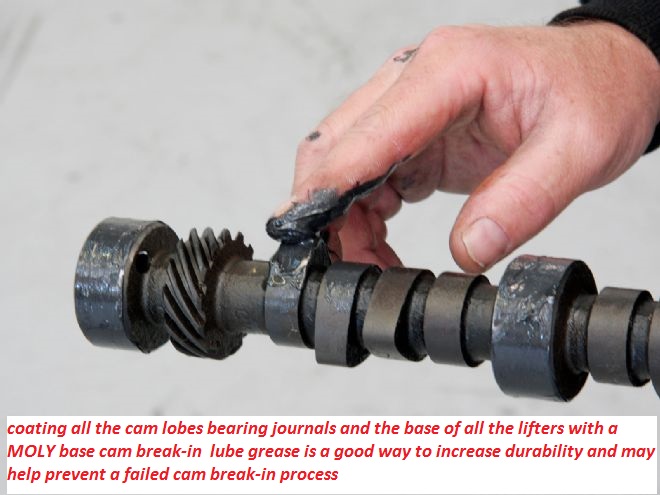
if youve used the moly assembly grease on the lobes and lifter bases, youll be fine with any of these oils


1. 5W30 Pennzoil Ultra, API SM = 115,612 psi
I have not been able to find this oil with the latest API SN certification. The bottle says, “No leading synthetic oil provides better wear protection . For once, a product hype turns out to be true.
zinc = 806 ppm
phos = 812 ppm
moly = 66 ppm

2. 10W30 Lucas Racing Only = 106,505 psi
zinc = 2642 ppm
phos = 3489 ppm
moly = 1764 ppm
NOTE: This oil is suitable for short term racing use only, and is not suitable for street use.

3. 5W30 Mobil 1, API SN = 105,875 psi
zinc = 801 ppm
phos = 842 ppm
moly = 112 ppm

4. 0W30 Amsoil Signature Series 25,000 miles, API SN = 105,008 psi
zinc = 824 ppm
phos = 960 ppm
moly = 161 ppm

******* 10% below number 1 = 104,051 psi ********


5. 10W30 Valvoline NSL (Not Street Legal) Conventional Racing Oil = 103,846 psi
zinc = 1669 ppm
phos = 1518 ppm
moly = 784 ppm
NOTE: This oil is suitable for short term racing use only, and is not suitable for street use.

6. 5W50 Motorcraft, API SN = 103,517 psi
zinc = 606 ppm
phos = 742 ppm
moly = 28 ppm

7. 10W30 Valvoline VR1 Conventional Racing Oil (silver bottle) = 103,505 psi
zinc = 1472 ppm
phos = 1544 ppm
moly = 3 ppm

8. 10W30 Valvoline VR1 Synthetic Racing Oil, API SL (black bottle) = 101,139 psi
zinc = 1180 ppm
phos = 1112 ppm
moly = 162 ppm

9. 5W30 Chevron Supreme conventional, API SN = 100,011 psi
This one only costs $4.29 per quart.
zinc = TBD
phos = TBD
moly = TBD

10. 5W20 Castrol Edge with Titanium, API SN = 99,983 psi
zinc = TBD
phos = TBD
moly = TBD
titanium = TBD


11. 20W50 Castrol GTX conventional, API SN = 96,514 psi
zinc = 610 ppm
phos = 754 ppm
moly = 94 ppm

12. 30 wt Red Line Race Oil = 96,470 psi
zinc = 2207 ppm
phos = 2052 ppm
moly = 1235 ppm
NOTE: This oil is suitable for short term racing use only, and is not suitable for street use.

13. 0W20 Mobil 1 Advanced Fuel Economy, API SN = 96,364 psi
zinc = TBD
phos = TBD
moly = TBD

14. 5W30 Quaker State Ultimate Durability, API SN = 95,920 psi
zinc = 877 ppm
phos = 921 ppm
moly = 72 ppm

15. 5W30 Castrol Edge with Titanium, API SN = 95,717 psi
zinc = 818 ppm
phos = 883 ppm
moly = 90 ppm
titanium = 44 ppm

16. 10W30 Joe Gibbs XP3 Racing Oil = 95,543 psi
zinc = 743 ppm
phos = 802 ppm
moly = 1125 ppm
NOTE: This oil is suitable for short term racing use only, and is not suitable for street use.
READ THE LINKED INFO POSTED IN THE THREADS BELOW

http://garage.grumpysperformance.com/index.php?threads/breaking-in-a-cam.798/#post-1160

http://garage.grumpysperformance.com/index.php?threads/cam-break-in-procedure.130/#post-728

http://garage.grumpysperformance.co...-wear-articles-you-need-to-read.282/#post-345
 
Grumpy some of those don't have a whole lot of zinc. I thought about 1800ppm of zinc was needed for flat tappet cams? I was planning on running the vr1 silver bottle as I've used it before without issue. Also what brand molly assembly lube do you reccomend? And I looked up gm e.o.'s and it says not an oil additive what's the deal with that?
 
Zinc content in the oil is not the only factor that helps reduce cam lobe wear from everything I've read,
Zinc content between about 600 ppm and 1200 ppm is more than sufficient, when blended with the correct supporting additives and Zinc over 1500 ppm tends to REDUCE its effective lubrication properties.
BOLD AND CAPS FOR EMPHISIS ONLY
I have not lost a flat tappet cam lobe, OR LIFTER during a cam break-in or during the first 30K miles in over 30 years
and I've used several oils,
like MOBILE ONE SYNTHETIC, SHELL, VALVOLINE,TEXICO ,
BUT I HAVE USED A GOOD DEAL OF MOLY CAM LUBE,
A HIGH QUALITY OIL FILTER, MAGNETS TO TRAP DEBRIS ,
and I VERY CAREFULLY VERIFY CLEARANCES AND VALVE TRAIN GEOMETRY
(and thats where I see the most guys cause them-selfs problem's)

most of the times that I get called over to figure out why a cam lost a lobe or lifter (OR SEVERAL) during a cam break-in,
I find that ALL valve train clearances were not carefully checked,
the valves were not properly adjusted, or they did nor use a good moly cam assembly lube , or occasionally the guy failed to get the car running for quite some time before they broke in the cam, so the cam was spinning at starter speeds for a few dozen start attempts or more while they worked out the bugs preventing the engine from firing and running, (and its usually the same guys they can,t adjust valves worth a crap also. )
if anything binds up, or comes close too, during the valve train /engine rotation, your very likely to have problems
Id say about
60%of the failed cam lobe & lifter problems were traced to a failure to check clearances or correct valve train geometry issues , like coil bind, rocker to rocker stud, or rocker to adjustment nut clearance, retainer to valve seal, clearances or rocker geometry, use of the wrong spring load rates for the application,or failure to check valve train or push rods binding issues like rocker to retainer, push rods binding on guide plates or heads,etc.
before they became an issue.
about
10% were traced to failure to remove metallic or other trash, generated by a previous cam failing from the engines internal oil passages, or failure to carefully clean the engine before installing the new cam, and components, ( use of shrapnel screens and magnets help a great deal in this but can,t remove all trash as some is non-magnetic)
5%
to low quality components, or miss matched parts, like the wrong spring load rates for the application, and perhaps
15% of the failures due to using the wrong lubricants , or not nearly enough moly cam lube on the lobes and lifter bases or setting up the oil supply system correctly, or use of a high quality oil and filter, and a failure to change that oil and filter regularly after the first few hundred miles , the remaining
1o% were from unknown causes but more than likely due to a failure to correctly break in the cam,or properly adjust the valves before the engine break-in process or carefully check and re-adjust the lifters rapidly during the break-in process
its likely cause


http://garage.grumpysperformance.co...ear-articles-you-need-to-read.282/#post-57371

http://garage.grumpysperformance.co...ectly-and-get-it-to-last-cam-install-info.90/

http://garage.grumpysperformance.com/index.php?threads/valve-train-clearances-and-problems.528/

http://garage.grumpysperformance.co...e-springs-and-setting-up-the-valve-train.181/

http://garage.grumpysperformance.com/index.php?threads/breaking-in-a-cam.798/#post-1160

http://garage.grumpysperformance.com/index.php?threads/cam-break-in-procedure.130/#post-728

http://garage.grumpysperformance.co...alling-a-cam-and-breaking-it-in.457/#post-561


http://garage.grumpysperformance.com/index.php?threads/metallic-debris-in-filter.12364/#post-61283

http://garage.grumpysperformance.co...train-clearances-and-problems.528/#post-57678


cambreakin.jpg

crn-99004.jpg


Congratulations.. If you managed to get them all within .004, then you have done better than 90+% of the machine shops out there.:D
You did oil the valve stems and guides, correct?
Crane should have included some moly cam lube. Use as Grumpy described above.
You can add a bottle of Howard's Cams Max ZPM Break-In Lube.
The most important product for proper flat tappet camshaft break-in available. This is true for both hydraulic and mechanical flat tappet camshafts. Virtually eliminates cam and lifter wear at initial break-in. Replaces the Zinc-Phosphates (ZDDP) removed from today's oils. High levels of Zinc-Phosphates (60,000 ppm Zinc, 42,000 Phospates), plus the addition of moly for extra protection. Compatible with all petroleum base and synthetic oils. Just add one 4 ounce bottle for up to 6 quarts of oil.
99000_hvr.jpg It costs $7.94/bottle.
But if you get the case of 24, then it comes out to $6.50/bottle.
Use 1 bottle with each oil change. Or if you are doing 3000 mile oil changes, use 1/2 bottle. Then use the other 1/2 bottle at 1500 miles. The additives diminish from use. Doing it this way keep the levels more consistent over time.
http://www.competitionproducts.com/Howards-Max-ZPM-Camshaft-Break-In-Lube/productinfo/99000-24/

Adding some Marvel Mystery Oil can't hurt either.

When you first fire the engine, make sure each pushrod is rotating. If the pushrod is rotating, that means that the lifter is rotating. If any are not, then you will have a circular lobe by the end of the 20-30 minute break-in period. Not to mention all that metallic debris throughout the engine. And all the damage done by the same. Use a cheap set of valve covers with the tops cut out.
 
Last edited:
Back
Top