oil pressure peaks then falls are rpms climb higher

grumpyvette

Administrator
Staff member
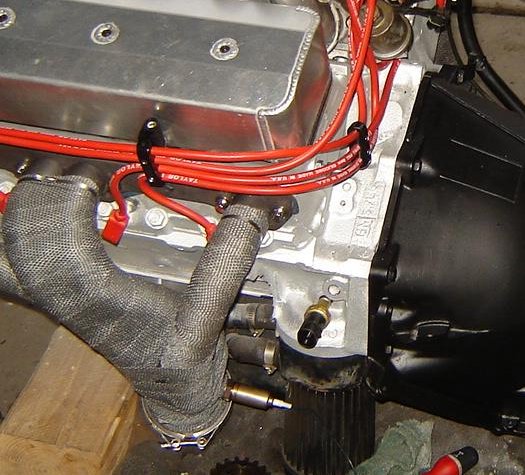
this is kind of a reminder/repost, but I came up recently,when a friend purchased an original 1966 chevelle with the original low- po BBC engine in it, he complained the timing was inconsistent and his oil pressure fell after about 2500rpm.....he thought the oil pump was defective, we did a few tests then pulled the oil-pan and front timing cover and replaced the oil pump and timing chain, the pictures below are from a similar problem but youll get the idea.

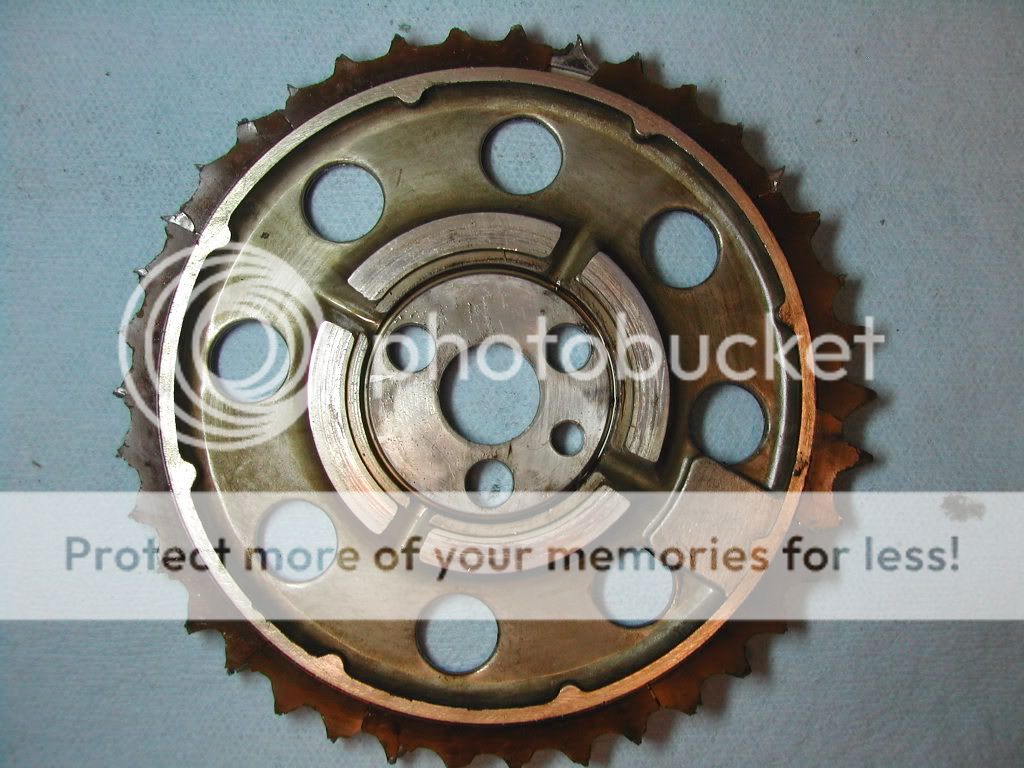
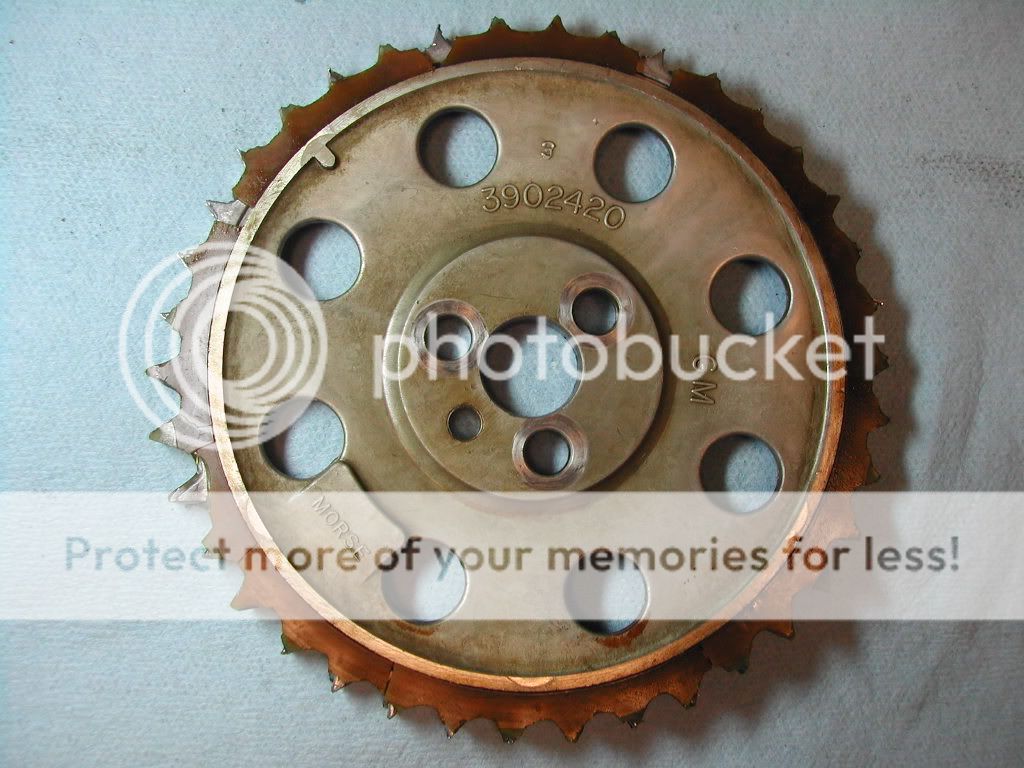
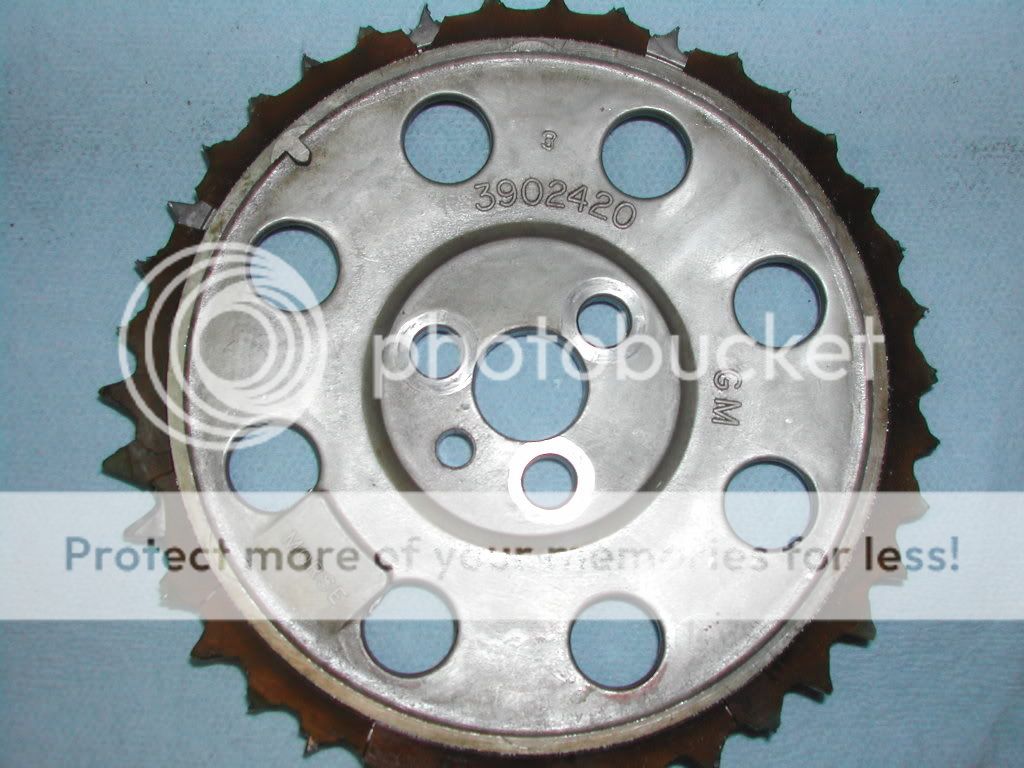
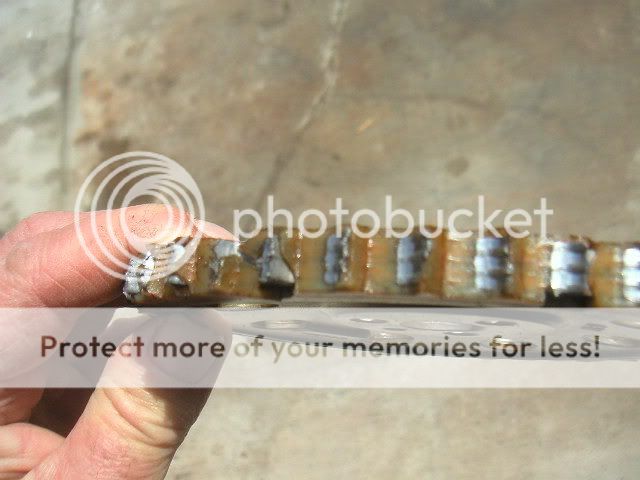
the original timing sets had nylon coated aluminum gears that worked fine until they got a lot of mileage and a few over heated oil baths where they eventually got brittle, and started shearing bits of gear teeth into the oil pan, and all that plastic crud starts to clog up the oil pump, pick-up screen


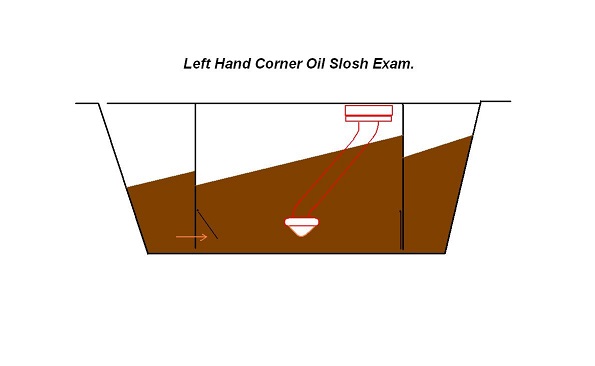
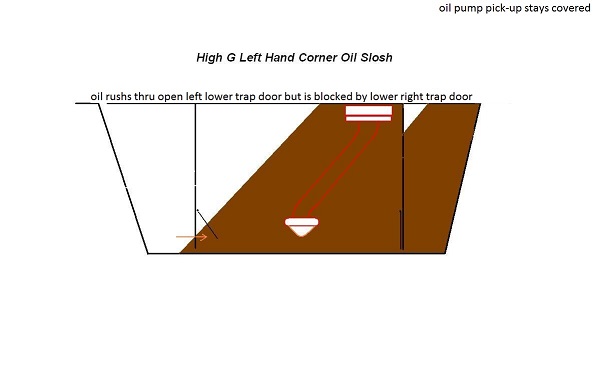
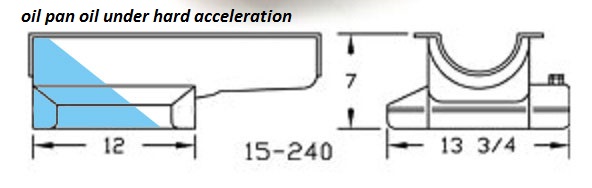
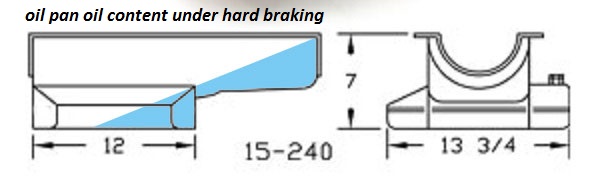
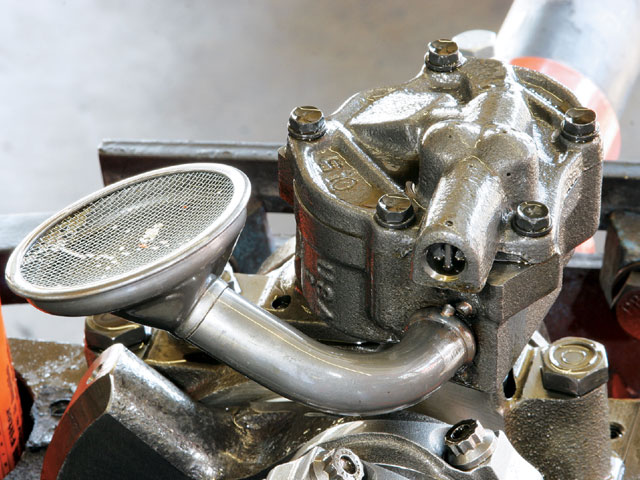
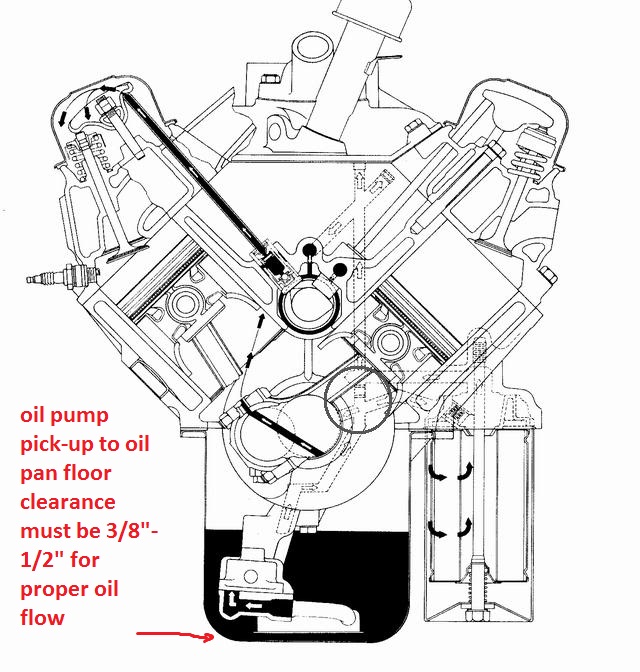
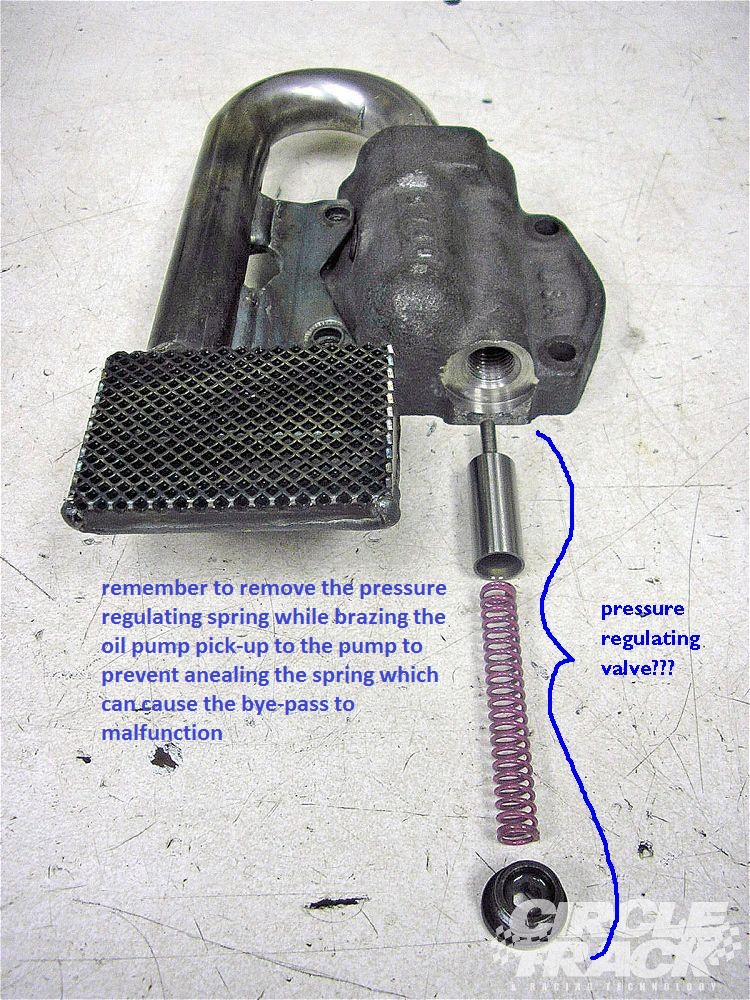
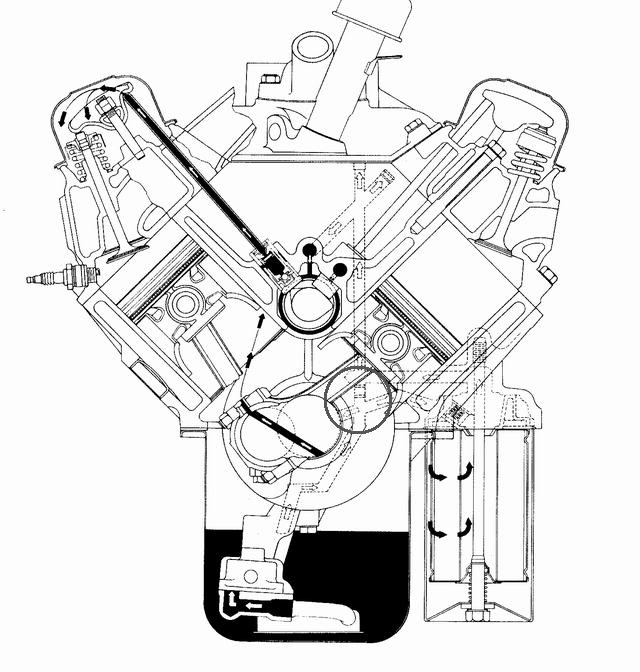
that's FREQUENTLY a symptom of the oil pump pick-up being mounted too close to the oil pan floor or a restricted oil drain in the upper engine or too small of an oil pan capacity or no windage tray,or crap collecting in the oil pump pick-up screen that restrict flow into the pump as the rpms increase, ALL RESULT in restricted RETURN of oil flowing into the oil pump
THE OIL PUMP PICK-UP VIBRATING CLOSER TO THE OIL PAN FLOOR, OR LOOSE CRAP like bits of gaskets or sealants partly blocking the screen on that pick-up, COMES INSTANTLY TO MIND!

ChevyOilingPluga.jpg

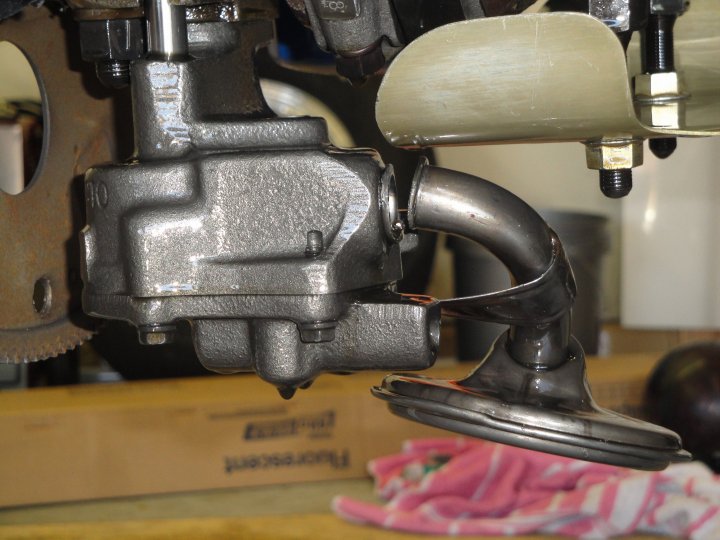
one of my friends had purchased a 1967 fire bird 400 from a guy that had 120k on the original engine it had good oil pressure at idle and up to about 3000rpm where it peaked then fell off if revved higher, the guy that sold the car said it had been that way for several YEARS, ever since he had the timing chain replaced? my buddy thought he was crazy, (thinking the timing chain had zero to do with oil pressure), but being more old school, I had a very good idea of the cause, and when I explained it too him he thought I was nuts, but I was correct, when we pulled the oil pan the oil pump pick-up was crammed full of plastic fragments from the original aluminum and nylon timing set,
PICT0023.jpg

PICT0022.jpg

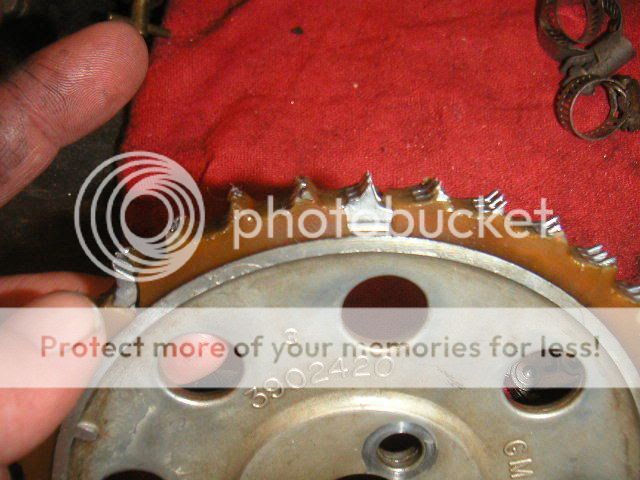
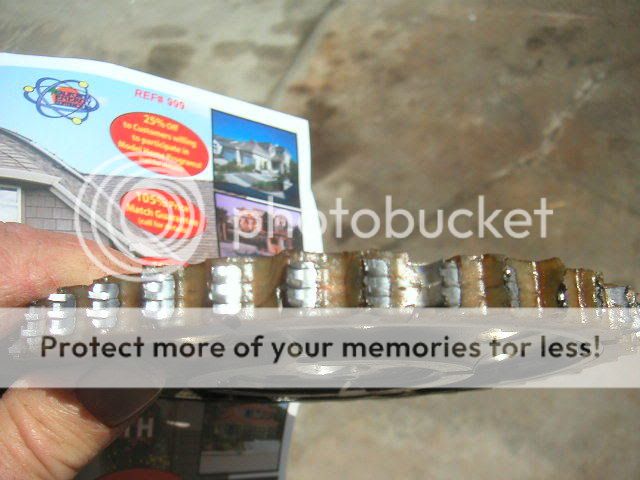
(similar to this)that had dropped into the sump as the old original timing set had worn. replacing it with a cloyes true roller set and a baffled 8 qt oil pan, and a high volume pump, instantly put the oil pressure curve back where it should have been[/b]

Why you don,t use the stock nylon coated aluminum gears on a high performance engine build
DSCN0819.jpg


DSCN0817.jpg

DSCN0816.jpg

DSCN0815.jpg

PICT0024.jpg

PICT0023.jpg

PICT0022.jpg

PICT0018.jpg


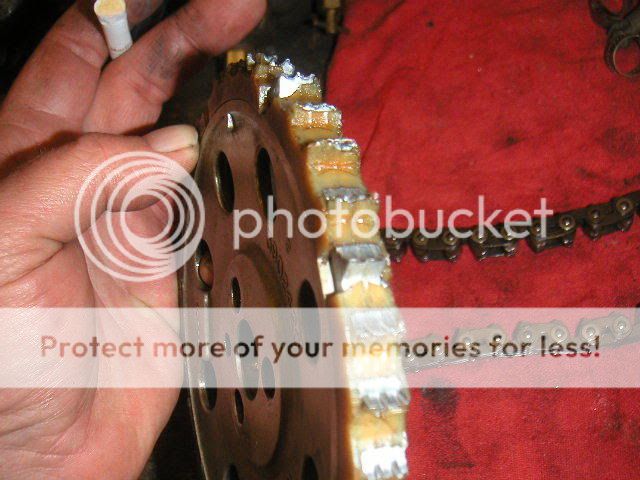
BTW, if your still not convinced, think about WHERE all those little pieces of nylon go and what they do,if your clueless...they tend to block or restrict the oil flow into the oil pump pick-up and get ground up and forced into the oil passages by the pump gears
pressureREGa.jpg


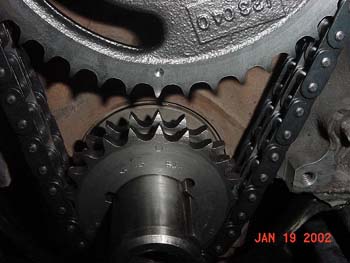
The CLOYES true roller style is vastly superior

marks_lined_up.jpg


how come its 180 degs out of phase?
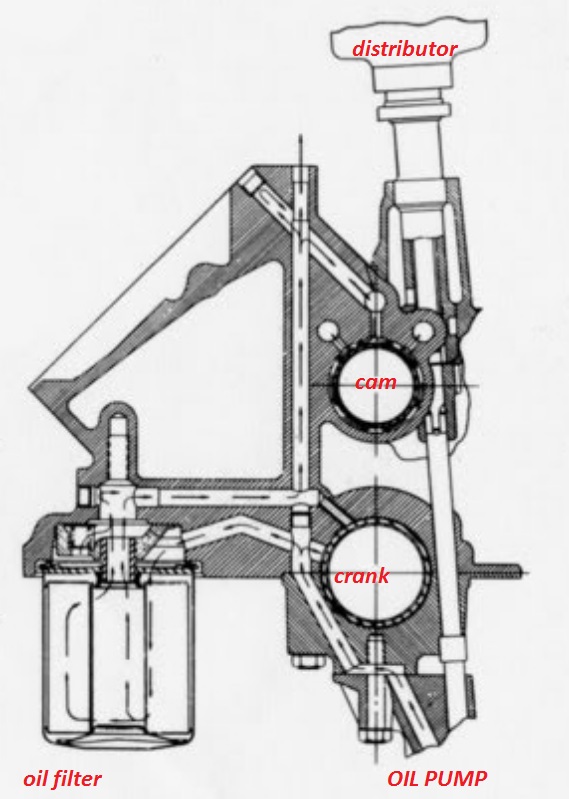
I get this question all the time, well here’s something I see lots of guys don’t understand, ONCE YOU'VE INSTALLED A CAM WITH THE TIMING MARKS YOU MUST ROTATE THE CRANK 360 DEGREES BEFORE DROPPING IN THE DISTRIBUTOR, while its true that if the, timing marks are positioned so the crank is at 12 o,clock and the cam gear is at 6 o,clock that the cam lobes will be in the position that fires #6 cylinder that HAS NO EFFECT AT ALL (on finding TDC,) for aligning the degree wheel with TDC,or THE timing tab pointer, for degreeing in the cam, the piston passes thru TDC TWICE in every firing cycle once on the firing/power stroke and once on the exhaust stroke, the cam rotates at exactly 1/2 the speed of the crank so to make it easy to line up the marks they install it with the marks at the closest point 6/12 for easy indexing, rotate the engine 360 degrees to the #1 TDC power stroke and the crank gear will still be at 12 o'clock 12/12 but the cam will be at 12 o,clock also, rotate another 360 degrees and your back where you started. its simply easier to index the cam at the point where the index marks align closely. look at how the cam lobes themselves open the valves when the cam is just installed the #1 cylinder valves are slightly open and the #6 are closed per "Lunati" ‘’YES YOU ARE RIGHT - WHEN CRANK IS AT TWELVE AND CAM IS AT SIX THEN #6 CYL IS FIRING AFTER YOU LINE UP YOUR MARKS AND INSTALL GEAR THEN ROTATE YOUR CRANK ONE REVOLUTION AND THEN DROP THE DIST. IN - AT THAT POINT
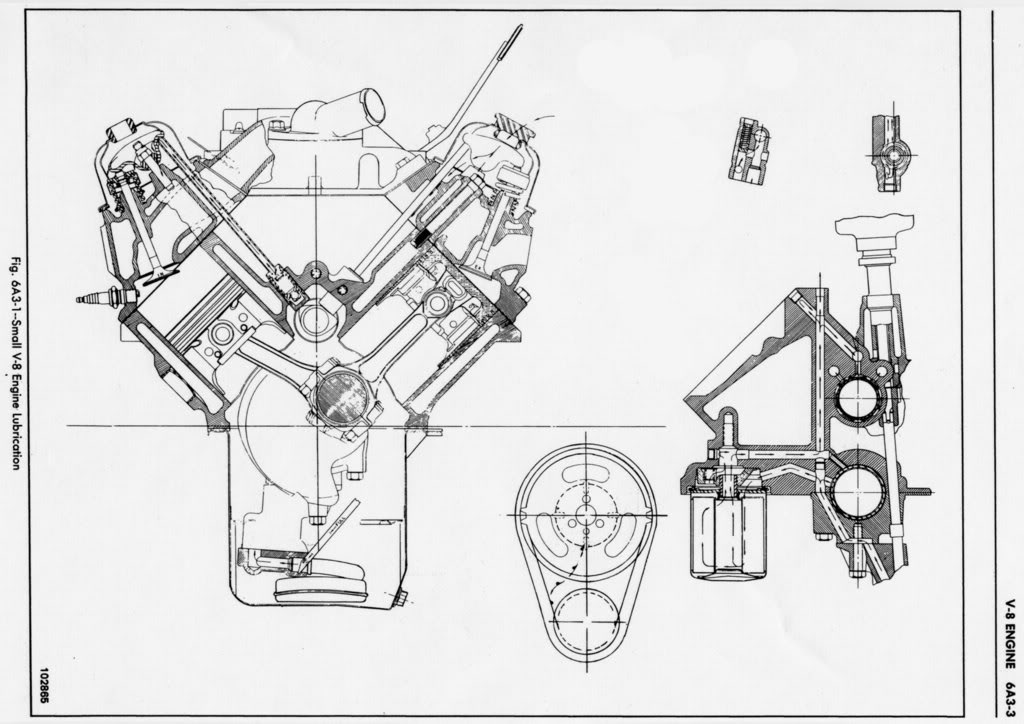
sbcoilh1.jpg

sbcoilh2.jpg

sbcoilh3.jpg

sbcoilh4.jpg

sbcoilh5a.jpg

sbcoilh6a.jpg

Oiling_350.jpg

camplugoilpassage.jpg

camplugoilpassage1.jpg
 
Last edited:
for a GOOD job, at a minimum, youll want to remove ALL the oil passage plugs , and clean the block out with solvent and high pressure air, and some rifle bore brushes, run thru the passages.
now obviously you won,t be the first guy that thinks of just installing a new cam, changing the oil and filter , maybe flushing the engine out a bit with a quart of diesel fuel added to the old oil, for about 2 minutes of idle time just before changing the oil etc., and while those practices do occasionally let you get by, thats not the correct route and it leaves a significant amount of metallic crud in the oil passages , the fact that people do occasionally get by with a semi clean engine is tribute to how well the factory lube system and oil filter functions,
but betting on those bearings and the new cam and lifters not being scored by the retained metallic debris, is at best a gamble, where your putting far more than the new cam and lifters at risk

to do the job correctly Remove ALL oil passage plugs. Those are the 2-3 at each end of the cam, depending on if its a bbc or sbc ,don,t forget the one under the rear main cap, and the one in the left deck at the rear. Removing the, main ,bearings and rotating assembly and carefully inspect and clean those components,remove the cam bearings, as the oil passage that feeds oil to the main bearings is behind them, and if there is ANY metallic crud retained AT ALL in the oil passages and if you don,t remove the bearings and clean the oil passages with a brush and high pressure air theres bound to be some retained, you can be certain that metallic debris, which will get flushed RIGHT DIRECTLY INTO your brand-new main bearings, lifters and cam lobes, during the first 10 minutes the new engines running, when you crank the new motor up, resulting in scored bearings and a highly increased chance of the new cam failing


LINK FOR OIL PASSAGE LOCATION INFO [/size]

http://forum.grumpysperformance.com/viewtopic.php?f=38&t=11

SBCOiling.gif


http://www.se-r.net/engine/block_prep.html

http://www.hotrodpitstop.com/engine-block-prep.php]
slosh1a.jpg

slosh2a.jpg

IF you've wondered why I suggest buying and using a well designed BAFFLED oil pan with 7-8 quart capacity its to prevent the oil from uncovering the oil pump pick-up under performance use.
without control baffles oil sloshes away from the oil pump pick-up

Slosh1.jpg

Slosh3.jpg

Slosh2.jpg


Cleaning Your Engine Block

Engine builders usually charge around $120 to clean a block, and most racers consider it money well spent to avoid the hassle. The engine builders usually use a mild acid or caustic wash, either in a hot tank or a jet sprayer. Whether you choose to do it yourself or have your engine shop handle the duties, make sure the freeze and gallery plugs are removed beforehand so that anything hidden behind them can get out. After all the machining processes are complete, the block needs to be cleaned again to get rid of any accumulated machining oils and metal slivers left over from cutting.


Cleaning is a necessary step even if you are using a brand-new block. New blocks can often have casting slag hanging around in the cracks and crevices, and it becomes a big, gritty problem if not removed before assembly. This is a step you can definitely do yourself. If the block is new, all you need is a water hose and a variety of brushes to make sure you scrub everything. If you are cleaning a rebuild, however, the work gets tougher. You need to use hot water and a cleaner capable of cutting through the grease and grime that builds up just about everywhere. When you are finished, make sure to hit all the surfaces with a light coat of WD-40 or some other type of light oil as soon as the surface has been dried to prevent rust.


Replace The Freeze Plugs

If you have your freeze plugs in place, it's also a good idea to pressure test the block before beginning the big projects. Pressure testing is done by filling the water jackets and then adding air pressure to see if there are any cracks or leaks. Both of these processes should be repeated after all the machine work is done to make sure you didn't cut too much away. Many machinists say they have seen situations in which a chunk of casting slag that was knocked away during one of the cutting procedures opens a pinhole through to a water jacket. The only way to catch this is with a final pressure check before engine assembly begins.

Sonic and Pressure Testing Your Race Engine Block

It doesn't make sense to do machine work on a block that may not even be usable. That's why it's wise to sonic test the block before much effort is put into it. Sonic testing can tell you the thickness of the cylinder walls quickly and easily. Even on a new block, this is important because core shift can cause one side of a cylinder wall to be too thin. Engine builder Peter Guild of PME Engines says he likes to see the cylinder wall thickness at least 0.275 inch. A sonic tester is also capable of catching a block that's just too far gone to be rebuilt again


related threads

http://forum.grumpysperformance.com/viewtopic.php?f=27&t=2886&p=7496&hilit=sprayer#p7496

http://forum.grumpysperformance.com/viewtopic.php?f=27&t=1077&p=2078&hilit=+pressure+water#p2078

http://forum.grumpysperformance.com/viewtopic.php?f=51&t=125

http://www.harborfreight.com/cpi/ctaf/displayitem.taf?Itemnumber=95159
95159.gif

http://www.harborfreight.com/cpi/ctaf/displayitem.taf?Itemnumber=97014
97014.gif


http://www.harborfreight.com/cpi/ctaf/displayitem.taf?Itemnumber=95947
95947.gif


POU-300AFC.jpg

http://secure.armorholdings.com/kleen-bore/product387.html

http://www.midsouthshooterssupply.com/item.asp?sku=0009796231

OBVIOUSLY USE OF A PRESSURE WASHER AND OR A DECENT AIR COMPRESSOR, and SOME good GREASE SOLVENT HAS ADVANTAGES, and use of QUALITY OIL FILTERS and INSTALLING HIGH TEMP, MAGNETS to trap any metallic crud you might miss helps


RELATED INFO YOULL WANT TO READ
http://forum.grumpysperformance.com/viewtopic.php?f=54&t=2080&p=5568&hilit=magnets#p5568

http://forum.grumpysperformance.com/viewtopic.php?f=52&t=282&p=5227&hilit=+magnets#p5227

http://www.kjmagnetics.com/proddetail.asp?prod=D66SH

http://forum.grumpysperformance.com/viewtopic.php?f=54&t=938&p=1581&hilit=+magnets#p1581

http://forum.grumpysperformance.com/viewtopic.php?f=54&t=120&p=867&hilit=+magnets#p867
d48761b8-1524-4912-bac8-46f309f497ad_300.jpg

a334c12a-47fc-4a13-b4f1-75cf0a9a9a74_400.jpg

http://www.homedepot.com/Outdoors-O...splay?langId=-1&storeId=10051&catalogId=10053
 
Last edited by a moderator:
obviously the first two steps in diagnosing any oil pressure problem you suspect is to check your dipstick for the proper oil level in the engine and then test the pressure with an independent test gauge to verify your cars gauge is correct, and you do have a problem , not a defective sensor or gauge
the oil pressure sensor location, is next to the distributor base,on most sbc engines on the rear of the block, but if your trying to track down an oil pressure issue it could be either a bad sensor, bad connection on the sensor or gauge, or a defective gauge, causing the high pressure reading OR it may be a defective oil pump, or bearing clearances or an oil passage plug, or the wrong oil viscosity, or a busted oil pump pick-up or incorrect installation of the oil pump or pick-up,defective oil filter or several other potential sources if its a low pressure issue as previously mentioned.

broken%20oilpickup.jpg

broken , or improperly installed oil pump pick-ups can cause several major oil pressure issues
pumpweld1.jpg


rearmainoilplug.jpg


http://forum.grumpysperformance.com/viewtopic.php?f=54&t=3536

Oilpressureswitchearly.jpg


http://www.harborfreight.com/engine-oil ... 92687.html
2526a.jpg

you MUST have an independent oil pressure gauge to verify any oil pressure issue before you start randomly replacing components or pulling the oil pan

39451a.jpg

oil pressure switch to fuel pump
41011a.jpg

gauge sensor, both connect near distributor base at rear of the block
Oilpressureswitchearly.jpg


20117a.jpg

temp sensor, mounts near oil filter
oil%20tempsensor.jpg

ITS a good idea to inspect the oil filter internals when you change oil as it may allow you to detect a problem with cam or lifter or bearing wear far earlier than you might otherwise detect it.

http://store.summitracing.com/partdetai ... toview=sku
sum-900510.jpg


viewtopic.php?f=54&t=117

its basically a heavy duty can opener designed to make it easy to internally inspect oil filters, by allowing you to remove the filter element , from inside the surrounding (CAN) for close visual inspection.
If you don,t have one, and have not used one, your unlikely to see, or appreciate the benefits,close inspection can and does frequently give you prior evidence of impending or at least gradually occurring wear and with practice you can make an excellent guess as to the parts and condition of those components.
IT also helps to trap crud if you install a couple high temp magnets on the filter and in the oil pan.

btw, add a few magnets to the oil pan and drain back area in your engine, the trap and hold metallic dust that comes from wear and increase engine life span by preventing that crap embedding in the bearings

http://www.kjmagnetics.com/proddetai...d=D66SH&cat=13

http://www.kjmagnetics.com/proddetail.asp?prod=D66SH

http://www.kjmagnetics.com/proddetail.asp?prod=D82SH

these are even more tollerant of temp swings and retain strength at even higher engine oil temps plus they are smaller and easier to use

The SH material in the D66SH magnets, means that the magnets can be heated to 300° F without any loss of magnetic strength, unlike standard neodymium magnets that begin to lose strength at 175° F. Suitable for many high temperature applications.


BTW this tool can save you hours of what could be un-necessary work ,you might otherwise do, pulling an oil pan under some conditions to do internal inspections, simply drain the oil and insert the tool to inspect the oil pump pick-up and its clearance to the oil pan floor which is frequently the info you need to diagnose a problem.
I know Ive used my tool dozens of times to prove to guys its a defective pick-up on the oil pump or a bad installation or not enough clearance to the oil pan floor causing their pressure issues
ITS also great for finding bent valves or cracks in combustion chambers, worn cam lobes, detonation damage on pistons, cracked cylinder walls, under some conditions,
BTW it helps to have a length of 20lb fishing line tied on the tip as it helps you bend and move the view once its inserted in the oil pan


http://www.toolrage.com/prodView.asp?sku=SLI-PV618
SLI-PV618.jpg


http://www.tooltopia.com/provision-pv618.aspx

ProVision 618 Flexible Fiberscope w/ 18" Non-Obedient Shaft


High resolution lens provides a clear image of objects as close as 3/4 inch and over one foot away while providing a wide 40 degree field of view.
Powerful lamp illuminates dark crevices on-demand with the push of a button conveniently located on the handle.
Ergonomically designed handle is comfortable to hold and allows one-handed focusing and light activation.
Rugged and water resistant, ProVision is made of high impact ABS and flexible cable sheathing. (Note: Shaft is water resistant, not the handle.)
PV-618 and PV-636 models have .23” diameter, flexible, non-obedient cable. Durable carrying case included.
Accessories available to optimize ProVision for specialized applications.
Made in the USA
Specifications:

Cable Length: 18" (457.2mm)
Cable Diameter: .23"
Handle Length: 6" (152.4mm)
Handle Width: 1.43" (36.2mm)Overall Length: 24" (609.6mm)
Weight of Scope w/ Carrying Case: 1 lb. 5.7 oz (615 g)
Field of View: 40°
Optimal Viewing Distance: Min. .8" (20mm); Max. is dependent upon ambient lighting conditions.
Lamp Volts: 2.7 volts (Halogen)
Power Source: 2 AA batteries (not included)
Pressure Necessary to Operate Lamp: 2.9 avg. p/psi; 3.2 max. p/psi


drain your oil , and you can use the flexible scope and look at the oil pump clearance to the oil pan floor, the oil pump pick-up and its brazed joint,the cam, pistons and bore walls etc, thru the oil pan drain hole, or pull a spark plug and inspect the valve or piston condition

scopeinternal.jpg

http://www.tooltopia.com/provision-pv618.aspx


pressure is a measure of RESISTANCE to FLOW, any time your having an oil pressure problem,

step one
verify the problem with a new different test gauge

step two
change to a WIX or PUREOLATOR brand oil filter and 5 or more quarts of new 10w30-or-10w40 oil, verify the dip stick level, and check if things have improved

step three
disassemble the oil filter look for indications of bearing wear

step four
if things have not improved pull the oil pan and check oil pump and bearings

RELATED INFO


viewtopic.php?f=54&t=3536

viewtopic.php?f=54&t=1334

viewtopic.php?f=54&t=4580

viewtopic.php?f=54&t=3194

viewtopic.php?f=54&t=52

viewtopic.php?f=54&t=525
 
Too much oil causing seals to fail?
I have someone trying to tell me that overfilling with oil will cause seals to fail because it will increase the pressure in the system.

"The thing is, isn't the extra oil in the sump? I can't see how having extra oil in the sump can get the oil pump to produce more pressure.
From what I've been told, if you over fill a sump to the point where the crank starts churing the oil you'll start foaming the oil. The oil pump will pick up this air/oil mix and pumping it through the motor, and since air is not a good lubricant for an automotive engine, the things that rely on the oil will start wearing very quickly.

Since I must acknowledge that I am wrong all the time, I have to ask, am I missing something? "


http://forum.grumpysperformance.com/viewtopic.php?f=54&t=64

http://forum.grumpysperformance.com/viewtopic.php?f=54&t=2187

http://forum.grumpysperformance.com/viewtopic.php?f=54&t=3536

http://forum.grumpysperformance.com/viewtopic.php?f=54&t=52

read thru these threads above

"btw your not wrong 100% of the time unless your married!"
 
Back
Top