big2bird posted some of this , on a different thread but it needs to be here also, and I ADDED STUFF YOU NEED TO KNOW
For those of you who have one, factory or otherwise, and you have noticed your timing jumps around instead of steady, here is your problem.
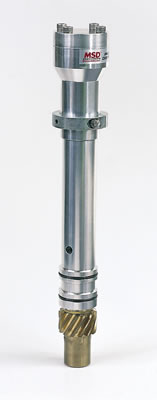
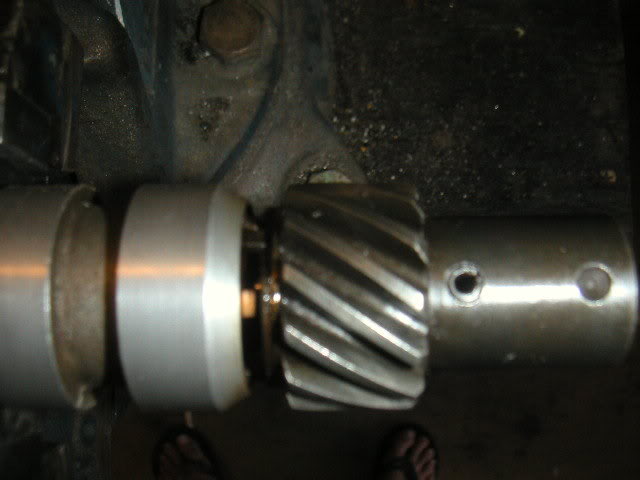
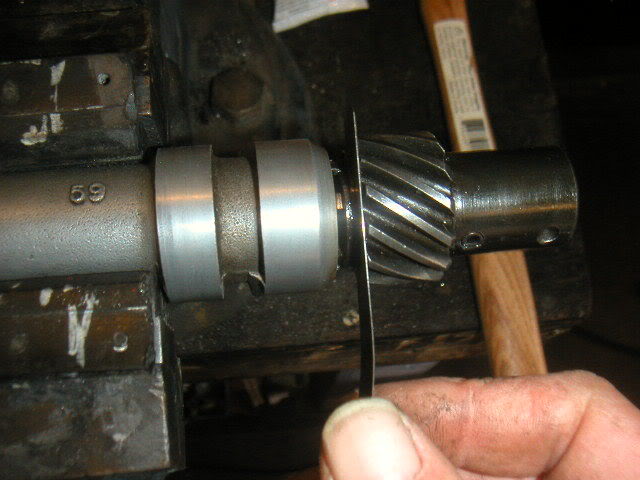
As you accelerate/decelerate, the spiral cut gear causes the shaft to rise and fall, turning in relationship to the cam, and making your timing vary. With the cap off, grasp the rotor and try to move it up and down. It will. Shimming the end play is the answer.
You can check the shaft/bushing clearance while you do these steps, but they are surprisingly durable, and without points, highly forgiving.
1)Mark the rotor position on the manifold, and remove it. It will turn as you do.
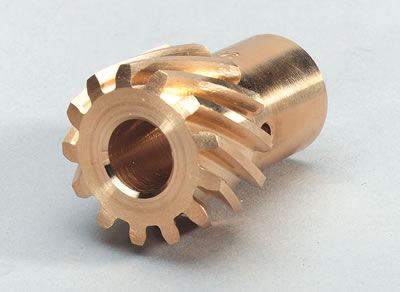
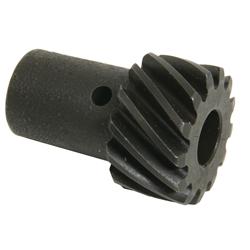
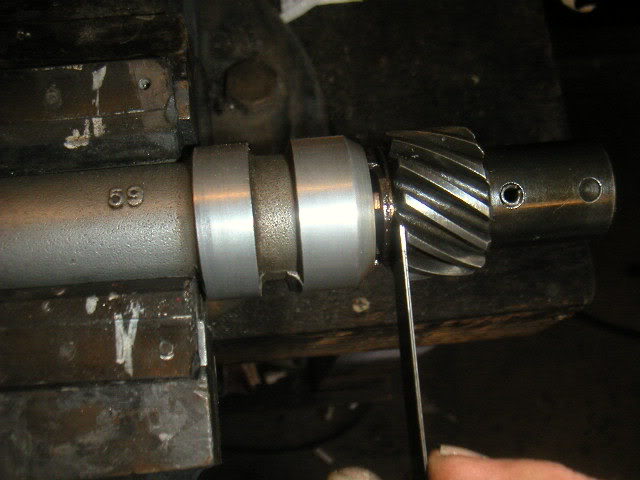
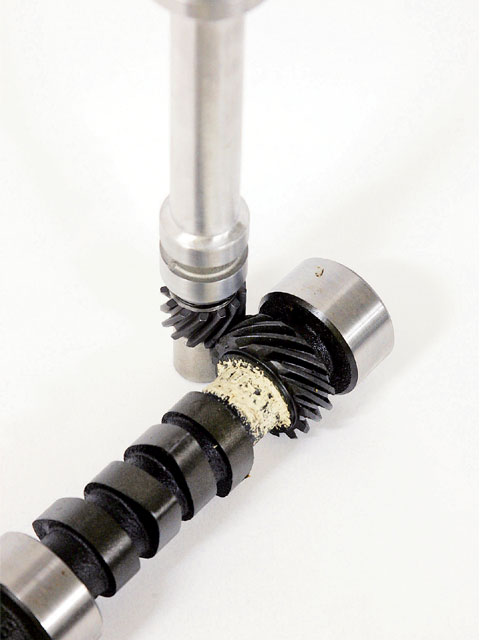
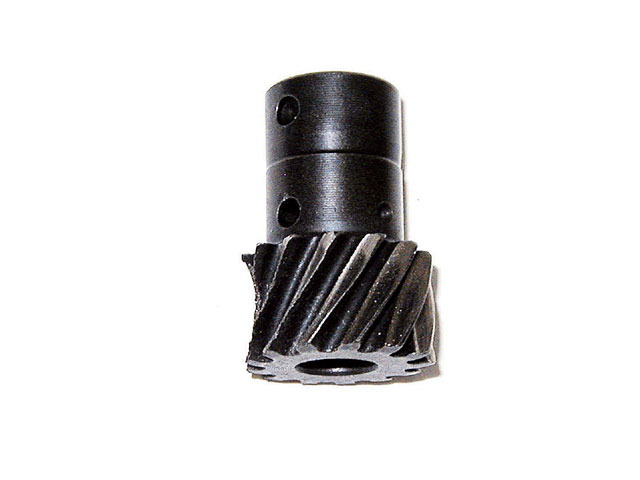
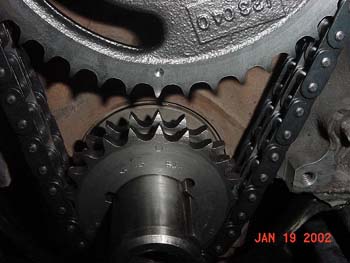
2)Chuck it softly but firmly as shown in a vice. Rotor point up. Notice the dimple on the gear. It is on the same side as the rotor point.its always a good idea to call the cam manufacturer and ask what is the correct matching cam gear and distributor gear set,and how its correctly installed.
READ THIS THREAD TOO
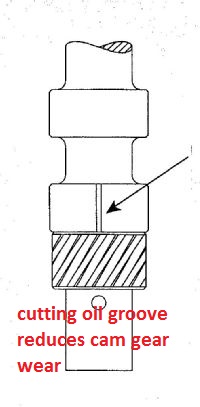
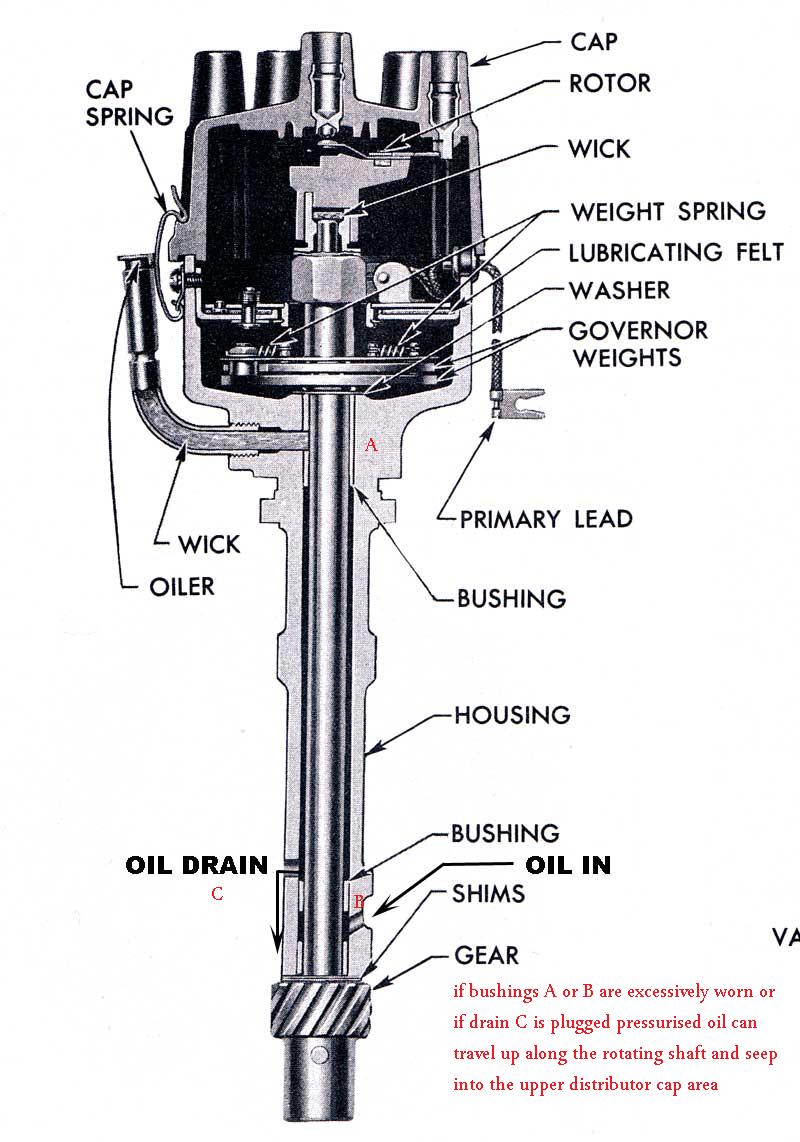
as a general tip, marking the distributor shaft so the oil sprays on the cam gear/distributor gear mesh/contact area helps,
durability, if its correctly located and its not too large,
but that depends to some extent to be helpful on getting the oil flow groove correctly indexed,
and that might be screwed up a bit if its not placed correctly , now obviously if the engines in the car and assembled its not a good idea to start doing this,,
it helps during the initial engine assembly if you put some thought into the build before you get too far into the build,
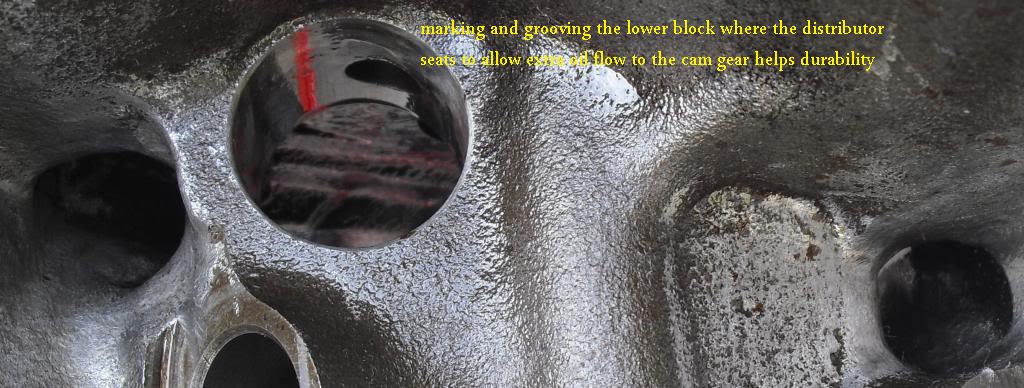
if you have the bare block at some point to groove the area in the block where the distributor seats,
just a bit with a very small second groove as the picture indicate,
as that ill always be in the correct location and does not depend on the distributors position in the block.
don't get carried away a groove about .008 x.008 (eight thousand's deep x eight thousand's wide in the correct location,) is all that's necessary
so grooving the lower oil band directly above the point where the gears start to mesh helps spray extra oil on the distributor/cam gears contact area, and yes that changes with distributor position so most guys cut a small fine groove in both the lower block wall and the distributor lower section above that location to assure a constant oil mist spray into the meshing gears
http://garage.grumpysperformance.com/index.php?threads/oil-system-mods-that-help.2187/

I suppose you could do these oil feed mods and groove the lower lifter bores and distributor gear oil feed groove,while you used a strong vacuum cleaner and magnets to limit the metallic debris ,on a partially assembled engine, but I've never tried it, I do the minor machine work to a clean bare block even before the cam bearings are installed and carefully clean it, and all the oil passages with a rifle bore brush high pressure air and solvents, several times before installing the cam bearings, I generally prefer to start with the block on an engine stand that I can rotate easily for full access. Crane cams recommends filing or cutting a .030-inch-wide by .030-inch-deep groove in the lower ring of the distributor housing immediately above the distributor gear. This slot is cut into a ring that seals a main oil passage, creating a spray of oil that is directed onto the distributor and cam gears for extra lubrication.
keep in mind grooving the lower distributor oil band will allow pressurized oil to flow through the lower band to supply oil to the distributor /cam gears contact point but this groove will rotate as the distributor ignition timing is advanced or retarded, timing the ignition advance, grooving the block keeps the oil groove directly over the gears regardless of the change in distributor location
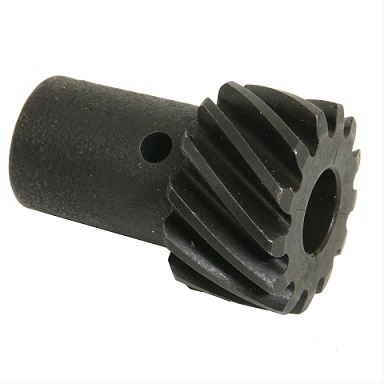
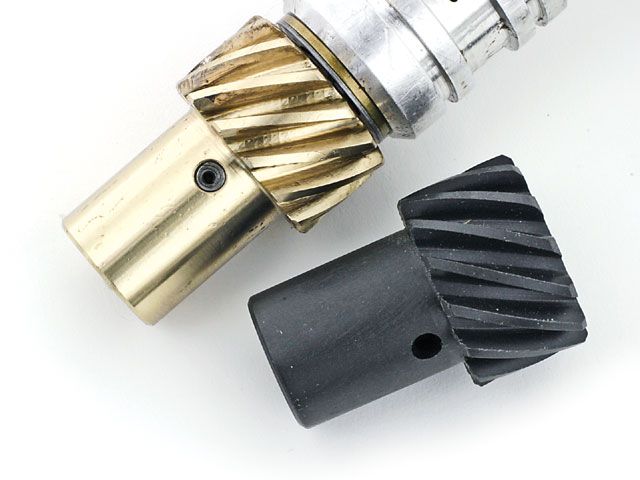
summit and JEGS sell several types of distributor gears, check the shaft diameter, on your distributor its USUALLY either .491 OR .500 and the gears DON,T interchange.
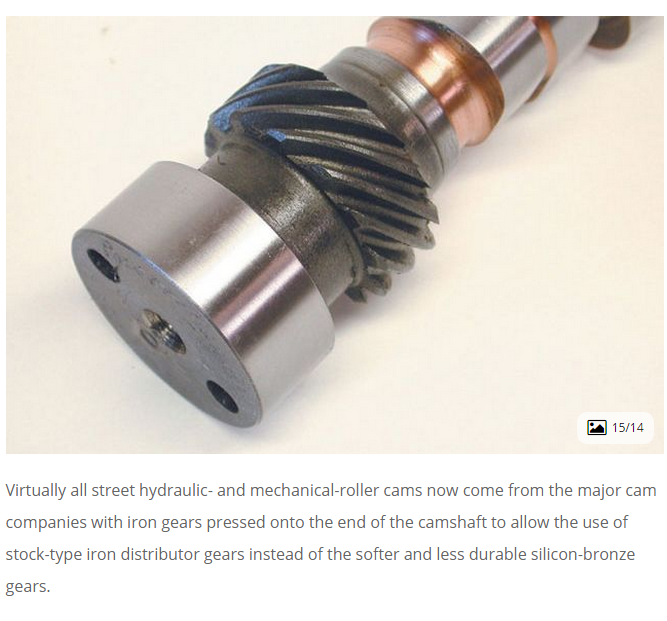
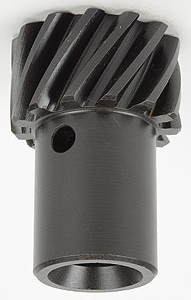
verify the correct gear to install with your cam manufacturer, a melonized iron gear is usually used with a cast iron cam core and a bronze gear with a steel billet roller cam UNLESS its got a pressed on iron gear, and yes there ARE reverse rotation CAMS for marine applications, so if your salvaging a boat engine be aware
check with the manufacturer anytime you have similar questions, on any valve train or ignition component.
but Id bet the stock distributor gear is what will be recommended,on any new engine build with a new cam installed.
this whole web site is designed to make it far FAR easier on guys wanting to build the required knowledge base required to learn the skills youll require to excell in this hobby.

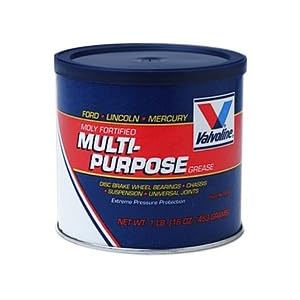
READ THE RELATED INFO CAREFULLY AND USE A GOOD MOLY LUBE ON THE DISTRIBUTOR AND CAM GEARS
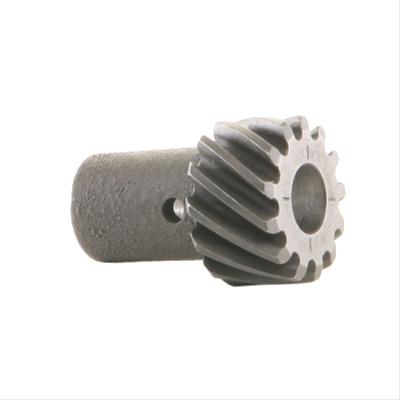
most stock chevy v8 distributors will use this gear. .491 diam.
https://www.summitracing.com/parts/ado-10456413/overview/make/chevrolet
many aftermarket distributors will use this gear .500 diam.
https://www.summitracing.com/parts/msd-8561/overview/make/chevrolet
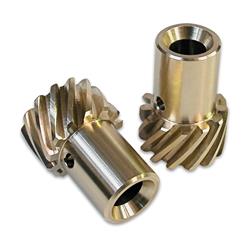
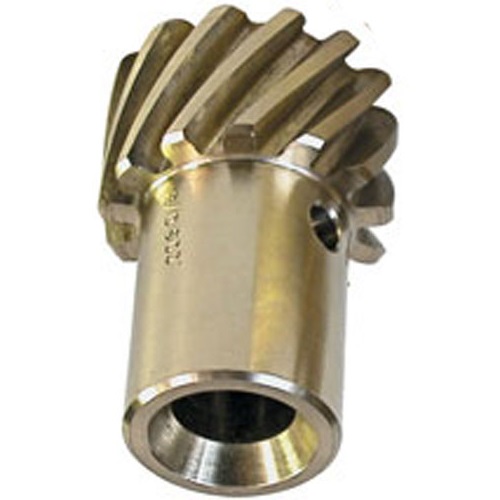
bronze distributor gears are generally used on billet steel roller cam cores
https://www.summitracing.com/parts/msd-8471/overview/make/chevrolet
http://garage.grumpysperformance.co...ation-and-bits-of-distributor-i-d-info.14880/
http://garage.grumpysperformance.com/index.php?threads/distributor-gear-wear.1701/#post-5252
http://garage.grumpysperformance.com/index.php?threads/distributor-gear-info.1186/#post-4155
http://garage.grumpysperformance.com/index.php?threads/oil-system-mods-that-help.2187/#post-5890
http://garage.grumpysperformance.co...stalling-the-intake-manifold-distributor.464/
http://garage.grumpysperformance.co...ear-articles-you-need-to-read.282/#post-61429
http://garage.grumpysperformance.co...ting-rebuilding-hei-ignitions.2798/#post-7247
http://garage.grumpysperformance.co...y-in-building-a-good-engine.11682/#post-54682
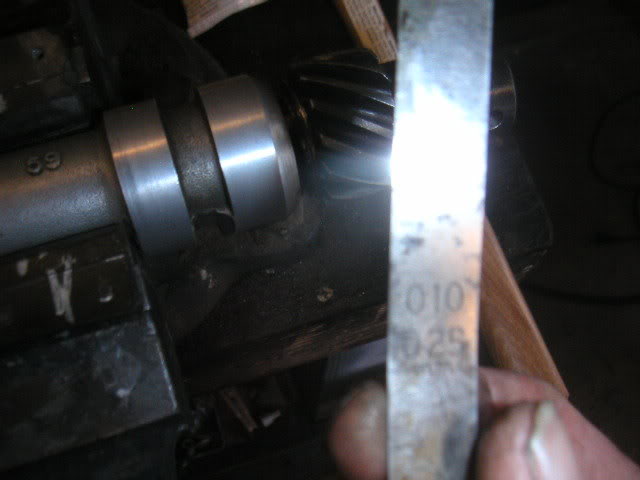
3) Place a feeler gauge between the thrust washer and the gear. Try different combination's until the feeler is snug, but not tight. This is your end play. .010" is necessary for expansion from heat, and lubrication.
if your seeing the timing change a few degrees, back and forth,
slack in a work timing chain, worn distributor gear or not having the proper shim clearance on the distributor center shaft will provide slop that allows timing to vary several degrees
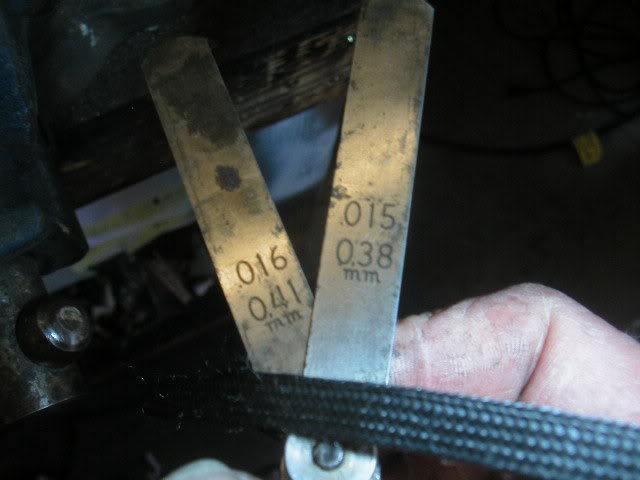
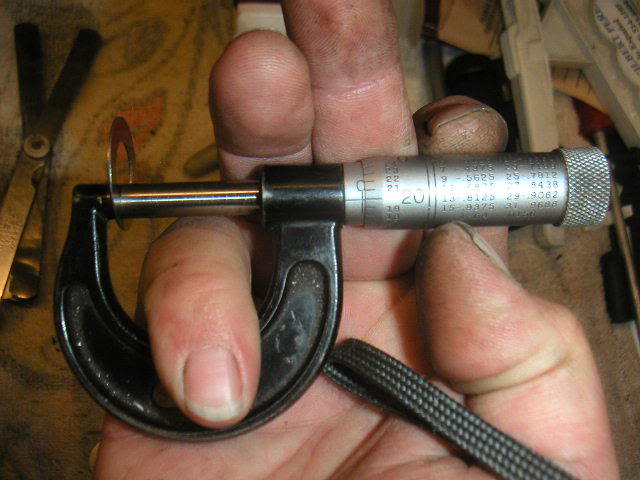
This one shows .031". We will install a .020" shim.
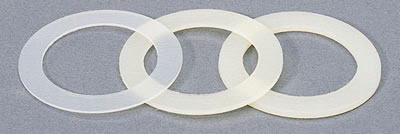
4)Buy these shims

5)Find a .020" shim in the kit.
Ive used moly grease for decades as a internal shaft lube
don,t confuse distributor end cam gear clearance (usually set at .007-.010) (how far the distributor gear can move on the distributor shaft and the clearance between the end of the oil pump drive drive shaft and the inside of the gear drive (usually set at .050) set when the distributor seats over the shaft and is clamped in the intake manifold
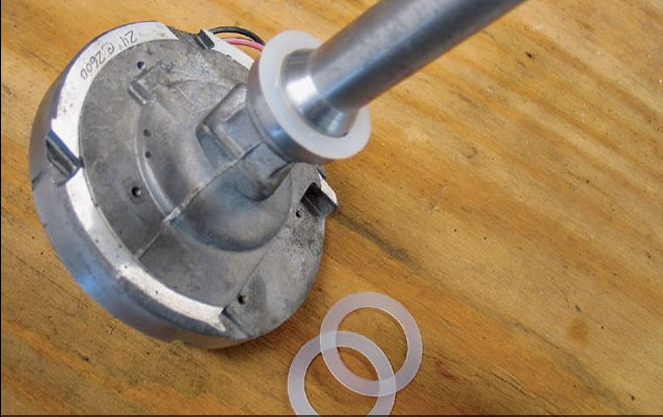
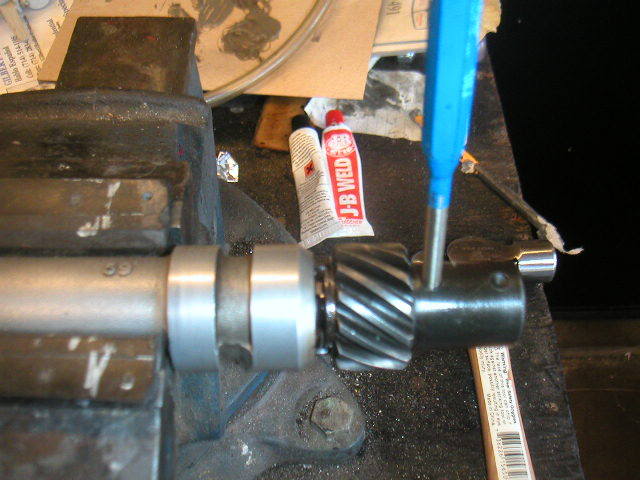
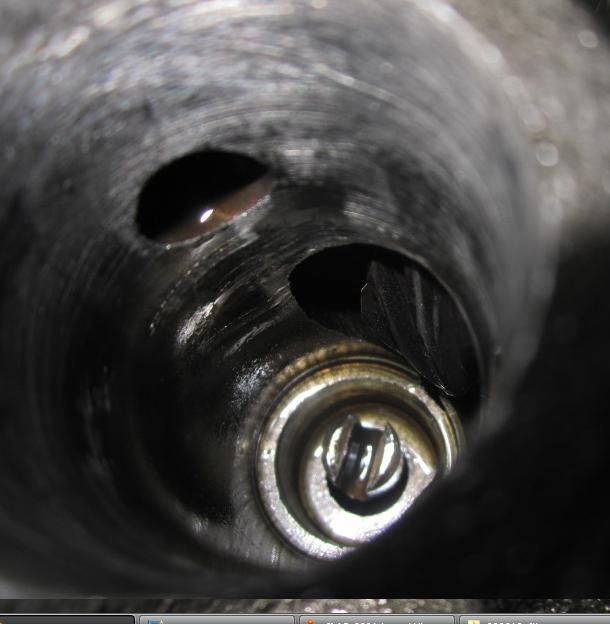
6)Drive out the roll pin. Support the gear, and drive it out with a pin punch. Use one slightly smaller than the pin.
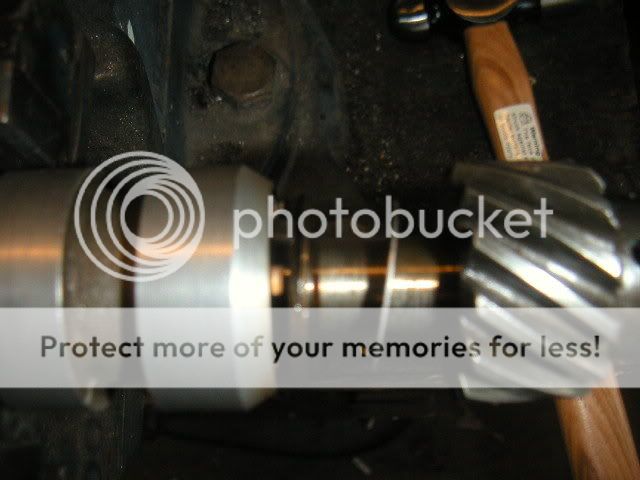
7)Install the shim.(If you don't have a micrometer, you can still do it. Just try varying thicknesses, temp hold the gear with your pin punch, and re-check the clearance)
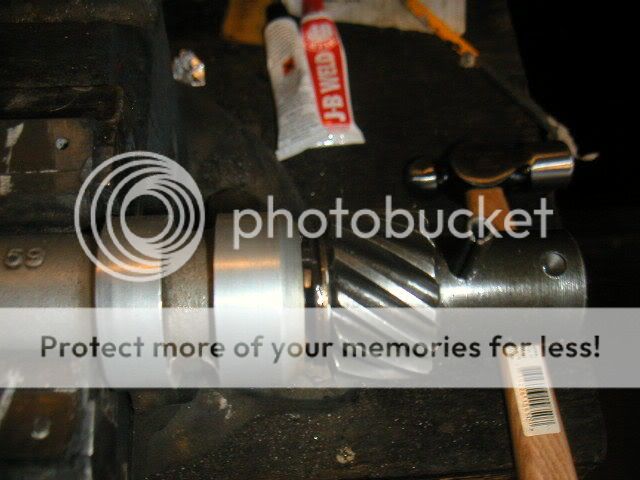
8)Re install the gear with the dimple up, as well as the rotor . Just drive it in till flush both sides. I gently start it, then use the vice to press it in.
9)Re-check the end play. Here a .010" gauge is perfect.
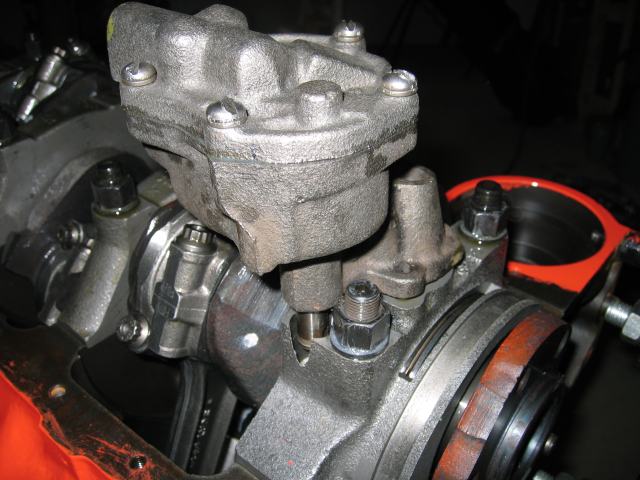
keep in mind the distributor base forms one wall of the lifter gallery oil passage

so grooving the lower oil band helps spray extra oil on the distributor/cam gears contact area
UH, ok, fair question....wass wrong with the procedure....???
:beer:[/QUOTE]
viewtopic.php?f=50&t=9946&p=38325#p38325

BTW while were talking distribs...cutting a shallow grouve in the block passage wall the distrib passes thru to form one wall of the oil passages, or the distributor lower body so pressurized oil squirts directly into the cam gear and distributor contact area adds relieablity over just having splash oiling
some of the better distributors with o-ring grooves have a small oil hole drilled between the o-rings that allows a steady stream of pressurized oil to enter the lower distributor shaft, the upper bearing is sealed so oil can,t exit into the upper distributor, but oil is routed to lube the lower bearing in the distributor, the oil exits to spray over the cam gear/distributor gear contact area, look closely at yours
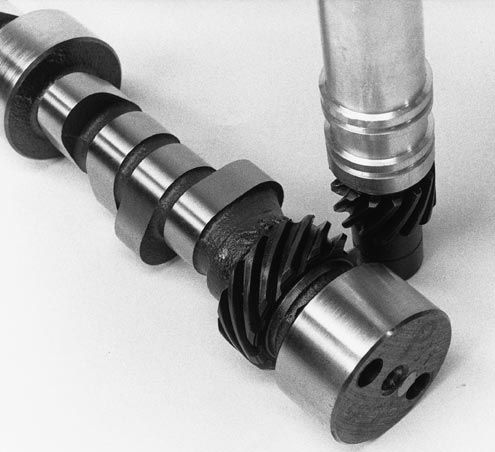
billet cams can and do have steel distributor gears that are not compatible with stock cast iron or melonized stock distributor gears, so anytime you change cams get and correctly install the matching distributor gear
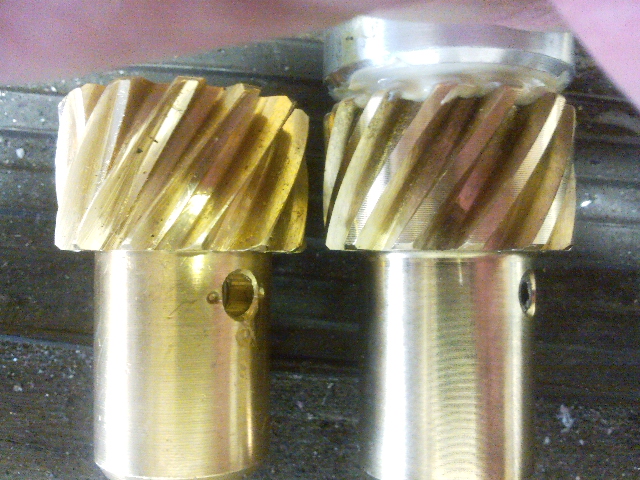
keep in mind theres a VAST difference in the QUALITY of bronze distributor gears and alloys vary wildly so its best to both use the cam manufacturers input during selecting components and not to assume all bronze gears are interchangeable
THERE'S AN EXCELLENT CHANCE of chipping or burring either the distributor or cam gears during the procedure, or bending the oil pump drive shaft as there is by definition is a limited tooth engagement and less than ideal alignment of the component during that procedure
yes it works most of the time IF your only concern is getting the distributor to drop fully in.....but if you could inspect the tip of the oil pump drive shaft and gears your almost guaranteed to see damage eventually, and if you do enough of the engine tear downs you'll also frequently see the broken connector collars the lower oil pump drive shaft and pump drive connections that can result from the temporary binding and mis-alignment during the procedure.....yeah! I know you don,t think IM correct! but after you have pulled down over a hundred chevys and rebuilt them you see patterns, ask questions and see the results
"Wear Versus Destruction
The gear that drives the distributor lives in a very difficult environment. First, in stock form, the only oil that lubricates the spinning cam and distributor gears gets there by the practically random splash effect. Second, in a wet-sump engine, the oil pump is driven off the distributor shaft. That means the resistance that the distributor gear applies as the cam gear tries to turn it comes not only from spinning the distributor shaft, but also the oil pump. If you are running a high-volume oil pump or racing on cold motor oil, this can cause tremendous pressure on the system. Even if you don't run a high-volume pump, the tight bearing tolerances used to increase oil control and high rpm levels seen in modern racing engines still cause the pump to work very hard and put extra resistance on the distributor gear."
look if your only installing a distrib after a manifold swap,
ITS not complicated, pull the #1 plug and put you thumb over the hole tightly, turn the engine in the normal dirrection of rotation, with a breaker bar and scocket untill you get compression in the #1 cylinder, as the damper TDC line approches the TDC timing tab, drop the distributor in with the rotor facing the #1 cylinder,compensate for the way the distrib gear causes the rotor to rotate as in seats,so its seated pointing where you intended, if it won,t fully seat turn the oil pump drive with a very large flat blade screw driver untill it will,with the distrib removed and try again, once it seats,facing the correct dirrection, install and tighten the distrib clamp so its difficult to spin the distrib easily by hand but still possiable to spin the distrib by hand, re-install the #1 plug and wire, install the cap and all ignition related wires, use your timing light and set the ignition timing,per the shop manuals instructions, tighten the distibutor hold clamp so it can,t move, IF it takes more than 10 minutes your in need of more practice or nearly hopeless as a mechanic.The CLOYES true roller style is vastly superior to the factory link belt design
ID suggest verifying TDC and the use of timing tape on the damper and a decent timing light rather than guessing.
once youve located TRUE TDC, you either install timing tape on your current damper, or a marked cover
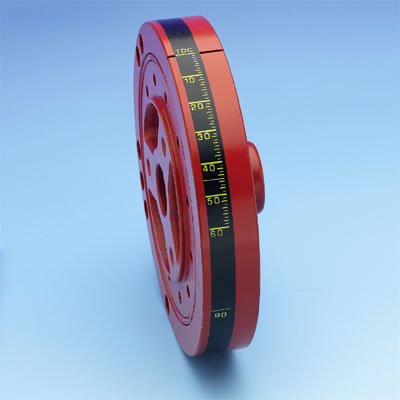
then graphing your advance curve
http://garage.grumpysperformance.com/index.php?threads/timing-lights.875/
http://garage.grumpysperformance.com/index.php?threads/timing-tabs-and-indicators.1015/
http://garage.grumpysperformance.com/index.php?threads/verifying-your-real-advance-curve.4683/
this is usually a good start point
how come its 180 degees out of phase?
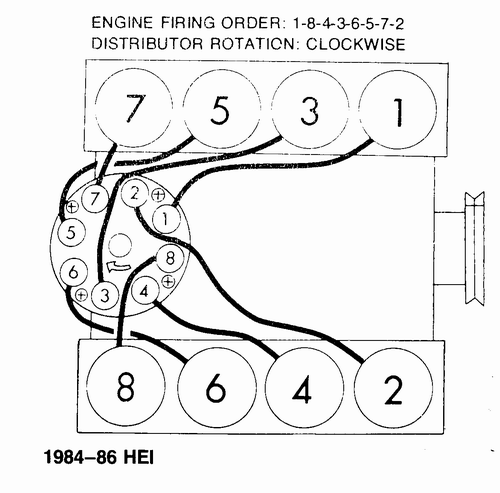
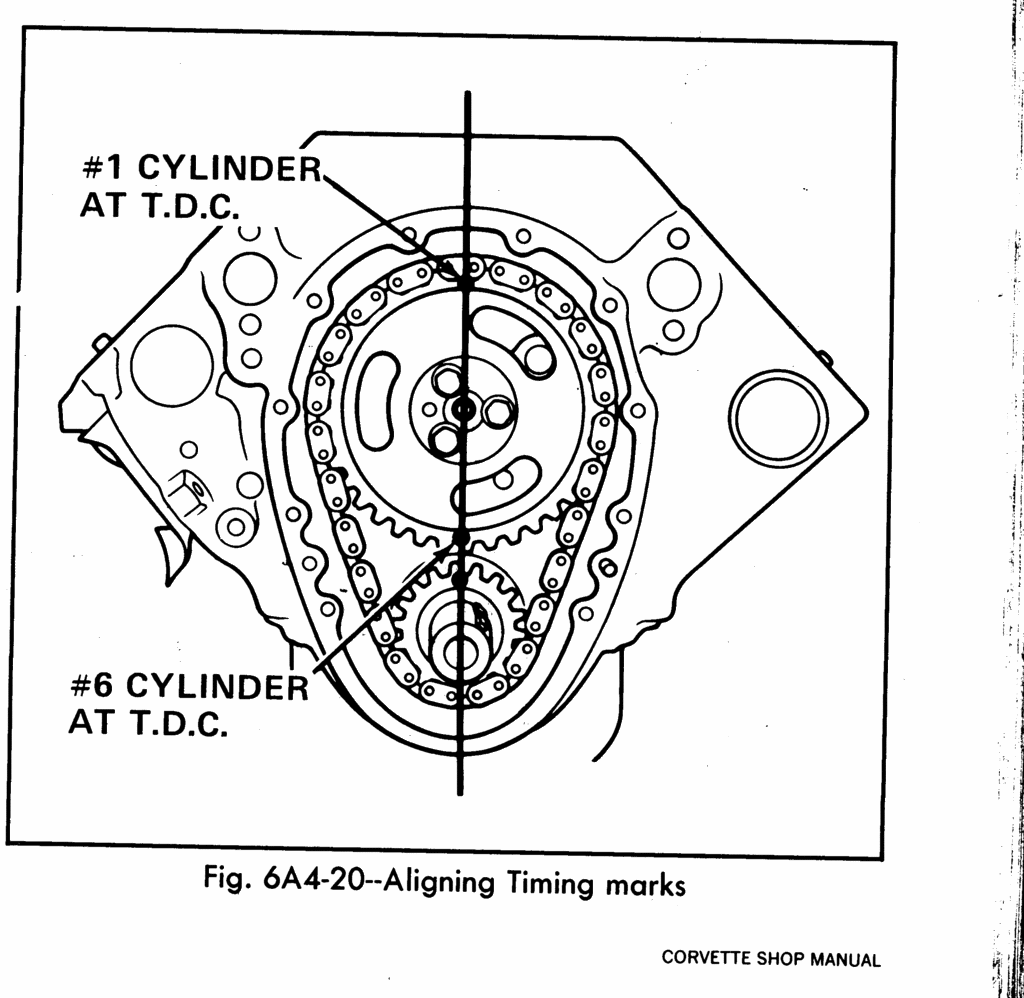
I get this question all the time, well here’s something I see lots of guys don’t understand, ONCE YOU'VE INSTALLED A CAM WITH THE TIMING MARKS YOU MUST ROTATE THE CRANK 360 DEGREES BEFORE DROPPING IN THE DISTRIBUTOR, while its true that if the, timing marks are positioned so the crank is at 12 o,clock and the cam gear is at 6 o,clock that the cam lobes will be in the position that fires #6 cylinder that HAS NO EFFECT AT ALL (on finding TDC,) for aligning the degree wheel with TDC,or THE timing tab pointer, for degreeing in the cam, the piston passes thru TDC TWICE in every firing cycle once on the firing/power stroke and once on the exhaust stroke, the cam rotates at exactly 1/2 the speed of the crank so to make it easy to line up the marks they install it with the marks at the closest point 6/12 for easy indexing, rotate the engine 360 degrees to the #1 TDC power stroke and the crank gear will still be at 12 o'clock 12/12 but the cam will be at 12 o,clock also, rotate another 360 degrees and your back where you started. its simply easier to index the cam at the point where the index marks align closely. look at how the cam lobes themselves open the valves when the cam is just installed the #1 cylinder valves are slightly open and the #6 are closed per "Lunati" ‘’YES YOU ARE RIGHT - WHEN CRANK IS AT TWELVE AND CAM IS AT SIX THEN #6 CYL IS FIRING AFTER YOU LINE UP YOUR MARKS AND INSTALL GEAR THEN ROTATE YOUR CRANK ONE REVOLUTION AND THEN DROP THE DIST. IN - AT THAT POINT
WATCH VIDEO

http://boxwrench.net/specs/chevy_sb.htm
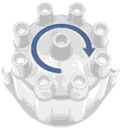
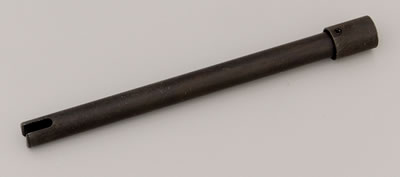
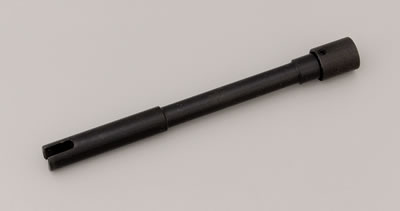
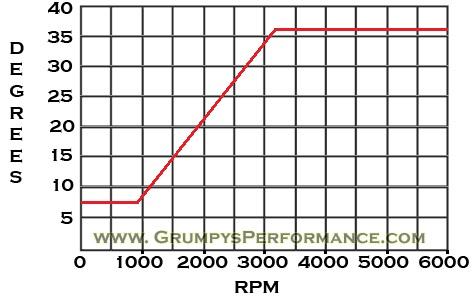
drop the distributor in with the rotor pointing at the #1 cylinder, and YEAH! it physically possible to get the distributors rotor to point at any place you want it too by changing the oil pump drive shaft alignment with a large flat blade screw driver while the distributors out of the engine and that's easily changed, but to do it correctly,you want the rotor to point at the #1 cylinder on the compression stroke, so pull the #1 plug, get a large ratchet/socket on the damper and put your finger over the open plug hole and slowly rotate the engine by hand in its normal rotational direction until you see pressure build under your finger as the rotor approaches #1 cylinder location on the distributor base which you should have marked as its supposed to be in direct alignment between the distributor and the number 1 cylinder on the engine, remember the distributor and cam gears are helical and the rotor turns as it seats so compensate slightly. and the rotor should be just coming into alignment as pressure builds under your finger, once that's done re-install the distributor cap and plug and use a timing light to set the timing, you normally want about 6-12 degrees BTDC at idle and watch it advance to about 37 degrees as the rpms build to about 3000rpmok, then have you checked the distributor to oil pump drive shaft length?,
IF YOUR DISTRIBUTOR LEAKS OIL AROUND THE BASE GASKET..
it seems the distributor is not seating fully against the intake ring gasket and the distributor to oil pump drive is suspected of being a bit to long, there should be about .050 slack MINIMUM between the oil pump drive shaft and the distributor gear
READ THIS
viewtopic.php?f=54&t=123&p=326#p326
viewtopic.php?f=70&t=6778&p=21751#p21751
watch the video
http://www.youtube.com/watch?v=YdIGZ-tV ... re=related
As you accelerate/decelerate, the spiral cut gear causes the shaft to rise and fall, turning in relationship to the cam, and making your timing vary. With the cap off, grasp the rotor and try to move it up and down. It will. Shimming the end play is the answer.
You can check the shaft/bushing clearance while you do these steps, but they are surprisingly durable, and without points, highly forgiving.
1)Mark the rotor position on the manifold, and remove it. It will turn as you do.
2)Chuck it softly but firmly as shown in a vice. Rotor point up. Notice the dimple on the gear. It is on the same side as the rotor point.its always a good idea to call the cam manufacturer and ask what is the correct matching cam gear and distributor gear set,and how its correctly installed.
READ THIS THREAD TOO
as a general tip, marking the distributor shaft so the oil sprays on the cam gear/distributor gear mesh/contact area helps,
durability, if its correctly located and its not too large,
but that depends to some extent to be helpful on getting the oil flow groove correctly indexed,
and that might be screwed up a bit if its not placed correctly , now obviously if the engines in the car and assembled its not a good idea to start doing this,,
it helps during the initial engine assembly if you put some thought into the build before you get too far into the build,
if you have the bare block at some point to groove the area in the block where the distributor seats,
just a bit with a very small second groove as the picture indicate,
as that ill always be in the correct location and does not depend on the distributors position in the block.
don't get carried away a groove about .008 x.008 (eight thousand's deep x eight thousand's wide in the correct location,) is all that's necessary
so grooving the lower oil band directly above the point where the gears start to mesh helps spray extra oil on the distributor/cam gears contact area, and yes that changes with distributor position so most guys cut a small fine groove in both the lower block wall and the distributor lower section above that location to assure a constant oil mist spray into the meshing gears
http://garage.grumpysperformance.com/index.php?threads/oil-system-mods-that-help.2187/
I suppose you could do these oil feed mods and groove the lower lifter bores and distributor gear oil feed groove,while you used a strong vacuum cleaner and magnets to limit the metallic debris ,on a partially assembled engine, but I've never tried it, I do the minor machine work to a clean bare block even before the cam bearings are installed and carefully clean it, and all the oil passages with a rifle bore brush high pressure air and solvents, several times before installing the cam bearings, I generally prefer to start with the block on an engine stand that I can rotate easily for full access. Crane cams recommends filing or cutting a .030-inch-wide by .030-inch-deep groove in the lower ring of the distributor housing immediately above the distributor gear. This slot is cut into a ring that seals a main oil passage, creating a spray of oil that is directed onto the distributor and cam gears for extra lubrication.
keep in mind grooving the lower distributor oil band will allow pressurized oil to flow through the lower band to supply oil to the distributor /cam gears contact point but this groove will rotate as the distributor ignition timing is advanced or retarded, timing the ignition advance, grooving the block keeps the oil groove directly over the gears regardless of the change in distributor location
summit and JEGS sell several types of distributor gears, check the shaft diameter, on your distributor its USUALLY either .491 OR .500 and the gears DON,T interchange.
verify the correct gear to install with your cam manufacturer, a melonized iron gear is usually used with a cast iron cam core and a bronze gear with a steel billet roller cam UNLESS its got a pressed on iron gear, and yes there ARE reverse rotation CAMS for marine applications, so if your salvaging a boat engine be aware
check with the manufacturer anytime you have similar questions, on any valve train or ignition component.
but Id bet the stock distributor gear is what will be recommended,on any new engine build with a new cam installed.
this whole web site is designed to make it far FAR easier on guys wanting to build the required knowledge base required to learn the skills youll require to excell in this hobby.
READ THE RELATED INFO CAREFULLY AND USE A GOOD MOLY LUBE ON THE DISTRIBUTOR AND CAM GEARS
most stock chevy v8 distributors will use this gear. .491 diam.
https://www.summitracing.com/parts/ado-10456413/overview/make/chevrolet
many aftermarket distributors will use this gear .500 diam.
https://www.summitracing.com/parts/msd-8561/overview/make/chevrolet
bronze distributor gears are generally used on billet steel roller cam cores
https://www.summitracing.com/parts/msd-8471/overview/make/chevrolet
http://garage.grumpysperformance.co...ation-and-bits-of-distributor-i-d-info.14880/
http://garage.grumpysperformance.com/index.php?threads/distributor-gear-wear.1701/#post-5252
http://garage.grumpysperformance.com/index.php?threads/distributor-gear-info.1186/#post-4155
http://garage.grumpysperformance.com/index.php?threads/oil-system-mods-that-help.2187/#post-5890
http://garage.grumpysperformance.co...stalling-the-intake-manifold-distributor.464/
http://garage.grumpysperformance.co...ear-articles-you-need-to-read.282/#post-61429
http://garage.grumpysperformance.co...ting-rebuilding-hei-ignitions.2798/#post-7247
http://garage.grumpysperformance.co...y-in-building-a-good-engine.11682/#post-54682
what a difference quality parts and a bit of experience make
I had bob stop by with a friend who had a 1967 corvette that he had installed a really nice 427 big block with a 1/2" stroker kit making it a 489 cid stroker , the engine looked really great as the owner had done extremely impressive paint and chrome detail work and accents and cleaned up the...
garage.grumpysperformance.com
3) Place a feeler gauge between the thrust washer and the gear. Try different combination's until the feeler is snug, but not tight. This is your end play. .010" is necessary for expansion from heat, and lubrication.
if your seeing the timing change a few degrees, back and forth,
slack in a work timing chain, worn distributor gear or not having the proper shim clearance on the distributor center shaft will provide slop that allows timing to vary several degrees
This one shows .031". We will install a .020" shim.
4)Buy these shims
5)Find a .020" shim in the kit.
Ive used moly grease for decades as a internal shaft lube
don,t confuse distributor end cam gear clearance (usually set at .007-.010) (how far the distributor gear can move on the distributor shaft and the clearance between the end of the oil pump drive drive shaft and the inside of the gear drive (usually set at .050) set when the distributor seats over the shaft and is clamped in the intake manifold
6)Drive out the roll pin. Support the gear, and drive it out with a pin punch. Use one slightly smaller than the pin.
7)Install the shim.(If you don't have a micrometer, you can still do it. Just try varying thicknesses, temp hold the gear with your pin punch, and re-check the clearance)
8)Re install the gear with the dimple up, as well as the rotor . Just drive it in till flush both sides. I gently start it, then use the vice to press it in.
9)Re-check the end play. Here a .010" gauge is perfect.
grumpyvette said:if you guys that hit the starter to drop the distributor in,:twitch:ever stop bye..........remind me not to let you install my distributor in any engine IM working on:twitch: :bonkers:
keep in mind the distributor base forms one wall of the lifter gallery oil passage
so grooving the lower oil band helps spray extra oil on the distributor/cam gears contact area
UH, ok, fair question....wass wrong with the procedure....???
:beer:[/QUOTE]
viewtopic.php?f=50&t=9946&p=38325#p38325
BTW while were talking distribs...cutting a shallow grouve in the block passage wall the distrib passes thru to form one wall of the oil passages, or the distributor lower body so pressurized oil squirts directly into the cam gear and distributor contact area adds relieablity over just having splash oiling
some of the better distributors with o-ring grooves have a small oil hole drilled between the o-rings that allows a steady stream of pressurized oil to enter the lower distributor shaft, the upper bearing is sealed so oil can,t exit into the upper distributor, but oil is routed to lube the lower bearing in the distributor, the oil exits to spray over the cam gear/distributor gear contact area, look closely at yours
billet cams can and do have steel distributor gears that are not compatible with stock cast iron or melonized stock distributor gears, so anytime you change cams get and correctly install the matching distributor gear
keep in mind theres a VAST difference in the QUALITY of bronze distributor gears and alloys vary wildly so its best to both use the cam manufacturers input during selecting components and not to assume all bronze gears are interchangeable
THERE'S AN EXCELLENT CHANCE of chipping or burring either the distributor or cam gears during the procedure, or bending the oil pump drive shaft as there is by definition is a limited tooth engagement and less than ideal alignment of the component during that procedure
yes it works most of the time IF your only concern is getting the distributor to drop fully in.....but if you could inspect the tip of the oil pump drive shaft and gears your almost guaranteed to see damage eventually, and if you do enough of the engine tear downs you'll also frequently see the broken connector collars the lower oil pump drive shaft and pump drive connections that can result from the temporary binding and mis-alignment during the procedure.....yeah! I know you don,t think IM correct! but after you have pulled down over a hundred chevys and rebuilt them you see patterns, ask questions and see the results
"Wear Versus Destruction
The gear that drives the distributor lives in a very difficult environment. First, in stock form, the only oil that lubricates the spinning cam and distributor gears gets there by the practically random splash effect. Second, in a wet-sump engine, the oil pump is driven off the distributor shaft. That means the resistance that the distributor gear applies as the cam gear tries to turn it comes not only from spinning the distributor shaft, but also the oil pump. If you are running a high-volume oil pump or racing on cold motor oil, this can cause tremendous pressure on the system. Even if you don't run a high-volume pump, the tight bearing tolerances used to increase oil control and high rpm levels seen in modern racing engines still cause the pump to work very hard and put extra resistance on the distributor gear."
look if your only installing a distrib after a manifold swap,
ITS not complicated, pull the #1 plug and put you thumb over the hole tightly, turn the engine in the normal dirrection of rotation, with a breaker bar and scocket untill you get compression in the #1 cylinder, as the damper TDC line approches the TDC timing tab, drop the distributor in with the rotor facing the #1 cylinder,compensate for the way the distrib gear causes the rotor to rotate as in seats,so its seated pointing where you intended, if it won,t fully seat turn the oil pump drive with a very large flat blade screw driver untill it will,with the distrib removed and try again, once it seats,facing the correct dirrection, install and tighten the distrib clamp so its difficult to spin the distrib easily by hand but still possiable to spin the distrib by hand, re-install the #1 plug and wire, install the cap and all ignition related wires, use your timing light and set the ignition timing,per the shop manuals instructions, tighten the distibutor hold clamp so it can,t move, IF it takes more than 10 minutes your in need of more practice or nearly hopeless as a mechanic.The CLOYES true roller style is vastly superior to the factory link belt design
ID suggest verifying TDC and the use of timing tape on the damper and a decent timing light rather than guessing.
once youve located TRUE TDC, you either install timing tape on your current damper, or a marked cover
then graphing your advance curve
http://garage.grumpysperformance.com/index.php?threads/timing-lights.875/
http://garage.grumpysperformance.com/index.php?threads/timing-tabs-and-indicators.1015/
http://garage.grumpysperformance.com/index.php?threads/verifying-your-real-advance-curve.4683/
this is usually a good start point
how come its 180 degees out of phase?
I get this question all the time, well here’s something I see lots of guys don’t understand, ONCE YOU'VE INSTALLED A CAM WITH THE TIMING MARKS YOU MUST ROTATE THE CRANK 360 DEGREES BEFORE DROPPING IN THE DISTRIBUTOR, while its true that if the, timing marks are positioned so the crank is at 12 o,clock and the cam gear is at 6 o,clock that the cam lobes will be in the position that fires #6 cylinder that HAS NO EFFECT AT ALL (on finding TDC,) for aligning the degree wheel with TDC,or THE timing tab pointer, for degreeing in the cam, the piston passes thru TDC TWICE in every firing cycle once on the firing/power stroke and once on the exhaust stroke, the cam rotates at exactly 1/2 the speed of the crank so to make it easy to line up the marks they install it with the marks at the closest point 6/12 for easy indexing, rotate the engine 360 degrees to the #1 TDC power stroke and the crank gear will still be at 12 o'clock 12/12 but the cam will be at 12 o,clock also, rotate another 360 degrees and your back where you started. its simply easier to index the cam at the point where the index marks align closely. look at how the cam lobes themselves open the valves when the cam is just installed the #1 cylinder valves are slightly open and the #6 are closed per "Lunati" ‘’YES YOU ARE RIGHT - WHEN CRANK IS AT TWELVE AND CAM IS AT SIX THEN #6 CYL IS FIRING AFTER YOU LINE UP YOUR MARKS AND INSTALL GEAR THEN ROTATE YOUR CRANK ONE REVOLUTION AND THEN DROP THE DIST. IN - AT THAT POINT
WATCH VIDEO
http://boxwrench.net/specs/chevy_sb.htm
drop the distributor in with the rotor pointing at the #1 cylinder, and YEAH! it physically possible to get the distributors rotor to point at any place you want it too by changing the oil pump drive shaft alignment with a large flat blade screw driver while the distributors out of the engine and that's easily changed, but to do it correctly,you want the rotor to point at the #1 cylinder on the compression stroke, so pull the #1 plug, get a large ratchet/socket on the damper and put your finger over the open plug hole and slowly rotate the engine by hand in its normal rotational direction until you see pressure build under your finger as the rotor approaches #1 cylinder location on the distributor base which you should have marked as its supposed to be in direct alignment between the distributor and the number 1 cylinder on the engine, remember the distributor and cam gears are helical and the rotor turns as it seats so compensate slightly. and the rotor should be just coming into alignment as pressure builds under your finger, once that's done re-install the distributor cap and plug and use a timing light to set the timing, you normally want about 6-12 degrees BTDC at idle and watch it advance to about 37 degrees as the rpms build to about 3000rpmok, then have you checked the distributor to oil pump drive shaft length?,
IF YOUR DISTRIBUTOR LEAKS OIL AROUND THE BASE GASKET..
it seems the distributor is not seating fully against the intake ring gasket and the distributor to oil pump drive is suspected of being a bit to long, there should be about .050 slack MINIMUM between the oil pump drive shaft and the distributor gear
READ THIS
viewtopic.php?f=54&t=123&p=326#p326
viewtopic.php?f=70&t=6778&p=21751#p21751
watch the video
http://www.youtube.com/watch?v=YdIGZ-tV ... re=related
Last edited by a moderator: