(rjent) I am posting this by TimAT's suggestion and with his blessing. He and I have collaborated on this post and this is what we have come up with. Hope it helps everyone tackling this job. 
My comments are in italics ...
********************************************************
This has been on my "gonna' do" list for a long time. Here are some of the tools, tips and trick stuff to rebuild a TH 400 (M-40 option).
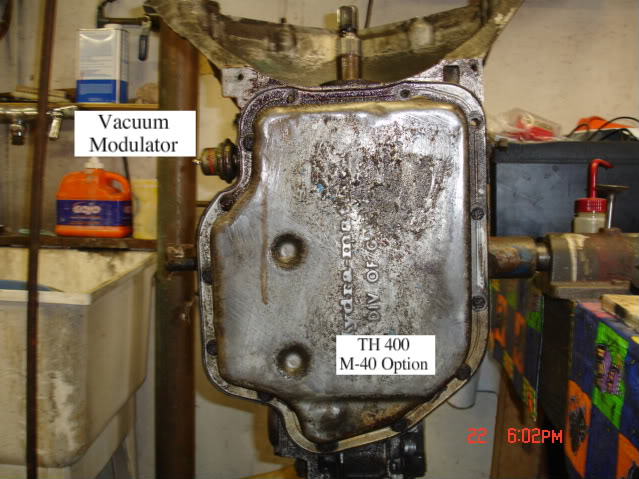
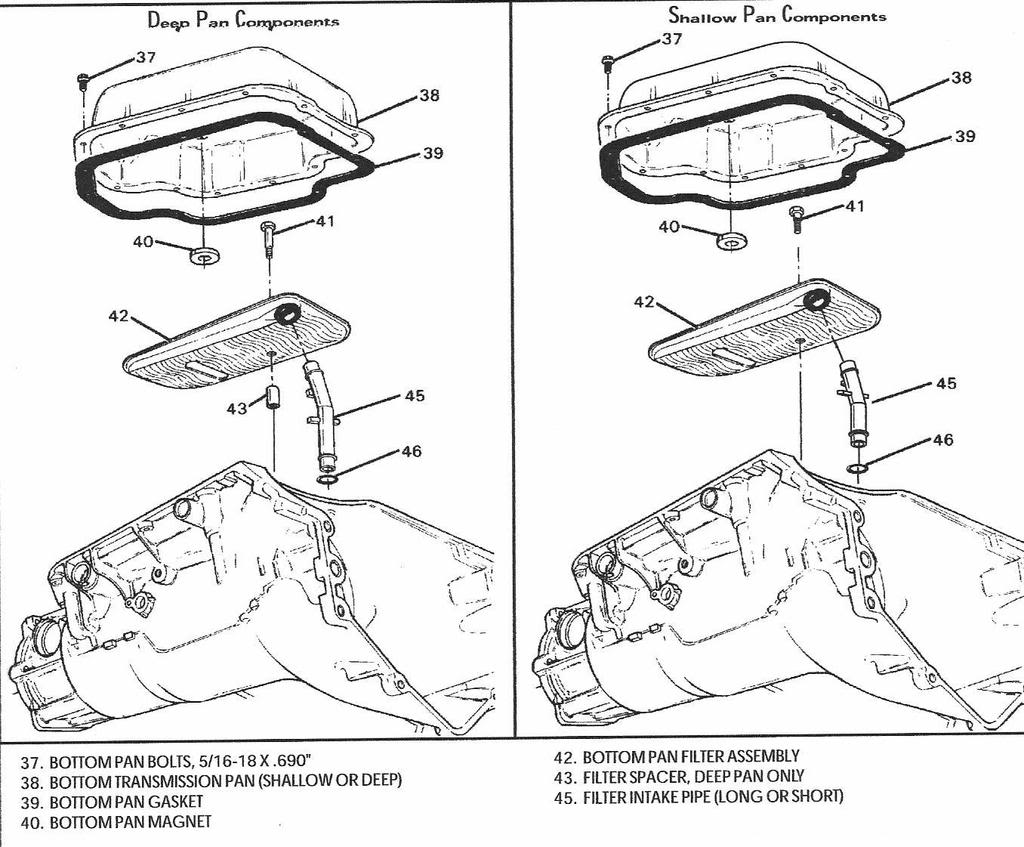
I have the fixture to mount the tranny on the bench, courtesy of a tool sale at a dealer that was going out. It's handy, but you can mount it to an engine stand, stand it in a 30 gallon barrel, roll it around on the floor or whatever works. It is easier when you can stand it up straight. I've seen guys bolt a steel plate to the bench and bolt the tranny to that. Works well. I'm going thru some of this with the assumption the trans {WAS/IS} working. And up front, I'll add some more pictures later- I got rolling thru this one and forgot to take as many pictures as I wanted. In any case, you need to have the ATSG manual for whatever trans you're working on. A valuable and necessary tool if you're in your first tranny. Stick a bucket under it to catch the oil- it'll drain a fair amount just setting there- I use a 5 gallon bucket. Then remove the pan. Look and see how much trash is there- you should see some black goo- that's the clutch material. Very possibly some small amounts of brass or aluminum or even some steel. If there's anything really broken, you'll find it as you go thru and inspect, but it will give you an idea of what you may find.
(rjent) I do not like dissassembling the transmission this dirty. Steam clean it like your life depends on it to get the outside as clean as possible. The rest of your work will then be cleaner and easier to keep up with. I also like Tims suggestion of the fixture mounted to the bench. When I was in the business, I had a metal build benchs built especially for the jobs. It was sloped back to a trough to catch the oil (these things will bleed like pigs for hours) as you dissassemble. There was also a hole in the front offset to the left that you could put the output shaft into the case and then stand the case upright. To me it made assembly easier. I do not like working on a wooden bench. It absorbes the oil, becomes messy and is hard to keep your work area clean. Just my .02
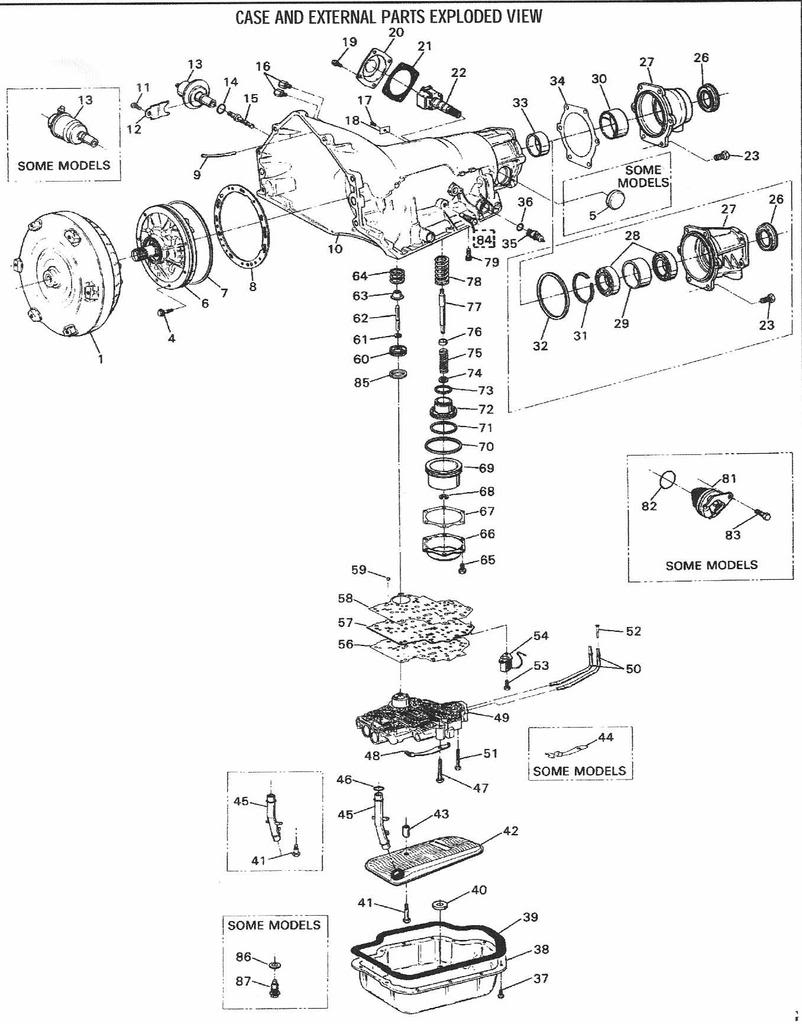
Notice in the upper left corner- that's the pickup tube from the filter to the pump. It may come out when you pull the filter off. Be sure and get the o-rings that may stay in the case.
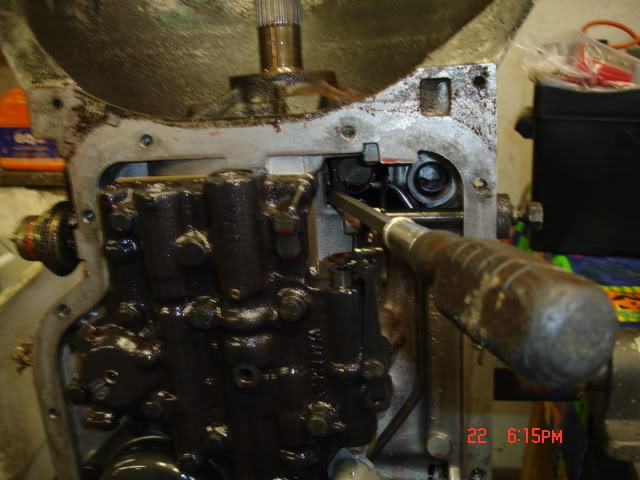
Pull the bolts around the pump- there are seal washers under the bolt heads- they get replaced. Again, I have a GM tool to pull the pump- most service manuals for the 400 show 2 slide hammers.
Without the GM tool, here's another way. Use a big screwdriver between the forward clutch housing and the back of the pump. GENTLY!! Usually you can pop the pump out.
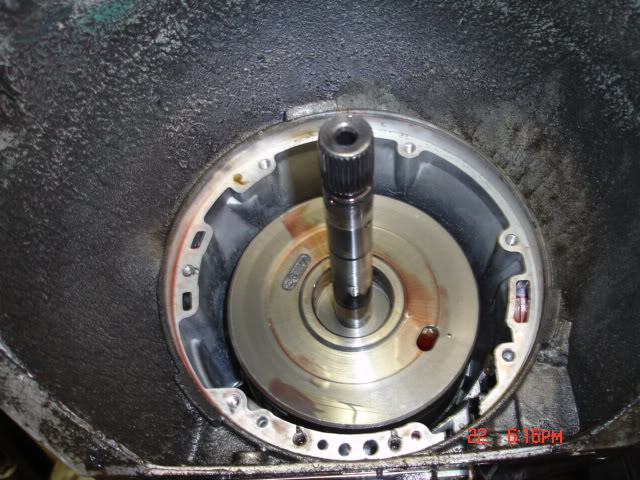
(rjent) I like knowing how things work. For those who are interested, the large spline is the stator spline, which is stationary, and the small spline is the turbine spline or input shaft. The converter is made up of the pump (outer shell driven by the engine) the stator (mounted on a sprag clutch), which redirects and accellerates the flow of oil to the turbine which drives the input shaft and is the power transfer shaft from the engine to the transmission. The accelleration of the oil is how the converter multiplies torque and it is also creates a LOT of heat in doing so.
Now the pump is out and you're looking at the forward clutch housing and input shaft.
Can't see it in the picture, but there's a band around the drum down in the case. Easy way to get it out is to remove the valve body.
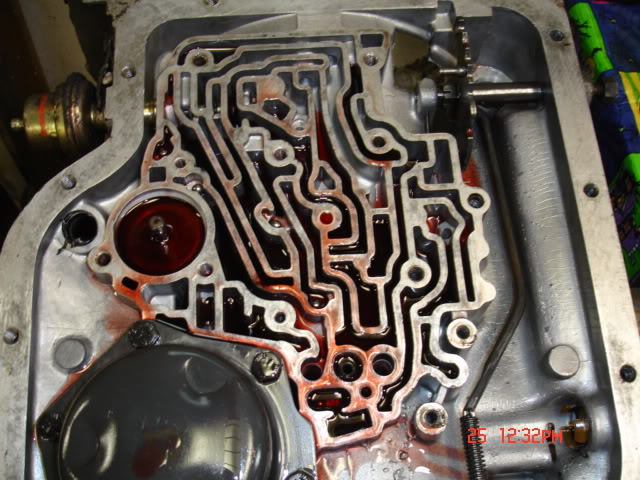
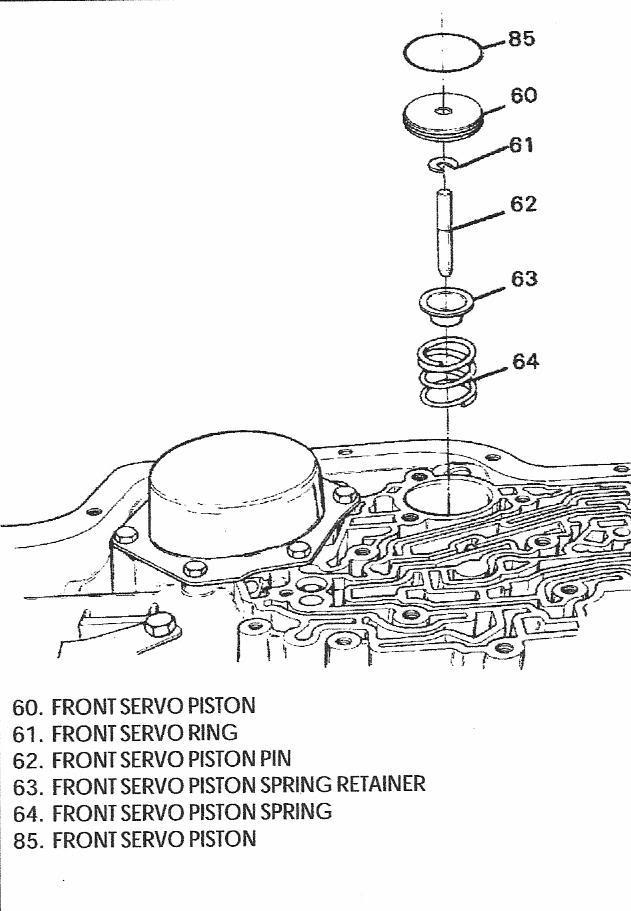
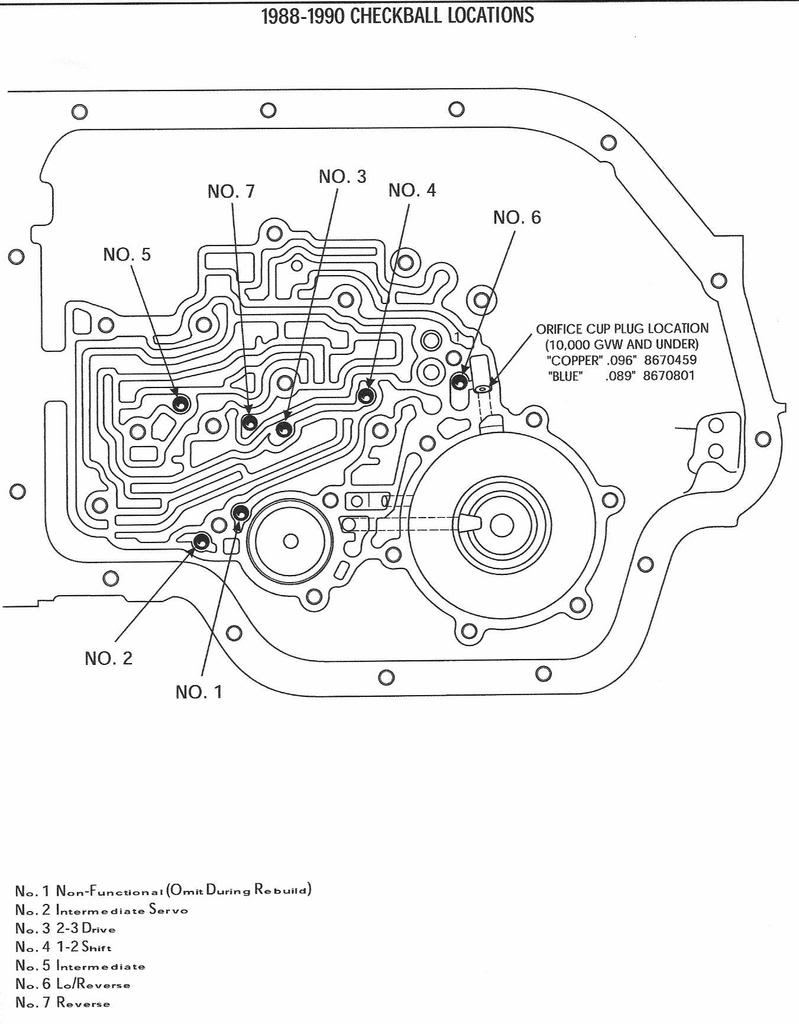
That round spot that is full of fluid is the servo for the band- pull the servo- there is a spring, a retainer for the horseshoe clip and the clip with the rod.
There are 5 checkballs too- collect them with a small magnet.
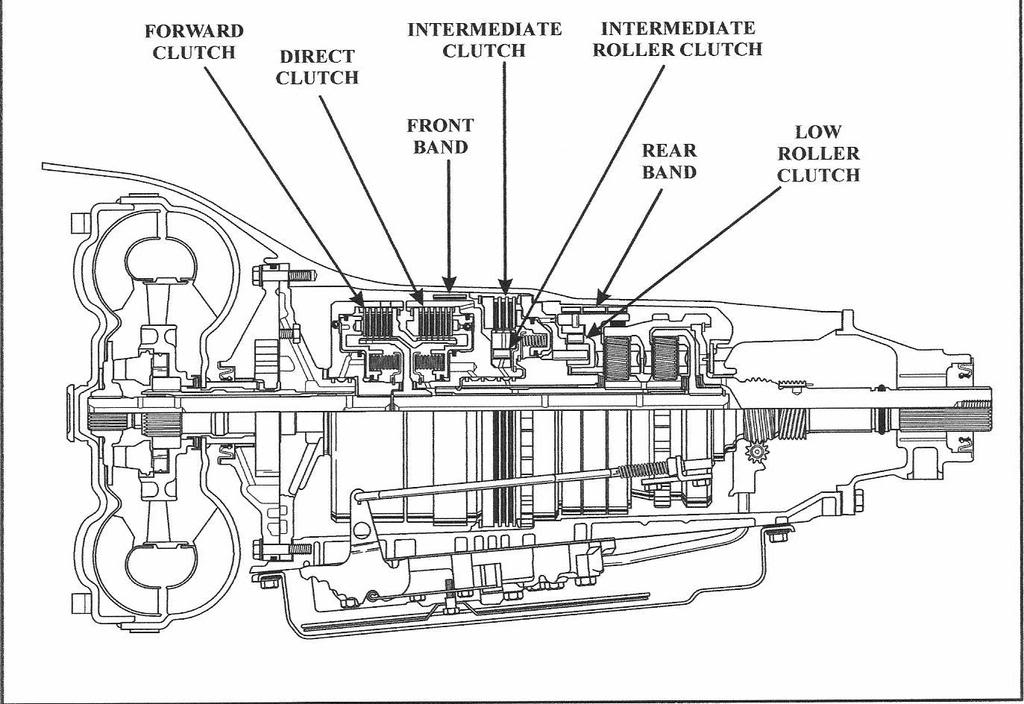
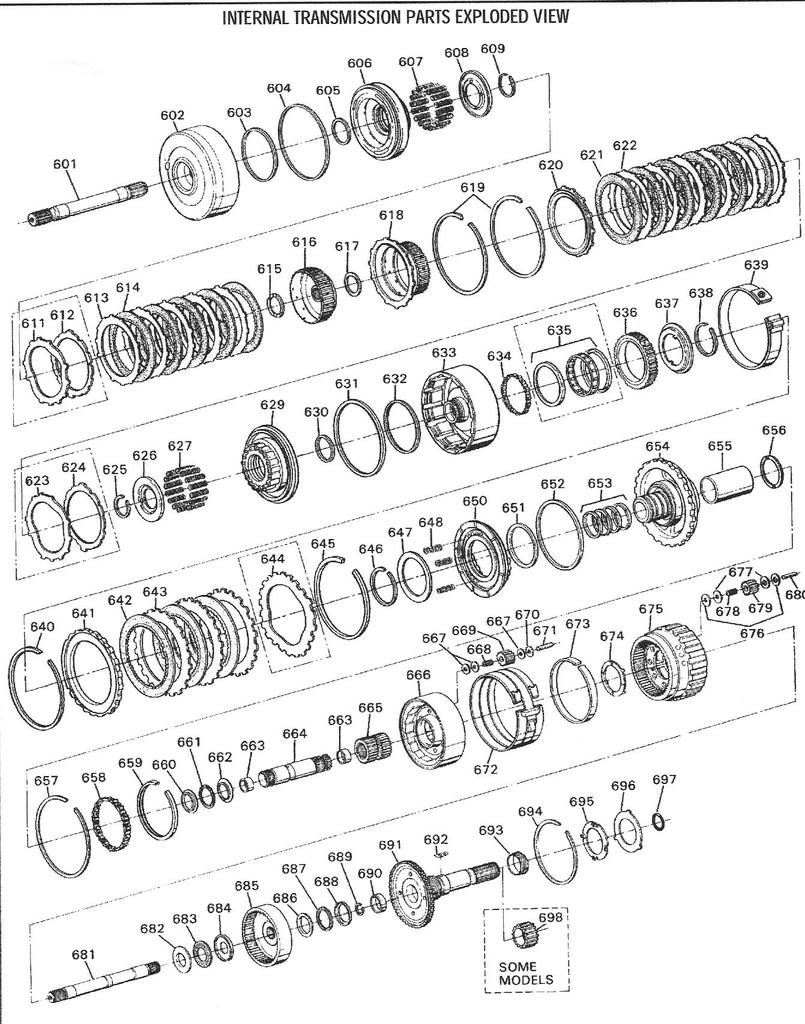
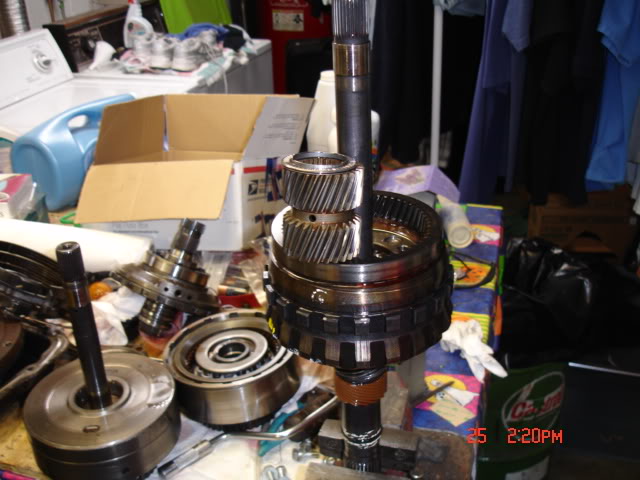
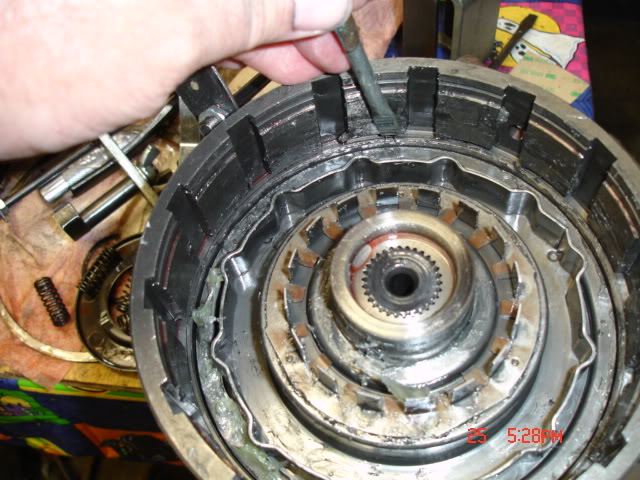
After you get that band loose, you can grab the input shaft and pull straight up- you get the forward and direct clutch housings. After they're out you can see the intermediate clutch and the back half or the trans:
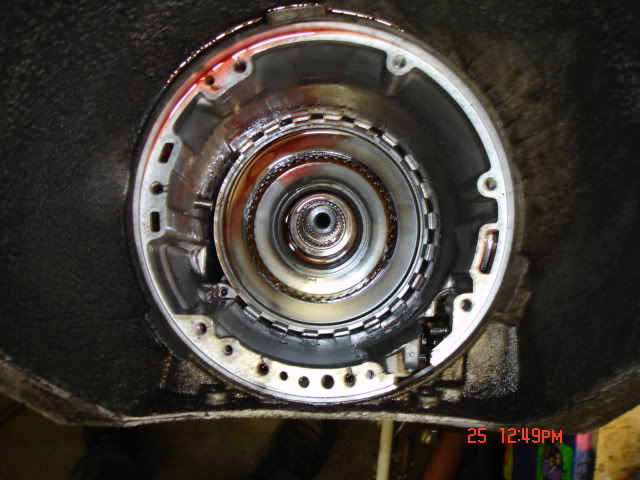
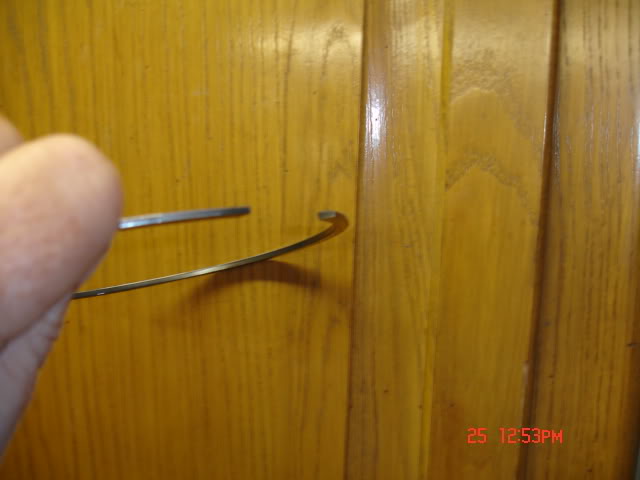
Here's the first snap ring you get- it holds the intermediate clutch pack in the case- you can't see it very well here, but the top is tapered- the flat side goes against the clutch backing plate. (The Trans-GO kit sends you a NEW flat snap ring for here. Use a big screwdriver and just work around the case and get it out of the groove. I ground a notch just behind the tip of an old one to help pull the ring up out of the groove.
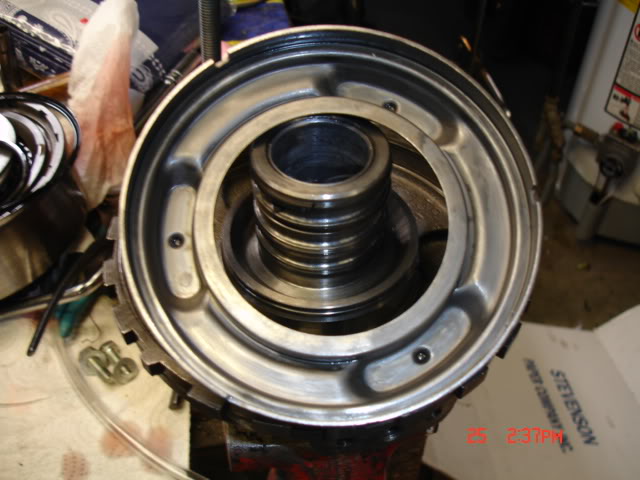
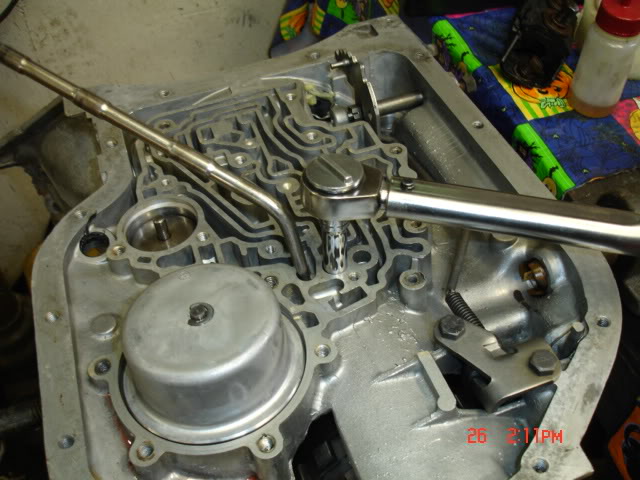
With the intermediate clutches out the center support is next- there is another snap ring holding it AND a bolt that comes in from the valve body-
Hard to see in that picture- Look at that black cover (lower left)- the bolt at 2 o'clock then straight to the right- 3 holes in line- the center support bolt is in the middle hole- If you look close- you can see a checkball just below those 3 holes.
The center support can be a little tough to remove- just get a grip and pull. After it's out, you can see the rear planetary set and another band- this one is the intermediate. The servo is under that black cover in the above picture- it'll need to come out before the band- it's got a spring under it so it may squirt a little fluid at you, but it won't fly across the room either. Once you let the pressure off the band, the rear planetary can come out. It's fairly heavy-
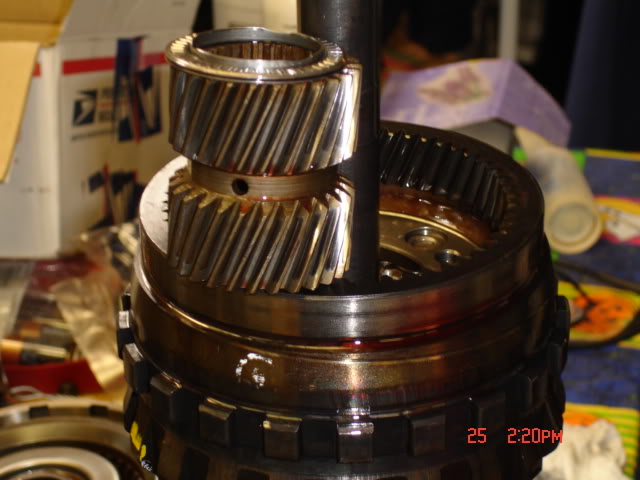
This is one place you get to make a choice- there are 2 different rear planetary sets- this one is the car/light truck set- note the helical cut gears. IF you can find one there is also a straight-cut gearset that was used in medium duty trucks and early motorhomes. That gearset is very hard to find and can be pretty expensive. Same ratio as far as I know. The small bit of added strength is not worth the $$ to me. And straight cut gears are a bit noisy..
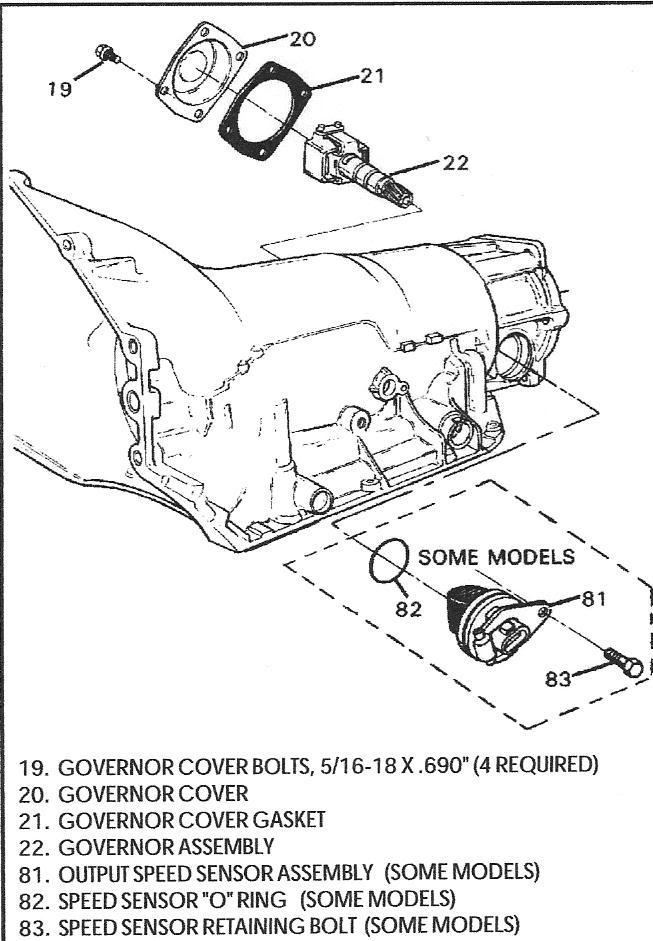
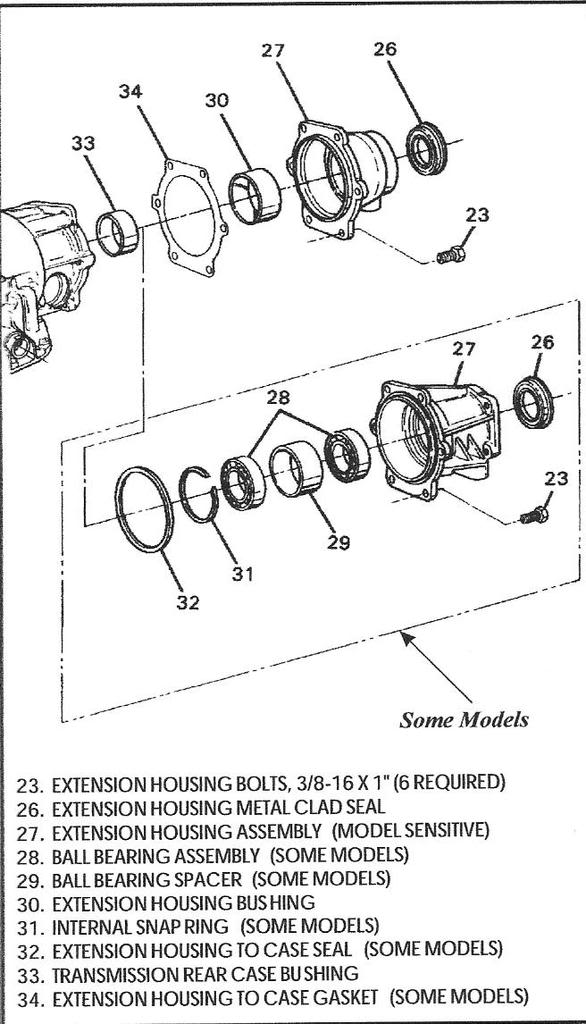
Now you have a bare case- if you were reading the ATSG manual and keeping your eyes open, you've removed the speedo adapter, governor, and rear housing. The only thing left is the shift selector shaft, park rod and pawl with the bracket. I've never seen a reason to remove any of these during a rebuild.
It's all apart, now is the time to clean the case. I have a deal with a local guy- I take him the case and he runs it thru his washer for $10. Then I take it home and clean it again. If you're going to do a restoration, you'll probably want to scrape all the really stuck goo off and keep cleaning until it's spotless. Not a bad idea, but for this one I didn't need to go that far.
Look at your ATSG manual again- there is a spacer and a thrust washer that goes in the rear of the case before the rear planetary- I use Trans-Gel Gold for assembly, but you can swipe a big jar of Vaseline from your bride too. Just don't plan on giving it back. She'll be PO'd big. Ask how I know this.
Here is the first set of seals- in the center support for the intermediate clutch. There are only 3 return springs so the only thing you need here is snap ring pliers. I have a set that has a flat tip with a 90* hook just for these snap rings. 2 seals on the piston-
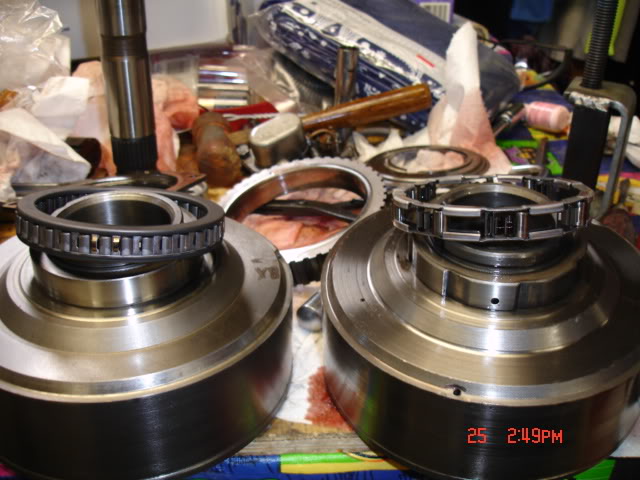
Now it's time for another choice. I like the 34 element sprag for the intermediate. More holding power and I feel it shifts better. Your call. The 34 element is on the left. I think they changes to that light sprag around 70 or 71 so changing requires that you get a new forward drum too.
When you get the rear gearset and center support back in the case, don't forget that band! Install the snap ring and the center support bolt. Torque it while holding the center support in the direction of rotation:
I made that tool- a long straight punch will work fine.
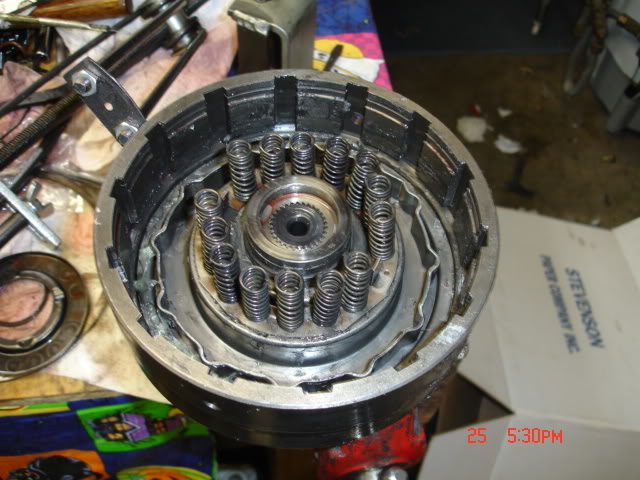
Now the fun part. replacing the seals and clutches. I have a K-D tool to compress the clutch return springs:
(rjent) I used to make all of my clutch compressors out of pieces of metal bent into a "U" in a vice at the right place(s) (each clutch/manuf. is different) with a hole in the middle and an all thread going through both. The U shaped metal pieces presses against the spring retainer and you simply tighten the all thread to compress. Works great and is a cheap tool! [/I]
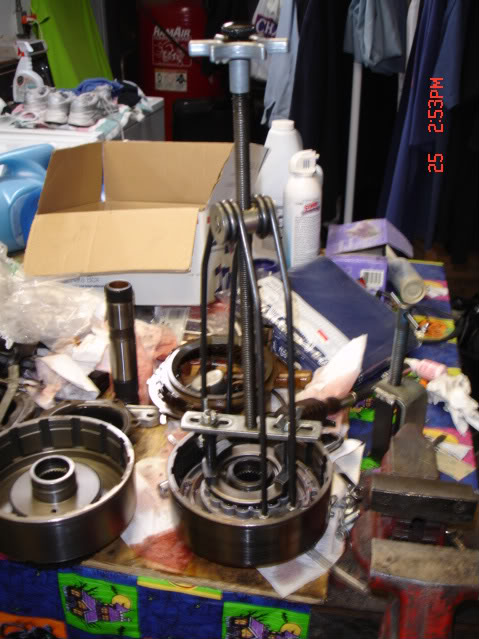
There are lots of ways to do this- drill a hole thru your bench and a piece of threaded rod- make a U shaped tool from a piece of flat stock, a few nuts and go. If you have a drill press you can use that. No set rules here other than keeping things clean as you go back together.
Compress the return springs a little and take the snap ring off, then let the pressure off the return springs.
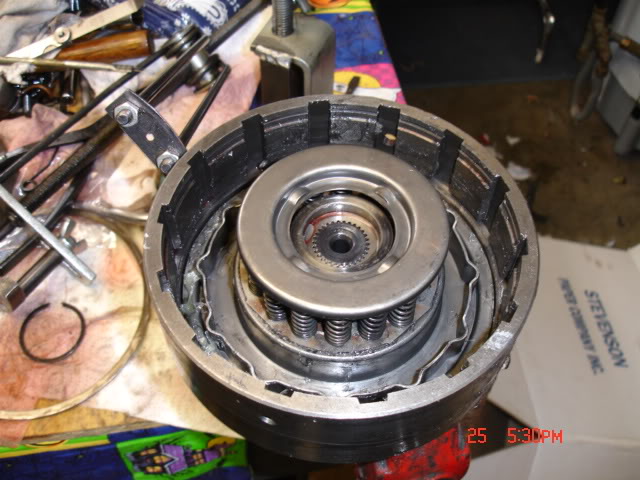
There are 3 seals in each of the drums, and 2 seals on the intermediate piston. WATCH how they come off- the lips MUST be pointing the correct direction- again, that ATSG manual is handy. Several of the seals are very close to the same dimensions too. Compare the length of the lip, the overall diameter, the thickness of the inner (or outer) ring. Original seals have numbers on them and some of the replacements do too. Don't count on being able to read them.
Put the seals back on the piston and lube them well. Pack them full. Make them a greasy nasty (but clean) mess. Set the piston back into the clutch drum and start working it down. (The inner seal is the first one you need to worry about, but they all seem to kind of go at the same time.)
There is a tool that can be made or purchased just to install these seals and several types of install tools available if you have $$ to burn. The GM spec'd tools are plastic sleeves that are tapered- set it in the drum, drop the piston with the new seals in and push. Done. I've seen those tools in the GM Manuals- no where else. Even the dealers didn't have them.
I use a feeler gauge and a little tool that has a wire loop in the end of a handle:
(rjent) Tip: As Tim says below, be very carefull with the feeler guage as you can cut the seal if you are not carefull.
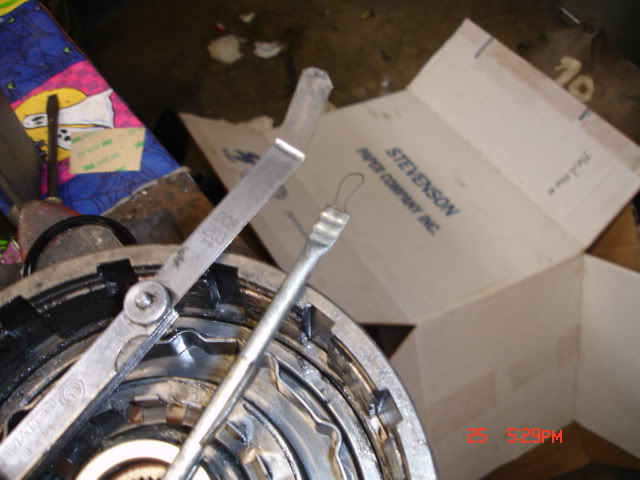
I like using a .008 feeler gauge for the larger diameter stuff and a .005 for the samll ones. A 400, I can use the .008 all the way thru. Go slow here. Two things- you don't want to cut a seal with the feeler gauge, or roll the lip. As you gently press the piston into the drum slide the feeler gauge around the OD of the piston, help the seal to compress and go in without the lip being turned up. You may have to pull the feeler gauge up and use the tip to tuck the seal down. Once you get the piston in, if it's correct, you can turn the piston in the drum by hand- if it won't pull it back out and look at the seals- one of them will be rolled. Put the return springs, retainer and snap ring back in and that's done.
(rjent) Be very careful with the feeler gauge. It is really easy to cut the seal. Also scrunch the seal up in your hand and then toss it on the bench. if it returns pretty much to a circle, it is cured. If is stayes "scrunched" it is "green" and will fail as it shrinks. I haven't seen a lot of green rubber, but it does happen ...
look through this link
http://www.ckperformance.com/images/112573/TH400 DISSASSEMBLY TECHNICAL.pdf
After you get all the clutch packs back together, use your air compressor and a blow gun- 5 PSI and you can air check the seals to verify they are good. Again, the ATSG manual shows which port to hit with the air and how to.
GM did a good thing when the made the 4L80E trans- they made the clutches and steel plates the same size as the 400. If you want to get creative, as you take your originals apart, count how many steel plates and faced plates you have. When you get your trans kit, get the same number of clutches and steels from a 4L80E, just add a couple extra. The 4L80 stuff is thinner than the 400 so you get more surface area and more holding power. Just remember to keep some clearance in the clutch packs so they don't drag.
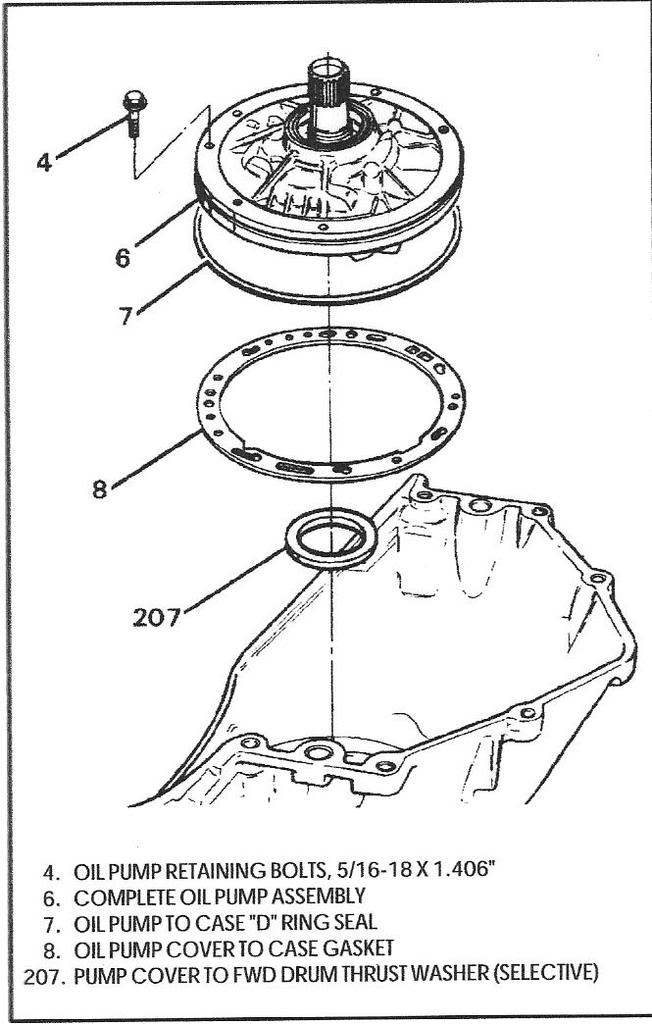
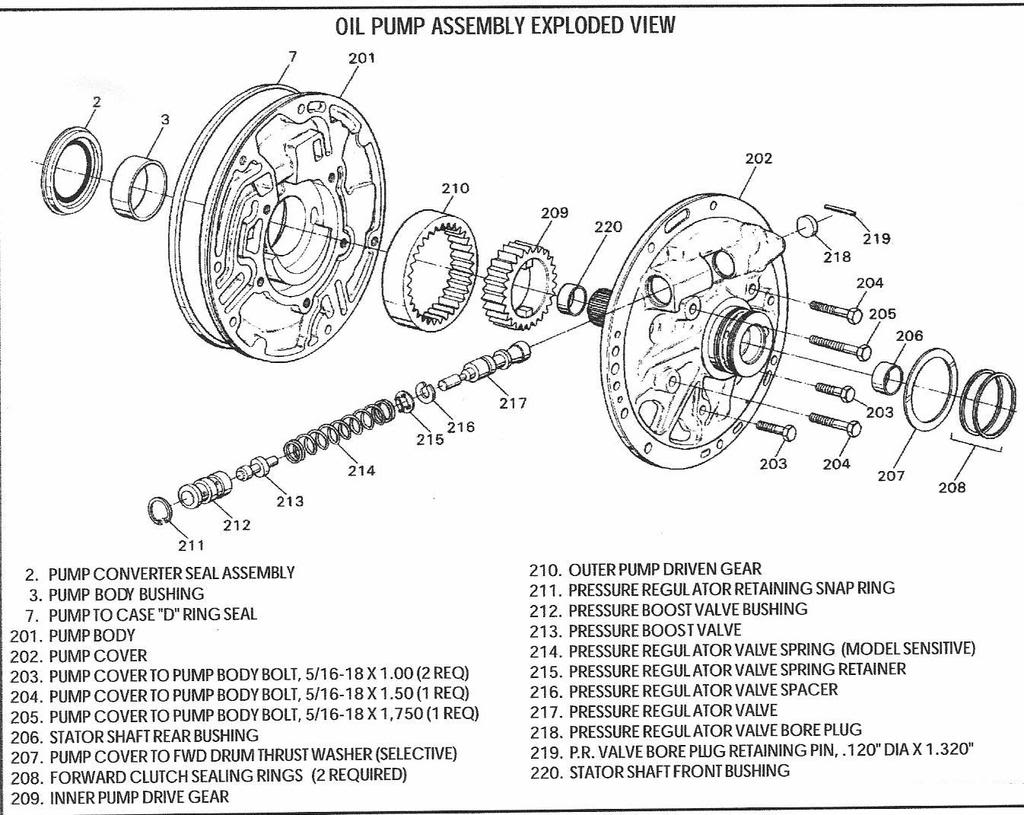
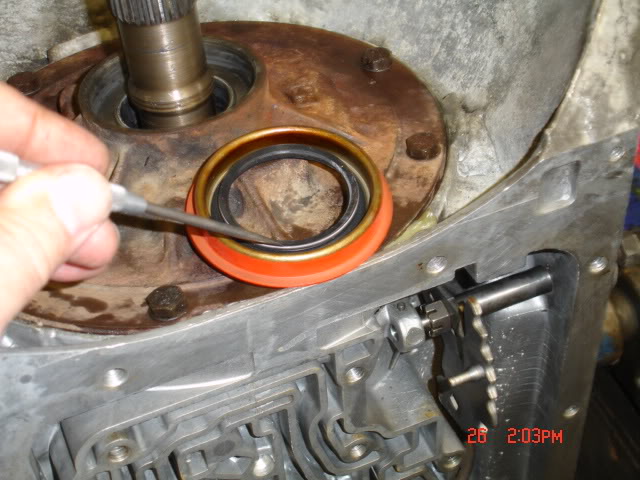
When you get everything back in the case it's time for the pump. I always replace the bushing. Takes some care, it's just like a cam bearing. First time around, I'd get a couple of them just to be sure. I keep a spare just in case. Take the front seal out of the pump, flip it over and then remove the bolts.
The front half has the two gears of the pump. Before you take them out, look- there is a dot on each one- that goes up. Notice the lugs on the inner gear- they don't go all the way forward- those line up with the convertor- put it in backwards and the convertor won't go in all the way.
Lay the front half of the pump seal side up. Set the new bushing in the recess on top of the original. I use a big socket and drive the old one out and the new one in at the same time, then use the old bushing to drive the new one just below flush.
To put the halves of the pump back together, you need a big hose clamp- or a lot of little ones. The pump halves have got to be lined up exactly to go back in the case. Another way to do this is to set the front half in the case, then set the rear half on it and install the bolts.
Flip the pump back over and install the front seal. I always pack the rear cavity of ANY seal of this type with grease. As you drive them in, there is a good chance that spring around the inside of the seal will come off. Guaranteed leak. I also put a thin bead of locktite around the OD of the seal.
I could go on here about things to "don't forget" but if you read the ATSG Manual, the GM service manual, the instructions in the TRANS-GO kit, ask questions about things that are not clear, you can get thru it.
TH400 Detent Switch Adjustment
After installation of a new switch, press the plunger in all the way. This will preset the switch for adjustment. The switch will automatically adjust itself the first time the throttle is opened all the way with the accelerator pedal.
(rjent) I am going to add some pictures and more text to this as will Tim in the future. This is a start. Enjoy
My comments are in italics ...
********************************************************
This has been on my "gonna' do" list for a long time. Here are some of the tools, tips and trick stuff to rebuild a TH 400 (M-40 option).
I have the fixture to mount the tranny on the bench, courtesy of a tool sale at a dealer that was going out. It's handy, but you can mount it to an engine stand, stand it in a 30 gallon barrel, roll it around on the floor or whatever works. It is easier when you can stand it up straight. I've seen guys bolt a steel plate to the bench and bolt the tranny to that. Works well. I'm going thru some of this with the assumption the trans {WAS/IS} working. And up front, I'll add some more pictures later- I got rolling thru this one and forgot to take as many pictures as I wanted. In any case, you need to have the ATSG manual for whatever trans you're working on. A valuable and necessary tool if you're in your first tranny. Stick a bucket under it to catch the oil- it'll drain a fair amount just setting there- I use a 5 gallon bucket. Then remove the pan. Look and see how much trash is there- you should see some black goo- that's the clutch material. Very possibly some small amounts of brass or aluminum or even some steel. If there's anything really broken, you'll find it as you go thru and inspect, but it will give you an idea of what you may find.
(rjent) I do not like dissassembling the transmission this dirty. Steam clean it like your life depends on it to get the outside as clean as possible. The rest of your work will then be cleaner and easier to keep up with. I also like Tims suggestion of the fixture mounted to the bench. When I was in the business, I had a metal build benchs built especially for the jobs. It was sloped back to a trough to catch the oil (these things will bleed like pigs for hours) as you dissassemble. There was also a hole in the front offset to the left that you could put the output shaft into the case and then stand the case upright. To me it made assembly easier. I do not like working on a wooden bench. It absorbes the oil, becomes messy and is hard to keep your work area clean. Just my .02
Notice in the upper left corner- that's the pickup tube from the filter to the pump. It may come out when you pull the filter off. Be sure and get the o-rings that may stay in the case.
Pull the bolts around the pump- there are seal washers under the bolt heads- they get replaced. Again, I have a GM tool to pull the pump- most service manuals for the 400 show 2 slide hammers.
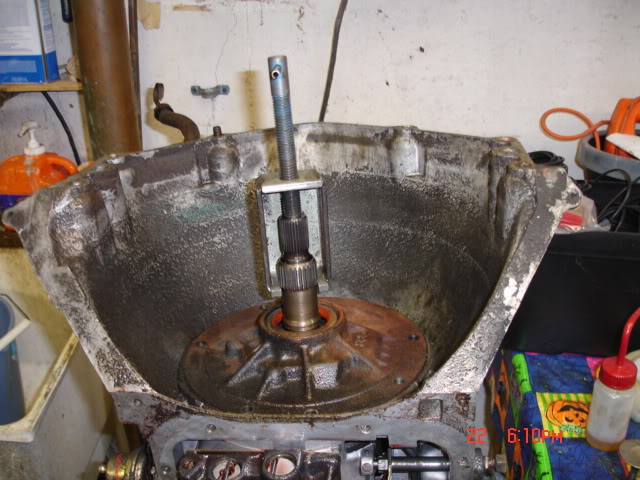
Without the GM tool, here's another way. Use a big screwdriver between the forward clutch housing and the back of the pump. GENTLY!! Usually you can pop the pump out.
(rjent) I like knowing how things work. For those who are interested, the large spline is the stator spline, which is stationary, and the small spline is the turbine spline or input shaft. The converter is made up of the pump (outer shell driven by the engine) the stator (mounted on a sprag clutch), which redirects and accellerates the flow of oil to the turbine which drives the input shaft and is the power transfer shaft from the engine to the transmission. The accelleration of the oil is how the converter multiplies torque and it is also creates a LOT of heat in doing so.
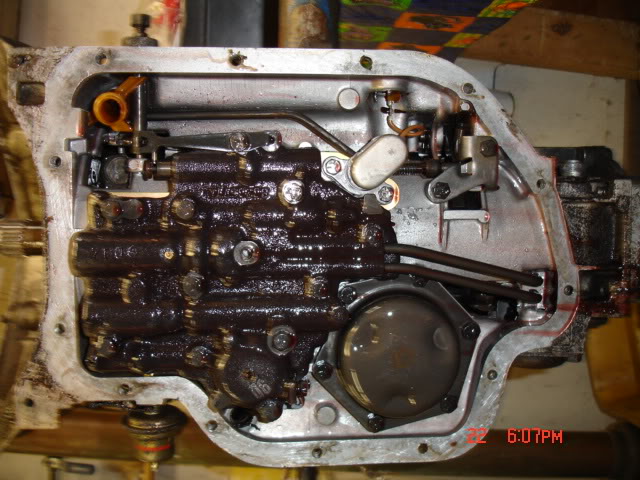
Now the pump is out and you're looking at the forward clutch housing and input shaft.
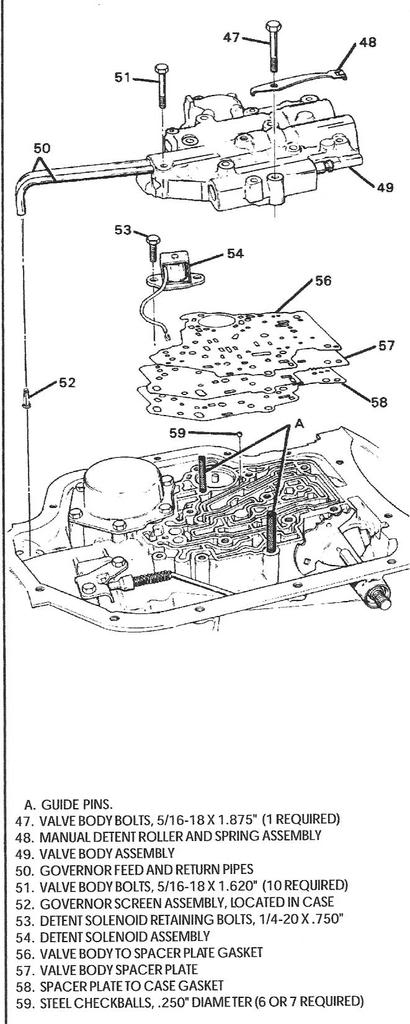
Can't see it in the picture, but there's a band around the drum down in the case. Easy way to get it out is to remove the valve body.
That round spot that is full of fluid is the servo for the band- pull the servo- there is a spring, a retainer for the horseshoe clip and the clip with the rod.
There are 5 checkballs too- collect them with a small magnet.
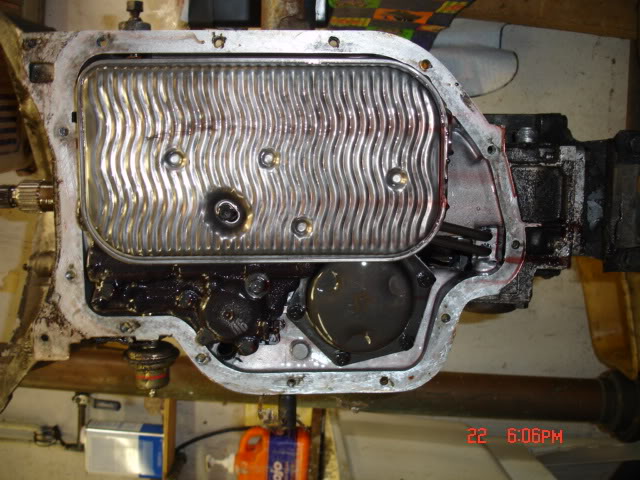
After you get that band loose, you can grab the input shaft and pull straight up- you get the forward and direct clutch housings. After they're out you can see the intermediate clutch and the back half or the trans:
Here's the first snap ring you get- it holds the intermediate clutch pack in the case- you can't see it very well here, but the top is tapered- the flat side goes against the clutch backing plate. (The Trans-GO kit sends you a NEW flat snap ring for here. Use a big screwdriver and just work around the case and get it out of the groove. I ground a notch just behind the tip of an old one to help pull the ring up out of the groove.
With the intermediate clutches out the center support is next- there is another snap ring holding it AND a bolt that comes in from the valve body-
Hard to see in that picture- Look at that black cover (lower left)- the bolt at 2 o'clock then straight to the right- 3 holes in line- the center support bolt is in the middle hole- If you look close- you can see a checkball just below those 3 holes.
The center support can be a little tough to remove- just get a grip and pull. After it's out, you can see the rear planetary set and another band- this one is the intermediate. The servo is under that black cover in the above picture- it'll need to come out before the band- it's got a spring under it so it may squirt a little fluid at you, but it won't fly across the room either. Once you let the pressure off the band, the rear planetary can come out. It's fairly heavy-
This is one place you get to make a choice- there are 2 different rear planetary sets- this one is the car/light truck set- note the helical cut gears. IF you can find one there is also a straight-cut gearset that was used in medium duty trucks and early motorhomes. That gearset is very hard to find and can be pretty expensive. Same ratio as far as I know. The small bit of added strength is not worth the $$ to me. And straight cut gears are a bit noisy..
Now you have a bare case- if you were reading the ATSG manual and keeping your eyes open, you've removed the speedo adapter, governor, and rear housing. The only thing left is the shift selector shaft, park rod and pawl with the bracket. I've never seen a reason to remove any of these during a rebuild.
It's all apart, now is the time to clean the case. I have a deal with a local guy- I take him the case and he runs it thru his washer for $10. Then I take it home and clean it again. If you're going to do a restoration, you'll probably want to scrape all the really stuck goo off and keep cleaning until it's spotless. Not a bad idea, but for this one I didn't need to go that far.
Look at your ATSG manual again- there is a spacer and a thrust washer that goes in the rear of the case before the rear planetary- I use Trans-Gel Gold for assembly, but you can swipe a big jar of Vaseline from your bride too. Just don't plan on giving it back. She'll be PO'd big. Ask how I know this.
Here is the first set of seals- in the center support for the intermediate clutch. There are only 3 return springs so the only thing you need here is snap ring pliers. I have a set that has a flat tip with a 90* hook just for these snap rings. 2 seals on the piston-
Now it's time for another choice. I like the 34 element sprag for the intermediate. More holding power and I feel it shifts better. Your call. The 34 element is on the left. I think they changes to that light sprag around 70 or 71 so changing requires that you get a new forward drum too.
When you get the rear gearset and center support back in the case, don't forget that band! Install the snap ring and the center support bolt. Torque it while holding the center support in the direction of rotation:
I made that tool- a long straight punch will work fine.
Now the fun part. replacing the seals and clutches. I have a K-D tool to compress the clutch return springs:
(rjent) I used to make all of my clutch compressors out of pieces of metal bent into a "U" in a vice at the right place(s) (each clutch/manuf. is different) with a hole in the middle and an all thread going through both. The U shaped metal pieces presses against the spring retainer and you simply tighten the all thread to compress. Works great and is a cheap tool! [/I]
There are lots of ways to do this- drill a hole thru your bench and a piece of threaded rod- make a U shaped tool from a piece of flat stock, a few nuts and go. If you have a drill press you can use that. No set rules here other than keeping things clean as you go back together.
Compress the return springs a little and take the snap ring off, then let the pressure off the return springs.
There are 3 seals in each of the drums, and 2 seals on the intermediate piston. WATCH how they come off- the lips MUST be pointing the correct direction- again, that ATSG manual is handy. Several of the seals are very close to the same dimensions too. Compare the length of the lip, the overall diameter, the thickness of the inner (or outer) ring. Original seals have numbers on them and some of the replacements do too. Don't count on being able to read them.
Put the seals back on the piston and lube them well. Pack them full. Make them a greasy nasty (but clean) mess. Set the piston back into the clutch drum and start working it down. (The inner seal is the first one you need to worry about, but they all seem to kind of go at the same time.)
There is a tool that can be made or purchased just to install these seals and several types of install tools available if you have $$ to burn. The GM spec'd tools are plastic sleeves that are tapered- set it in the drum, drop the piston with the new seals in and push. Done. I've seen those tools in the GM Manuals- no where else. Even the dealers didn't have them.
I use a feeler gauge and a little tool that has a wire loop in the end of a handle:
(rjent) Tip: As Tim says below, be very carefull with the feeler guage as you can cut the seal if you are not carefull.
I like using a .008 feeler gauge for the larger diameter stuff and a .005 for the samll ones. A 400, I can use the .008 all the way thru. Go slow here. Two things- you don't want to cut a seal with the feeler gauge, or roll the lip. As you gently press the piston into the drum slide the feeler gauge around the OD of the piston, help the seal to compress and go in without the lip being turned up. You may have to pull the feeler gauge up and use the tip to tuck the seal down. Once you get the piston in, if it's correct, you can turn the piston in the drum by hand- if it won't pull it back out and look at the seals- one of them will be rolled. Put the return springs, retainer and snap ring back in and that's done.
(rjent) Be very careful with the feeler gauge. It is really easy to cut the seal. Also scrunch the seal up in your hand and then toss it on the bench. if it returns pretty much to a circle, it is cured. If is stayes "scrunched" it is "green" and will fail as it shrinks. I haven't seen a lot of green rubber, but it does happen ...
look through this link
http://www.ckperformance.com/images/112573/TH400 DISSASSEMBLY TECHNICAL.pdf
After you get all the clutch packs back together, use your air compressor and a blow gun- 5 PSI and you can air check the seals to verify they are good. Again, the ATSG manual shows which port to hit with the air and how to.
GM did a good thing when the made the 4L80E trans- they made the clutches and steel plates the same size as the 400. If you want to get creative, as you take your originals apart, count how many steel plates and faced plates you have. When you get your trans kit, get the same number of clutches and steels from a 4L80E, just add a couple extra. The 4L80 stuff is thinner than the 400 so you get more surface area and more holding power. Just remember to keep some clearance in the clutch packs so they don't drag.
When you get everything back in the case it's time for the pump. I always replace the bushing. Takes some care, it's just like a cam bearing. First time around, I'd get a couple of them just to be sure. I keep a spare just in case. Take the front seal out of the pump, flip it over and then remove the bolts.
The front half has the two gears of the pump. Before you take them out, look- there is a dot on each one- that goes up. Notice the lugs on the inner gear- they don't go all the way forward- those line up with the convertor- put it in backwards and the convertor won't go in all the way.
Lay the front half of the pump seal side up. Set the new bushing in the recess on top of the original. I use a big socket and drive the old one out and the new one in at the same time, then use the old bushing to drive the new one just below flush.
To put the halves of the pump back together, you need a big hose clamp- or a lot of little ones. The pump halves have got to be lined up exactly to go back in the case. Another way to do this is to set the front half in the case, then set the rear half on it and install the bolts.
Flip the pump back over and install the front seal. I always pack the rear cavity of ANY seal of this type with grease. As you drive them in, there is a good chance that spring around the inside of the seal will come off. Guaranteed leak. I also put a thin bead of locktite around the OD of the seal.
I could go on here about things to "don't forget" but if you read the ATSG Manual, the GM service manual, the instructions in the TRANS-GO kit, ask questions about things that are not clear, you can get thru it.
TH400 Detent Switch Adjustment
After installation of a new switch, press the plunger in all the way. This will preset the switch for adjustment. The switch will automatically adjust itself the first time the throttle is opened all the way with the accelerator pedal.
(rjent) I am going to add some pictures and more text to this as will Tim in the future. This is a start. Enjoy
Last edited by a moderator: