whats likely to be needed , how difficult?

Grumpy

The Grumpy Grease Monkey mechanical engineer.
Staff member
I've had my 94 coupe for a few months now and am very pleased with nearly everything about the car.

I would however like it to have modern day levels of hp.
I'd like a radio upgrade and perhaps new seat leather.

This car is in amazing shape for its age. It is just clean top and bottom. It is a lot of fun to drive.

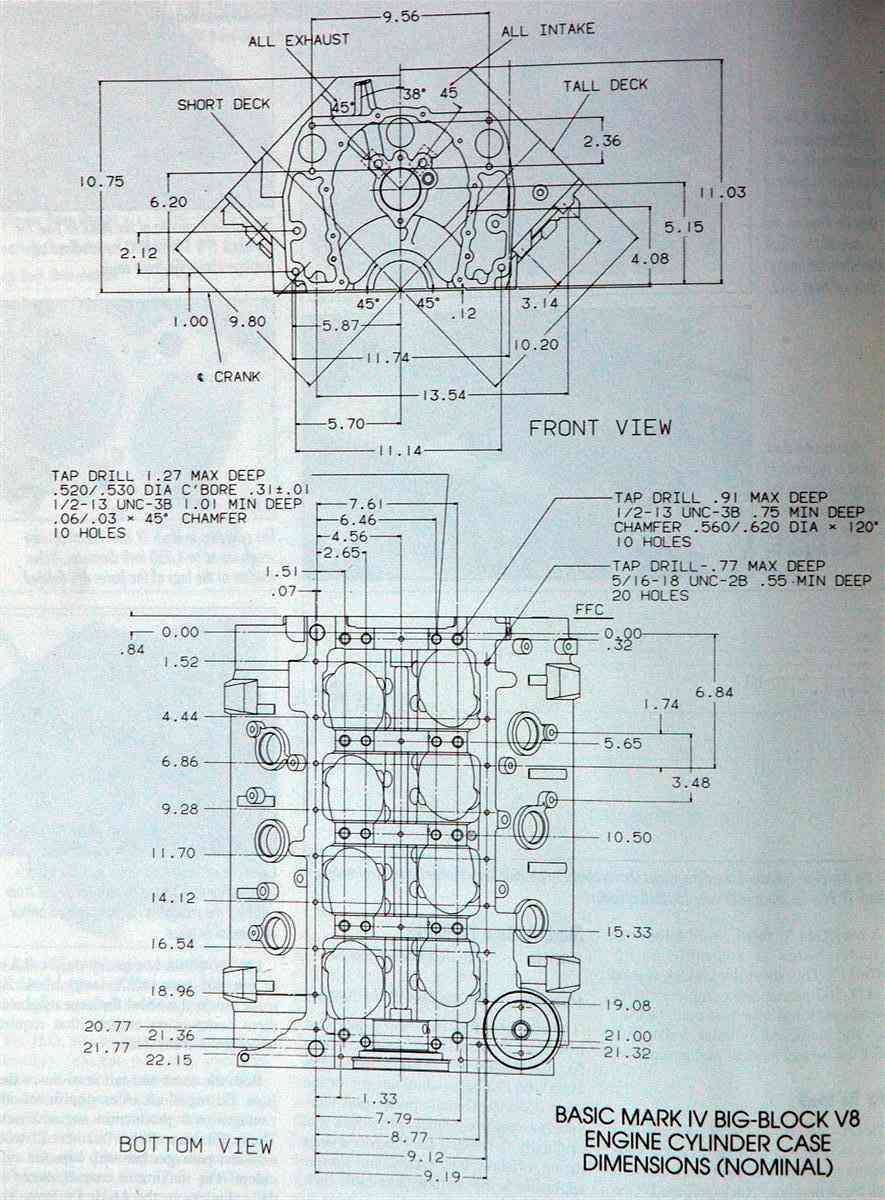
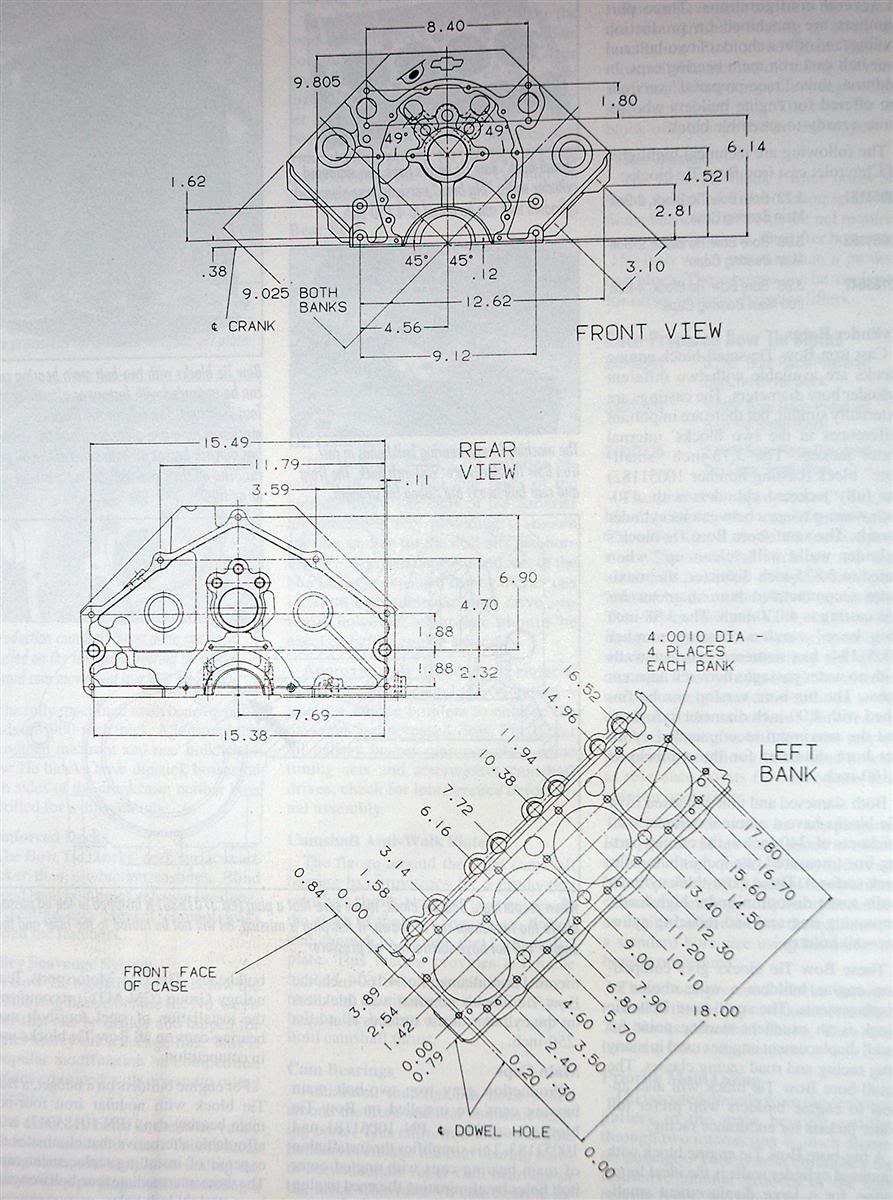
The motor is really clean inside and out. The heads still look like the day they were put there.

I'm not sure that is the right thing to do to this car.

She is still nearly 100% original.

Is that worth worrying about in a car of this type???
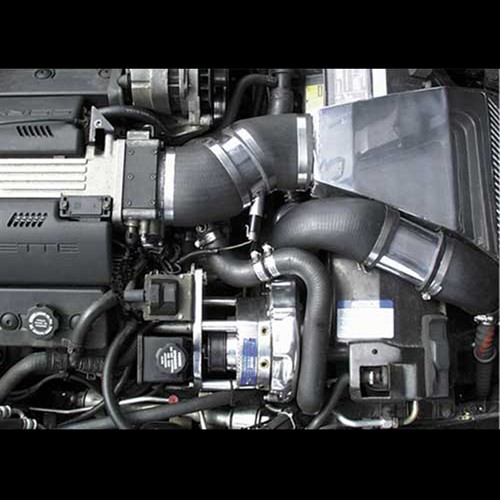
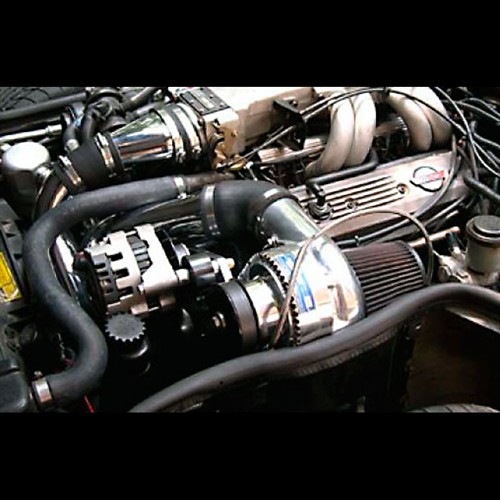
Looks like the procharger kit for mine runs about 6K.

They claim it is doable by mortal.

I am fairly handy, this does not look too complicated.

How would that compare to having a shop do the heads, cam and headers?


Id point out that you can get rather impressive power increases from the replacement of some of the more restrictive components , but to do it correctly you'll benefit a great deal from some careful and rather detailed research into both what your trying to accomplish and the results other people have gotten as they tried to do similar mods to similar cars.
keep in mind its a whole lot cheaper to learn from other peoples mistakes and learn what works from other peoples successes that go through a rather expensive and time intensive system of trial and error by testing the result YOU get from installing parts and that a few weeks of detailed research could rather easily save you many thousands of dollars in wasted effort .
Id also point out that a great deal of the cost youll encounter will be labor related if you don,t do the physical mechanical work yourself, and that more than a few machine shops are known to do expensive but sub par quality work, so avoiding them is part of the challenge you'll face modifying your car.
In short , knowing exactly what you want to accomplish, what parts will be required and exactly what will be involved in installing and adjusting them will be critical to having the car run like you intend it to and at a cost you can afford!
If you can follow instructions, I have little doubt anyone with moderate mechanical skills and common tools could assemble and install a centrifugal super charger, simply because its just physically not that difficult, but remember to get it working correctly what they may not tell you is
theres frequently other required changes,
if you want the engine to last,
and car to take full advantage of the new power.

you need a low restriction exhaust
you'll need larger flow rate injectors
it helps to have forged piston's and crank and rods
its HIGHLY advisable to open the ring end gaps slightly
you'll need a better high flow fuel pump to supply those injectors
you'll need an ignition that controls advance in relation too boost
you'll need to run HIGH TEST OCTANE GAS
You"ll USUALLY NEED, better brakes
You"ll USUALLY NEED, a different rear gear ratio
You"ll USUALLY NEED,a different converter stall speed

You"ll USUALLY NEED a larger more efficient radiator
You"ll USUALLY NEED a 7-8 quart baffled oil pan
You"ll USUALLY NEED a , oil cooler


109charger.jpg

http://www.shopsupercharger.com/p-1...-kit-by-procharger-ho-intercooled-system.aspx
116charger.jpg

http://www.shopsupercharger.com/t-choosing-supercharger-kit.aspx

http://www.superchevy.com/how-to/en...chevy-mini-blower-test-danger-mouse-part-ten/
 
Last edited:
The last I knew Grumpy Vortech quit making Supercharger kits for the 1985-1991 TPI C4 Corvette.
When I joined here in 2011 I checked into and discontinued .

Likely the same for 1992-1996 C4 Corvette LT-1 & LT-4.

Unfortunately Its C5 &C6 & C7 Supercharger kits readily available only.

The brackets For a C4 Would be a problem..
without a sample to copy you must fabricate from scratch.
Drag Race Car Style.
 
I still have not seen as efficient Centrifugal Superchargers in action as VORTECH Street -Strip.
Rival Big Single Turbos & Smaller Twin Turbo Engines.
 
WHILE I WOULD IN PRINCIPAL AGREE ,
THAT NOT HAVING AN OFF THE SHELF BRACKET EASILY AVAILABLE,
WOULD PRESENT A HUGE ISSUE WITH MOST POTENTIAL BUYERS
I don,t think that would give me personally the least issue if I decided to go that route,
simply because.
I own both several welders and a Milling machine.
the reason I posted the info above , in that original post was
to get people reading the thread,
to think through all the additional parts
that will be required AFTER you decide to purchase a supercharger.

BBCbottCustom.jpg

SBCprintCustom2.jpg


about 99% of the guys I've ever talked with look at the price of a super charger install and think,
"wow. thats one expensive, option, but the addvertizement says I can boost hp by 50%-70% ,
now to do that without having to actually disassemble the engine with a simple bolt on accessory,
sure sounds a good deal easier than getting into true engine mods so it might just be worth it!"
I then point out what to me is the all too obvious FLAW in that way of thinking ,
and most of them either think I'm ,either not well informed or
making this crap up just to spoil their great idea!


theres frequently other required changes,
if you want the engine to last,
and car to take full advantage of the new power.

http://www.performanceenginetech.com/supercharged-lt1-build/


heres a build that did not impress me a bit
http://www.hotrod.com/articles/0712phr-blown-big-block-chevy-engine-build/amp/

you need a low restriction exhaust ($1000)
http://www.melrosecorvette.com/c4-headers-exhaust/
you'll need larger flow rate injectors ($340)
http://treperformance.com/i-2061283...ctors-8.html?gclid=CK-HzsPplssCFQyHaQodEXYIWw
it helps to have forged piston's and crank and rods ($1800)

its HIGHLY advisable to open the ring end gaps slightly
(free during new rotating assembly install)
you'll need a better high flow fuel pump to supply those injectors ($230)
you'll need an ignition that controls advance in relation too boost ($400)
you'll need to run HIGH TEST OCTANE GAS(no brainer)
You"ll USUALLY NEED, better brakes ($800)
You"ll USUALLY NEED, a different rear gear ratio ($1200)
You"ll USUALLY NEED,a different converter stall speed ($500)

You"ll USUALLY NEED a larger more efficient radiator ($500)
You"ll USUALLY NEED a 7-8 quart baffled oil pan ($370)
http://www.jegs.com/i/Canton-Racing-Products/074/15-240/10002/-1
You"ll USUALLY NEED a , oil cooler
($300 with lines and connectors brackets etc.)

OPTIONS
http://airflowresearch.com/articles/article009/A9-P1.htm
OPTIONS
http://www.superchevy.com/how-to/en...t-1-aiming-for-600-plus-hp-with-a-396-gen-ii/
OPTIONS
https://www.cantonracingproducts.com/Trackside/PDF/street_thunder.pdf
OPTIONS
https://books.google.com/books?id=v8-3S86J6ysC&pg=PA3&lpg=PA3&dq=lt1+396+rotating+assembly&source=bl&ots=S-D_cC7ols&sig=6tKZ1ROU0qO8cbh7lu1Uk49qvv0&hl=en&sa=X&ved=0ahUKEwjysNyZ8ZbLAhXHeCYKHc1WAaw4HhDoAQhsMAg#v=onepage&q=lt1 396 rotating assembly&f=false

Supercharged 396 LT1 Build
http://www.performanceenginetech.com/supercharged-lt1-build/

This article will describe the components and details of a 396 cubic inch LT1/LT4 for a supercharged application. It’s based on a combination I’ve built many times, intended for use with a centrifugal blower such as a Vortech S-trim or T-trim, or a Procharger P-600 or D-1. It has very good drivability, and will make 600 RWHP on premium pump gas at 12 psi while using a good intercooler. With race gas, an aftermarket computer, and 18 psi, this same combo has run 9.50’s at 145 mph in a very well prepared street/strip Camaro.

Lets get to it….

Rotating Assembly
At the heart of the rotating assembly will be a forged 3.875″ stroke crankshaft with standard size 2.100″ rod journals, 350 main journals, and a 1 piece seal rear flange. This configuration isn’t widely available, and given the power level that’s attainable, I’d certainly recommend sourcing a reputable American made company. If you plan to step up to a cog style belt, you should consider having your crank custom made with a Big Block Chevy post. Just be aware that this option requires a special timing set, timing cover, and damper.


Connecting rods will be 5.850″ center-to-center length, allowing for a reasonable compression distance for use with a dished piston. Be sure to use at least an ARP 2000 bolt material or better. If it’s an upgrade over 8740, pay the extra – this is not the place to cheap out. You’ll also want to be sure the rods you select are designed to improve stroker clearance at the pan area of the block, as well as the cam side.

The pistons will be a custom configuration with a 31cc full round dish, 1.228″ compression distance, and 1/16-1/16-3/16 ring package. The dish size is based on 9.25:1 compression ratio with a 58cc combustion chamber volume. The compression distance is necessary in order to allow the underside of the dish to clear the top of the connecting rod pin end. It also requires a 9.015″ block deck height for “zero” deck, which provides the added benefit of better intake port and bolt hole alignment than the typical 9.000″ finished deck.

My choice in a ring package will obviously match the piston groove arrangement, using a ductile iron, moly faced top ring, cast iron second ring, and standard tension oil ring. I’d recommend about .022″ top ring gap and .024″ 2nd ring gap for applications up to 12 psi boost. As a general rule of thumb, increase the gaps of both rings .001″ for every additional 2 lbs of boost.

Race style bearings intended for large fillet crankshaft journals should be employed here. Clearances should be .0025″ for the rods and .003″ for the mains. It may be necessary to combine standard, under-size, and extra clearance bearing shells to acquire the proper oil clearance.

Camshaft & Valvetrain
The all important valve timing events are based on a hydraulic roller cam core with good quality hydraulic roller lifters. Any of the popular aftermarket lifters or replacements directly from GM will work well. Just don’t go for the odd brand stock replacements. Here are the cam specs:


    • Duration @ .050″ lift: Intake: 230 deg. / Exhaust: 244 deg.
    • Lift w/1.6 rocker ratio: Intake: .544″ / Exhaust: .578″
    • Lobe Separation: 114 deg. / 4 deg. advance
    • Intake centerline installed at 110 deg.
    • Base Circle: 1.050″
The timing set will depend on whether or not you’re a fan of electric water pumps. If you don’t mind using one, then the Cloyes true roller double chain set will work great. Just know that you can’t use the factory cam driven water pump with this type of timing set. It also requires the use of a ’95 or newer opti-spark distributor.

If you prefer the factory mechanically driven water pump, then I recommend the LT4 extreme duty set. I would also recommend that you get an oversize crank gear, as the chain is sloppy with the normal gear, and will be worse after align honing the block. These gears are available directly from Cloyes in .005″ and .010″ oversize. It’s been my experience that most of the time, the .005″ over gear is just right. This set also requires the newer style cam pin driven opti-spark.

Rocker arms will be 1.6 ratio Comp “Pro Magnums”, and are an excellent value given the well-engineered placement of critical mass. Be sure to use the configuration meant to be used with 7/16 studs and guide plates. Note that if you plan to use the stock valve covers with these, you’ll need to bend and snip some of the supports of the hold down bolt tubes inside the covers.

For boosted applications I like to use a combination set of valve springs due to the added weight and pressure against the larger intake valve face. I would also definitely use quality titanium retainers and 10 degree locks. Specific part numbers will depend on a combination of cylinder head variables, but are derived from the installed height of the springs. Here is what I would recommend:


    • Intake springs: 160 lbs. seat pressure at installed height / 400 lbs. at max valve lift
    • Exhaust springs: 135 lbs. seat pressure at installed height/ 375 lbs. at max valve lift
Pushrods should be .080″ wall, 5/16 diameter, chromemoly material, about 7.200″ length. You’ll need to verify the proper length by using an adjustable checking pushrod.

Cylinder Heads & Intake Manifold
The brand of cylinder head you use is up to your personal preference as long as the ports and components are of high quality. For this application, I have used AFR 195 fully CNC ported heads. I’m confident that another brand with equal port capabilities will yield similar results, but I know for sure the AFR’s make the numbers.

Besides the high flow numbers, a real advantage of the aftermarket head is the thicker deck. Whenever boost levels approach 10 psi or more, you must have a good deck to keep the gasket in place. Regardless of the brand you choose, you’ll need to meet or exceed these specs:

Intake:


    • Valve size: 2.055″
    • Runner volume: 203 cc
    • .100 = 67.70 cfm
    • .200 = 141.70 cfm
    • .300 = 195.90 cfm
    • .350 = 222.40 cfm
    • .400 = 241.00 cfm
    • .450 = 254.20 cfm
    • .500 = 265.00 cfm
    • .550 = 269.60 cfm
    • .600 = 273.50 cfm
    • .650 = 277.80 cfm
Exhaust:


    • Valve size: 1.600″
    • Runner volume: 68 cc
    • .100 = 47.35 cfm
    • .200 = 108.99 cfm
    • .300 = 161.10 cfm
    • .350 = 182.08 cfm
    • .400 = 200.19 cfm
    • .450 = 212.26 cfm
    • .500 = 220.21 cfm
    • .550 = 224.34 cfm
    • .600 = 226.56 cfm
    • .650 = 230.90 cfm
These numbers were measured on my Superflow SF-600 w/computer controlled data acquisition using a cnc’d radius inlet plate, and a 2″ dia exhaust pipe 6″ in length.

Unless you happen to already own, or are able to find a factory LT4 intake, you’ll need to invest in an Edelbrock LT4 intake manifold. It will need to be port matched to your cylinder head intake runners, and the throttle body face opened up to match a 58mm throttle body.

Oiling System
The oiling system is comprised of a Melling M155HV high volume oil pump and a Canton oil pan and proper companion pick-up. The Moroso LT1 pan can be substituted, but I wouldn’t recommend the Milodon pan, as it has fitment issues that are not worth the aggravation in my opinion.

Whatever pan you use, you’ll need to check the rod bolt clearance along the pan rail, and the internal scraper. You’ll also need to check for clearance between the number 8 crankshaft counterweight and the oil pan rail where it turns in behind the oil filter.

That’s it for this installment. You now have a comprehensive list of the main components required to build this engine. In part 2, I’ll outline the block prep, key assembly specs and unique details. As always, I look forward to your feedback, questions, or comments on current or future topics. You can comment directly to this or any other article on the site or send me an e-mail. Please invite your friends to join us, and thanks for visiting …..

 
Last edited:
Yeah I did the $ Money math a long time ago Grumpy.
Can't afford......

I do Like BBC Engines too....
Still have my Tall Deck 427 BBC.
Someday .
 
I went to Digital Corvette Grumpy.
Followed and read up.

There isn't a factory C4 automatic that can take this kind of HP & Torque.
Ditto for the Main Driveshaft.
Just the ZF M6 Can take it for a while.
But when it blows your SOL.
Obselete expensive trans to replace.
C4 Dana 36 won't last.
C4 Dana Built by me maybe....still cross your fingers and hope for the best.
Factory block used...Notta.

Tubo 400 or 4L80E trans required .
No ifs ands or butts...

Looking at $20,000 in reality to do the job right...

Should post your usual Link(s) to here on DC.
 
I took a look at DC Again Grumpy.
Your Link is up.
Rather interesting way to talk to the guys .
You post & link.
I am here yet to help.
Good for Your site too..Keep the traffic high.
 
Back
Top