there are several tricks & tools that make installing plugs easier,
one trick to installing/starting the threads is to slip a plug neck firmly into a 18" section of rubber fuel line,
this allows the plug to be easily directed into place,spun and aligned in a tight place .
gap them correctly, a .043 is about correct for most applications and don,t forget the ANTI-SEEZE on the threads
http://www.power-21.com/AutolitePower21 ... preads.pdf
viewtopic.php?f=70&t=840&p=2309#p2309
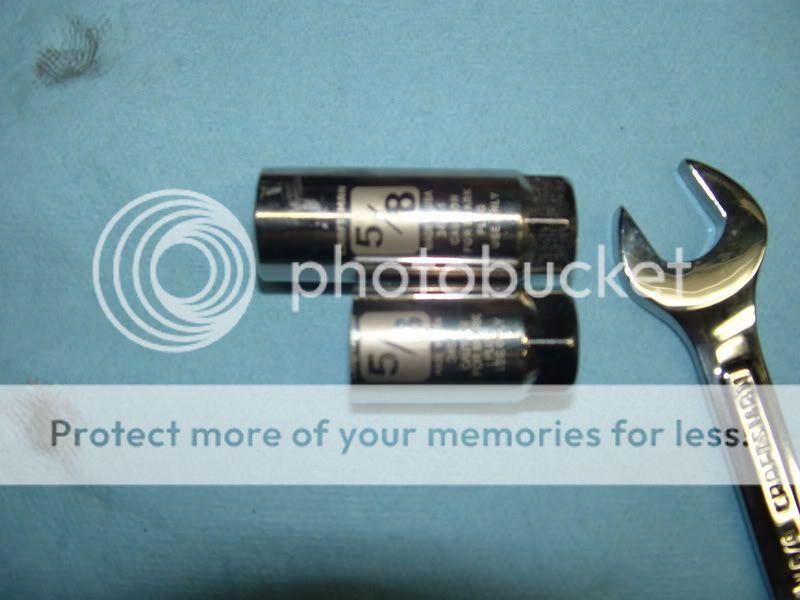
cutting a standard socket to shorter length helps at times, using a much longer spark plug socket
and an open end wrench vs a ratchet can work at times..
http://www.headersockets.com/
then theres snap-ons limited access socket

http://buy1.snapon.com/catalog/item.asp ... e&tool=all
http://www.harborfreight.com/cpi/ctaf/displayitem.taf?Itemnumber=94011

http://www.rshongkong.com/cgi-bin/b...efdffhdhif.0&cacheID=hk01netscape&Nr=avl:hk01

these spinner ratchets are basically a P.I.T.A. and nearly useless and clumsy 98% of the time but on rare occasions they are a job saver
adding thermal spark plug shields for the ignition wires near the headers helps protect the ignition efficiency and reduce problems
http://cableorganizer.com/insultherm-spark/
http://www.mytoolstore.com/kd/kdgear02.html#9520
http://www.harborfreight.com/cpi/ctaf/displayitem.taf?Itemnumber=91705

wobble extensions can be a help at times
http://www.amazon.com/Piece-Wobble-...70-0918205?ie=UTF8&s=hi&qid=1191099843&sr=1-3
and you won,t be the first guy to cut a hole in an inner fender skirt to get access at a decent angle to a spark plug and if you need to remove some accessory to get access, DO IT rather than beat yourself silly trying to work around the darn thing!!
think in THREE dimensions, sometimes accessing a plug from under the cars far easier than from above.
the two rear pass side plugs on some corvettes is usually easier this way IF YOU have the correct tools
In most cases a offset box end wrench can be used,

in many cases youll want to cut the wrench in half or shorter for easier access, or use one in combo with a sparkplug socket thats been cut much shorter than originally produced on a lathe, Ive even seen guys cut the socket shorter and weld a short wrench at an odd angle just for one particularly P.I.T.A. plug location on thier car
but in some cases

cutting a socket down like this and use of a open end wrench , rather than a ratchet to turn the socket from the side on the rear hex is the better route, (yeah! you may need to cut it even shorter than the picture suggests) in fact with the use of a wrench on the outside hex, theres no reason the socket can,t be cut enough for the plug tip to extend well out of the drive hole where the ratchet usually fits into the socket and don,t forget that they make 1/2" drive sockets also that allow the plug to extend further out, or that you can weld a wrench at odd angles to the socket (even to the side of the socket) one great reason to pick up cheap Chinese wrenches , is the cut/weld use for applications where you'll be reluctant to do so with a decent wrench brand
RELATED INFO
http://www.digitalcorvettes.com/forums/showthread.php?t=80783
one trick to installing/starting the threads is to slip a plug neck firmly into a 18" section of rubber fuel line,
this allows the plug to be easily directed into place,spun and aligned in a tight place .
gap them correctly, a .043 is about correct for most applications and don,t forget the ANTI-SEEZE on the threads
http://www.power-21.com/AutolitePower21 ... preads.pdf
viewtopic.php?f=70&t=840&p=2309#p2309
cutting a standard socket to shorter length helps at times, using a much longer spark plug socket
and an open end wrench vs a ratchet can work at times..
http://www.headersockets.com/
then theres snap-ons limited access socket
http://buy1.snapon.com/catalog/item.asp ... e&tool=all
http://www.harborfreight.com/cpi/ctaf/displayitem.taf?Itemnumber=94011

http://www.rshongkong.com/cgi-bin/b...efdffhdhif.0&cacheID=hk01netscape&Nr=avl:hk01

these spinner ratchets are basically a P.I.T.A. and nearly useless and clumsy 98% of the time but on rare occasions they are a job saver
adding thermal spark plug shields for the ignition wires near the headers helps protect the ignition efficiency and reduce problems
http://cableorganizer.com/insultherm-spark/
http://www.mytoolstore.com/kd/kdgear02.html#9520
http://www.harborfreight.com/cpi/ctaf/displayitem.taf?Itemnumber=91705

wobble extensions can be a help at times
http://www.amazon.com/Piece-Wobble-...70-0918205?ie=UTF8&s=hi&qid=1191099843&sr=1-3
and you won,t be the first guy to cut a hole in an inner fender skirt to get access at a decent angle to a spark plug
think in THREE dimensions, sometimes accessing a plug from under the cars far easier than from above.
the two rear pass side plugs on some corvettes is usually easier this way IF YOU have the correct tools
In most cases a offset box end wrench can be used,

in many cases youll want to cut the wrench in half or shorter for easier access, or use one in combo with a sparkplug socket thats been cut much shorter than originally produced on a lathe, Ive even seen guys cut the socket shorter and weld a short wrench at an odd angle just for one particularly P.I.T.A. plug location on thier car
but in some cases
cutting a socket down like this and use of a open end wrench , rather than a ratchet to turn the socket from the side on the rear hex is the better route, (yeah! you may need to cut it even shorter than the picture suggests) in fact with the use of a wrench on the outside hex, theres no reason the socket can,t be cut enough for the plug tip to extend well out of the drive hole where the ratchet usually fits into the socket and don,t forget that they make 1/2" drive sockets also that allow the plug to extend further out, or that you can weld a wrench at odd angles to the socket (even to the side of the socket) one great reason to pick up cheap Chinese wrenches , is the cut/weld use for applications where you'll be reluctant to do so with a decent wrench brand
RELATED INFO
http://www.digitalcorvettes.com/forums/showthread.php?t=80783


